
English
Hiii there, friends of the HiveDiy community, how are you today?, I hope you are doing great!
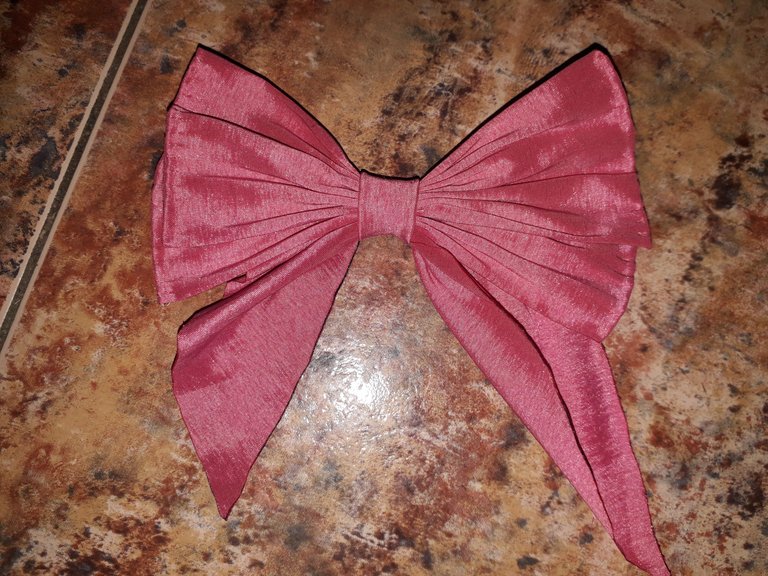
Today, I bring you another of the wonders that I have achieved thanks to sewing (or not so wonderful): some bows!
But these are not just any bows, I made them with a lot of love. You see, when I saw the pink fabric, I thought “what if I make myself some bows like the ones from Candy Candy?".
I know, you're probably thinking that I'm obsessed with that cute freckled girl, and the answer is… OF COURSE I AM. I wouldn't want to go into detail about why I like her, since we're not here for that, but I'll simply say that Candy Candy is to me like the creator of the “coquettes”, hehehe, just kidding (but the very feminine aspects of the series is something I won't fail to appreciate).
Well, friends, let's start with the process of creating these bows, which I will call “double bows”. Let's grab a needle and thread, and let's get started!
Materials
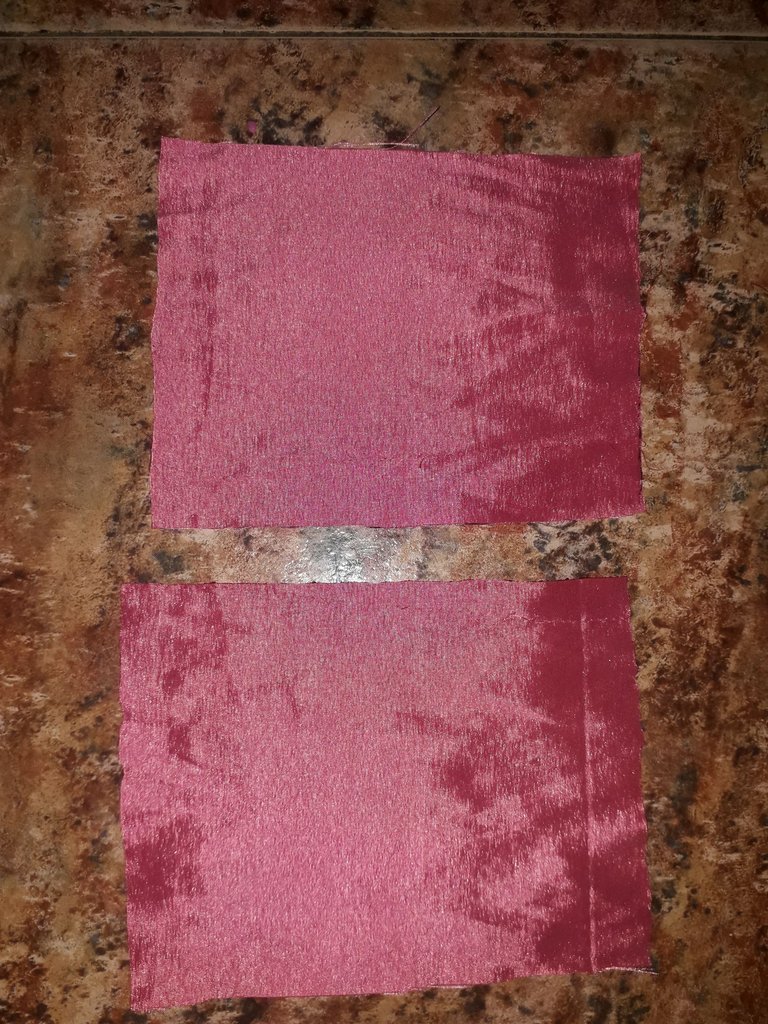
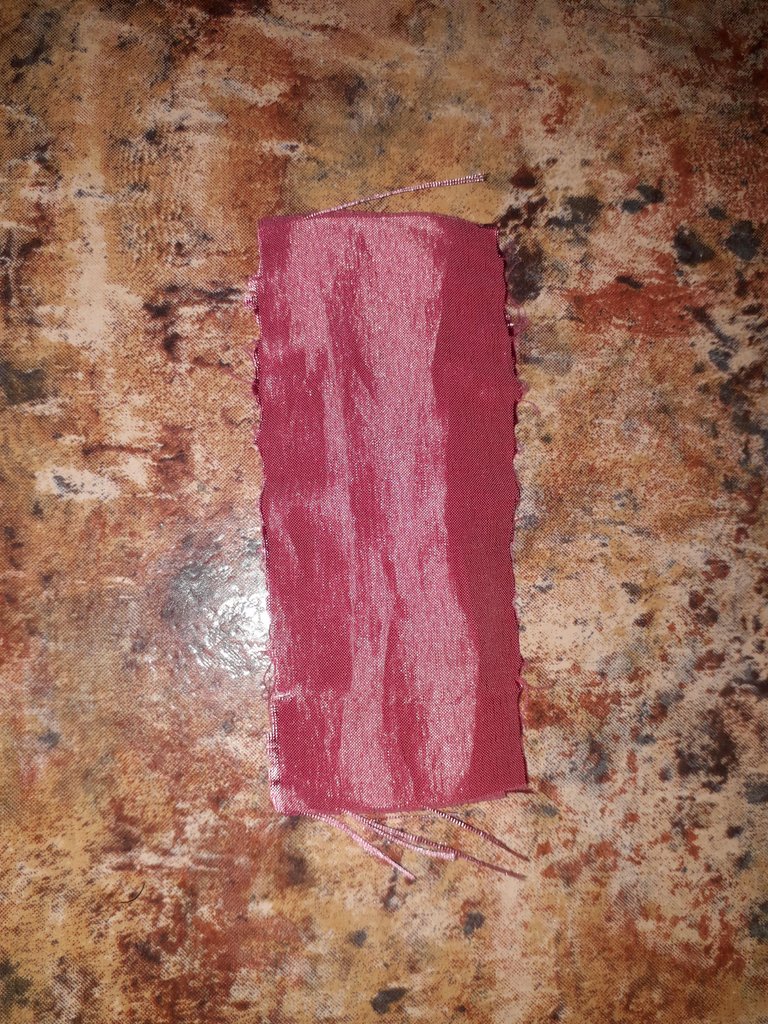
4 rectangles of pink satin fabric of 20 x 15 cm (2 for each bow).
2 triangles of pink “satin” fabric 28 x 13 cm (1 for each bow).
2 rectangles of pink “satin” fabric 7 x 3 cm (1 for each bow).
2 pink “satin” fabric ribbons of 35 x 2 cm (1 for each bow). Here you should use hair clips, but since I didn't have any, I decided to put some ribbons to tie the bow. It was something very improvised, and I liked how they turned out, but you should use hair clips if you want to, hahaha).
2 hair ties.
Note: If you want to use a hair clip, you can keep reading, below I made a small section on how we would make the bow if we used a hair clip. The materials you would need is a hair clip and a silicone gun.
I should clarify that I made these bows from my imagination, without guides, maybe that's why the measurements may be a little weird. Remember that this is an inspiration that I am making, I don't mean that they are exactly the same as the ones Candy uses or that they have the same size and fabric. But come on, let's trust in the process, they sure look nice, don't they?
 |  |
|---|
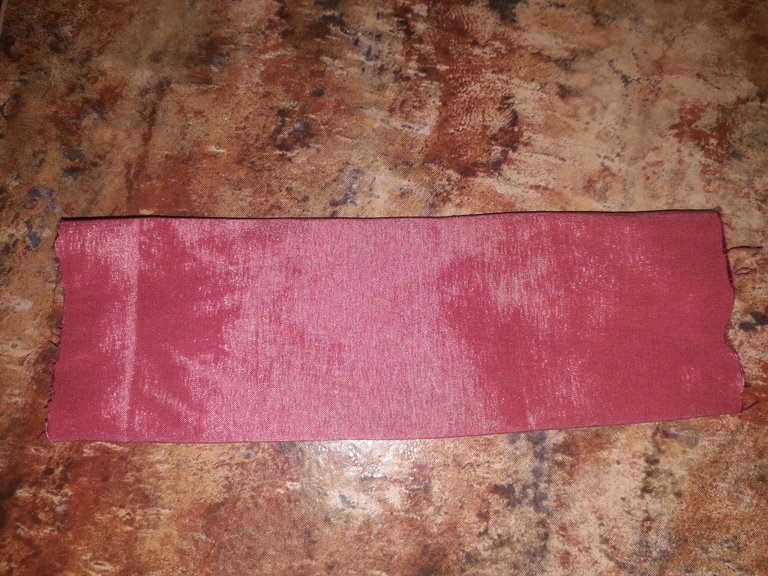
We take our 20 x 15 rectangle and fold it in half, so that it is wider than it is long. Then, we are going to pass a seam across the entire width of the fabric, from end to end, as shown in the second image.
 |  |
|---|
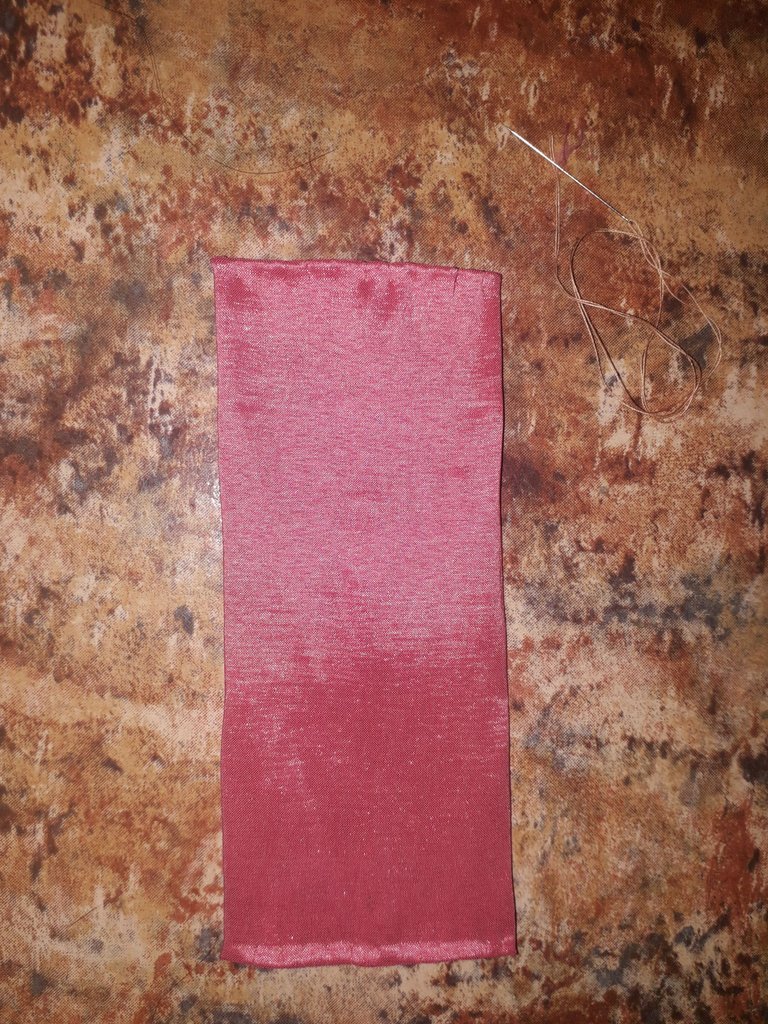
Turn the fabric over so that the seam is in the center of the back, and fold the edges inward to make a hem. I put an iron on it so that the fabric doesn't move when sewing.
When I sewed, I did something I call “dot stitching” which is basically making a seam that is hardly noticeable on the front side, but on the back side you can see the thread, hahaha. Do you know what I mean? It's like baste stitching, but the seam that will be visible, I do it by putting the needle and thread almost where they came out, forming just a point; I think I had already explained this when I made the skirt, I hope you understand me or know what I mean.
 |  |
|---|
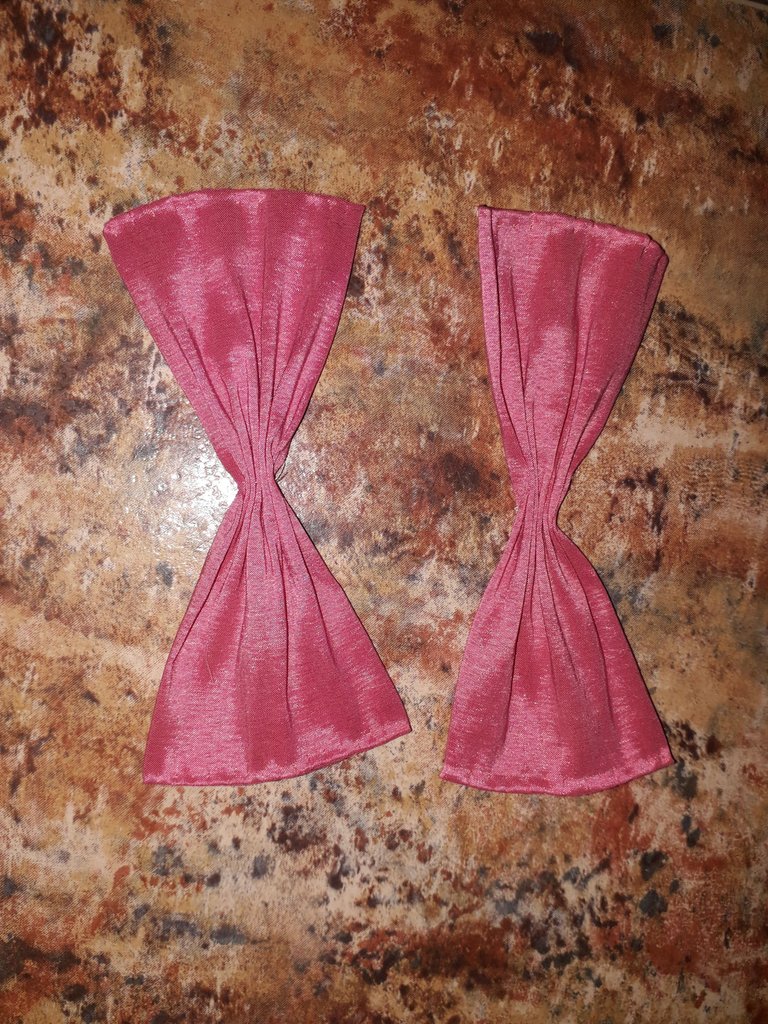
Now we are going to baste the fabric right in the middle, vertically, and we are going to pull the thread so that the fabric puckers like this, can you see the ribbon shape? It is advisable to give the thread a couple of turns around the fabric to secure what we did, like wrapping it. Although I must admit that I didn't do it here, because I didn't know it yet, later on in the process I realized that it was an effective method. Although I do not consider it so necessary, just tying the thread is enough, in the same way at the end you will be wrapping it with a cloth.
We repeat the whole process described above until we have two of these bows. But this is not the final step yet, keep reading pls.
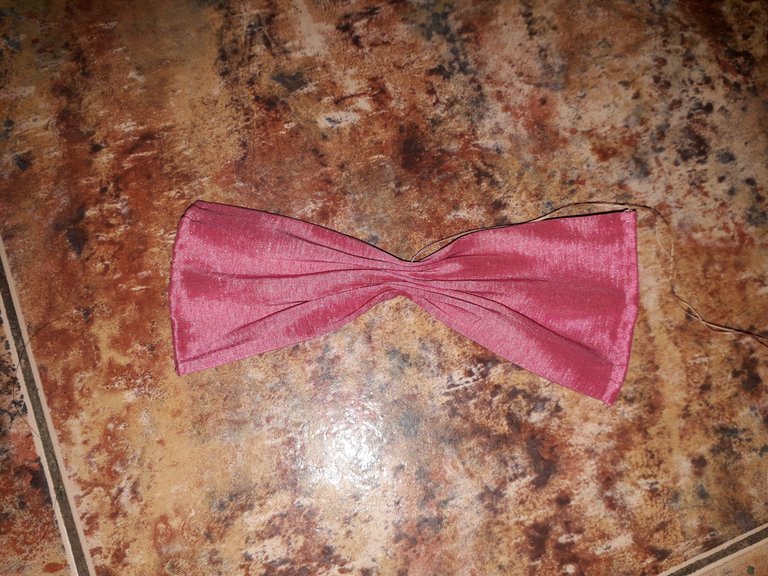
Now we are going to place the two ribbons in this way, in the shape of an X, making sure that the two centers are one on top of the other. We're going to make a small seam to make sure that the fabric doesn't move.
Look, now it looks bigger, it's an interesting way to make a more colorful bow, have you tried it before?
 |  |
|---|
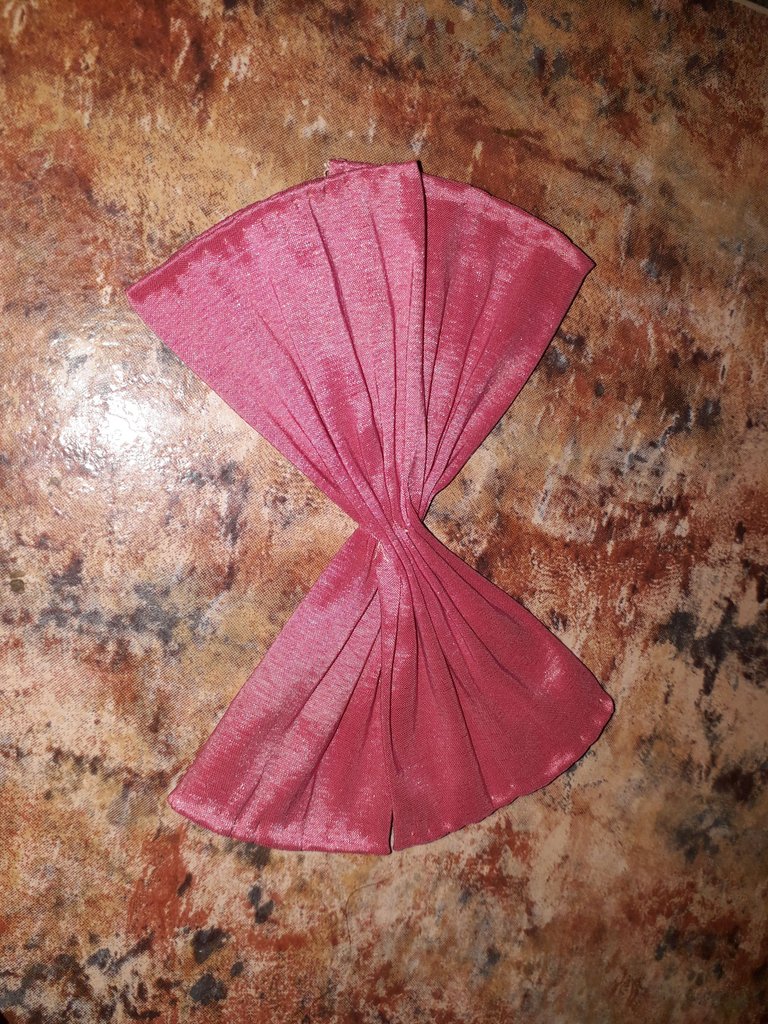
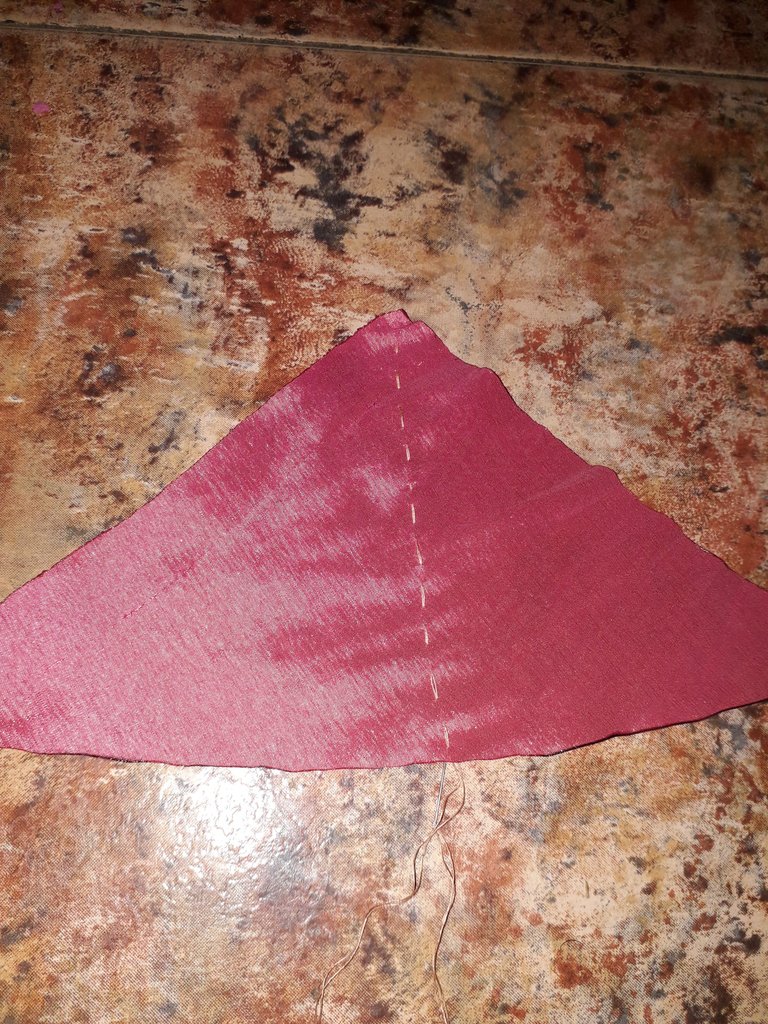
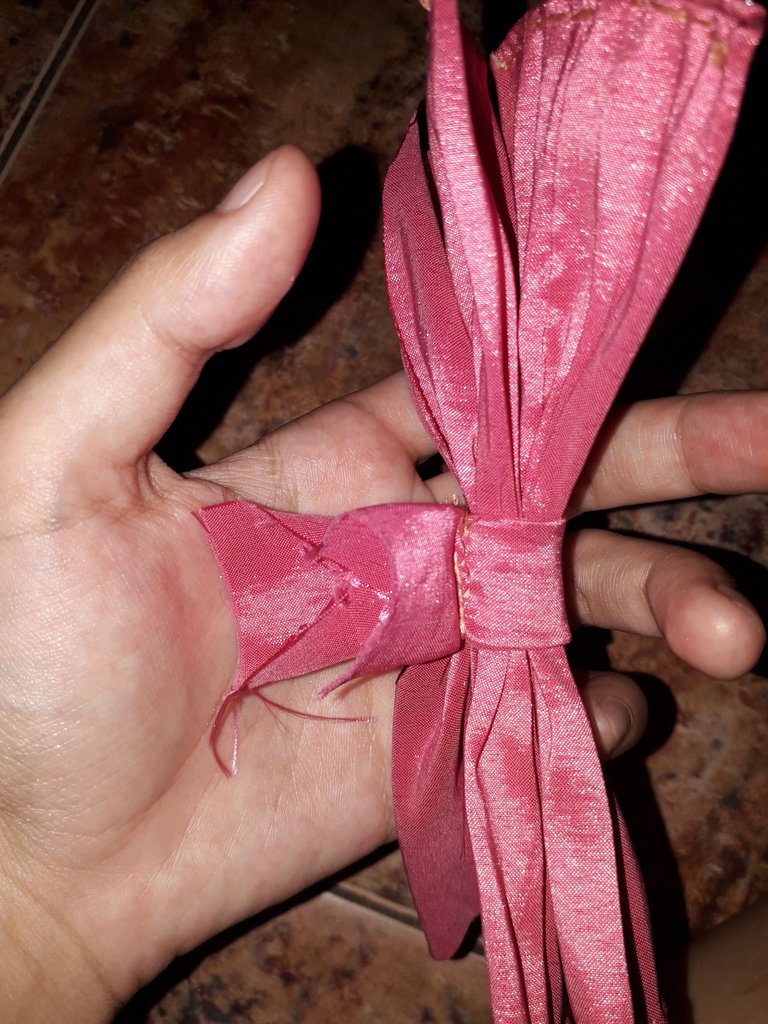
Now we are going to take one of the triangles of fabric, and we are also going to sew it baste right down the center, vertically, as shown in the photo. Then we pull to gather and go around twice to wrap the thread around the fabric and secure our work.
After this, we are going to take the now gathered triangle along with the rest of the ribbon. And we are going to join them together by putting the ribbon on top of the gathered triangle, as seen in the photo on the right.
Finally, we are going to take a hair tie, if you don't have one you can use thread, and we are going to use it to hold together the two elements of the bow (the crossed fabrics and the gathered triangle). We turn it until it is well fixed, and we would almost have our first bow, how exciting!
 |  |
|---|
Remember the 7 x 3 cm rectangles I mentioned in the materials? Well, we are going to take one of those rectangles and we are going to hem it at each vertical end, that is to say, at the left and right ends. We pass the iron over it to fix the fabric, and we will wrap the whole bow, closing it at the back, obviously to make it look nice, right?
To make with hair clip
In this step is where you should have glued the hair clip to the back base of the bow, but I didn't do it that way because I already mentioned that I would use ribbons. But well, in case you have hair clip, what you should do is glue it to the back base of the bow, preferably with hot silicone, and then wrap the fabric around the bow; opening the clip so that it is basically wrapping the hair clip as well, but in a way that allows you to open it when you put it on, obviously. I know I'm explaining too much, but I feel insecure because I don't have pictures to illustrate the process. I hope you understand what I wanted to explain, I get very tangled.
Ah, if we are working with a hair clip, it also changes the way we close the fabric that wraps around the clip and bow. I made some leftover fabric, on purpose, so that we would have a little more freedom and comfort when wrapping it. What you will do to use it with the hair clip is: cut some of the excess fabric from the ends, but not all of it. The upper end we are going to bring it down, passing over the clip, and we are going to apply hot silicone between the hair clip and the end of the fabric, and we glue it. The lower end we take it upwards, so that it passes over the other end that is already covering the clip, and we put hot silicone between the two fabrics, and we glue.
I hope you find the explanation useful, I didn't want to leave you out if you were using a hair clip, I hope you understand the explanation. Kisses.
We are going to make a seam that joins the two ends of the fabric flush with each other; I gave them a measure of fabric so that there is a little bit of fabric left over when wrapping, this is so that we can have more freedom and comfort when wrapping the bow. Finally, when the two ends are joined, we are going to make a seam on top that joins them horizontally, and we will cut off the excess.
Annnd...
That's it, finally. Now we are going to take the remaining materials and repeat the process once more, until we have...
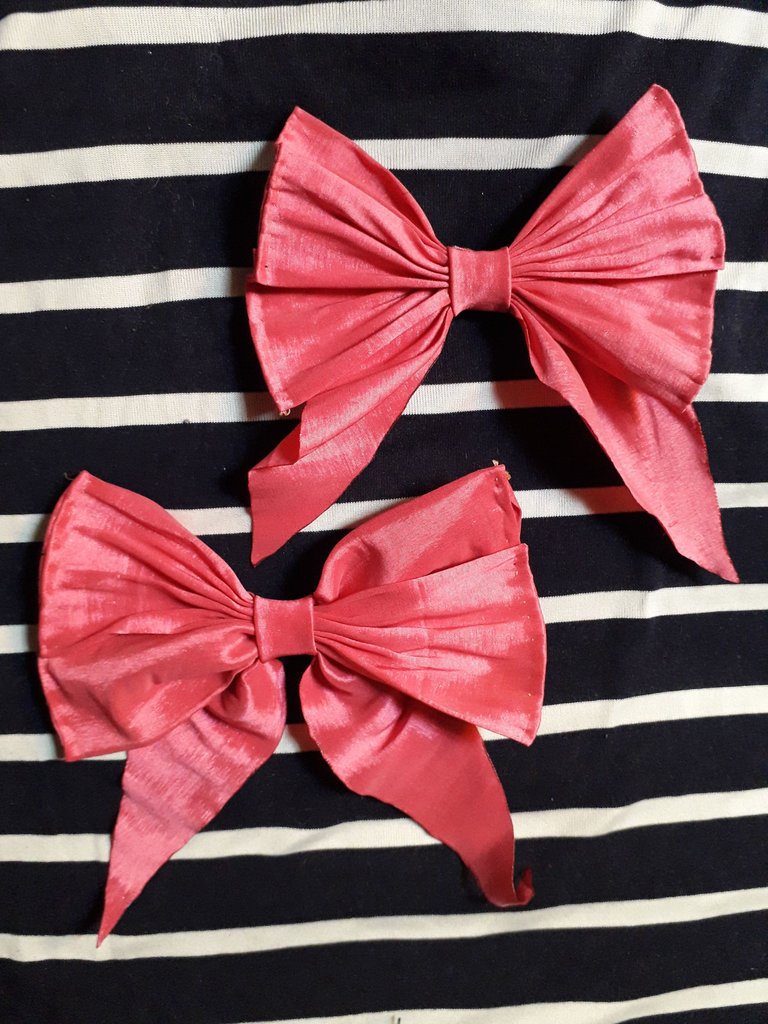
This.
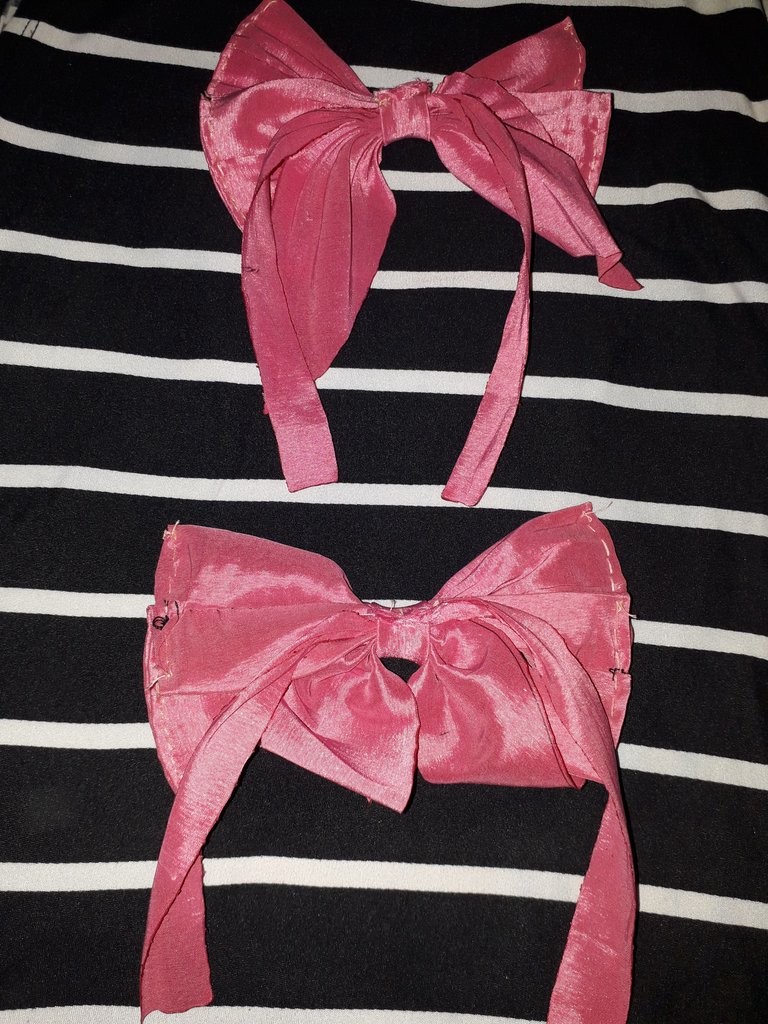
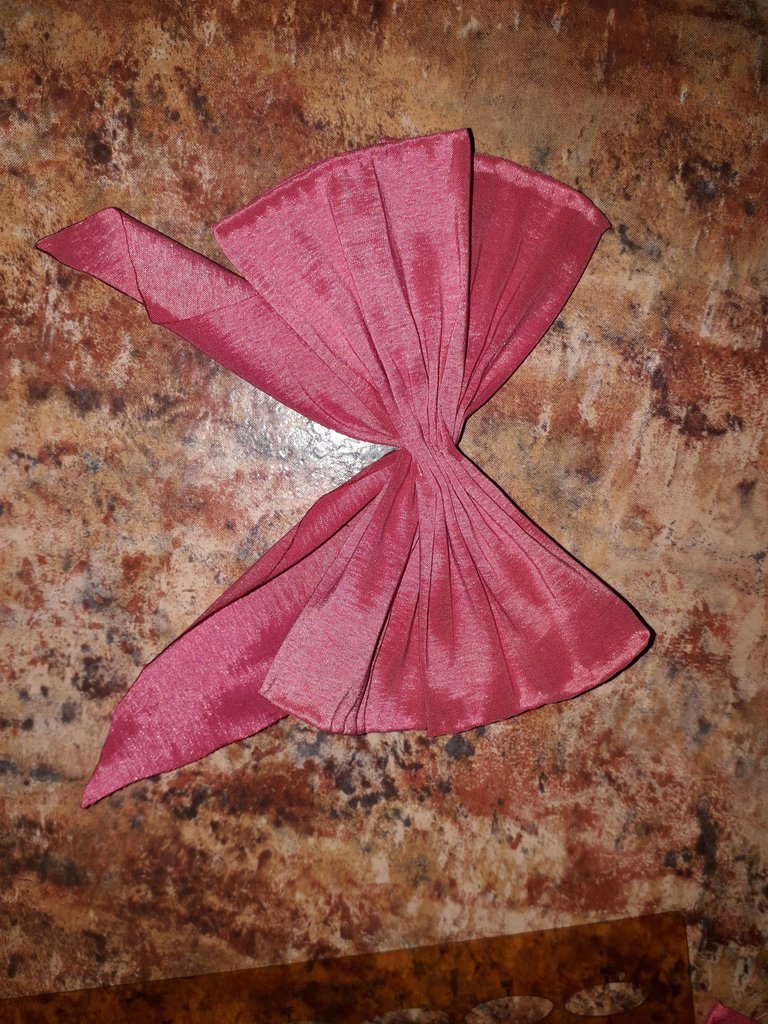
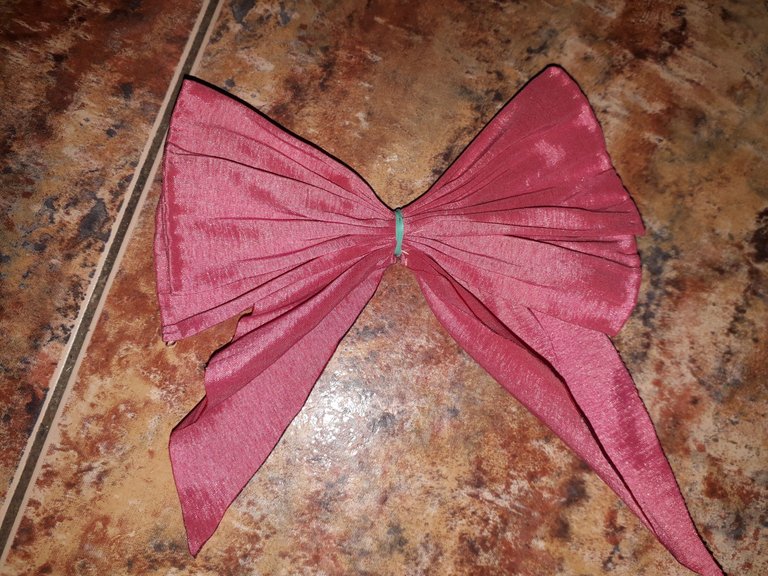
Oh yes, I forgot to mention that I tucked one of the ribbons right through the back of the bow, in the space between the bow and the wrapping fabric, but I did this step just before I put it on for the photos. But that's how they turned out, as in the image above.
Note: To prevent the fabric from fraying, I burned the entire edge of the ribbons with a lighter. Be careful because this fabric burns fast, the idea is to go through quickly to seal the fabric.
here I leave them in case you'd like to take a look, although I'm a little embarrassed too hehehe.That would be all, my dears. This time I'm not uploading pictures because I already have a #Liketu post showing my favorites,
Without anything else to add, take care, drink water, and don't forget to smile, I love you, see you in the next post, bye!
Español
Holiii, amigos de la comunidad de HiveDiy, ¿cómo se encuentran el día de hoy?, ¡espero que muy bien!
El día de hoy, les traigo otra de las maravillas que he logrado gracias a la costura (o no tan maravilla): ¡unos lacitos!
Pero estos no son cualquier lacitos, los hice con mucho amor. Verán, cuando vi la tela rosada pensé “¿y si me hago unos lacitos como los de Candy Candy?”.
Ya sé, estarán pensando que estoy obsesionada con esa linda pecosa, y la respuesta es… POR SUPUESTO QUE SÍ. No quisiera entrar en detalle sobre por qué me gusta, ya que no estamos aquí para eso, pero simplemente diré que Candy Candy es para mí como la creadora de las “coquettes”, jijii. Es bromita (pero los aspectos tan femeninos de la serie es algo que no dejaré de apreciar).
Pues bien, amigos, ya sin tanto rodeo, comencemos con el proceso de creación de estos lacitos a los que yo llamaré “lacitos dobles”. Tomemos hilo y aguja, y ¡vamos allá!
Materiales
4 rectángulos de tela “raso” rosada de 20 x 15 cm (2 para cada lazo).
2 triángulos de tela “raso” rosada de 28 x 13 cm (1 para cada lazo).
2 rectángulos de tela “raso” rosada de 7 x 3 cm (1 para cada lazo).
2 cintas de tela “raso” rosada de 35 x 2 cm (1 para cada lazo. Aquí se deberían usar ganchitos para el cabello, pero como yo no tenía, decidí ponerle unas cintas, para llevar el lacito amarrado. Fue algo muy improvisado y me gustó como quedaron, pero ustedes deberían usar ganchitos si quieren, jajaja).
2 Liguitas para el cabello.
Nota: Si quieres usar ganchos para el cabello, puedes seguir leyendo, más abajo hice un pequeño apartado de como haríamos el lazo si se usara un gancho para el cabello. Los materiales que necesitarías son un gancho para el cabello y una pistola para silicona.
Debo aclarar que hice estos lacitos desde mi imaginación, sin guías, quizá por eso las medidas pueden estar un poco raras. Recuerden que es una inspiración que yo estoy haciendo, no quiero decir que son exactamente iguales a los que usa Candy o que tienen el mismo tamaño y tela. Pero vamos, confiemos en el proceso que seguro que quedan lindos, ¿a que sí?
| |
|---|
Tomamos nuestro rectángulo de 20 x 15 y lo doblamos a la mitad, de manera que quede más ancho que largo. Luego, vamos a pasar una costura por todo lo ancho de la tela, de punta a punta, tal como se ve en la segunda imagen.
| |
|---|
Volteamos la tela de manera que la costura quede en el centro de la parte trasera, y vamos a doblar los bordes hacia dentro para hacer un dobladillo. Yo le pasé una plancha para que no se nos mueva la tela a la hora de coser.
Cuando cosí, hice algo que yo llamo “costura de punto” que es básicamente hacer una costura que sea poco perceptible por la parte del frente, pero de la parte de atrás si se nota el hilo, jajaja. ¿Si me explico? Es como coser basteando, pero la costura que va a estar visible, la hago metiendo la aguja y el hilo casi por donde sale el hilo, formando apenas un punto; creo que esto ya lo había explicado cuando hice la falda, espero que me entiendan o sepan a lo que me refiero.
| |
|---|
Ahora vamos a bastear la tela justo en el medio, de manera vertical, y vamos a jalar el hilo para que la tela se frunza así, ¿ya le ven la forma de listoncito? Es recomendable darle un par de vueltas al hilo alrededor de la tela para asegurar lo que hicimos, como envolviéndola. Aunque debo admitir que aquí no lo hice, porque no lo sabía aún, luego más adelante en el proceso fue que me di cuenta de que era un método eficaz. Aunque no lo considero tan necesario, con amarrar el hilo basta. De igual manera, al final lo estará envolviendo una tela.
Todo el proceso narrado anteriormente lo repetimos hasta tener dos lacitos de estos. Pero este no es el paso final aún, sigan leyendooo.
Ahora vamos a ubicar los dos lacitos de esta manera, en forma de equis, haciendo que los dos centros queden uno encima del otro. Vamos a hacer una pequeña costura para asegurar que no se muevan las telas.
Miren, ahora se ve más grande, es una manera interesante de hacer un lazo más vistoso, ¿lo habían intentado antes?
| |
|---|
Ahora vamos a tomar uno de los triángulos de tela, y también lo vamos a coser basteado justo por el centro, de manera vertical, como se ve en la foto. Después jalamos para fruncir y volvemos a dar dos vueltas para envolver el hilo alrededor de la tela y asegurar nuestro trabajo.
Luego de esto, vamos a tomar el triángulo ahora fruncido junto con el resto del lazo, y los vamos a juntar poniendo el lazo encima del triángulo fruncido, tal y como se ve en la foto de la derecha.
Por último, vamos a tomar una liguita de cabello, si no tienen pueden usar hilo, y la vamos a usar para mantener juntos los dos elementos del lazo (las telas cruzadas y el triángulo fruncido). Damos vueltas hasta que quede bien fijo y ya casi tendríamos nuestro primer lacito, ¡que emociónnn!
| |
|---|
¿Recuerdan los rectángulos de 7 x 3 cm que mencioné en los materiales? Pues vamos a tomar uno de esos rectángulos y vamos a hacerle un dobladillo en cada extremo vertical, es decir, en el extremo izquierdo y derecho. Le pasamos la plancha por encima para fijar la tela, y con esto envolveremos todo el lazo, cerrándolo por detrás.
Para hacer con gancho de cabello
En este paso, es donde deberías haber pegado el ganchito de cabello a la base trasera del lazo, ojo ahí, yo no lo hice así porque ya les mencioné que usaría unas cintas.
Pero bueno, en caso de que ustedes tengan ganchitos, lo que deben hacer es pegarlo a la base trasera del lazo, con silicona caliente, preferiblemente, y luego sí envuelven la tela alrededor del lazo.
Ah, si estamos trabajando con un gancho, también cambia la forma en la que cerramos la tela que envuelve al gancho y al lazo. Yo hice que quedara tela restante a propósito, para que tuviéramos un poco de más libertad y comodidad a la hora de envolverlo. Lo que ustedes harán para usarla con gancho es: cortar un poco de la tela sobrante de los extremos, pero no toda. El extremo superior lo vamos a llevar hacia abajo, que pase por encima del gancho, y vamos a aplicar silicona caliente entre el gancho y el extremo de tela, y pegamos. El extremo inferior lo llevamos hacia arriba, de manera que pase por encima del otro extremo que ya está cubriendo el gancho, y ponemos silicona caliente entre las dos telas, y pegamos.
Espero que se entienda la explicación, no quería dejarte por fuera si estabas usando gancho de cabello, ojalá entiendas la explicación. Besitos.
Vamos a hacer una costura que una los dos extremos de la tela, y queden ras con ras; yo medí la tela de manera que les sobre un poco al envolver el lazo, esto con la finalidad de que podamos tener más libertad y comodidad a la hora de envolver el lazo. En fin, al juntar ambos extremos, vamos a hacer una costura por encima, que los una, de manera horizontal, y cortaremos el sobrante.
Yyyy…
Ya estaría, por fin. Ahora vamos a tomar los materiales restantes y repetiremos el proceso una vez más, hasta que nos quede…
Esto.

Ah, sí, olvidé mencionarles que metí una de las cintas justo por la parte de atrás del lazo, en el espacio que queda entre el lazo y la tela que lo envuelve, pero este paso lo llevé a cabo justo antes de ponérmelo para las fotos. Pero así quedaron, como en la imagen de arriba.
Nota: Para que la tela no se deshilachara, quemé todo el borde de las cintas con un encendedor. Tengan cuidado porque esta tela se quema rápido, la idea es pasar rápido para sellar la tela.
acá se los dejo por si quisieran echarle un vistazo, aunque me da un poco de penita también jijiji.Eso sería todo, queridos. Esta vez no subo fotos porque ya tengo un post de #Liketu mostrando mis favoritas, por
Sin nada más que añadir, cuídense, tomen agua, y no se olviden de sonreír. ¡Se les quiere, nos vemos en el próximo post, chau!
Credits | Créditos
- English translation DeepL (sorry for any mistakes, I don't know much English)
- Traducción al inglés DeepL (lo siento por cualquier error, no sé mucho inglés.)
- Cover, dividers, and banners made in Canva
- Portada, separadores y banners hechos en Canva
- Photos used in the post were taken by me, using a Samsung Galaxy J6
- Las fotos usadas en el post fueron tomadas por mí, usando un Samsung Galaxy J6
Posted Using INLEO
Jaja candy candy es la mamá del Coquette por su puesto que sí 💜😊 están muy preciosos , justo cuando vi la portada dije : se ven como si fueran de un anime y si eran 😸
Ella las creó jajaja 🤭.
Oye, me alegro mucho de que haya quedado la portada como yo quería que los demás la percibieran. 💙✨
Y gracias por tu apoyo, bonita. 🌻
Hermoso trabajo. El color que elegiste es extremadamente lindo.
Muchas gracias, me alegra que le haya gustado! 💙✨