Muy buenas tardes, apreciada y muy creativa comunidad Hivediy, ante de todos les envio un gran saludo, espero se encuentren muy bien y Dios los bendiga a todos. Hoy me estoy incorporando nuevamente a la plataforma, me ausente porque tenia problemas con la señal de internet y tambien por motivos de salud, pero ya estoy de vuelta con ustedes para compartir con todos ustedes mis proyectos, que de verdad son muy buenos, como falta pocos dias para la navidad, hoy me inicio con un proyecto navideño, se trata de un dispensador utilitario con motivo de Santa Claus, y lo mejor de todo es que en este proyecto utilizamos materiales de uso reciclables y tambien otros tipos de materiales, que son muy economicos y muy facil de conseguir, sin mas nada que decir vamos a comenzar con los pasos para elaborar este bonito, practico y sencillo proyecto, seguro les va a gustar tanto como a mi.
Good afternoon dear and very creative Hivediy community, first of all I send you a big hello, I hope you are very well and God bless you all. Today I join the platform again, I was absent because I had problems with the internet signal and also for health reasons, but I am back with you to share with all of you my projects, which are really very good, as there are a few days left Christmas, today I start with a Christmas project, it is a utility dispenser for Santa Claus, and the best of all is that in this project we use recyclable materials and also other types of materials, which are very cheap and very easy to get, without More let's start with the steps to make this beautiful, practical and simple project, I'm sure you'll like it as much as I do.
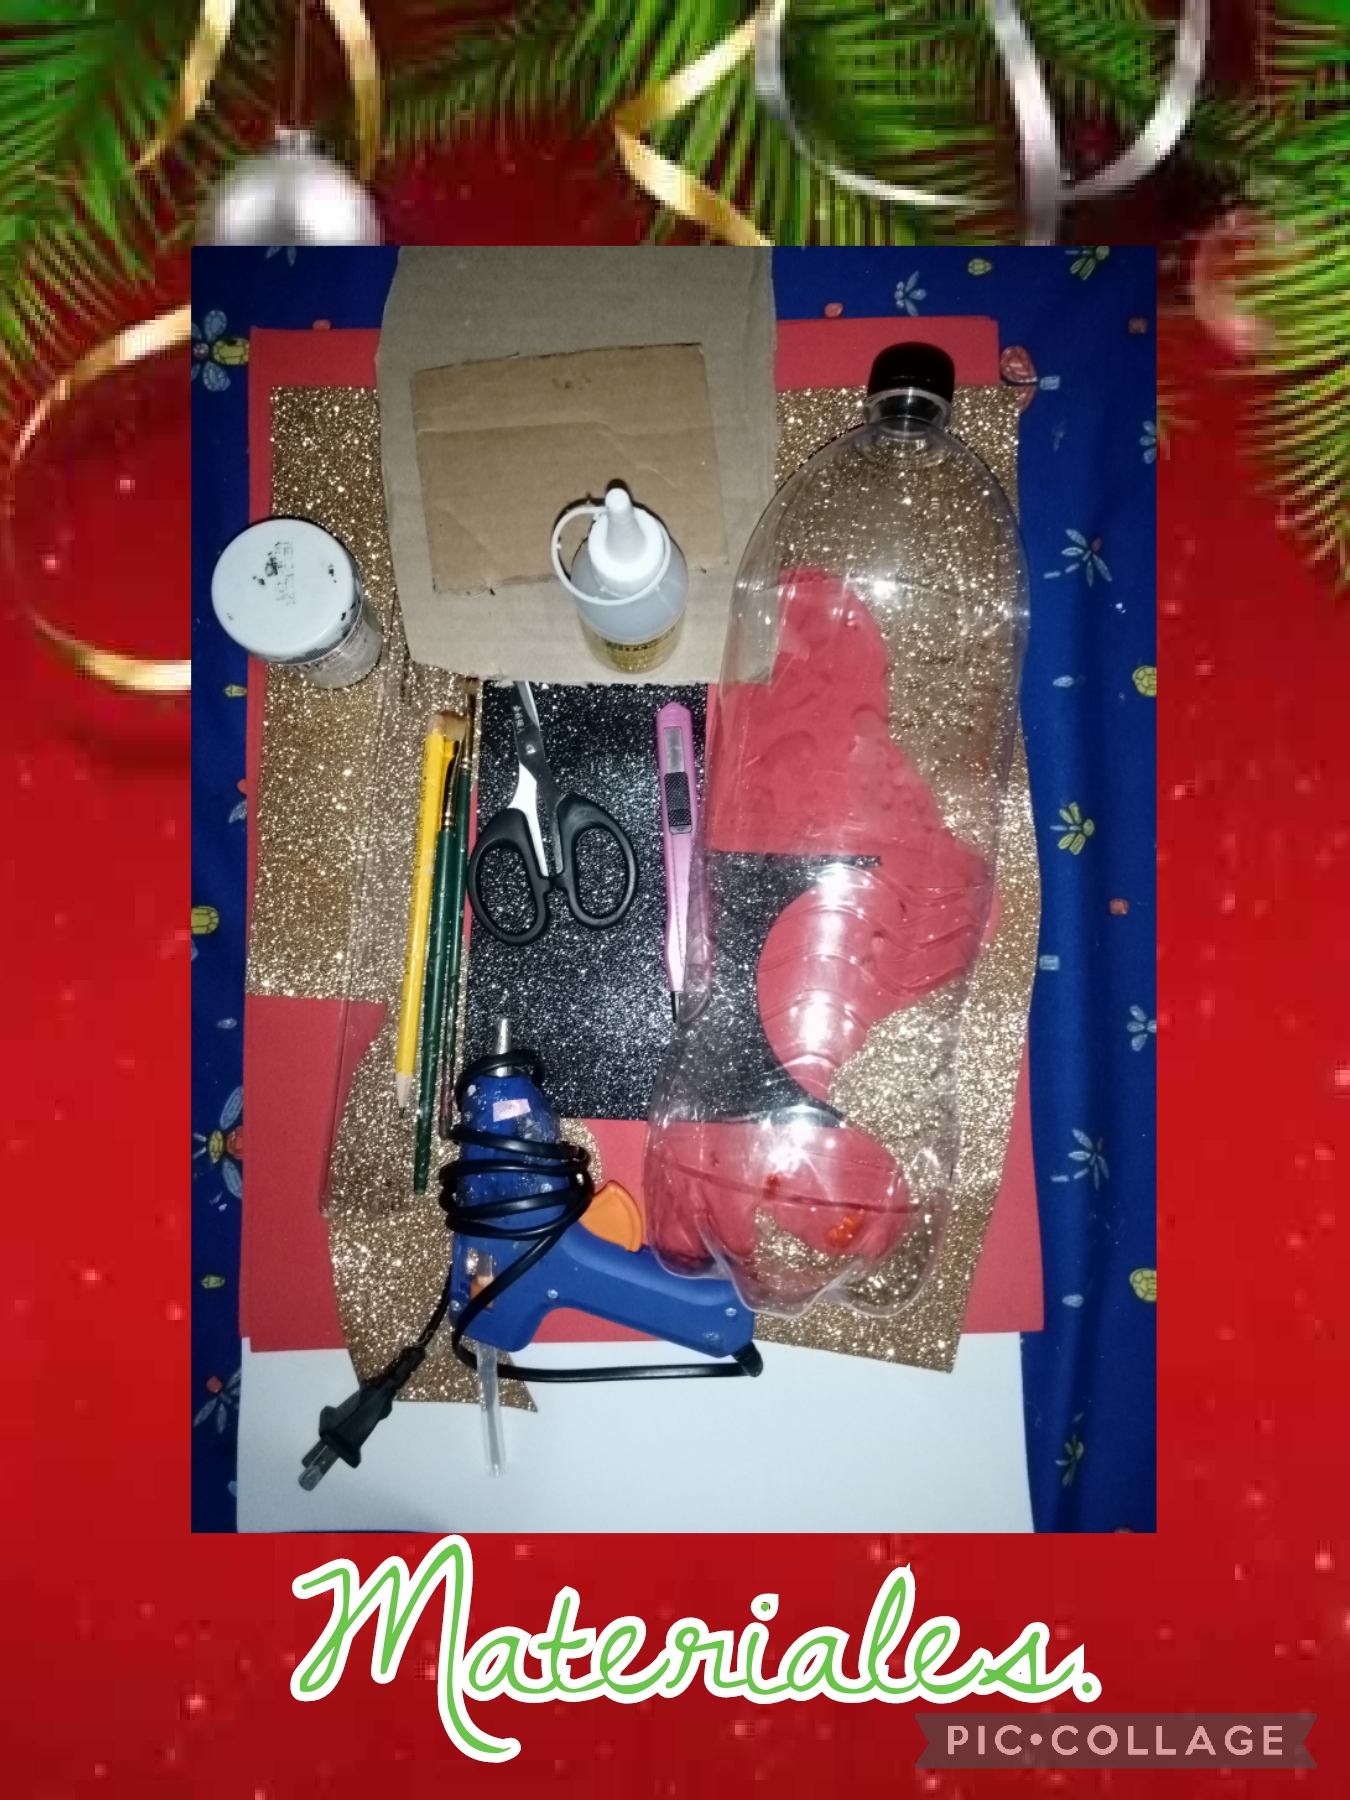
Para elaborar este bonito, práctico y muy sencillo, dispensador utilitario con motivo navideño, Santa Claus, vamos a necesitar los siguientes materiales y herramientas.
*1 botella plástica de utilización reciclable.
*1 pedazo de cartón de utilización reciclable.
*Foamis de varios colores y diferentes texturas.
*Silicona líquida.
*1 exacto.
*1 tijera.
*1 lápiz.
*Pincel angular y pintura al frío.
*1 Pistola para silicona caliente.
To make this beautiful, practical and very simple utility dispenser for Christmas, Santa Claus, we are going to need the following materials and tools.
*1 recyclable plastic bottle.
*1 piece of recyclable cardboard.
*Foams of various colors and different textures.
*Liquid silicone.
*1 exact.
*1 scissors.
*1 pencil.
*Angular brush and cold paint.
*1 Hot glue gun.
We'll start with this fun and very creative step by step.
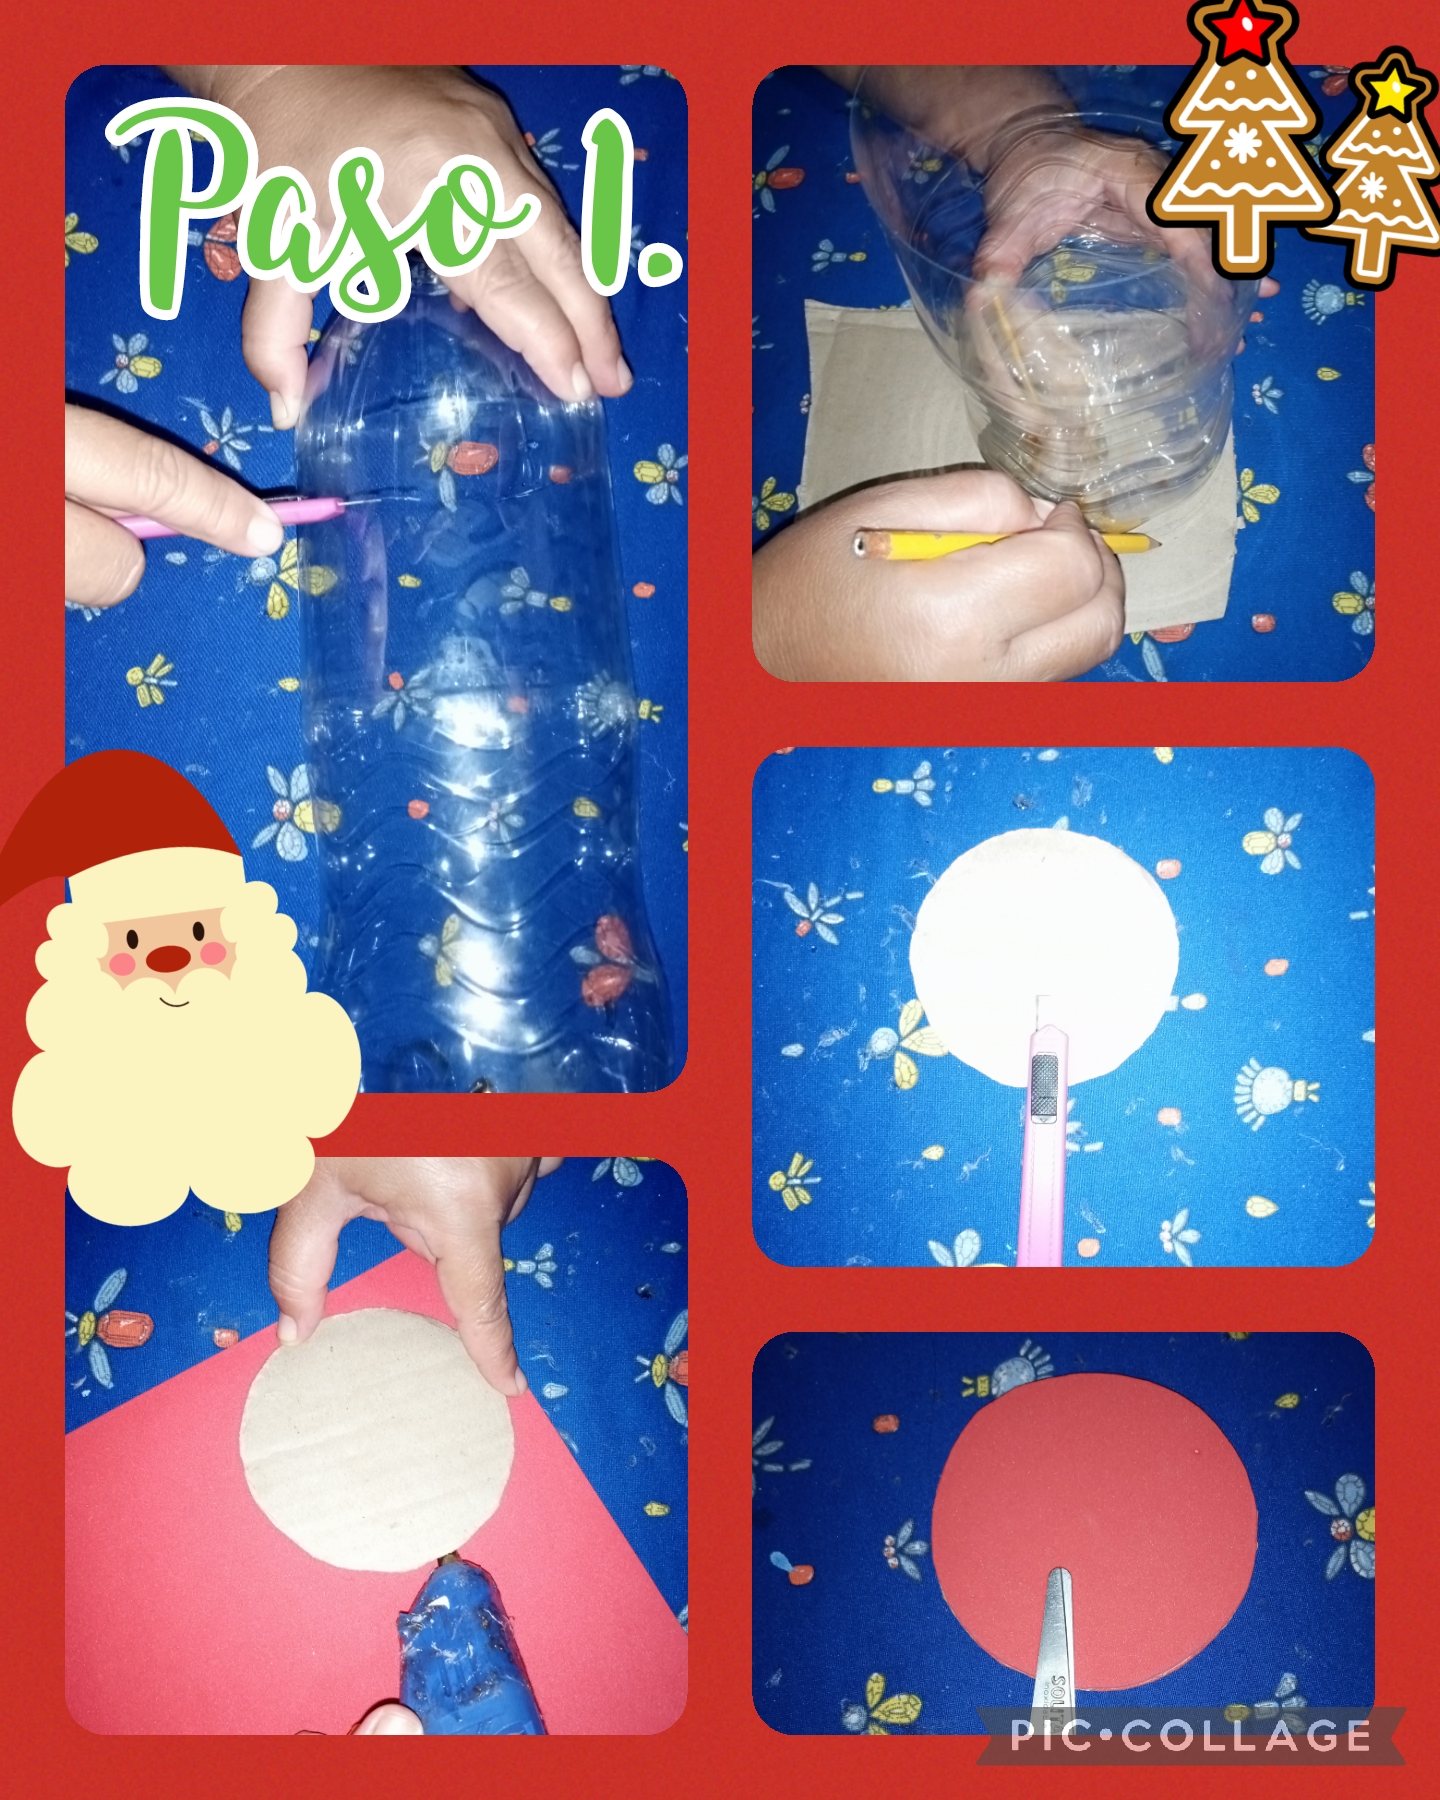
Step 1. We are going to start this project and we are going to do it in the following way, we take a plastic bottle and an exact, we mark and cut the plastic bottle, to the desired size, then we take a piece of cardboard from recyclable use and we mark a circle and cut it with the same exact one, that circle will serve to stick it to the bottom of the plastic bottle, then with red foami with a smooth texture, we will cover it and cut it along the entire edge, see the images.
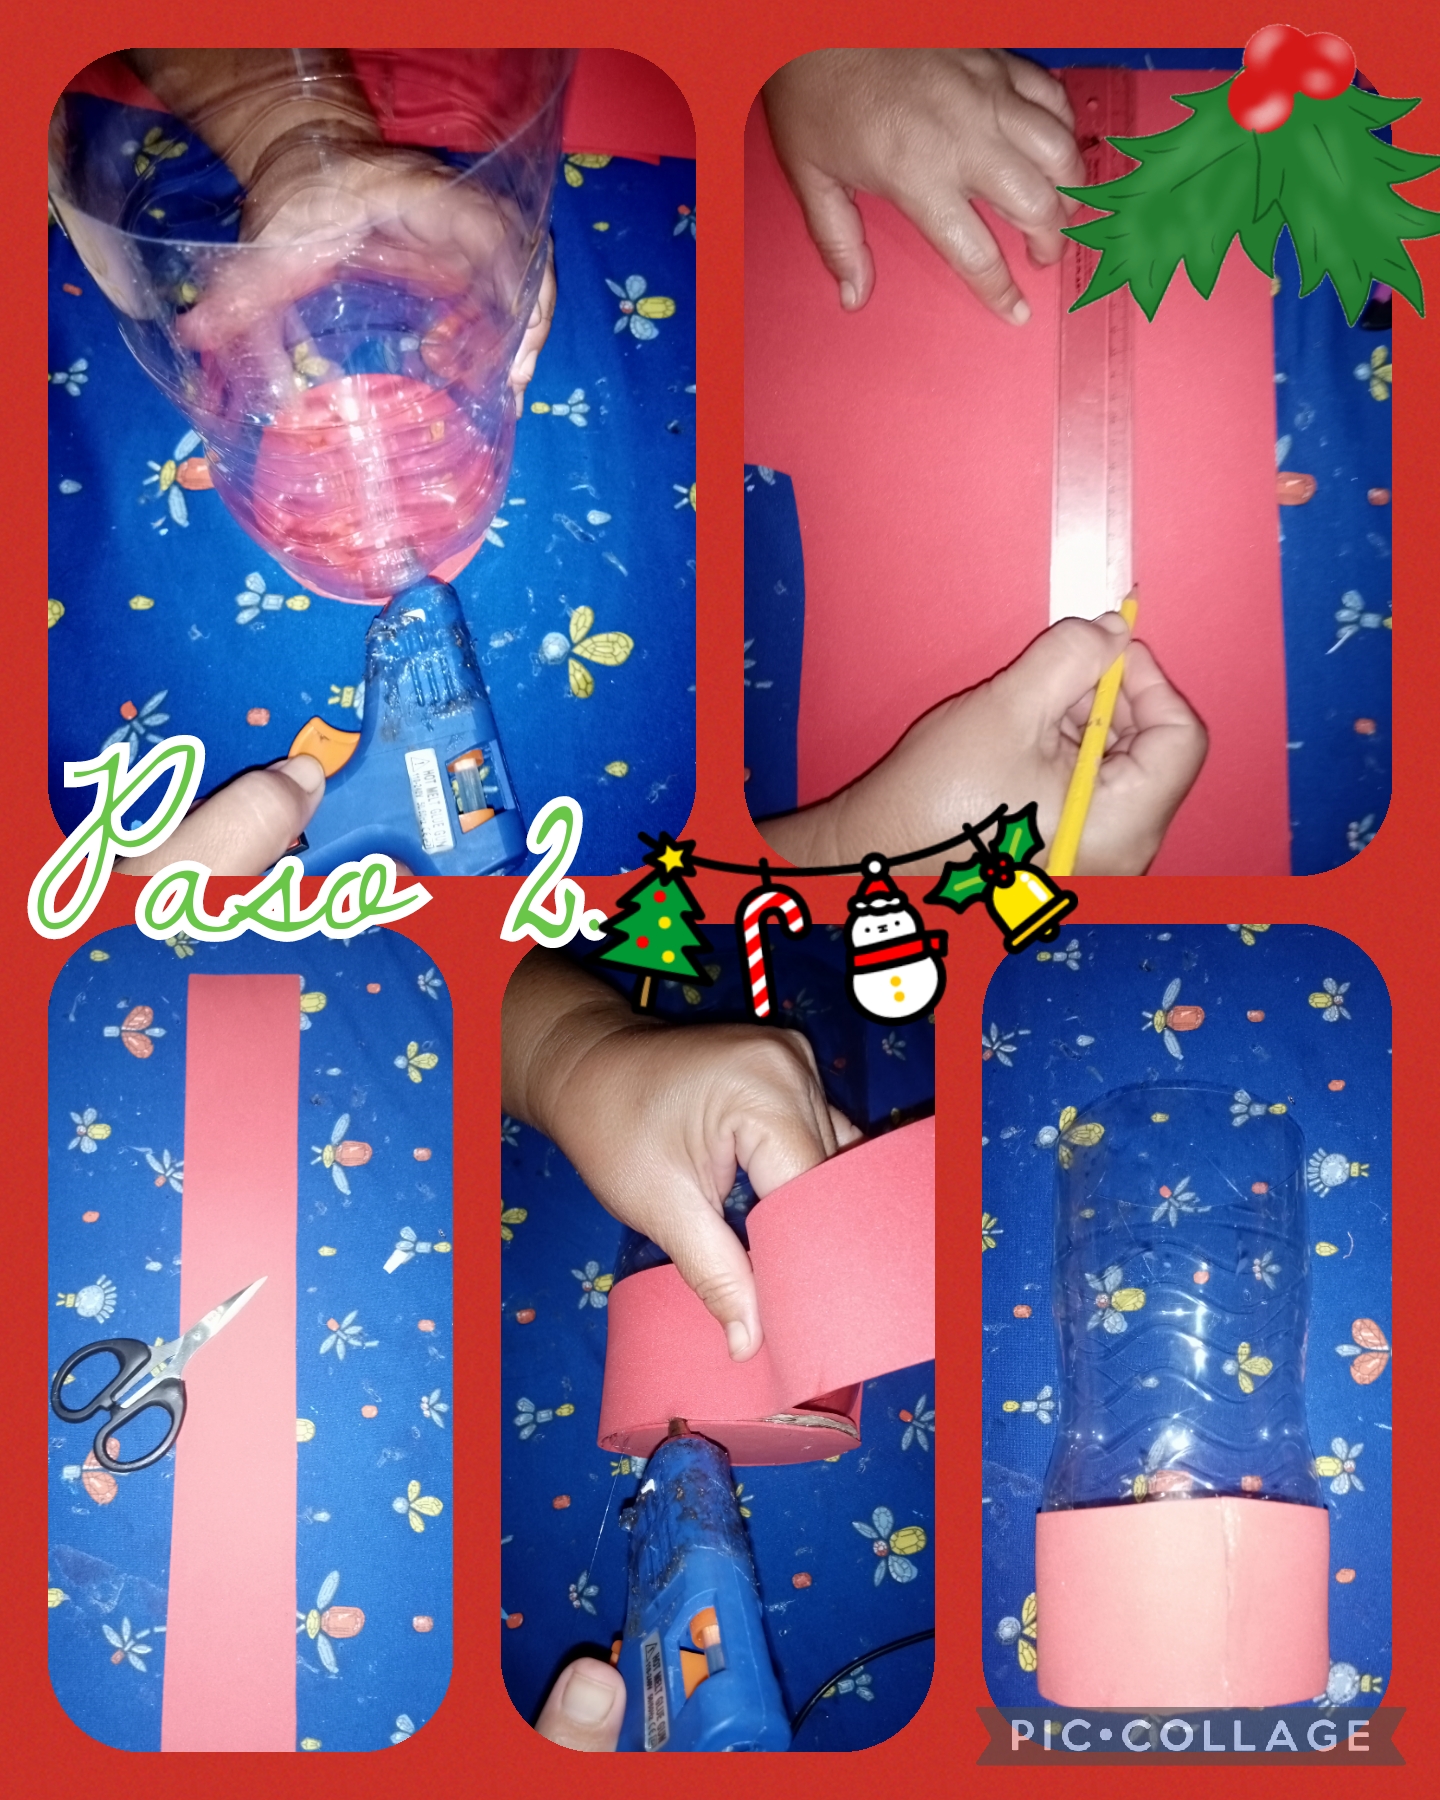
Step 2. Now in this step we are going to glue the circle to the bottom of the plastic bottle with hot glue, then we take red foam with a smooth texture and we are going to mark and cut a thick strip 6 cm wide and long that It depends on what is going to be covered, then we stick it to the bottom of the bottle, always using and sticking with hot silicone so that it is well glued and strong, see the images.
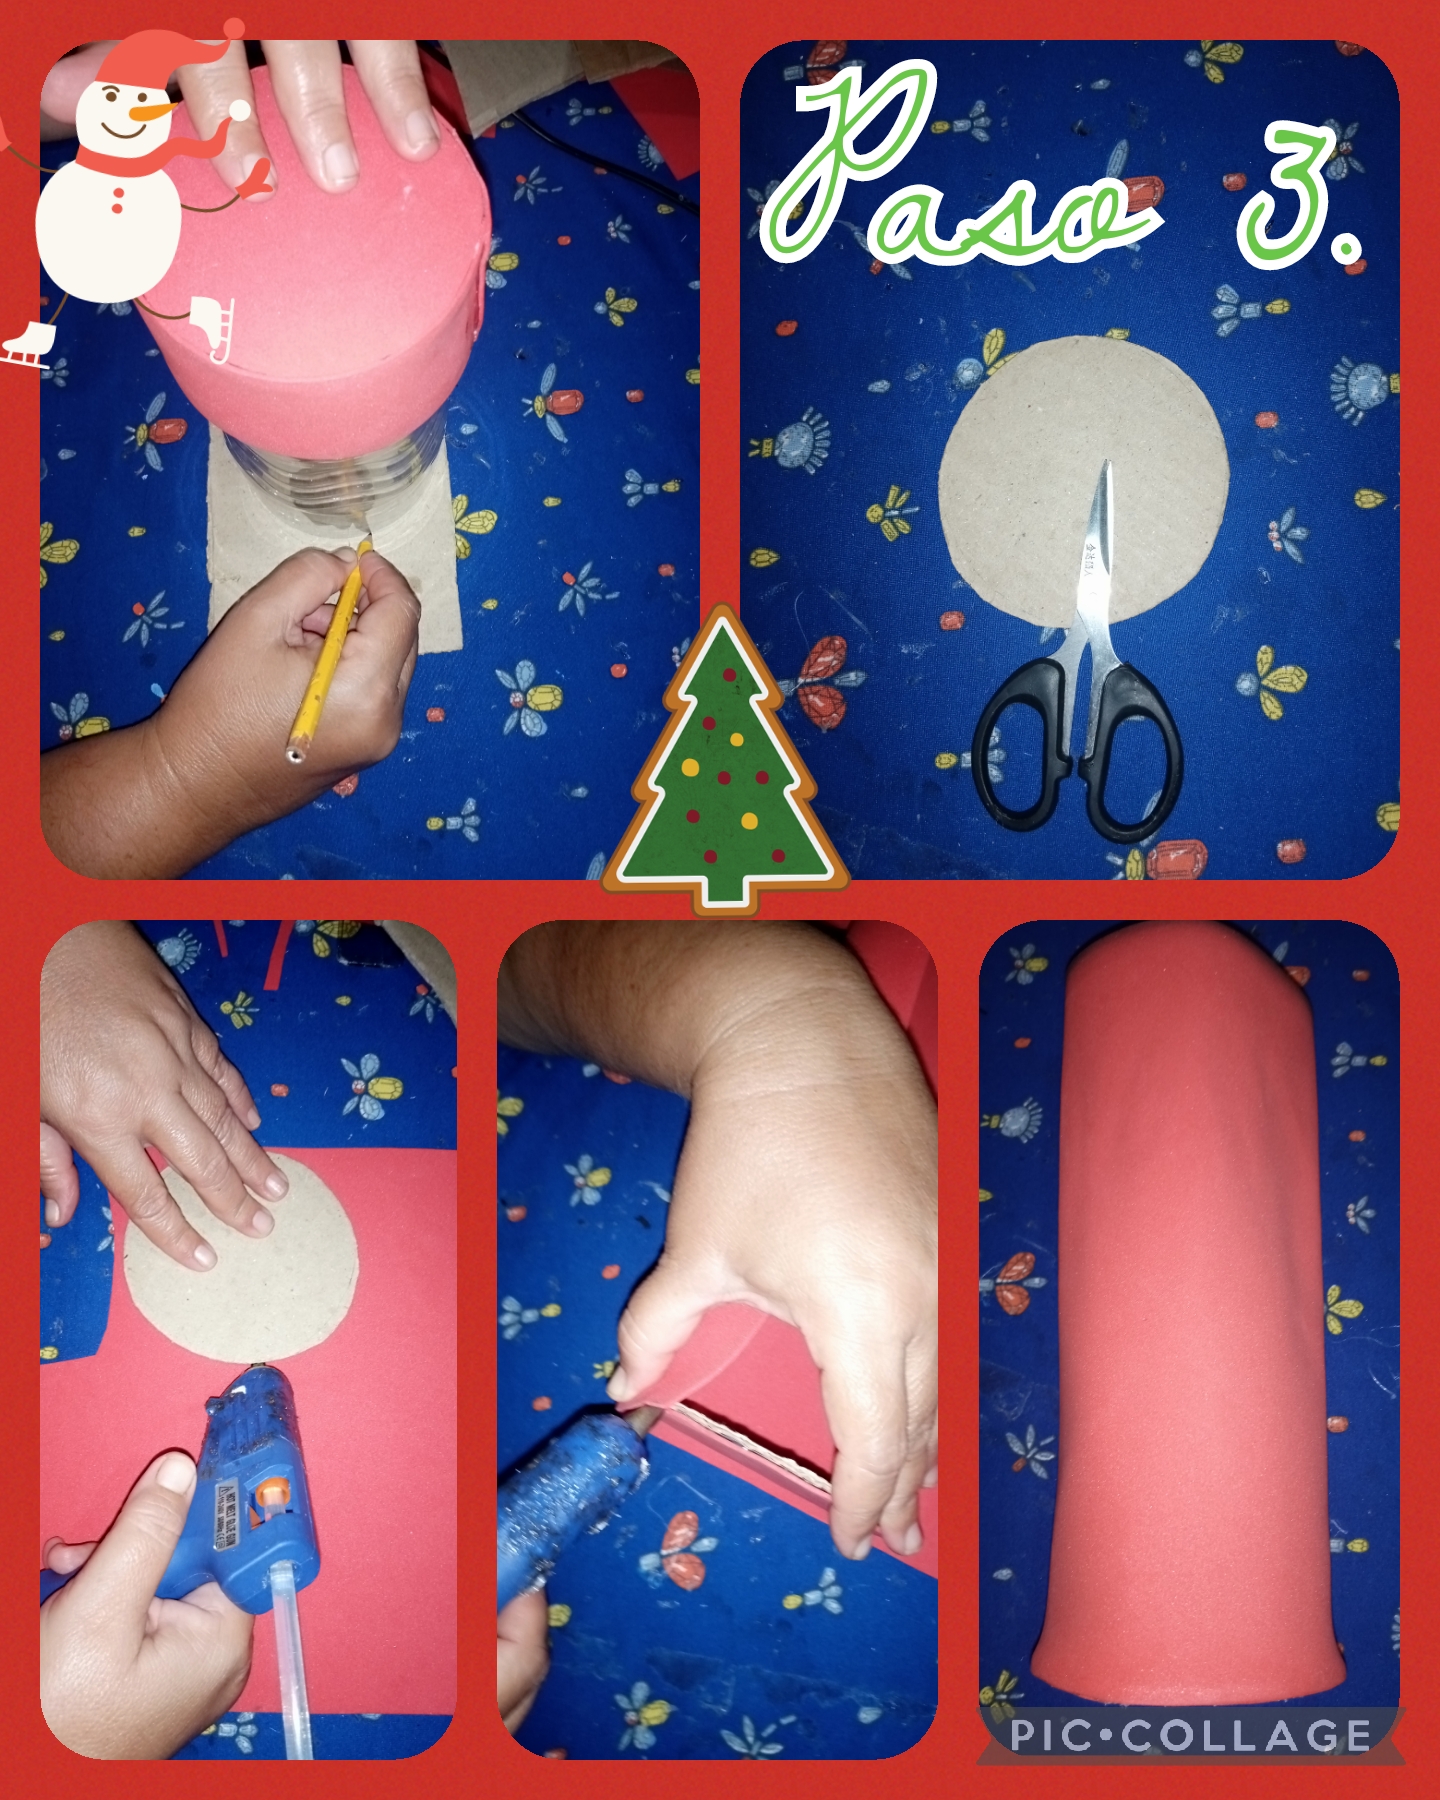
Step 3. Now in this step we are going to make the top cover of the dispenser that we are making, we are going to take a piece of recyclable cardboard, and mark the circle and then cut it out, in this case we use scissors, then we paste it on a red foami with a smooth texture, and we cut it, and to finish this step we are going to paste a fairly large foami with hot silicone, around the edge of the cardboard circle until we finish gluing it completely, this will help us as a lid for the dispenser, see the pictures.
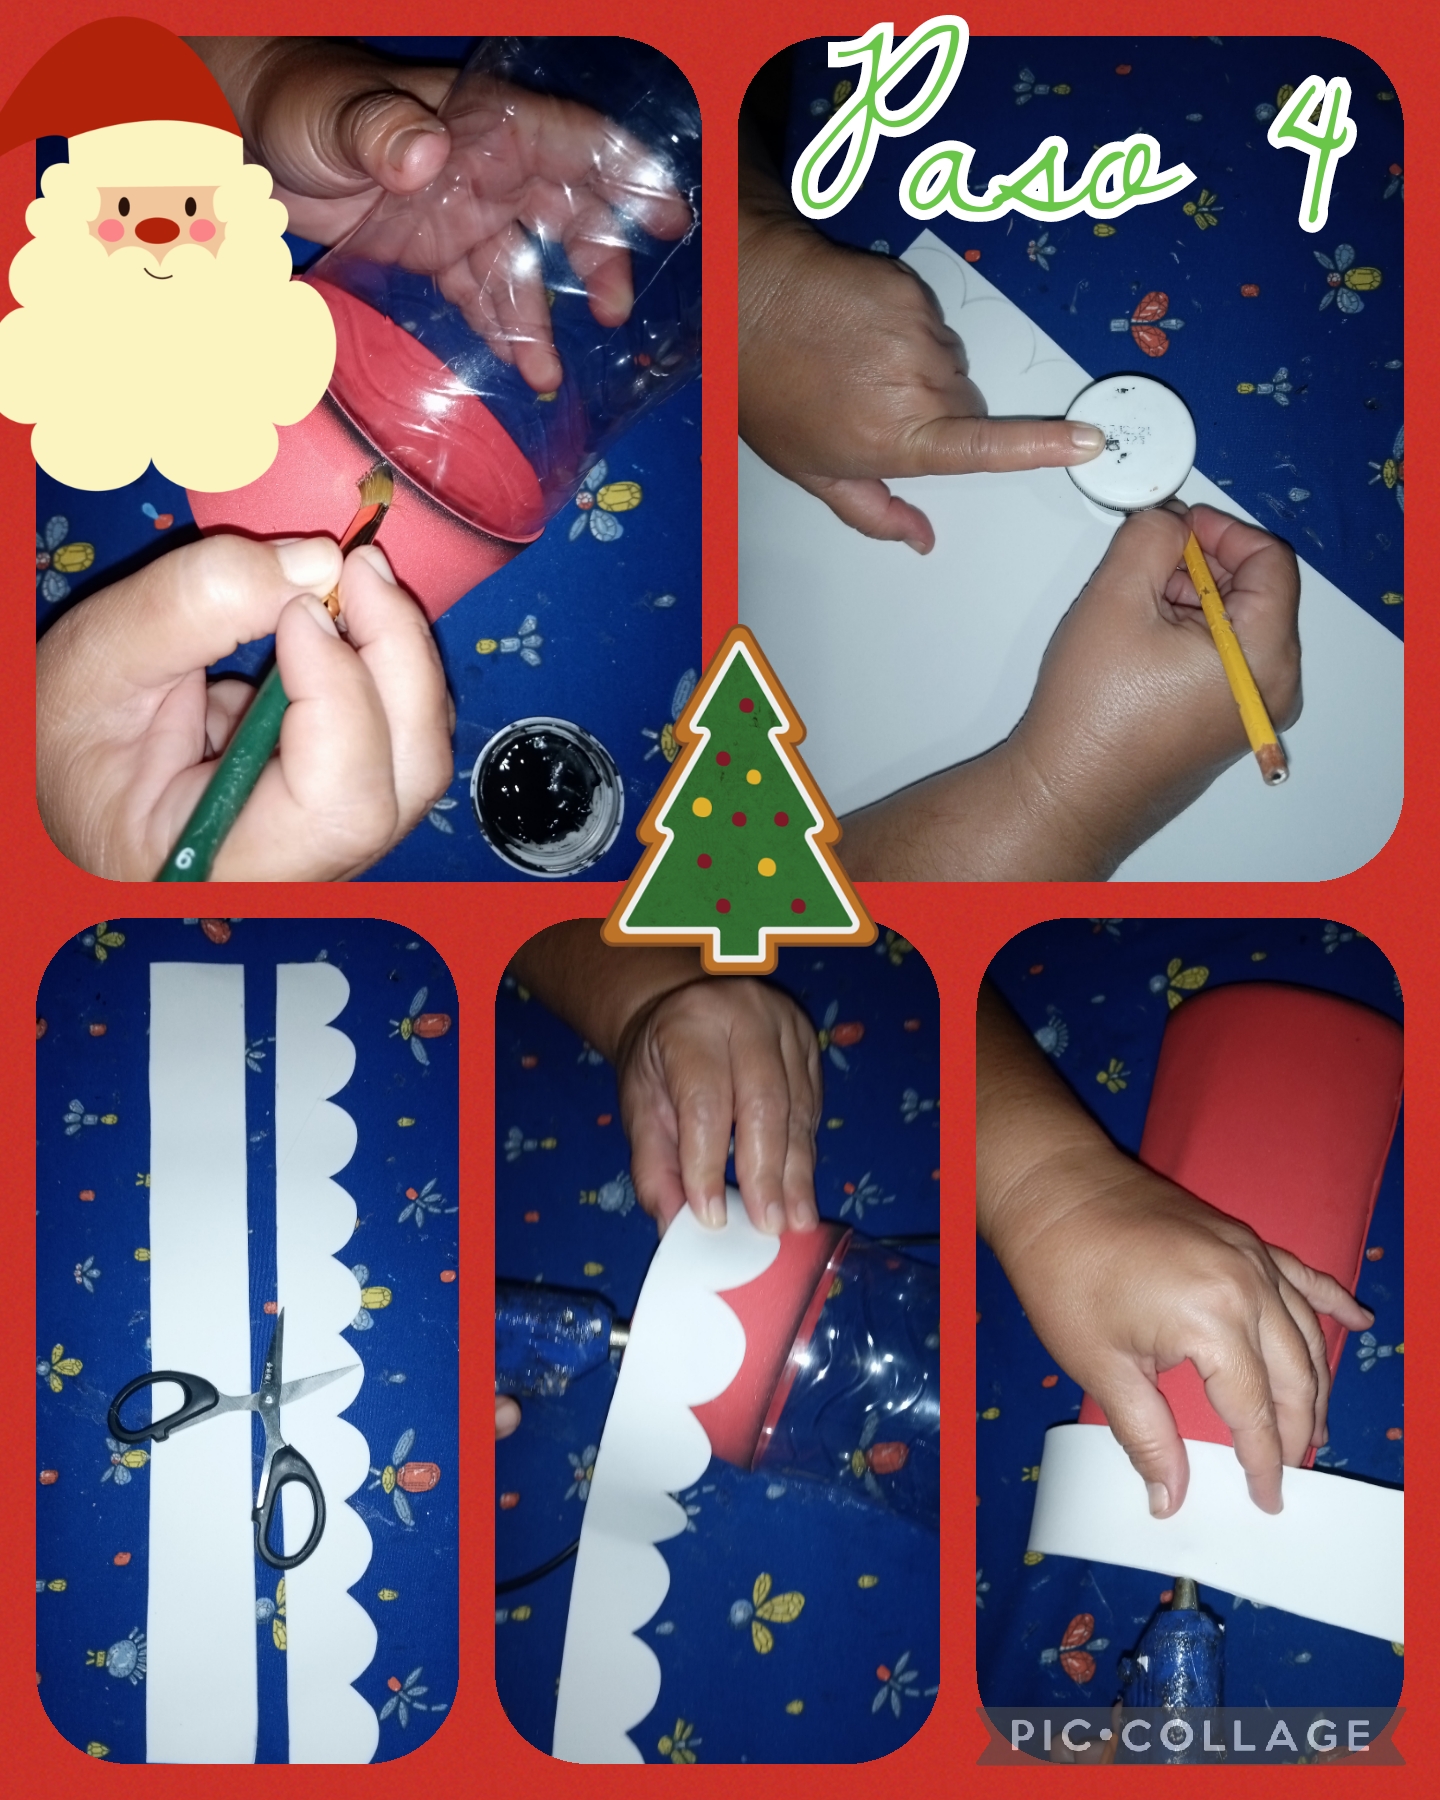
Step 4. Now with an angular brush and cold black paint, we are going to blur the edges, in this way we wet the tip of the angular brush in water, we unload it on a cloth and then we wet it in the cold paint and Finally, we rub it on the edge of the pieces and it is nuanced, then we take another white foami with a soft texture, we mark waves and we also cut a thick strip 5 centimeters wide, with hot silicone we glue the wavy ones in the lower part and the straight strip on top of dispenser cap, see pictures.
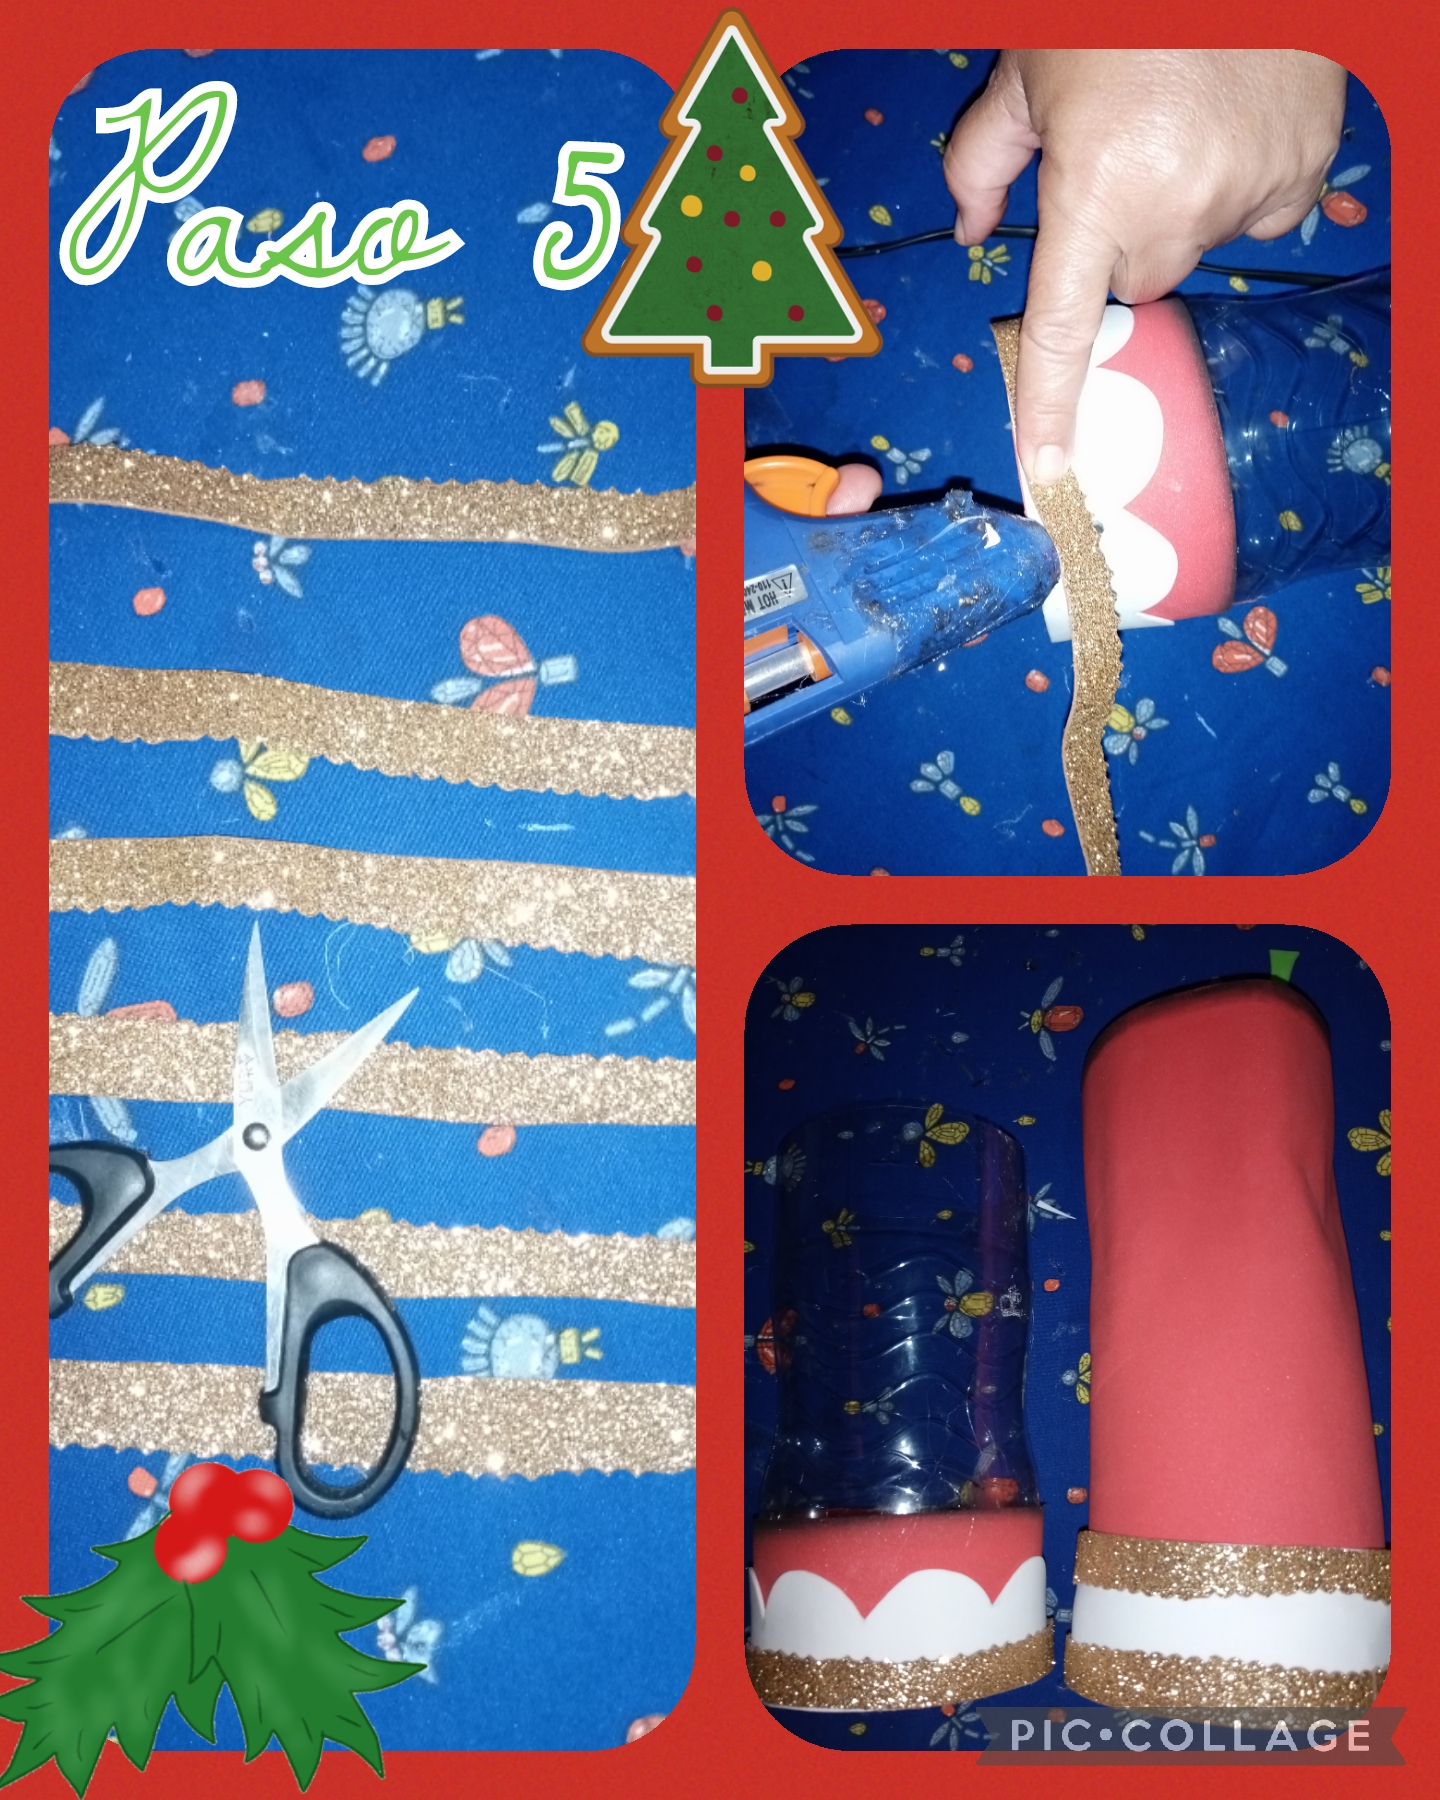
Step 5. In this step we cut wavy strips 2 centimeters wide to decorate the dispenser at the top of the lid and at the bottom and that's how it will look, see the images.
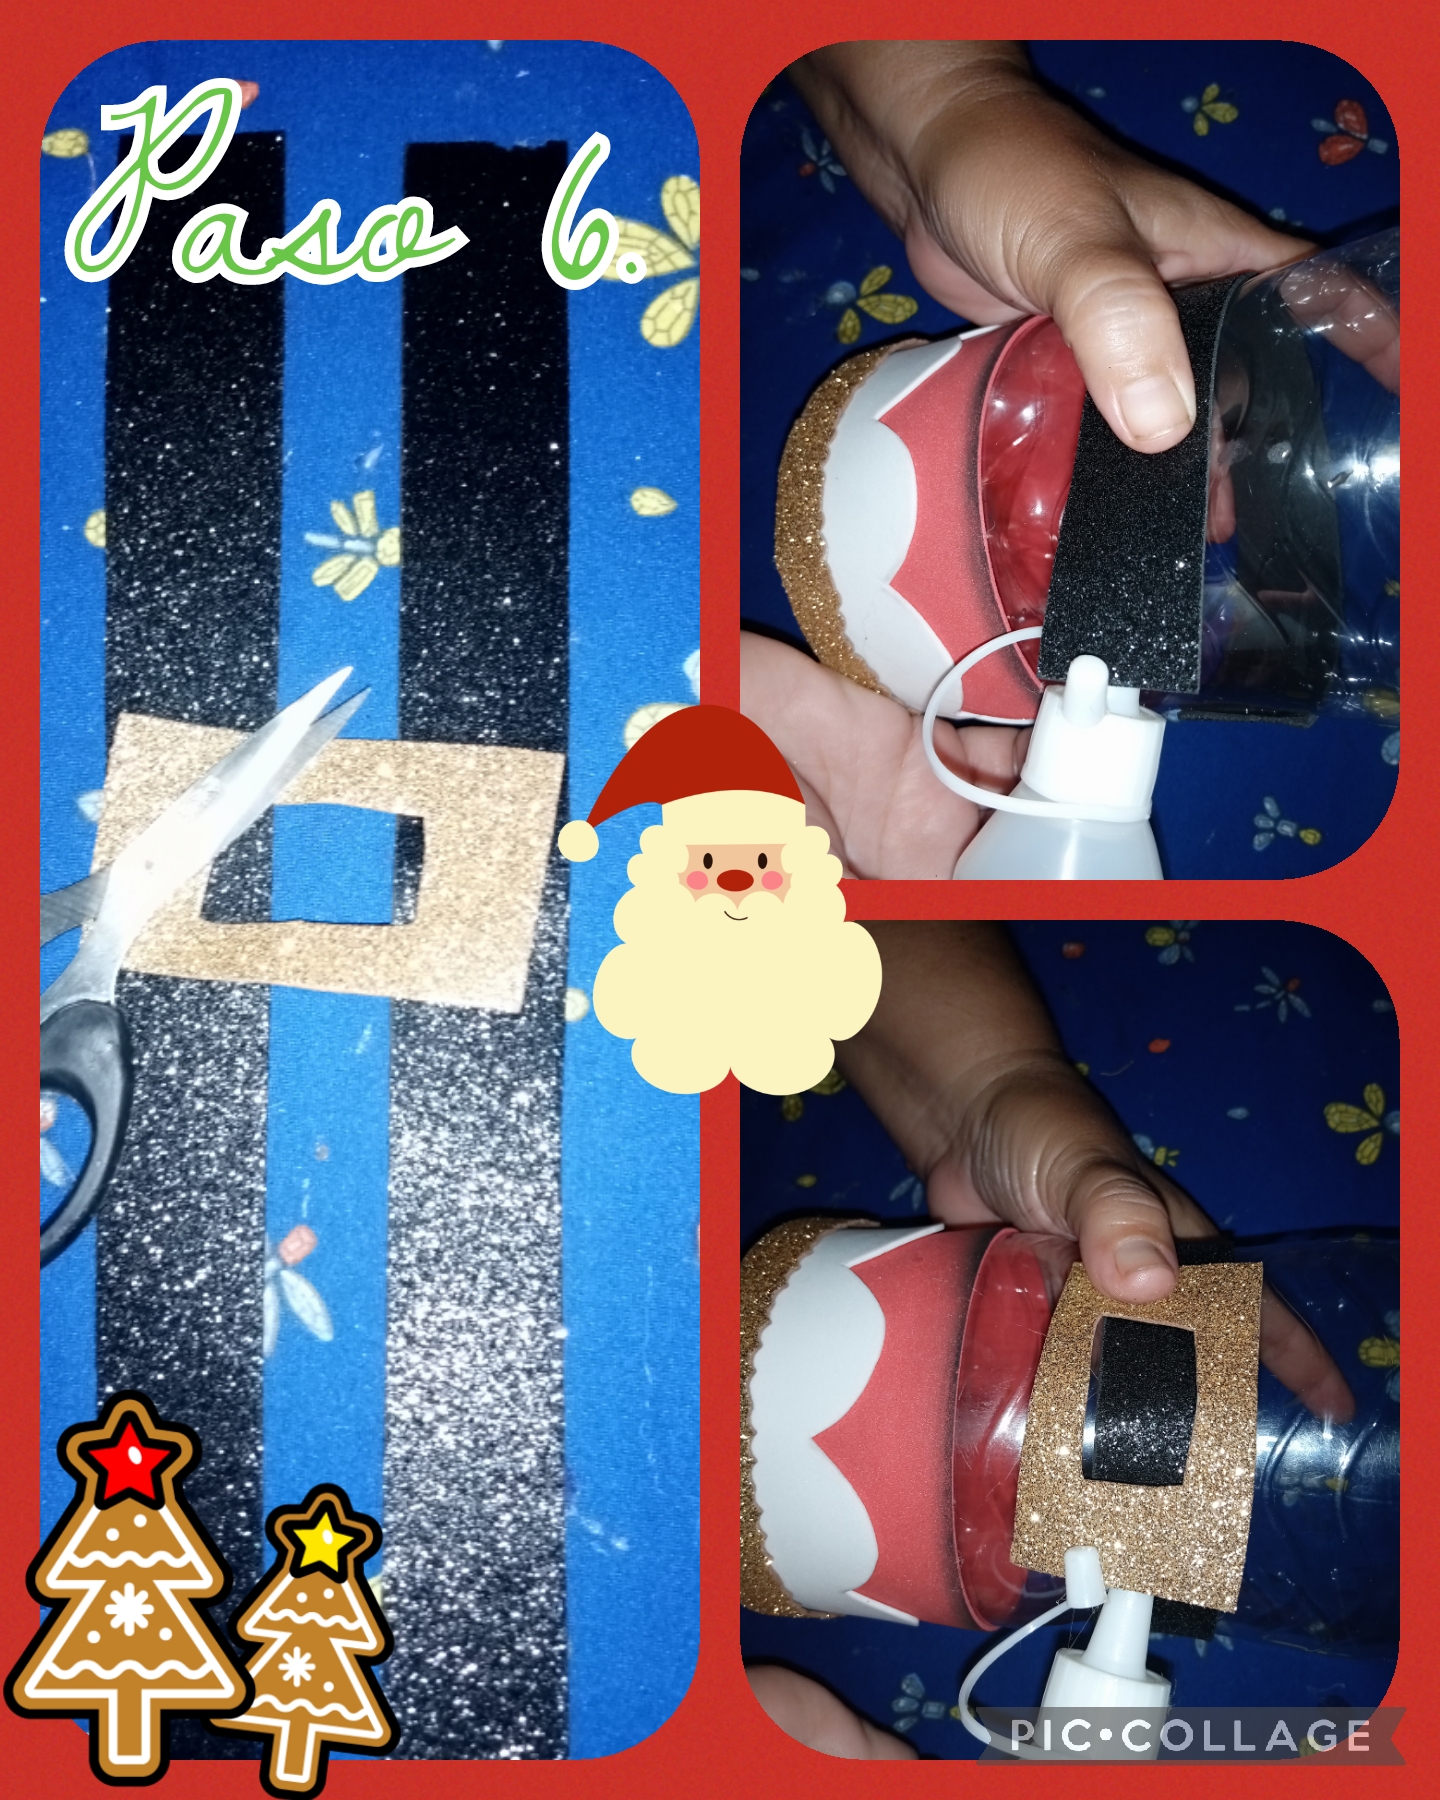
Step 6. We are going to continue marking and cutting, now we are going to mark and cut strips of diamond foami, black and gold, this will help us to stick it in the center of the dispenser as the strap with the Santa Claus buckle , we are going to stick it with liquid silicone, because with hot silicone the plastic of the bottle that we use for the dispenser melts, I show you the images so that you can see how our dispenser looks.
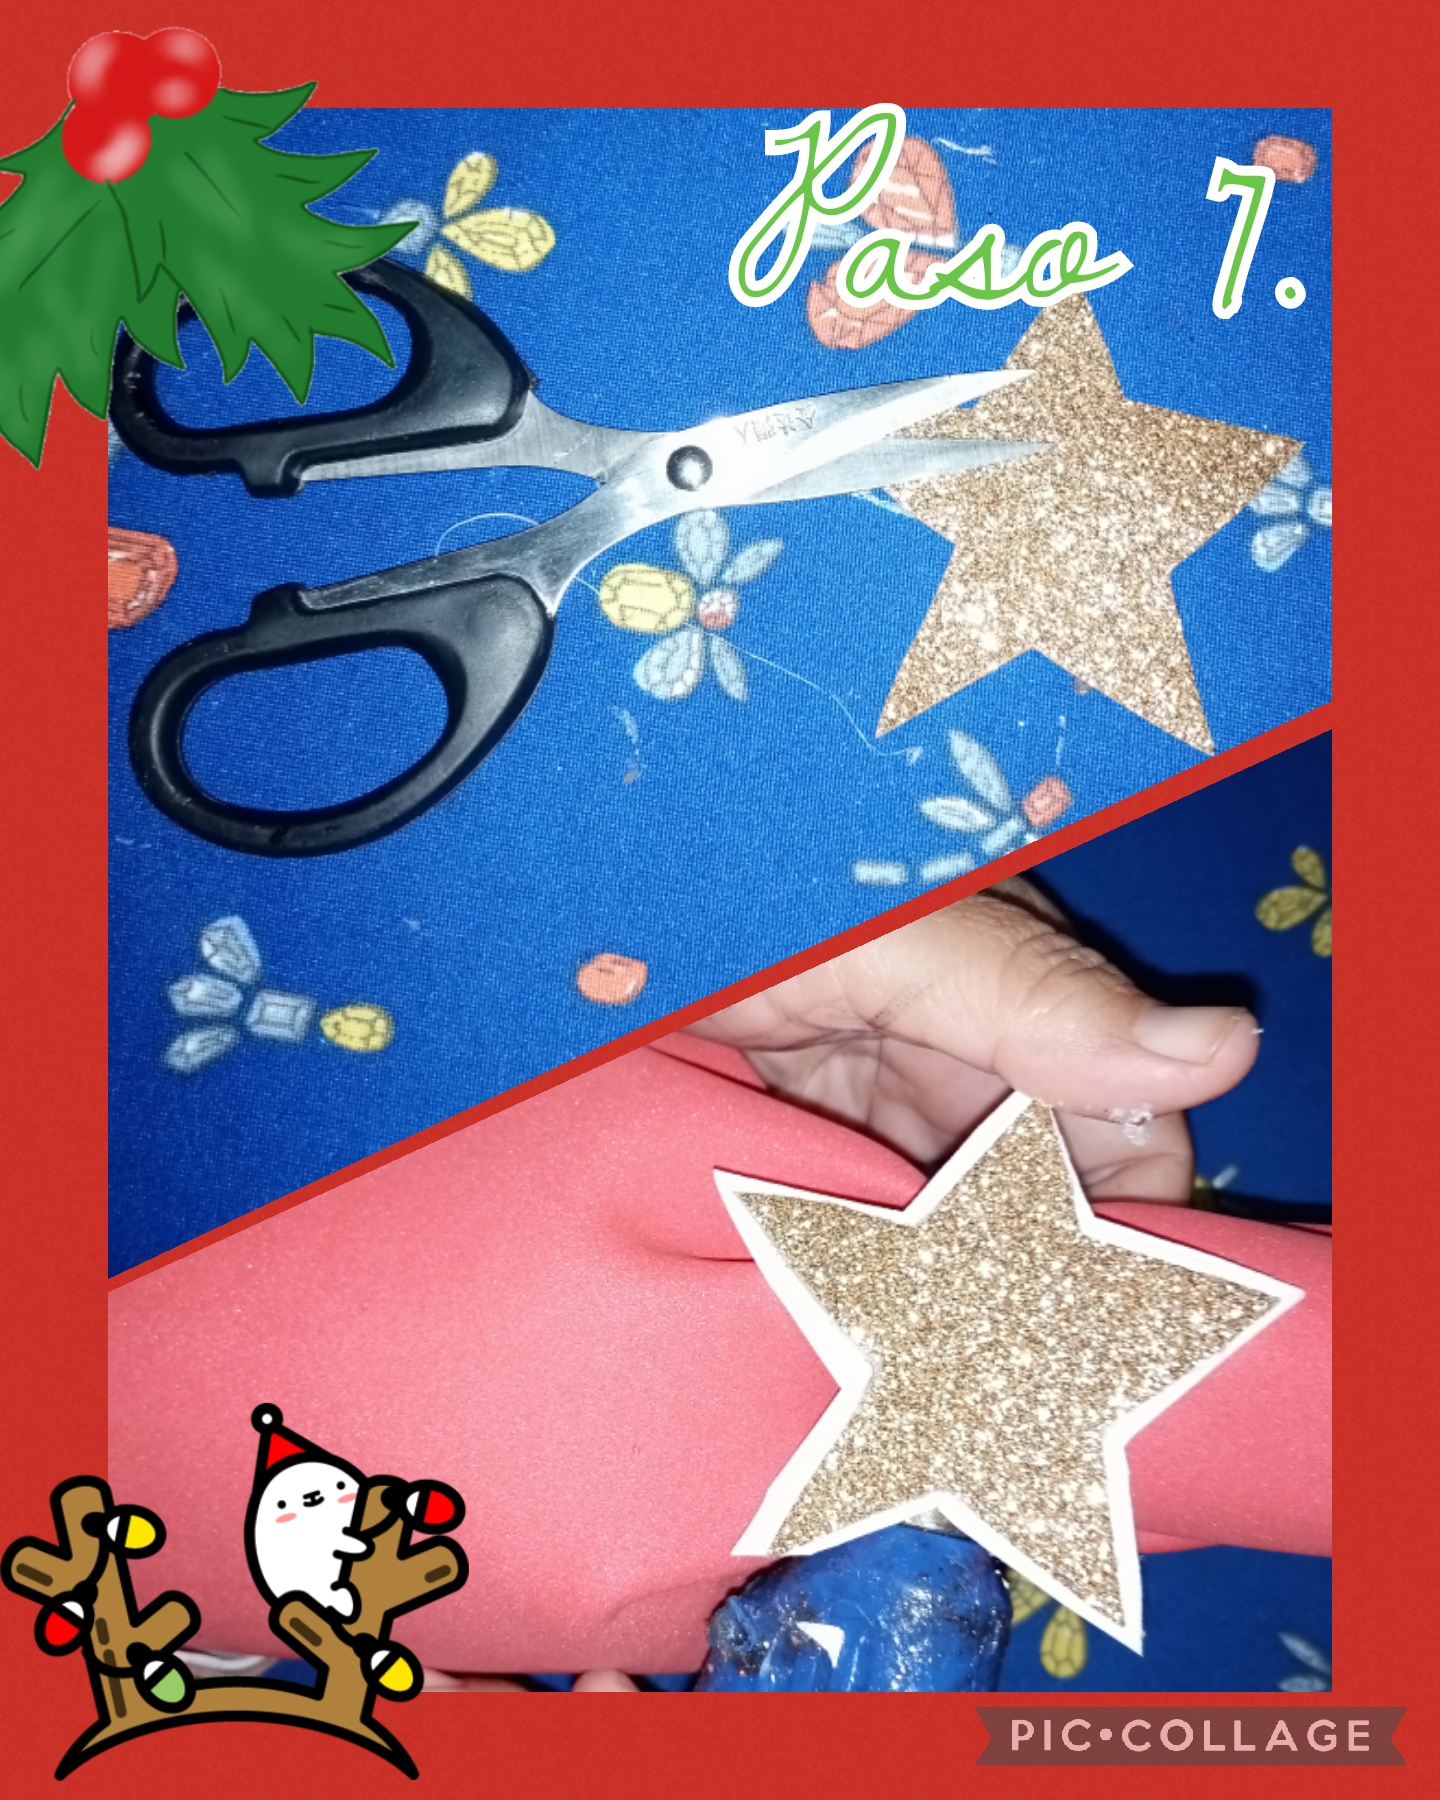
Step 7. To make a star we are going to use diamond foami, gold color and white foami with a smooth texture, we mark and cut out the star and then with hot silicone we glue it on top of the white foami and cut it along the edge leaving half centimeter away as relief and finally we stick it with hot silicone on the top of the dispenser lid, see the images.
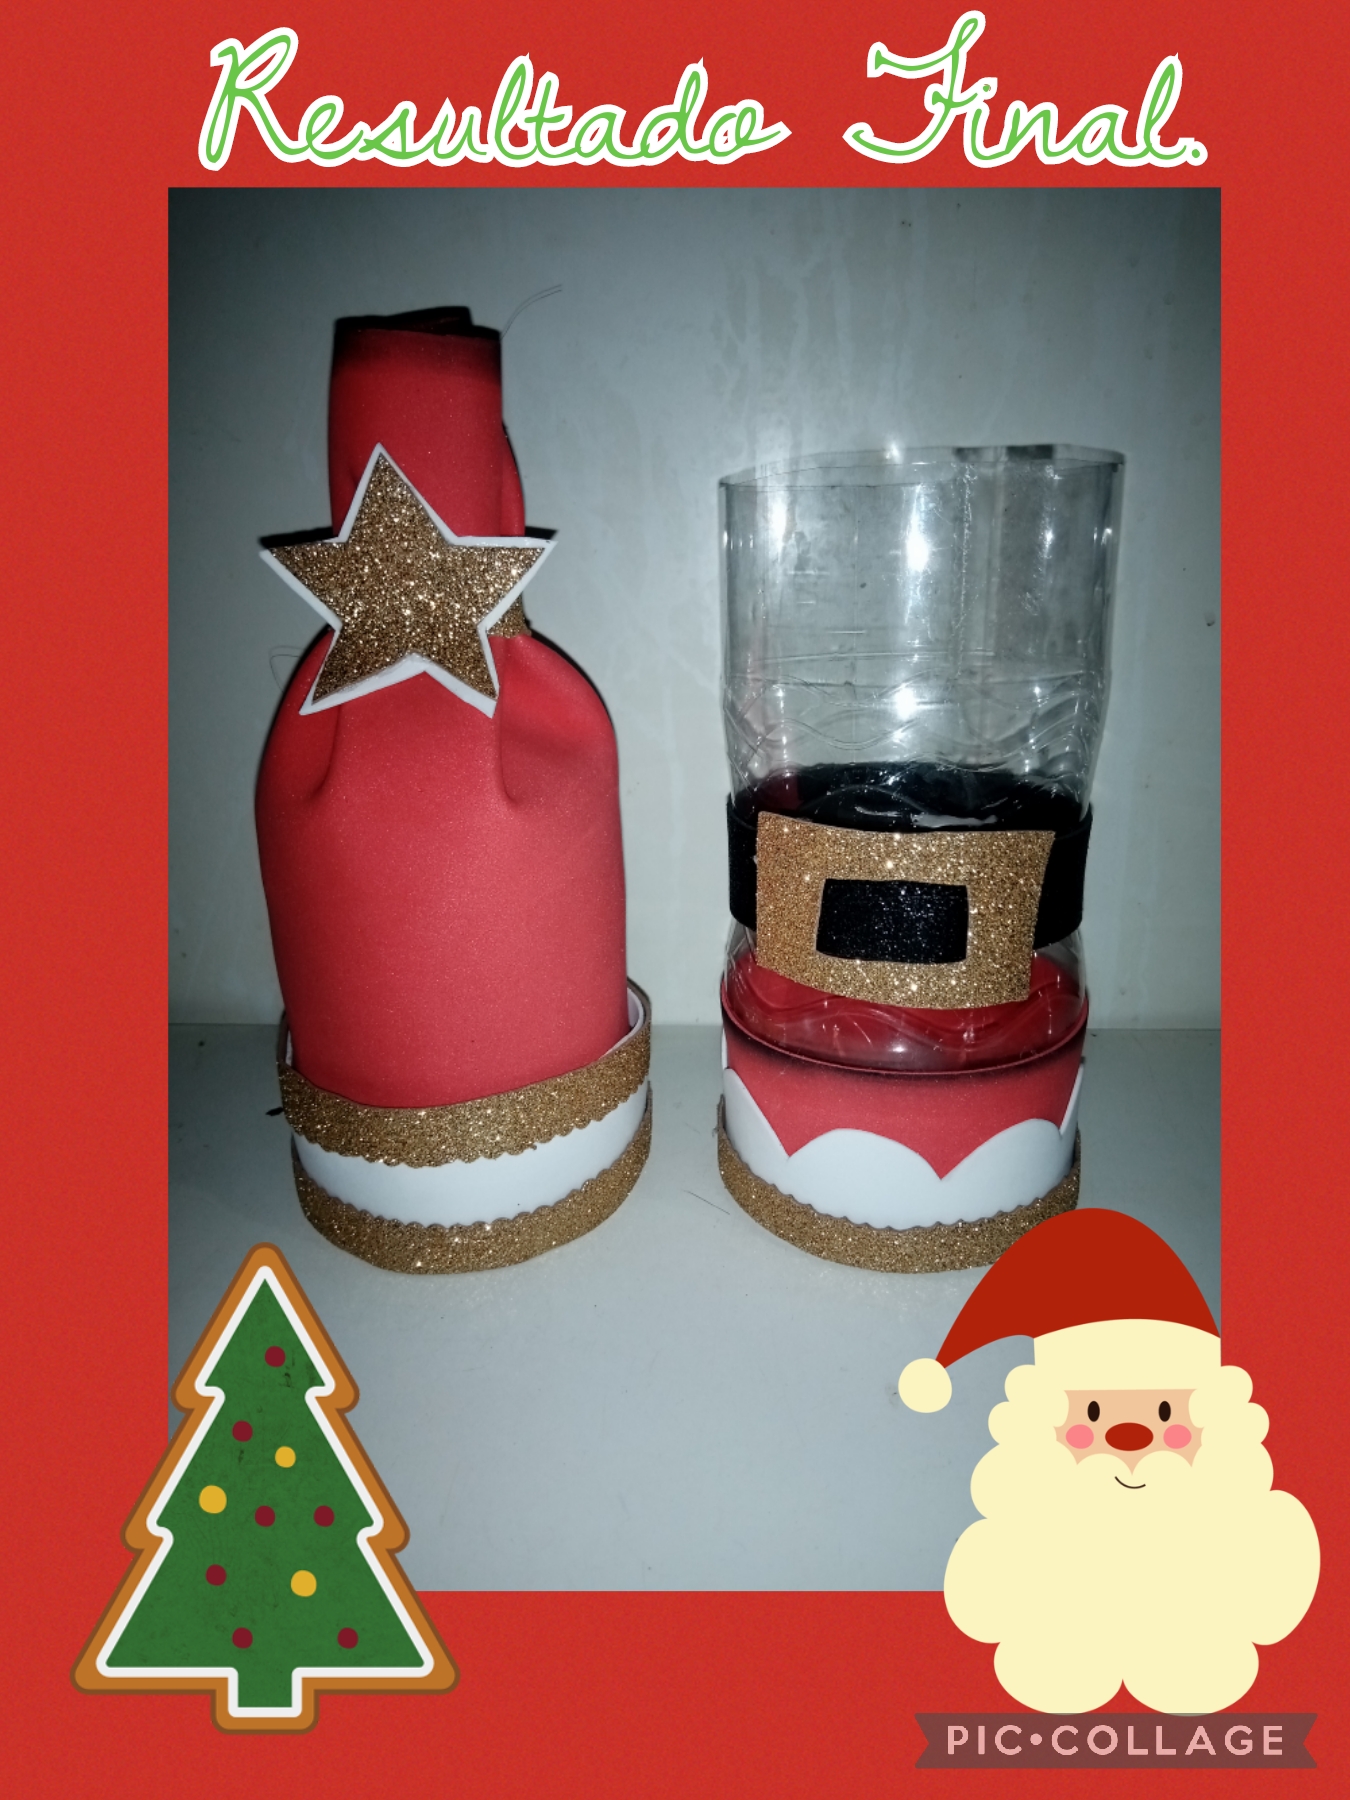
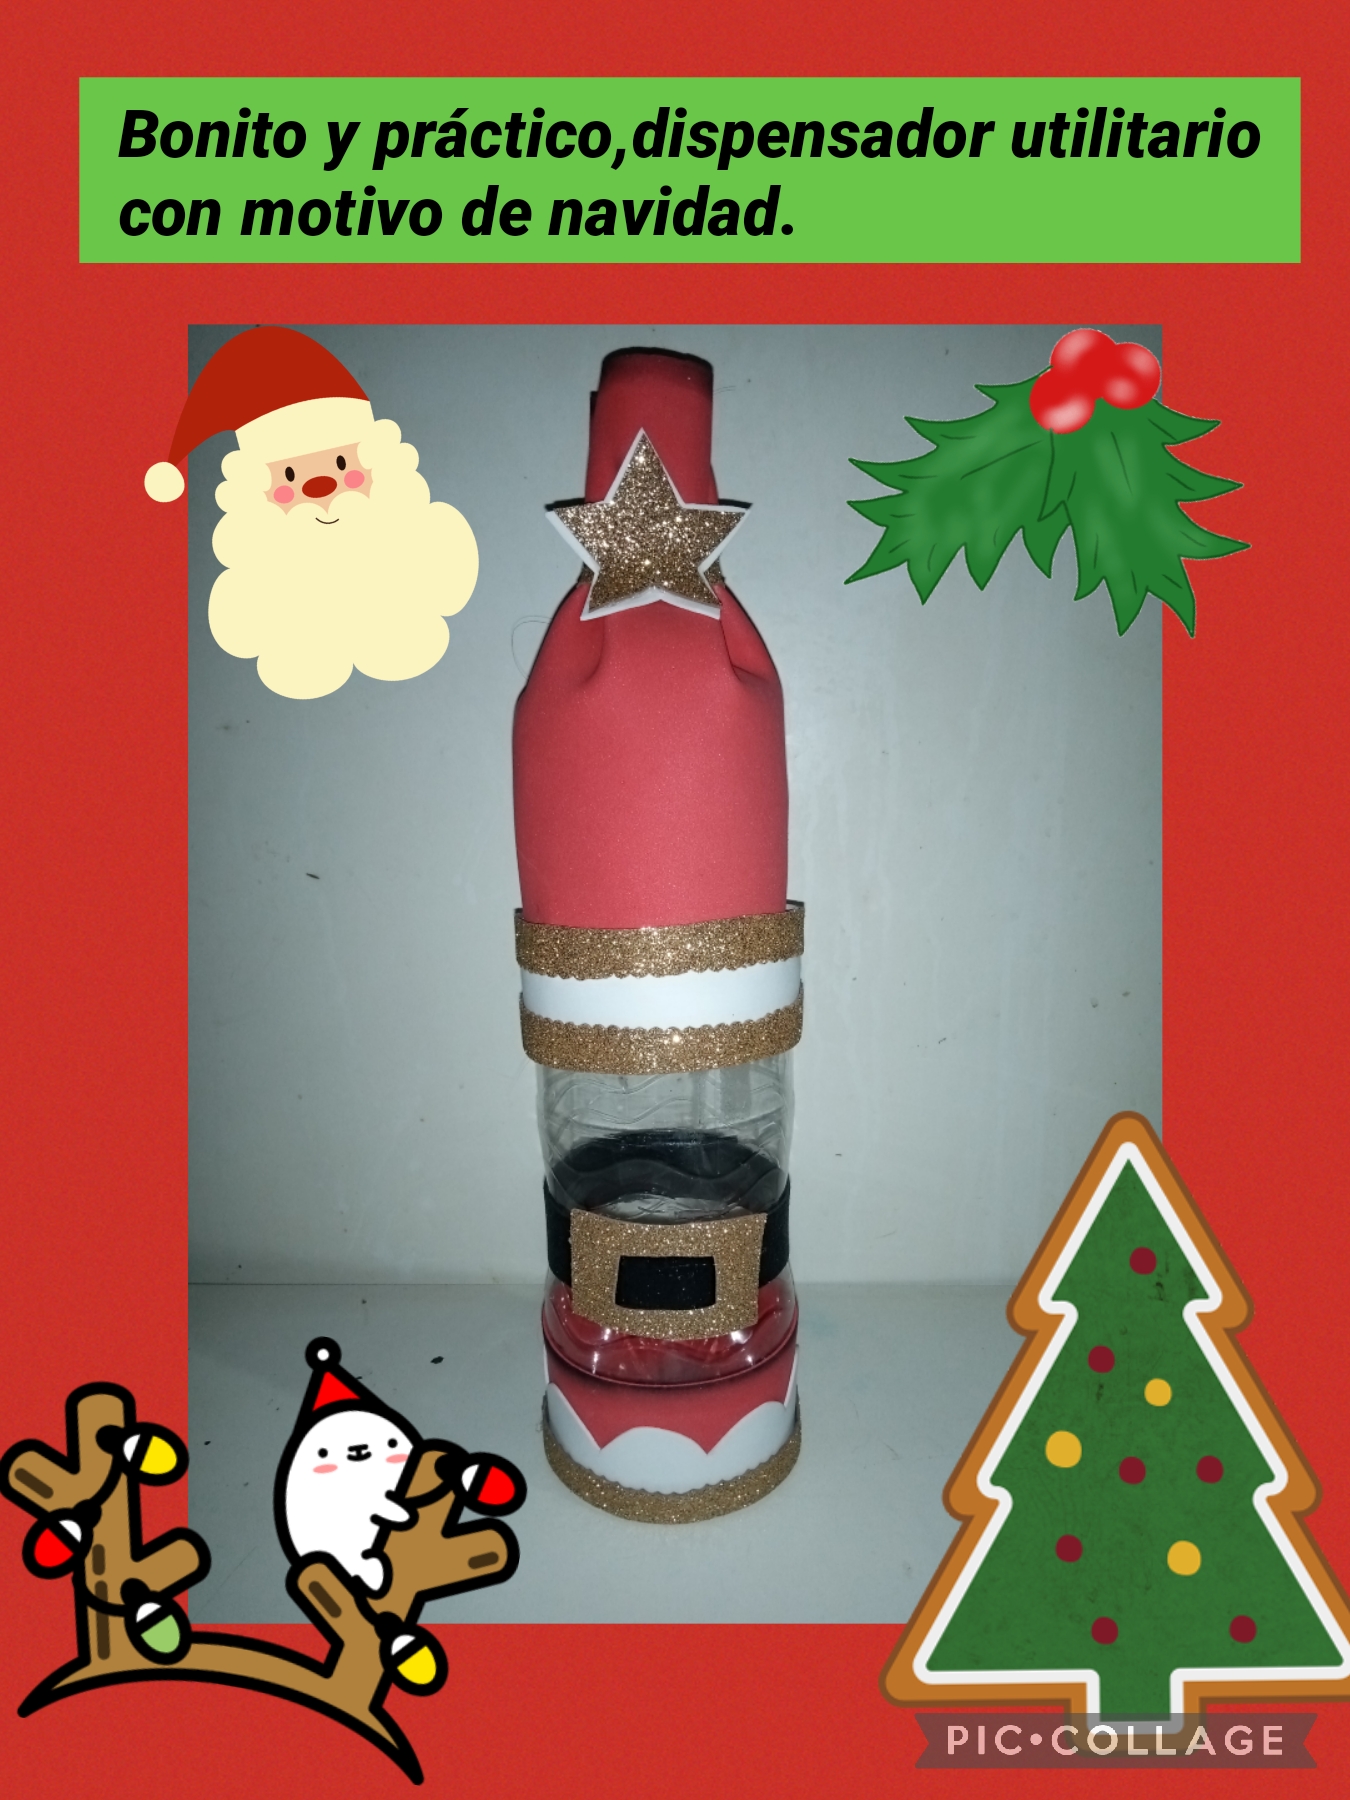
We have reached the end of all the steps, and the final result has been this beautiful, practical and very simple utilitarian dispenser, with Santa Claus Christmas motif, ideal for storing or storing whatever you want, thanks for visiting my blog and reading to the end, see you very soon with another creative idea, have a good afternoon, God bless you all.
Las fotos fueron tomadas con mi telefono Tecno Spark 6go, y editadas con la aplicacion Pic-Collage, y el contenido fue es traducido con google ingles-español.
The photos were taken with my Tecno Spark 6go cell phone, and edited with the Pic-Collage application, and the content was translated with Google English-Spanish.
No solo he disfrutado leer tu post y ver en fotografías cada paso bien detallado, sino que me has motivado a comenzar las decoraciones navideñas de este año. Ya que económicamente será una navidad medio fuerte siempre es bueno dejarse llevar por la creatividad de las herramientas que tenemos en casa. Muchas gracias por compartir, me encantó todo. Hay mucha belleza en lo más simple...
Congratulations @cruzjimenez01! You have completed the following achievement on the Hive blockchain and have been rewarded with new badge(s):
Your next target is to reach 20000 upvotes.
You can view your badges on your board and compare yourself to others in the Ranking
If you no longer want to receive notifications, reply to this comment with the word
STOPSupport the HiveBuzz project. Vote for our proposal!
Muy útil y práctico para guardar objetos, está muy lindo el motivo, me encanta que usaras materiales de reciclaje 😃
Hi @cruzjimenez01
Do you know you could have used #diy tag for this post to earn some BUIDL tokens in addition to Hive crypto?
In case you are not aware, read this post to know the types of content, among others, you could post using #diy tag.
You could also use the #diy tag when you share content showcasing your DIY skills.
When you use #diy tag your posts will also appear on https://built-it.io website, giving you wider exposure.
Because most people are not aware of the potential of BUIDL token, it can still be bought at very cheap price now.
If you are selling any diy products, then you can also use #forsale tag to earn LIST tokens. You can use #forsale tag, regardless of where plyou are selling the products, be it on https:hivelist.store or elsewhere.
Hope that helps.