Hello everyone... 🌺✨
Hello to my dear Hivers and the dear community of artists #HiveDiy, as always very pleased and excited to be here again, showing you my work made with love and especially for you.
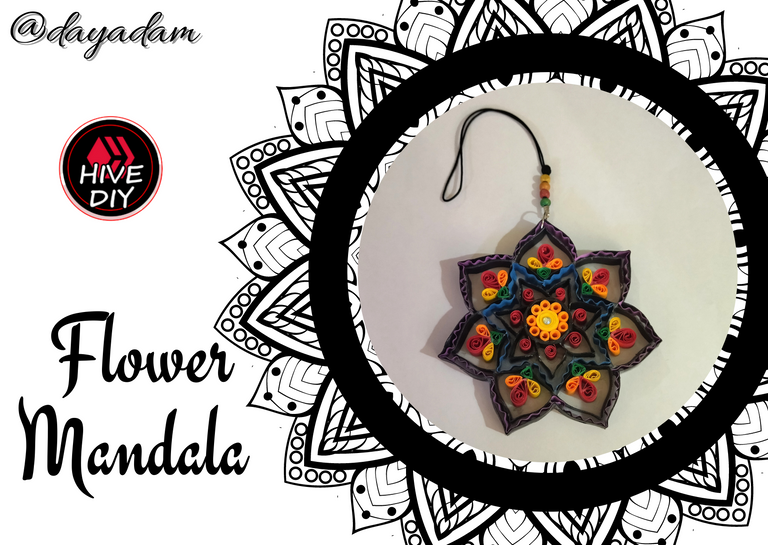
Today I bring you a flower mandala that I made in the quilling technique, merging various figures to decorate it.
For those who know my work with the quilling technique, you know that every day I want to challenge myself, learn more, to offer a variety of styles and figures, although I have characterized and focused on the part of jewelry with quilling, which is not so common, it is a very versatile technique in which you can create everything unimaginable, and which I have taken much love, because it relaxes me at any time, even in the most difficult situation that may be happening in my life.
Without further ado, I leave you my creative process, hoping you like it, enjoy it and get inspired to carry out this style of work, which is very beautiful and relaxing.
Let's begin:😃

Hola a todos... 🌺✨
Hola a mis queridos Hivers y a la querida comunidad de artistas #HiveDiy, como siempre muy complacida y emocionada de encontrarme por acá nuevamente, mostrándole mi trabajo hecho con mucho amor y especialmente para ustedes.
Para hoy les traigo una mándala tipo flor que realice en la técnica de quilling, fusionando diversas figuras para decorarla.
Para los que conocen mi trabajo con la técnica de quilling, saben que cada día deseo retarme, aprender más, para ofrecerles variedad de estilos y figuras, aunque me he caracterizado y enfocado en la parte de bisutería con quilling, cosa que no es tan común, es una técnica muy versátil en la que se puede crear todo lo inimaginable, y a la cual le he tomado mucho amor, ya que me relaja en cualquier momento, hasta en la situación más difícil que pueda estar sucediendo en mi vida.
Sin más preámbulos les dejo mi proceso, creativo esperando que les guste, lo disfruten y se inspiren en llevar a cabo este estilo de trabajos, que son muy bonitos y relajantes.
Comencemos:😃

• Cintas de quilling de 9mm de ancho colores variados de tu preferencia.
• Hoja blanca.
• Lápiz.
• Trozo de acetato.
• Cinta adhesiva
• Aguja para quilling.
• Palillo mondadientes.
• Regla con diversas medidas de circunferencia.
• Pega blanca extra fuerte (de carpintería).
• Tijera.
• Alfiler o aguja pinta gruesa.
• Argolla mediana de bisutería.
• Hilo chino fino negro.
• Tapa nudos de bisutería.
• Cristales o de bisutería.
• Perlas de madera.
• Pincel.
• Pinza punta fina.
- 9mm wide quilling ribbons in assorted colors of your choice.
- White sheet.
- Pencil.
- Piece of acetate.
- Adhesive tape
- Quilling needle.
- Toothpick toothpick.
- Ruler with different circumference measurements.
- Extra strong white glue (carpentry glue).
- Scissors.
- Pin or thick pintle needle.
- Medium size costume jewelry ring.
- Thin black Chinese thread.
- Jewelry knot cover.
- Crystals or costume jewelry.
- Wooden beads.
- Brush.
- Fine tip tweezers.

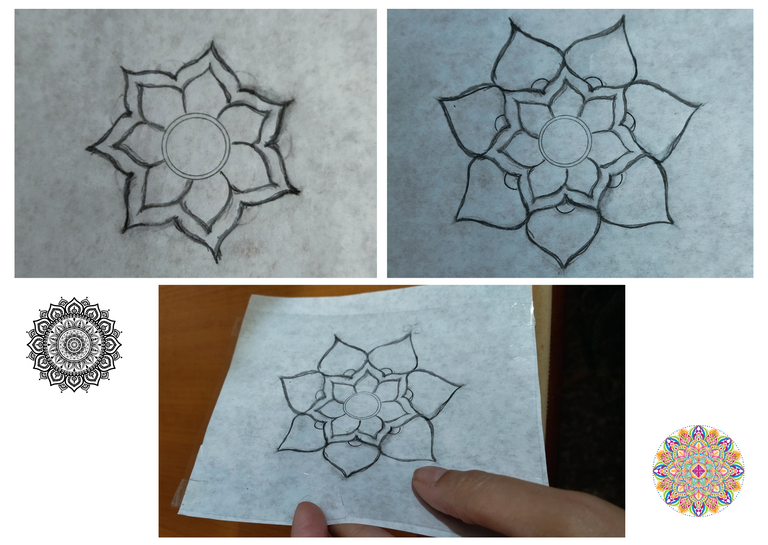
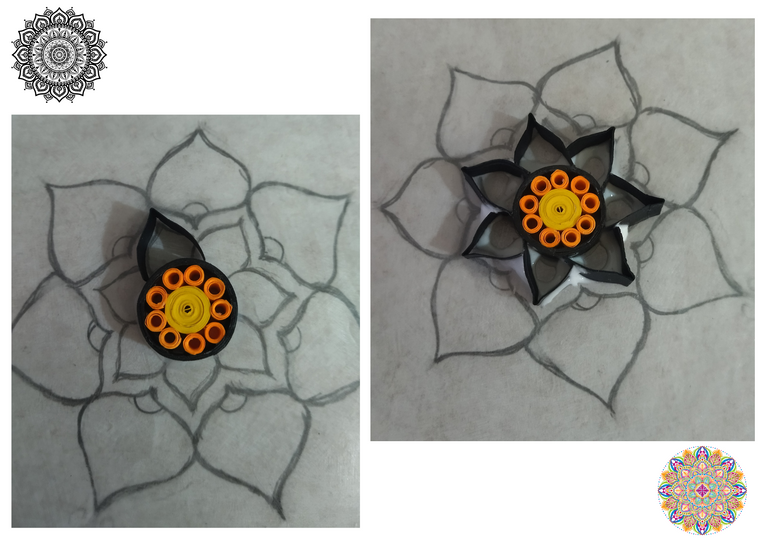
- Let's start by taking a white sheet of paper, we will paint a sketch of the mandala we want to make the size of your preference, just let your imagination fly and create a model. Let's take into account that you can make a mandala with infinite figures, colors and shapes that you like. This is just a sketch, it doesn't have to be perfect, it's just to guide you, then you can add or remove figures, it's a matter of enjoying and creating.
- When I finished my drawing, I proceeded to take a piece of transparent acetate, I used one from a folder that was already damaged, I placed my drawing on the bottom and put some tape on the sides so it does not move, this is only transitory.
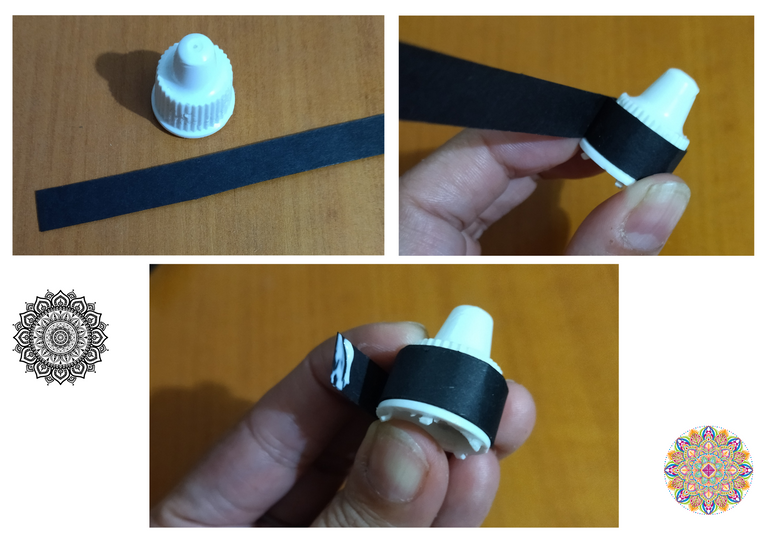
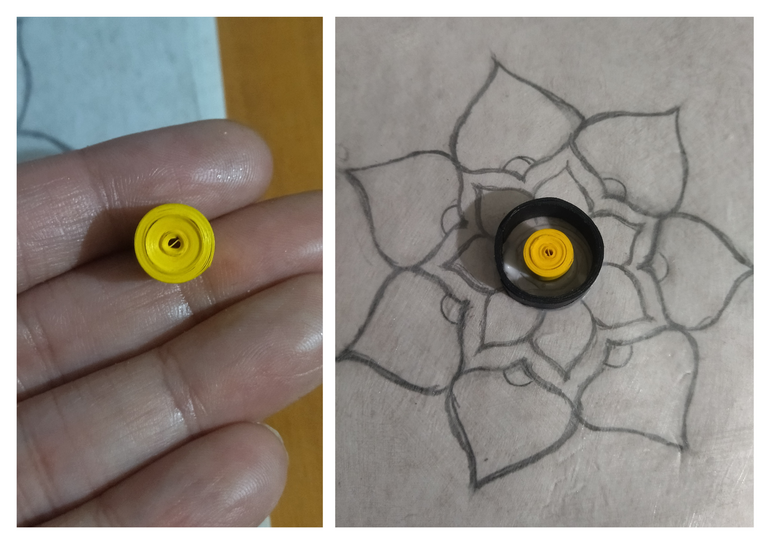
- Let's start making the central border of the mandala, I took 9mm wide quilling tape and wrapped it around a medicine cap that is about the same size as the circle of my sketch, when I finished with the tape I sealed it with extra strong white glue.
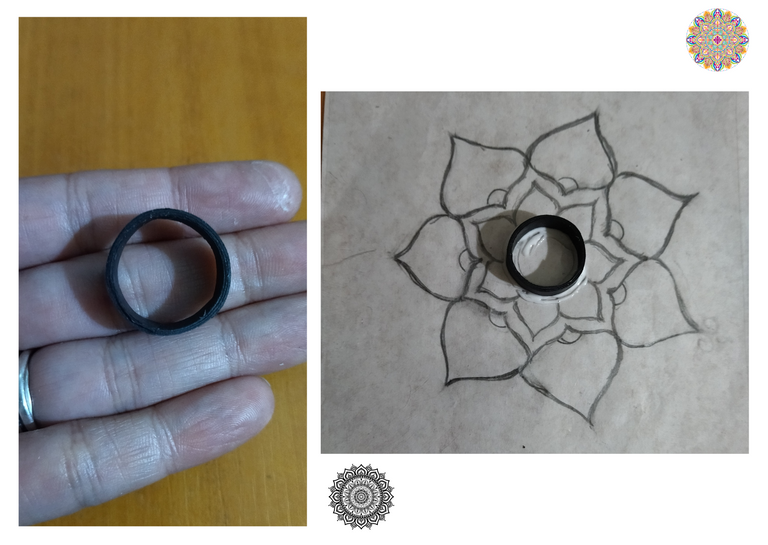
- Once the circle is ready, we will glue it to the acetate bordering it with extra strong white glue (carpentry glue)..

• Vamos a comenzar tomando una hoja de papel blanca, pintaremos un boceto de la mándala que queramos realizar del tamaño de tu preferencia, solo deja volar tu imaginación y crea un modelo. Tomemos en cuenta que una mándala la puedes realizar con infinidades de figuras, colores y formas que te gusten. Este simplemente es un boceto, no tiene que quedar perfecto solo es para guiarte, luego puedes añadir figuras o quitar, es cuestión de disfrutar y crear.
• Al terminar mi dibujo, procedí a tomar un trozo de acetato transparente, use uno de una carpeta que ya estaba estropeada, coloque mi dibujo en la parte de abajo y coloque un poco de cinta adhesiva a los lados para que no se mueva, esto es solo transitorio.
• Comencemos realizando el borde central de la mándala, tome cinta de quilling de 9mm de ancho y la enrolle alrededor de una tapita de medicina que media aproximadamente lo mismo que el circulo de mi boceto, al terminar con la cinta selle con pega blanca extra fuerte.
• Al tener el circulo listo, pegaremos al acetato bordeando con pega blanca extra fuerte (de carpintería).
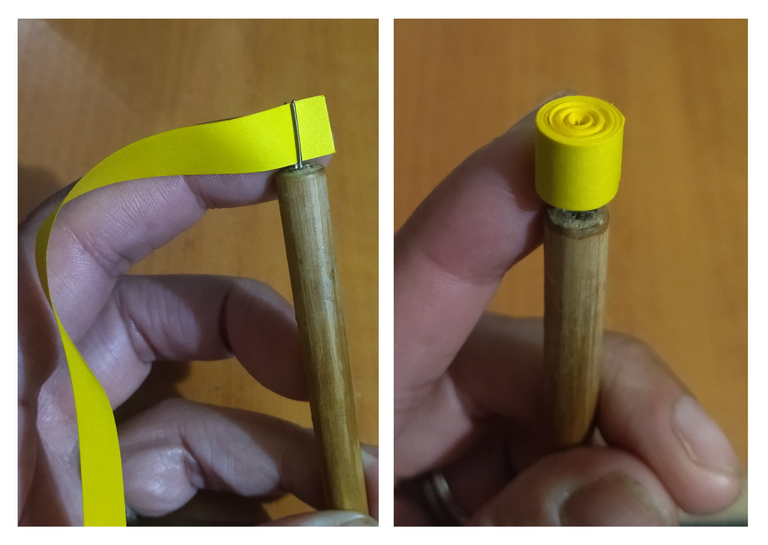
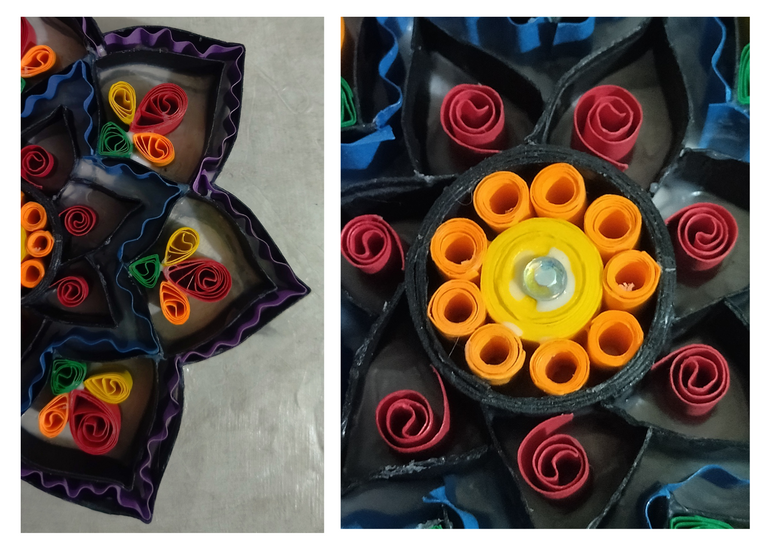
- Take a 9mm wide yellow quilling tape, roll it with the quilling needle and form a tight circle, this circle will be glued in the middle of the mandala.
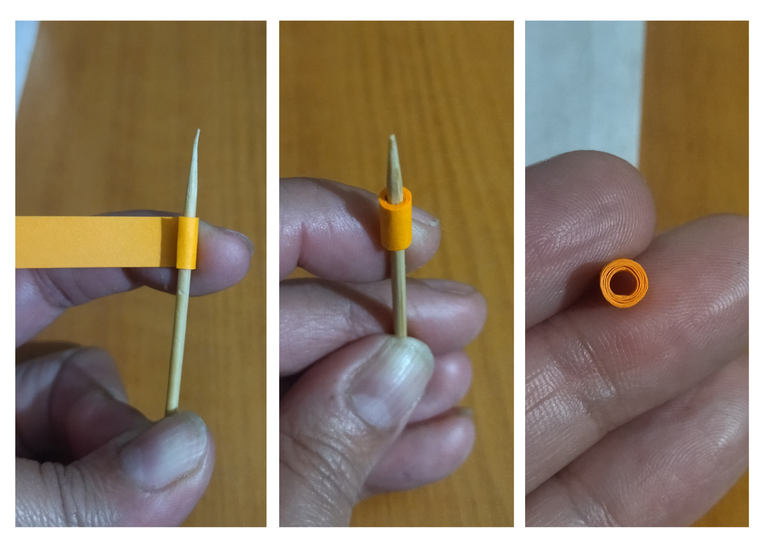
- Then with orange quilling tape we are going to form small hollow circles with the help of a toothpick, rolling it around the same. We are going to make the right amount to place around the yellow circle. At the end we place them in a harmonic way.
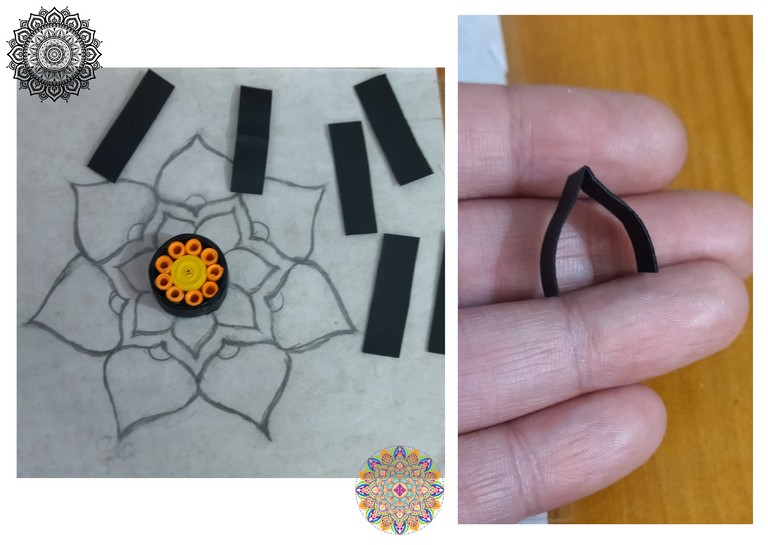
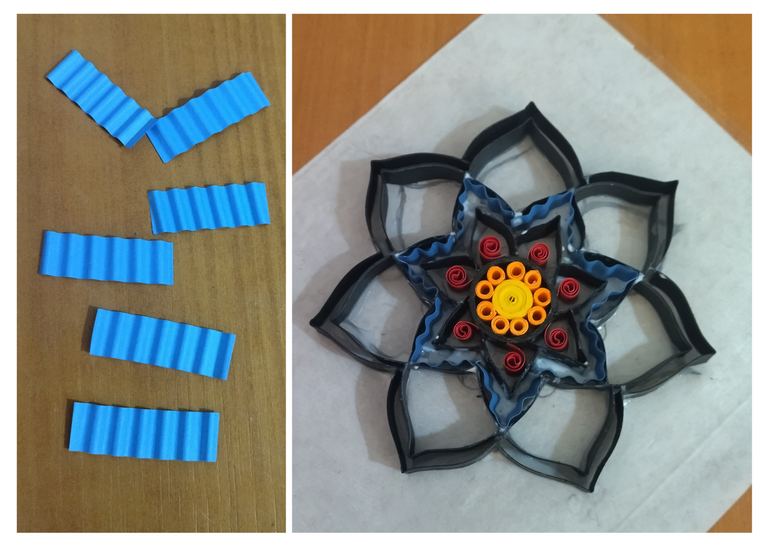
- With pieces of 9mm wide black ribbon I proceeded to border the shape of the first petals of the mandala.
• Tome una cinta para quilling de 9mm de ancho color amarillo enrolle con la aguja para quilling y forme un circulo apretado, este círculo lo pegare en el medio de la mándala.
• Luego con cinta de quilling color naranja vamos a formar pequeños círculos huecos con la ayuda de un palillo mondadientes, enrollándola alrededor del mismo. Vamos a realizar la cantidad adecuada para colocar alrededor del circulo amarillo. Al culminar los colocamos de manera armónica.
• Con trozos de cinta negra de 9mm ancho procedí a bordear la forma de los primeros pétalos de la mándala.

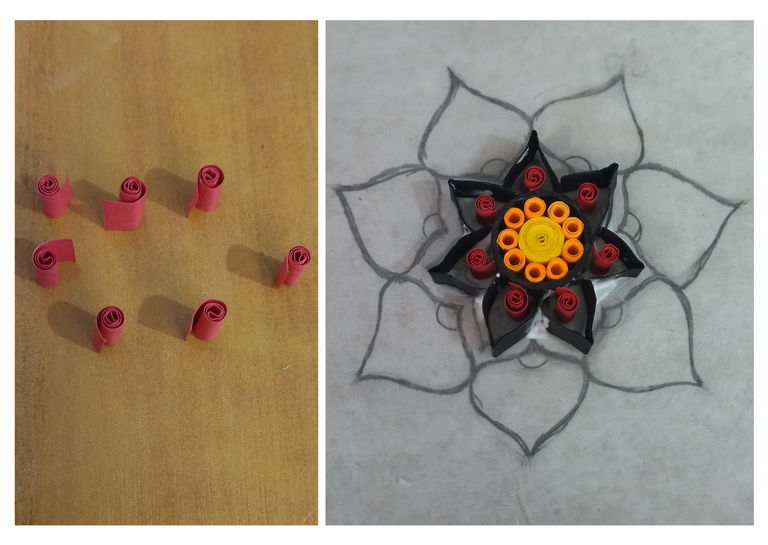
- Take small pieces of 9mm wide red ribbon and roll them with the quilling needle at the tip to make small spiral-like circles, and place them as decoration in the middle of the first petals.
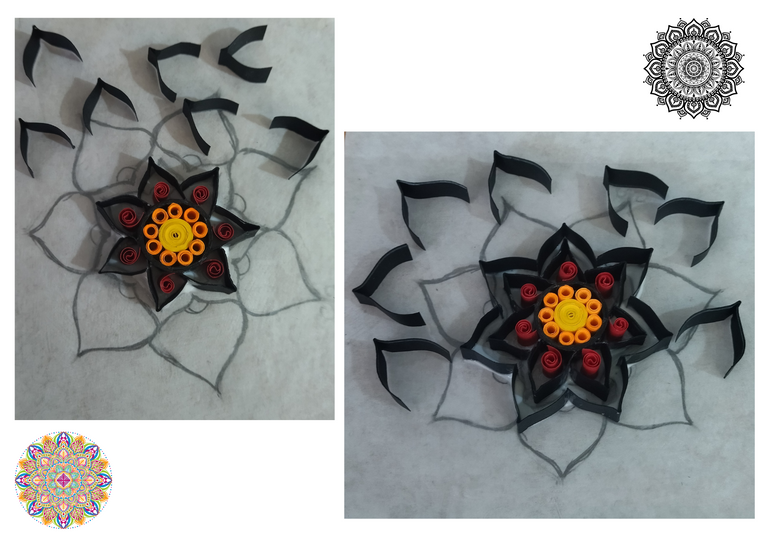
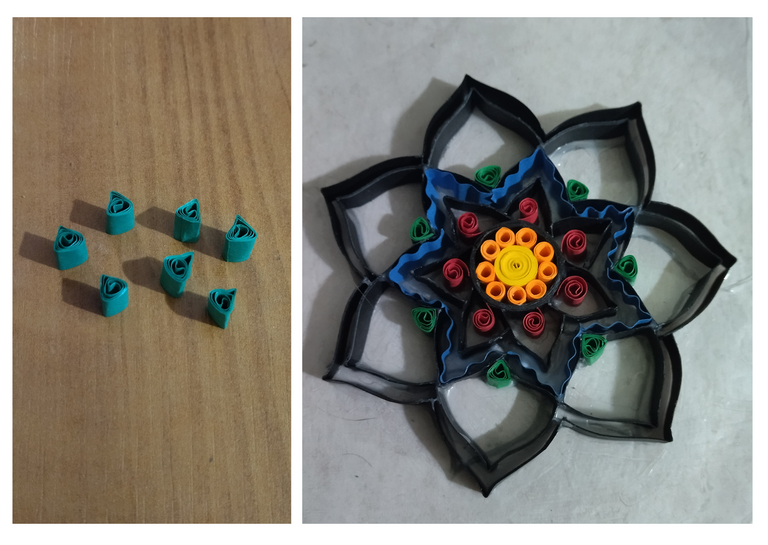
- I will continue bordering with 9mm wide black ribbon the second and third row of petals, along the way I wanted to add a fourth border of petals.
As I pointed out at the beginning I made a sketch to guide me, but it's just a matter of letting our imagination run wild and keep adding what we want to our creations.
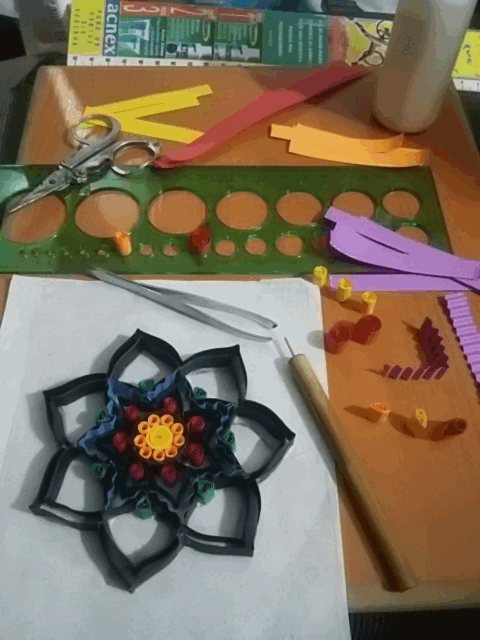
If you want some ideas on how to fill any mold or figure you want to make, here is a link of a post I made where you will get in more detail, how to make several basic quilling figures..
• Tome trocitos de cinta roja de 9mm de ancho enrolle con la aguja para quilling la punta para realizar unos pequeños círculos tipo espiral, y los coloque como decoración en medio de los primeros pétalos.
• Seguiré bordeando con cinta negra de 9mm de ancho la segunda y tercera hilera de pétalos, en el trayecto quise agregar un cuarto bordeado de pétalos.
Como les señale al principio realice un boceto para guiarme, pero solo es cuestión de dejar volar la imaginación y seguir agregando lo que deseamos a nuestras creaciones.
Si quieres algunas ideas de como rellenar cualquier molde o figura que desees realizar, por acá te dejo un link de un post que elabore donde conseguirás con más detalle, como hacer diversas figuras básicas de quilling.
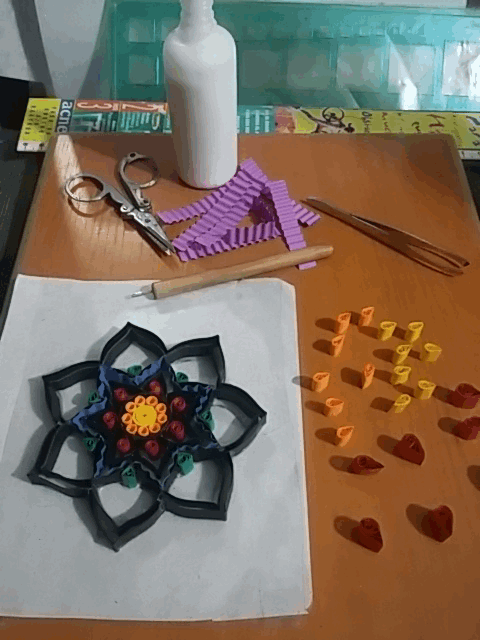
- Now let's finish filling and embellishing our mandala with some details, I took pieces of blue ribbon 9mm wide and passed them through a machine that I have for corrugating paper and filled one of the lines that I bordered in the shape of a petal.
- With 9mm wide green ribbons I proceeded to make some triangle shapes, with them I added another decoration.
• Ahora vamos a terminar de rellenar y embellecer nuestra mándala con algunos detalles, tome trozos de cinta azul de 9mm de ancho los pase por una máquina que dispongo para corrugar papel y rellene una de las líneas que bordee en forma de pétalo.
• Con cintas de color verde de 9mm de ancho procedí a realizar algunas figuras en forma de triángulos, con ellas añadí otra decoración.
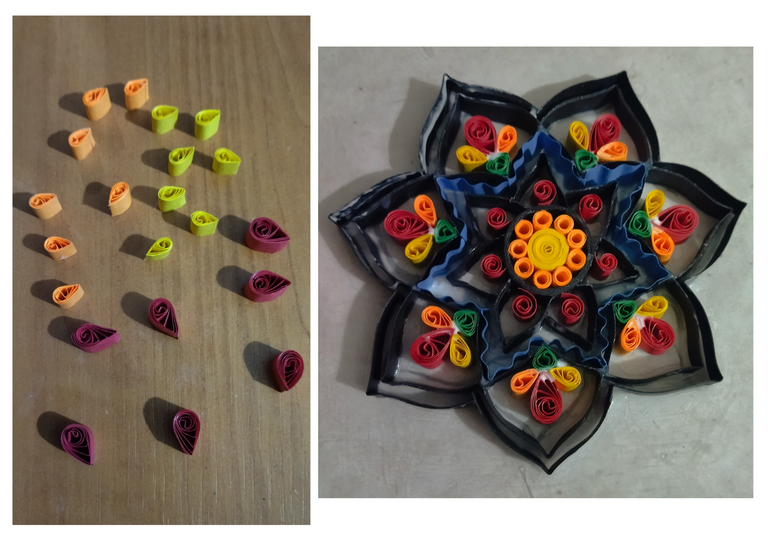
- Then with pieces of yellow, orange and red ribbons, I made diamond shapes of various sizes, which I incorporated into my mandala.
- To complement the filling, I ran purple ribbons through the corrugator and added them to the last border of my mandala.
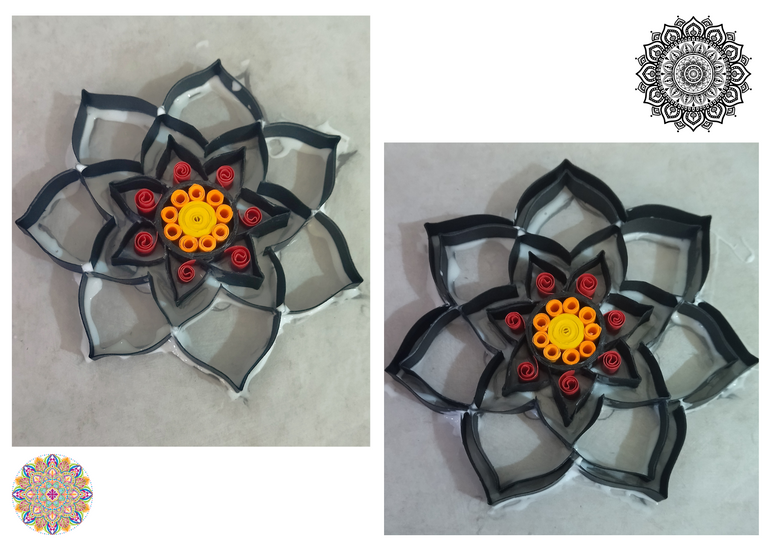
- For highlighting I added a crystal to the middle piece.
- Remove the sheet with the sketch that I had placed on the back, and proceeded to cut the acetate around the edges, the acetate can be removed, but I'm going to leave it to protect the piece more.
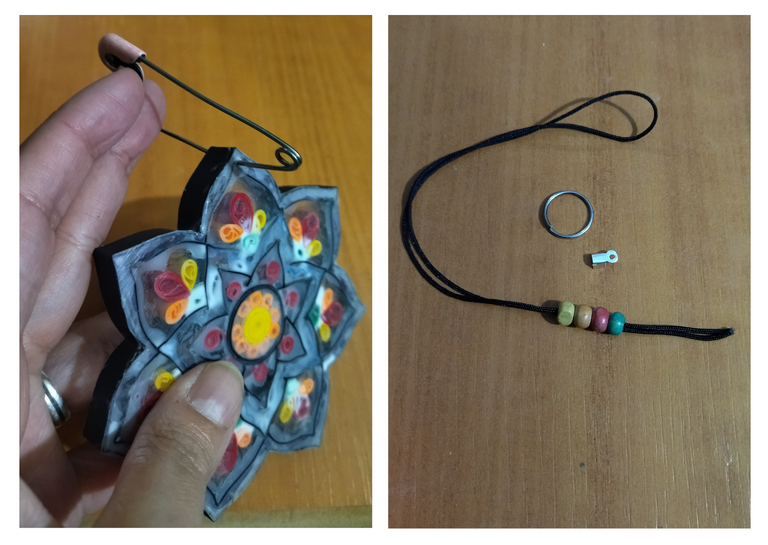
- Finally I put a small hanging thread, which I made with Chinese thread, a knot cover and a ring and I put three wooden beads to decorate, insert it into the mandala to which I previously opened a small hole with a thick pin.
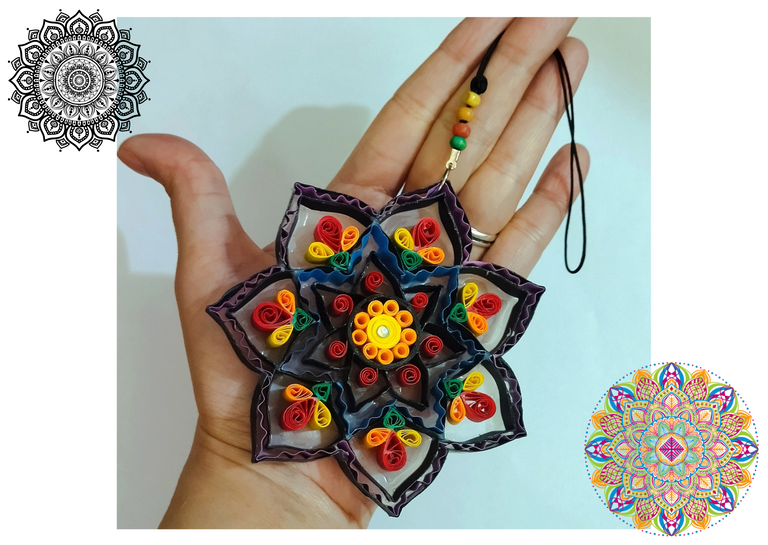
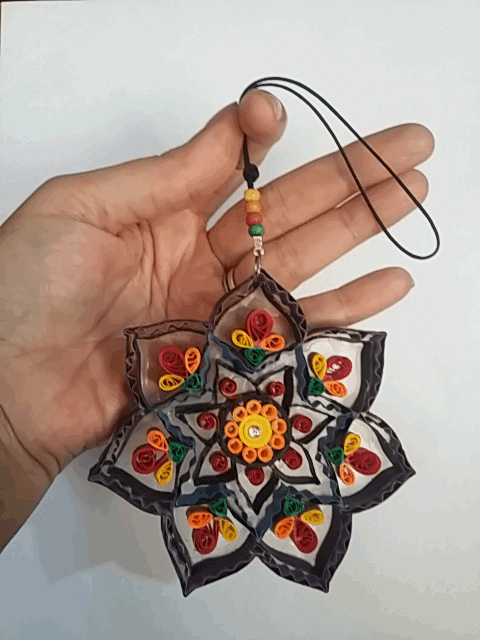
I leave you the final result of this flower mandala that I made with much affection for you...🌺✨💕
• Luego con trozos de cintas amarillas, naranjas y rojas, realice especies de rombos de diversos tamaños, los cuales incorpore a mi mándala.
• Para complementar el relleno, pasé cintas moradas por el corrugador, y añadí al último bordeado de mi mándala.
• Para para resaltar agregue un cristal en la pieza del medio.
• Retire la hoja con el boceto que había colocado en la parte de atrás, y procedí a recortar el acetato por los bordes, el acetato lo podemos retirar, pero lo voy a dejar para que proteja más la pieza.
• Por ultimo le coloque un pequeño hilo colgante, que elabore con hilo chino, una tapa nudos y una argolla y le coloque tres perlas de madera para decorar, inserte el mismo en la mándala a la que previamente le abrí un pequeño agujero con un alfiler punta gruesa.
Les dejo el resultado final de esta mándala tipo flor que hice con mucho cariño para ustedes… 🌺✨💕


What did you think, did you like it?
I hope you did, I hope you liked my explanation, procedure and photos, I made them with love for you.
"Let out that muse that inspires you, and let your imagination fly".
Thank you all, see you next time. 🐾🐱💕
¿Que les pareció, les gustó?
Espero que sí, que les haya gustado mi explicación, procedimiento y fotos, los hice con mucho cariño por y para ustedes.
"Deja salir esa musa que te inspira, y deja volar tu imaginación".
Gracias a todos, nos vemos en la próxima. 🐾🐱💕
Todas las fotos usadas en este post son de mi autoría y han sido sacadas en mi celular personal un Redmi 9T y editadas Canva Banner y separador hecho por mí en Canva Traducido con la ayuda de DeepL

~~~ embed:1644433677034614792 twitter metadata:MjgwNzY3MTk3fHxodHRwczovL3R3aXR0ZXIuY29tLzI4MDc2NzE5Ny9zdGF0dXMvMTY0NDQzMzY3NzAzNDYxNDc5Mnw= ~~~
~~~ embed:1644434562154373120 twitter metadata:MTQyODU5MDg5MDg3NzA4MzY0OXx8aHR0cHM6Ly90d2l0dGVyLmNvbS8xNDI4NTkwODkwODc3MDgzNjQ5L3N0YXR1cy8xNjQ0NDM0NTYyMTU0MzczMTIwfA== ~~~
~~~ embed:1644712746104020994 twitter metadata:MjQ1ODg3NjY4fHxodHRwczovL3R3aXR0ZXIuY29tLzI0NTg4NzY2OC9zdGF0dXMvMTY0NDcxMjc0NjEwNDAyMDk5NHw= ~~~
The rewards earned on this comment will go directly to the people( @dayadam, @fixie, @cpol, @ylaffittep, @elbuhito ) sharing the post on Twitter as long as they are registered with @poshtoken. Sign up at https://hiveposh.com.
Thanks @poshtoken ✨
The rewards earned on this comment will go directly to the people ( dayadam ) sharing the post on LeoThreads,LikeTu,dBuzz.https://leofinance.io/threads/@dayadam/re-leothreads-evek68dv
Que trabajo yan hermoso. 😍... Me encantan los colores y las fotos de las cintas que formaron la mandala. Te felicito por este trabajo estupendo @dayadam. Benditas tus manos creadoras. Un abrazo infinito 😘💜
!VSC
!PIZZA 🍕
@chacald.dcymt has sent VSC to @dayadam
This post was rewarded with 0.1 VSC to support your work.
Join our photography communityVisual Shots
Check here to view or trade VSC Tokens
Be part of our Curation Trail
@chacald.dcymt ha enviado VSC a @dayadam
Éste post fue recompensado con 0.1 VSC para apoyar tu trabajo.
Únete a nuestra comunidad de fotografía Visual Shots
Consulte aquí para ver o intercambiar VSC Tokens
Se parte de nuestro Trail de Curación
$PIZZA slices delivered:
(4/5) @chacald.dcymt tipped @dayadam
What an amazing tutorial - I have to say: the amount of detail is insane! Great tutorial (I really like the gifs and variety of shots) and the result is pure beauty!
Thank you very much for your words. They are an honor for me. I'm glad you liked my work. Have a beautiful day ✨
Thanks for the support @diyhub
Qué delicadeza, cuánto detalle y dedicación se aprecia en este regalo que nos das hoy, amiga. 🥰 Cómo diría un humorista de acá: "morí muerta". Gracias por esto. 🙏
Gracias hermosa por tus lindas palabras. Me alegra muchísimo que te haya gustado.
Abrazotes para ti amiga @ylaffittep ✨🥰😘
Ufff todo un gran trabajo amiga! Maravilloso
Que linda. Me alegra muchísimo que te gustará @equipodelta.
Abrazos, que tengas un bendecido día ✨🥰😘
Hermoso trabajo amiga @dayadam y los colores se ven muy excelente, que buenas manos para las labores tienes, sigue así y muchos éxitos.
Gracias bella. Me complacen tus lindas palabras. Gracias por ello. Abrazos @doriscova8 ✨
Bellísimo!!!
Todo lo que te haga sentir mejor no dejes de hacerlo 😃
Gracias hermosa. Así lo haré. Un gran abrazos. Gracias por pasar a ver mi trabajo @creacioneslelys ✨
Muy lindo tu trabajo amiga.
Gracias por compartir...
Gracias mi linda. Un placer para mí. Saludos ✨
Qué hermoso trabajo, amiga, la verdad cada día me sorprendo las maravillas que se pueden crear con este trabajo, te felicito por tu creatividad, un gran arte, saludos.
Gracias por tus palabras bella. Me alegra mucho que te haya gustado y hayas pasado a ver mi trabajo. Un gusto verte por aquí. Saludos @ikigaidesign ✨
I love the many different colors, it is so festive!
!LADY😍@dayadam, you outdid yourself! That looks very complicated.
View or trade
LOHtokens.@silversaver888, you successfully shared 0.1000 LOH with @dayadam and you earned 0.1000 LOH as tips. (1/30 calls)
Use !LADY command to share LOH! More details available in this post.
What nice words friend, I am very pleased that you liked my work.I try every day to show a better job with love. Hugs and my thanks for being here. Blessings @silversaver888 ✨❤️
Thanks for the support @jasonmanapasee and @dsc-r2cornell ✨
Pero que acaban de ver mis ojos!! esto es una obra de arte! me imagino el trabajo que debio llevarte hacerlo y la paciencia, o al menos eso es lo que imagino jajaja felicidades!
Gracias mi bella, bienvenida a mi humilde blog, está invitada cuando lo desees. No te niego que lleva trabajo, pero me encanta hacerlo y cuando haces lo que te apasiona todo se hace llevadero y más cuando te gusta el el resultado final. Abrazos @elbuhito ✨
Felicitaciones!
Gracias por deleitarnos con tan magnífica publicación, la cual fue valorada por @Womentribe una comunidad para destacar el valioso potencial del ser humano.
Únete a nuestro canal de Discord
Anímate a usar nuestra etiqueta #womentribe
*Sigue nuestras cuentas:
@Womentribe
suscribete aquí @colmena-139925
twitter
Instagram
Muchísimas gracias por el apoyo. Es un placer para mí que hayan tomado en cuenta mi trabajo @womentribe ✨