Hola, hola amigos de esta bella y creativa comunidad @Hivediy 🤗
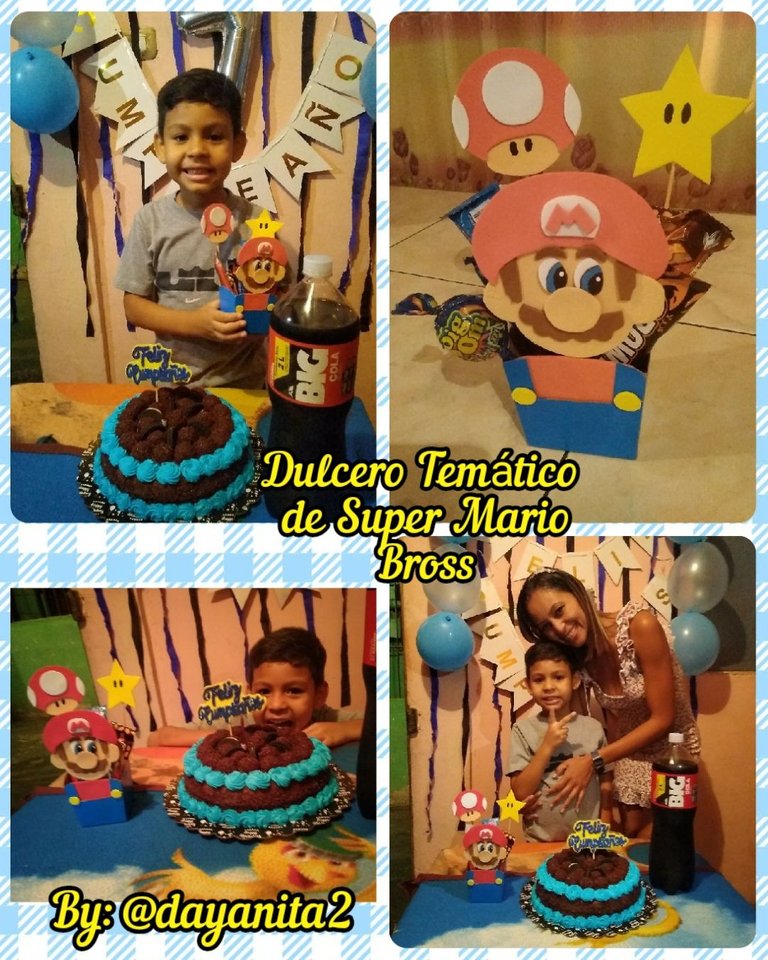
De nuevo por acá para mostrarles un nuevo proyecto, este lo elabore para mi sobrino Enmanuel quien estuvo de cumpleaños hacen unos días y como su personaje favorito es Super Mario Bross, le realice un dulcero con esta temática y le agregue dos de los personajes del juego, dos potenciadores de poder el honguito y la estrella.
Bueno sin más preámbulos los invito a este sencillo paso a paso:
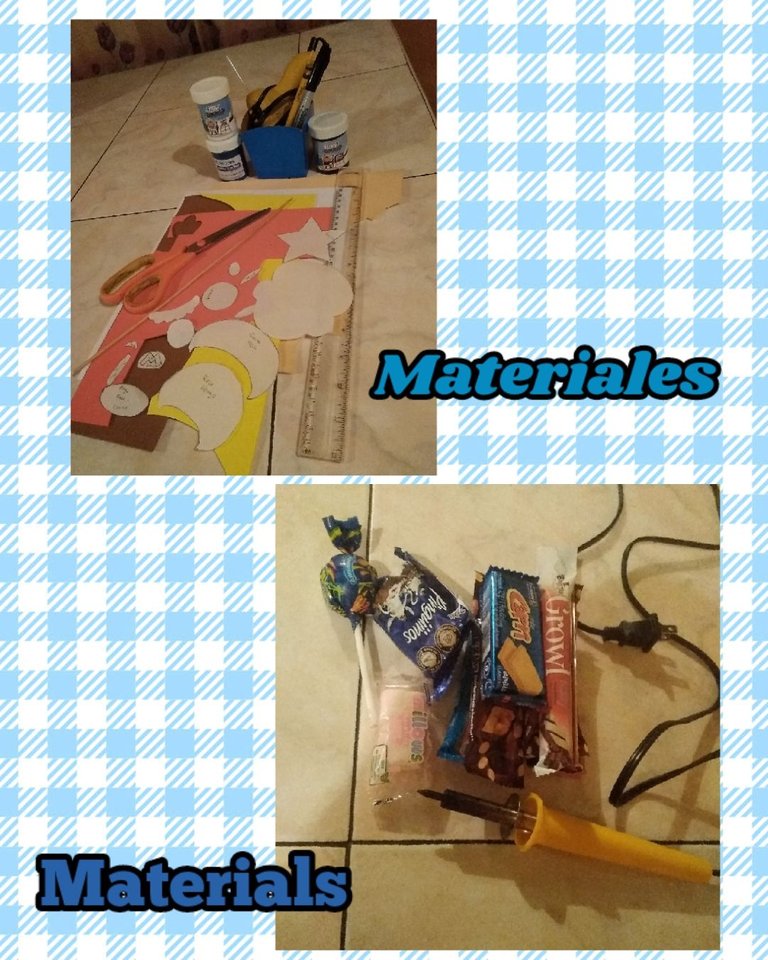
🎮 Foami(goma eva) de color: rojo,amarillo, blanco,marrón y piel.
🎮 1 Caja que recicle de donde venían cotufas.
🎮 Pinturas al frío blanco, negro y azul.
🎮 Pistola de silicón, cautil, tijera,regla, palitos de altura y marcador fino negro.
🎮 Patrones y chucherías o dulces.
Hello, hello friends of this beautiful and creative community @Hivediy 🤗
Here again to show you a new project, I made this for my nephew Enmanuel who had his birthday a few days ago and since his favorite character is Super Mario Bross, I made him a candy box with this theme and I added two of the game's characters, two power-ups the little mushroom and the star.
Well without further ado I invite you to this simple step by step:
🎮 Color foami (eva rubber): red, yellow, white, brown and skin.
🎮 1 Box that recycles where popcorn came from.
🎮 White, black and blue cold paintings.
🎮 Silicone gun, captil, scissors, ruler, height sticks and black fine marker.
🎮 Patterns and trinkets or sweets.
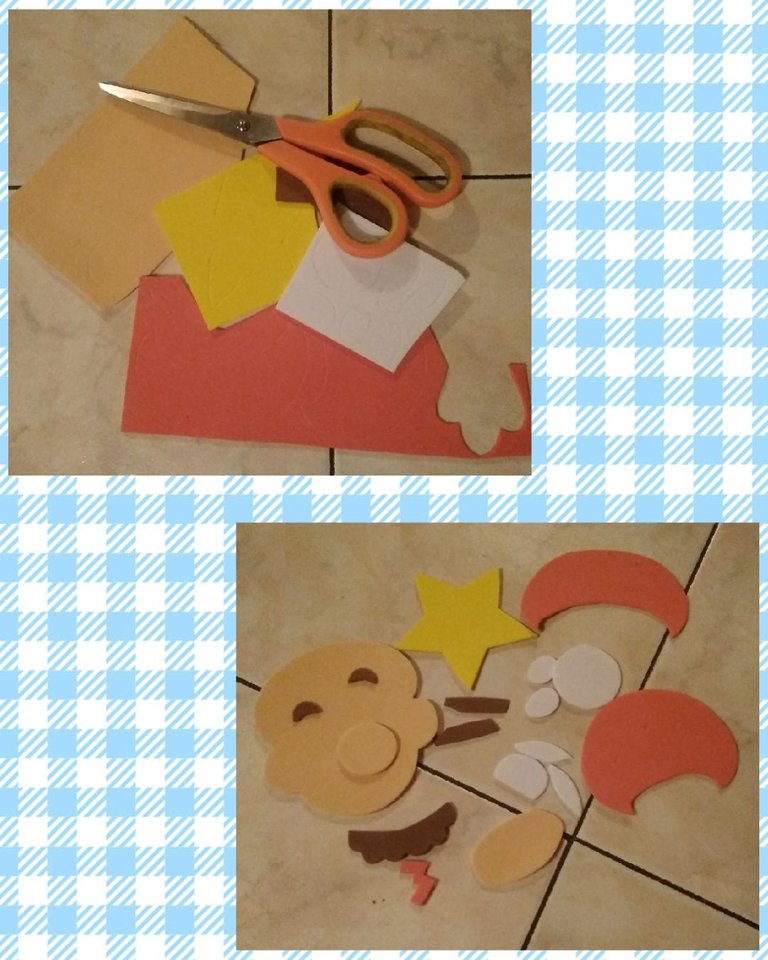
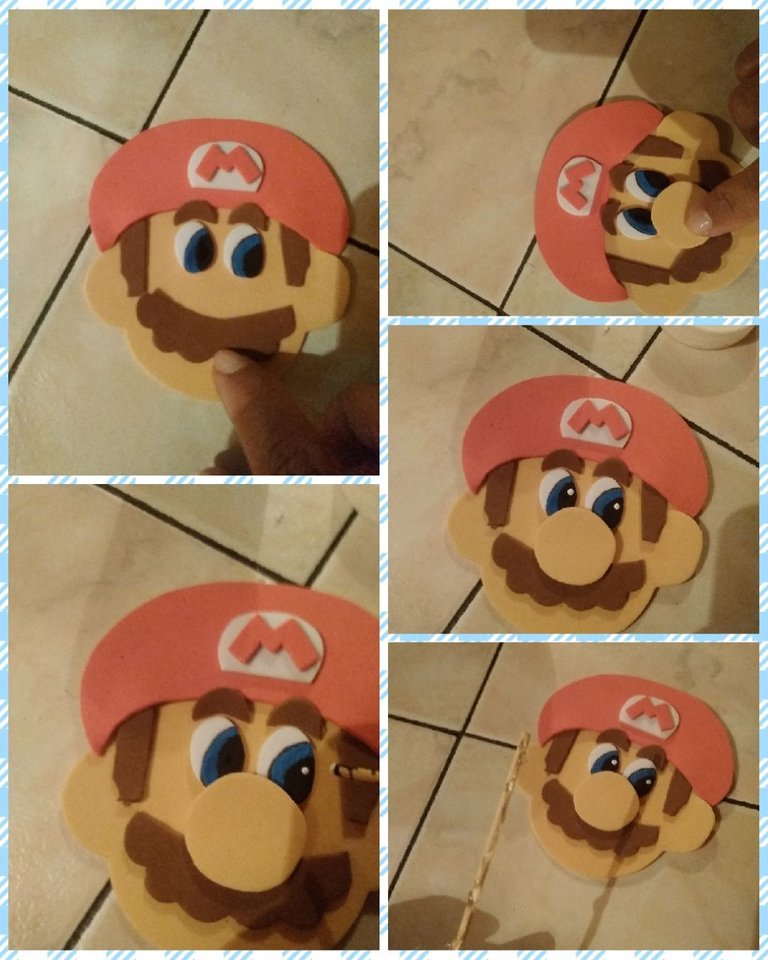
Lo primero que haremos es tomar lo patrones y pasarlos al foami (goma eva) haciendo uso del palito de altura, la cara de Mario, la cara del honguito y el círculo que es la nariz se sacara en el de color piel, en el blanco se pasara el círculo del honguito y los dos laterales, los dos ojos y el patrón donde irá la letra M, en el marrón marcaremos el bigote, las dos cejas y las patillas de su cabello, en el rojo la gorra, la M y la cabeza del honguito, en amarillo irá la estrella.
The first thing we will do is take the patterns and pass them to the foami (eva rubber) using the height stick, Mario's face, the face of the mushroom and the circle that is the nose will be removed in the skin-colored one, in the white We will pass the circle of the mushroom and the two sides, the two eyes and the pattern where the letter M will go, in the brown we will mark the mustache, the two eyebrows and the sideburns of his hair, in the red the cap, the M and the head of the mushroom, in yellow will go the star.
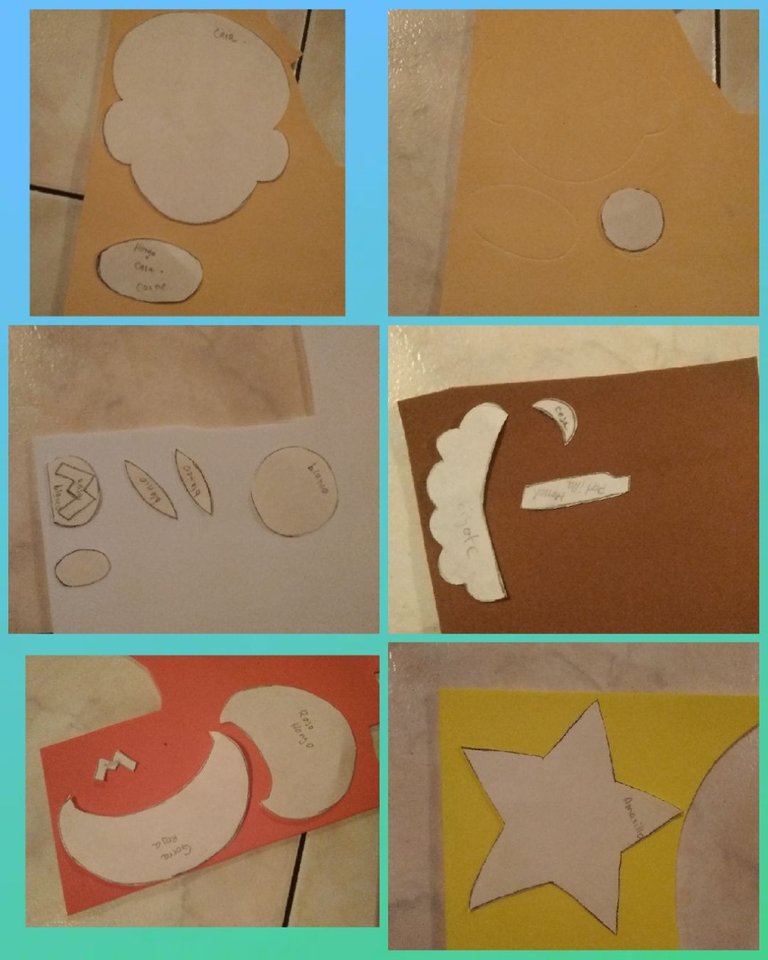
✂️ Hora de recortar cada uno de los patrones que pasamos al foami (goma eva) al recortar es importante hacerlo con mucha precisión, evitando picotear el material ya que de un buen recortado depende un bonito resultado.
✂️ When cutting each of the patterns that we pass to the foami (eva rubber) when cutting, it is important to do it with great precision, avoiding pecking the material since a good result depends on a good cut.
Iniciaremos armando a cada uno de los personajes:
Mario Bross
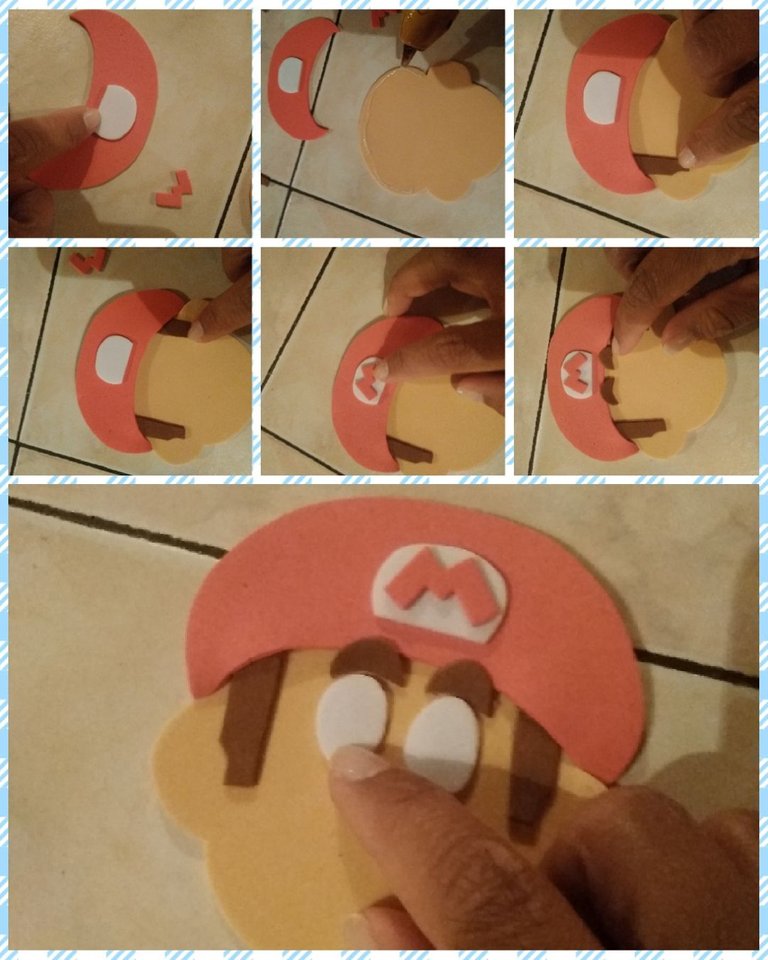
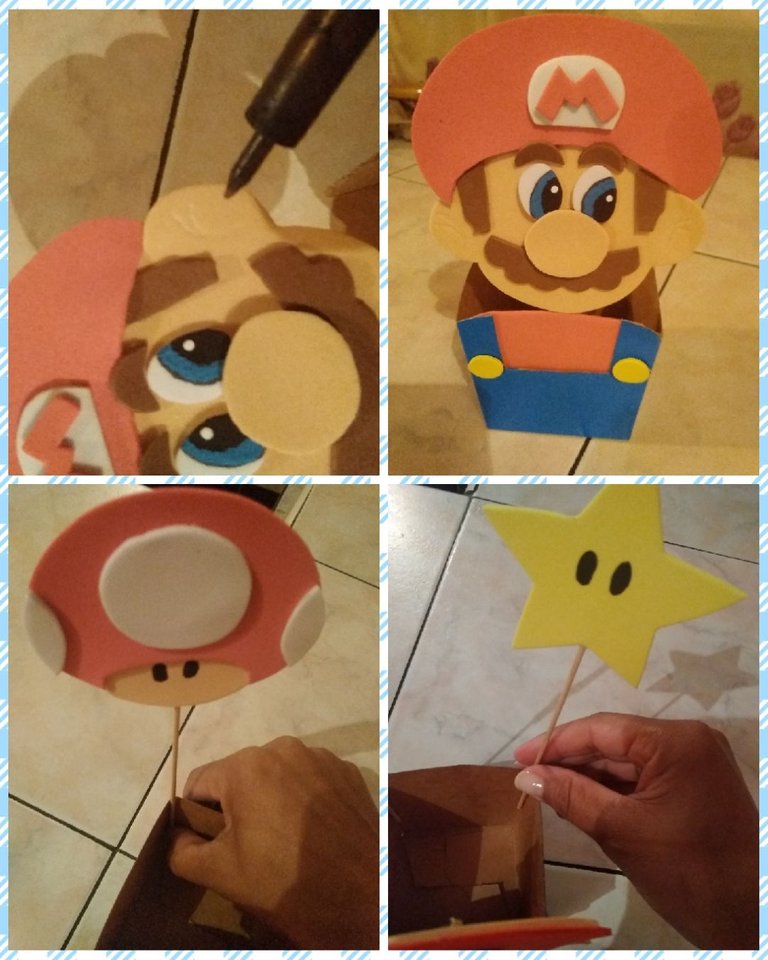
🎮 Tomamos la gorra y le pegamos con silicón la pieza blanca, tomamos la cara ubicamos las patillas del cabello y encima de la cara se pegara la gorra, por último se ubica la letra M encima de la pieza blanca,en el limite de la gorra se pegan las dos cejas y debajo de estas los dos ojos.
El honguito y la estrella
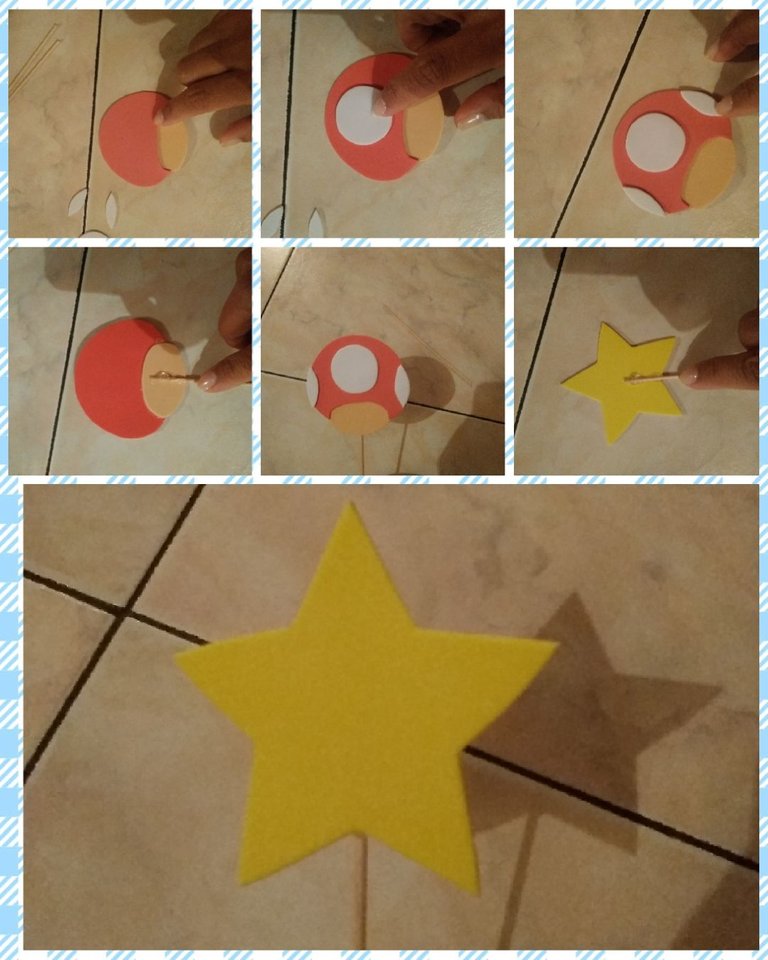
🎮 Con silicón pegaremos la cabeza del honguito con su cara, seguiremos con el círculo en el centro de la cabeza las dos piezas blancas a los lados ubicandolas que queden al mismo nivel, por último se le pega el palito de altura detrás justo en el centro del mismo.
🎮 A la estrella le pegaremos el palito de altura detrás y en el centro de la misma.
We will start assembling each of the characters:
Mario Bross
🎮 We take the cap and glue the white piece with silicone, we take the face, place the sideburns of the hair and the cap will be glued on top of the face, finally the letter M is located on top of the white piece, at the limit of the cap the two eyebrows are glued and below these the two eyes.
The little mushroom and the star
🎮 With silicone we will glue the head of the mushroom to its face, we will continue with the circle in the center of the head, the two white pieces on the sides, placing them at the same level, finally the height stick is glued behind right in the center of the same.
🎮 We will stick the height stick to the star behind and in the center of it.
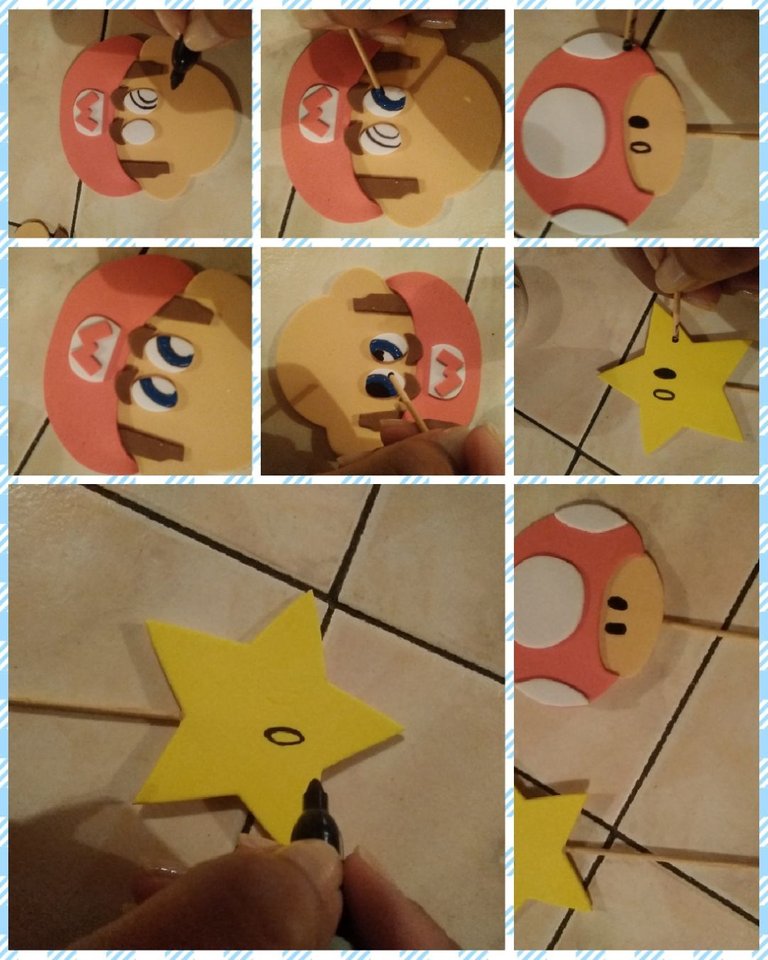
🎮 Ahora con el marcador fino negro marcaremos a los ojos las líneas de las mismas, seguidamente con la pintura al frío negro y el palito de altura pintamos la franja negra, con el azul la franja que sigue dejamos secar.
🎮 Al honguito y la estrella le dibujaremos los ojito que nos queden ovalados y luego se pintaran con la pintura negra y se dejan secar.
🎮 Ya con los ojos de Mario secos, procedemos a pegar el bigote y encima de este justo en el centro de los ojos se ubica la nariz, ahora con la pintura al frío blanca y el palito de altura haremos un pequeño puntito a cada ojo para dar luz a la mirada. Ya tenemos listo nuestro rostro de Mario, continuamos pegando el palito de altura detrás de este justo en el centro.
🎮 Now with the fine black marker we will mark the lines of the eyes, then with the black cold paint and the height stick we paint the black strip, with the blue the strip that follows we let dry.
🎮 We will draw the eyes of the mushroom and the star that are oval and then they will be painted with black paint and allowed to dry.
🎮 With Mario's eyes dry, we proceed to glue the mustache and on top of it, right in the center of the eyes, the nose is located, now with the white cold paint and the height stick we will make a small dot in each eye to give light to the look We already have our Mario face ready, we continue to paste the height stick behind it right in the center.
Ensamblado de la caja
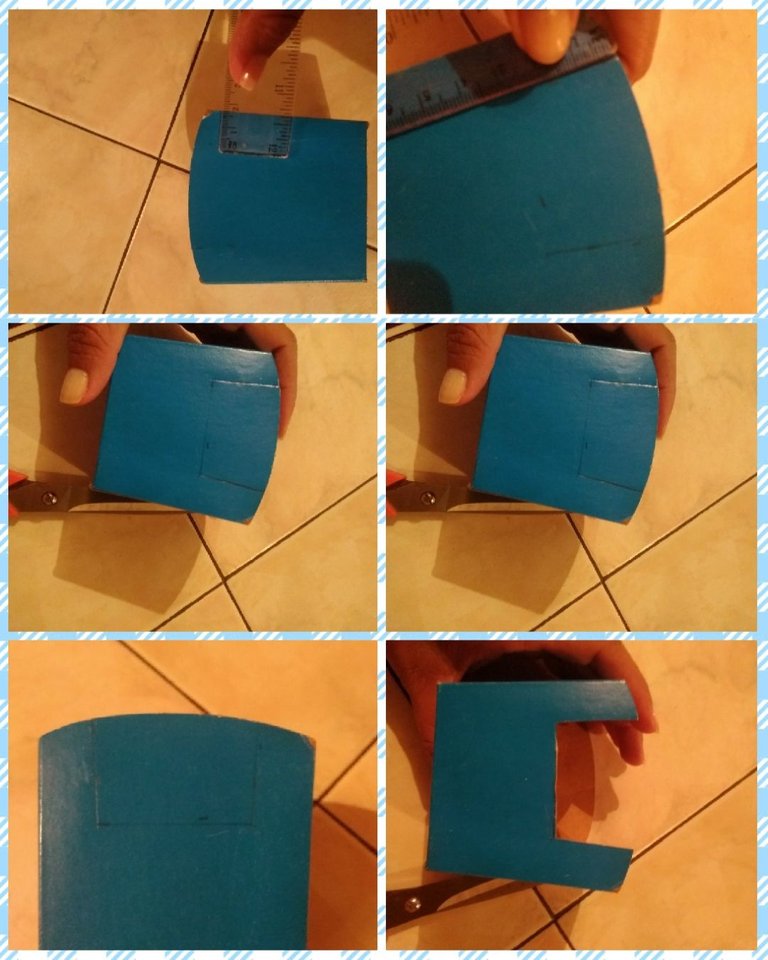
🎮 Como les dije aproveche una cajita en donde me dieron unas cotufas en una fiestecita que asistí hace tiempo y la guarde sabia que me seria de gran utilidad y para hacer la braga de Mario me parecio ideal ya que es azul. Tome la regla y marque por una cara de la caja: de cada lado deje 1,5cm de ancho y de largo 3cm, luego traze y uní los puntos me quedo como un cuadradito que luego recorte con la tijera, el resultado lo observas en la imágen.
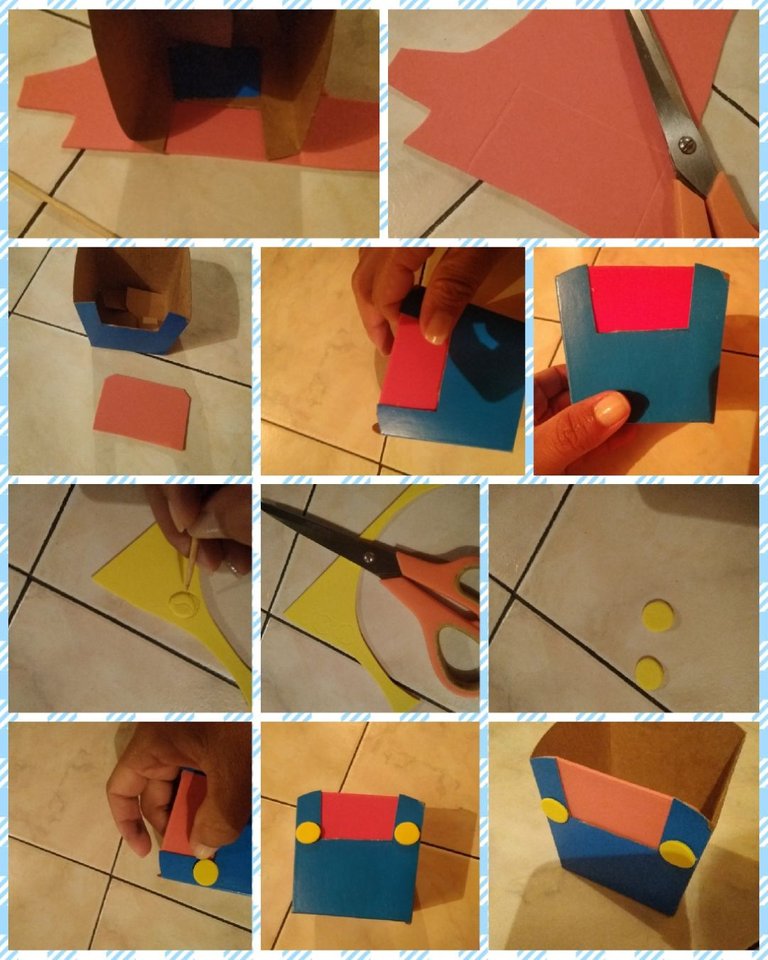
🎮 Ahora tomaremos el foami (goma eva) rojo y marcaremos con el palito de altura, colocando encima la caja por el lado que sacamos el cuadrado, recortamos con la tijera y obtendremos un cuadrado rojo que pegaremos dentro de la cajita por el lado que hicimos el corte de la misma y como resultado tenemos que la cajita se transformo en la ropa de Mario su (linda braguita), para completar el atuendo marcamos en foami (goma eva) amarillo los dos botones se recorta y se pega a la cajita en un lado y en el otro justo en donde termina el corte de la misma.
Box Assembly
🎮 As I told you, I took advantage of a box where they gave me some popcorn at a party that I attended a long time ago and I kept it knowing that it would be very useful to me and to make Mario's panty it seemed ideal to me since it is blue. Take the ruler and mark on one side of the box: on each side leave 1.5cm wide and 3cm long, then trace and join the points. image.
🎮 Now we will take the red foami (eva rubber) and mark with the height stick, placing the box on the side that we removed the square from, cut with the scissors and we will obtain a red square that we will paste inside the box on the side that we made the cut of it and as a result we have that the box was transformed into Mario's clothes (pretty panties), to complete the outfit we marked in yellow foami (eva rubber) the two buttons are cut and glued to the box in a side and on the other right where the cut ends.
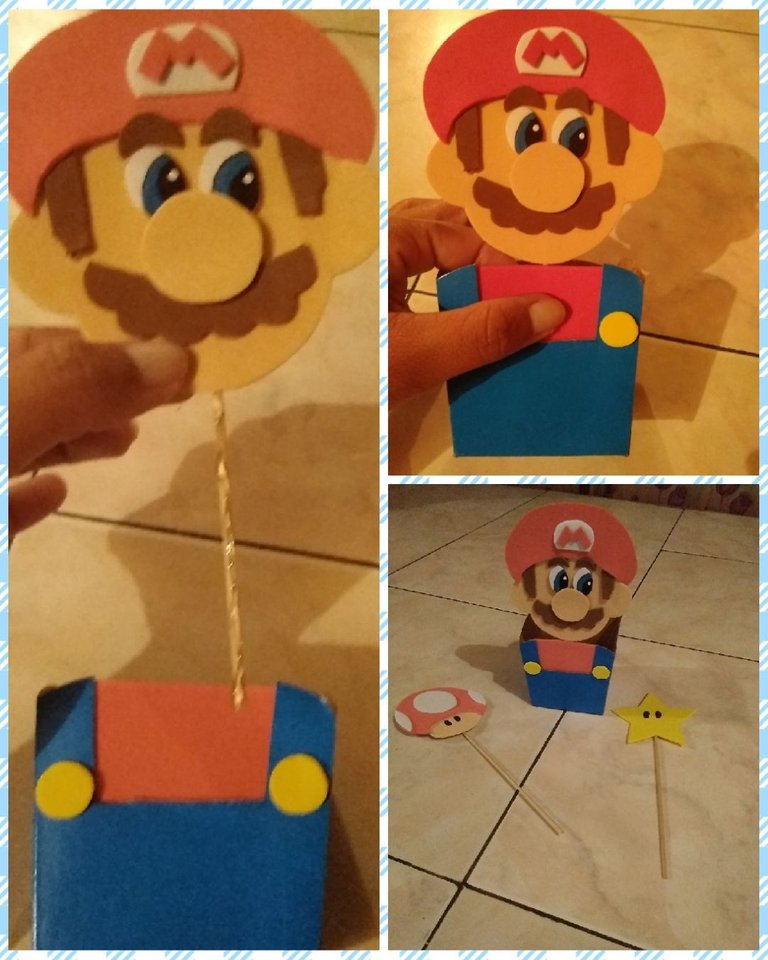
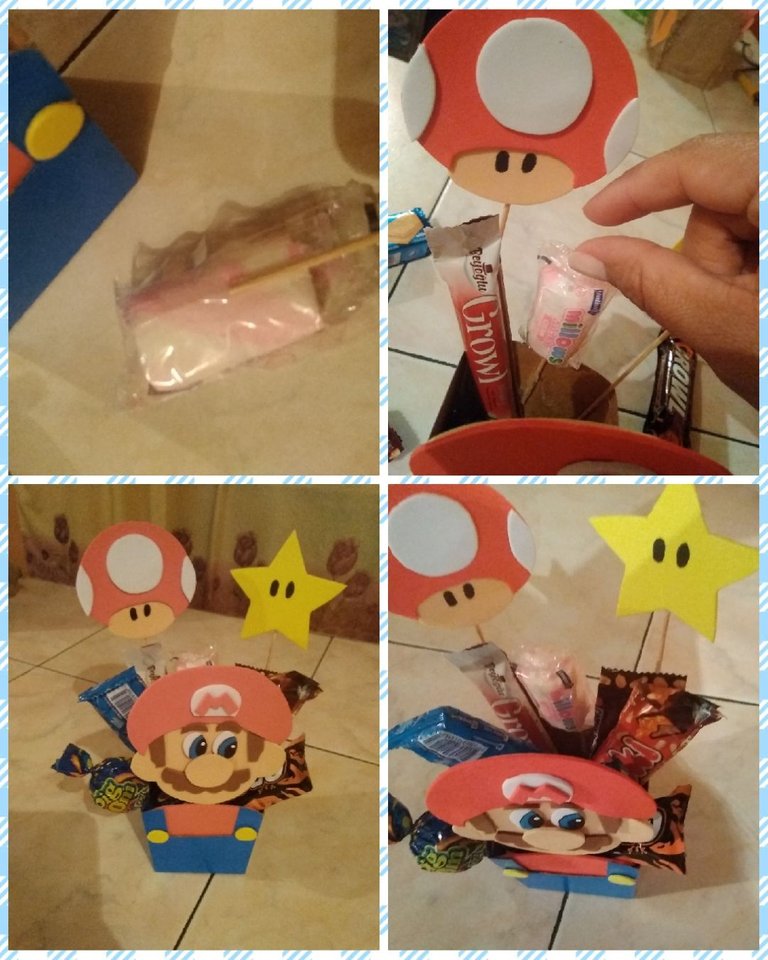
🎮 Para terminar de ensamblar el dulcero, pegamos a la caja el rostro de Mario para ello le colocaremos abundante silicón al palito de altura se presiona por unos segundos para que este no se despegue.
🎮 Al ver el rostro de Mario me di cuenta que le hacía falta los surcos de las orejas para ello use el cautíl y se los dibuje.
🎮 En la parte de atrás de la caja en sus dos esquinas pegue a la izquierda el honguito y a la derecha la estrella de esta manera se visualizan todos los personajes.
🎮 Uno de los dulces como era pequeño le pegue un palito de altura para darle elevación al meter cada una de las chucherías o dulces, fuí metiendo dentro del dulcero cada una buscando que quedarán ordenadas y que se apreciaran apenas al ver el dulcero.
🎮 To finish assembling the candy box, we glue Mario's face to the box, for this we will place plenty of silicone on the high stick, press it for a few seconds so that it does not come off.
🎮 When I saw Mario's face, I realized that he needed the furrows in his ears to do so, I used the captive and drew them for him.
🎮 In the back of the box, in its two corners, paste the mushroom on the left and the star on the right, in this way all the characters are displayed.
🎮 One of the sweets, as it was small, I hit a stick high to give it elevation when putting each of the trinkets or sweets, I was putting each one inside the candy box looking for them to be ordered and appreciated as soon as they saw the candy box.
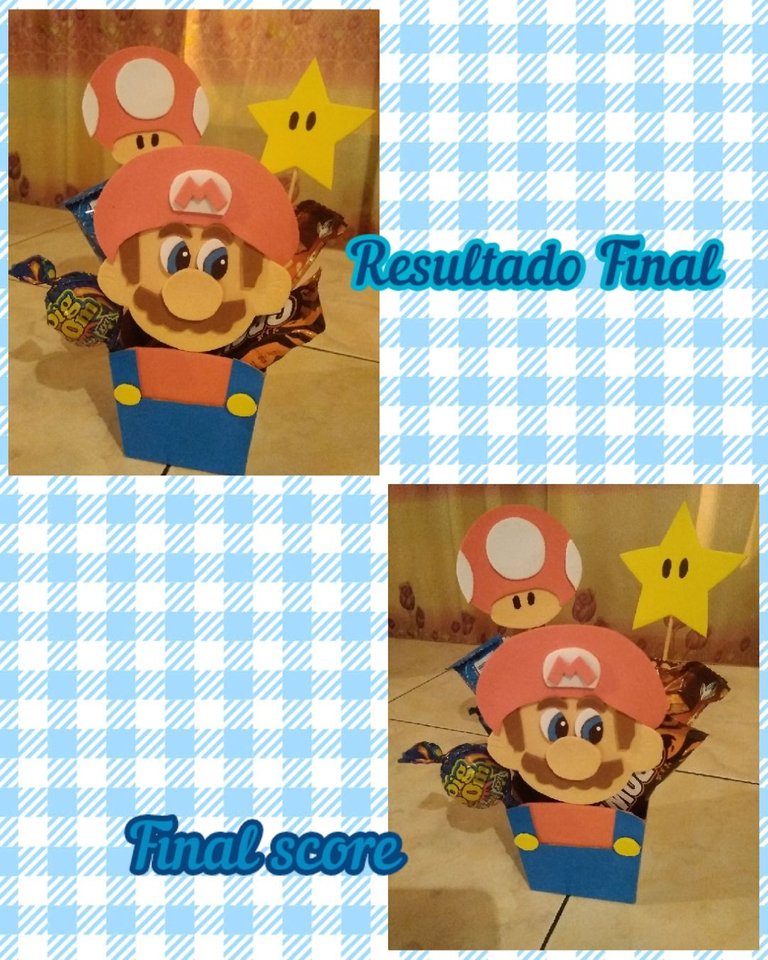
Y bien amigos así elabore este lindo dulcero de Mario Bross para mi sobrino Enmanuel a él le encanto pues además de ser su personaje favorito estaba lleno de los dulces que le gustan.
Me lleno el corazón de alegría, que este pequeño detalle mi sobrino lo aprecio tanto que me dijo: tía me hiciste el niño más feliz del mundo gracias y me abrazo!!! 🤗
En otros post lo he dicho mis sobrinos son mi inspiración para crear, son mis fans, casi siempre lo que hago es para ellos, me encanta verlos felices ya que son los hijos que no he podido tener 😔 pero ellos han sido mi recompensa 🙏.
Por acá les dejo mi bello resultado como siempre los invito a que se animen y lo hagan para los pequeños de la casa es super sencillo, usas poco material y como siempre busco reciclar, reusar para crear algo nuevo.
And well friends, I made this cute Mario Bross candy box for my nephew Enmanuel, he loved it because besides being his favorite character, it was full of the sweets he likes.
My heart is filled with joy, my nephew appreciates this little detail so much that he said to me: aunt you made me the happiest child in the world thank you and hug me!!! 🤗
I have said it in other posts, my nephews are my inspiration to create, they are my fans, almost always what I do is for them, I love to see them happy since they are the children that I could not have 😔 but they have been my reward 🙏.
Here I leave my beautiful result, as always I invite you to cheer up and do it for the little ones in the house, it is super simple, you use little material and as always I seek to recycle, reuse to create something new.
![photocollage_2023626205754601[1].jpg](https://images.hive.blog/768x0/https://files.peakd.com/file/peakd-hive/dayanita2/48UmAEDPK4ERPgtjMXMgDzpPXQhe5mjhKHSLoWL58M1Qd2rUvQsZZW8u9KmWaep7kM.jpg)
Amigos como siempre complacida de mostrar cada una de mis creaciones, gracias a ustedes que se detienen a leer cada una de mis publicaciones que tengan un lindo y bendecido día lleno de energías positivas ✨.
Las fotos fueron tomadas y editadas con mi celular
use la aplicación "Foto Collage"
La traducción la realice con el traductor de google
Hasta un Próximo Encuentro!!!
🤗😘
Friends, as always, pleased to show each of my creations, thanks to you who stop to read each of my posts, have a nice and blessed day full of positive energy ✨.
The photos were taken and edited with my cell phone.
use the "Photo Collage" app
The translation is done with google translator
Until a Next Meeting!!!
🤗😘
