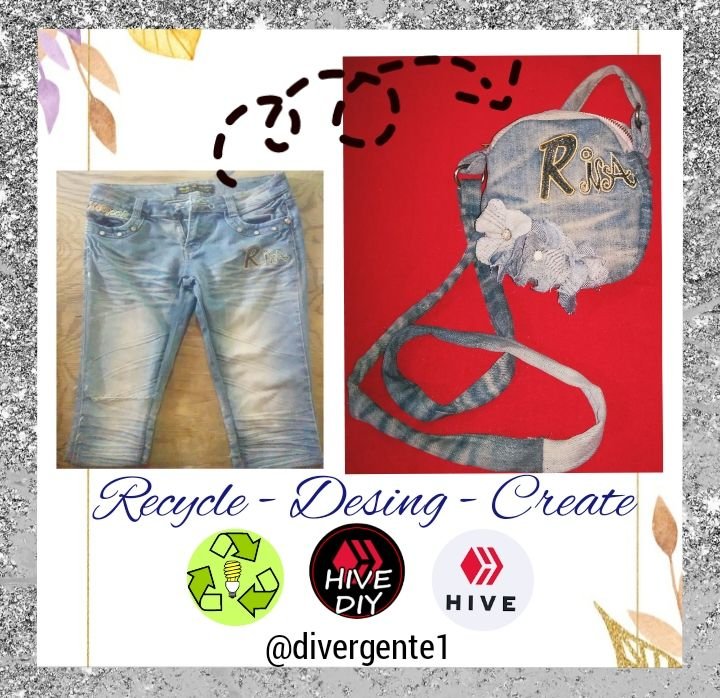
It is a pleasure to greet you friends of Hive! Most of the objects that we use on a daily basis fulfill their useful life until the time when we decide that they no longer serve us and we must throw them away. However, where the end of the useful life of the things we use on a daily basis ends, the proposal that recycling offers us begins. The design that I show below was designed and created starting from the reuse of some Jean pants to make a bag. you can create it in your own style, you just have to cheer up and follow the steps that I show you below:
Es un gusto saludarles amigos de Hive! La mayoria de los objetos que utilizamos a diario cumplen con su periodo de vida util hasta el tiempo en que decidimos que ya no nos sirven y debemos botarlos. sin embargo, Donde termina ese fin de la vida util de las cosas que utilizamos a diario empienza la propuesta que nos brinda el reciclaje. El diseño que a continuacion muestro fue diseñado y creado partiendo de la reutilizacion de unos pantalones Jean para hacer un bolso . Puedes crearlo a tu propio estilo, solo tienes que animarte y seguir los pasos que te muestro a continuacion:
-Scissors.
-Jean pants.
-Folder or cardboard to create a circle.
-Measuring tape.
-Marker.
-Closing.
Español
Materiales utilizados:

-Tijeras.
-Pantalon Jean.
-Carpeta o cartulina para crear un circulo.
-Cinta Metrica.
-Marcador.
-Cierre.
English
First Step
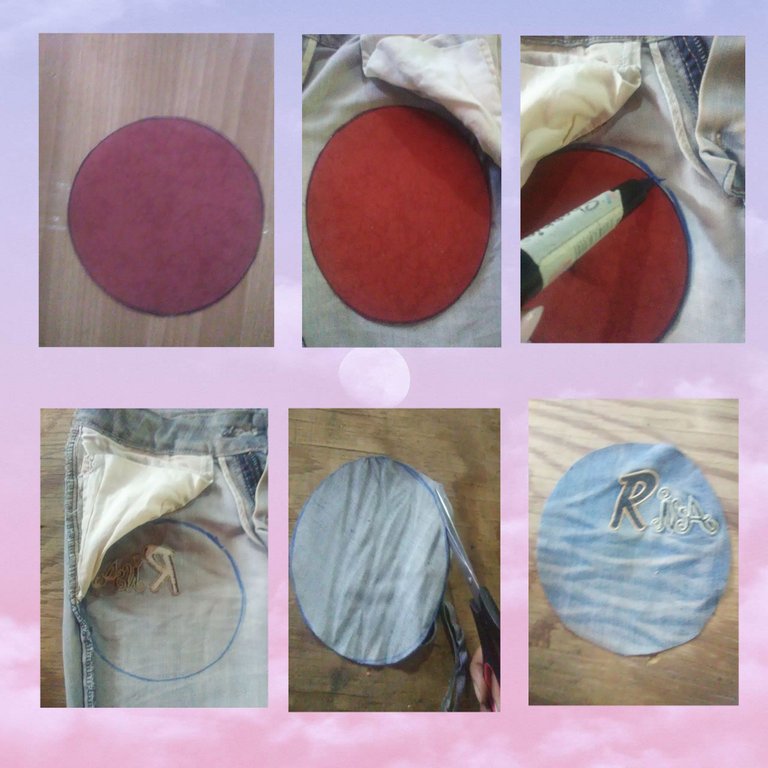
The first thing to do is to use our pattern created on the folder or cardboard by marking a circle of approximately 11 inches in radius or 22 inches in diameter. This circle is placed on the inside of the pants to avoid tracing it on the fabric of the pants to avoid staining the fabric. in this way the circle drawn on our pants is obtained. You must draw 2 circles to obtain two copies of it. Then with the scissors cut around the circles.
Español
Primer Paso
Lo primero que hay que hacer es utilzar nuestro patron creado en la carpeta o cartulina marcando un circulo de aproximadamente 11 pulgadas de radio o 22 pulgadas de diametro. este circulo se coloca sobre la parte interior del pantalon para evitar que al calcarlo sobre la tela del pantalon se evite manchar la tela. de esta manera se obtiene el circulo trazado sobre nuestro pantalon. Se deben trazar 2 circulos para obetener dos ejmaplares de este. Luego con la tijera se recorta al rededor de los circulos.
English
Second Step
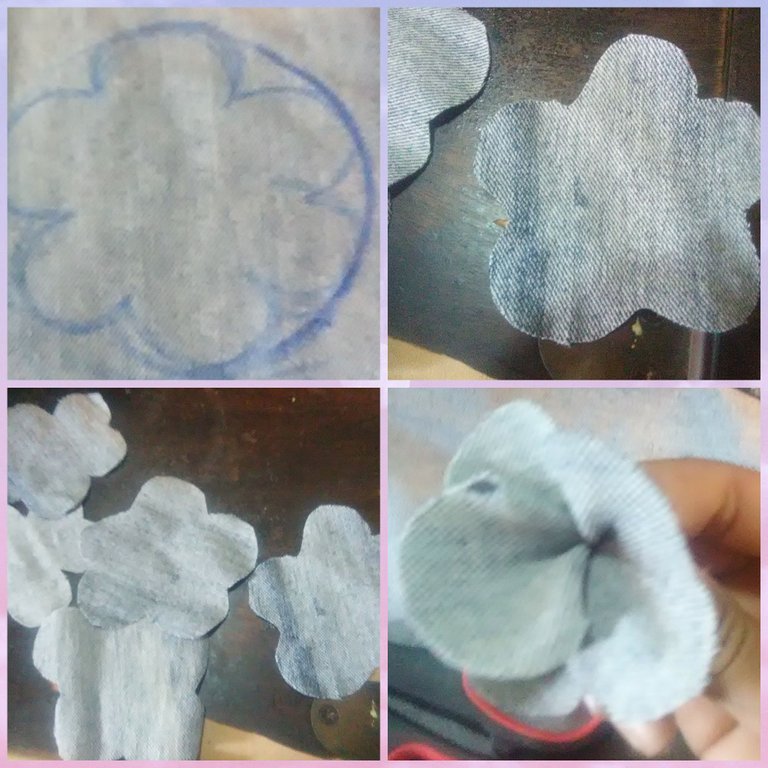
Then flowers are traced on the pants fabric and cut as shown in the image. they can make it any way and design they want. On this occasion I traced a circle with a 3-inch radius. then internally trace lines to form 6 flower petals. once cut, it is shaped by joining the central part of the flower with the fingers.
Español
Segundo Paso
Luego se trazan flores sobre la tela del pantalon y se cortan como se muestran en la imagen. pueden hacerlo de la forma y el diseño que deseen. en esta ocasion yo marqué un circulo de 3 pulgadas de radio. luego internamente traze lineas para formar 6 petalos de la flor. una vez cortadas se le da la forma uniendo con los dedos la parte cemtral de la flor.
English
Third Step
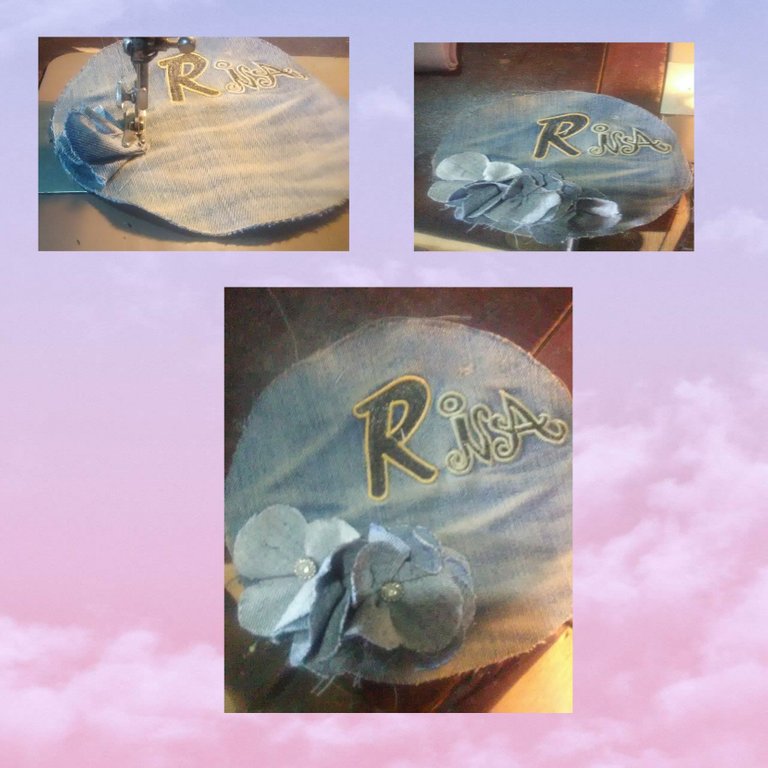
To fix the flower, we proceed to sew it with the sewing machine on the main face of what will be the bag. The 5 flowers are fixed on the fabric and if you like, you can place a small stone on the center of the flower. In this case I placed the same buttons that came with the pants.
Español
Tercer Paso
Para fijar la flor se procede a coserla con la maquina de coser sobre la cara principal de lo que será el bolsito. Se fijan las 5 flores sobre la tela y se es de su agrado pueden colocar alguna piedrita sobre el centro de la flor. En este caso yo coloque los mismo botoncitos que trajo el pantalon.
English
Fourth Step
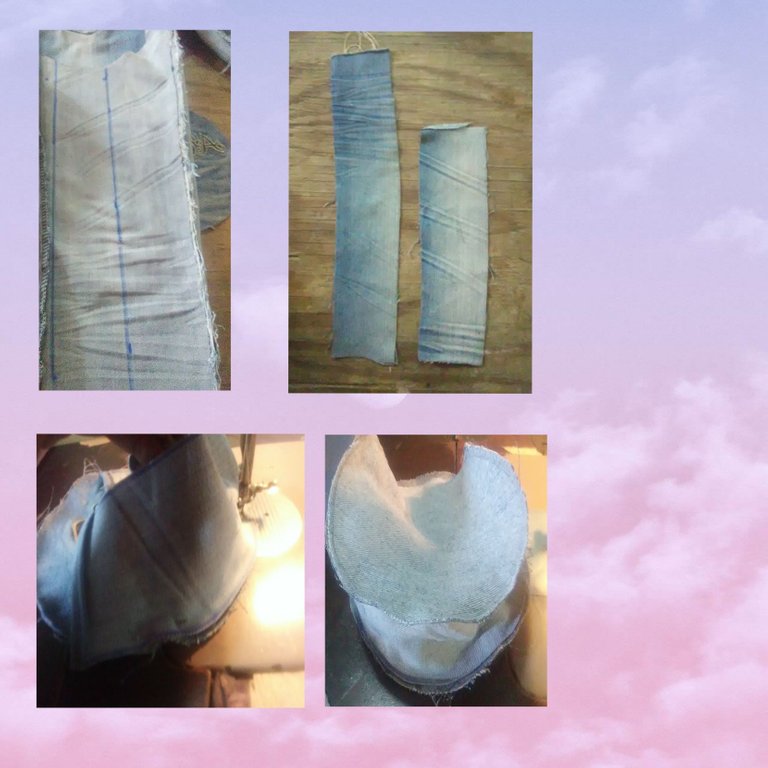
Two strips of 14 inches long by 3 inches wide and 8 inches long by 3 inches wide, respectively, are drawn below. they are then cut and sewn around the front and back sides of the bag. These are going to be sewn one at a time; that is, the front face is placed upwards, joining this face with the front face of the braid that was cut. The same procedure is then carried out with the other rear face.
Español
Cuarto Paso
A continuacion se trazan dos tiras de 14 pulgadas de largo por 3 pulgadas de ancho y 8 pulgadas de largo por 3 pulgadas de ancho respectivamente. luego se cortan y se cosen alrededor de las caras frontal y trasera del bolsito. Esta se van a coser una a la vez; es decir, se coloca la cara frontal hacia arriba uniendo esta cara con la cara frontal de la trenza que se corto. Luego se realiza el mismo procedimiento con la otra cara trasera.
English
Fiveth Step
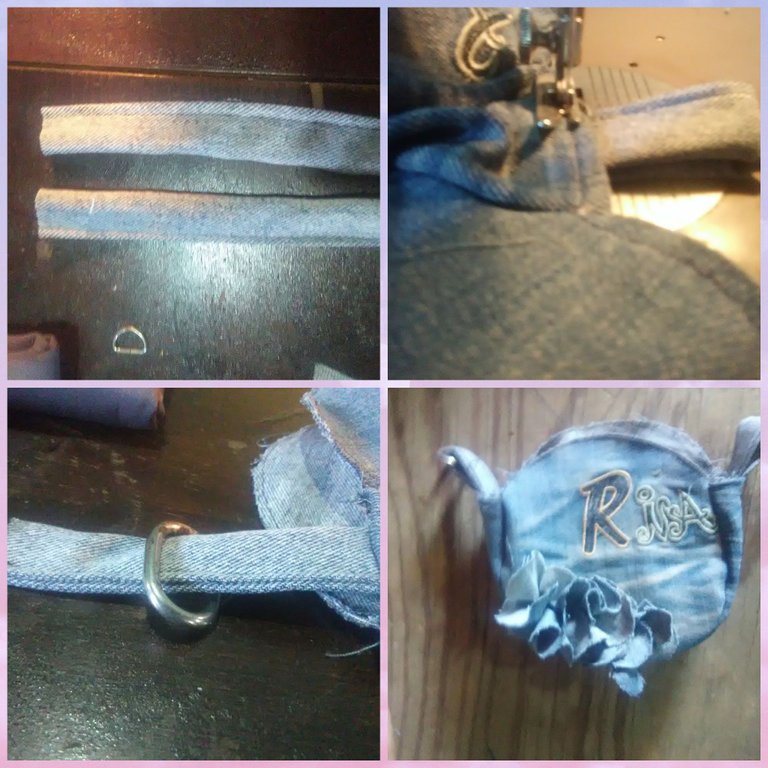
trace, cut and sew 2 strips 4 inches long and 1.5 wide. the lower part of the rope is sewn so that these serve as fasteners as shown in the image.
Español
Quinto Paso
se trazan, se cortan y se cosen 2 tiritas de 4 pulgadas de largo y 1,5 de ancho. se cose la parte inferior de la cuerdita para que estas sirvan de sujetadores como se muestra en la imagen.
English
Sixth Step
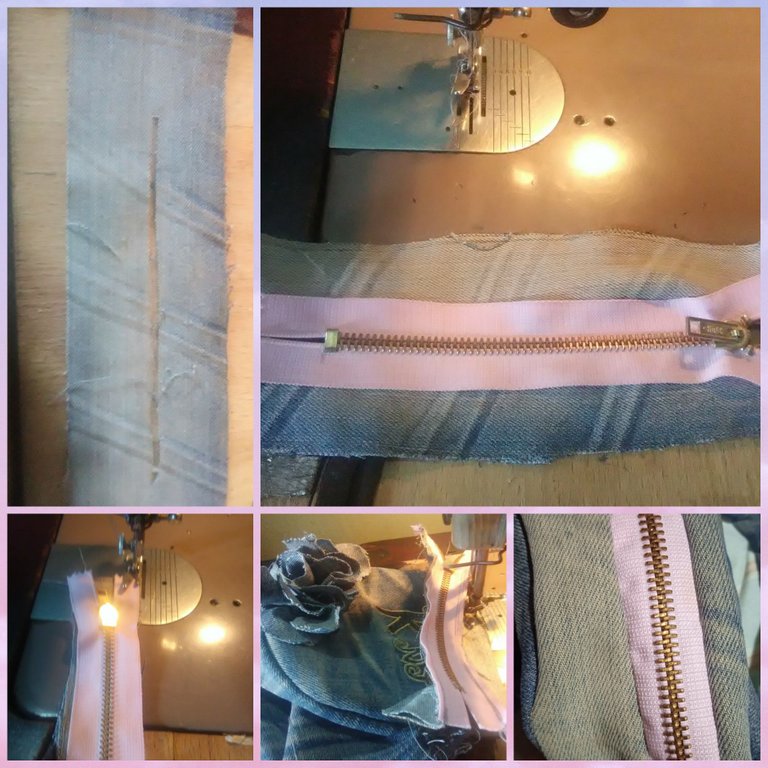
Then the other strip that was cut earlier (the 8-inch one) is made an opening in the middle as shown in the image and is ready to sew between this opening. once fixed it is sewn on the bag.
***Español***
Sexto Paso
Luego la otra tira que se corto anteriormente ( la de 8 pulgadas) se hace una abertura en el medio como se muestra en la imagen y nos dispondremos a coser entre esta abertura. Una vez fijada se cose sobre el bolsito.
English
Seventh Step
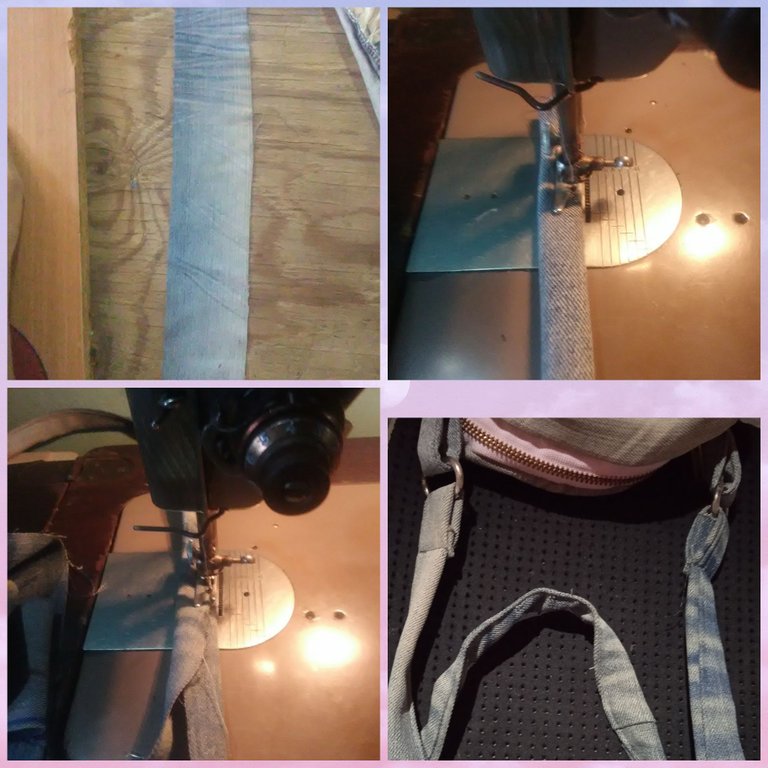
To finish, we proceeded to trace and cut a ribbon or strip approximately 48 inches. later this is sewn on the sewing machine and inserted through the metal ears shown in the image.
In this way you get this design that will allow you to recycle and give your outfit a different touch!

Español
Septimo Paso
Para finalizar se proced a trazar y cortar un cinta o tira aproximadamente de 48 pulgadas. posteriormente esta se cose en la maquina de coser y se inserta por la orejillas metalicas que se muestran en la imagen.
De esta manera se obtiene este diseño que te permitira reciclar y darle un toque difrente a tu atuendo!
English
Credits
Español
Creditos
El telefono utilizado para tomar Las fotos fueron Un xioami Redmi Note 9.
Las fotos fueron editadas en la aplicacion Editor de foto polish.
Traductor utilizado: Deepl
Your content has been voted as a part of Encouragement program. Keep up the good work!
Use Ecency daily to boost your growth on platform!
Support Ecency
Vote for new Proposal
Delegate HP and earn more
Congratulations @divergente1! You have completed the following achievement on the Hive blockchain and have been rewarded with new badge(s):
Your next target is to reach 900 upvotes.
You can view your badges on your board and compare yourself to others in the Ranking
If you no longer want to receive notifications, reply to this comment with the word
STOPCheck out the last post from @hivebuzz:
Support the HiveBuzz project. Vote for our proposal!
Hola amiga, realmente te quedó hermoso, a mí me gusta usa este tipo de reciclaje, gracias por compartir.
Que buena manera de reutilizar una prenda de ropa que ya no estemos usando y convertirlo en algo nuevo, bonito y útil.
Que lindo que quedo, y la explication esta perfecta.
Qué bello y util bolsito. Me encantó que usaras la parte del bordado para darle más realce al mismo.
Muchas Gracias! @equipodelta 🌟
Muy cierto, podemos extender la vida útil de muchos materiales convirtiéndolos en prendas de gran utilidad. Rescatando lo mejor del reciclaje.
Muchas Gracias. Tambien me gusta tu trabajo
🌟
Hola, me parece genial como elaboraste el bolso, sacando provecho de algo que ya no te parecía útil. Felicitaciones te quedó muy lindo.
Bello trabajo amiga. Me encanto el resultado final, una hermosa carterita bien confeccionada. De verdad me ha encantado cada una de las cosas que has venido mostrando y cada una de tus técnicas. Muchos éxitos y mil bendiciones @divergente1 💕
Gracias Amiga! Tus palabras las tomo con motivacion. Tambien Te deseo exitos en todos tus proyectos y en tu vida. 🤗 @dayadam
Te quedo lindo tu bolsito amiga, excelente trabajo, así aprendemos a reciclar con nuestros jeans que ya no usamos.