Buenas noches queridos amigos!
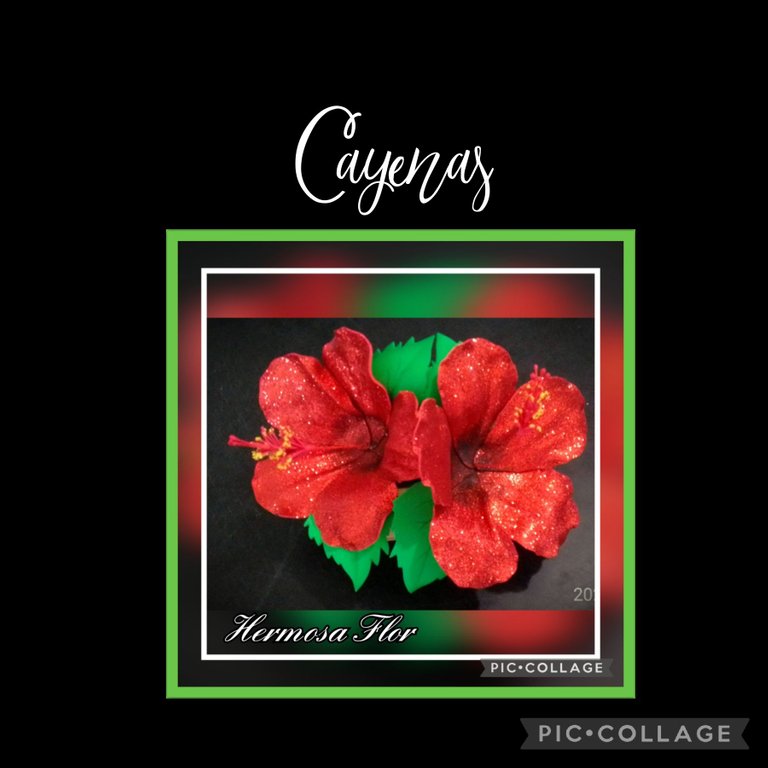
Por aquí vengo nuevamente a mostrarles un paso a paso muy fácil de realizar y con el que podrás decorar cualquier espacio de la casa u oficina, se trata de unas flores muy bonitas, en Venezuela las llamamos Cayenas pero su nombre científico es Hibiscus rosa-sinensis, originario de Asia Oriental y su árbol llega a medir de 2 a 5 metros de altura, y las hay de con distintos colores entre ellas naranja, amarilla, blanca, rosada y la que más me gusta es la roja, de pequeña mi madre y abuela tomaban para los nervios un té que preparaban con sus flores pero, además me enteré que tiene muchas propiedades como, antiespasmódica, para la caída del cabello, y para decorar el jardín o el patio son muy hermosas.
Pero hay quienes como yo, no tenemos jardín, ni patio entonces les mostraré como hacer unas flores artificiales pero que estoy segura te van a encantar y vas a poder realizar tu mismo porque son muy fáciles.
Entonces empecemos:
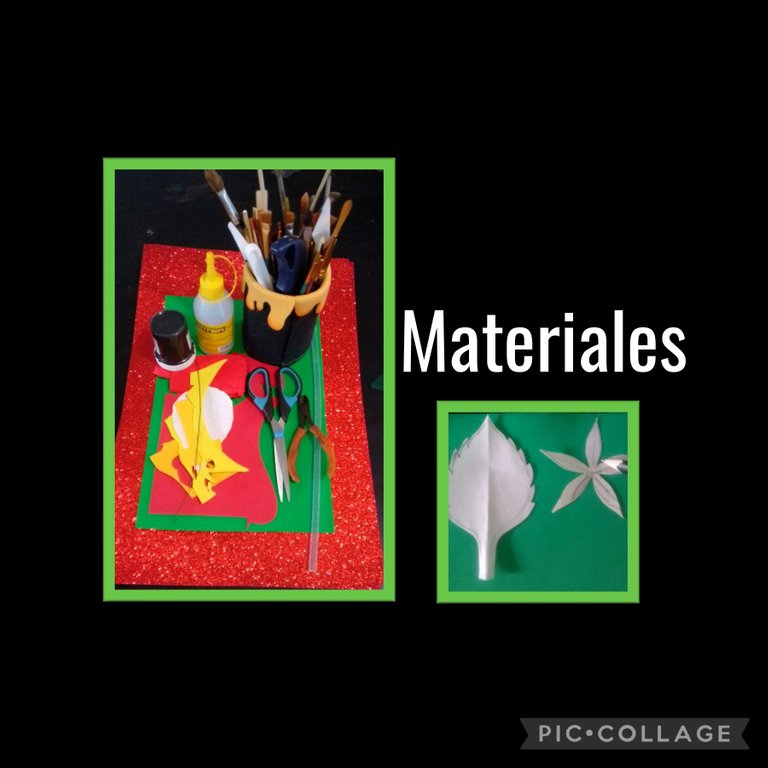
| Foami escarchado y mate | Pintura y pinceles |
|---|---|
| 5 Pistilos | Moldes |
| Alambre floral | Tijera |
| Tijera | Lápiz |
| Palo de madera | Piqueta |
| Silicón | Papel crepé rojo |
| Pistola de silicón | Plancha eléctrica |
Procedimiento:
Paso 1:
Dibujar moldes
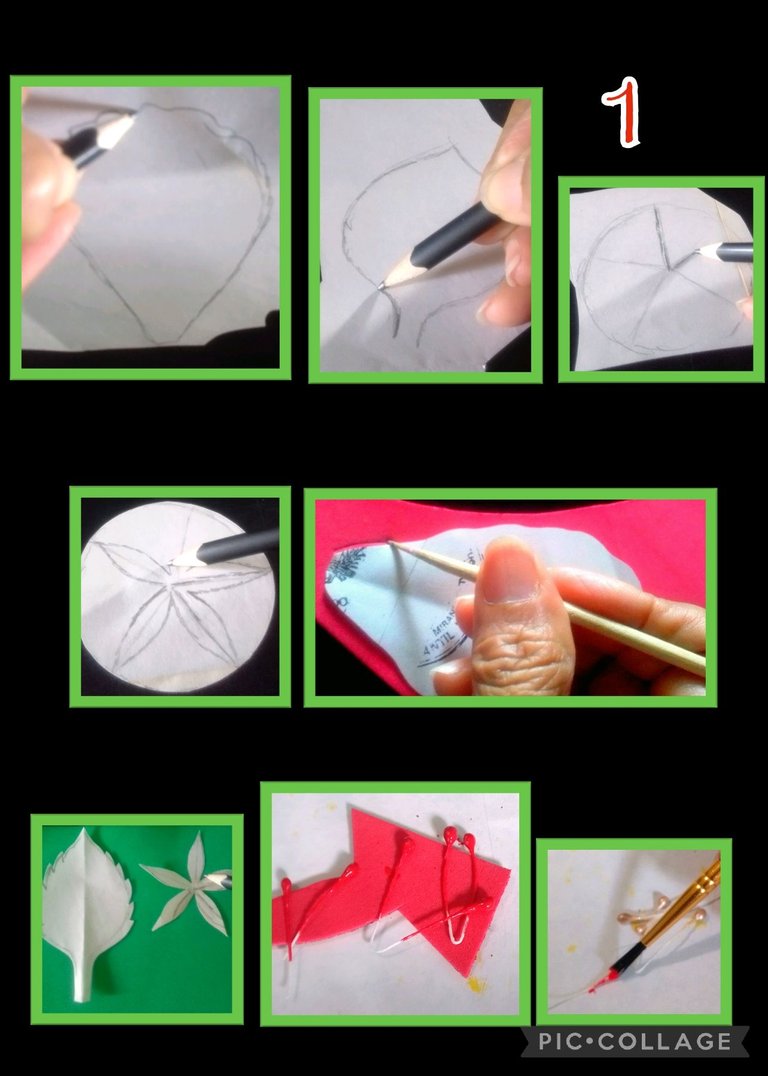
- Comienza por dibujar los moldes, sino sabes dibujar calca o imprime: (pétalo, hoja y sépalo), recorta y marca con un palito de altura sobre el foami:
- 5 Pétalos
- 2 Hojas
- 1 Sépalo y recorta.
- Luego pinta los pistilos de color rojo serán 5 para cada flor y deja secar.
- Paso 2:
Termoformar pétalos.
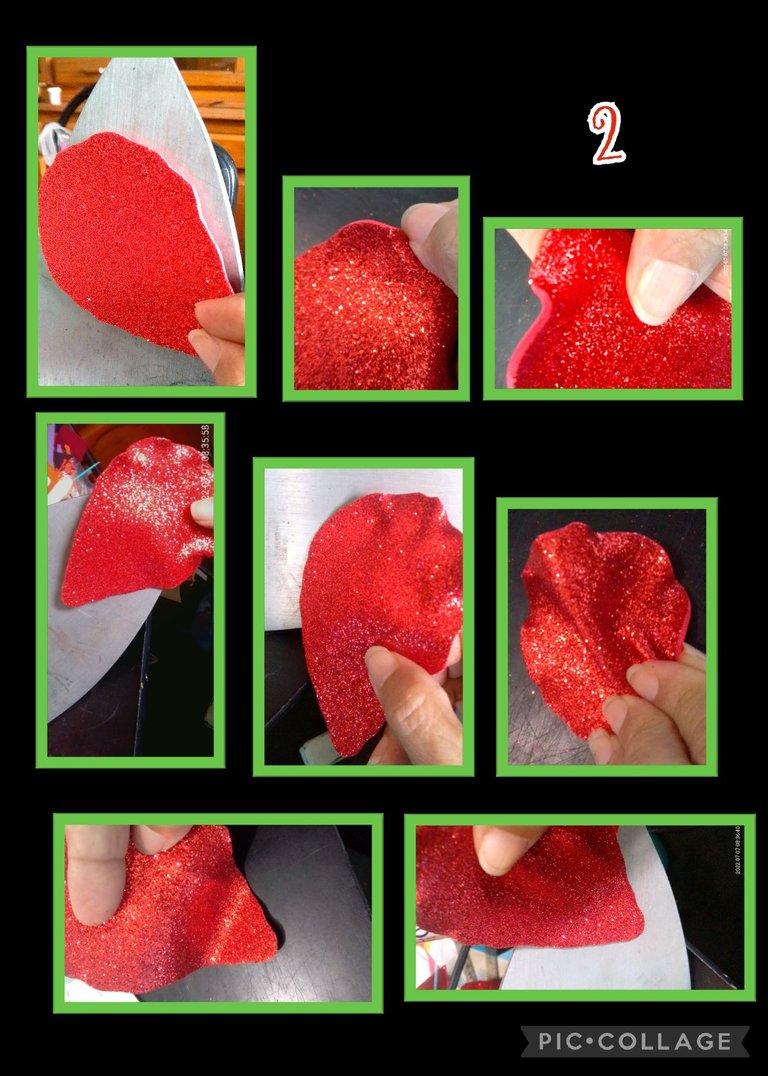
- Calienta la plancha a temperatura media, luego coloca los pétalos uno a uno y calienta por partes para ir dando forma primero a la parte superior del pétalo, torciendo un poco el foami y deja enfriar.
- Luego calienta la parte del centro y arruga o haz pliegues, igual deja enfriar y luego calienta la parte baja del pétalo y dobla como se vé en la foto.
- Paso 3:
Armar pistilos.
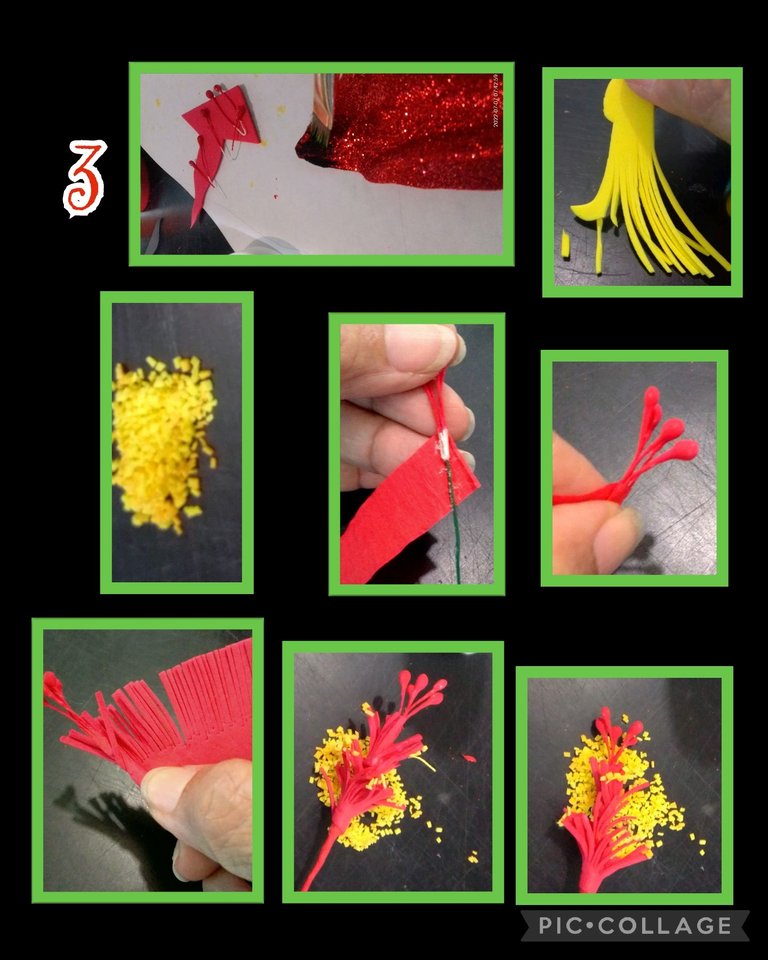
- Mientras secamos los pistilos, aplica pintura marrón oscura o negra en la parte baja de cada uno de los pétalos, barriendo desde abajo hacia arriba, esto para darle profundidad y semejar aún más los pétalos de la cayena.
- Recorta En tiritas muy delgadas un retazo de foami amarillo y recorta en pedacitos como de 0,5 a 1 milímetro, luego une los 5 pistilos y pega al alambre con una tira de papel crepé rojo y forra el alambre.
- Aparte recorta un rectángulo de foami de 3x5cms, aplica silicón y pega, cuando seque comienza a forrar bajando el foami en cada vuelta y al final pega con silicón caliente.
- Ahora aplica pega blanca o silicón en las puntas de las tiritas del pistilo y pasa por el picadillo amarillo de foami para que se peguen.
Paso 4:
Pintar hojas y armar flores.
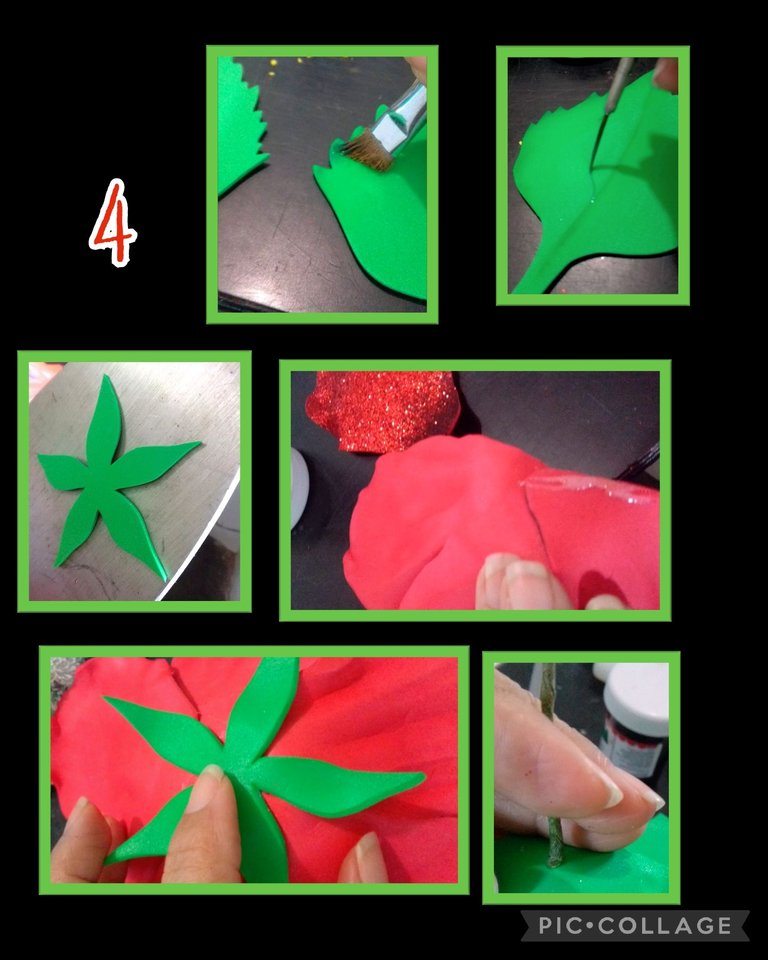
Moja el pincel en agua y pasa por un paño para quitar el exceso de agua, luego moja la punta en pintura verde y comienza a sombrear la orilla de las hojas y delinea las nervaduras con un pincel liner o marcador punta fina.
Luego calienta la plancha y coloca el sépalo sobre para darle un poco de forma.
Aplica silicón caliente en una lateral de los pétalos y comienza a pegar hasta formar la flor y cerrarla con el último pétalo, luego aplica silicón y pega el sépalo haciendo un poco de presión y por último inserta en todo el centro un palito de altura para abrir un orificio y meter el alambre con el pistilo.
Paso 5:
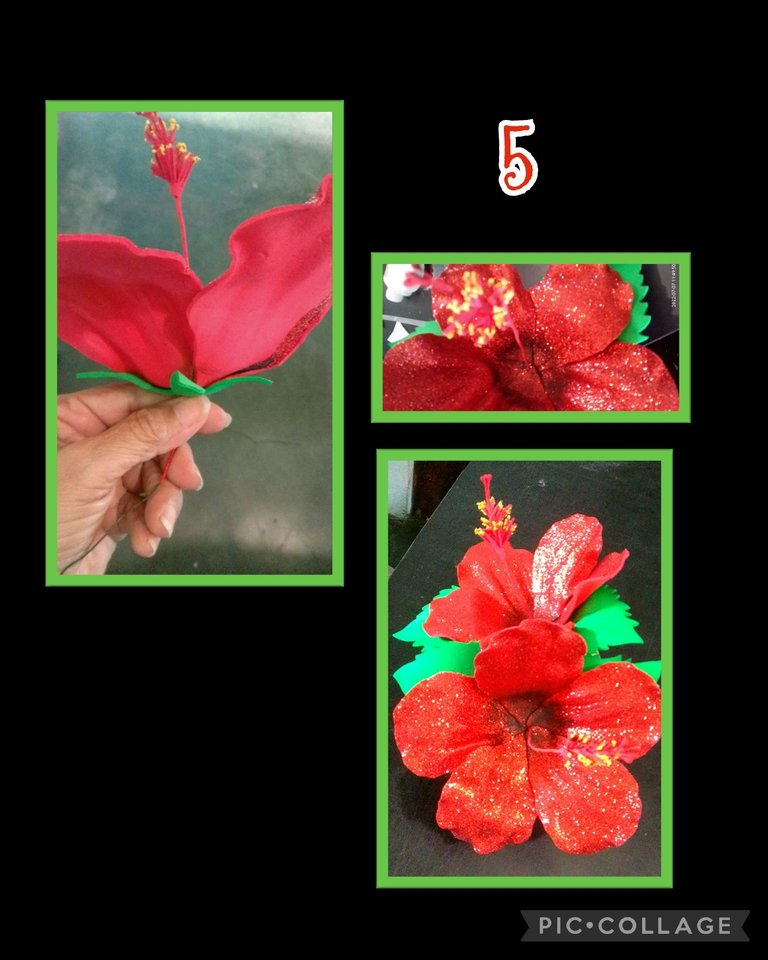
- Pega las hojas y así quedan listas estas lindas flores.
Espero te haya gustado mi paso a paso y deseo que puedas hacerlas para decorar en tu casa u oficina.
Fuente:
https://es.wikipedia.org/wiki/Hibiscus_rosa-sinensis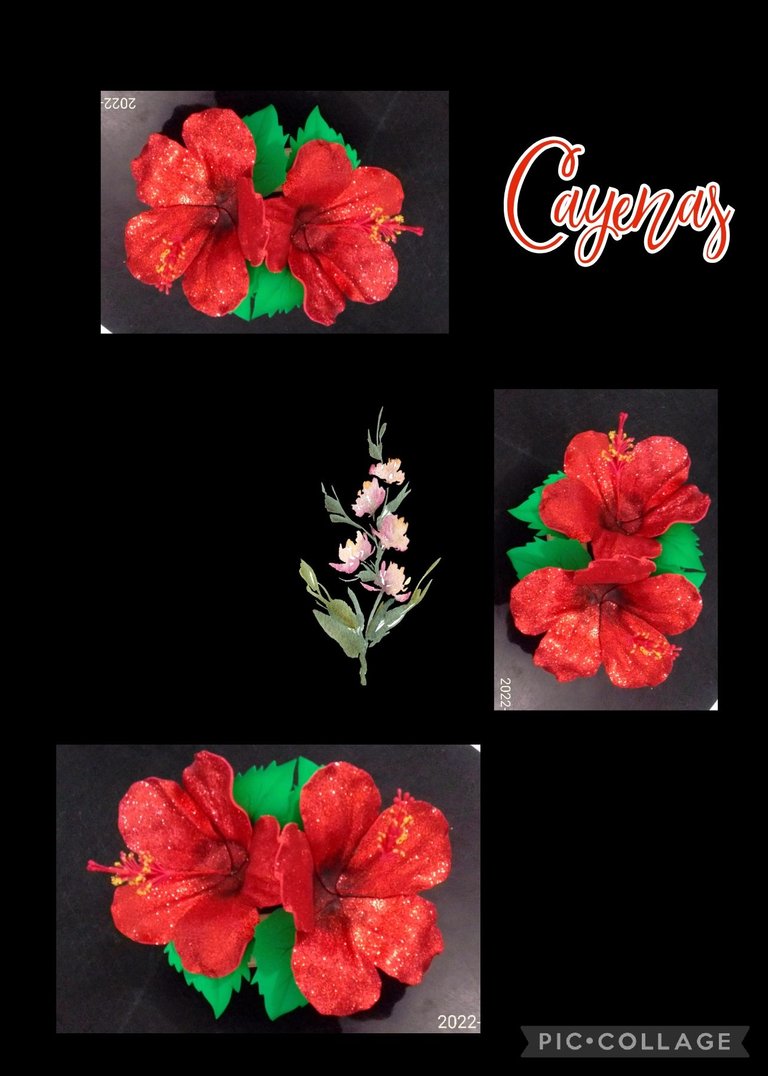
Ahora me despido no sin antes decir que esta publicación está traducida por DeepL, editada con Etiquetas HTML, las Fotos capturadas con mi teléfono Blu G5 y editadas con Pic Collage.
Hasta mi otra publicación...
Saludos y muchas gracias por la visita y apoyo.
English:
Good evening dear friends!
Welcome to all who visit my blog.
When I was a child, my mother and grandmother used to drink a tea made with its flowers to treat their nerves, but I also learned that it has many properties such as antispasmodic, for hair loss, and they are very beautiful to decorate the garden or the yard.
But there are those like me, who have no garden or yard, so I will show you how to make some artificial flowers that I am sure you will love and that you will be able to make yourself because they are very easy.
So let's get started:
| Frosted and matte Foami | Paint and brushes |
|---|---|
| 5 Pistils | Moulds |
| Floral wires | Scissors |
| Scissors | Pencil |
| Wooden stick | Piqueta |
| Silicone | Red crepe paper |
| Silicone gun | Electric iron |
Procedure:
Step 1:
Draw molds
- Start by drawing the molds, if you don't know how to draw, trace or print: (petal, leaf and sepal), cut out and mark with a height stick on the foami:
- 5 Petals
- 2 Leaves
- 1 Sepal and cut out.
- Then paint the pistils red, 5 for each flower and let them dry.
Step 2:
Thermoform petals.
- Heat the iron to medium temperature, then place the petals one by one and heat in parts to shape the top part of the petal first, twisting the foami a little and let it cool.
- Then heat the center part and wrinkle or make folds, let it cool and then heat the lower part of the petal and fold as shown in the photo.
Step 3:
Assemble pistils.
- While drying the pistils, apply dark brown or black paint on the bottom of each of the petals, sweeping from the bottom up, this to give it depth and further resemble the petals of the cayenne.
- Cut a piece of yellow foami into very thin strips and cut into pieces of about 0.5 to 1 millimeter, then attach the 5 pistils and glue to the wire with a strip of red crepe paper and line the wire.
- Cut a 3x5cms rectangle of foami, apply silicone and glue, when it dries start lining the foami down each turn and at the end glue with hot silicone.
- Now apply white glue or silicone on the ends of the strips of the pistil and pass them through the yellow foami to make them stick.
Step 4:
Paint leaves and assemble flowers.
Dip the brush in water and wipe off excess water, then dip the tip in green paint and begin shading the edges of the leaves and outline the veins with a liner brush or fine tip marker.
Then heat the iron and place the sepal on top to give it some shape.
Apply hot silicone on one side of the petals and start gluing to form the flower and close it with the last petal, then apply silicone and glue the sepal with a little pressure and finally insert a stick in the center to open a hole and put the wire with the pistil.
Step 5:
- Glue the leaves and these pretty flowers are ready.
I hope you liked my step by step and I hope you can make them to decorate your home or office.
Source:
https://es.wikipedia.org/wiki/Hibiscus_rosa-sinensis
Now I say goodbye but not before saying that this publication is translated by DeepL, edited with HTML tags, the photos captured with my Blu G5 phone and edited with Pic Collage.
Until my other publication...
Greetings and thank you very much for your visit and support.
Súper bellas.
Muy bien trabajas las técnicas para lograr tal parecido con las cayenas originales. Te quedaron perfectas.
Hola amiga, muchas gracias por tus palabras.
Que bueno que te gustaron.
Saludos y bendiciones para ti.
Congratulations @elmundodebetty! You have completed the following achievement on the Hive blockchain and have been rewarded with new badge(s):
Your next target is to reach 200 upvotes.
You can view your badges on your board and compare yourself to others in the Ranking
If you no longer want to receive notifications, reply to this comment with the word
STOPTo support your work, I also upvoted your post!
Wow amiga @elmundodebetty , estás flores te quedaron verdaderamente hermosas, están de ensueño. Felicidades, y gracias por compartir este excelente paso a paso.
Saludos 😚🤗🌺🌸😍🥰🌈🐱🐾🌞😊💐😘🌹❤️💕
Muchas gracias mi querida amiga, me encanta que te gusten.
Y a ti por leer y comentar:
Saludos.😍
¡Felicidades! Esta publicación obtuvo upvote y fue compartido por @la-colmena, un proyecto de Curación Manual para la comunidad hispana de Hive que cuenta con el respaldo de @curie.
Si te gusta el trabajo que hacemos, te invitamos a darle tu voto a este comentario y a votar como testigo por Curie.
Si quieres saber más sobre nuestro proyecto, acompáñanos en Discord: La Colmena.
Gracias, muchas gracias @la-colmena por su apoyo!
Qué hermosas son, se ven muy reales. Esta semana he estado practicando algunas, intento hacer un centro de mesa. Las tuyas son espectaculares.
Hola, hola... muchas gracias y que bueno!
Las flores son muy hermosas y si, hay que practicar para ir aprendiendo, eso también hago yo y me encantaría ver ese centro de mesa, me imagino quedará muy lindo!
Muchos saludos @equipodelta y gracias por su apoyo.
It lost its funding recently and your help would be much appreciated to keep the HiveSQL service free for the Hive community.
You can do it on Peakd, Ecency, or using HiveSigner.
Thank you for your support!Dear @elmundodebetty, sorry to jump in a bit off topic but may I ask you to support the HiveSQL proposal?