

Feliz y bendecido sábado.
Bienvenidos a todos los que me visitan y dedican un poco de su tiempo para ver mi publicación.
Entonces anímate y acompáñame a ver como se hace.
Necesitas:
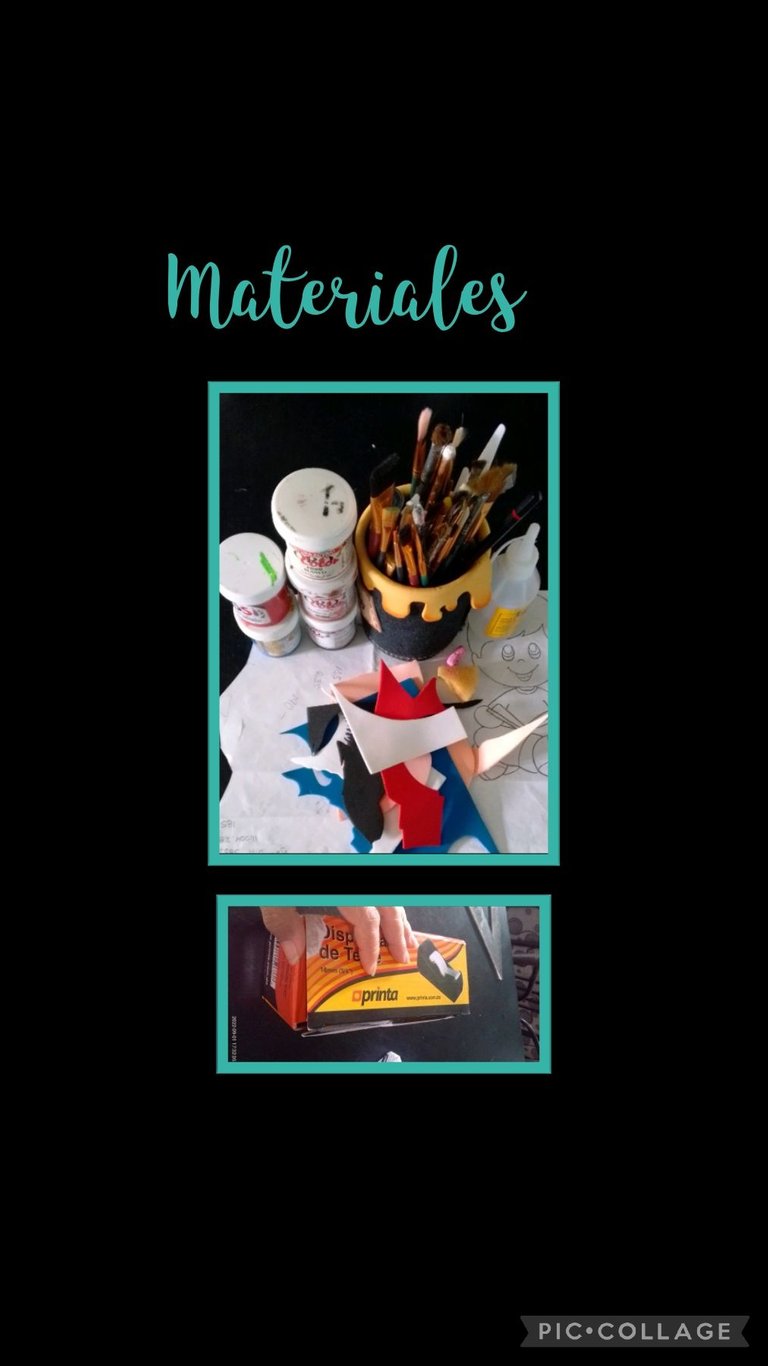
| Caja reciclada | Cartulinas negra y blanca |
|---|---|
| Foami de colores | Pinturas y pinceles |
| Tijera y regla | Lápiz y marcador |
| Tiza y goma espuma | Silicón |
| Cuchilla | Palillo |
| Dibujo | Anime o icopor |
Listos los materiales, comencemos:
Paso 1:
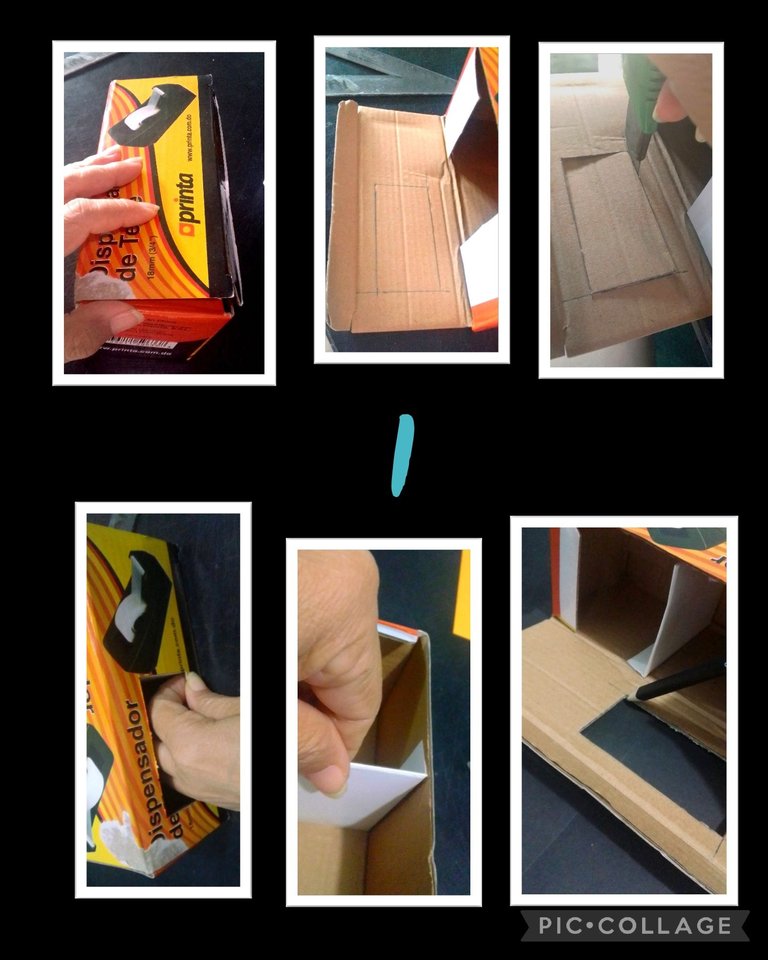
- Marca en la tapa de la caja, un rectángulo del tamaño de tu preferencia luego recorta con una cuchilla, después recorta un pedazo de cartulina, deja una pestaña en cada extremo y pega para hacer una división en la caja la cual pegarás justo donde queda el orificio.
- Ahora coloca la caja sobre la cartulina negra y márcala incluyendo el orificio.
Paso 2:
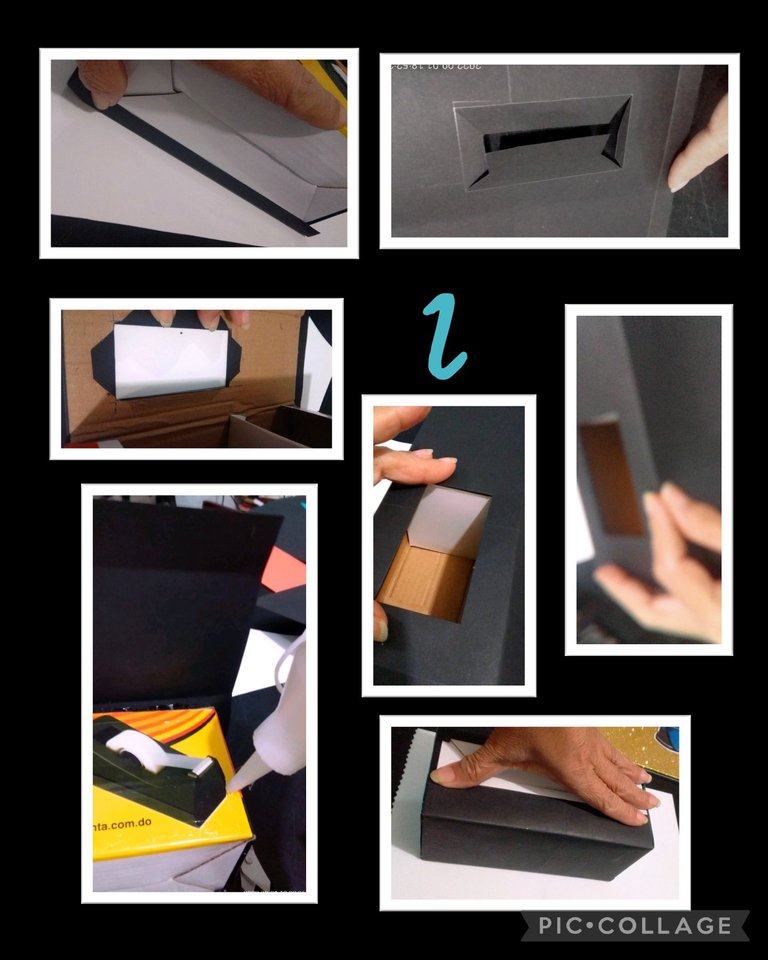
- Comienza a forrar la caja pegando una orilla en la parte de abajo de la caja y haz un corte en el centro del orificio y recorta hacia las esquinas. (ver foto 2), luego aplica silicón en las pestañas y pega hacia adentro.
- Luego aplica silicón a cada lado del cuadro y pega haciendo los dobleces, así harás hasta forrar todos los lados y rematas en la parte de abajo.
Paso 3:
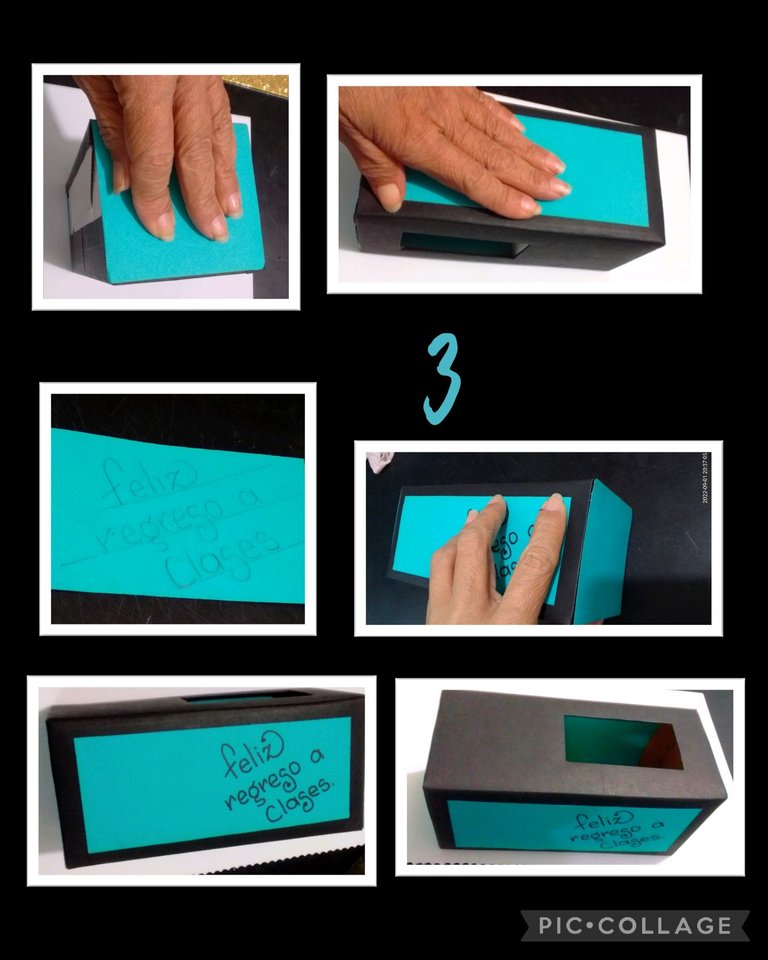
- Ahora para los laterales recorta en cartulina turquesa 2 cuadrados y un rectángulo, luego pega a la caja haciendo un poco de presión, puedes colocar la frase de "Felíz regreso a Clases" o escribir el nombre, todo queda a tu creatividad.
Así queda forrada la caja.
Paso 4:
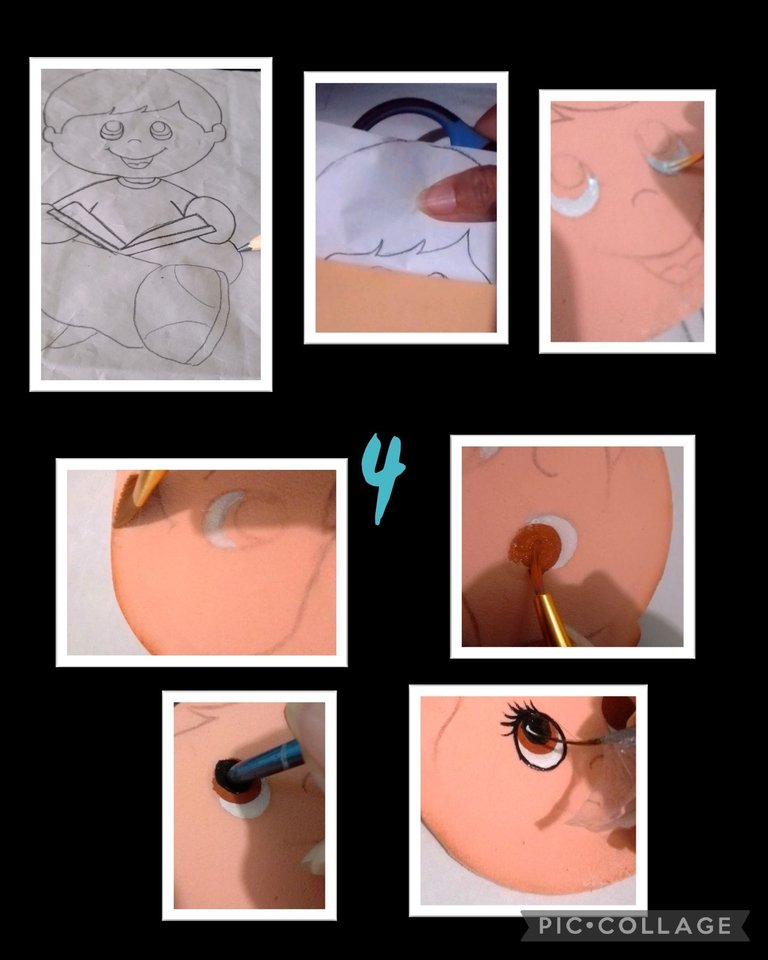
- Remarca el dibujo con un lápiz, coloca el papel sobre el foami y frota con la tijera hasta que se marque el dibujo y recorta, así harás con cada una de las piezas.
- Con un pincel delgado comienza a pintar o rellenar los ojos con pintura blanca y deja secar, mientras esto pasa, con un pincel angular, comienza a pintar el borde de las piezas.
- Sigue rellenando los ojos ahora con pintura marrón, deja secar y luego con la punta trasera del pincel pinta con negro y delinea , por último pon un punto de luz con pintura blanca.
Paso 5:
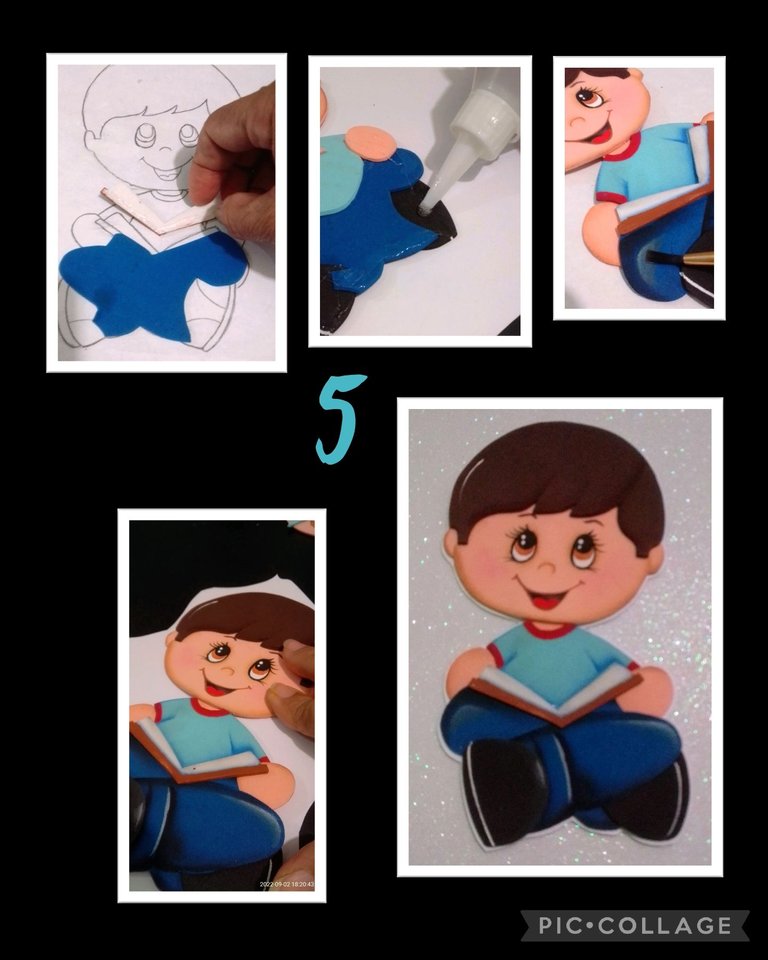
- Después de pintar todas las piezas, aplica silicón y comienza a pegar y armar el muñequito.
- Aplica silicón en la parte posterior del muñequito y pega a una cartulina blanca y recorta dejando un borde de 1 o 2 milímetros.
Paso 6:
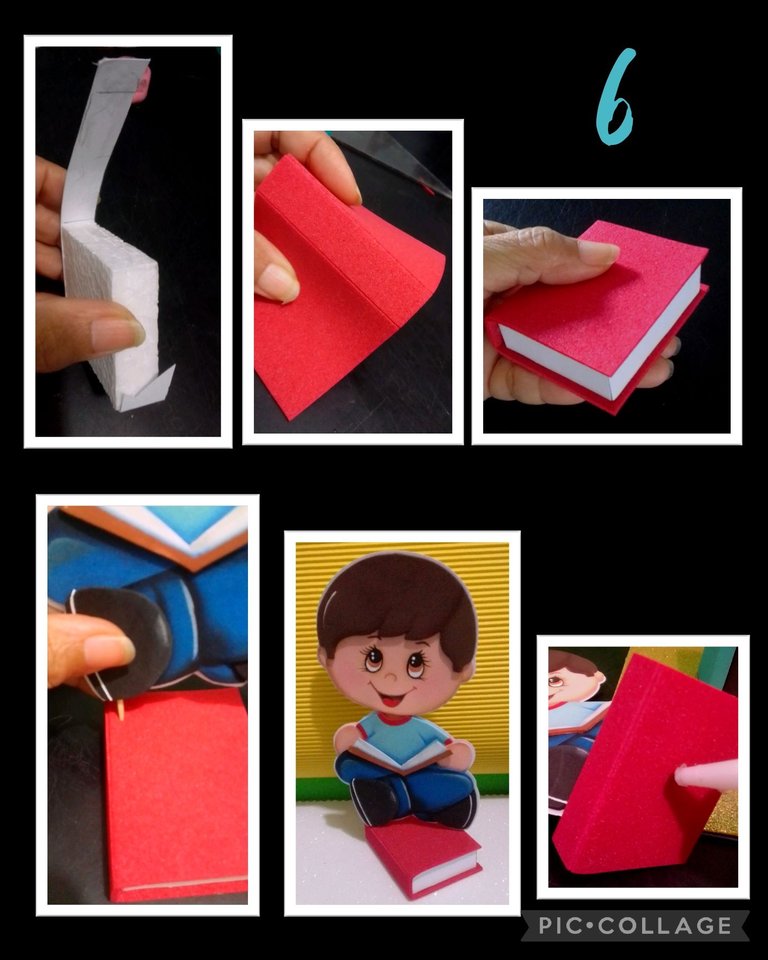
- Recorta un rectángulo en anime de 8x5cms. luego mide el contorno y recorta en cartulina blanca una tira y pega con silicón al anime.
- Aparte recorta un rectángulo de 18cm x 6cm, coloca sobre el anime y marca el espesor del anime y pasa la cuchilla superficialmente haciendo 2 pequeños cortes, luego aplica silicón y pega al anime para armar el libro.
- Inserta un palillo en el zapato del muñequito y la otra punta del palillo inserta en el anime para simular que el niño está sentado sobre el libro y aplica silicón en la parte de abajo del libro.
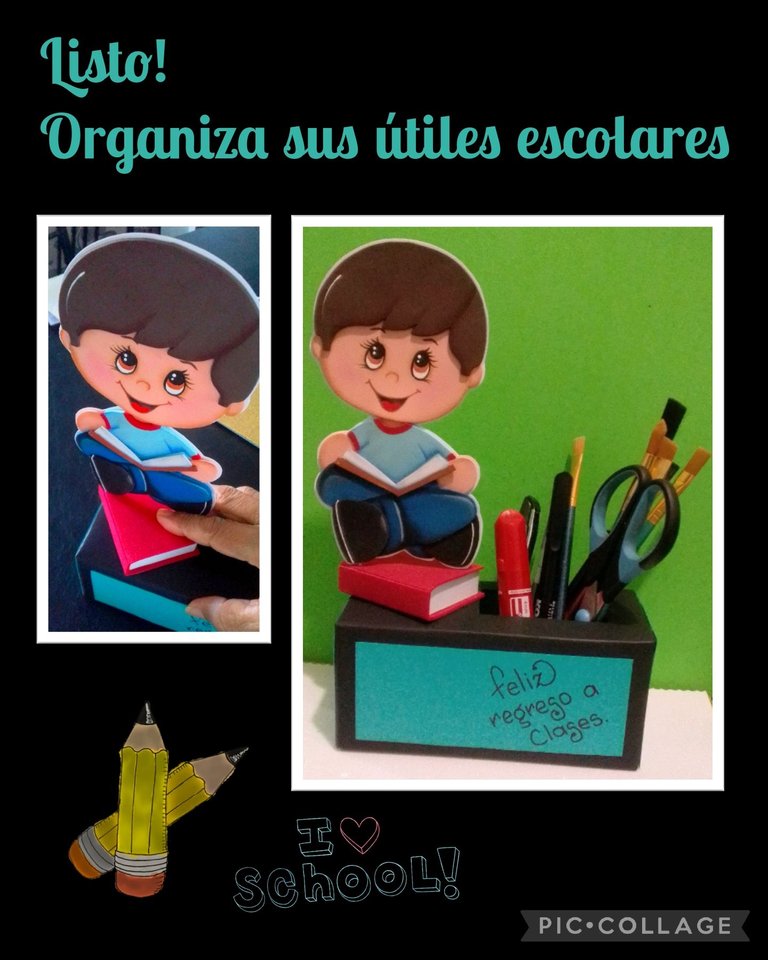
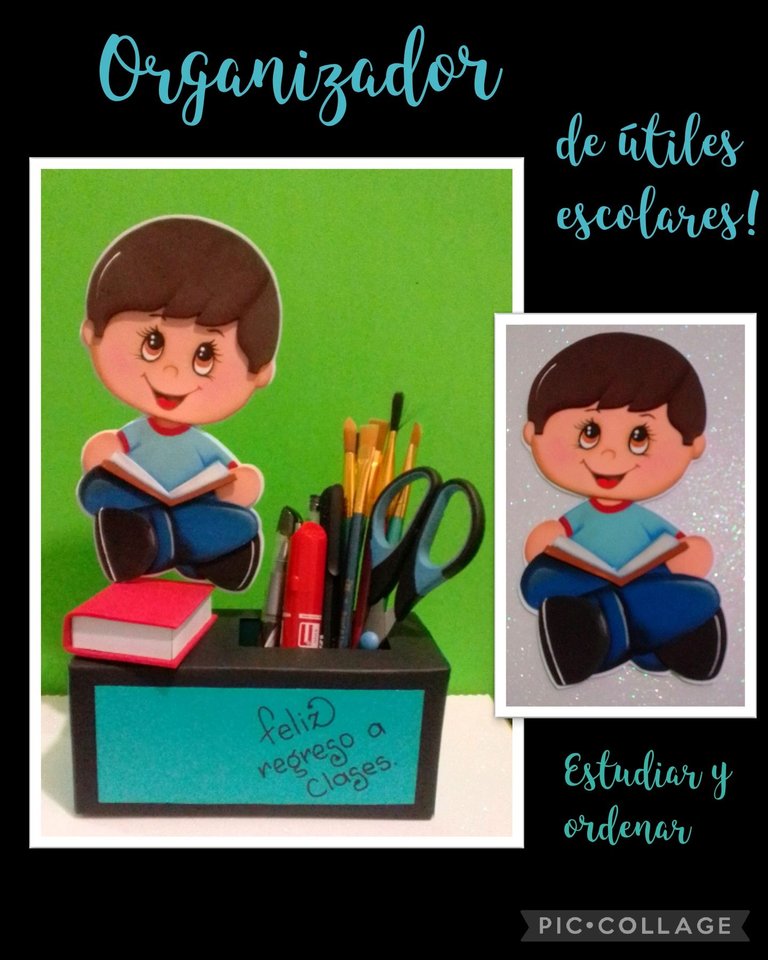
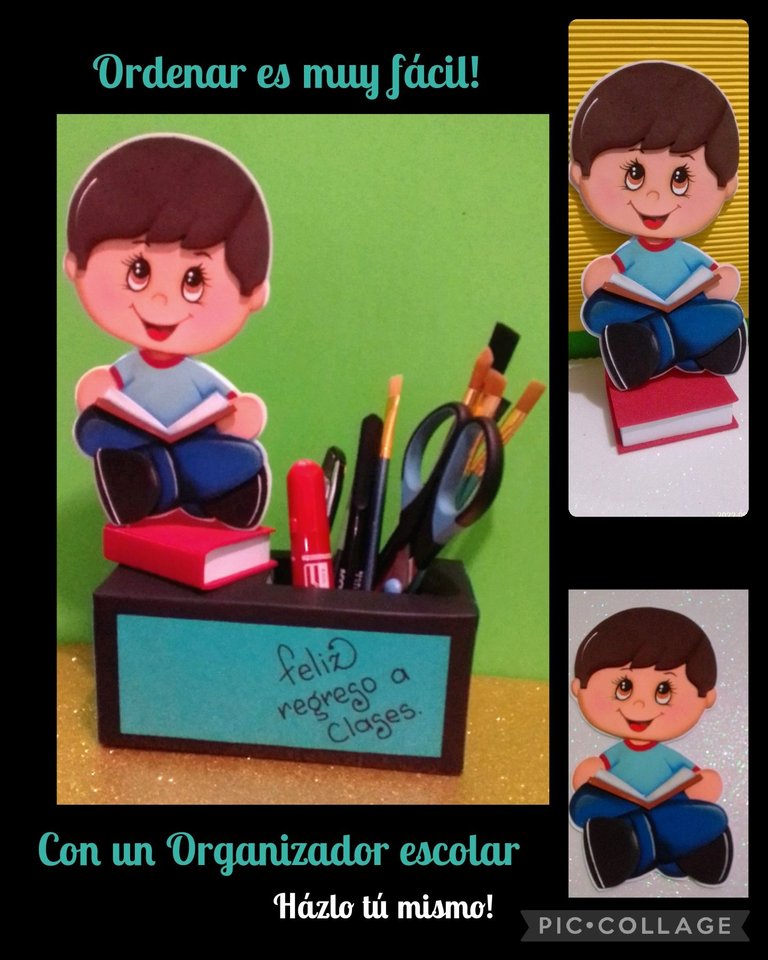
- Y por último pega sobre la caja, así queda listo este fácil, útil y lindo organizador.
Y ahora te muestro otras fotos para que veas lo que puedes hacer con una simple caja y retazos de foami y cartulina.
Fuente:
https://www.pinterest.es/pin/68743836601/
Mi publicación la traduje con DeepL, el texto usando etiquetas HTML y las fotos son capturadas por mi teléfono BLU G5 y editadas con Pic Collage.
Me despido deseando que mi publicación te sirva de guía para crear un Organizador a tu gusto.
Y si es de tu agrado me dejas un comentario, feliz estaré de responder.
Muchas gracias por tu visita.
Saludos.
English:
Happy and blessed Saturday.
Welcome to all of you who visit me and dedicate a little of your time to see my publication.
As the school season is approaching, today I want to share with you a tutorial where I show you how to make a nice and useful school organizer, made with a recycled box, which will serve for your child to learn to keep orderly their supplies such as pencils, colors, scissors, brushes, etc. and you can also adapt to your need.
So cheer up and join me to see how it's done!
You need:
| Recycled box | Black and white cardstock |
|---|---|
| Colored Foami | Paints and brushes |
| Scissors and ruler | Pencil and marker |
| Chalk and foam rubber | Silicone |
| Pencil and marker | Chalk and foam rubber |
| Drawing | Anime or icopor |
Materials ready, let's get started:
Step 1:
- Mark on the lid of the box, a rectangle of the size of your choice then cut with a knife, then cut a piece of cardboard, leave a tab at each end and glue to make a division in the box which you will glue just where the hole is.
- Now place the box on the black cardboard and mark it including the hole.
Step 2:
- Start lining the box by gluing a border to the bottom of the box and cut a slit in the center of the hole and trimming towards the corners (see photo 2), then apply silicone to the tabs and glue inwards.
- Then apply silicone to each side of the box and glue making the folds, this way you will do until you cover all the sides and finish off at the bottom.
Step 3:
- Now for the sides, cut out 2 squares and a rectangle in turquoise cardboard, then glue to the box with a little pressure, you can place the phrase "Happy Back to School" or write the name, everything is up to your creativity.
This is how the box is lined.
Step 4:
- Outline the drawing with a pencil, place the paper on the foami and rub with the scissors until the drawing is marked and cut it out, this is what you will do with each of the pieces.
- With a thin brush begin to paint or fill the eyes with white paint and let dry, while this happens, with an angled brush, begin to paint the edge of the pieces.
- Continue filling the eyes now with brown paint, let it dry and then with the back tip of the brush paint with black and outline , finally put a point of light with white paint.
Step 5:
- After painting all the pieces, apply silicone and start gluing and assembling the doll.
- Apply silicone on the back of the doll and glue to a white cardboard and cut out leaving a border of 1 or 2 millimeters.
Step 6:
- Cut a rectangle in anime of 8x5cms. then measure the outline and cut a strip in white cardboard and paste with silicone to the anime.
- Cut out a rectangle of 18cm x 6cm, place on the anime and mark the thickness of the anime and pass the knife superficially making 2 small cuts, then apply silicone and glue to the anime to assemble the book.
- Insert a toothpick into the doll's shoe and the other end of the toothpick into the anime to simulate the child sitting on the book and apply silicone to the bottom of the book.
- And finally glue on the box, so this easy, useful and cute organizer is ready.
And now I show you other pictures so you can see what you can do with a simple box and scraps of foami and cardboard
Source:
https://www.pinterest.es/pin/68743836601/
My post was translated with DeepL, the text using HTML tags and the photos are captured by my BLU G5 phone and edited with Pic Collage.
I say goodbye wishing that my publication serves you as a guide to create an Organizer to your liking.
And if you like it, leave me a comment, I'll be happy to answer.
Thank you very much for your visit.
Greetings.
Hola muy encantada con ese hermoso organizado.
Hola amiga, muchas gracias.
Feliz noche!
Bendiciones.
community & peakd as well as on my Discord Server
comunidad de colmena y Peakd así como en mi servidor de discordiaCongratulations, your post has been upvoted by @dsc-r2cornell, which is a curating account for @R2cornell's Discord Community. We can also be found on our hive Felicitaciones, su publication ha sido votado por @dsc-r2cornell. También puedo ser encontrado en nuestra
Muchas gracias @dsc-r2cornell por el apoyo a mi publicación.
Bello organizador✂️✏🖍🖌, el muñeco te quedo demás de lindo! Me encantó!! 🥰🥰🥰
Hola amiga, muchas gracias!
Saludos.
No deja de sorprenderme tu talento, haces que parezca fácil hacer figuras en foami, esta forma de hacer un organizador de materiales es diferente cualquiera quisiera tenerlo en su escritorio, gracias por compartir tu creatividad.
Hola querida amiga, muchas gracias por tus lindas palabras, de verdad me alegran el día y bueno es para mi placentero compartir con ustedes mis manualidades.
Gracias a ti por comentar!
Saludos y bendiciones.
Que preciosura, me encata tu trabajo, muy bien explicado y se ve bastante sencillo. Nunca se me ha dado bien hacer ojos pero me gustó mucho como lo explicaste.
Muchas gracias por compartir amiga. Saludos. ✨❣️
Hola amiga, muchísimas gracias, si es sencillo!
Estoy a la orden, cualquier duda que tengas.
Y a ti por comentar.
Igual para ti.
Muchas gracias linda. 😊✨