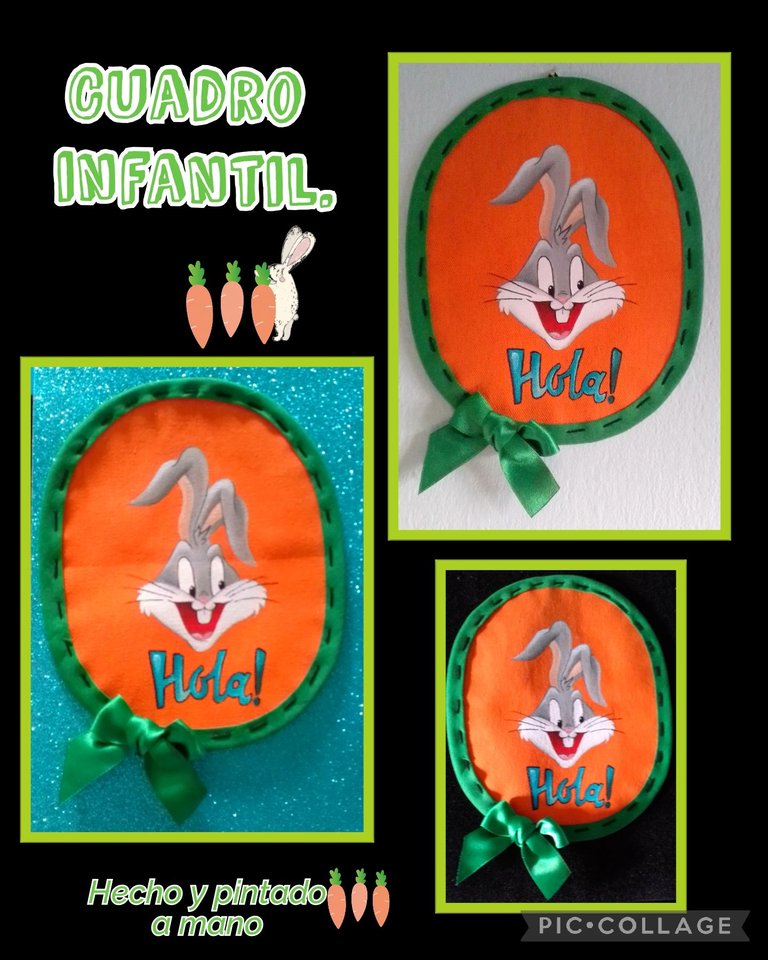
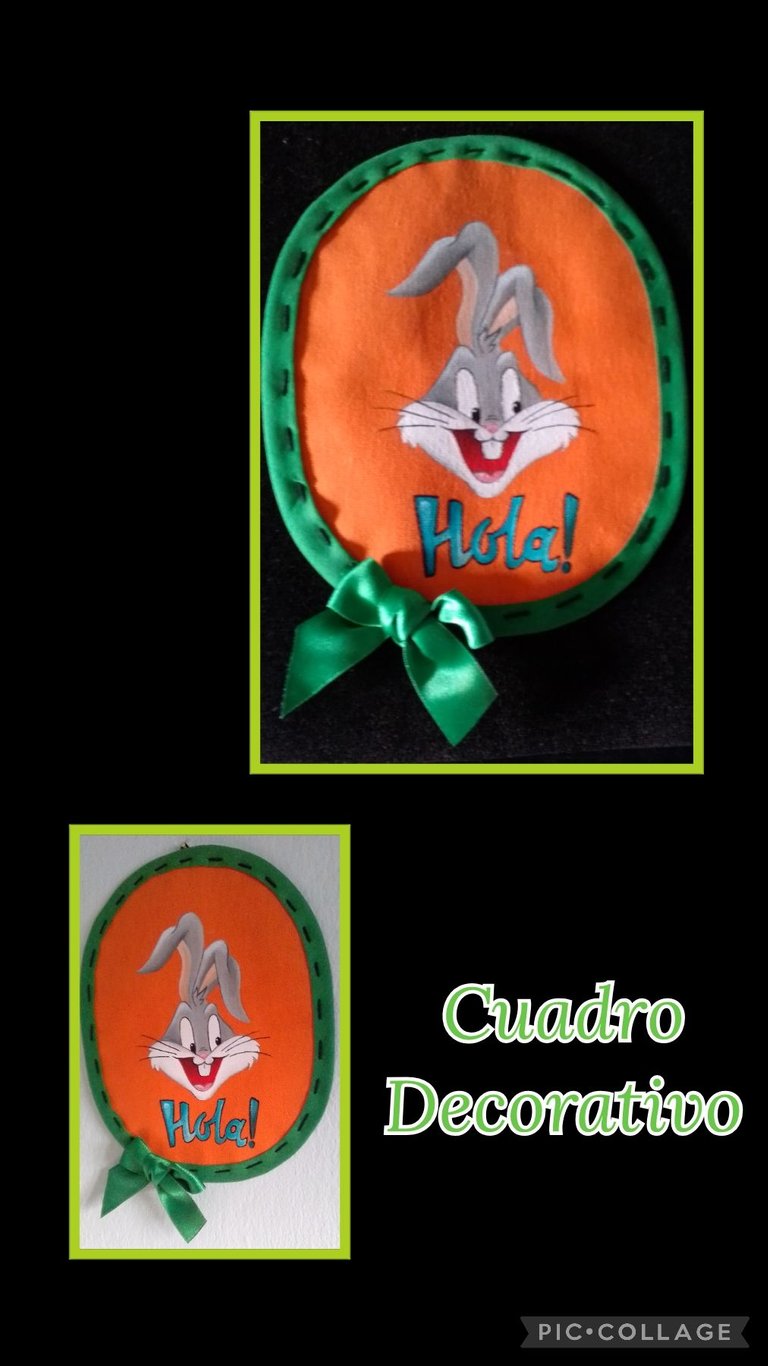
Hoy como siempre quiero darles la bienvenida a mi espacio preferido en donde me encanta compartir con ustedes mis publicaciones y hoy quiero enseñarles a realizar este lindo Cuadro Infantil de Bugs Bunny que hice con un retazo de tela y pinté a mano con pinturas al frío y les digo, es muy fácil de hacer y con pocos y económicos materiales, me parece una idea muy buena para decorar las paredes de la casa, este para el cuarto de un niño es muy bonito. Después les pintaré uno para la cocina, bueno si les gusta este jajaja.
Espero que sí!
Tienes que buscar estos materiales:
| Tela gruesa | Sesgo verde |
|---|---|
| Hilo de tejer | Hilo de coser y agujas |
| Pinturas y pinceles | Bolígrafo sin tinta |
| Dibujo o impresión | Papel carbón |
| Cinta de tela |
Ahora te invito a que me acompañes a ver y aprender el procedimiento!
Paso 1:
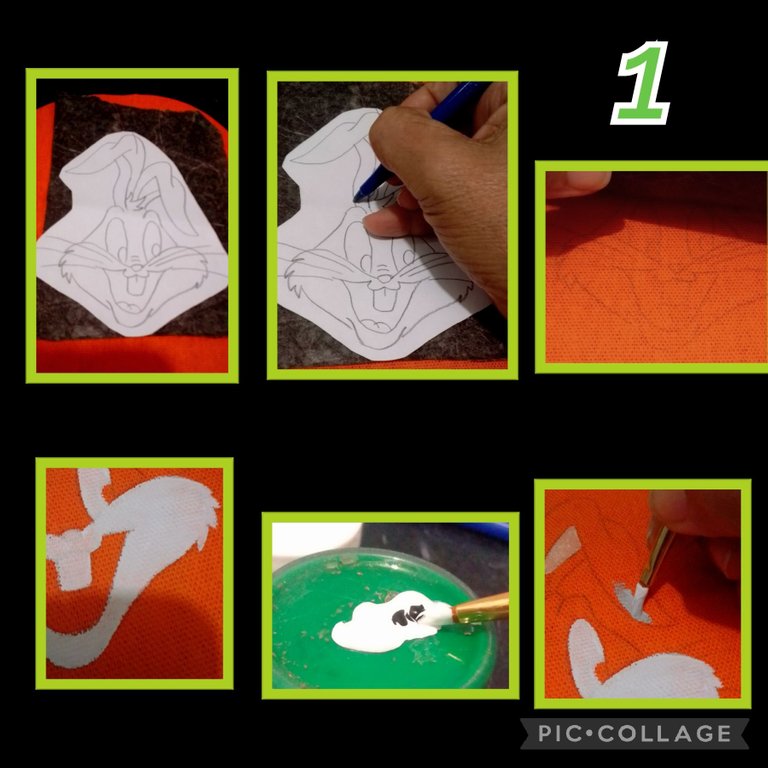
Primero recorta la tela y coloca sobre el papel carbón y arriba el dibujo o impresión, si quieres puedes fijar con alfileres.
Luego remarca con un bolígrafo sin tinta haciendo presión para que se transfiera el dibujo a la tela y antes de retirar los alfileres asegúrate que no falte nada por transferir y luego retira los alfileres y papeles.Ahora comienza a pintar con pintura blanca, la parte baja de la cara, ojos, dientes y nariz, (tratando en lo posible de no salirte del borde, jajaja, como cuando dibujabas en primaria), deja secar un rato y pasa otra capa de pintura, a veces si la pintura está muy líquida, será necesario otra capa (2 o 3 capas) para que quede totalmente blanco.
Aparte liga pintura blanca y un poquito de negro para hacer un color gris claro y comienza a pintar las orejas.
- Paso 2:
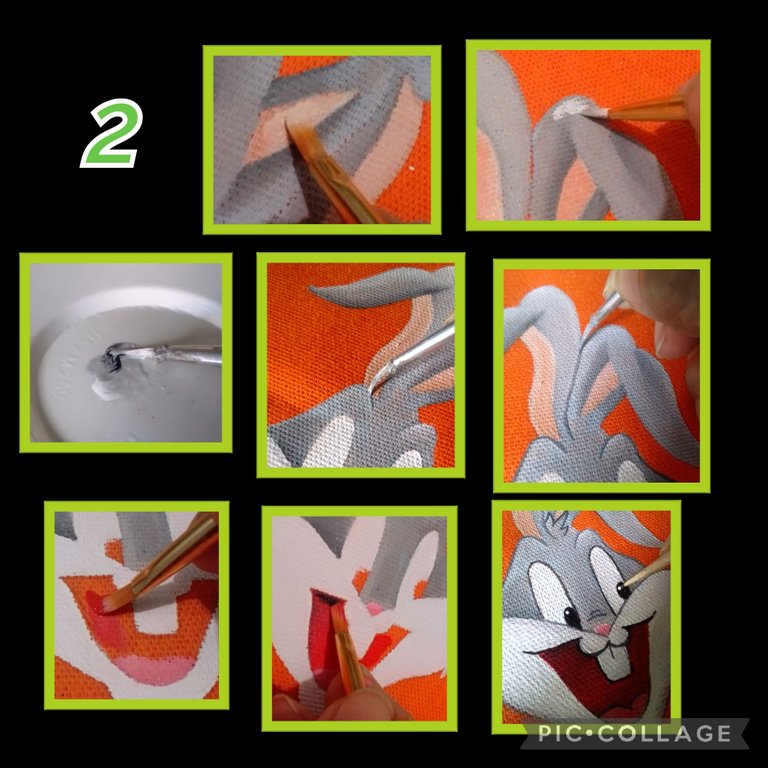
- Después de pintar las orejas y toda la parte gris de la cara, pinta con color carne el centro de las orejas luego pinta con un poquito de pintura blanca en la parte de arriba de las orejas para dar claridad (ver foto).
- Luego aplica otra capa de pintura carne en las orejas.
- Vuelve a ligar un poco de pintura gris, pero agrega más pintura negra para delinear por el centro de las orejas, cejas y el contorno de la cara.
- Rellena con pintura rosada la lengua y con pintura roja la boca, luego pinta con negro la parte de arriba y difumina hacia abajo con pintura roja hasta unir los colores.
- Paso 3:
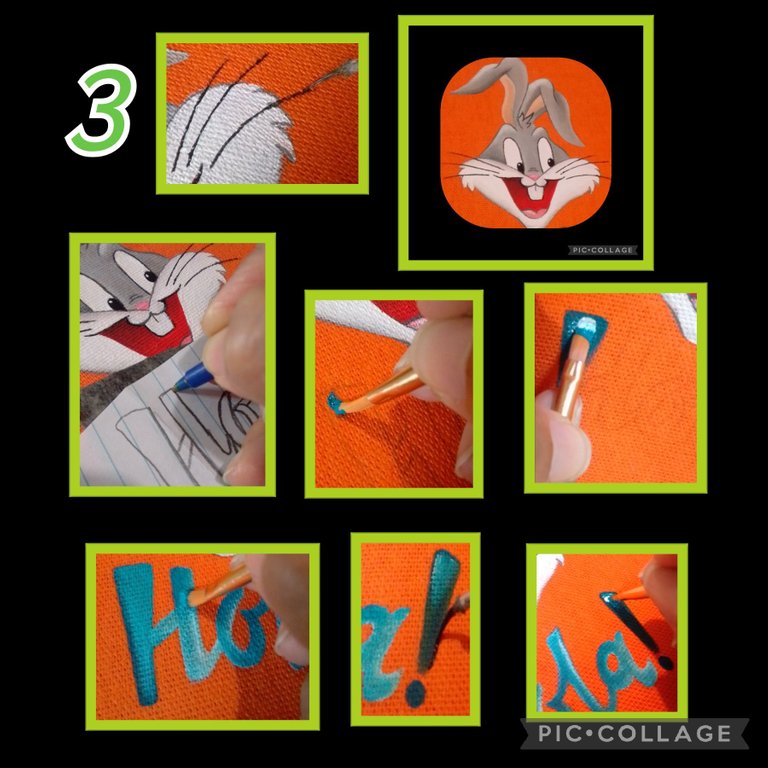
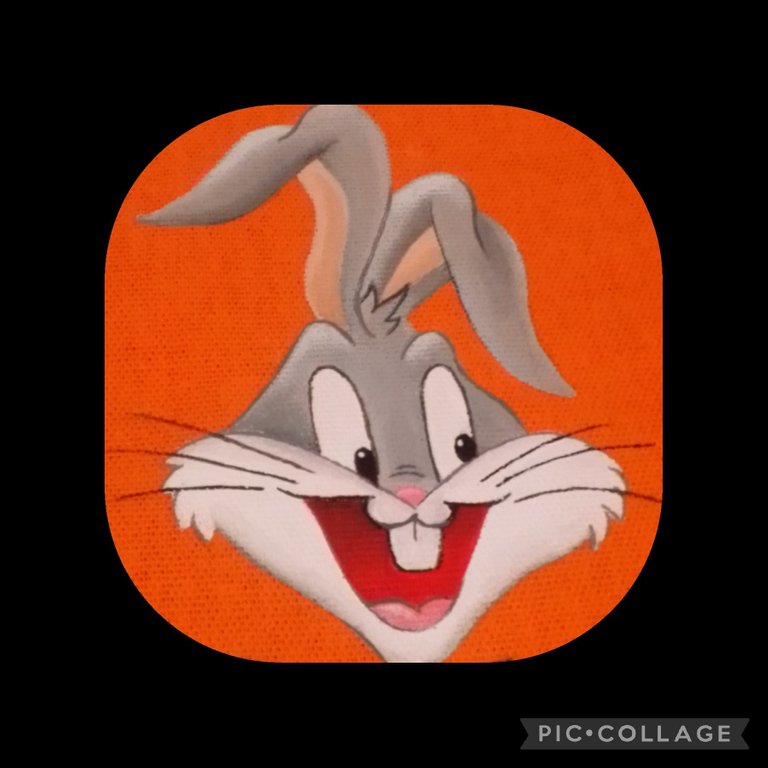
- Delinea con pintura negra los ojos, bigotes, boca del conejo y deja secar.
- Seguido transfiere la palabra (Hola), repitiendo el primer paso, luego comienza a pintar con pintura color turquesa y vas aclarando aplicando un poco de pintura blanca y difumina uniendo los dos colores..(esto se hace cuando la pintura está aún húmeda)
- Y para terminar, delinea con pintura negra todo los bordes de las letras y deja secar bien.
- Paso 4:
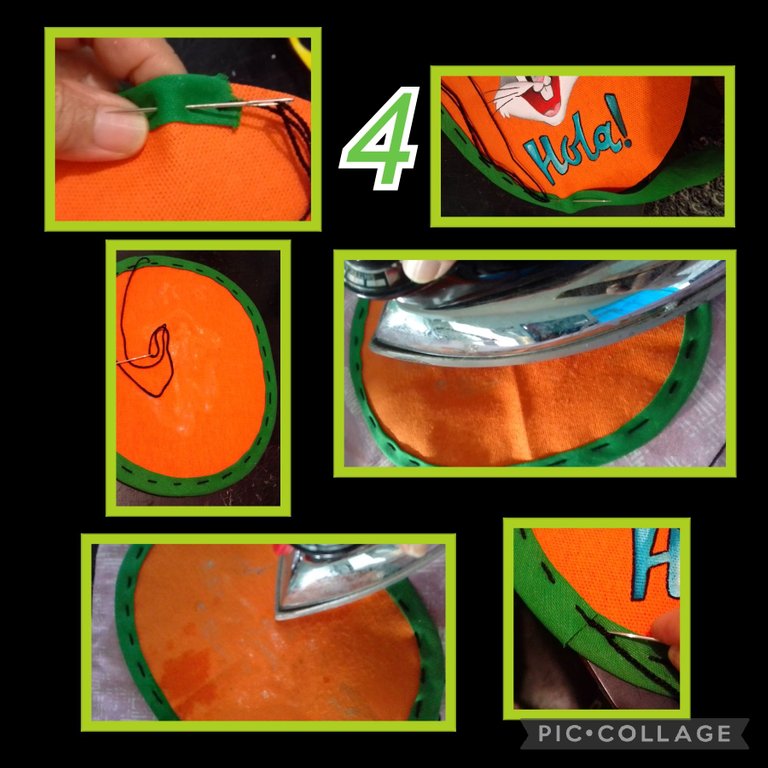
Comienza a coser el sesgo hilvanando o dando puntadas con hilo de tejer color negro, tratando que sean uniformes por todo el contorno del óvalo.
Calienta la plancha y pasa por el lado de atrás de la pintura, esto es para fijar más la pintura y quitar las arrugas de la tela.
Remata haciendo un nudo.
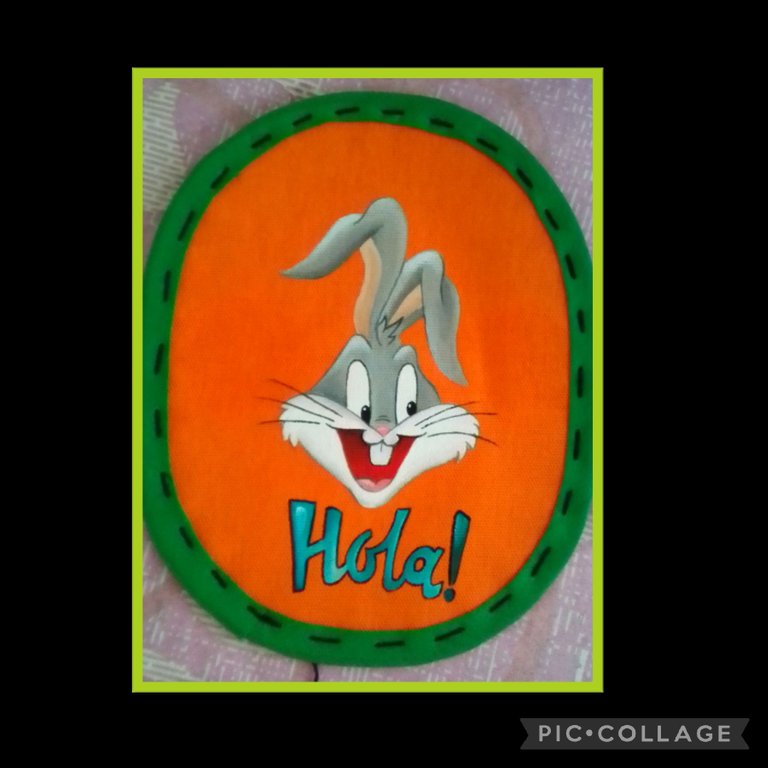
Así va quedando!
- Paso 5:
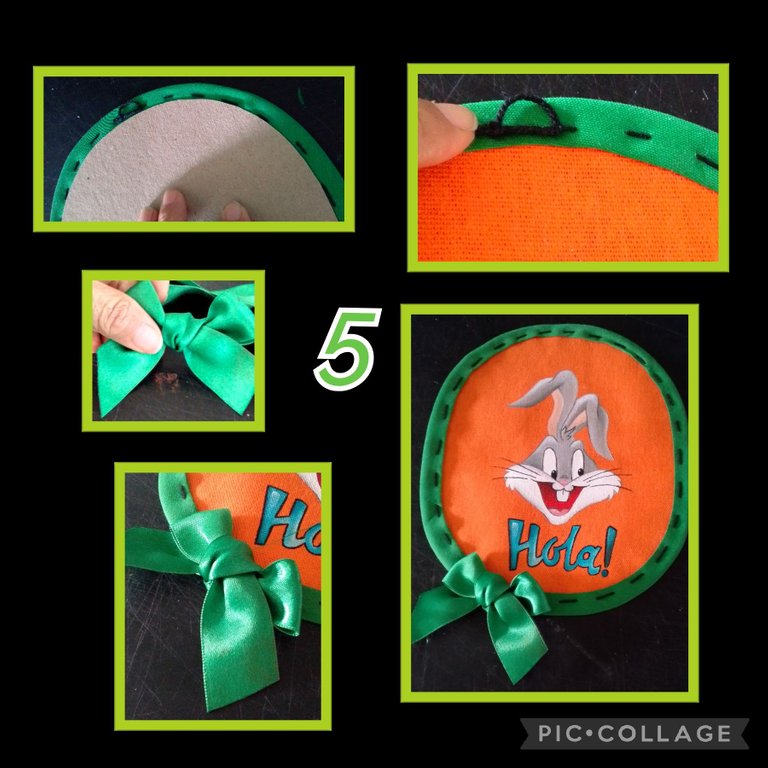
- Si la tela es muy suave y quieres darle firmeza, recorta un cartón y pega detrás de la tela.
- Ah, se me olvidaba, haz una lazada con el hilo de tejer en el centro del óvalo para poder guindar nuestro cuadro.
- Aparte haz un lazo con cinta verde y cose o pega en el empate del sesgo para que no se vea.
Y listo! Ya quedó terminado este lindo y sencillo Cuadro Decorativo

Mi publicación está traducida con DeepL, utilizando etiquetas HTML y las fotos son capturadas con mi Teléfono Blu G5 y editadas con Pic Collage.
Fuente:
Ahora ya si me despido, feliz de haber compartido este rato con ustedes, y deseando sea de provecho mi tutorial
Si tienes alguna pregunta, estoy a tu orden.
Muchas gracias por tu visita y comentario.
Aprende y Hazlo con Amor
https://www.pinterest.es/pin/20336635809240730/
Saludos.
Ingles:

Today as always I want to welcome you to my favorite space where I love to share my publications with you and today I want to show you how to make this beautiful Bugs Bunny Children's Painting that I made with a piece of fabric and painted by hand with cold paints and I say, it is very easy to do and with few and cheap materials, it seems to me a very good idea to decorate the walls of the house, this one for a child's room is very nice. Then I'll paint one for the kitchen, well if you like this lol.
Hope so!
You have to look for these materials:
| Thick fabric | Green bias |
|---|---|
| Knitting thread | Sewing thread and needles |
| Paints and brushes | Ballpoint pen without ink |
| Drawing or printing | Charcoal paper |
| Fabric tape |
Now I invite you to join me to watch and learn the procedure!.
Step 1:

First cut out the fabric and place it on the carbon paper and place the drawing or print on top, if you want you can pin it with pins.
Then highlight with a pen without ink by applying pressure so that the drawing is transferred to the fabric and before removing the pins make sure that nothing is missing to transfer and then remove the pins and papers.Now start painting with white paint, the lower part of the face, eyes, teeth and nose, (trying as much as possible not to leave the edge, hahaha, like when you were drawing in elementary school), let it dry for a while and pass another layer of paint, sometimes if the paint is very liquid, it will be necessary another layer (2 or 3 layers) to make it completely white.
Then mix white paint and a little bit of black to make a light gray color and start painting the ears.
- Step 2:

- After painting the ears and all the gray part of the face, paint with flesh color the center of the ears then paint with a little bit of white paint on the top of the ears to give clarity (see photo).
- Then apply another coat of flesh paint on the ears.
- Bind a little gray paint again, but add more black paint to outline the center of the ears, eyebrows and the contour of the face.
- Fill in pink paint on the tongue and red paint on the mouth, then paint black on the top and blend down with red paint to blend the colors together.

- Step 3:

- Outline with black paint the eyes, whiskers, mouth of the rabbit and let it dry.
- Then transfer the word (Hello), repeating the first step, then start painting with turquoise paint and lighten it by applying a little white paint and blend the two colors together (this is done when the paint is still wet).
- And finally, outline with black paint all the edges of the letters and let dry well.
- Step 4:

Start stitching the bias binding by basting or stitching with black knitting thread, trying to make them uniform all around the outline of the oval.
Heat the iron and pass through the back side of the painting, this is to fix the paint more and remove the wrinkles of the fabric.
Finish by tying a knot.
This is how it will look!

- Step 5:

- If the fabric is very soft and you want to give it firmness, cut out a piece of cardboard and glue it behind the fabric.
- Oh, I forgot, make a loop with the knitting thread in the center of the oval to be able to hang our picture.
- Also, make a loop with green ribbon and sew or glue on the bias binding so that it doesn't show.
And that's it! Now you have finished this beautiful and simple Decorative Frame.


My post is translated with DeepL, using HTML tags and the photos are captured with my Blu G5 Phone and edited with Pic Collage.
Source:
Now I say goodbye, happy to have shared this time with you, and hoping that my tutorial will be useful.
If you have any questions, I'm at your service.
Thank you very much for your visit and comment.
Learn and Do it with Love.
https://www.pinterest.es/pin/20336635809240730/
Greetings.
Hola.. lindo conejito. Me encantó.
Hola amiga, que bueno que te gustó!
Muchas gracias por comentar.