Buenas noches a todos los amigos que visitan mi Blog.
Cómo están?
Vas a necesitar:
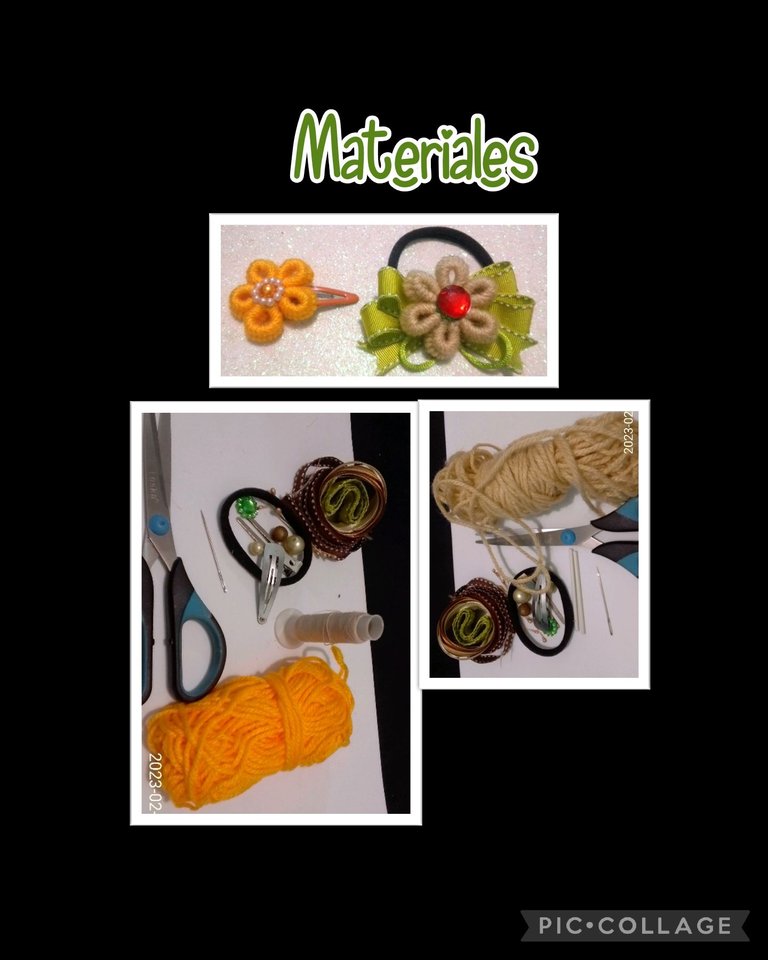
| Liga, cola y pinza | Hilo estambre |
|---|---|
| Pedreria y perlas | Cinta de tela |
| Hilo y aguja | Tijera |
| Hisopos de algodón | Rabo de ratón |
| Silicón |
Listos los materiales, es hora de poner manos a la obra!
Paso 1:
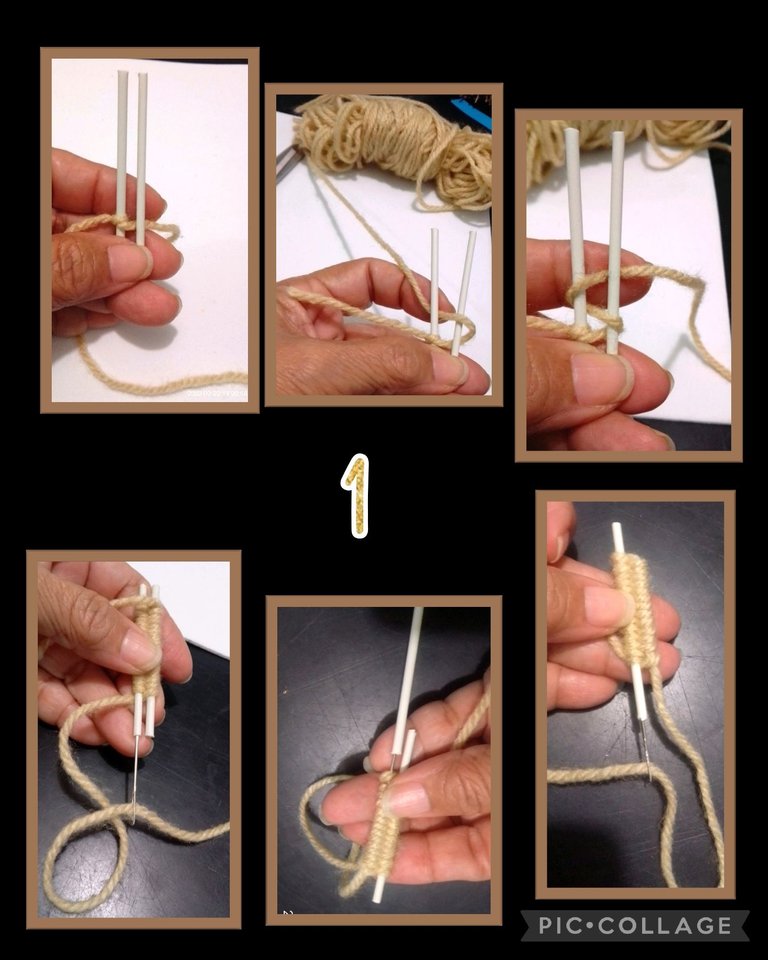
- Lo primero que debes hacer es recortar dos palitos de oídos quitando las cabecitas de algodón.
- Luego haz un nudo en uno de ellos, coloca el otro palito al lado, justo delante del hilo.
- Ahora trae el hilo hacia arriba y pasa primero sobre el 2do palito (derecho) y luego por debajo del primer palito(izquierdo).
- Continúa haciendo este paso con el hilo como que fueras a hacer un número 8 y repite 20 veces.
- Al terminar ensalta la aguja con el hilo sobrante e inserta por la parte inferior dentro del palito del lado izquierdo y saca la aguja y el palito hacia arriba. (ver foto)
- Ahora inserta nuevamente la aguja por el otro palito.
Paso 2:
- Saca la aguja y el palito, luego amarra las puntas de los hilos haciendo un pequeño nudo así formarás cada uno de los pétalos, haciendo 6 en total.
- Recorta los hilos sobrantes y enhebra una aguja con hilo de coser y comienza a unir por la parte de abajo los 6 pétalos.
Paso 3:
- Une las puntas, forma la flor y cose en el centro, aparte
arma un lazo con la cinta de tela y con un pedazo de rabo de ratón une a la liga y amarra, luego haz dos lazadas en cola de raton y pega con silicón y deja secar.
Paso 4:
- Aplica silicon en el centro de la flor y en la piedra, luego pega la flor en el centro del lazo y después pega la piedra.
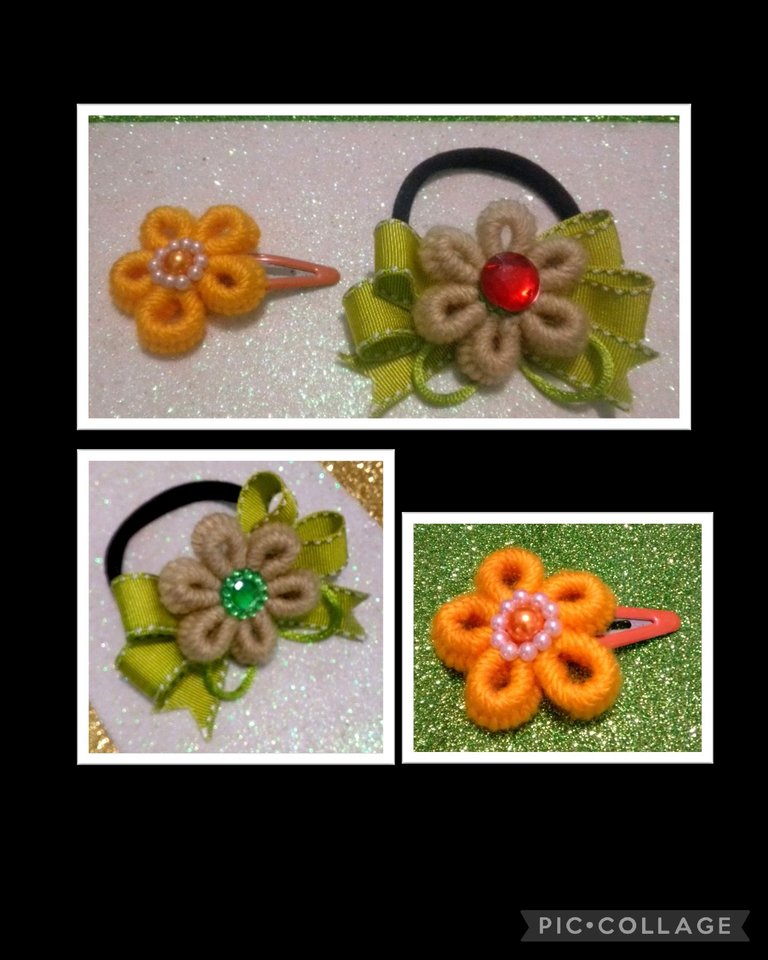
Y así quedó!

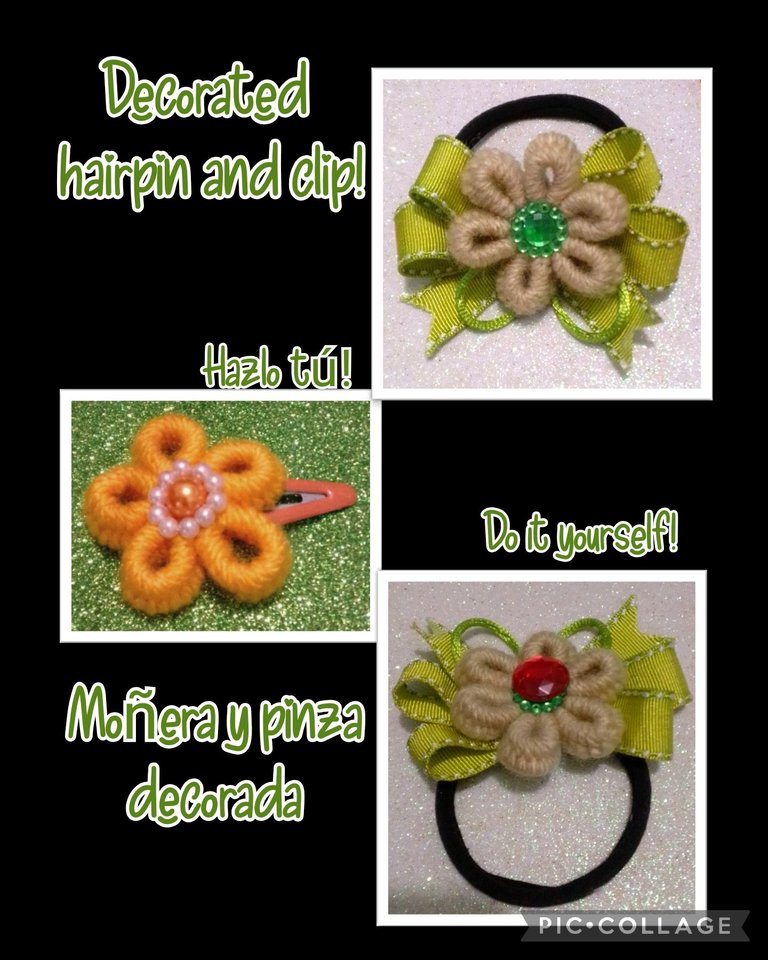
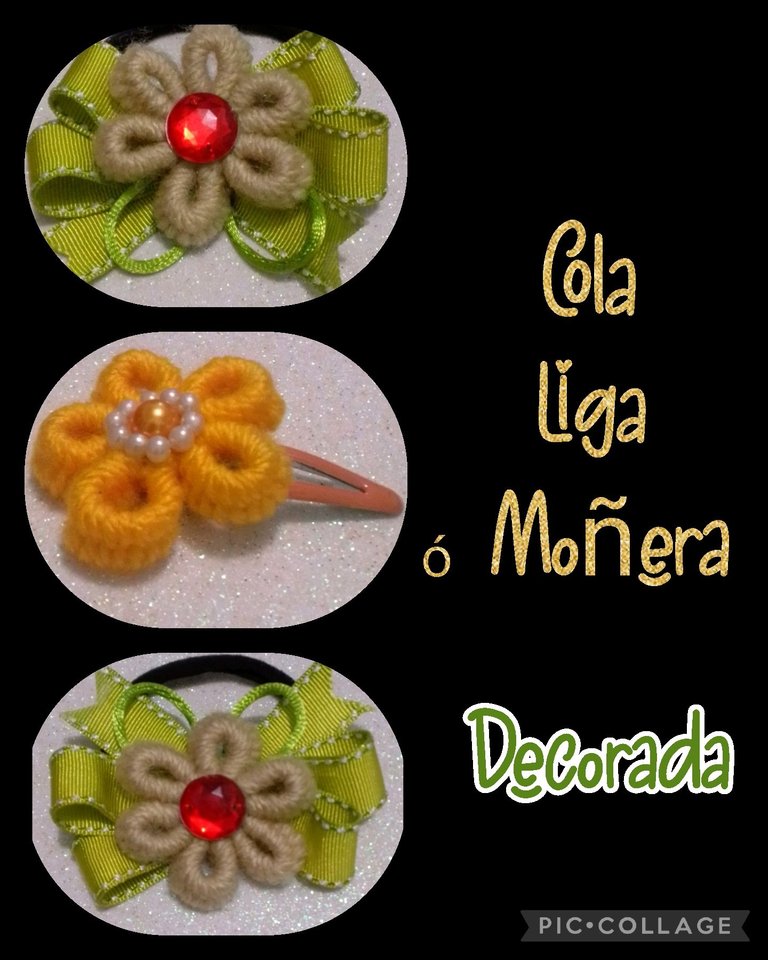
- Ahora te muestro otro modelito de flor, esta la hice de 5 pétalos y el centro lo decoré con perlitas y pegué a una pinza.
Ahora te mostraré las fotos de mi publicación
Fuente:
Traductor: DeepL
Etiquetas: HTML
Telefono: BLU G5
Editor de fotos: Pic Collage.
Ahora me despido esperando te guste mi publicación y sea útil para ti.
Gracias por tu visita y apoyo, hasta mi próximo tutorial.
English:
Good evening to all my friends who visit my Blog.
How are you?
You will need:
| Garter, glue and tweezers | Yarn |
|---|---|
| Pedreria and beads | Cloth ribbon |
| Thread and needle | Scissors |
| Cotton hyssop | Mouse tail |
| Silicone |
All materials ready, it's time to get to work!
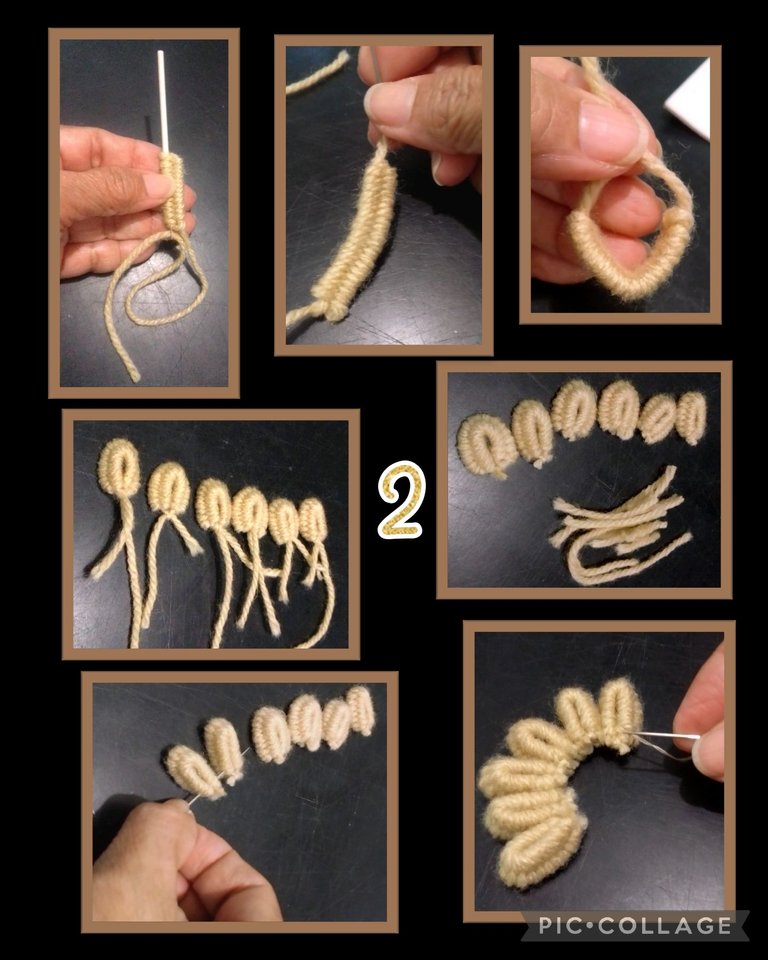
Step 1:
- The first thing you need to do is cut out two ear sticks by removing the little cotton heads.
- Then tie a knot in one of them, place the other stick next to it, just in front of the thread.
- Now bring the thread up and pass it first over the 2nd stick (right) and then under the first stick (left).
- Continue doing this step with the yarn as if you were going to make a number 8 and repeat 20 times.
- When finished, thread the needle with the remaining thread and insert the needle through the bottom of the left side of the stick and pull the needle out and the stick upwards (see photo).
- Now insert the needle through the other stick again.
Step 2:
- Take out the needle and the stick, then tie the ends of the threads in a small knot to form each of the petals, making 6 in total.
- Trim the excess threads and thread a needle with sewing thread and begin to join the bottom of the 6 petals.
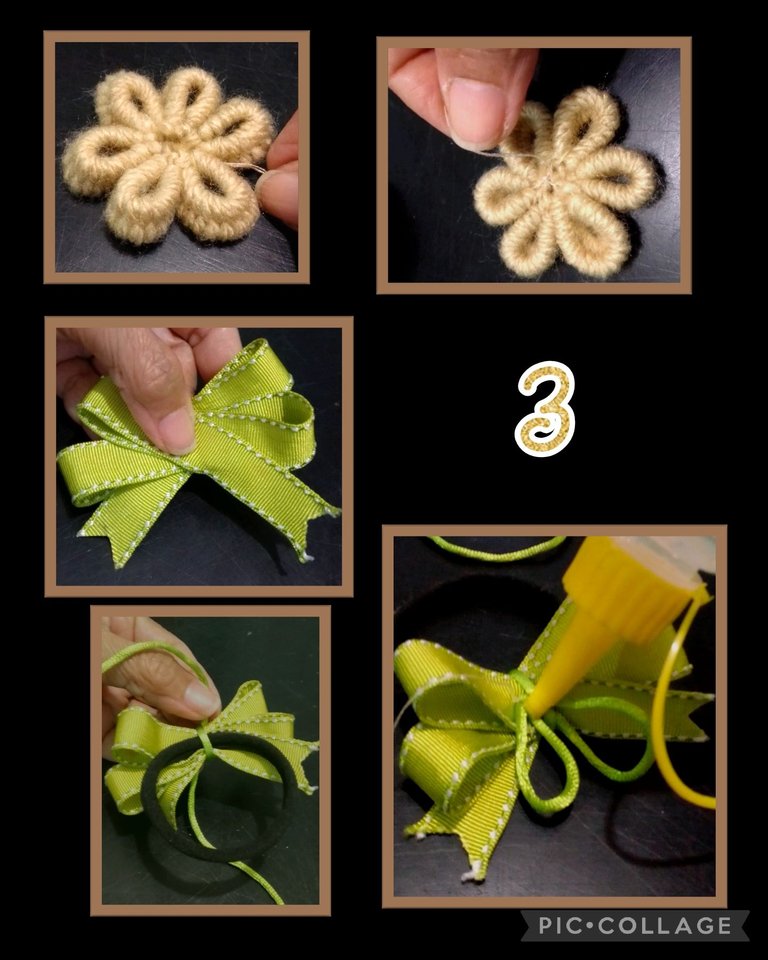
Step 3:
- Join the ends together, form the flower and sew in the center, apart.
Make a loop with the fabric ribbon and with a piece of mouse tail attach to the garter and tie, then make two loops in mouse glue and glue with silicone and let dry.
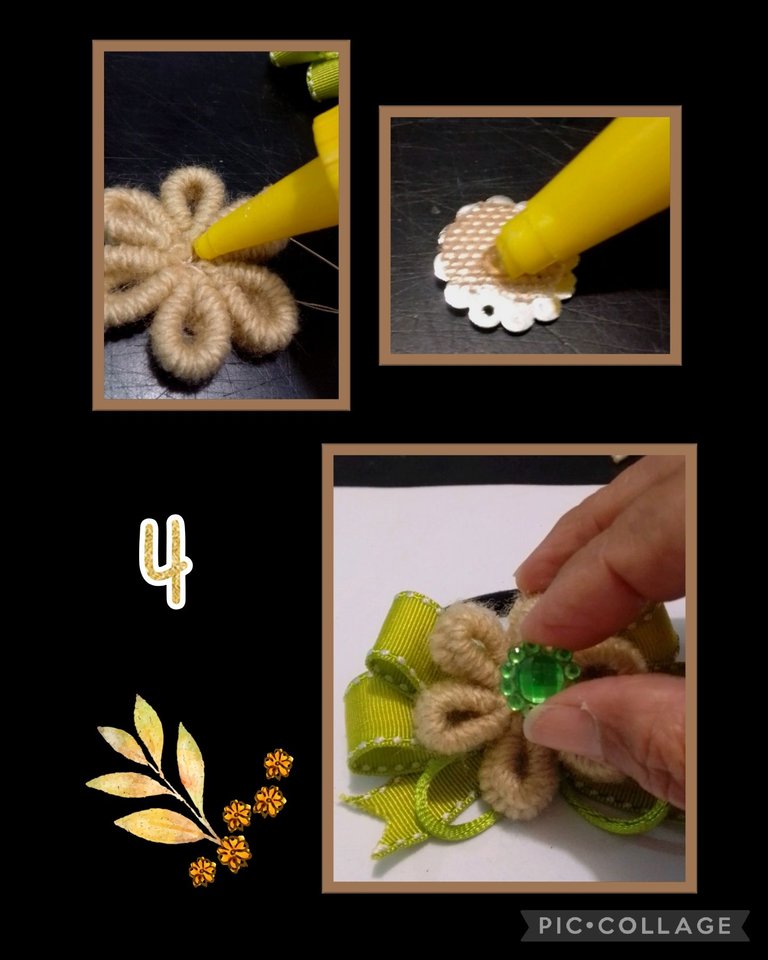
Step 4:
- Apply silicone in the center of the flower and on the stone, then glue the flower in the center of the loop and then glue the stone.
And this is how it looks like!
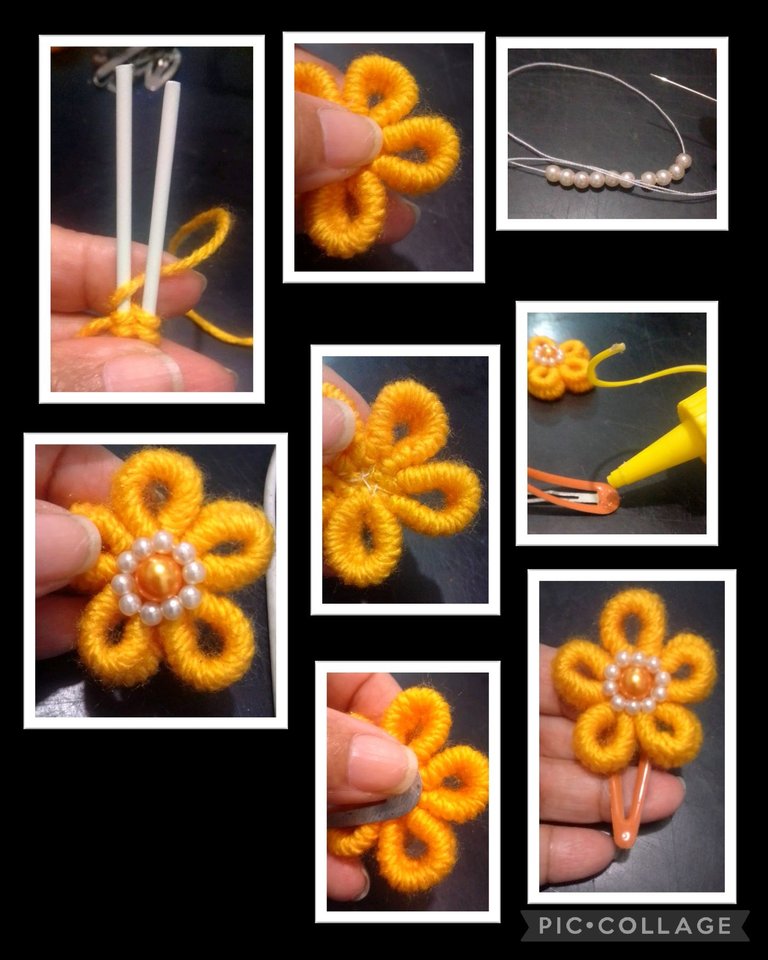
- Now I show you another little flower model, this one I made with 5 petals and I decorated the center with pearls and glued it to a clamp.
Now I will show you the pictures of my publication
Source:
Translator: DeepL
Tags: HTML
Phone: BLU G5
Photo Editor: Pic Collage.
Now I say goodbye hoping you like my publication and is useful for you.
Thanks for your visit and support, until my next tutorial.
Que belleza amiga @elmundodebetty. Un trabajo delicado, con un diseño muy lindo, Me encanto la combinación de colores.
Gracias por mostrar tu excelente proceso creativo.
Feliz fin de semana...
Muchas gracias por tu comentario y que bueno que te gustó!
Es un placer para mí!
Igual para tí.🌹Buen día, hola amiga @dayadam cómo estás?
💕
The rewards earned on this comment will go directly to the people( @dayadam ) sharing the post on Twitter as long as they are registered with @poshtoken. Sign up at https://hiveposh.com.
Thank you for sharing this post on HIVE!
Your content got selected by our fellow curator semarekha & you just received a little thank you upvote from us for your great work! Your post will be featured in one of our recurring compilations which are aiming to offer you a stage to widen your audience within the DIY scene of Hive. Stay creative & HIVE ON!
Please vote for our hive witness <3
Muchas gracias @diyhub por el apoyo a mi publicación.
Quedaron preciosas amiga, gracias por compartir.
Que bueno que te gustaron amiga.
Siempre un placer para mi
Saludos.
Una hermosa creación como todo lo que haces, te felicito amiga
Muchas gracias amiga Mayi por tan lindo comentario!
Bendiciones y éxitos para ti!🌻
Hace días hice una moñera con estambre, pero reconozco que esto es otro nivel ajajajaj, que acabado tan prolijo amiga, estas moñeras fácilmente podrían comercializarse.
Hola mi bella Jenny, cómo estas?
Jajajaja, me alegro que te hayan gustado!
Sí amiga! quedan muy bonitas y sería un buen producto para la venta!
Ya como que me entusiasmo y lo hago!
Gracias y feliz inicio de semana!