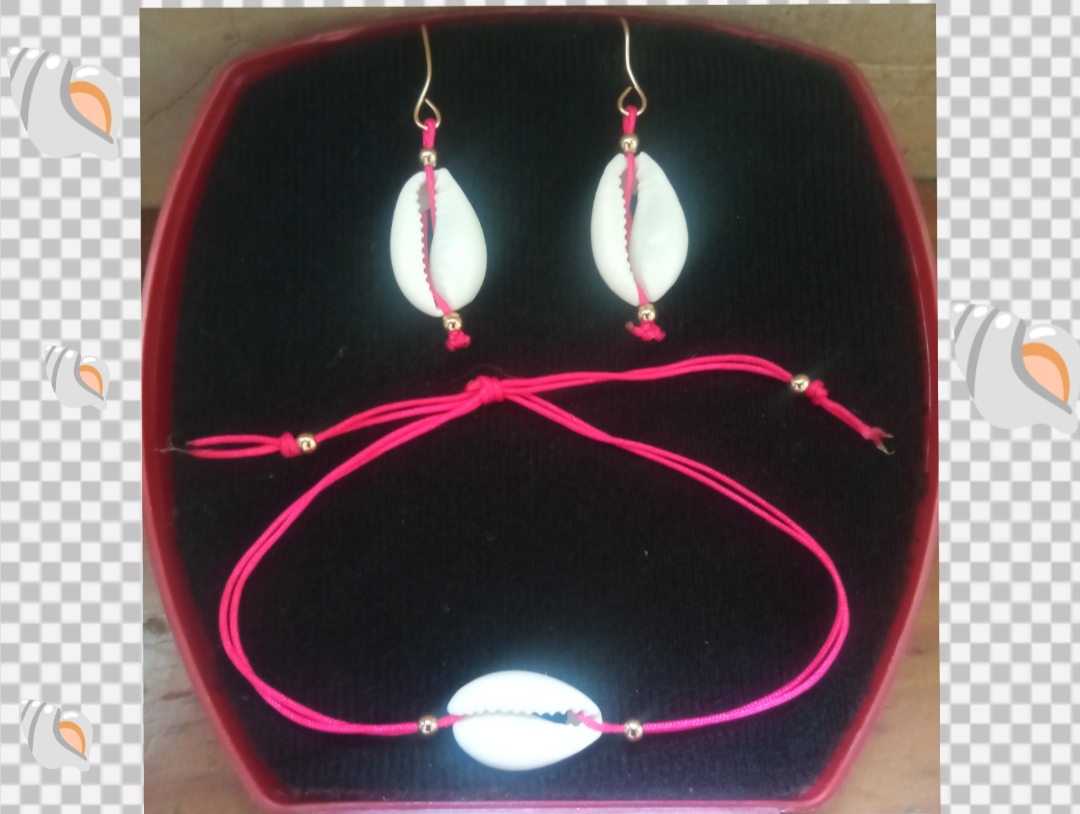
Feliz y bendecida tarde tengan todos ustedes es un gran gusto para mí el compartir nuevamente con todos ustedes en esta oportunidad les quiero regalar con muy sencillo tutorial para la elaboración de un lindo set de pulsera y zarcillos elaborados con lindas conchas marinas ideal para lucir en esta temporada vacacional, cuando vayan a la playa o en cualquier ocasión que así ustedes lo deseen. Este es un diseño súper fácil y económico de elaborar pues para la elaboración de este set no necesitamos muchos ni costosos materiales estas lindas conchas marinas la puedes conseguir si a diferencia de mí no estás en la isla de Margarita o en un lugar donde puedas acercarte a la playa también las encontrarás en las tiendas de bisutería en paquetitos muy accesibles.
Happy and blessed afternoon to all of you, it is a great pleasure for me to share again with all of you. In this opportunity, I want to give you a very simple tutorial for the elaboration of a beautiful set of bracelets and earrings made with beautiful seashells, ideal for wear this holiday season, when you go to the beach or on any occasion that you want.
This is a super easy and cheap design to make because for the making of this set we do not need many or expensive materials. You can get these beautiful seashells if, unlike me, you are not on the island of Margarita or in a place where you can get close to You will also find them on the beach in jewelry stores in very accessible packages.
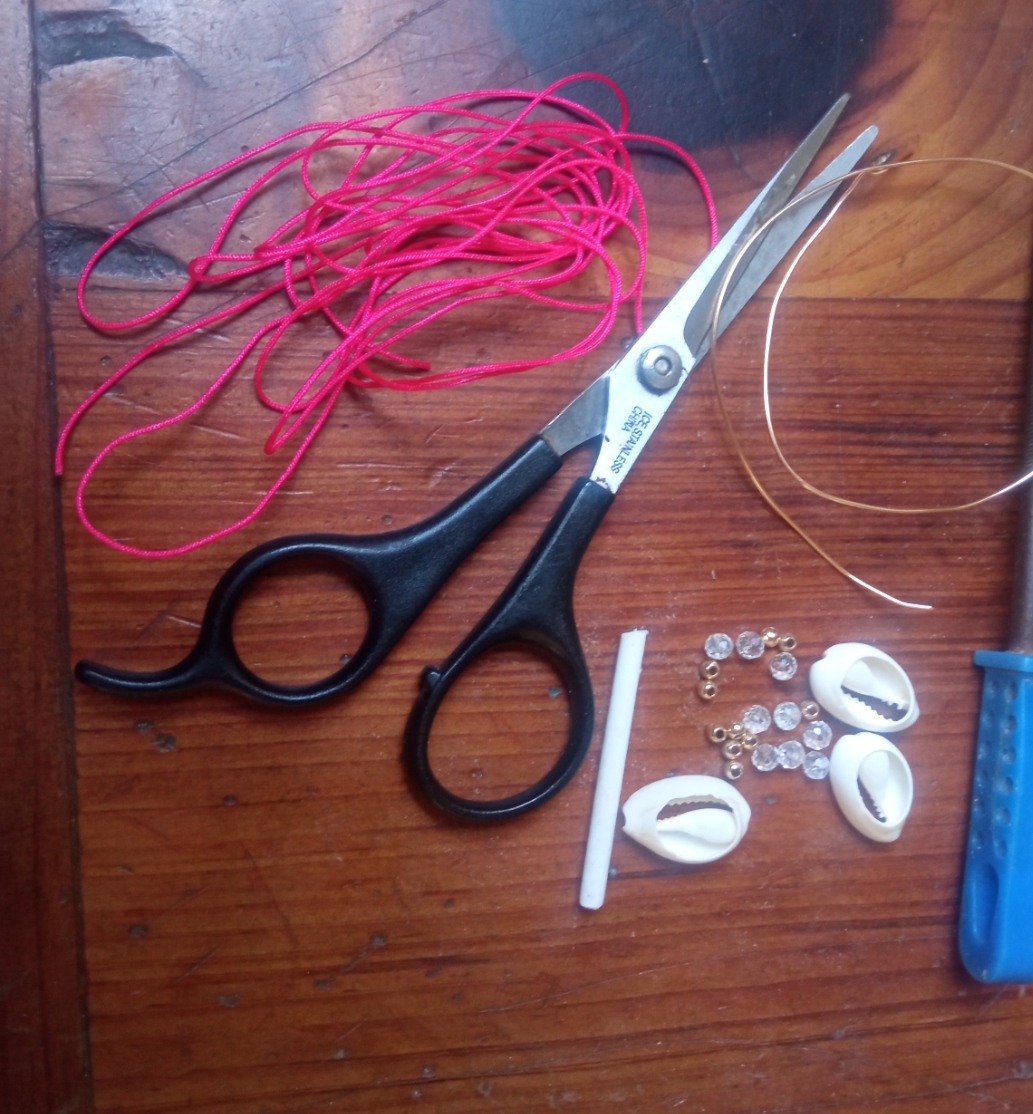
- Alambre de bisutería calibre 20.
- hilo chino fucsia.
- conchitas marinas.
- balines.
- Tijera.
- pinza de bisutería.
- yesquero.
- 20 gauge jewelry wire.
- fuchsia Chinese thread.
- sea shells.
- pellets.
- Scissors.
- jewelry clip.
- tinderbox
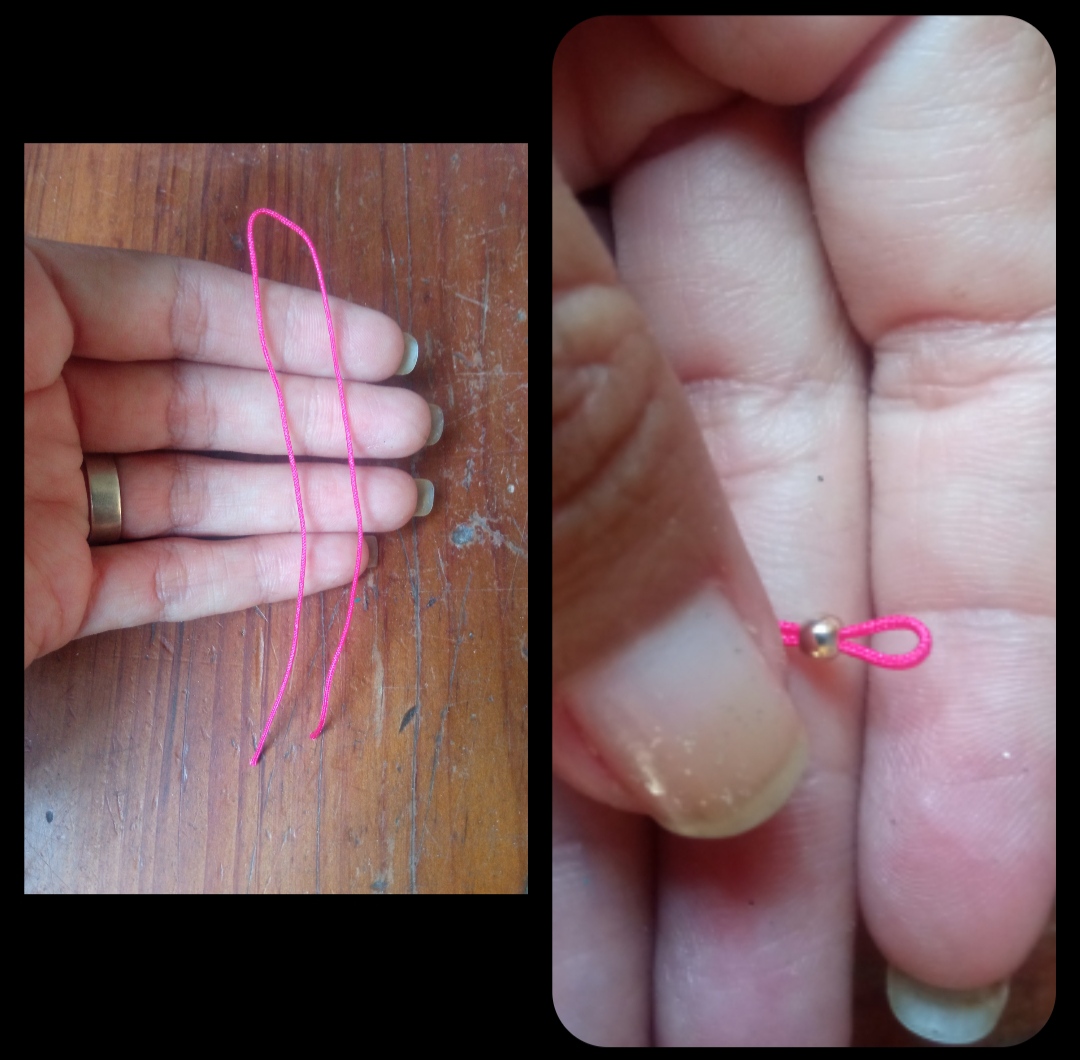
✴️ Paso 1: para iniciar elaboraremos nuestro hermoso par de zarcillos para ello cortaremos un pedazo de hilo chino de 8 cm este lo doblaremos en dos y con ayuda del yesquero quemaremos las puntitas del hilo para hacerlas aún más delgadas y poder introducir el pequeño balín dorado el cual llevaremos hasta el doblez del hilo dejando una pequeña argollita de hilo en la parte superior.
✴️ Step 1: to start we will make our beautiful pair of tendrils, for this we will cut an 8 cm piece of Chinese thread, we will fold it in two and with the help of the tinderbox we will burn the ends of the thread to make them even thinner and to be able to introduce the small golden ball which we will take to the fold of the thread, leaving a small ring of thread at the top.
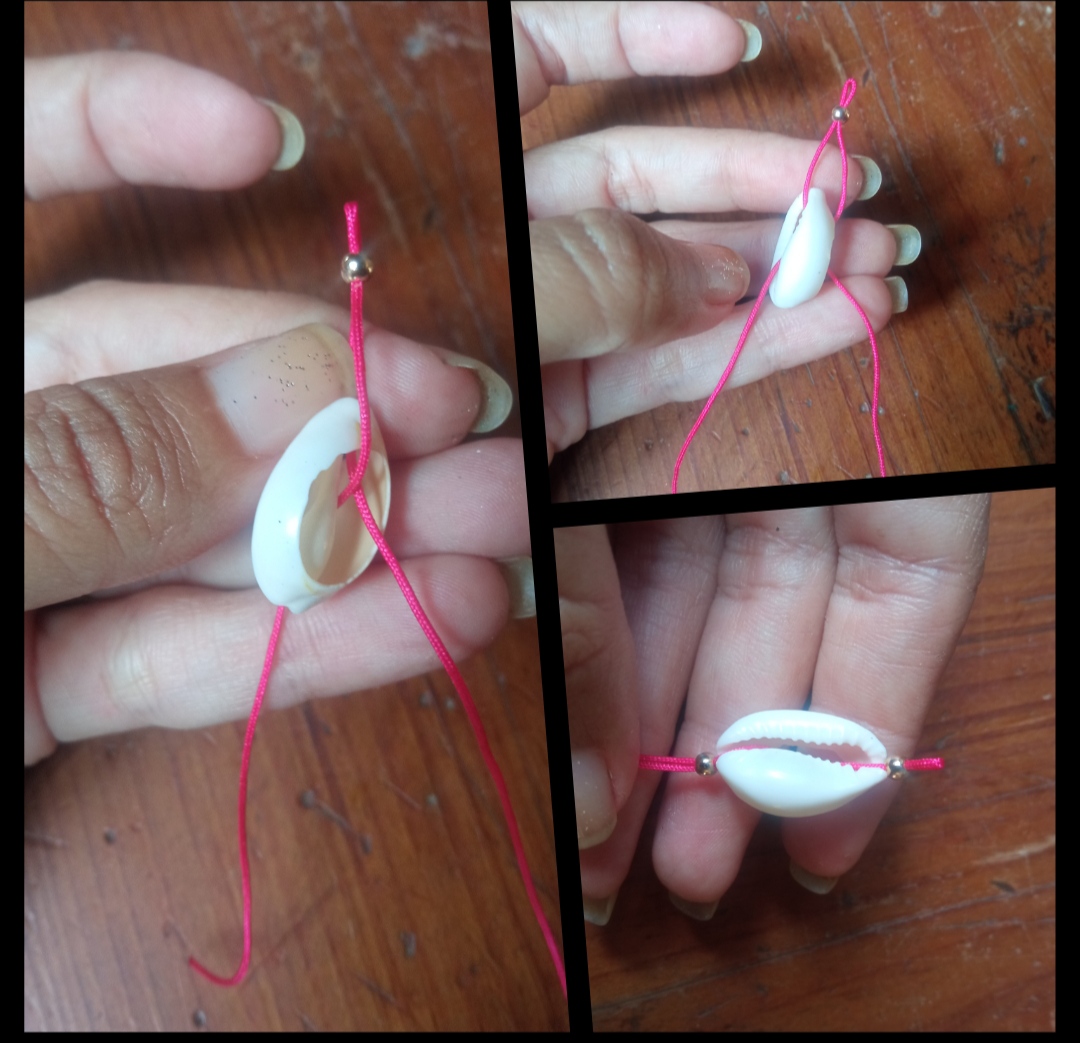
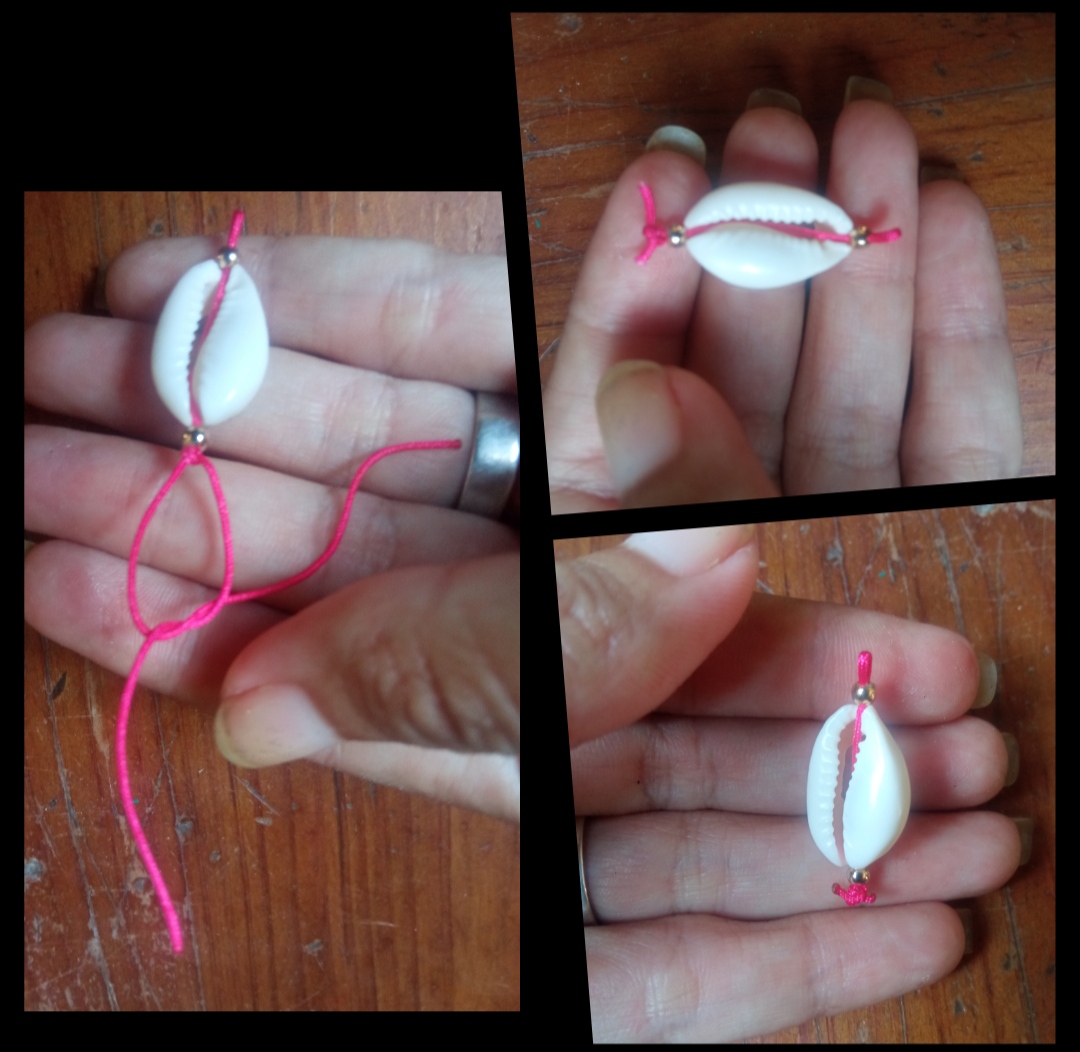
✴️ Step 2: to continue we take the seashell and as you can see this shell has an opening in its central part there we will introduce one of the ends of the thread and we will leave the other in its back, then we cross the threads that is to say the thread that is in the back part we are going to place it towards the front part and we already have the other one that remains in its back part, so again we introduce a new golden ball on both sides of the thread and we take it to the bottom of the the sea shell and to culminate and hold the shape there we make a couple of normal knots under this pellet, we cut the Chinese thread a little and burn the ends with the tinderbox
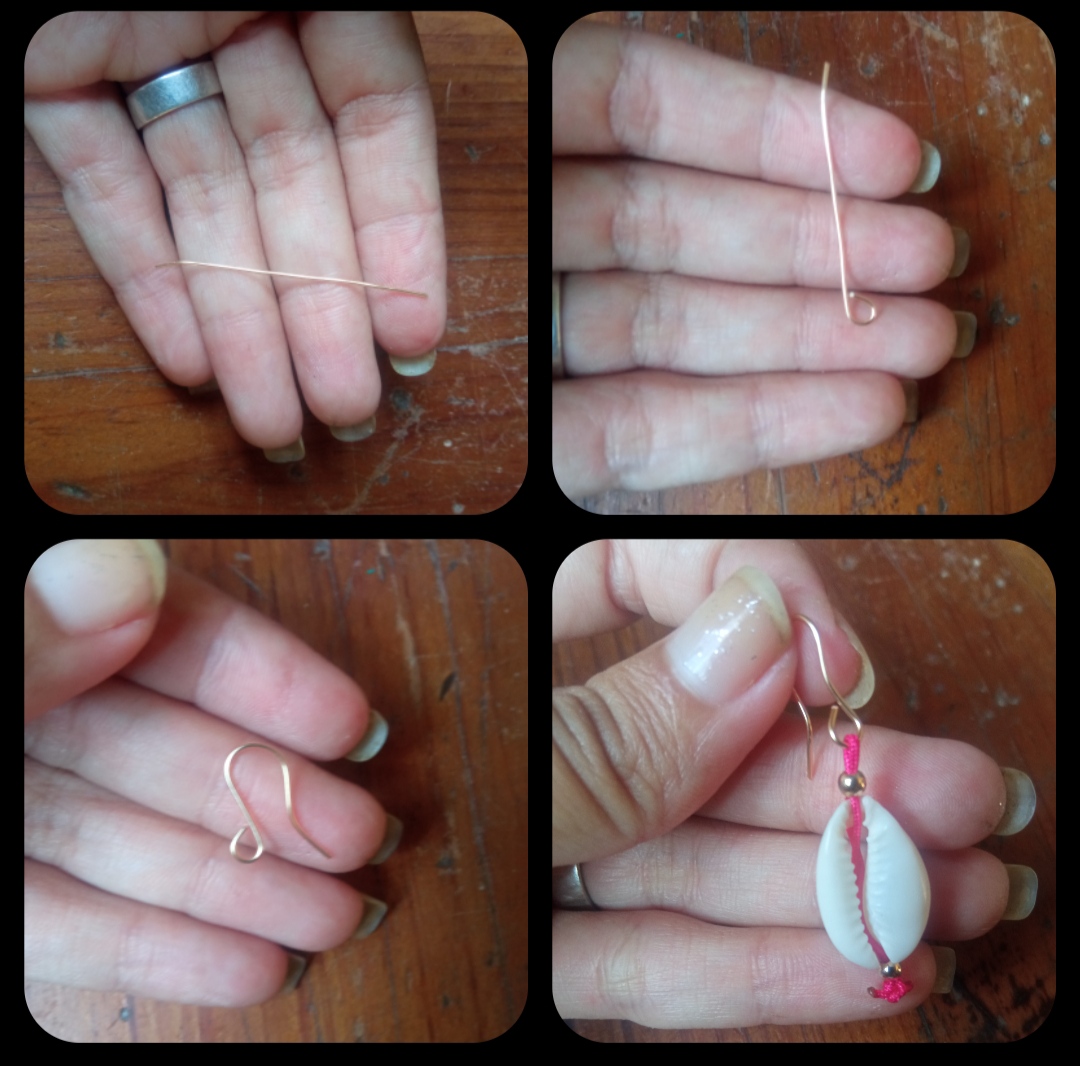
✴️ Paso 3: Ahora procedemos a tomar un pedacito de alambre de bisutería calibre 20 para elaborar el anzuelo para nuestro zarcillo tal cual pueden observar a continuación y esta pieza la vamos a unir a nuestra elaboración enganchandolo en El pequeño agujero que dejamos en la parte superior del hilo chino y listo así lograremos elaborar este muy sencillo y hermoso zarcillo.
✴️ Step 3: Now we proceed to take a little piece of 20-gauge costume jewelry wire to make the hook for our tendril as you can see below and we are going to join this piece to our preparation, hooking it to the small hole that we left in the upper part of the Chinese thread and ready, so we will be able to elaborate this very simple and beautiful tendril.
✴️ Paso 4: ahora para completar el set nos corresponde elaborar la pulsera para ello cortaremos dos pedazos de hilo chino de 15 cm aproximadamente tomaremos el primer pedazo y lo doblaremos en dos este lo introduciremos una de las puntas del hilo por la apertura del Caracol y lo Álamos hasta tener el mismo largo cada lado del ido seguidamente introducimos un pequeño balín dorado por ambos extremos del hilo y lo llevamos hasta nuestra pieza marina, y continuaremos introduciendo un nuevo balín dorado el cual dejaremos en la punta del hilo y luego realizaremos un pequeño nudo normal para evitar el balín pueda salirse de la forma. Este mismo procedimiento lo elaboraremos del otro lado de la pieza marina.
✴️ Step 4: now to complete the set we have to make the bracelet, for this we will cut two pieces of Chinese thread of approximately 15 cm, we will take the first piece and we will fold it in two, we will introduce one of the ends of the thread through the opening del Caracol and los Álamos until each side of the left is the same length, then we introduce a small golden pellet at both ends of the thread and we take it to our marine piece, and we will continue introducing a new golden pellet which we will leave at the end of the thread and then we will make a small normal knot to avoid the pellet from getting out of shape.
We will elaborate this same procedure on the other side of the marine piece.
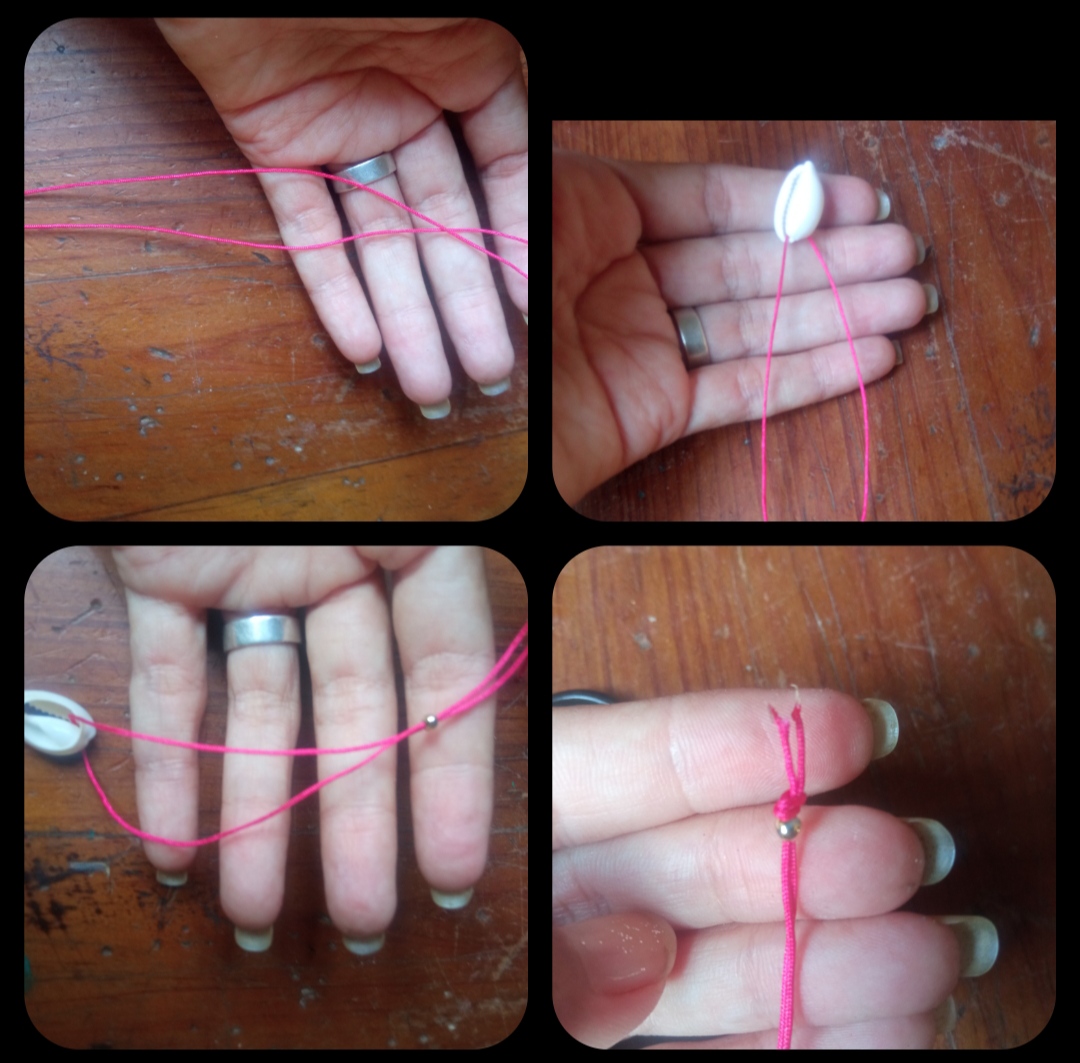
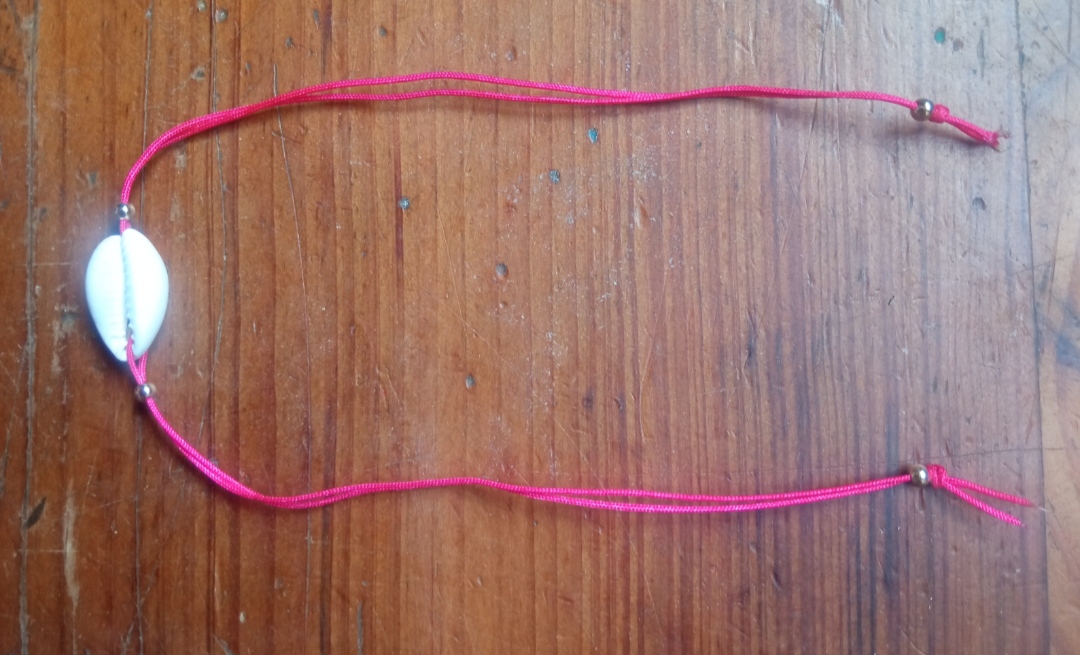
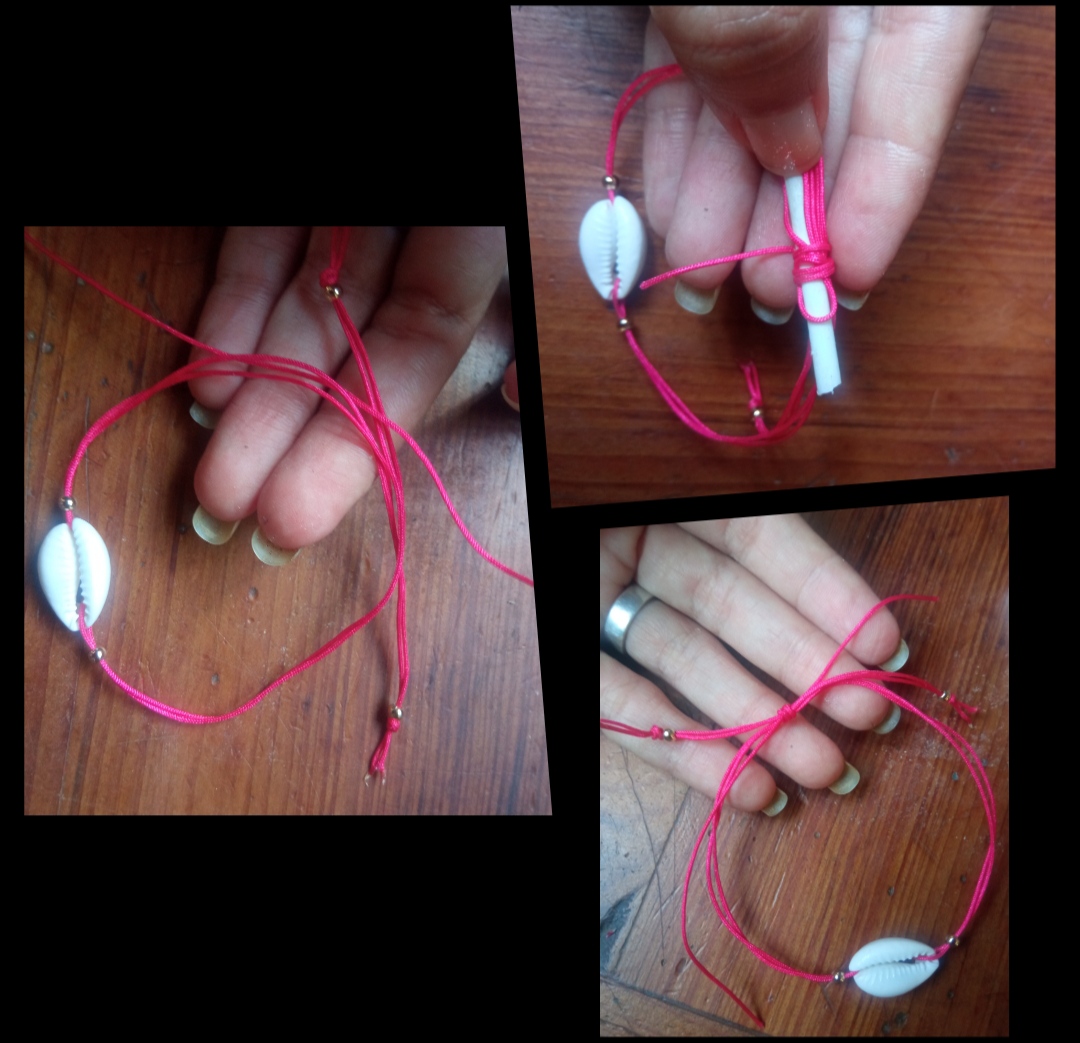
✴️ Paso 5: para culminar elaboraremos un pequeño nudo que nos permita colocar nuestra pulsera de forma corrediza es decir que podamos adaptarla a nuestro tamaño deseado para ello cruzaremos las dos puntas de nuestra pulsera de manera que queden en una parte unida los dos lados de la pulsera y tomaremos un pedacito de 8 cm de hilo chino y si está a su disposición pueden tomar un palillito de chupeta. Colocamos el palillo de chupeta encima de los lados de la pulsera Y encima de este el pedacito de hilo chino que hemos cortado para realizar el nudo doblamos este pedacito de hilo chino y comenzamos a enrollarlo encima de él mismo y los demás hilos para culminar el nudo este extremo del hilo chino lo vamos a introducir por el palillo y lo vamos a halar por la parte derecha mientras jalamos al mismo tiempo la punta que nos quedó en la parte izquierda, luego cortamos el exceso del hilo de este nudo y quemamos las puntitas.
✴️ Step 5: to finish we will make a small knot that allows us to place our bracelet in a sliding way, that is to say that we can adapt it to our desired size, for this we will cross the two ends of our bracelet so that the two remain in one part sides of the bracelet and we will take an 8 cm piece of Chinese thread and if it is available you can take a lollipop stick.
We place the lollipop stick on top of the sides of the bracelet And on top of this the little piece of Chinese thread that we have cut to make the knot we fold this little piece of Chinese thread and begin to wind it on top of itself and the other threads to complete the knot We are going to introduce this end of the Chinese thread through the toothpick and we are going to pull it on the right side while at the same time pulling the end that remained on the left side, then we cut the excess thread from this knot and burn the ends.
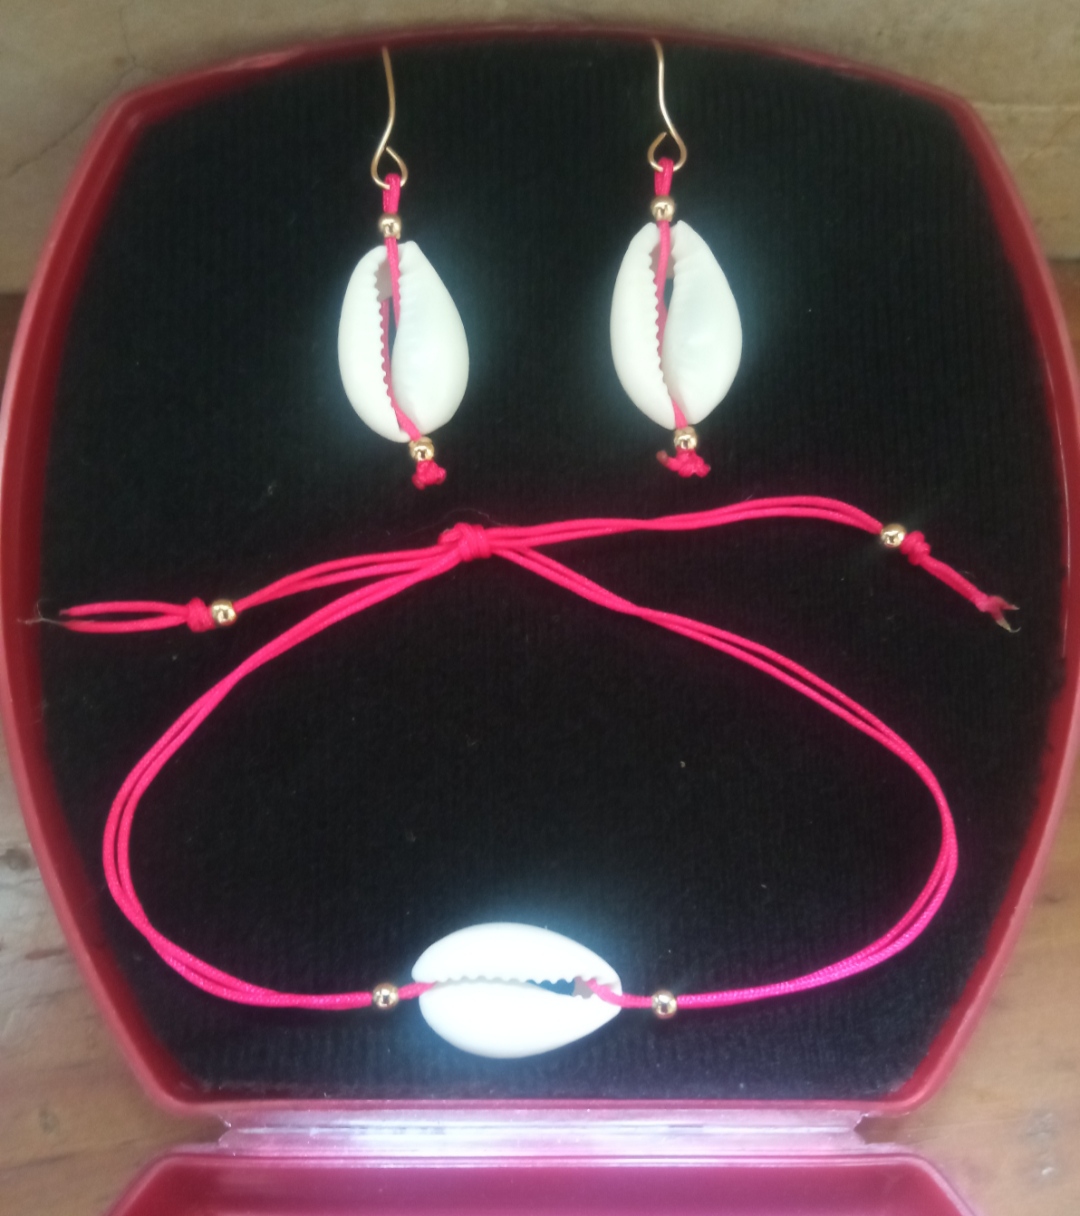
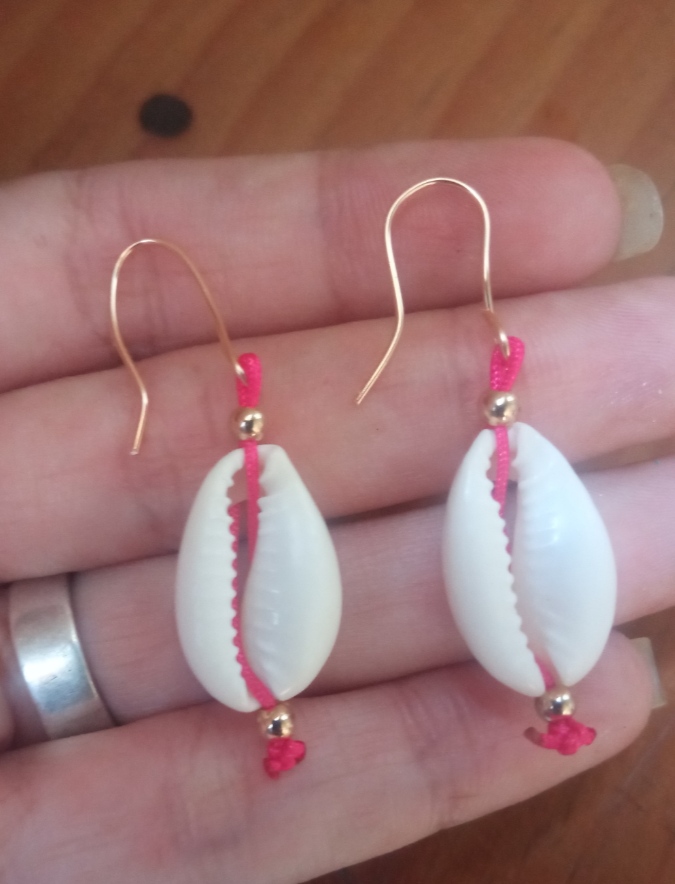
Todas las Fotos son de mi autoría y fueron tomadas con mi Celular Redmi 9And with this very simple procedure we will be able to elaborate a very beautiful set of earrings and bracelets which we can combine by placing them if you want a color thread of your choice or any rhinestones that you want. I fell totally in love with this beautiful set of accessories which I also hope It has been to your total satisfaction, my dear friends I must say goodbye for this occasion, always thanking you for your acceptance and your visit.
Greetings and blessings
All Photos are my authorship and were taken with my Redmi 9 Cellphone
Que bonito. De verdad te felicito porque veo que nos regalas cosas con mucha creatividad. En lo personal me encanto ese conjunto con esa concha incluida.
Gracias por regalarnos tu proceso creativo. Saludos @emmaris ✨
!DIY
Gracias a ti por tu comentario, me alegra que te haya gustado 😊.
You can query your personal balance by
@dayadam just sent you a DIY token as a little appreciation for your post dear @emmaris! Feel free to multiply it by sending someone else !DIY in a comment :) You can do that x times a day depending on your balance so:!DIYSTATSMuy lindo trabajo