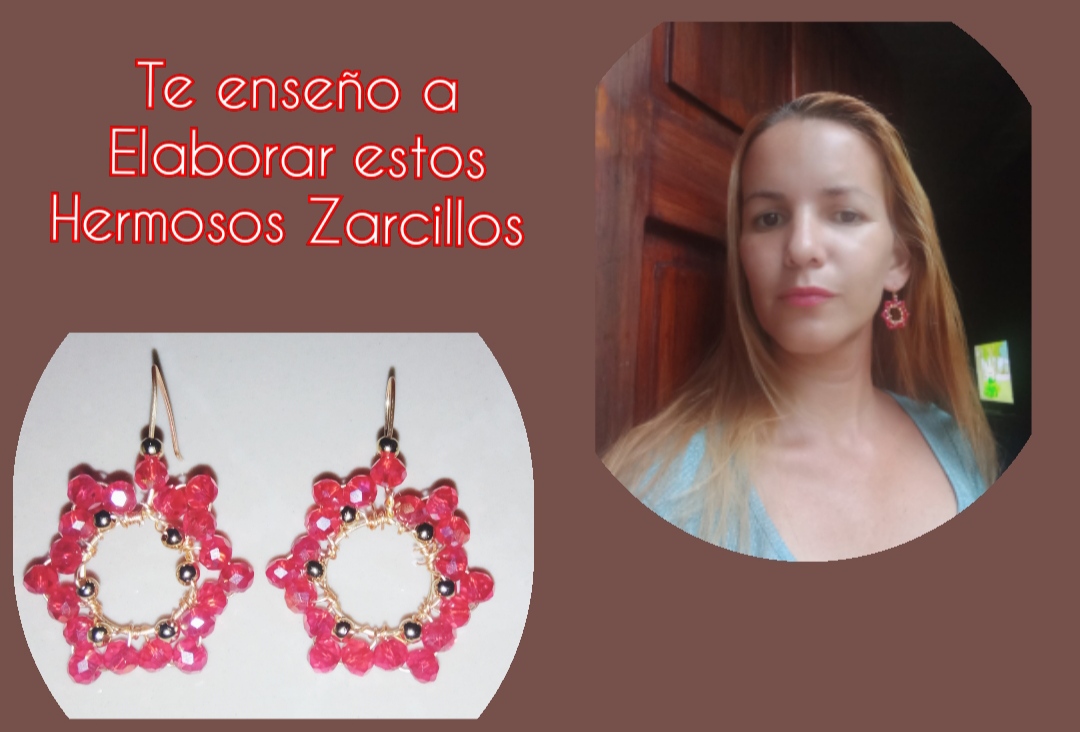
Saludos queridos y apreciados amigos de esta hermosa y creativa comunidad, un gusto y un placer para mi pasar por acá compartiendo una vez más con ustedes y disfrutando de sus maravillosas creaciones, en esta ocasión les traigo un muy sencillo tutorial dónde paso a paso les comparto como elaborar unos hermosos zarcillos Realizados en Alambrismo. La técnica de Alambrismo nos ofrece la gran facilidad de imaginar, moldear y crear formas y creaciones a nuestro gusto y preferencia.
Greetings dear and appreciated friends of this beautiful and creative community, it is a pleasure for me to come here once again sharing with you and enjoying your wonderful creations, this time I bring you a very simple tutorial where I Step I share with you how to make some beautiful tendrils Made in Wire.
The Wire Rope technique offers us the great ease of imagining, molding and creating shapes and creations to our liking and preference.
La elaboración de estos zarcillos que les comparto hoy es muy fácil y sencilla de elaborar, acá les comparto esta presentación elaborada para todos ustedes.
The elaboration of these tendrils that I share today is very easy and simple to elaborate, here I share this presentation elaborated for all of you.
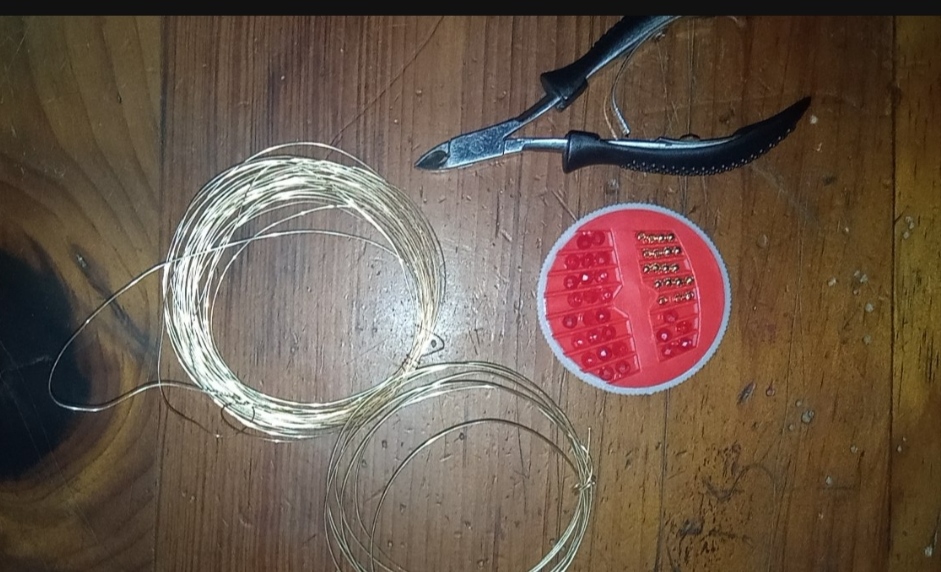
✴️ Que Materiales Necesitas:
- Alambre de bisutería calibre 22.
- Alambre de bisutería calibre 26.
- pinza de Bisutería.
- piedras brillantinas Rojas.
- Piedras pequeñas doradas.
✴️ What Materials Do You Need:
- 22 gauge jewelry wire.
- 26 gauge jewelry wire.
- Jewelery clip.
- Red glitter stones.
- Small golden stones.
😊 paso a paso
😊 Step by step
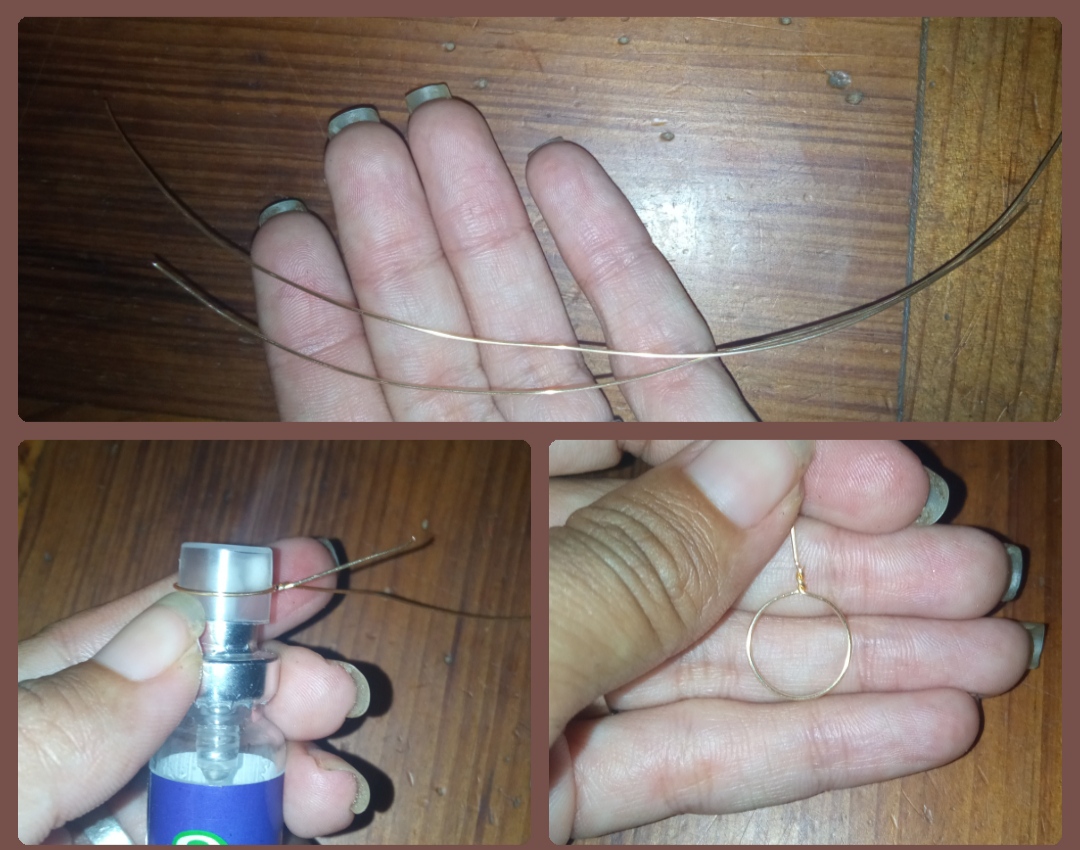
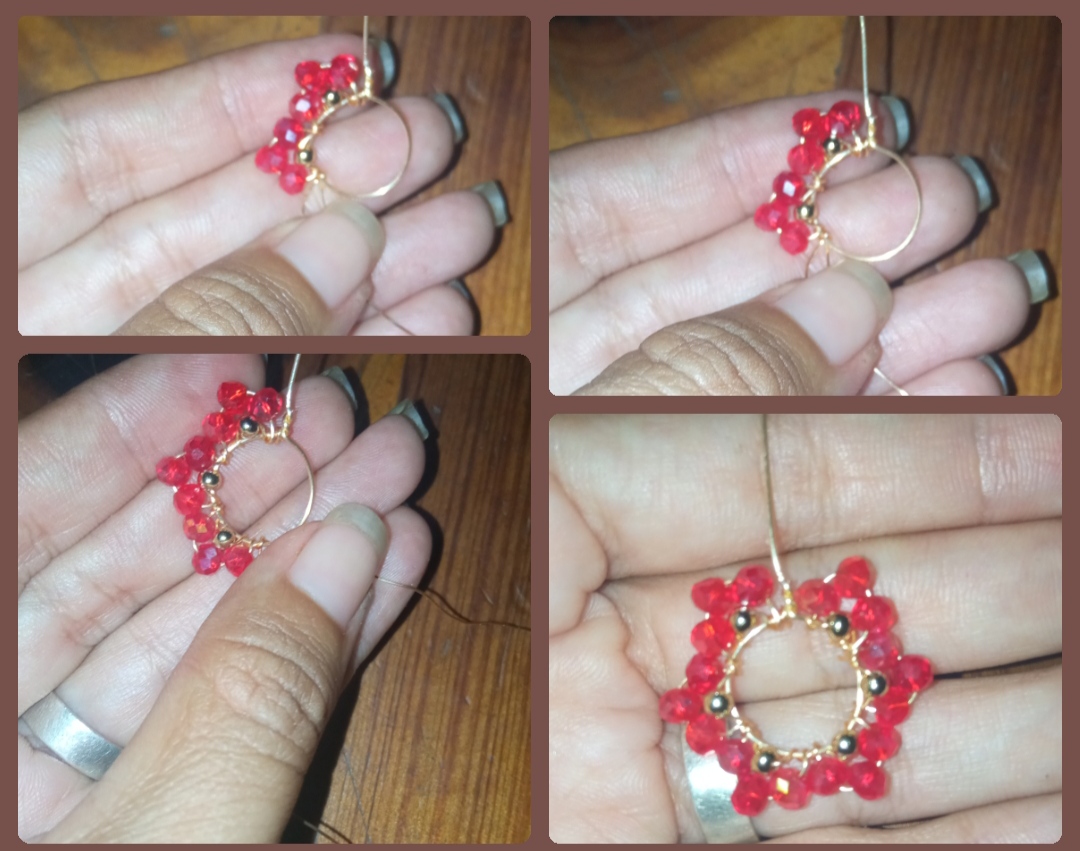
⭐ Paso 1: Para iniciar nuestra elaboración debemos tener todos los materiales a la mano, tomaremos el alambre de bisutería calibre 22 y con ayuda de la pinza cortaremos dos pedazos de 10 cm cada uno, luego apoyando is en un tubo o marcador le daremos forma circular a este pedazo de alambre y con ayuda de la pinza tomaremos ambas puntas del alambre y realizaremos dos vueltas, para que así quede bien sujeta la forma circular y cortaremos una de las dos puntas del alambre.
⭐ Step 1: To start our elaboration we must have all the materials at hand, we will take the 22 gauge jewelry wire and with the help of the pliers we will cut two pieces of 10 cm each, then supporting is in a tube or marker we will shape it circularize this piece of wire and with the help of the pliers we will take both ends of the wire and make two turns, so that the circular shape is well secured and we will cut one of the two ends of the wire.
⭐ Paso 2: Para continuar cortamos dos pedazo de alambre de bisutería calibre 26 de aproximadamente 10cm cada uno y ambos los enrrollaremos en el círculo base que realizamos anteriormente, Seguidamente Introducimos por uno de los alambres una Pichita dorada pequeña y tomamos el alambre fino y le damos dos vueltas sobre nuestro círculo base para evitar se mueva la piedra, en el otro pedazo de alambre Introducimos tres piedras brillantinas Rojas realizamos un tipo de arco encima de la piedra dorada y amarramos el alambre en la base.
⭐ Step 2: To continue, we cut two pieces of 26-gauge jewelry wire of approximately 10cm each and we will wind both of them in the base circle that we made previously, then we introduce a small golden Pichita through one of the wires and we take the fine wire and we we make two turns on our base circle to prevent the stone from moving, in the other piece of wire we introduce three red glitter stones, we make a type of arch on top of the golden stone and we tie the wire to the base.
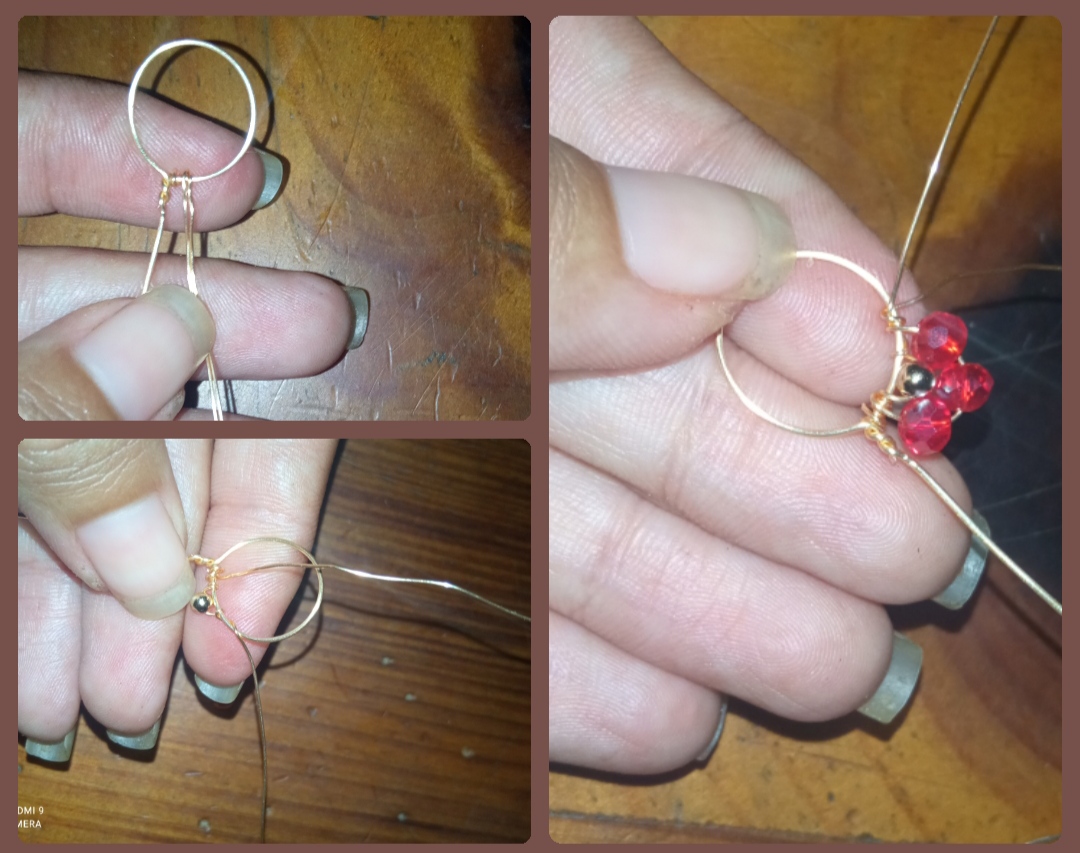
⭐ Paso 3: volvemos a realizar lo mismo introduciendo por un alambre de los finos una piedra dorada y por el otro tres piedras rojas y amarramos ambos alambre finos de la base circular.
Este procedimiento lo realizaremos 4 veces más hasta rodear la forma circular y cortamos el exceso del alambre fino.
⭐ Step 3: We do the same thing again, inserting a golden stone through one of the fine wires and three red stones through the other, and we tie both fine wires from the circular base.
We will do this procedure 4 more times until we surround the circular shape and cut the excess of the fine wire.
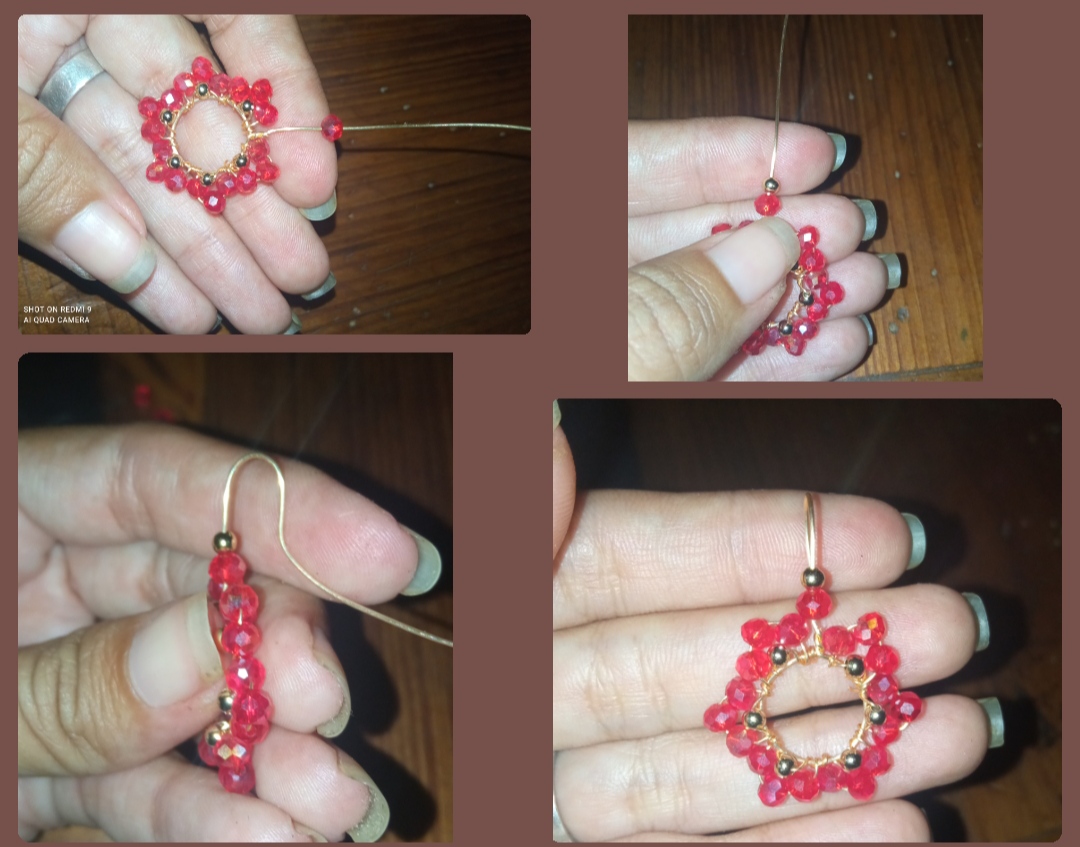
⭐ Paso 4: para continuar, con el alambre que nos queda encima de la parte círcular base introduciremos una piedrita Brillante roja y una pequeña dorada y con el alambre sobrante realizaremos el Anzuelo bde nuestro zarcillo mildeando con nuestras manos, volteamos el alambre hacia atrás, moldearemos y cortamos el exceso de alambre.
⭐ Step 4: to continue, with the wire that remains on top of the base circular part, we will insert a red Brilliant stone and a small gold one and with the remaining wire we will make the Hook b of our tendril, milling with our hands, turning the wire backwards, We will mold and cut the excess wire.
⭐ Hermosos Zarcillos⭐
⭐ Beautiful Tendrils ⭐
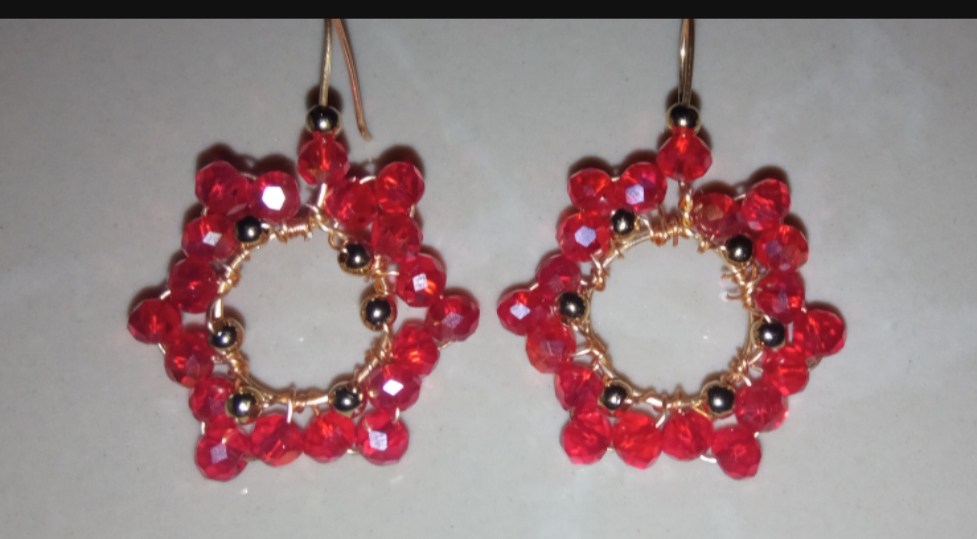
Y así mis queridos amigos lograremos crear y obtener un resultado delicado y muy hermoso, ustedes pueden jugar con los colores y realizarlos del color de su preferencia, yo quedé muy feliz y salisfecha del resultado obtenido el día de hoy, el Alambrismo es una técnica fácil de trabajar y con práctica se puede ir mejorando cada día.
Los invito a visitar mi blog para que observen mis otras creaciones en Alambrismo.
And so, my dear friends, we will be able to create and obtain a delicate and very beautiful result, you can play with the colors and make them in the color of your choice, I was very happy and satisfied with the result obtained today, Wire Rope is an easy technique to work and with practice you can improve every day.
I invite you to visit my blog to see my other creations in Alembrismo.
Queridos Amigos espero que está muy sencilla creacion sea del agrado de ustedes y deseo que este post les sea de utilidad.
Me despido muy agradecida de su visita y comentarios, Les agradezcy estaré encantada de recibir sus comentarios y sugerencias.
Saludos y bendiciones para ustedes.
Dear Friends, I hope that this very simple creation is to your liking and I hope that this post will be useful to you.
I say goodbye very grateful for your visit and comments, I thank you and I will be delighted to receive your comments and suggestions.
Greetings and blessings to you.
las fotos fueron tomadas con mi teléfono Redmi 9, contenido exclusivo para Hive. Y la traducción fue realizada a través de Google.
photos were taken with my Redmi 9 phone, exclusive content for Hive. And the translation was done through Google.
You can support the new proposal (#240) on Peakd, Ecency, or using HiveSigner.
Thank you!Dear @emmaris, sorry to jump in a bit off-topic.May I ask you to review and support the new proposal (https://peakd.com/me/proposals/240) so I can continue to improve and maintain this service?