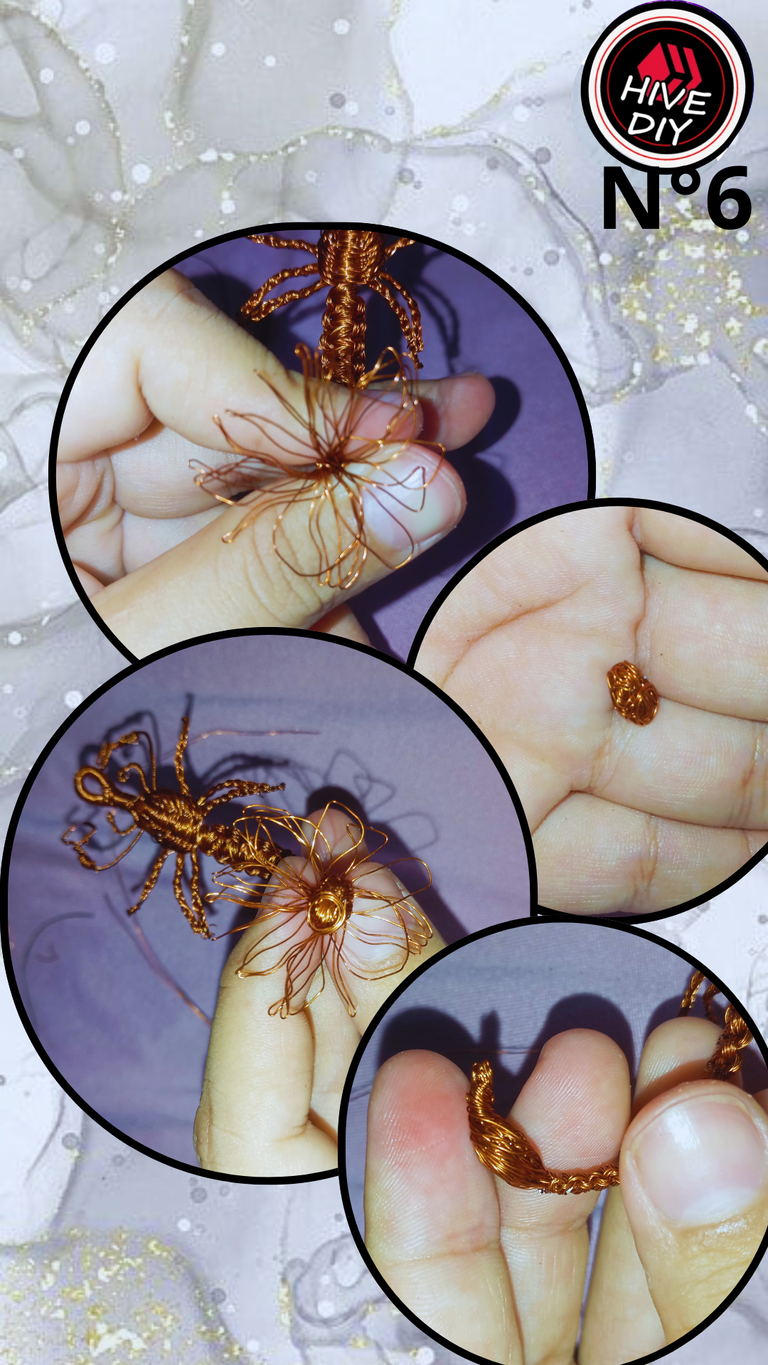
Greetings community. I hope everyone is having a beautiful start to the week. Today I am back with more ideas in recycled copper wire. Although it is a bit tedious having to untangle the copper, and this is the detail that I like the least about working with this material, I know that what follows will be more rewarding. As I told you before, the one I use is from a fan motor and when I took it out it got tangled, so in order to make these creations I have to take the time and dedication to untangle each copper strand, as far as I can, and from there the crafts continue but it takes a lot of time to do only that step.🥲
Saludos comunidad. Espero todos estén teniendo un hermoso inicio de semana. Hoy he vuelto con más ideas en alambre de cobre reciclado. A pesar de que es un poco tedioso tener que desenredar el cobre, y este es el detalle que menos me agrada de trabajar en este material, sé que lo que sigue después será más gratificante. Ya qué, como les había comentado anteriormente esté que utilizo es de un motor de ventilador y al momento de sacarlo se enredó bastante entonces para poder hacer estas creaciones tengo que tomarme el tiempo y la dedicación de ponerme a desenredar cada hebra de cobre, pues en lo que más puedo, ya de ahí siguen son las manualidades pero toma bastante tiempo hacer solamente ese paso.🥲
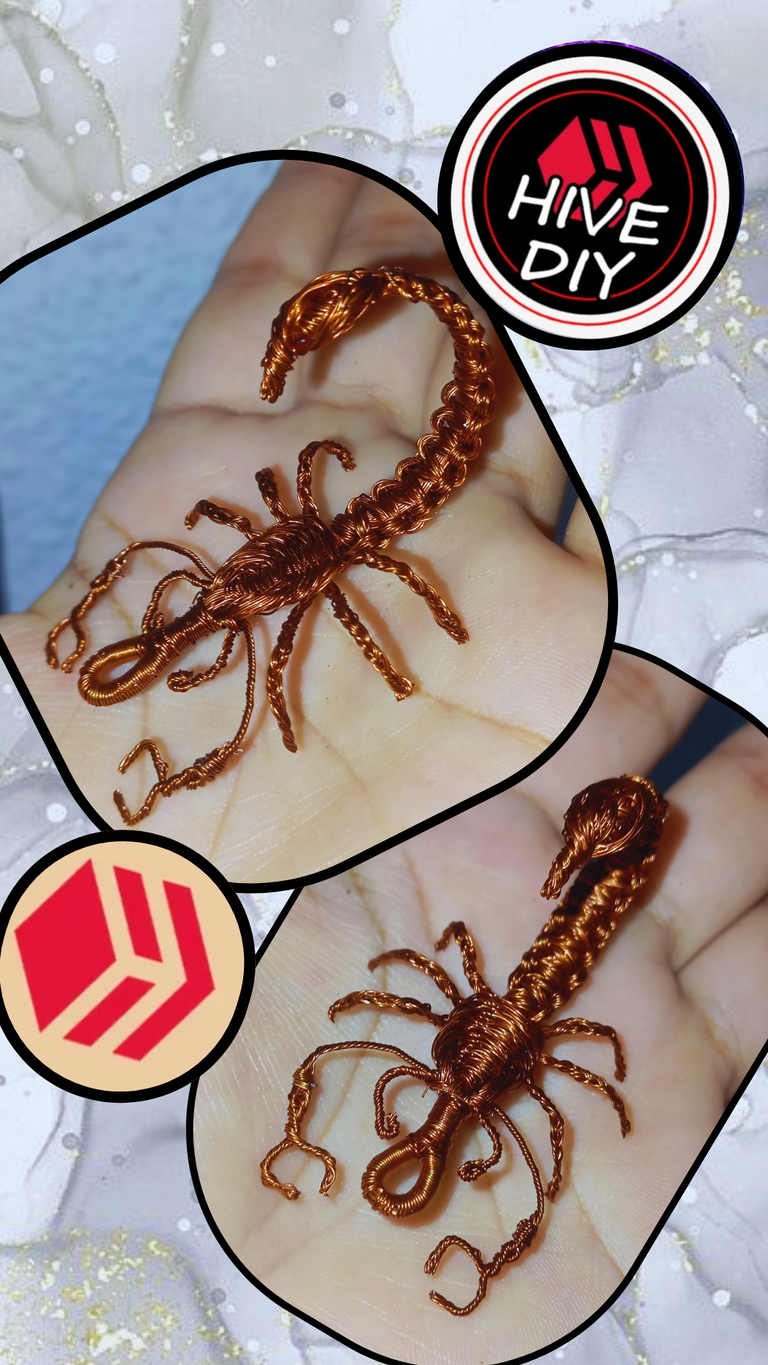
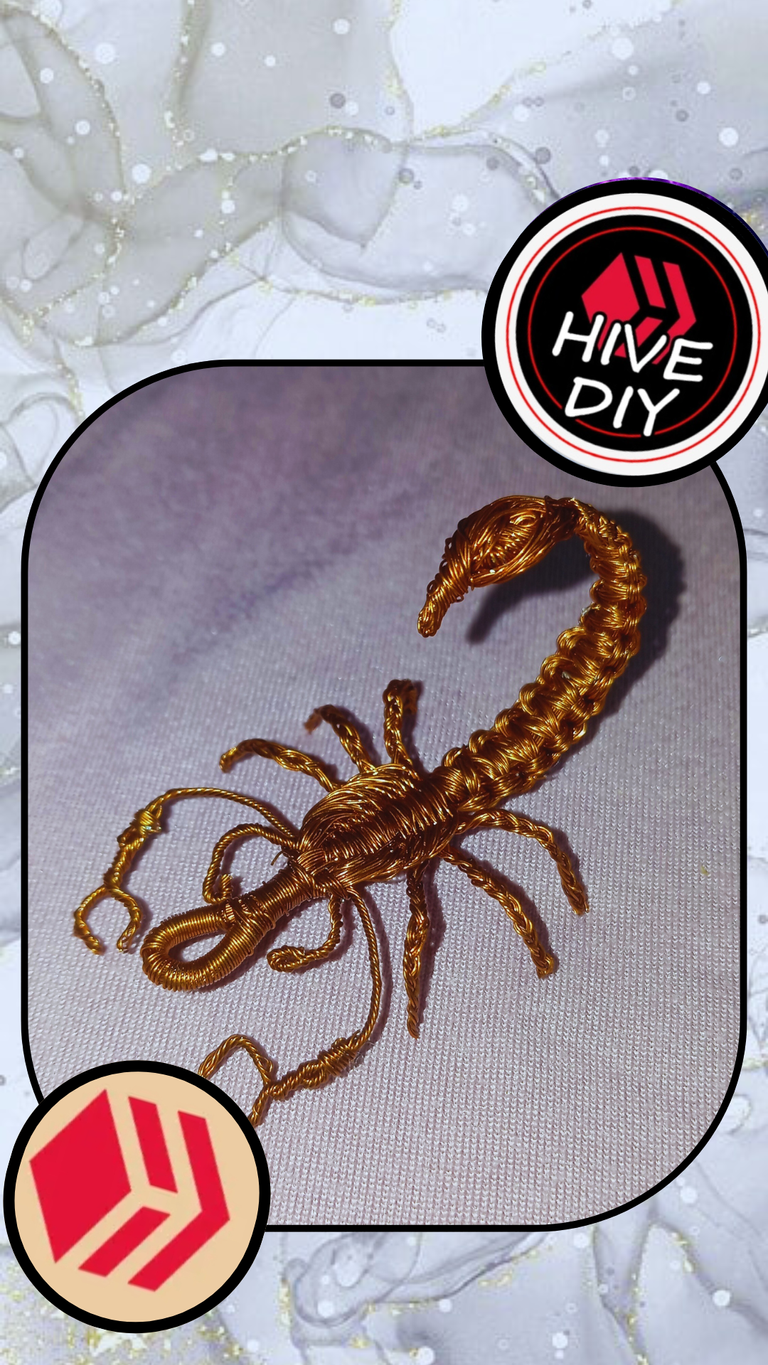
Today I made a scorpion shaped pendant, I tell you that I was surprised with the result, I really feel that it was very nice I hope you like it.
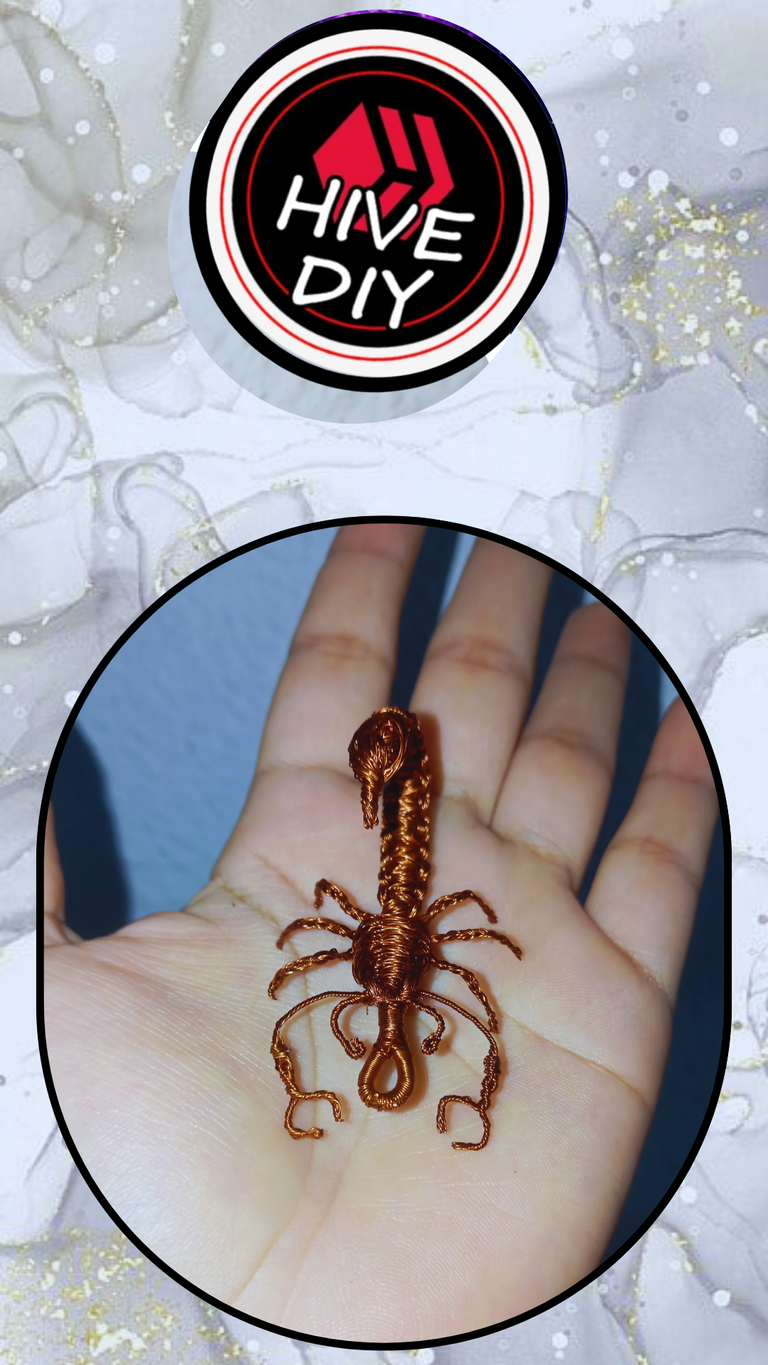
Hoy realicé un colgante en forma de escorpión, les cuento que quedé sorprendida con el resultado, la verdad siento que quedó muy bonito ojalá les guste.
Materials:
🦂 Recycled copper.
🦂 Scissors.
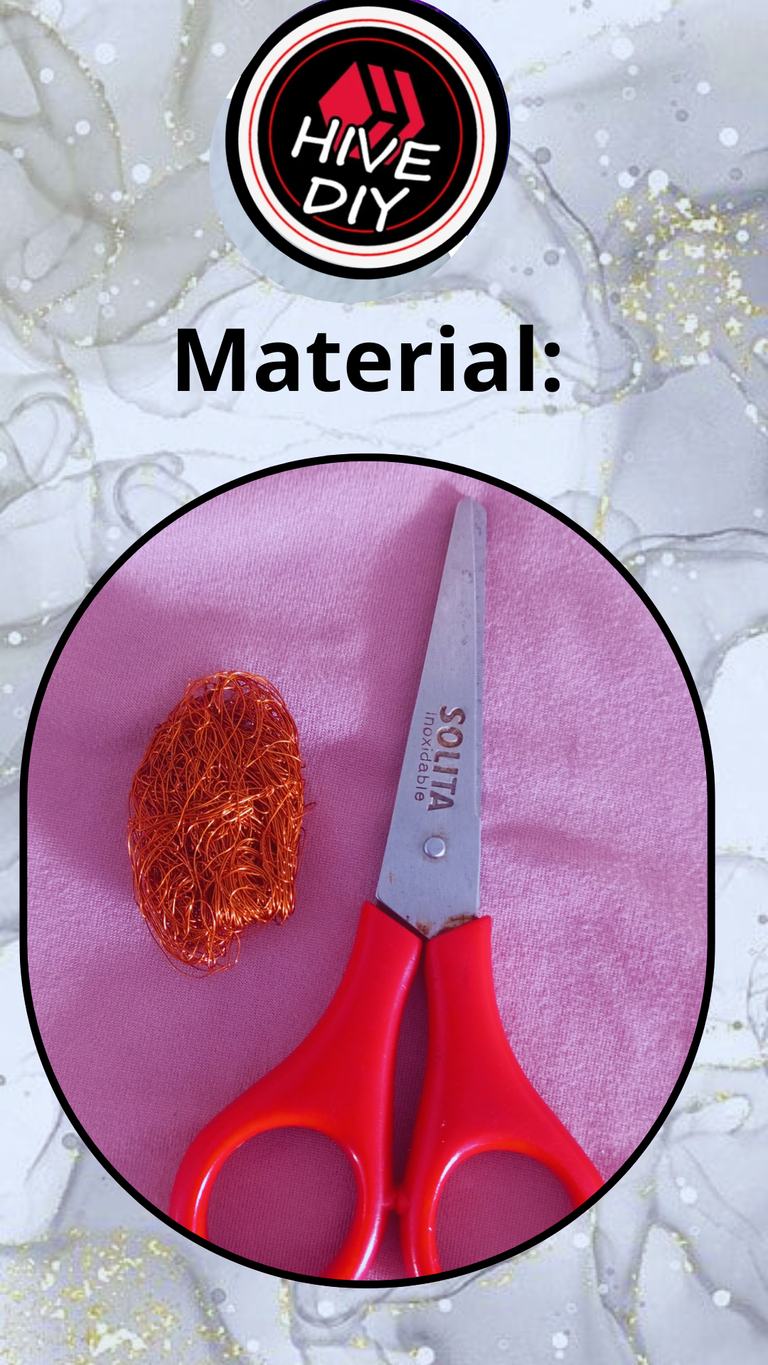
Materiales:
🦂 Cobre reciclado.
🦂 Tijera.
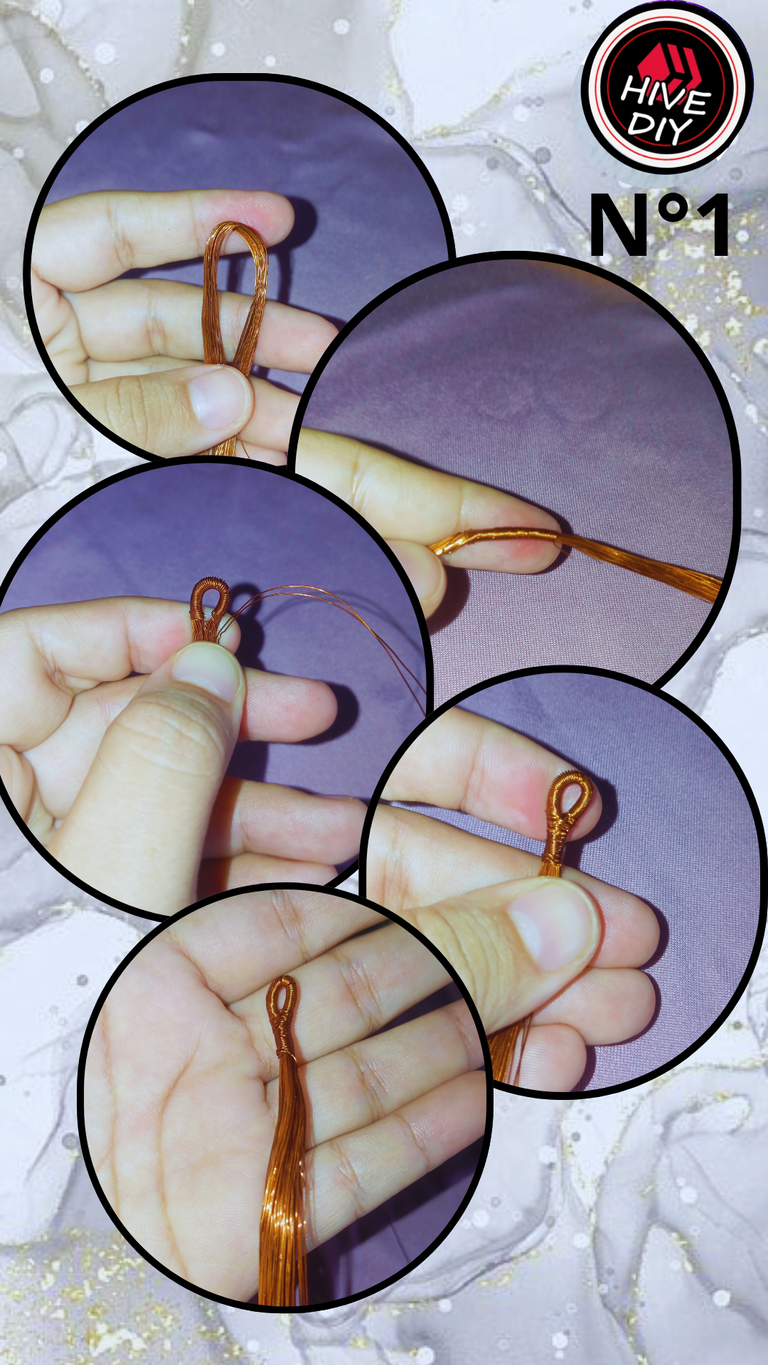
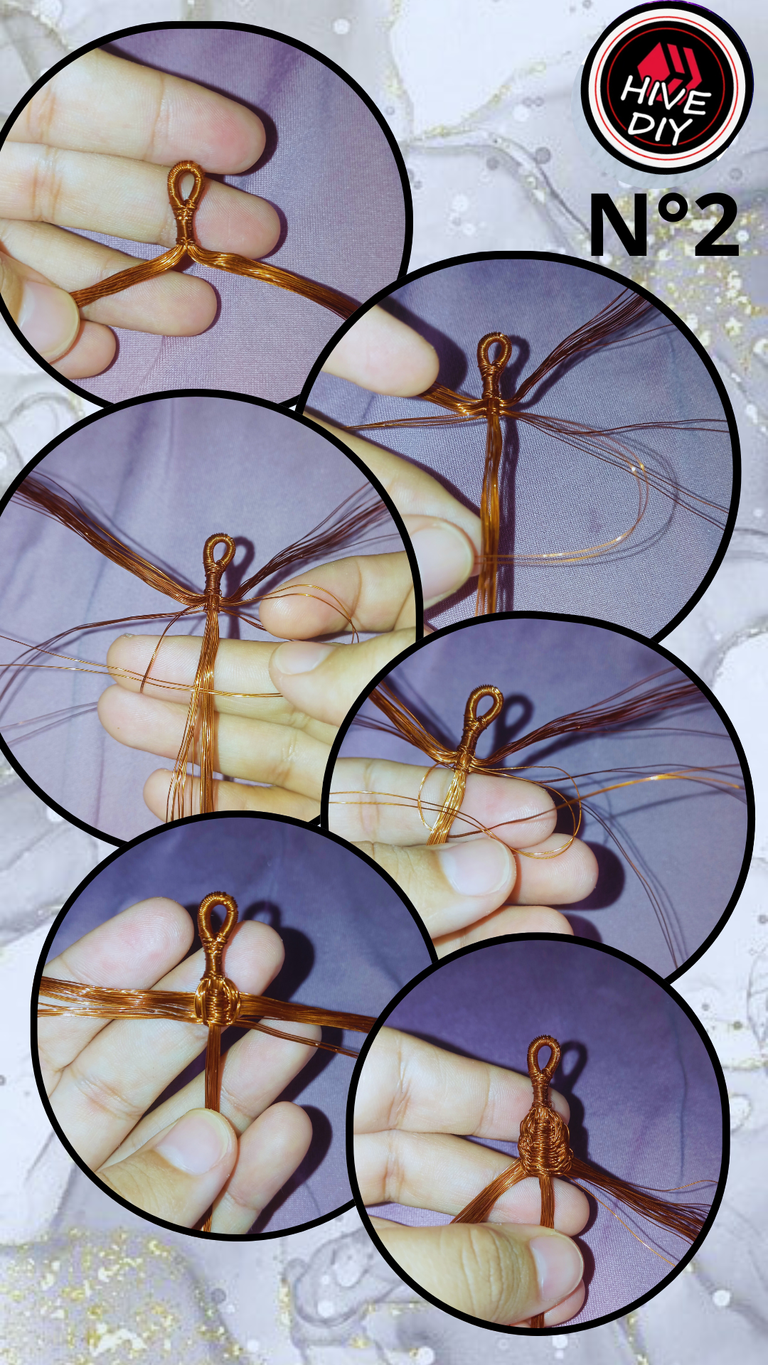
Step 1:
We take a large amount of copper and fold them in half to know where the center will go, with a copper strand we wrap and when we have a centimeter covered we fold to make a ring and continue wrapping everything. It should be as in the photo, so we will make the part where our scorpion will hang.
Paso 1:
Tomamos una cantidad grande de cobre y las doblamos a la mitad para saber dónde irá el centro, con una hebra de cobre envolvemos y al tener un centímetro cubierto doblamos para hacer un aro y seguimos envolviendo todo. Debe quedar como en la foto,así haremos la parte donde se colgará nuestro escorpión.
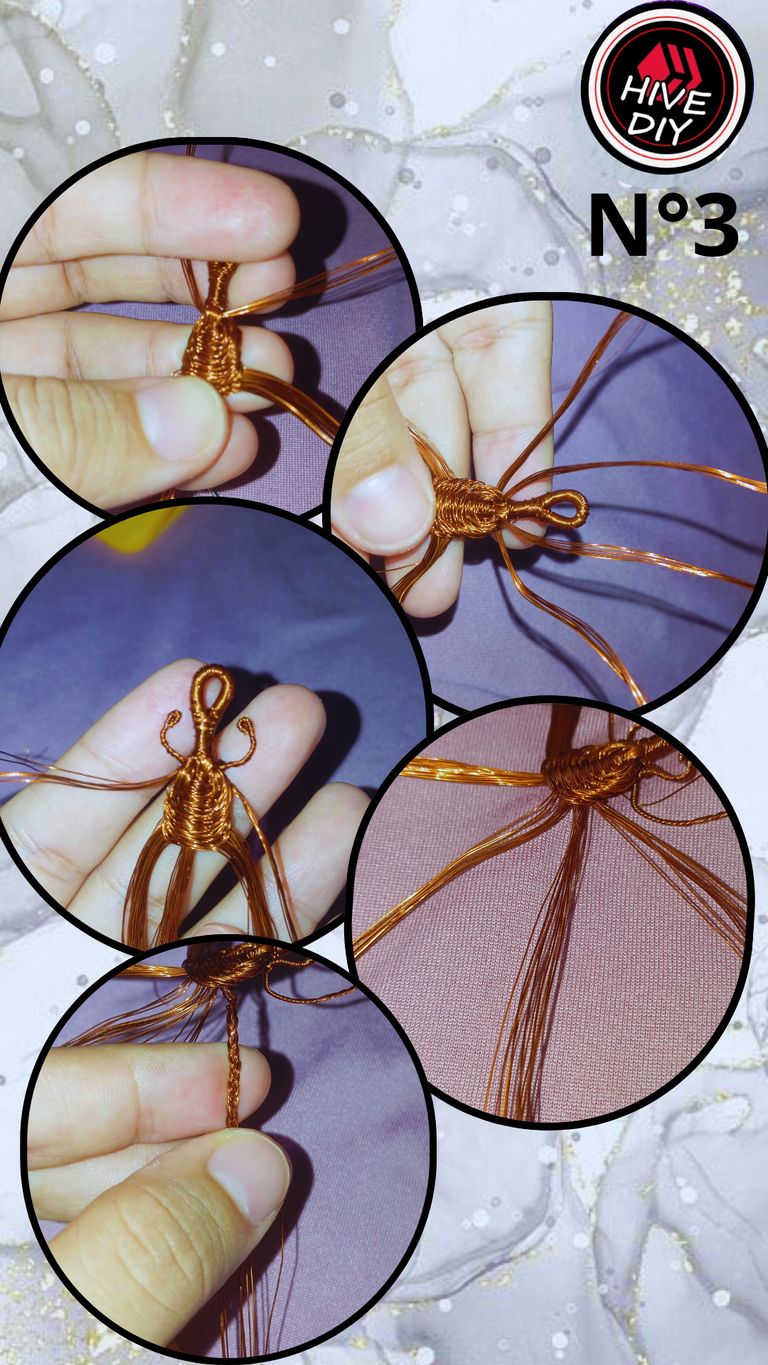
Step 2:
Divide the copper strands in half and take a little bit towards the center, leaving the same amount on each side. We take out 2 strands from each side and proceed to weave passing in a curved form towards one side leaving an eyelet, then we will do the same form but with the other two copper strands, we pass over the ends, then we pass them behind and through the eyelet that we had made, we pull and follow this process but with other 4 different strands. We repeat this step until we obtain the desired volume.
Paso 2:
Dividimos a la mitad las hebras de cobre y sacaremos un poco hacía el centro dejando la misma cantidad de cada lado. Sacamos de a 2 hebras de cada lado y procedemos a tejer pasando en forma curva hacia un lado dejando un ojal, luego haremos la misma forma pero con las otras dos hebras de cobre, pasamos por encima de las puntas, luego las pasamos por detrás y por el ojal que habíamos hecho, halamos y seguimos este proceso pero con otras 4 hebras diferentes. Este paso lo repetimos hasta obtener el volumen deseado.
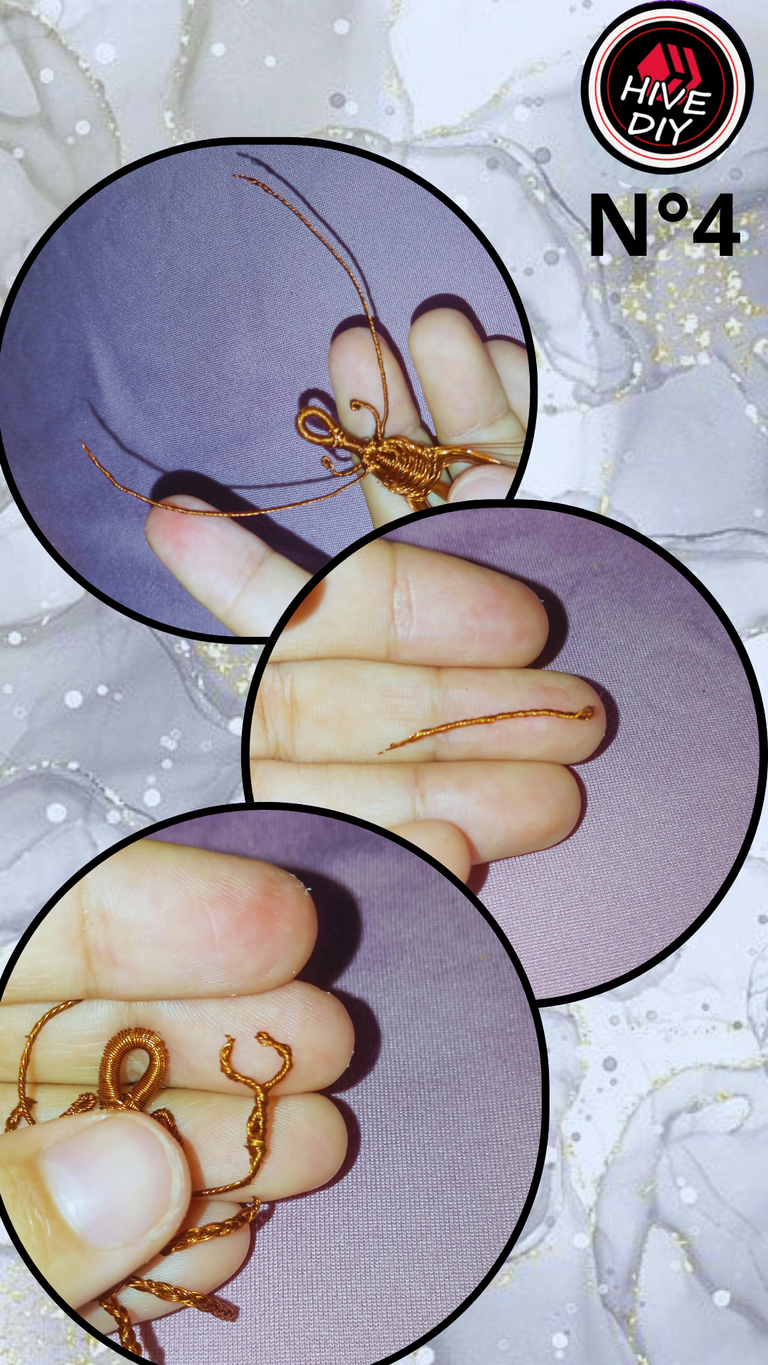
Step 3:
At the tip of the head of the scorpion we will pass some copper strands that we will then divide into 4, these will be the pincers and the smaller legs.
With the copper strands of the body we divide into 3 and braid them to make the missing legs.
Paso 3:
En la punta de la cabeza del escorpión pasaremos unas hebras de cobre que luego dividiremos en 4, estás serán las pinzas y las patas más pequeñas.
Con las hebras de cobre del cuerpo dividimos en 3 y trenzamos para hacer las patas faltantes.
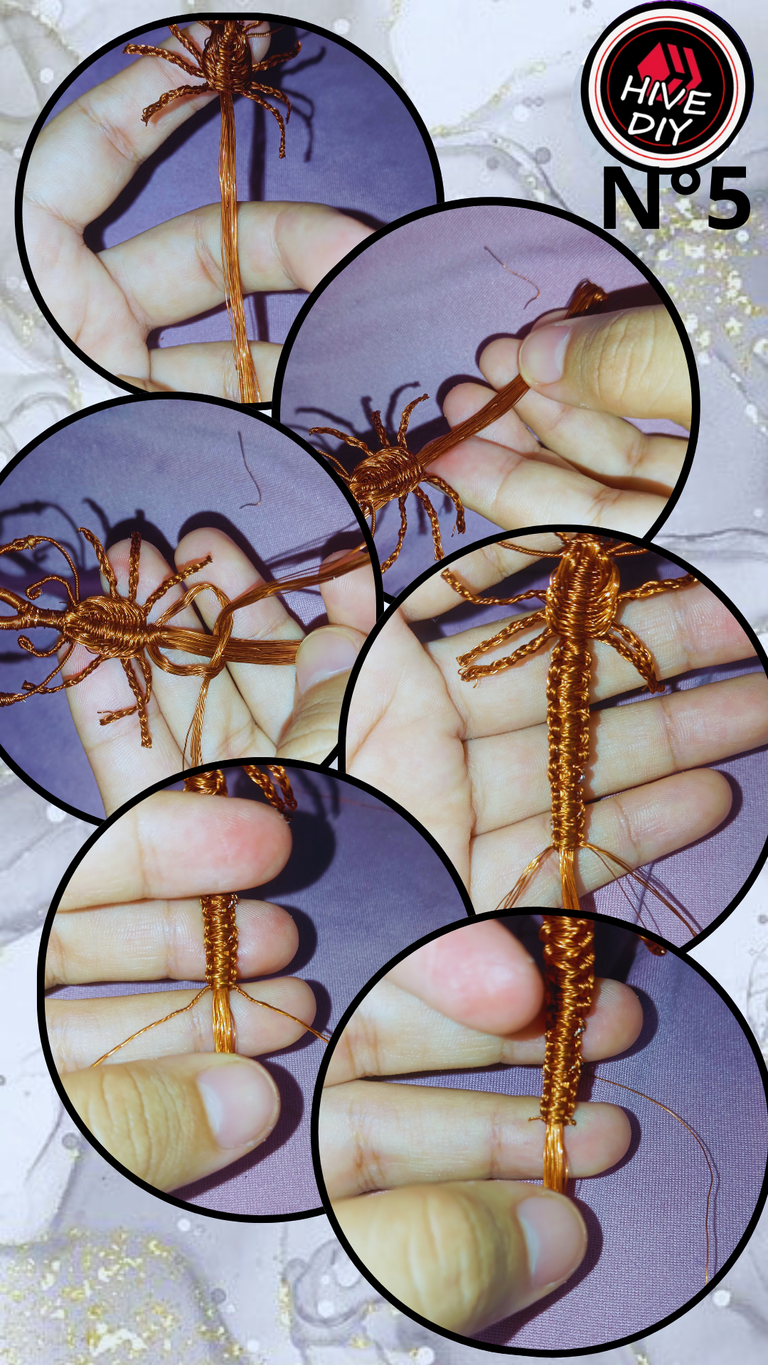
Step 4:
We will make the tweezers with a small piece of twisted copper, we bend it, tie it with a strand of the same and give shape.
Paso 4:
Las pinzas las haremos con una pieza pequeña de cobre entorchado, la doblamos, amarramos con una hebra de este mismo y damos forma.
Step 5:
We will make the tail by folding the copper towards the bottom, divide it and we will weave in the same way as we did the body, but in this step we will use all the copper strands and as we weave we will cut a strand on each side so that the tail becomes thinner and thinner. Cut the excess, fold the ends and leave a centimeter of the tail without weaving to make the sting.
Paso 5:
Haremos la cola doblando los cobre hacía la parte de abajo, dividimos está misma y tejeremos de la misma forma que hicimos el cuerpo, pero en este paso usaremos todas las hebras de cobre y ha medida que vayamos tejiendo iremos cortando una hebra de cada lado para que la cola vaya quedando cada vez más delgada. Cortamos el sobrante, doblamos escondiendo las puntas y dejaremos un centímetro de la cola sin tejer para hacer el aguijón.
Step 6:
Open the tail and place in the center a small sphere of the same copper, wrap and roll well. In this way the tail will be ready. We proceed to give the structure to the scorpion and it is finished.
Paso 6:
Abrimos la cola y colocamos en el centro una pequeña esfera del mismo cobre, envolvemos y enrollamos bien. De esta forma quedará lista la cola. Procedemos a darle la estructura al escorpión y queda terminado.
I want to thank you for your support and motivate me to continue creating, for me it is a pleasure to share these ideas with all of you. I think I'm getting better and better. Greetings guys, take care of yourselves, see you soon!!!
Quiero agradecerles por su apoyo y motivarme a seguir creando, para mí es todo un placer compartir estás ideas con todos ustedes. Creo que cada vez voy mejorando más. Saludos chicos cuidense mucho, hasta pronto!!!

Translation with DeepL
Photos taken with Redmi 12
Editing done in Canva
Traducción con DeepL
Fotos tomadas con Redmi 12
Edición realizada en Canva
Increíble el diseño de este escorpión, y saber el material que usaste para recrearlo... Es increíble.
Además, lo amé porque es mi signo. Felicitaciones
Muchas gracias por el apoyo. Le cayó como anillo al dedo con su signo ☺️🥰 Saludos
Maravillosa creacion a base de cable de cobre, al ver esa bola de cable toda enredada pude entender por que te desagrada tanto desenredarlo jaja pero el resultado lo vale, esta muy bien elaborado y bien detallado 😍
Muchas gracias, realmente si es bastante fastidioso desenredar el cobre🤣🤣🤣Pero valió la pena cada segundo invertido.☺️ Saludos
Qué increíble trabajo hiciste con el cobre, quedó realmente espectacular. Queda muy bien para decoración porque es llamativo y lleno de detalles
!DIY
Gracias amiga, creo que tienes razón para ser un material reciclado el acabado quedó bonito.Saludos🥰
You can query your personal balance by
@mandysmoon just sent you a DIY token as a little appreciation for your post dear @hayleysv! Feel free to multiply it by sending someone else !DIY in a comment :) You can do that x times a day depending on your balance so:!DIYSTATSWow... Te quedó genial, tiene muchísimos detalles, y es súper original. Te felicito por tan increíble trabajo 😁👍
Muchísimas gracias. A pesar de que es un poco difícil trabajar con este material valió la pena. 😌☺️ Saludos.
Oh por Dios este escorpión te quedó genial, les tengo terror pero no puedo negar que sin criaturas hermosas, esto que realizaste en alambre es espectacular.
!discovery 40
A mí también me da un poco de miedo está criatura pero hacerlo me pareció interesante. Gracias por su apoyo. SALUDOS 😊☺️
This post was shared and voted inside the discord by the curators team of discovery-it
Join our Community and follow our Curation Trail
Discovery-it is also a Witness, vote for us here
Delegate to us for passive income. Check our 80% fee-back Program
No puedo creer que hayas hecho semejante obra de arte sólo con cobre, realmente es demasiado bonito.🦂
Que bueno que le haya gustado. Yo también quedé un poco sorprendida con el resultado. ☺️ Saludos.