Very nice afternoon for everyone, it is a pleasure to greet you and wish you the best for this day and the following ones. It's a pleasure to be here at @hivediy, I'm stopping by to show you my most recent project. Preparing for the December season that will arrive in a few days, for this reason I feel encouraged and of course, showing you part of them, today I will give you some very easy steps, for this very nice and easy idea, to decorate and set your home I'm talking to you about a very striking Christmas tree that you can hang using the Crochet technique. Follow me and you will see how easy it is to make.//
Muy bonita tarde para todos, es un gusto, saludar y desear lo mejor, de este día y los siguientes. Me complace estar por acá en @hivediy, paso para mostarles, mí más reciente proyecto. Preparándome a propósito de la época Decembrina que en pocos días llegará, por tal motivo me siento animada y por supuesto, mostrándoles parte de ellos, hoy les daré unos muy fáciles pasos, para está muy linda y facil idea, para decorar y ambientar su hogar, les hablo, de un muy llamativo arbolito de Navidad, que podrás colgar, dónde use la técnica Crochet. Sígame y verás lo fácil que es su elaboración.

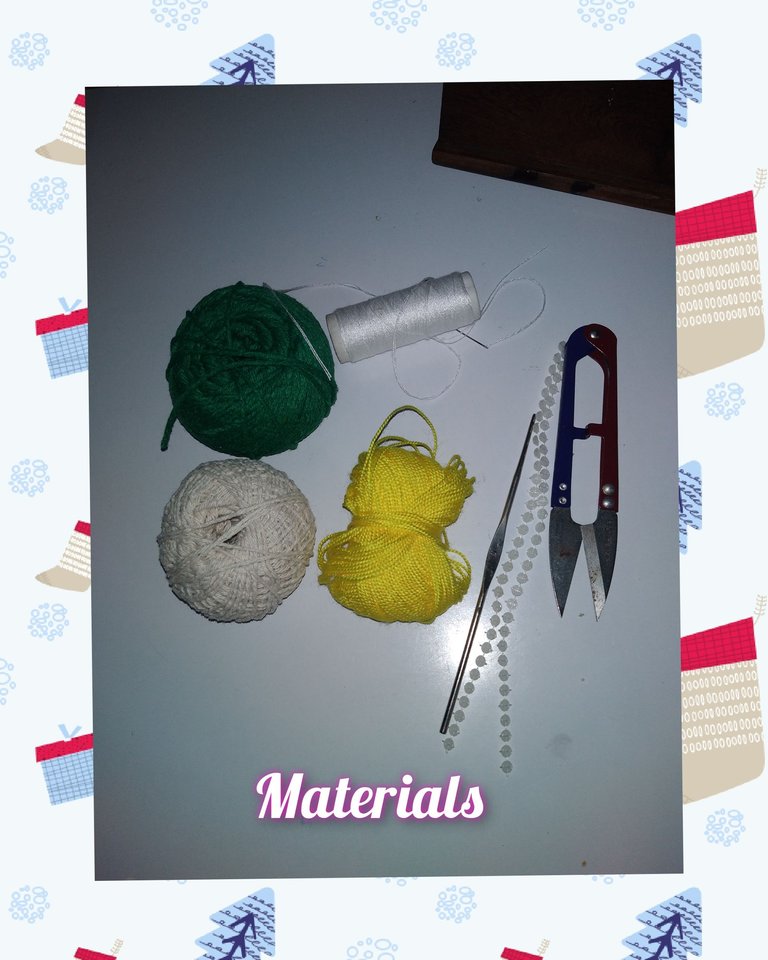
Materials/ Materiales.
. Pavilo thread, Christmas green color, traditional color and yellow.
. Knitting needle.
. Thread and needle for sewing.
. These white enamelled half-pearls.
. Scissors.//
. Hilo pavilo, color verde navidad, color tradicional y amarillo.
. Aguja para tejer.
. Hilo y aguja para coser.
. Estras medias perlas corridas de color blanca esmaltadas.
. Tijeras.
Step/Pasos.
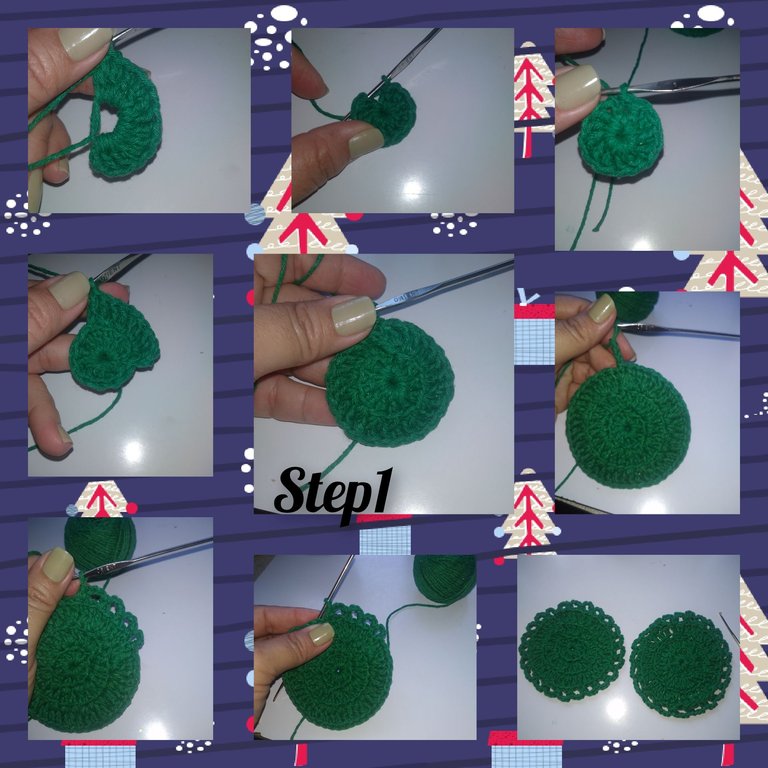
1.) Start, make a magic knot, with the green thread, inside it, washing 3p.c, equivalent to one dc, and I knit 11 dc more high, I tie the ring and close with dc in the third dc of start. I knit a second round, and I will increase two dc in the first dc of the previous round, in the next one a dc, and like this I do the route, increasing, after one dc I knit a third round, they continue the process of the round previous, that is, making an increase, after a high point and closing with p.d. I knit a fourth round, to do this, I lift three p.c, leave a space and knit m.p, this is how I do the entire route. Short and finish. I repeat the process to obtain two circles of the same size and shape.
1.) Inicio, hacien un nudo mágico, con el hilo de color verde, dentro de el, lavando 3p.c, equivalente a un p.a, y tejo 11 p.a altos más, revogo el anillo y cierro con p.d en el tercer p.c de inicio. Tejo una segunda vueltas, y haré aumento de dos p.a en el primer p.a de la vuelta anterior, en el siguiente un p.a, y así hago el recorrido, haciendo aumento, luego de un p.a.tejo una tercera vuelta, siguien el proceso de la vuelta anterior, es decir haciendo aumento, luego de un punto alto y cerrando con p.d. tejo una cuarta vuelta, para ello, levanto tres p.c, dejo un espacio y tejo m.p, así hago todo el recorrido. Corto y remato. Repito el proceso para obtener dos círculos de el mismo tamaño y forma.
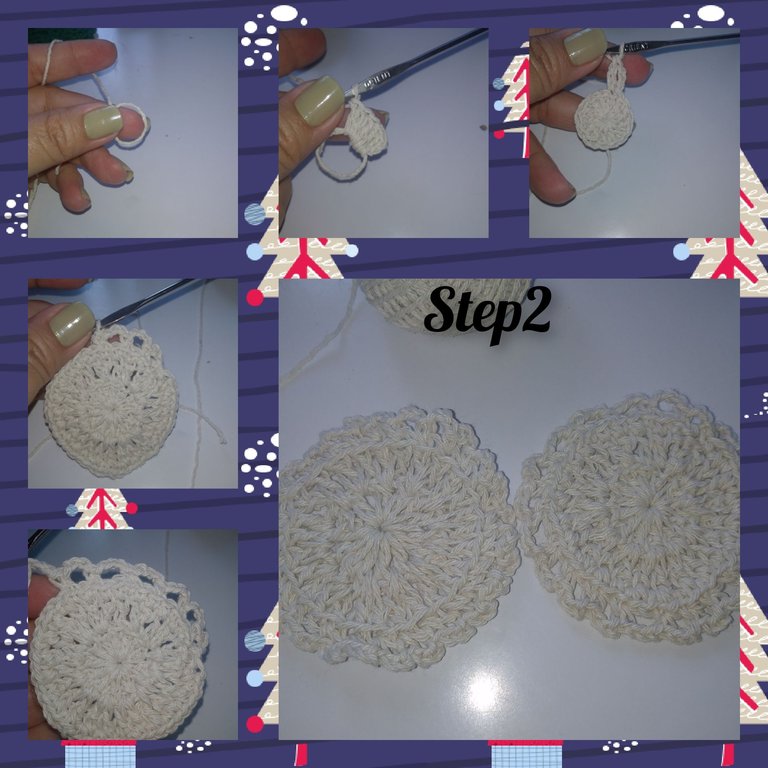
2.) Using the traditional colored pavilo thread, I start as in the previous step, but this time I will only knit two rounds and after this, I make the third just like the fourth round in the previous step. Likewise, I repeat the process, since I will need two circles of the same color. Model and size.
2.) Usando el hilo pavilo de color tradicional, inicio como el paso anterior, pero está vez solo tejere, dos vueltas y luego de esta, hago la tercera igual que la cuarta vuelta de el paso anterior. Así mismo, repito el proceso,vya que necesitaré dos círculos de igual color. Modelo y tamaño.
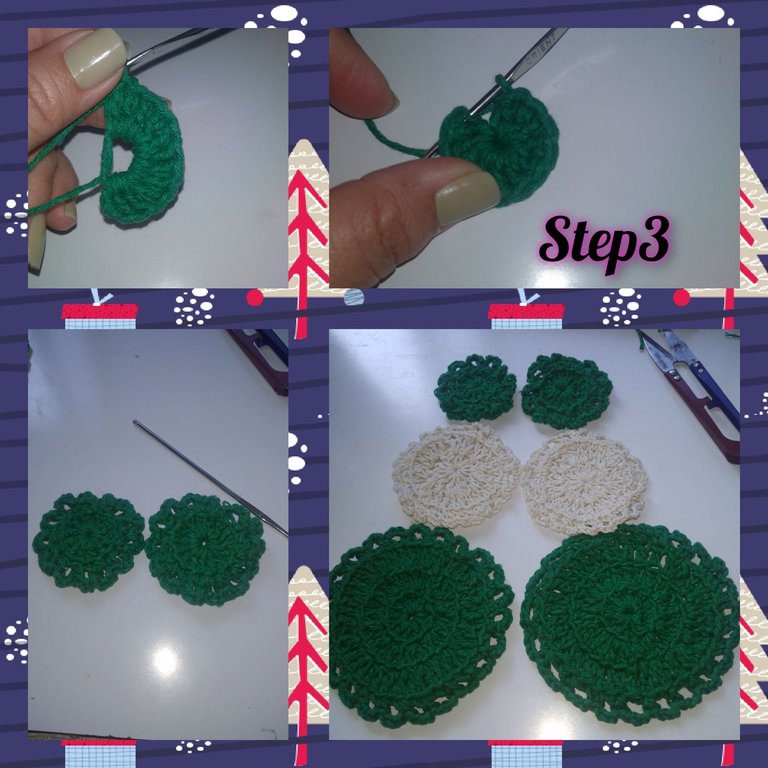
3.) In this step, I will use the green thread, starting the same as in the previous rounds, but I will only knit one round in dc and the next in dc to make the edge. Ready this I repeat, for the next circle. Now I have two of each size.
3.) En este paso, usaré el hilo de color verde, iniciando igual que en las vueltas anteriores, pero solo tejere una vuelta en p.a y la siguiente en p.c para hacer el borde. Listo esto repito, para el siguiente círculo. Ahora tengo dos de cada tamaño
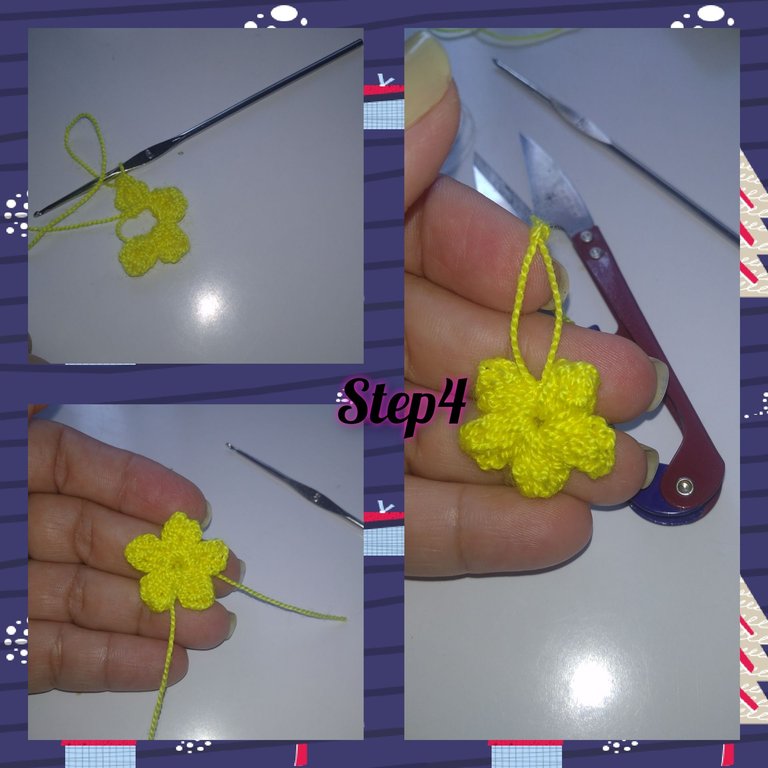
4.) With the yellow thread, I will make a m and inside it I will knit 5 groups of (one dc, two dc and one dc, I close together and go down to the ring with dc. I close the ring and simulate a small and delicate Star.
4.) Con el hilo de color amarillo, haré un a.m y dentro de el tejere 5grupos de ( un p.a, dos p.d y un p.a, cierro junto y bajo al anillo con p.d. cierro el anillo y simuló una pequeña y delicada Estrella.
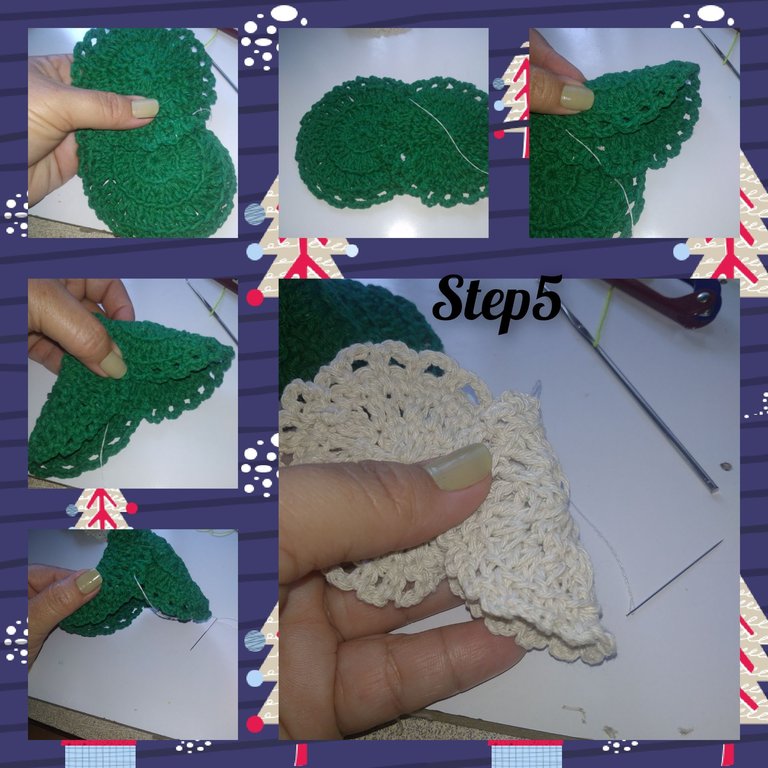
5.) With the needle and thread, I begin to glue the circles in pairs, I place one and on it less than half of the other, I stitch, I take a first side and I stitch and glue the other side, leaving a kind of cone , that is to say that they are not completely on top of each other but approximately one third.
5.) Con la aguja e hilo, comienzo a pegar los círculos en pares, coloco uno y sobre este menos de la mitad de el otro, doy puntadas, tomo un primer lado y doy puntada pegando el otro lado, dejando una especie de cono, es decir que no queden completamente uno sobre el otro sino una tercera parte
6.) I will start by gluing the star to the top of the cone formed with the smaller circles. After gluing well, I insert it inside the cone and involve the medium-sized cone, continue and involve the larger one. In this way the tree is formed.
6.) Comenzaré, pegando la estrella en la parte superior de el cono formado con los círculos de menos tamaño, luego de pegar bien, Introduzco por dentro de el cono e involucró el cono mediano, continuo e involucró el de mayor tamaño. De esta manera quedan formado el árbol.

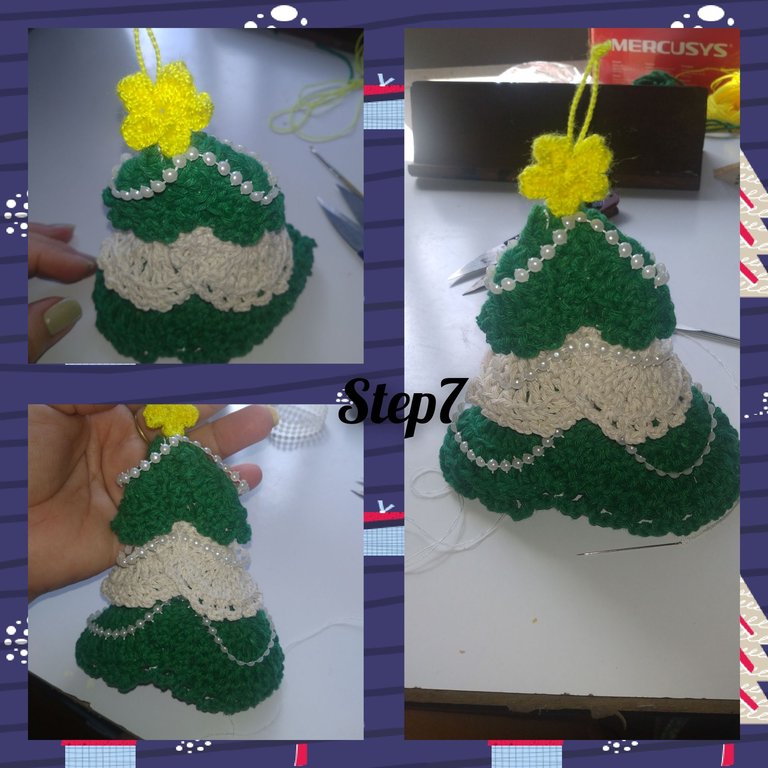
7.) To simulate the lights, I will use the back chains, sticking with a needle and thread, on the front part, from the top, letting it fall and arantoda on the other side at the top, like this way I repeat in each space.
7.) Para simular las luces, utilizaré la cadenas de atrás, pegando con un apuntada de aguja e hilo, en las parte de el frente, desde la parte alta, dejándola caer y arantoda en el otro lado en la parte alta, de esta manera repito en cada espacio.
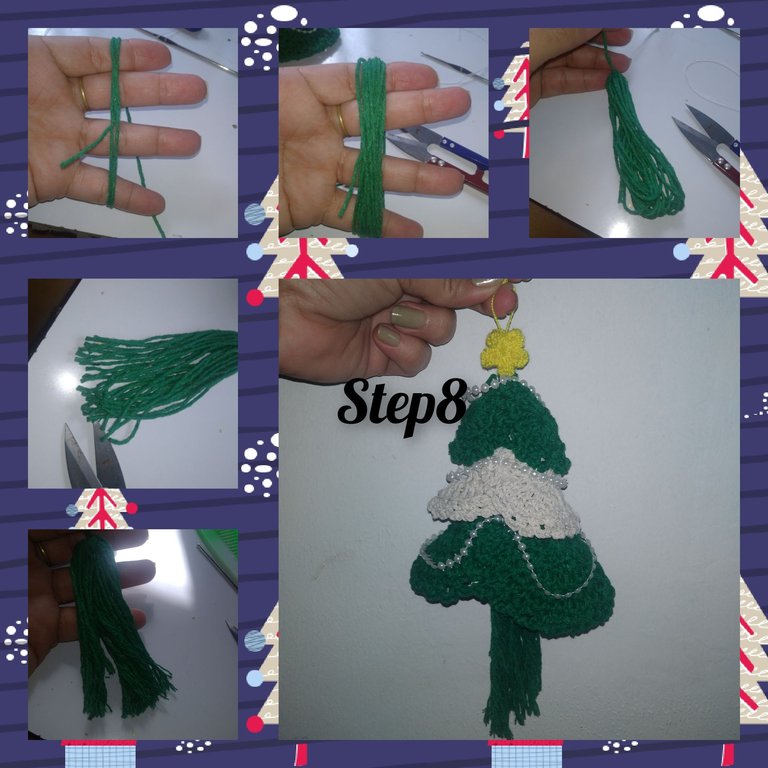
8.) Join the index/little fingers and make fifteen turns with the green thread, then put together a small bow and place it as a pendant in the center of the last cone.
8.) Uno los dedos los dedos índice/meñique y doy quince vueltas con el hilo de color verde, luego armó un pequeño moño y coloco como colgante en el centro de el último cono.
In this way, I am very happy with the final result, which before had only been an idea, and which after being executed fascinated me. I hope they like it as much as I do.
De esta manera, concluyo muy contenta con el resultado final, que antes solo había Sido una idea, y que luego de ejecutada me fascinó. Espero que les guste tanto como a mí.

Glossary:
. P.a = High point
. P.m = Midpoint.
. P.b = single crochet.
. P.d = slipped stitch.
.P.C = point String.
. All photos are my property, taken with my smartphone.
. Use InShot.
. Use GIF video cover.
Grateful, you followed me until the end, it is always a pleasure to have your visit to my blog, see you soon.//
Glosario:
. P.a = Punto alto
. P.m = Punto medio.
. P.b = punto bajo.
. P.d =punto deslizado.
.P.C = punto Cadena.
. Todas las fotos son de mí propiedad, tomadas con mí telefono inteligente.
. Use InShot.
. Use cobertor de video GIF.
Agradecida, me hayas seguido hasta el final, siempre es un gusto contar con su visita a mí blog, será hasta pronto.
Muy agradecida por su apoyo...que lindo @hive-130560
Este es un momento hermoso en cada hogar, decorar el árbol sin duda alguna marca el real inicio a la navidad, buen contenido el tuyo te felicito
Gracias mi amiga hermosa, que honor me hace con su comentario.abrazos.
Saludos y recibe un abrazo fuerte