
Hola gente!
Ya estoy aquí de nuevo con otra tarjetita, ¡cuánto me gusta hacer esto! No hay mucho que decir para esta presentación, solo disfruta del proceso, y si te gusta, en algún momento puedes hacerla y regalarle ese detalle a esa persona especial para recordarle con algo tan sencillo, lo valioso y lo mucho que la quieres. Ah y se acerca el día del amor y la amistad, esta tarjeta es ideal para ese día.
Hello people!
Here I am again with another little card, how much I love doing this! There is not much to say for this presentation, just enjoy the process, and if you like it, at some point you can make it and give that detail to that special person to remind them with something so simple, how valuable and how much you love them. Oh and the day of love and friendship is coming, this card is ideal for that day.


- Cartulina negra
- Cartulina blanca
- Cartulina estampada
- Pega
- Tijera
- Regla
- Marcadores
- Black cardboard
- White cardboard
- Stamped cardboard
- Glue
- Scissors
- Ruler
- Markers

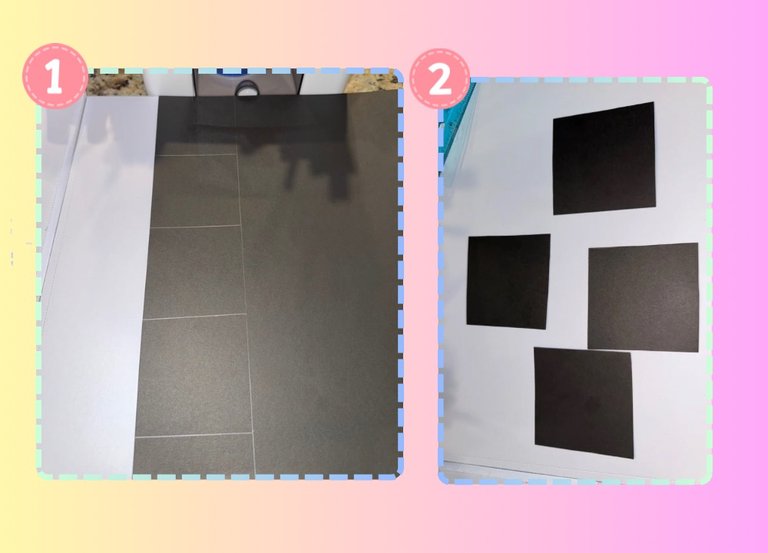
- En la cartulina negra haremos cuatro cuadrados de 6 cm x 6 cm y los recortaremos.
- On the black cardboard we will make four squares of 6 cm x 6 cm and cut them out.

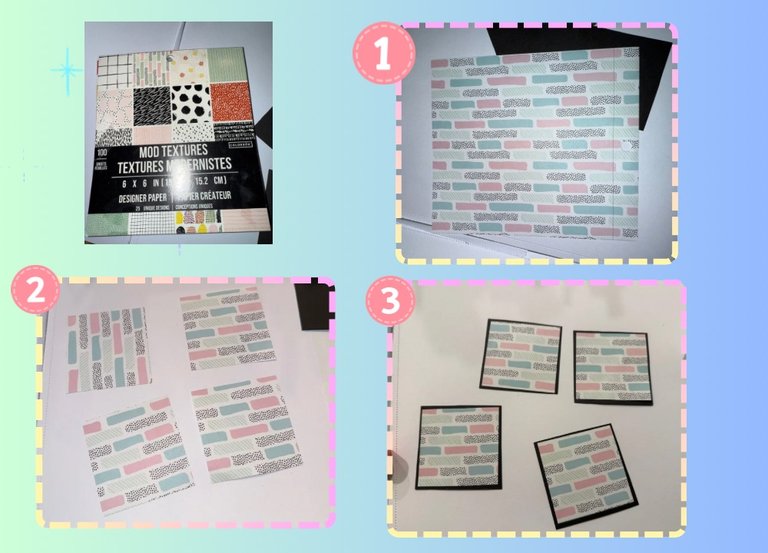
- Vamos a hacer cuatro cuadrados de 5 cm x 5 cm en la cartulina impresa, recortarlos y pegarlos sobre los cuatro cuadrados negros hechos anteriormente.
- We are going to make four squares of 5 cm x 5 cm on the printed cardboard, cut them out and glue them on the four black squares previously made.

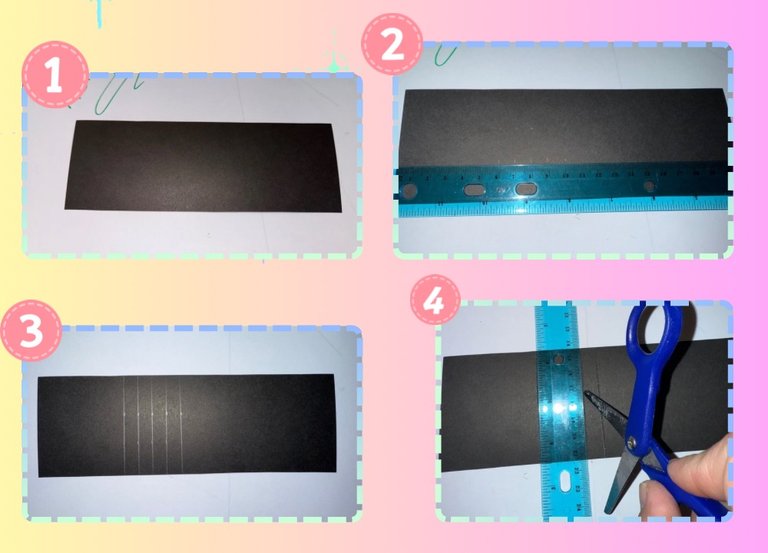
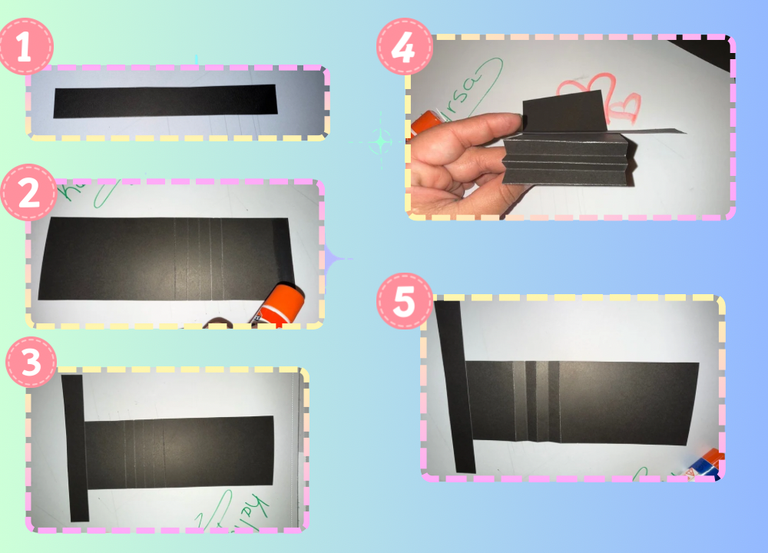
- En una cartulina negra vamos a hacer un rectángulo de 21 cm de ancho por 6 cm de largo. Hacemos una marca a 6 cm de cada lado y luego 4 marcas más de 1 cm que unimos y con la ayuda de las tijeras marcamos.
- On black cardboard we are going to make a rectangle 21 cm wide by 6 cm long. We make a mark at 6 cm on each side and then 4 more marks of 1 cm we join and with the help of the scissors we mark.

- En cartulina negra hacemos otro trozo de 15 cm por 2 cm. Lo pegamos en la base de la cartulina. Marcamos los pliegues.
- In black cardboard we make another piece of 15 cm by 2 cm. We glue it on the base of the card. We mark the folds.

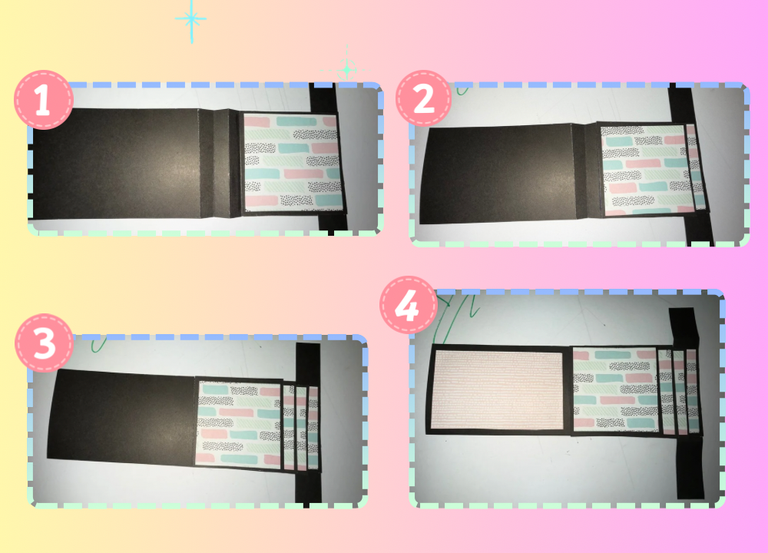
- Vamos a pegar en cada espacio cada uno de los cuadrados que hicimos al principio y en una cartulina con un estampado diferente hacemos un rectángulo de 10 cm por 4 cm y pegamos
- We are going to glue in each space each of the squares we made at the beginning and in a cardboard with a different print we make a rectangle of 10 cm by 4 cm and we paste

- Luego hacemos 4 cuadros más en cartulina negra de 4 cm x 4 cm, en cada caja escribimos con marcadores alguna frase de tu preferencia. En la primera caja yo escribí «Amor» en la segunda «un detalle» en la tercera «Para recordarte» y en la cuarta «Cuanto te quiero» y así al deslizar la tarjeta se revelará la frase «Amor un detalle para recordarte cuanto te quiero».
- Then we make 4 more boxes in black cardboard of 4 cm x 4 cm, in each box we write with markers some phrase of your preference. In the first box I wrote “Love” in the second “a detail” in the third “To remember you” and in the fourth “How much I love you” and thus to slide the card will reveal the phrase “Love a detail to remind you how much I love you”
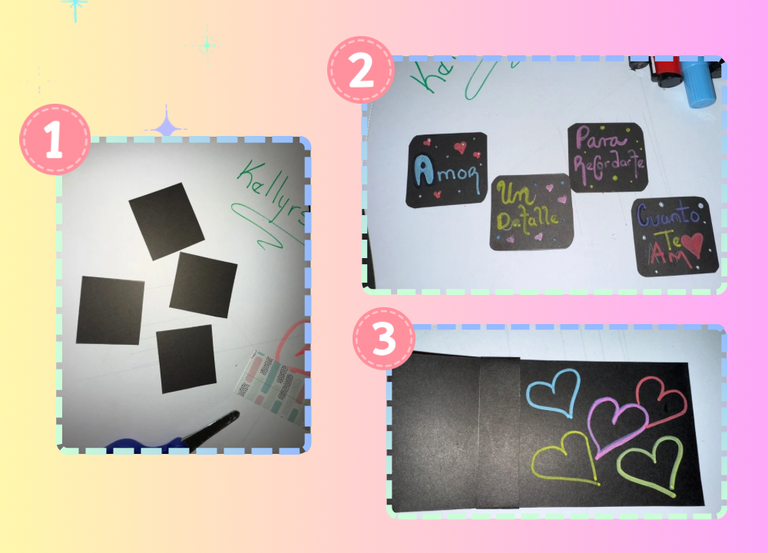

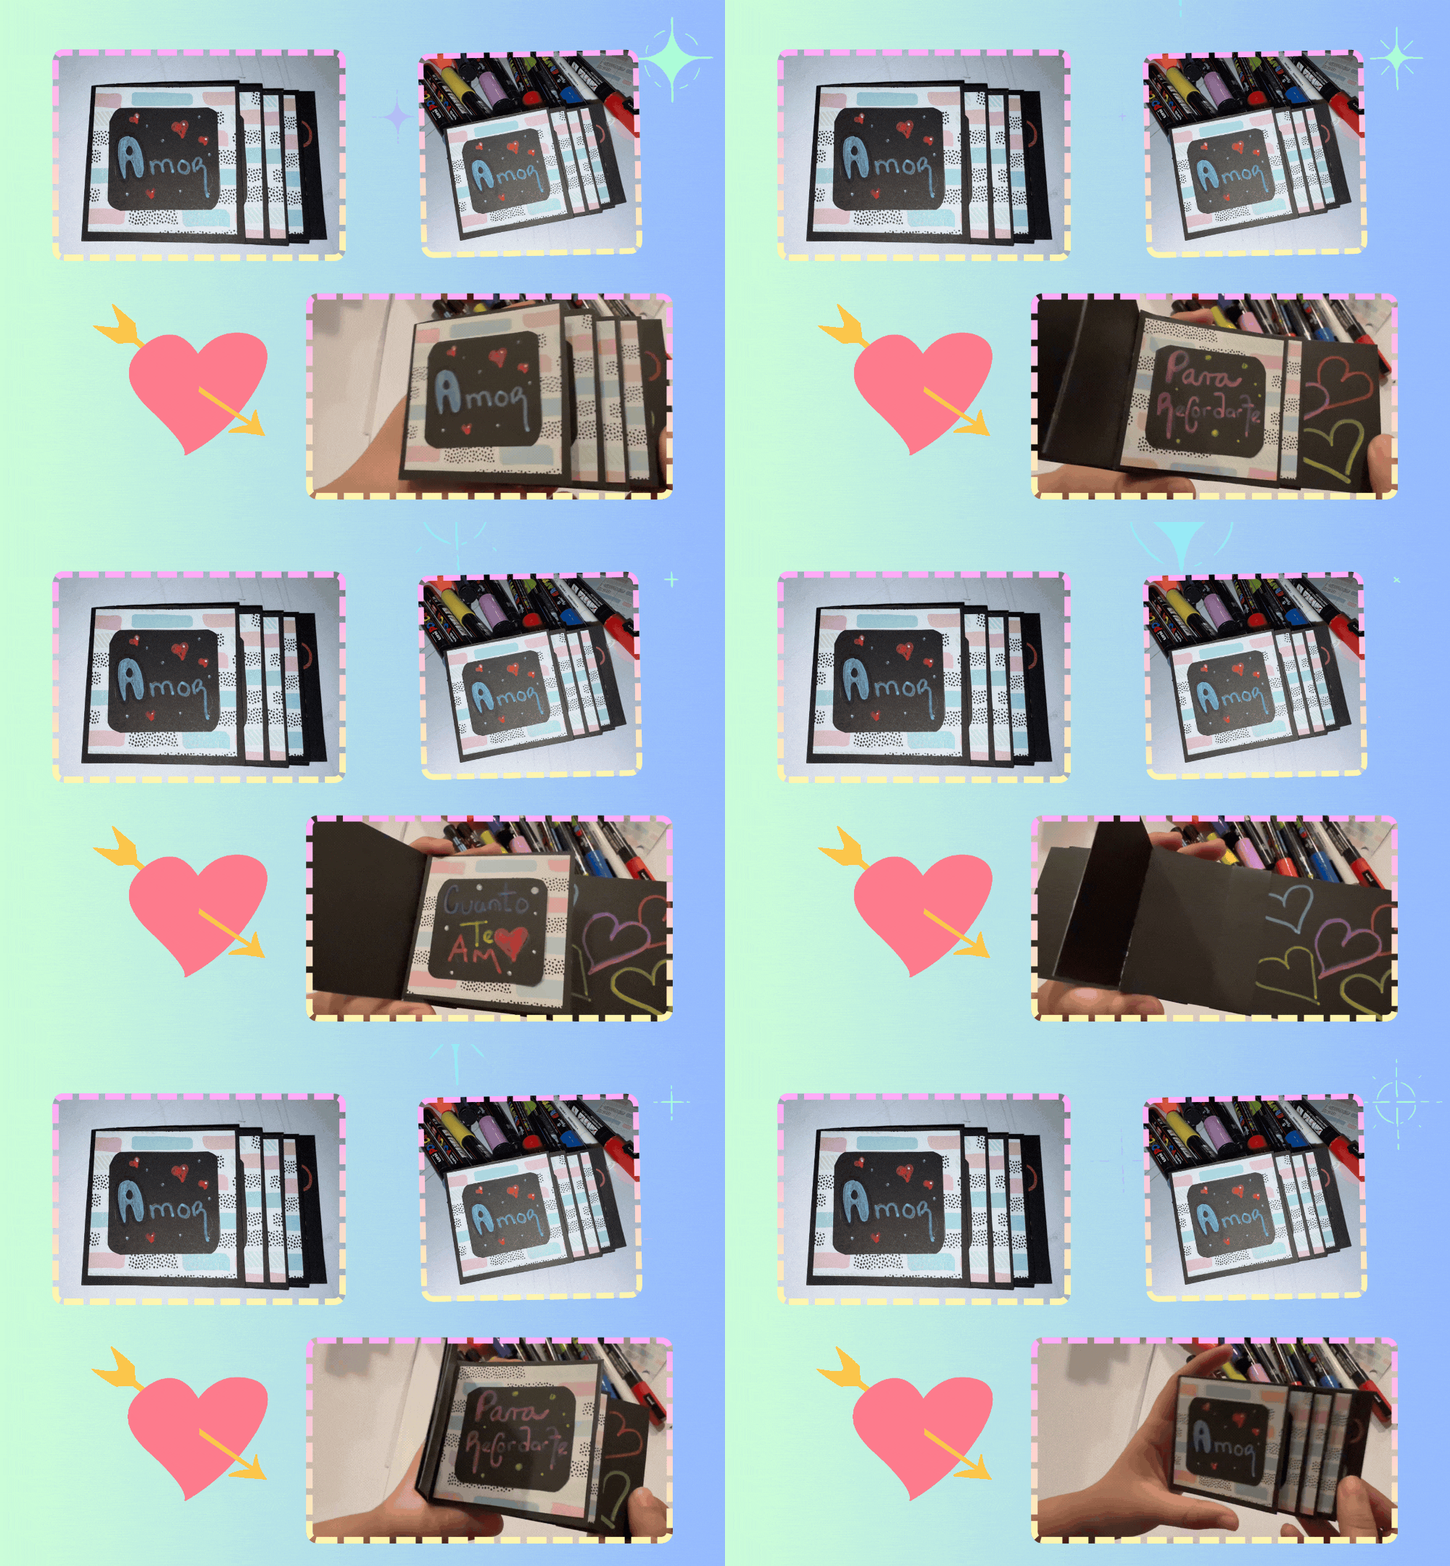
- Finalmente pegamos cada frase en un recuadro. Como puedes ver en la imagen la tarjeta se desliza para mostrar la dedicatoria.
- Finally we paste each phrase in a box. As you can see in the image the card slides to show the dedication.
Estaré encantada de leer y responder a sus comentarios. Gracias totales a todos los que aprecian mi contenido, y que se toman el tiempo de leer y dejar un comentario, gracias, muchas gracias. Les deseo lo mejor.
Hasta pronto.
I will be happy to read and respond to your comments. Total thanks to all of you who appreciate my content, and who take the time to read and leave a comment, thank you, thank you very much. I wish you all the best.
See you soon.
Otros trabajos similares :
| DIY - Creative card for mom ENG/SPA | DIY - Surprise gift box ENG/ESP | DIY "A card dedicated to my favorite hiver " ENG/ESP | Creative wedding anniversary card ENG/SPA | DIY- Tarjeta creativa de cumpleaños 🧁 |
|---|---|---|---|---|
 |  |  |  |  |

Fotografías de mi propiedad tomadas con el celular iPhone 📲 16 pro max, editadas en canva
Traducción realizada con la versión gratuita del
traductor DeepL
Todos los diseños fueron creados en canva
Photographs of my property taken with the IPhone 📲 16 pro max, edited in canva
Translation made with the free version of
translator DeepL
All designs were created in canva
¡Que preciosa y original tarjeta! Muchas gracias pro compartir la idea 🙏
Holaaa!! Un gusto verte por aquí, me alegra que te gustara 🌻
Que bonita 🥹 gracias por la idea 😊
Gracias Mariale! Un gusto para mí es un gusto para mí compartirles estas bonitas ideas 💡 feliz día 🌷
This is so beautiful and thoughtful, such a wonderful gift for a loved one. Well done and thanks for sharing.
Me parece muy interesante la idea, podría ser muy práctica para colocar fotografías, a mi hija le encanta hacer este tipo de tarjetitas tan lindas.🤗❤️
Lo de las fotografías sería genial, también es una buena opción. Un saludo para tu hija que le gusta hacer lo mismo que a mí jejej. Gracias por el comentario 🪻🪻🪻🪻 Saludos
Es muy apreciado tu saludo para mi hija, mi bella, espero que sigas creando estas lindas ideas.🤗😘
Esta realmente hermosa, desde el color, el diseño, la creatividad con la que la realizaste y el mensajito de amor jeje muy buena creacion 😘
Holaaa!!! Muchas , muchas gracias. Que gusto tu comentario. Feliz día 💐💐💐