ESPAÑOL
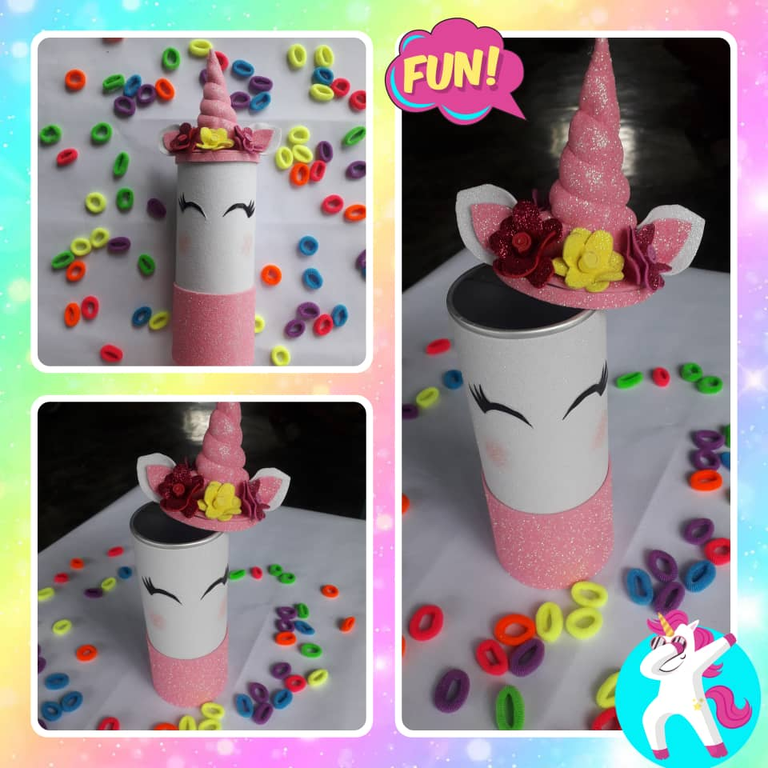
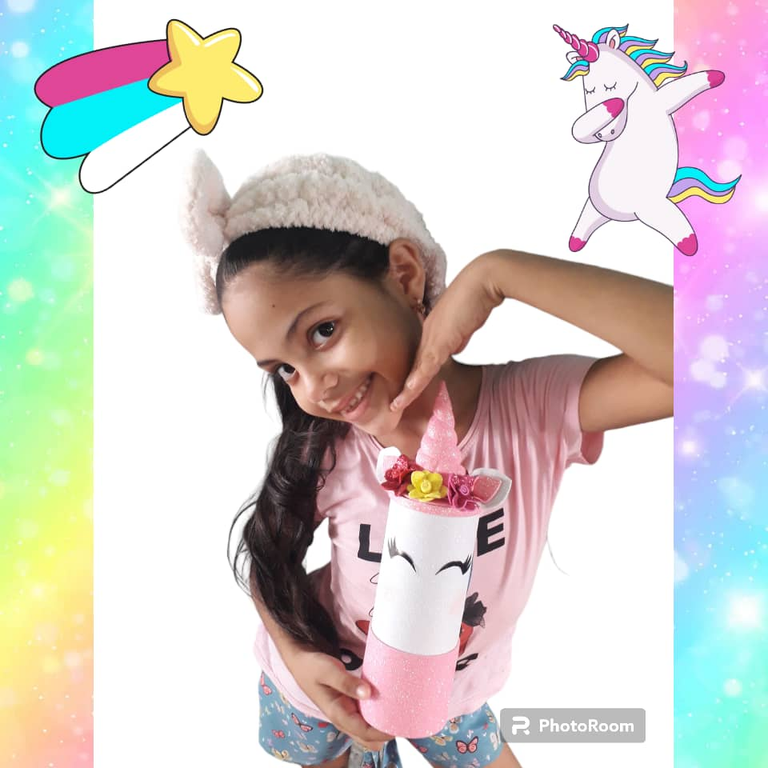
Hola amigos de #hivediy hoy quiero compartirles esta hermosa creación que la hice con todo el amor del mundo para mi hija, ella es una niña que por donde quiera pierde una colita yo como madre me puse a pensar cómo hacer para que no las pierda y se me ocurrió hacerle este hermoso detalle de unicornio ya que a ella le gustan muchos y al mostrárselo quedó fascinada esta tan enamorada de su porta colitas que está pendiente de guardarlas allí y a todo el que llega a visitarnos se lo muestra ella quedó maravillada con su detalle.
Bueno mis amigos este porta colitas es muy fácil de elaborar y para eso necesitaremos los siguientes materiales:
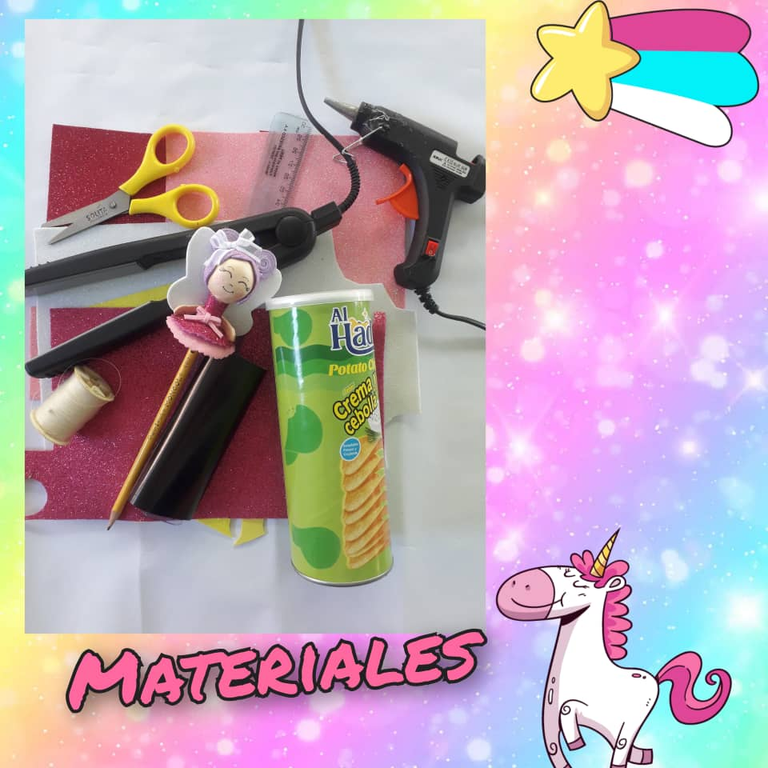
MATERIALES:
- Foami escarchado blanco, rosa, fucsia y amarillo.
- Pistola de silicón
- 1 barra de silicón
- Una plancha ( de cabello o de ropa)
- Tijera
- Regla
- Lapiz
- Papel lustrillo o cartulina negra
- Guata (yo usaré estambre de reuso)
Y con estos materiales proseguimos al paso a paso de esta hermosa creación:
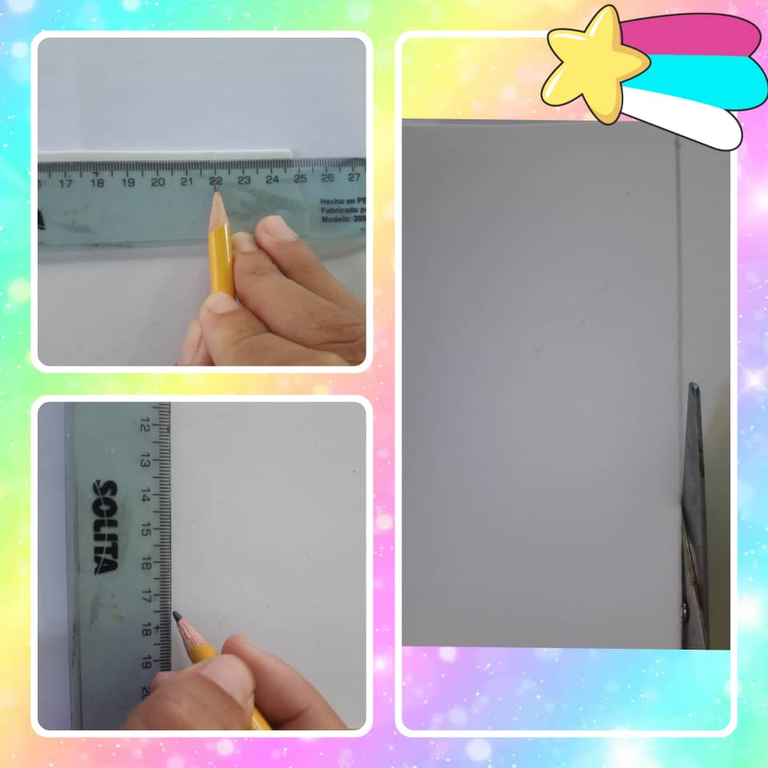
Paso 1:
Tomamos el foami blanco y con una regla medimos 22cm x 17,5cm y procedemos a cortar con la tijera.
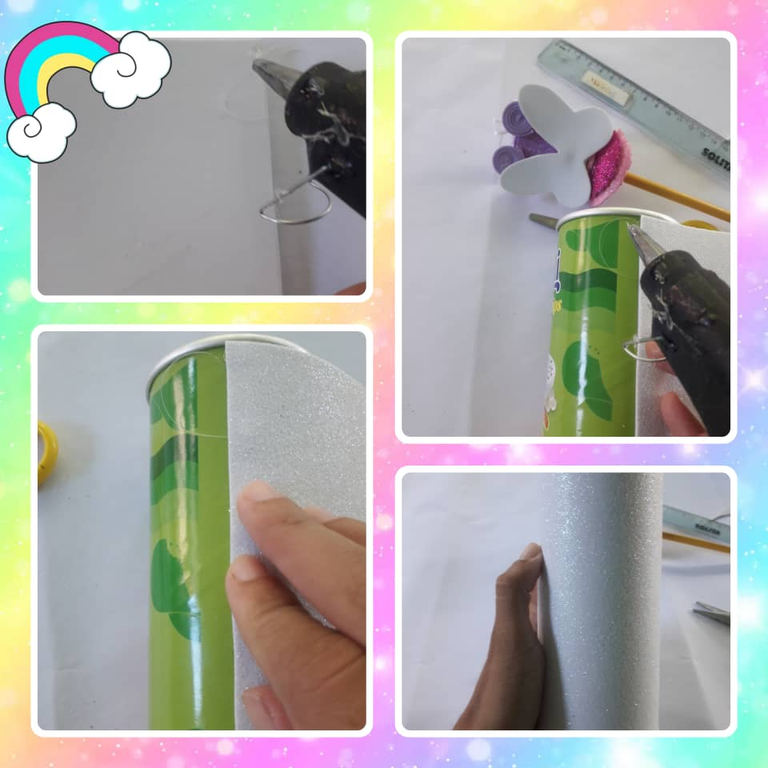
Paso 2:
Una vez cortado el foami blanco tomamos el pote de papitas y pegamos el foami con el silicón por todo el envase quedando de esta forma.
Paso 3:
Tomamos el foami rosado y con la regla medimos 22,5cm x 6,5cm y recortamos; para luego proceder a pegar en la parte inferior del envase quedando de la siguiente forma.
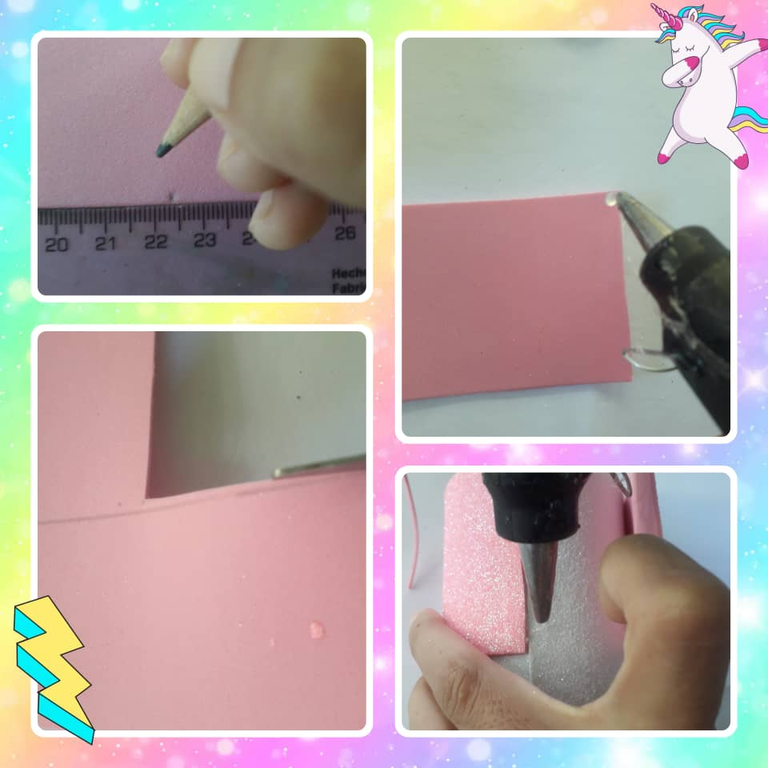
Paso 4:
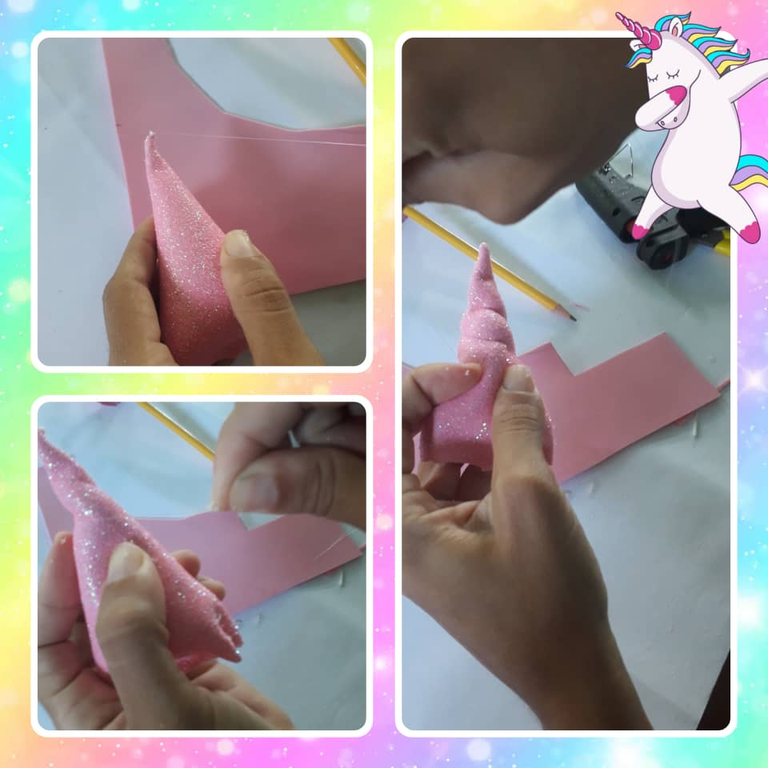
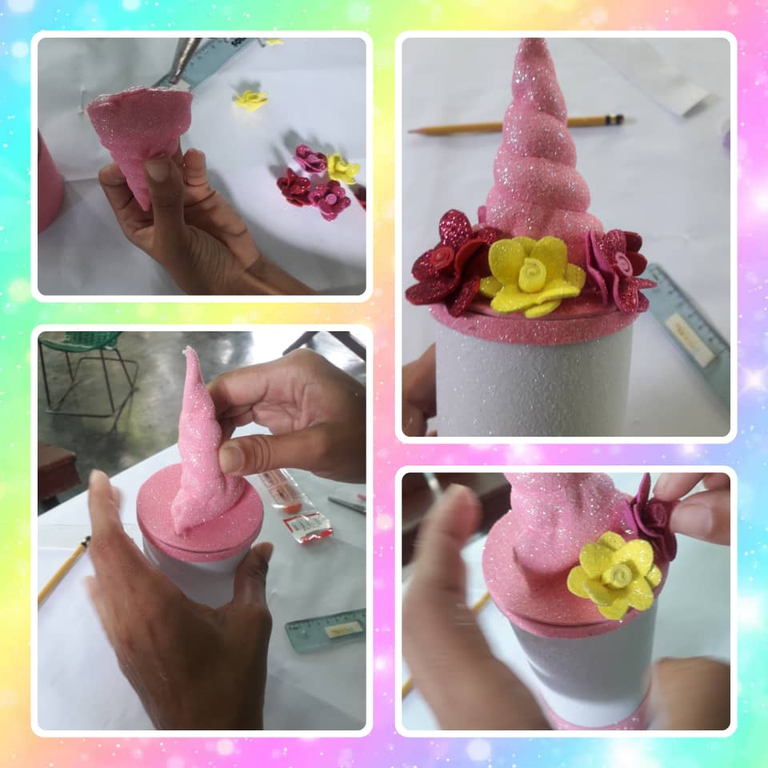
Con el restante del foami rosa marcamos con el lápiz un triángulo de aproximadamente 10,5 cm de altura y en la parte de abajo hacemos una curva quedando de esta manera.
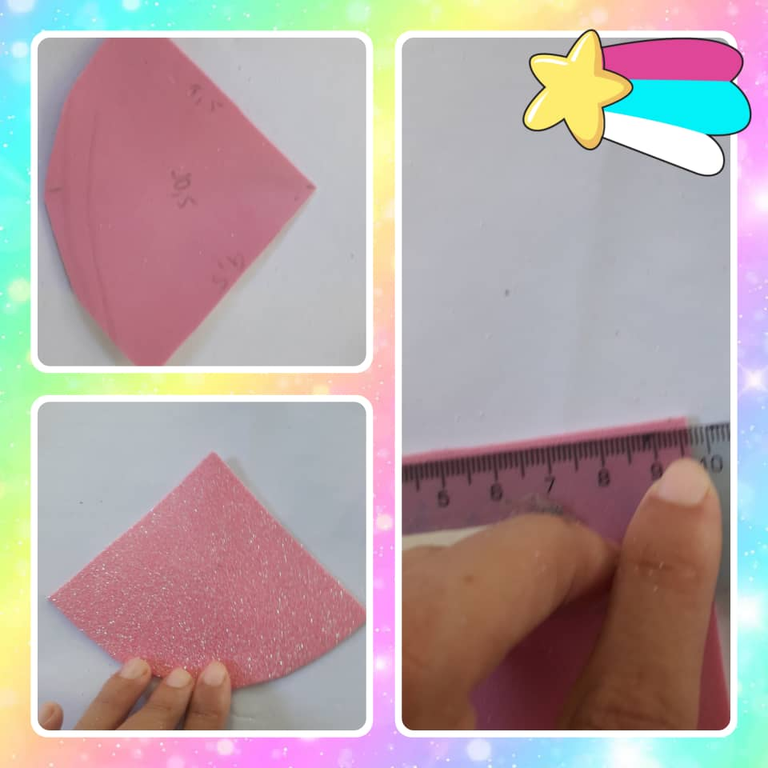
Paso 5:
Luego en la mitad del triángulo colocamos el nailon en la punta o parte superior y lo ajustamos con un puntito de silicón para proseguir a pegar los extremos del triángulo haciendo un cono.
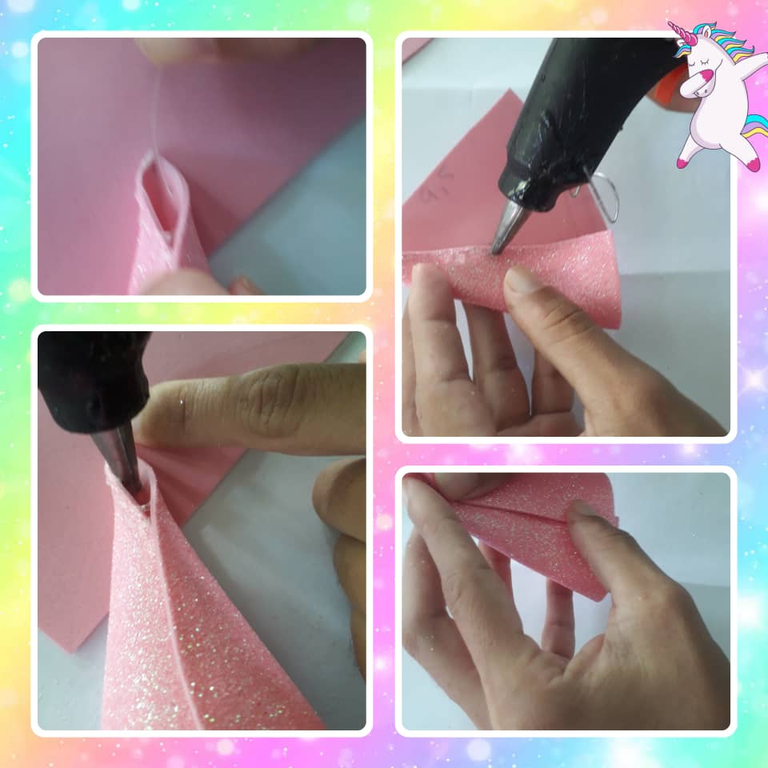
Paso 6:
Rellenamos con guata, en mi caso rellene con restos de estambre que tenía de reúso y sellamos la parte inferior con silicón y en cada extremos doblamos hacia adentro y terminamos de pegar.
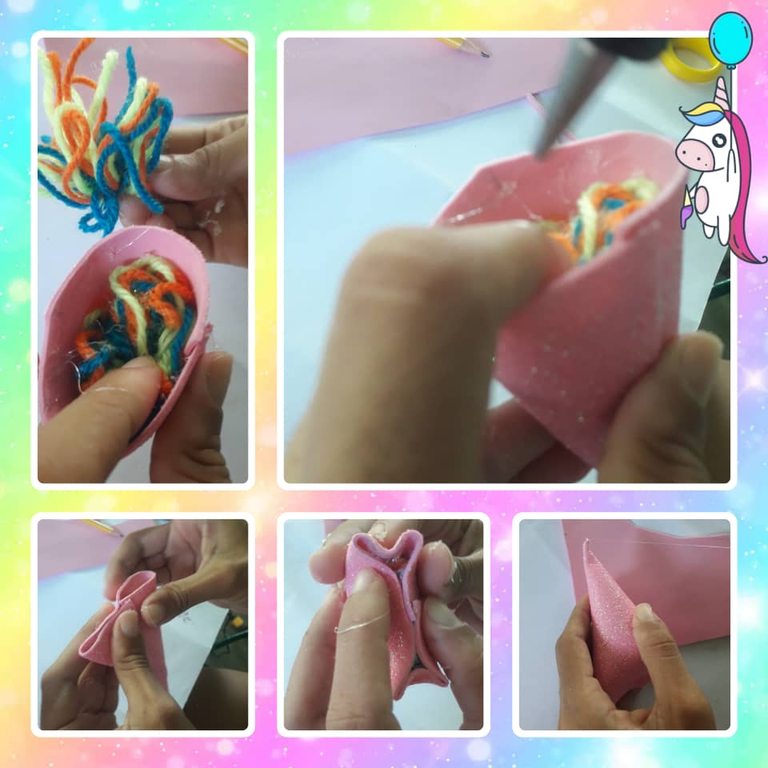
Paso 7:
Una vez relleno el cono tomamos el nailon, procedemos a enrollar por todo el cono presionando muy bien para que nos de la forma que deseamos de nuestro cuernito.
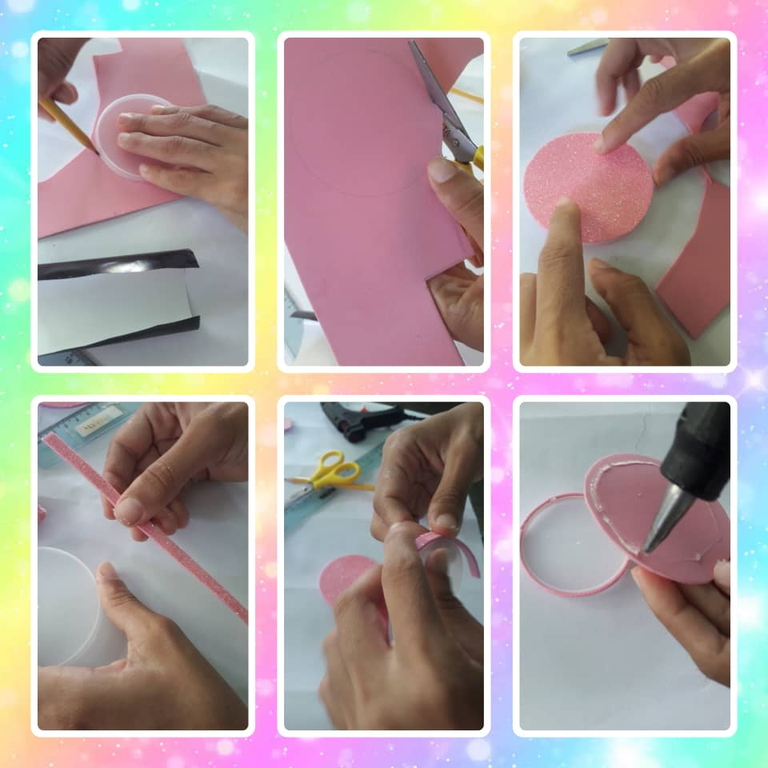
Paso 8:
Procedemos a forrar nuestra tapa con el foami rosa marcando un círculo con la tapa para luego pegarlo a ella y cortamos tiras de 7mm para pegar por el borde y de esta forma damos por forrada nuestra tapa.
Paso 9:
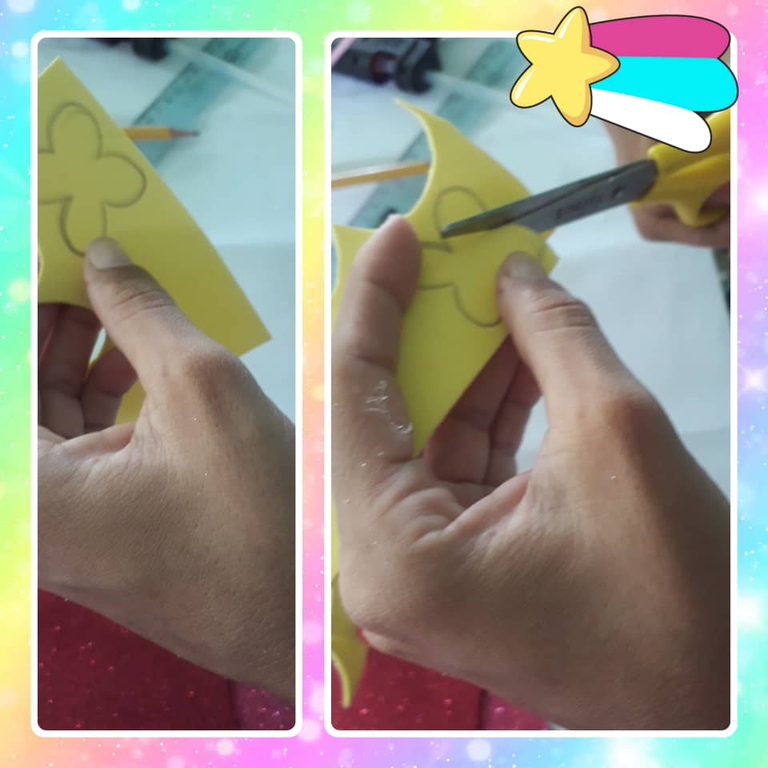
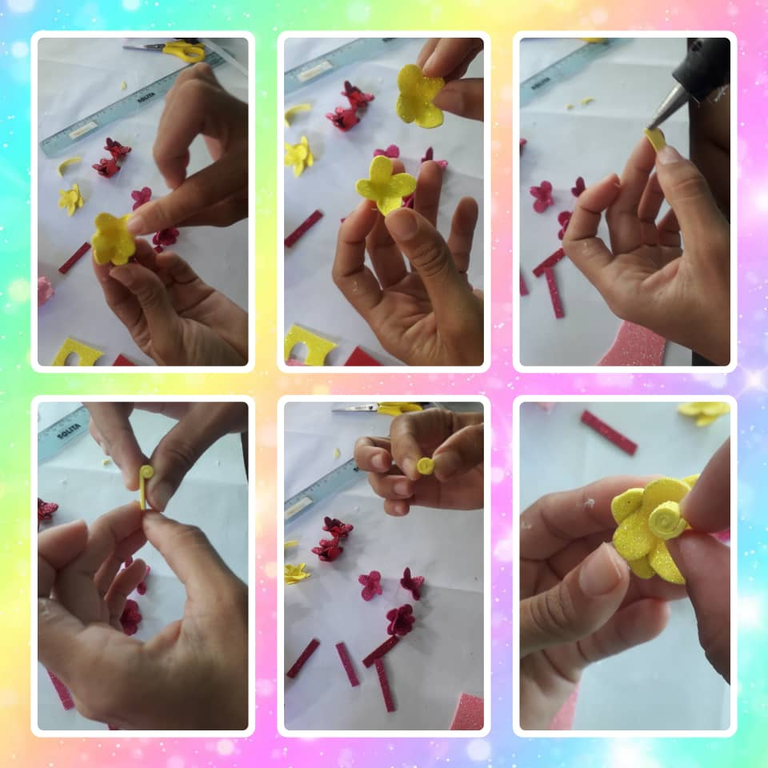
Para decorar nuestro unicornio haremos unas flores con foami amarillo, rojo y fucsia; para esto debemos marcar en el foami por cada color cuatro flores de cuatro pétalos de aproximadamente 2,5cm x 2,5cm como el que verán a continuación.
Paso 10:
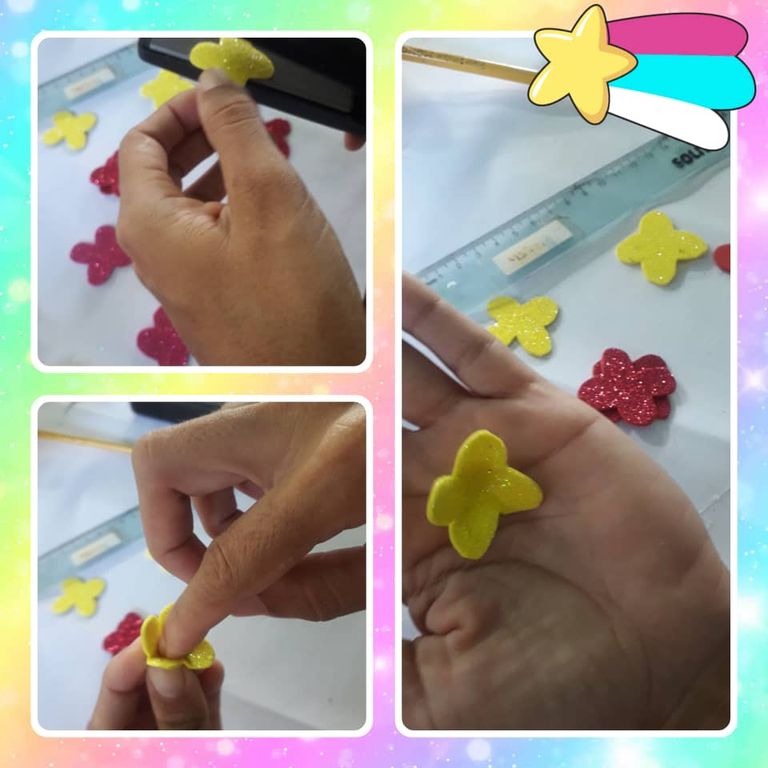
Luego de recortar cada una de las flores los pasamos por una plancha y damos forma colocando el dedo índice en el centro de la flor y con la otra mano vamos dando la forma que deseamos.
Paso 11:
Unimos las florecitas de dos en dos y con una tira de foami de 5mm x 4cm enrollamos y pegamos en el centro de la flor quedándonos este hermoso resultado.
Paso 12:
Procedemos a pegar el cuernito de la tapa, luego en la parte del frente y detrás del cuerno pegamos tres flores.
Paso 13:
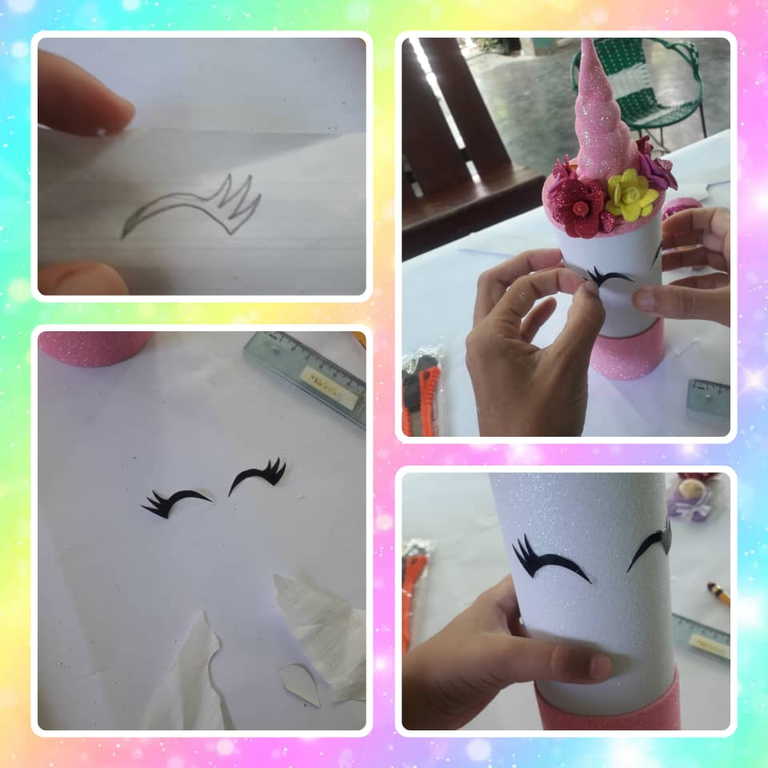
Del internet pueden sacar el molde del ojito de unicornio que deseen en mi caso yo escogí este lo calqué de la computadora y de ahí lo marque en un papel lustrillo negro lo recorte y pegue a mi porta colitas.
Paso 14:
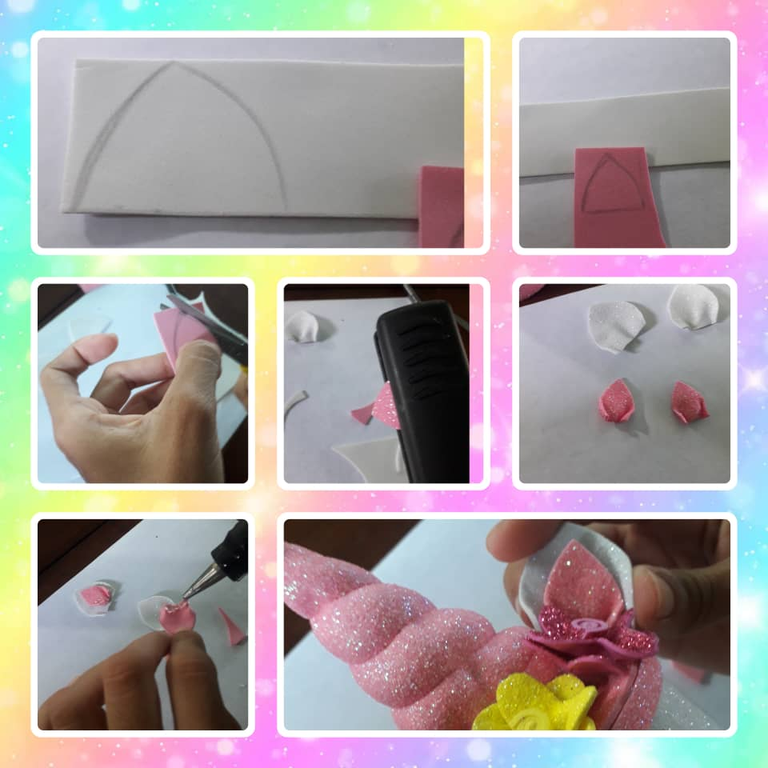
Por último marque las orejitas en el foami blanco e hice unas más pequeñas en el rosa para pegarlas encima no sin antes pasarla por la plancha para darle forma. Quedándonos este resultado; y así pasamos a pegarlas.
Bueno mis amigos esta hermosa creación pueden hacerla para guardar lo que deseen, como por ejemplo dulces, galletitas, accesorios, lápices de colores. Lo que a usted se le ocurra es muy práctico y fácil de elaborar.
Espero les haya gustado hasta otra oportunidad.

Las fotos son de mi propiedad tomada con mi teléfono SAMSUNG J6, modificando las fotos con el programa Foto Collage Grid Art y photo room, traducido con el programa Deelp traductor versión gratis.
# ENGLISH
Hello friends of #hivediy today I want to share with you this beautiful creation that I made with all the love in the world for my daughter, she is a girl who everywhere she loses a tail I as a mother I started to think how to do not to lose them and I came up with this beautiful detail of unicorn as she likes many and to show it was fascinated this so in love with her tail holder that is pending to keep them there and everyone who comes to visit us shows it she was amazed with her detail.
Well my friends this ponytail holder is very easy to make and for that we will need the following materials:
MATERIALS:
- White, pink, fuchsia and yellow frosted foami.
- Silicone gun
- 1 silicone stick
- An iron (hair or clothes iron)
- Scissors
- Ruler
- Pencil
- Lustrillo paper or black cardboard
- Wadding (I will use reusable yarn)
And with these materials we proceed to the step by step of this beautiful creation:
Step 1:
We take the white foami and with a ruler we measure 22cm x 17,5cm and proceed to cut with the scissors.
Step 2:
Once the white foami is cut we take the potato chip pot and stick the foami with the silicone all over the container looking like this.
Step 3:
We take the pink foami and with the ruler we measure 22,5cm x 6,5cm and cut out; then proceed to glue on the bottom of the container looking like this.
Step 4:
With the remaining pink foami we mark with the pencil a triangle of approximately 10.5 cm in height and at the bottom we make a curve remaining in this way.
Step 5:
Then in the middle of the triangle we place the nylon at the tip or top and adjust it with a dot of silicone to proceed to glue the ends of the triangle making a cone.
Step 6:
Fill with wadding, in my case I filled with leftover yarn that I had to reuse and seal the bottom with silicone and at each end we fold inward and finish gluing.
Step 7:
Once filled the cone we take the nylon, we proceed to roll around the cone pressing very well so that we get the shape we want our little horn.
Step 8:
We proceed to line our lid with the pink foami marking a circle with the lid to then glue it to it and cut 7mm strips to glue around the edge and in this way we give for lined our lid.
Step 9:
To decorate our unicorn we will make some flowers with yellow, red and fuchsia foami; for this we must mark on the foami for each color four flowers of four petals of approximately 2.5cm x 2.5cm as you will see below.
Step 10:
After cutting out each of the flowers we pass them through an iron and give shape by placing the index finger in the center of the flower and with the other hand we are giving the shape we want.
Step 11:
We join the little flowers in pairs and with a strip of foami 5mm x 4cm we roll and glue in the center of the flower leaving us this beautiful result.
Step 12:
We proceed to glue the little horn of the lid, then on the front and behind the horn we glue three flowers.
Step 13:
From the internet you can get the mold of the unicorn eye you want in my case I chose this one I traced it from the computer and from there I marked it on a black lustrillo paper I cut it out and glued it to my tail holder.
Step 14:
Finally mark the little ears in the white foami and I made some smaller ones in the pink foami to glue them on top but not before passing it through the iron to shape it. This is the result; and then we glue them.
Well my friends this beautiful creation can make it to store whatever you want, such as candy, cookies, accessories, crayons. Whatever you can think of it is very practical and easy to make.
I hope you liked it until another opportunity.
The photos are my own taken with my phone SAMSUNG J6, modifying the photos with the program Foto Collage Grid Art and photo room, translated with the program Deelp translator free version.
Ha quedado hermoso y es un diseño muy original 👍
Gracias me alegra que le haya gustado.
Quedó muy lindo, además, no solo es decorativo sino útil. Excelente idea, gracias por compartir un poco de tu creatividad. Saludos.
De nada me complace que les haya gustado.y me motiva a seguirles compartiendo.
Wowww, this is really beautiful and I am sure your daughter will love it.
Good job mommy and thanks for sharing
`This post has been selected by the Newbies Initiative team and may possibly receive support from the Hive Learners Community. Kindly click on the banner to visit our community and check out our Discord channel here.
Si le gustó muchísimo quedo enamorada
Wow que genial quedo, como decía en otra publicación, me siento como pez fuera del agua al ver lo talentosos que son acá jeje, mi hija y yo acabamos de terminar uno, pero lejos de verse tan genial como el suyo, felicidades!!!
Gracias, se que les quedo igual de hermoso.