Happy weekend my beautiful people, I hope you enjoy these days.
The date is approaching where we all make plans to take a special outing, although it can be done at any time, it is always exciting to do it also on February 14, Valentine's Day or day of love and friendship, and although this tutorial is not dedicated to that special day, it would be a nice choice of accessory, to give as a gift or to wear on this day.
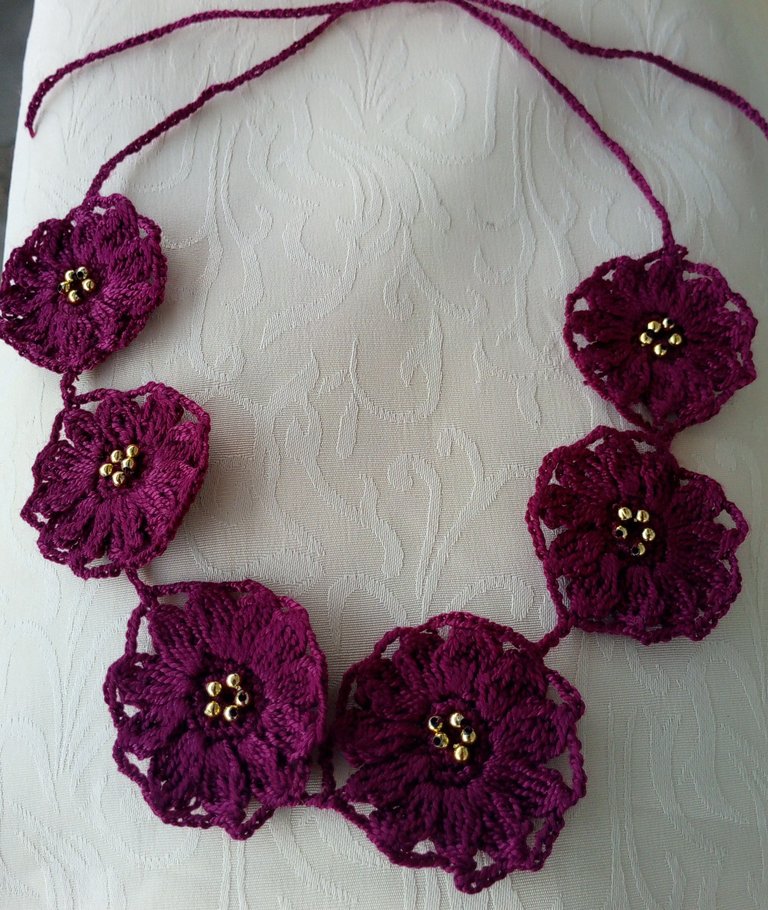
I have always liked to wear chains and chokers, especially woven, is a piece that is not seen everywhere, and that allows you to feel comfortable, very little gives allergies, is a soft and light garment that will not stay tangled in the hair and surely where you go you will be admired, if you combine it with a good blouse that highlights this accessory.
I hope you like it.
The pictures you will see below were taken with my phone model TECNO SPARK GO 2024.
Feliz fin de semana mi gente linda, espero que disfruten estos dias.
Ya se acerca la fecha donde todos hacemos planes de echar una salidita especial, aunque se puede hacer en cualquier momento, siempre es emocionante hacerlo también el 14 de febrero, día de San Valentín o día del amor y la amistad, y aunque este tutorial no sea dedicado a ese día especial, sería una bonita opción de accesorio, para regalar o para lucir en este día.
Siempre me ha gustado usar cadenas y gargantillas, sobre todo tejidas, es una pieza que no se ve en todos lados, y que permite sentirse cómodo, muy poco da alergias, es una prenda suave y liviana que no se va a quedar enredada en el cabello y seguramente donde vayas serás admirada, si la combinas con una buena blusa que destaque este accesorio.
Espero que les guste.
Las fotografías que verán a continuación, fueron tomadas con mi teléfono modelo TECNO SPARK GO 2024.

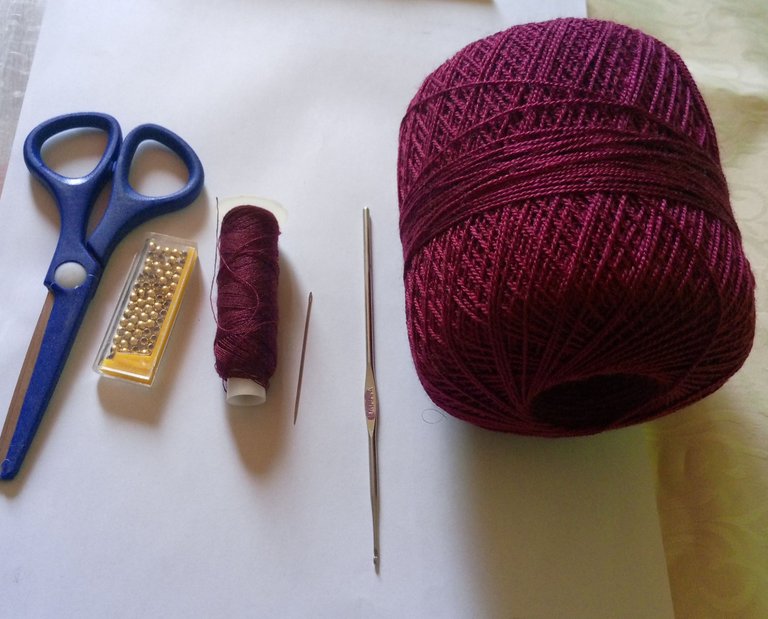
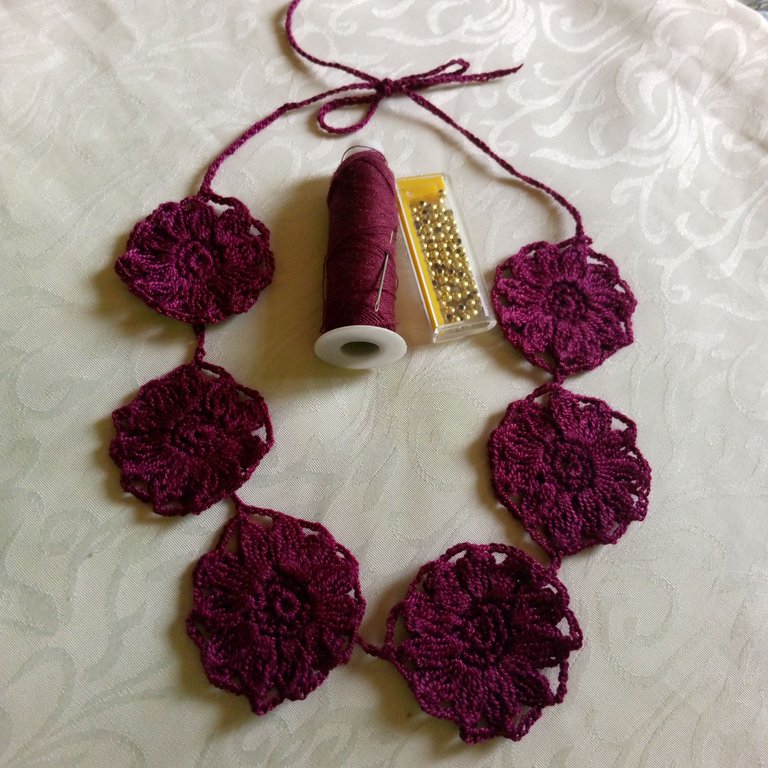
Materials:
- Crochet thread
- sewing thread
- 1 mm crochet needle
- Hand sewing needle
- Golden acrylic beads
- Scissors
Materiales:
- Hilo de crochet
- hilo de coser
- Aguja de ganchillo de 1 mm
- Aguja de coser a mano
- Perlas acrílicas doradas
- Tijera
 |  |  |
|---|
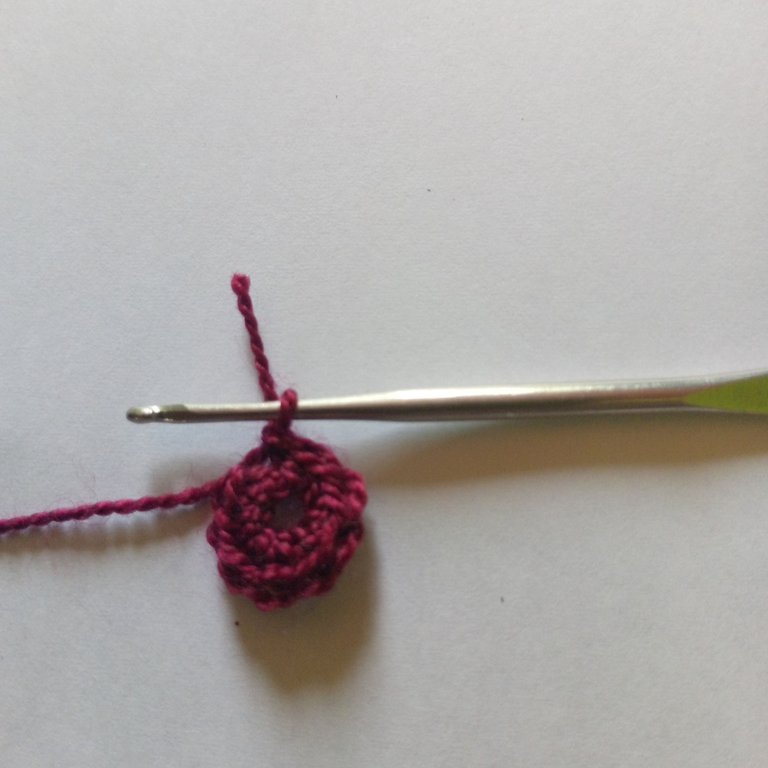
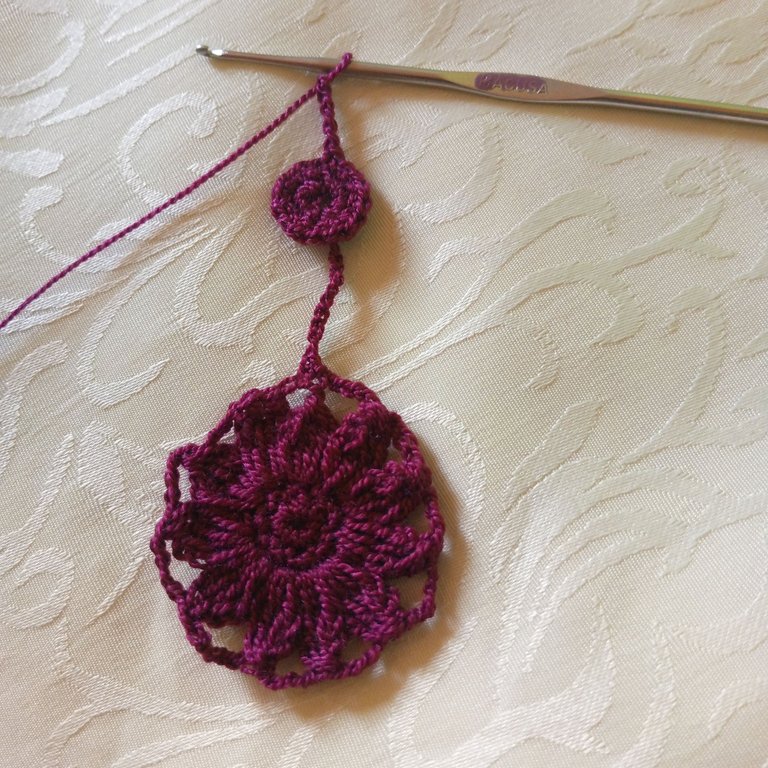
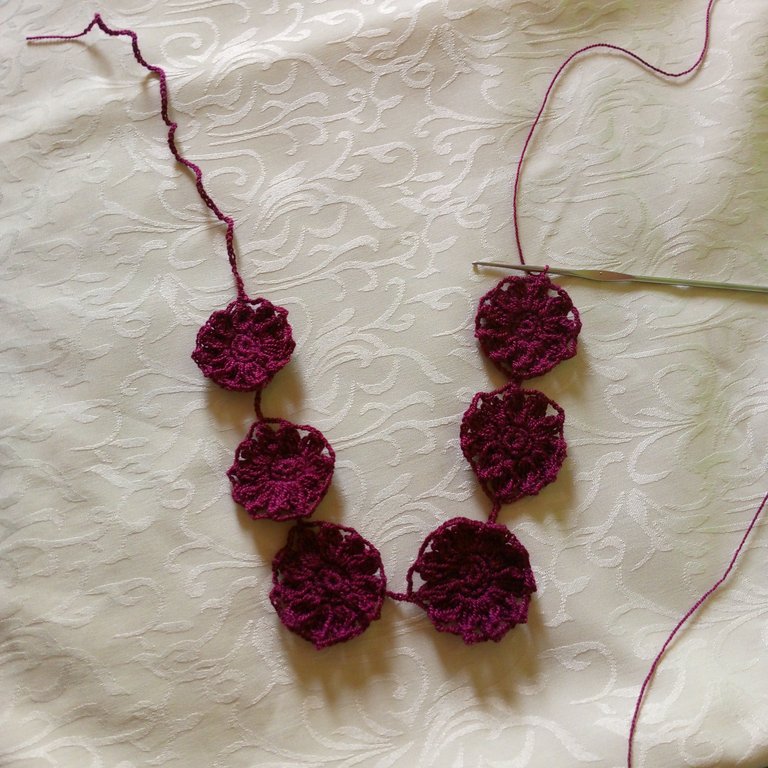
The first thing we are going to do is a magic ring of 10 short slipped stitches, then we are going to make a row of 11 single crochet stitches, closing the row with 1 slipped stitch, from the slipped stitch we are going to knit 4 chain stitches, and continue with double loops to create 4 high stitches without closing until we complete, then we close the 4 stitches with 1 slip stitch and we will start with 1 chain of 4 stitches, we will repeat the 4 high stitches to make a second petal, we will return with a chain of 4 stitches and so we will go until we complete 11 petals, which close with 1 slip stitch.
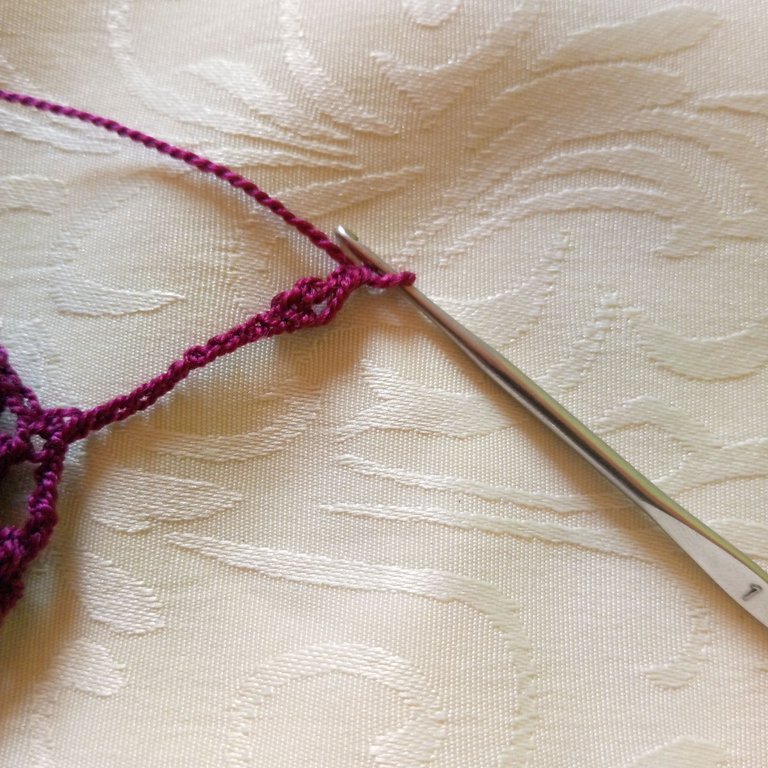
From the slipped stitch we will knit 11 chain stitches, we make a loop and we will return to stitch 10 of the chain to make a small hole with this single crochet to create a ring of 10 slipped stitches and then a round of 11 single crochets, we repeat the previous step only that in this step we will not make a magic ring with the ring, but we will make it from 1 single crochet.
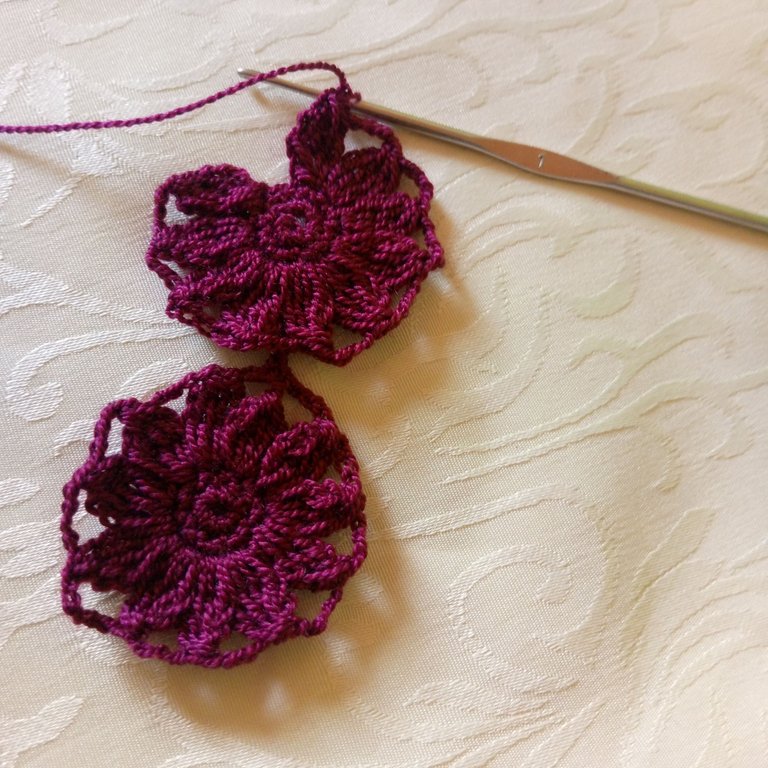
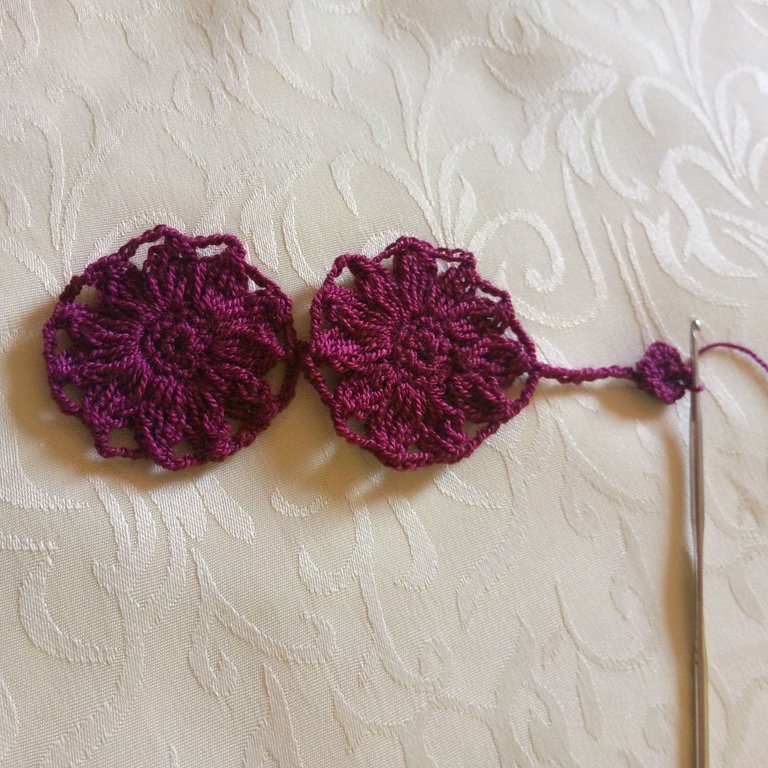
In this step we already have a second ring to knit a second flower of 11 petals that we will make with the same steps of the previous flower.
Lo primero que vamos a hacer es un anillo mágico de 10 puntos cortos deslizados, luego vamos a darle una vuelta de 11 puntos bajos, cerrando la vuelta con 1 punto deslizado, desde el punto deslizado vamos a tejer 4 puntos de cadena, y seguimos con unas lazadas dobles para crear 4 puntos altos sin cerrar hasta completar, luego cerramos los 4 puntos con 1 punto deslizado y comenzaremos con 1 cadena de 4 puntos, volvemos repetir los 4 puntos altos para hacer un segundo pétalo, volvemos con una cadena de 4 puntos y así iremos hasta completar 11 pétalos, que cierran con 1 punto deslizado.
Desde el punto deslizado vamos a tejer 11 puntos de cadena, hacemos una lazada y vamos a volver a punto 10 de la cadena para hacer un pequeño orificio con este punto bajo para crear un anillo de 10 puntos deslizados y luego una vuelta de 11 puntos bajos, se repite lo anterior solo que en este paso no vamos a realizar un anillo mágico con el aro, pero sí lo vamos a realizar a partir de 1 punto bajo.
En este paso ya tenemos 1 segundo aro para tejer una segunda flor de 11 pétalos que realizaremos con los mismos pasos de la flor anterior.
 |  |  |
|---|
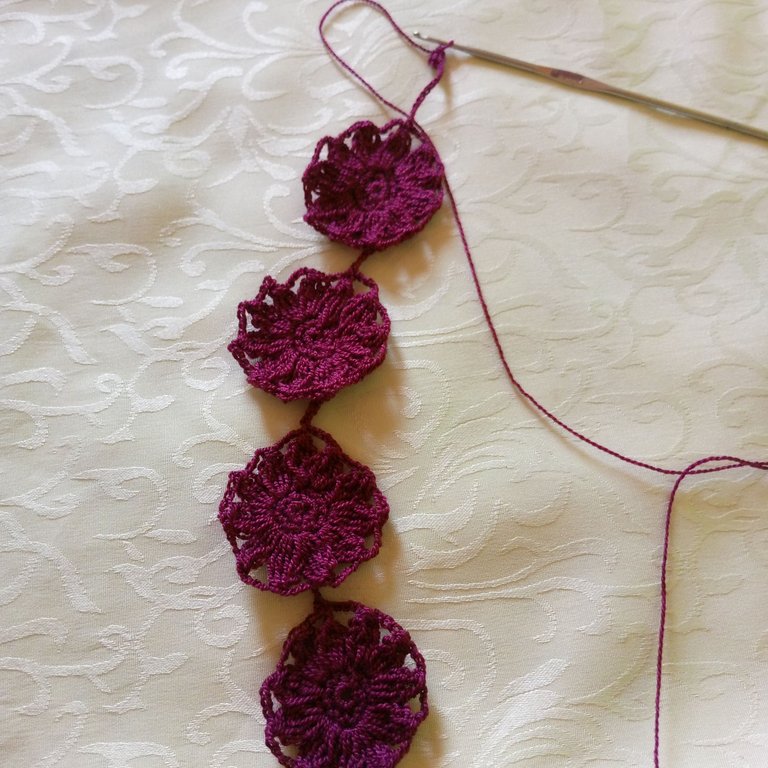
Summarizing a little, since in this point we are only going to make the same stitches, to create 6 flowers of 11 petals, formed with 4 high stitches, 4 chains to separate and we will continue in this sequence for each of the flowers that are joined together with a chain of 11 stitches.
Resumiendo un poco, ya que en este punto solo vamos a realizar los mismos puntos, para crear 6 flores de 11 pétalos, formadas con 4 puntos altos, 4 cadenas para separar y seguiremos en esta secuencia para cada una de las flores que van unidas entre sí con una cadena de 11 puntos.
 |  |  |
|---|
After finishing the 6 flowers, we are going to weave a chain of 70 stitches on both sides so that the choker can be adjusted to the neck, either long or closer to the neck.
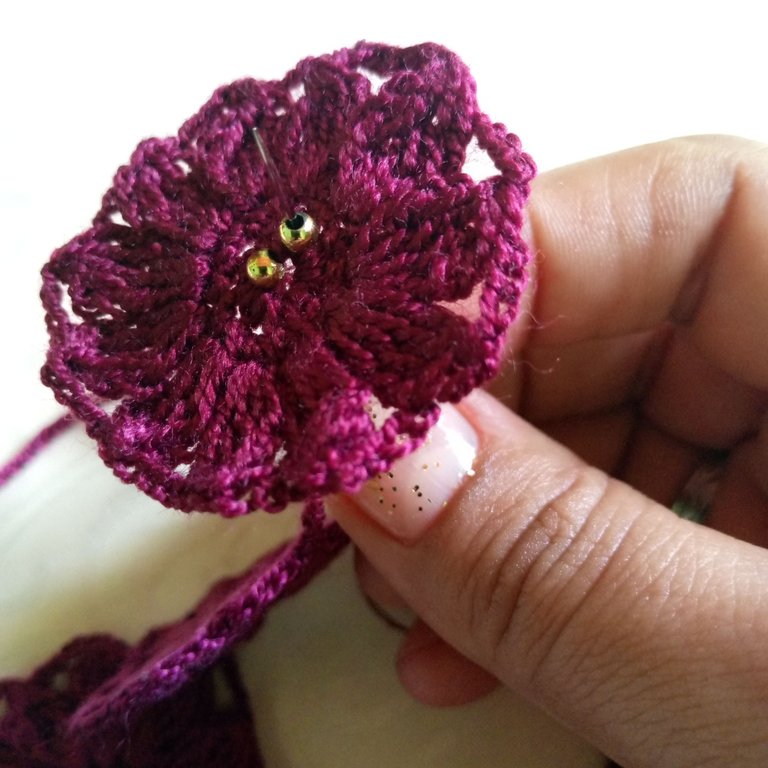
After finishing the string of chains, we will decorate the flowers with golden pearls, or with the pearls of your choice, threading a needle with red wine thread, we will sew 5 pearls in the center of each flower to give it shine.
Terminando las 6 flores, vamos a tejer una cadena de 70 puntos en ambos lados para que la gargantilla se pueda ajustar al cuello, sea larga o más pegada al cuello.
Luego de terminar el cordón de cadenas, vamos a decorar las flores con las perlas doradas, o con las perlas que sean de su preferencia, enhebrando una aguja con hilo vino tinto, vamos a coser 5 perlas en el centro de cada flor para darle brillo.
 |  |
|---|
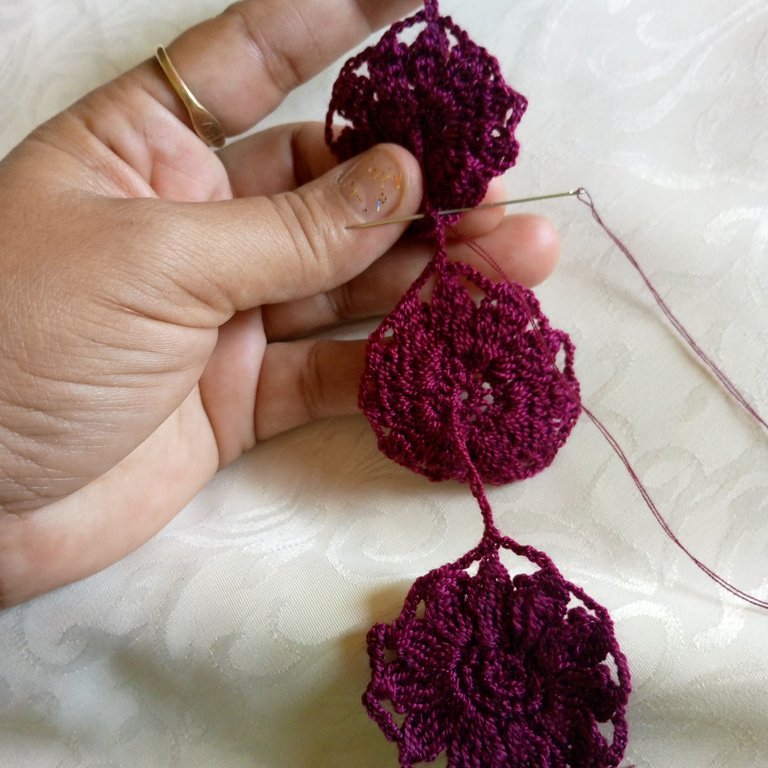
Then, to prevent the flowers from turning over, we will fix with thread the chains that are behind the flowers guiding us by each petal tip to avoid unwanted details.
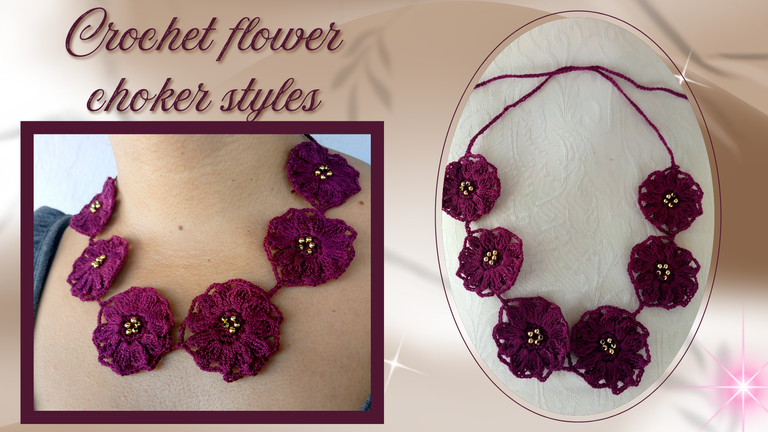
And with this step we will have a beautiful red wine colored crochet choker, ideal for outings with nice accessories of great comfort and beauty.
It is a great pleasure to share my first crochet tutorials with you, I hope you tell me what you think.
And with love to all of you, I wish you good health and a blessed weekend.
Después, para evitar que las flores se vayan a voltear, vamos a fijar con hilo las cadenas que están detrás de las flores guiándonos por cada punta de pétalos para evitar detalles no deseados.
Y con este paso tendremos una gargantilla preciosa de color vino tinto en crochet, ideal para unas salidas con lindos accesorios de mucha comodidad y belleza.
Es un gran placer poder compartir mis primeros tutoriales en crochet con ustedes, espero que me digan que les pareció.
Y con mucho cariño a todos, les deseo buena salud y Bendecido fin de semana.
social networks / redes sociales
Traductor Deepl
Translated Deepl
Ediciones Canva
Editions Canva


Posted Using INLEO
Muy hermosos amé el color, te felicito
Gracias amiga, este color es bello.
Definitivamente esta gargantilla te ha quedado hermosa, el diseño y el color están de lujo 😍
Ainsss amiga bella, muchas gracias.
Abrazos!!!!🤗😘
This crochet choker is gorgeous, a very elegant design and a beautiful color. Thanks as always for leaving your great work.
Thank you very much for being part of my growth, supporting my content.😊😘
🤝👌❤️
Es tan muy hermoso y su color lo hace ver excelente. Felicidades, gracias por compartir @lauracraft
Muhas gracias amiga, me alegra que te haya gustado, realmente este color es uno de mis favoritos.
Amazing, you are very skilled at making it.
Oh, how nice, thank you!😊
You're welcome sis♥️
😘😁
Hola @lauracraft, la gargantilla que muestras tiene estilo, te ha quedado de maravilla, el color que escogiste me ha gustado mucho, es bastante interesante. Bien combinada con las prendas de vestir dará su toque de elegancia a su dueña. Saludos
😁 Hola @darknapol, ay qué bonito, muchas gracias, muy lindas palabras, te felicitó, me alegra saber que te haya gustado mi trabajo, este color me inspiro para hacerme un accesorio que resalte la elegancia.
¡Saludos!!!
Un placer, saludos
Saludos, un placer 🤝💙
Congratulations @lauracraft! You have completed the following achievement on the Hive blockchain And have been rewarded with New badge(s)
Your next payout target is 9000 HP.
The unit is Hive Power equivalent because post and comment rewards can be split into HP and HBD
You can view your badges on your board and compare yourself to others in the Ranking
If you no longer want to receive notifications, reply to this comment with the word
STOP😃👏
👍👍
Es hermoso el diseño que realizaste, y el color me encantó
Saludos @yennysferm71 muchas gracias corazón.😘