Hola, en este post quiero mostrar y comentar como es mi proceso para elaborar nombres personalizados, donde compartiré algunos pasos que son claves para mí y que podrían ser útiles si te estás iniciando en la producción de joyería, no solo para realizar los nombres sino también otras figuras; cada paso está basado en mi forma de trabajo que he ido adaptando en mis más de 12 años de experiencia, si deseas puedes ver parte de lo que hago en mi cuenta de Instagram.
https://www.instagram.com/m16ueljoyas/
Note: the publication is written in Spanish and translated with Deepl.com, so it may have some mistakes or use incorrect words.
Hello, in this post I want to show and comment how is my process to make custom names, where I will share some steps that are key for me and that could be useful if you are starting in jewelry production, not only to make the names but also other figures; each step is based on my way of working that I have been adapting in my more than 12 years of experience, if you want you can see part of what I do in my Instagram account.
**EL DISEÑO / THE DESIGN **
Es ideal que tengas algunas tipografías para trabajar, en este caso use unas llamadas Sunset Clouds y que están disponibles en:
https://www.dafont.com/sunset-clouds.font
It is ideal that you have some fonts to work with, in this case I used some fonts called Sunset Clouds which are available at:
https://www.dafont.com/sunset-clouds.font

La mayoría de las letras que uso las saco de dafont.com, pero hay muchos más sitios para descargar tipografías, pero te recomiendo que le des un vistazo a https://fonts.google.com, las tipografías se instalan en tu computador con un simple doble click, no tiene complicación.
En cuanto diseñar el nombre, si no tienes mucho conocimiento de programas de diseño, puedes utilizar Word, PowerPoint e incluso Canva, pero te recomiendo que utilices Inkscape, que es una aplicación parecida a Illustrator pero gratuita y relativamente fácil de utilizar. Puedes descargar directamente de su página web https://inkscape.org/es/
Most of the fonts I use I get them from dafont.com, but there are many more sites to download fonts, but I recommend you to take a look at https://fonts.google.com, the fonts are installed on your computer with a simple double click, it has no complications.
As for designing the name, if you do not have much knowledge of design programs, you can use Word, PowerPoint and even Canva, but I recommend you use Inkscape, which is an application similar to Illustrator but free and relatively easy to use. You can download it directly from their website https://inkscape.org/es/
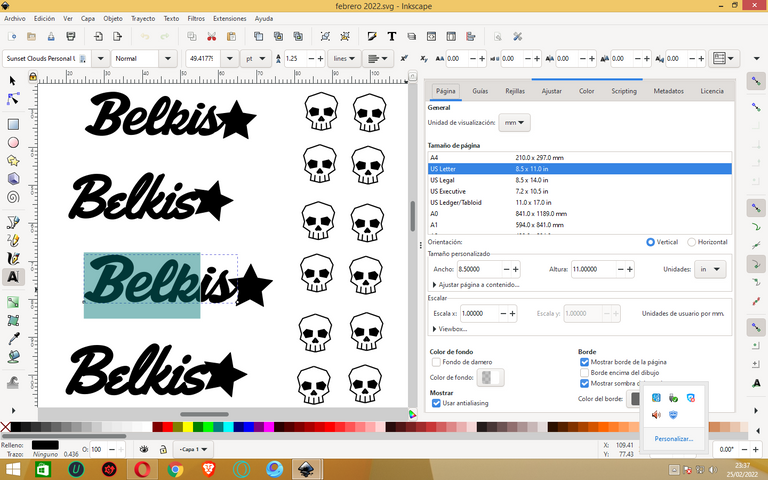
Al Diseña el nombre y puedes acompañarlo con algún adorno yo use una estrella, la pieza debe ser mayor a 4 cm de largo, trabaja en un documento que tenga el tamaño de la hoja que vas a imprimir, aquí en mi país utilizamos tamaño carta.
Design the name and you can accompany it with an ornament, I used a star, the piece must be larger than 4 cm long, work on a document that has the size of the sheet that you are going to print, here in my country we use letter size.
MATERIALES Y HERRAMIENTAS / MATERIALS AND TOOLS
Para trabajar ahora el nombre sobre el metal requerimos lo siguiente:
- Lámina de Bronce, cobre o plata, el espesor recomendado es de 0.7 a 0.8 mm, con esto se corta bien sin tanto esfuerzo y la pieza queda resistente.
- Arco de segueta para joyería.
- Segueta de joyería de 0/2 o 0/3.
- Astillero de madera para calar
- Lijas de 220, 360 y 400.
- Mechas o brocas para perforar de 0.7 mm, son las que tienen la medida perfecta para que entre la segueta en las perforaciones de la lámina.
- Dremel, Foredom o similar.
- Motor de Banco
- Cera de pulir para joyería.
To work now the name on the metal we require the following:
- Bronze, copper or silver sheet, the recommended thickness is 0.7 to 0.8 mm, with this it cuts well without so much effort and the piece is resistant.
- Jewelry saw.
- Jewelry saw of 0/2 or 0/3.
- Wooden jigsaw for fretwork
- 220, 360 and 400 grit sandpaper.
- Bits or drill bits of 0.7 mm, they are the ones that have the perfect size for the saw to enter in the perforations of the sheet.
- Dremel, Foredom or similar.
- Bench Motor
- Jewelry polishing wax.
PASO 1 / STEP 1
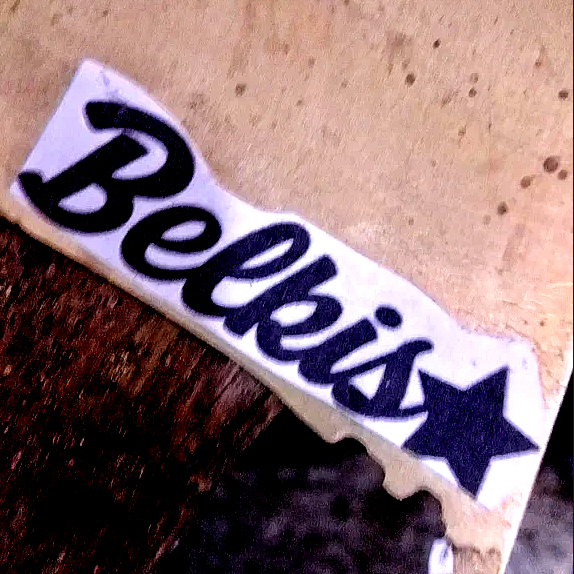
Una vez impresa en papel el nombre, este se debe recortar y pegar en la lámina; antes de pegar en la lámina, debes pasarle lija 220 para eliminar grasa y que el pegamento fije bien, yo uso pega de barra, porque puedes mover la figura mientras se pega, pero puedes usar también pega blanca; otra cosa que yo hacía antes era usar cinta adhesiva de papel sobre la lámina y después pegaba la imagen.
Once the name is printed on paper, it must be cut out and glued on the sheet; before gluing on the sheet, you must sand it with 220 grit sandpaper to remove grease and glue it well, I use glue stick, because you can move the figure while gluing, but you can also use white glue; another thing I used to do was to use paper tape on the sheet and then glue the image.
PASO 2 / STEP 2
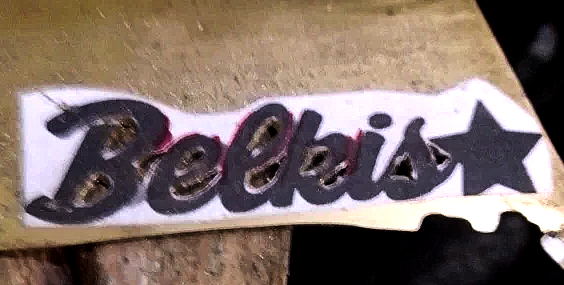
Con la mecha para perforar de 0.7 mm es necesario abrir hueco en todos las áreas internas del nombre y después con la segueta iniciar los cortes por estas áreas; debes tener en cuenta en crear puntos de unión entre las letras para darle más resistencia a la pieza, en la imagen los puedes notar que los marque con marcador rojo, también hice la unión de la b con la e que en la impresión, estaban separadas; para mí es mejor hacer todos estos detalles de corrección a mano, porque en el programa de diseño quizás nos haga perder tiempo y no quede tan bien.
With the 0.7 mm drill bit it is necessary to make a hole in all the internal areas of the name and then with the cutter start the cuts in these areas; you must keep in mind to create points of union between the letters to give more resistance to the piece, in the image you can notice that I marked them with red marker, I also made the union of the b with the e that in the printing, were separated; for me it is better to make all these details of correction by hand, because in the design program may make us lose time and not look so good.
PASO 3 / STEP 3
Después de efectuar todos los cortes internos con el Dremel y la mecha para perforar abrí los huecos sobre la B y la estrella para que serán para colocar las argollas para ajustar a una cadena, seguidamente se realizaron los cortes externos.
After making all the internal cuts with the Dremel and the drill bit, I opened the holes on the B and the star so that they will be used to place the rings to adjust to a chain, then the external cuts were made.
PASO 4 / STEP 4
Se quita la impresión que estaba pegada de la lámina, para esto, puedes quemarlo como lo hice yo o simplemente lo sumerges un rato en agua, en incluso lo remueves con las manos; ya hecho esto, se debe revisar la pieza y con un marcador fino, marcar donde se va a corregir el nombre.
To do this, you can burn it as I did or simply soak it in water for a while, or even remove it with your hands; once this is done, the piece must be checked and with a fine marker, mark where the name is going to be corrected.
PASO 5 / STEP 5
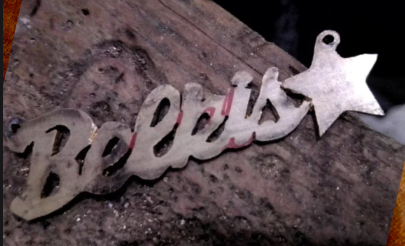
Con la segueta se corrigen los excedentes de material y se le termina de dar la forma; para generar las líneas que separan las letras se inclina el arco de segueta y se corta poco a poco sin llegar a desgastar el material con la intención de mantener la unión que le da resistencia a la pieza; para finalizar se le pasa lija al nombre en este orden, 220, 360 y 400, puedes hacerlo con el Dremel usando un porta-lija o a mano. Te recomiendo que uses un pedazo de cuero pequeño para poner el nombre y lijar, así no dañas tus manos ni la pieza.
With the saw correct the excess material and finish giving the shape; to generate the lines that separate the letters, tilt the arc of the saw and cut little by little without wearing the material with the intention of maintaining the union that gives strength to the piece; to finish, sand the name in this order, 220, 360 and 400, you can do it with the Dremel using a sandpaper holder or by hand. I recommend you to use a small piece of leather to put the name and sand, so you don't damage your hands or the piece.
PASO 6 / STEP 6
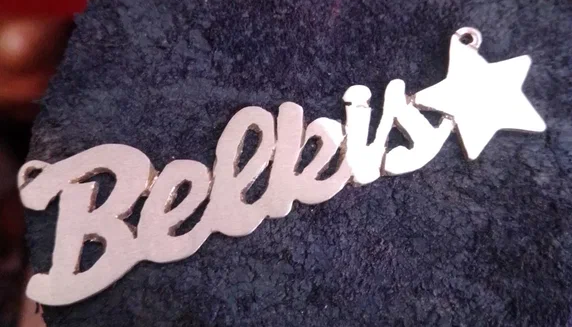
Después de haber pasado las lijas, se pule, yo lo hago en el motor de banco con las mopas de pulir, una de jeans que es de dureza mediana y luego con la de algodón para terminar de dar el brillo, uso cera para pulir especial para joyería; si tienes el Dremel las mopas pequeñas de pulir también sirven y puedes usar la cera de pulir que viene en el paquete de accesorios. Recuerda también usar el cuero para tener la pieza mientras pules y puedes sostener el dije en donde va las argollas usando alambre delgado de cobre.
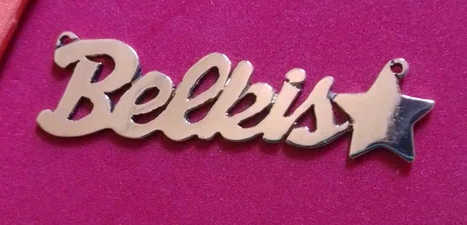
Limpia la prenda con agua caliente, jabón y un cepillo dental, trata de sacar todo el excedente de cera, pasa por agua para quitar el jabón, para finalizar seca con un paño de algodón, te puedes ayudar con un secador de pelo.
After having passed the sandpaper, polish, I do it on the bench motor with the polishing mops, a jeans mop that is of medium hardness and then with the cotton mop to finish the shine, I use special polishing wax for jewelry; if you have the Dremel the small polishing mops also work and you can use the polishing wax that comes in the accessory package. Remember to also use the leather to hold the piece while polishing and you can hold the pendant where the rings go using thin copper wire.
Clean the garment with hot water, soap and a toothbrush, try to remove all the excess wax, pass through water to remove the soap, finally dry with a cotton cloth, you can help with a hair dryer.
PASO 7 /STEP 7
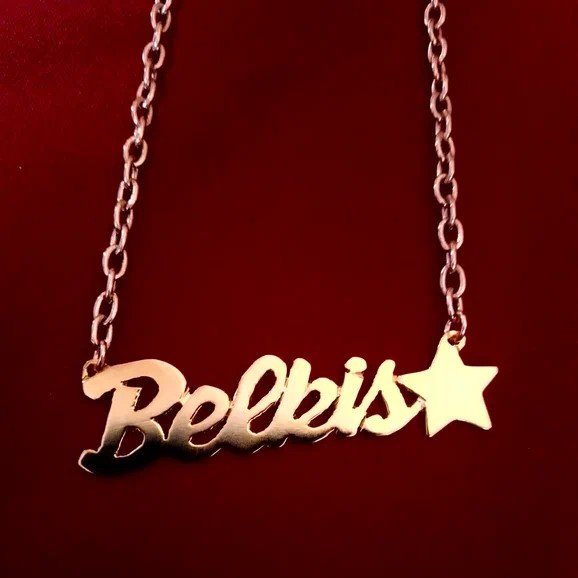
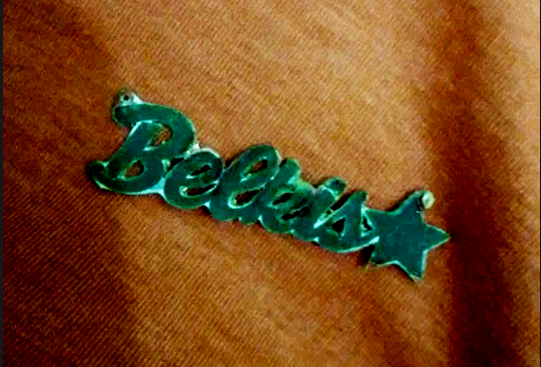
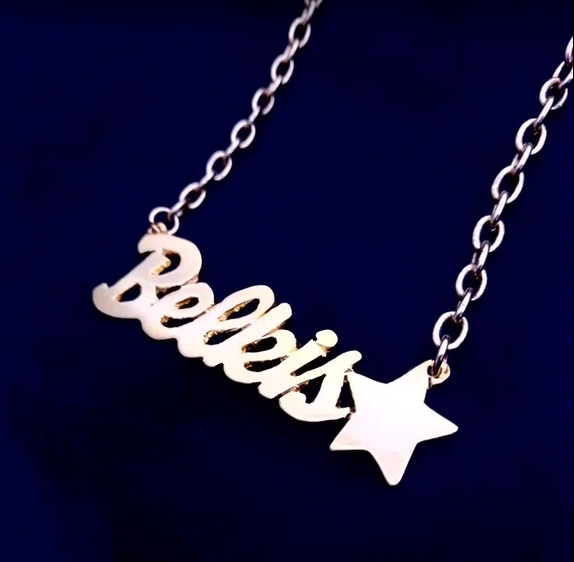
Una vez terminado si le agregan las argollas y se junta a una cadena para ya tener el collar... el largo de la cadena con el nombre una medida básica es de 40 a 45 cm, la pieza que realice la mande a bañar en oro, la que tu crees la puedes mandar a bañar en oro o plata, si la pieza que haces es en plata ley no es necesario darle baño.
Espero lo que acaban de ver por lo menos les sirva para ver los pasos básicos para la elaboración de nombres personalizados y que le guste como me quedo a mi....
Gracias por leerme y el apoyo, espero publicar más piezas con su proceso.
Once finished if you add the rings and joins a chain to already have the necklace ... the length of the chain with the name a basic measure is 40 to 45 cm, the piece you make the send it to bathe in gold, you can send it to bathe in gold or silver, if the piece you do is in sterling silver is not necessary to give bath.
I hope what you have just seen at least helps you to see the basic steps for the elaboration of personalized names and that you like the way I did it....
Thanks for reading and support, I hope to publish more pieces with your process.
Que gran trabajo y que manera tan detallada de explicarnos tu oficio, te quedó muy bella y prolija la cadena personaliza.
!discovery 35
Gracias, me faltaron cosas, pero creo quedaría muy largo.... me alegra que se haya entendido
Acá ver los tutoriales es un placer siente cómodo realizándolo, así sea largo será un gusto ver tu trabajo saludos @m16uellop fleiz fin de semana y carnavales. ⚙️💡✨🎉
Has sido votado por
PROYECTO ENLACE
'Conectando Ideas y Comunidades'
PROYECTO ENLACE es un proyecto de curación de habla hispana enfocado en recompensar contenido de calidad y apoyar autores en su proceso de crecimiento en HIVE.
Creemos y apostamos por el futuro de esta gran plataforma, y estamos muy emocionados de poder hacerla crecer junto a esta comunidad. Así que te invitamos a usar nuestra etiqueta ENLACE y estar atento a todas las actividades que tenemos preparadas y que estaremos publicando en breve.
¿QUIERES AUTOMATIZAR TUS GANANCIAS DE CURACIÓN? SE PARTE DEL PROYECTO ENLACE APOYANDO A NUESTRO TRAIL EN HIVE.VOTE INGRESA AQUÍ PARA CONOCER LOS DETALLES.
¿QUIERES INVERTIR ENLACE? DESCUBRE COMO HACERLO Y GENERAR INGRESOS DE FORMA SEMANAL MEDIANTE TU DELEGACIÓN DE HP AQUÍ TE EXPLICAMOS COMO.
Te invitamos a participar en nuestro servidor de Discord: https://discord.gg/3S9y7BbWfS
Atentamente
EQUIPO ENLACE 2021
gracias
me emociona, soy nuevo ya veo como es eso...
Congratulations @m16uellop! You have completed the following achievement on the Hive blockchain and have been rewarded with new badge(s):
Your next target is to reach 300 upvotes.
Your next target is to reach 1500 upvotes.
You can view your badges on your board and compare yourself to others in the Ranking
If you no longer want to receive notifications, reply to this comment with the word
STOPTo support your work, I also upvoted your post!
Check out the last post from @hivebuzz:
Support the HiveBuzz project. Vote for our proposal!
This post was shared and voted inside the discord by the curators team of discovery-it
Join our community! hive-193212
Discovery-it is also a Witness, vote for us here
Delegate to us for passive income. Check our 80% fee-back Program