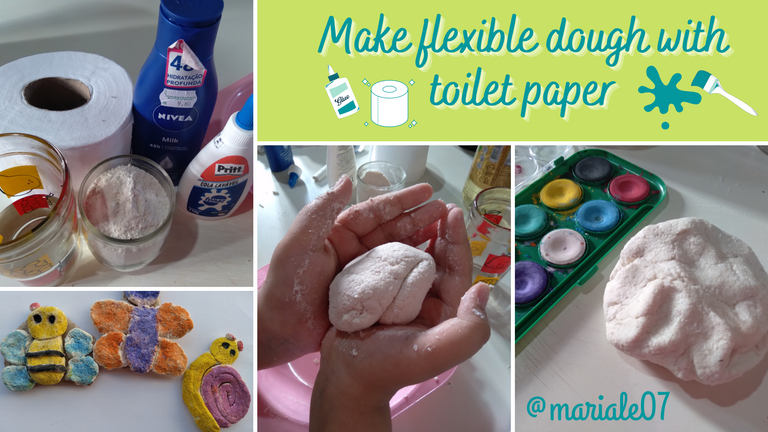
Hola Comunidad HiveDiy!
Hoy vengo a compartir una manualidad que hice con mi hija, masa moldeable.
Yo nunca he trabajado con este tipo de manualidades, pero aun así me atreví a experimentar y en el proceso también aprender de este maravilloso mundo de las manualidades. También me di cuenta que no soy muy hábil, ni estética en estas cosas, pero lo que si soy es una mamá con una hija que necesita actividades como estas para entretenerse y cultivar su creatividad.
Para saber que hacer me puse a buscar tutoriales en YouTube sobre cómo hacer “papel mache”, algo que cuando era niña logre hace una vez y pensé que sería fácil de hacer. En eso encontré varios videos donde te enseñan hacer masa flexible o moldeable con papel higiénico, entre otros ingredientes, mientras veíamos el video mi hija se emocionó muchísimo y empezamos a buscar los materiales, descubrimos que teníamos todo lo necesario y nos pusimos manos a la obra.
Para hacer masa flexible con papel higiénico, necesitamos estos ingredientes:
- Papel higiénico
- Harina de trigo
- Pega blanca
- 1 cucharadita de aceite
- 1 cucharadita de crema corporal
- ½ Vaso de agua
- Paso 1: Cortamos o rasgamos el papel higiénico en pedazos bien pequeñitos, luego mojamos con agua de a pocos y amasamos para que todo el papel se moje e integre.
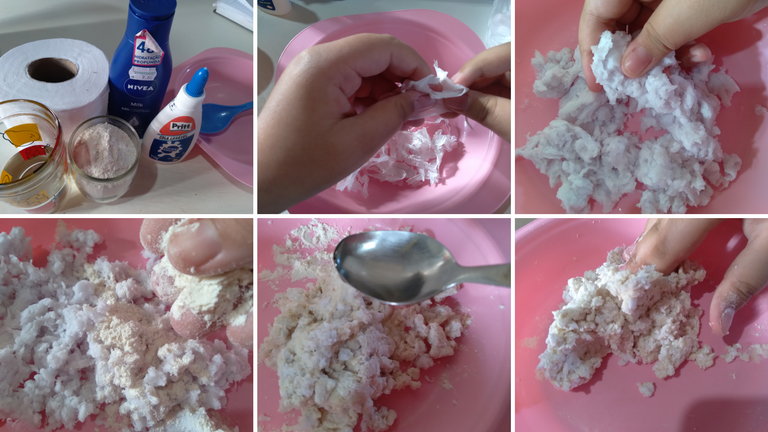
Paso 2: Agregamos harina de trigo de a pocos, y amasamos junto con el papel hasta que esté integrado, allí agregamos una cucharadita de aceite vegetal.
Paso 3: Agregamos dos cucharadas grandes de pega blanca, amasamos y luego agregamos también la crema corporal, seguimos amasando.
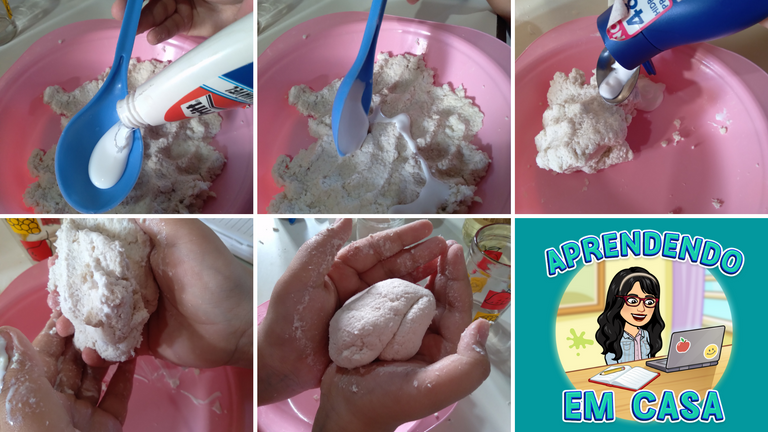
Nota: La cantidad de los ingredientes como la harina y la pega varían según sintamos la humedad y elasticidad de la masa, así que podemos ir agregando más pegamento y harina hasta sentir que la masa no se pega a las manos, y sea fácil de moldear.
- Paso 4: separe la masa en varias porciones para agregarle color, usamos unas acuarelas secas que tenemos, y fuimos colocándole color a la masa, pero nos dimos cuenta que la acuarela no le aporto mucho color en si a la masa. (puede que funcione si se usa pintura acrílica o una tinta más concentrada).
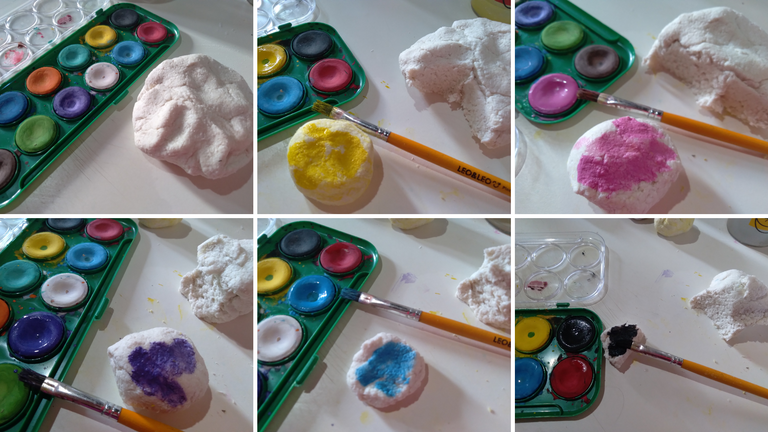
- Paso 5: Modelamos unas formas simples, como una abejita, una mariposa y un caracol.
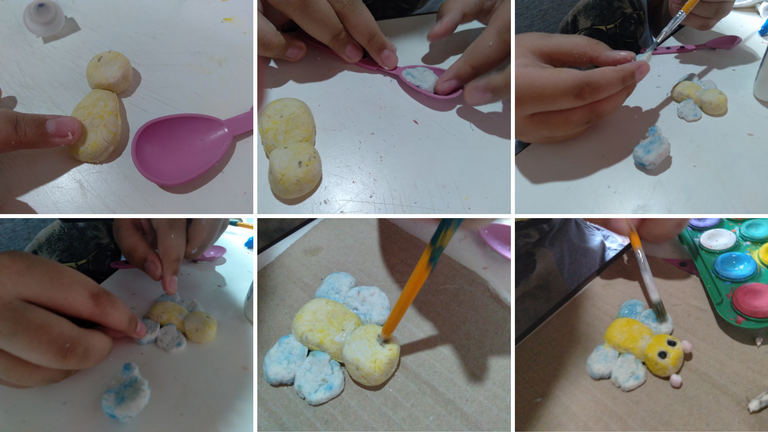
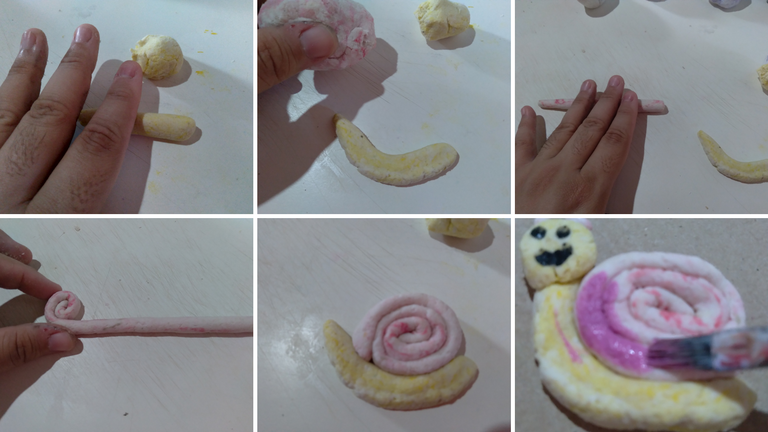
- Paso 6: Pintamos con un pincel y acuarela los detalles y la superficie de las formitas que hicimos, luego dejamos secar por un día.
Nota: esta masa se puede guardar en la nevera, la envolvemos en una bolsita plástica y durara suave por varios días hasta que se vuelva a usar.
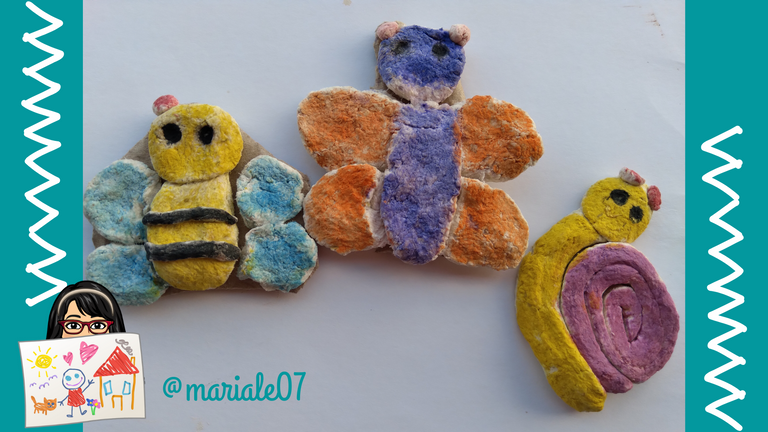
Este fue el resultado, en realidad sentimos que sirvió más que nada para experimentar y aprender esta técnica, y esperamos que la próxima vez nos queden mejor y poder usarlas como decorativos, llaneros, imanes para la nevera, y cualquier otra idea que surja.
Los tutoriales que vimos son buenísimos, se los recomendamos, están aquí en estos enlaces:
Tutorial de cómo hacer masa flexible con papel higiénico
Tutorial para principiantes de cómo hacer unas formitas simples con masa flexible
Eso es todo por ahora, Feliz semana para todos!
Todas las fotos son de mi propiedad ediciones en Canva.com

Hello Hive Diy Community!
Today I come to share my participation in the Moldable world contest, which invites us to create with moldable dough.
I have never worked with this type of crafts, but even so I dared to experiment and in the process also learn from this wonderful world of crafts. I also realized that I am not very skilled, nor aesthetic in these things, but what I am is a mom with a daughter who needs activities like these to entertain herself and cultivate her creativity.
To find out what to do I started looking for tutorials on YouTube on how to make "paper mache", something I did once when I was a kid and I thought it would be easy to do. I found several videos where they teach you how to make flexible or moldable dough with toilet paper, among other ingredients, while watching the video my daughter got very excited and we started looking for the materials, we discovered that we had everything we needed and we got down to work.
To make flexible dough with toilet paper, we need these ingredients:
- Toilet paper
- Wheat flour
- White glue
- 1 teaspoon of oil
- 1 teaspoon of body cream
- ½ glass of water
Step 1: Cut or tear the toilet paper into very small pieces, then wet with water a little at a time and knead so that all the paper is wet and integrated.
Step 2: Add wheat flour a few at a time, and knead together with the paper until it is integrated, then add a teaspoon of vegetable oil.
Step 3: Add two tablespoons of white glue, knead and then add the body cream, continue kneading.
Note: The amount of ingredients such as flour and glue vary depending on how wet and elastic the dough feels, so you can add more glue and flour until you feel that the dough does not stick to your hands, and is easy to shape.
Step 4: separate the dough into several portions to add color, we used some dry watercolors that we have, and we were putting color to the dough, but we realized that the watercolor did not bring much color itself to the dough. (It might work if you use acrylic paint or a more concentrated ink).
Step 5: We modeled some simple shapes, like a little bee, a butterfly and a snail.
Step 6: Paint with a brush and watercolor the details and the surface of the shapes we made, then let them dry for a day.
Note: this dough can be kept in the fridge, wrap it in a plastic bag and it will last for several days until it is used again.
This was the result, actually we feel that it served more than anything to experiment and learn this technique, and we hope that next time they will be better and we can use them as decorative, llaneros, magnets for the fridge, and any other idea that comes up.
The tutorials we saw are very good, we recommend them, they are here in these links:
Tutorial on how to make flexible dough with toilet paper
Tutorial for beginners on how to make some simple shapes with flexible dough
That's all for now, Happy week to all!
Translated with www.DeepL.com/Translator (free version)


Ohhh! que magnifico tutorial para el concurso, lastima que acaba de cerrar y ya he lanzando el siguiente.
Andaba buscando cómo hacer este engrudo, gracias por proporcionarnos tu espectacular tutorial <3
Muy lindo, practico y creativo tu post, me gusto gracias por compartirlo. Saludos mi bella.
Esta cool esto , no pense que se usara papel higuienico 🤔
Que bonito trabajo han realizado tu y tu pequeña hija, las dos son muy hábiles. No conocíamos esta técnica, que se ve fácil, dando como resultado una masa para crear muchas cosas bellas.
Muy buen trabajo.
Está genial, lo voy a hacer con jeremías, ya había pensado comprarle plastilinas, esto me parece chevere. saludos, besitos isa.
He realizado este tipo de masas, son muy buenas y las creaciones resisten muchisimo, gracias por compartir este tipo de contenido.
Wuuuaao... una excelente idea, no sabia que se pudiera utilizar para esto
Gracias por compartir esta información.
Hola @mariale07, espero estés bien. Gracias por mostrarnos ésta técnica, la desconocía y me parece genial. Mi hijo con autismo tiene bastante alteración sensorial y siempre ando buscando tipos de texturas para estimularlo, ésta pasta parece ser firme pero no tan suave (eso parece) así que probaré hacerla para ver como la tolera mi niño y te aviso...
Gracias, excelente idea de verdad.
Saludos, bendiciones y éxitos.
Hola muy creativo, te felicito te quedo bien, continua con el mismo empeño, es solo cuestión de practica, saludos
Your content has been voted as a part of Encouragement program. Keep up the good work!
Use Ecency daily to boost your growth on platform!
Support Ecency
Vote for Proposal
Delegate HP and earn more