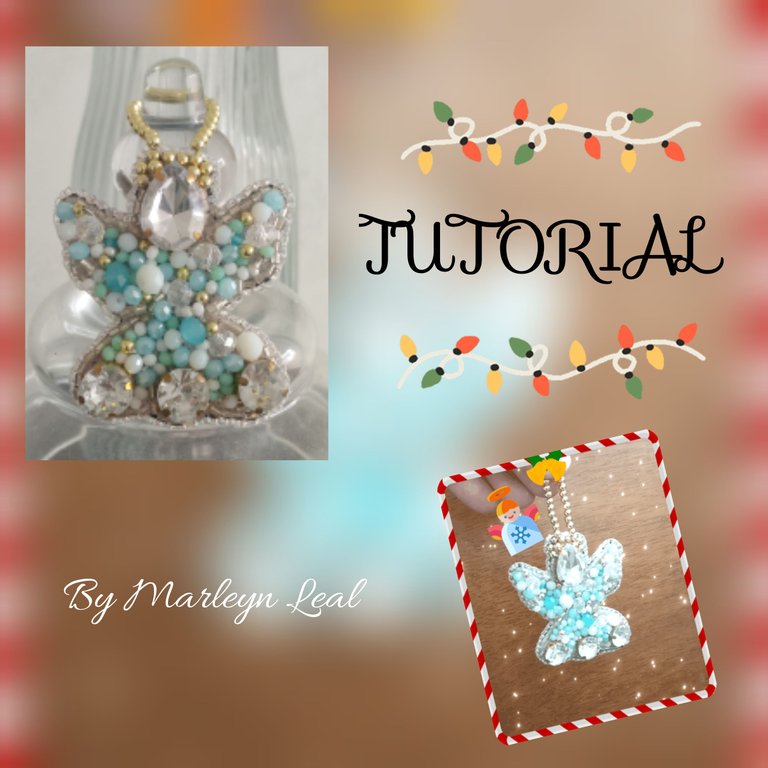

Feliz y bendecido día, espero estén bien llenos de buenas energías, ánimo, siempre positivos, y felices!!! Como saben me encanta crear, y no podía perder la oportunidad de participar en esta maravillosa Iniciativa que nos trae @hivediy, para mi la Navidad es una época especial del año que va más allá de los regalos y las compras. Es un momento para estar en familia, compartir momentos significativos y mostrar gratitud por lo que tenemos. Crear adornos navideños es una forma maravillosa de añadir un toque personal a nuestras celebraciones, es una actividad que nos va a recordar que la Navidad es más que solo lo comercial. Es un tiempo que debemos usar para agradecer, estar en familia y disfrutar de las pequeñas cosas que realmente importan. Al hacer adornos a mano, no solo embellecemos nuestros hogares, sino que también cultivamos el espíritu navideño en su forma más pura y auténtica.
Decorar tu hogar para la Navidad puede ser una actividad creativa y divertida. Uno de los adornos más elegantes que puedes hacer es un Angelito colgante navideño con cristales y mostacillas. A continuación, te presento un paso a paso para crear tu propio adorno.
Materiales:
Tela POP o tela fina para la base del bordado, Tela gruesa o cuero para la base de atrás, 3 cristales engastados de 1 centímetro de diámetro, Gota engastada de 2.5 centímetros de diámetro, Canutillo partido plateado, Plantilla de ángel, Aguja para mostacillas, Balin dorado de 2 milímetros, hilo nailon blanco, Cristal checo transparente de 8 milímetros, cristal checo verde aguamarina, blanco mate y azul cielo de 2 milímetros, Cristal checo blanco y azul cielo de 6 milímetros, mostacillas blancas, azul clara y plateada, Silicon liquido o pega E6000.
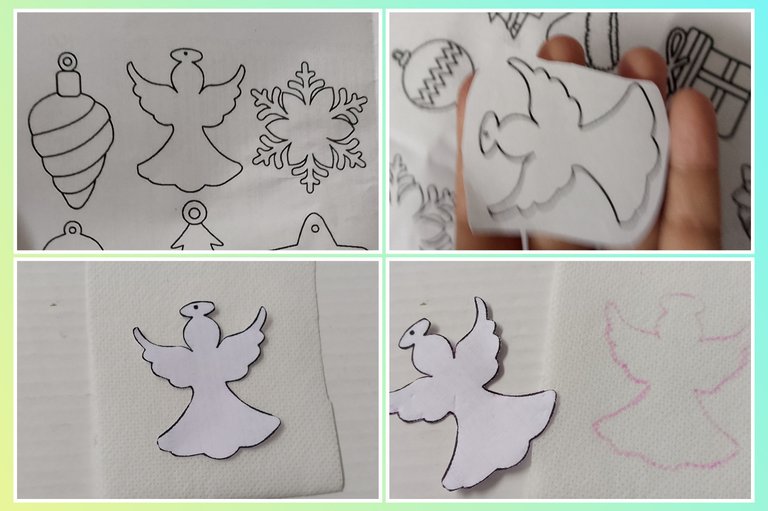
Selecciona la plantilla de tu preferencia, corta y pasa el dibujo a la tela con ayuda de un lapiz o un color si sabes dibujar solo lo dibujas yo lo realizo de esta manera porque no se me da muy bien el dibujo.
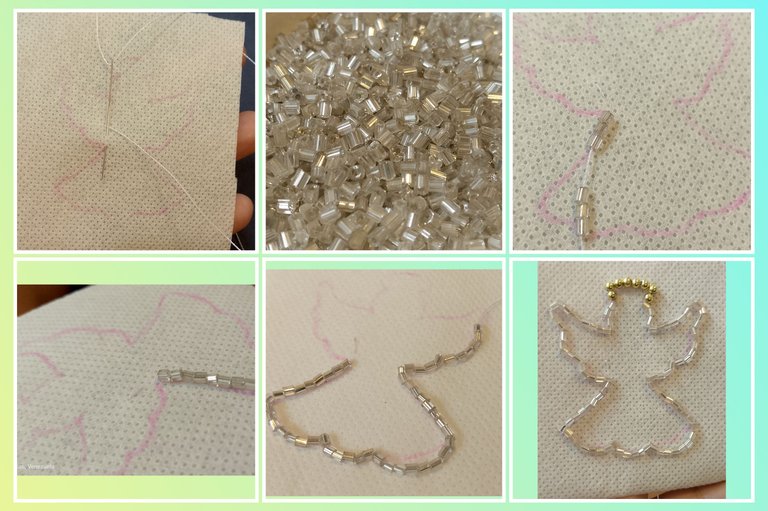
Ensarta el hilo en la aguja, y comienza a bordar los canutillos plateados por la orilla de nuestro dibujo para darle su forma, y en la parte superior vamos a colocar 8 balines dorados de 8 milímetros, es muy facil vamos ir de 6 en 6 es decir introduce 6 canutillos partidos en la aguja, verifica donde termina y allí introduce la aguja hacia abajo, ahora saca la aguja por el 3 canutillo partido y pasaras la aguja por los otros 3 canutillos, al salir la aguja volvemos a colocar 6 canutillos partidos y repetimos el proceso, debes estar muy pendientes habrá partes del bordado que solo colocaras 3 canutillos o incluso solamente uno, la idea es no perder la forma que ya trazamos con el lápiz.
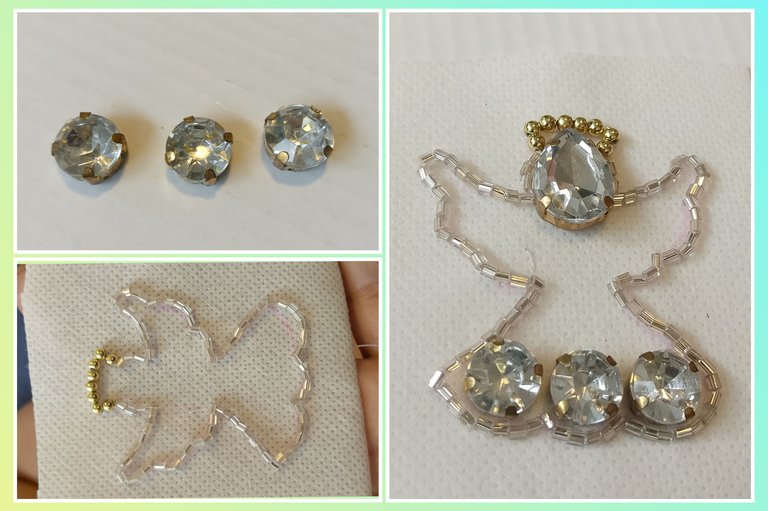

Al terminar de bordar la orilla de nuestra pieza, vamos a coser los apliques engastados, a mi me gustan los apliques engastados por que en la pieza de metal que tienen abajo trae 4 huecos por donde podemos pasar la aguja para coserlo muy bien a nuestra pieza, hazlo con cuidado por la parte de abajo siempre al coser un aplique realiza un nudo, y luego continuas con el otro aplique sin necesidad de cortar el hilo, esto lo hacemos porque si en algún momento se nos revienta el hilo solo se dañara una parte de la pieza y no todo.
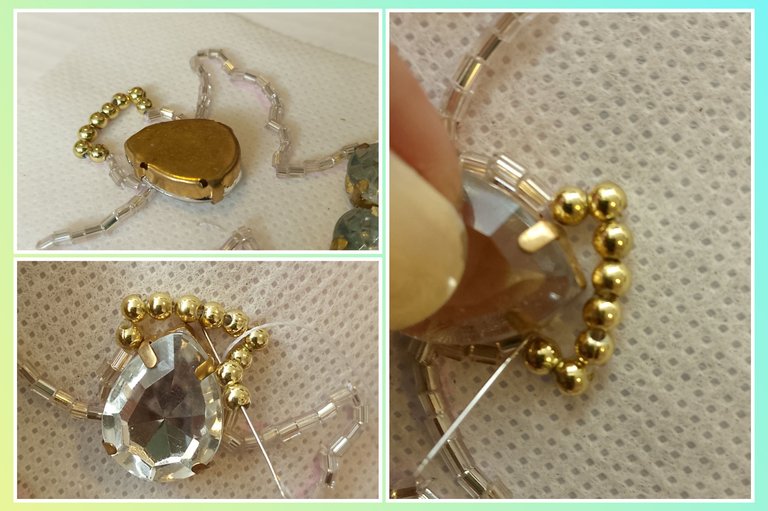
En la parte superior vamos a colocar la gota engastada esto representa la cara de nuestro angelito como te muestro en la primera imagen traen 4 orificios, por donde la aguja pasa perfectamente y de esta manera se fijara muy bien la pieza a la tela, luego de colocarla vamos a colocar un balin dorado en el espacio en blanco que queda entre la gota y la linea de balines dorados de arriba.
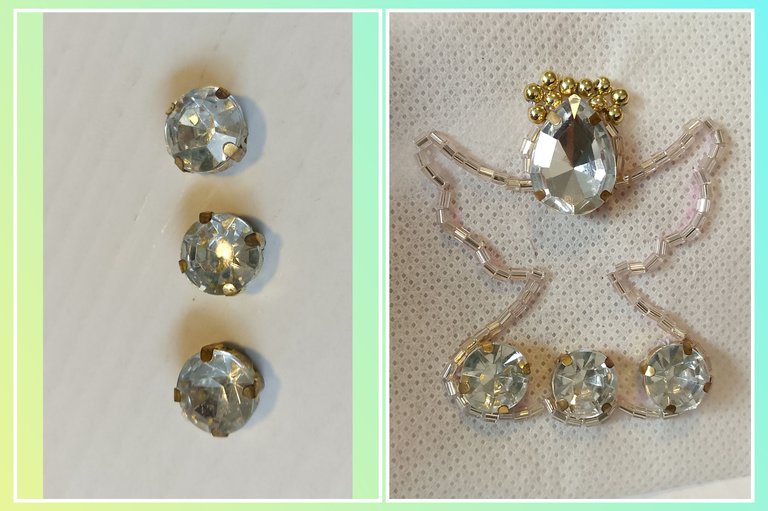
como te muestro en esta foto asi va a quedar la parte de arriba dorada, si cuentas de abajo hacia arriba por cada lado el tercer balin dorado esta como levantado esto es para al terminar de alli sacar la tira dorada para colgarlo al terminar la pieza.
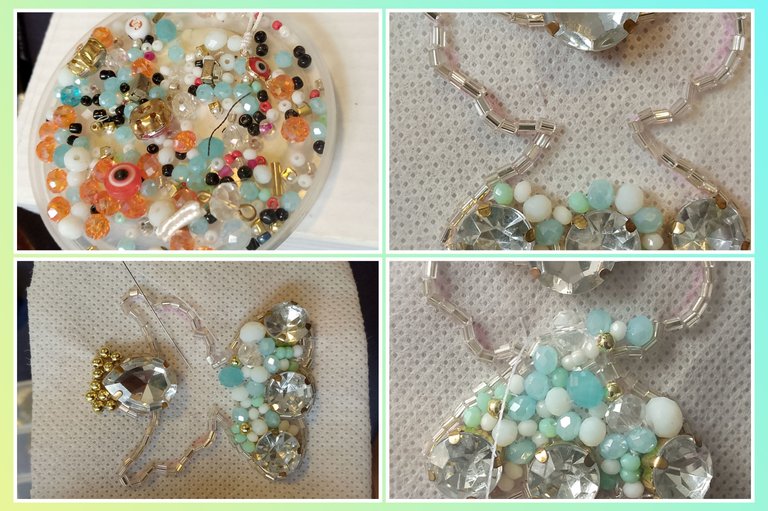
Yo tenia todo separado bien hermosos pero se me cayo al suelo y se unieron todos los cristales, por eso se ve ese desastre... Bueno comencemos a bordar los cristales yo lo estoy haciendo de 3 en 3 sin un patrón en especial solo coloque las piedras que me parecían que una bien en el lugar y en el orden sin un orden realmente, lo mas importante es no dejar espacios vacíos y jugar con los colores y tamaños para que de esta manera todo se vea bonito junto, por al rededor de los cristales trate de colocarlos como rodeándolo , lo que hago es colocar 3 cristales o mostacillas o intercalando entre cristales y mostacillas introducir la aguja hacia abajo por donde termina el ultimo cristal y luego subir la aguja por el segundo cristal y traspasarlo esto es una manera de asegurar las piedras y que con el movimiento no se rompan o se aflojen, recuerda cada cierto tiempo realizar un nudo por la parte de atrás de la pieza y luego continuar.
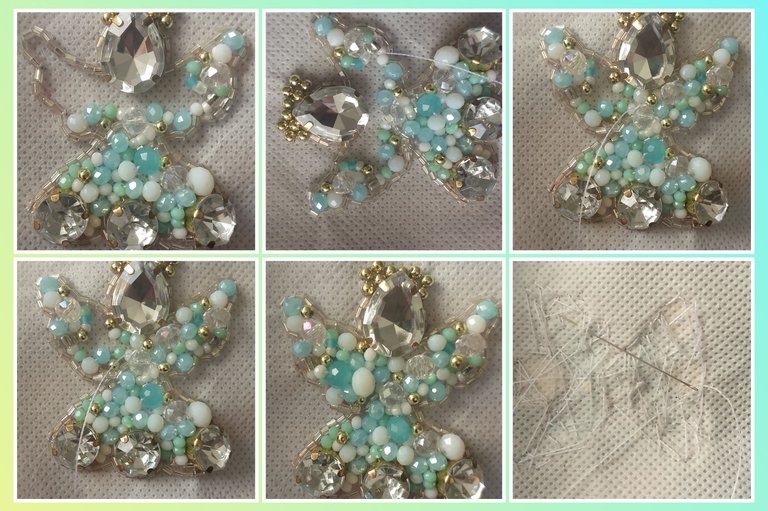
Continuamos bordando en la parte superior intentando que en la parte de las alas utilicemos las mismas piezas para que sea simétrico, es decir utilizar para ambas partes los mismos tamaños de cristales tratando que se vea igual en ambas partes. al terminar realiza varios nudos en la parte de atrás de la pieza si te queda mucho hilo en la aguja no lo cortes pasarlo para arriba por una de las orillas que con ese miso hilo bordaremos toda la orilla, si queda poco cortarlo y volver a ensartar la aguja.
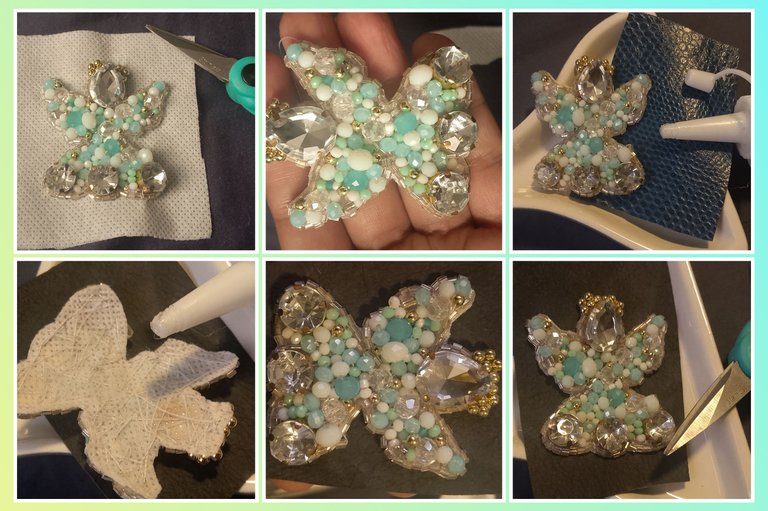
Vamos a cortar la tela sobrante con mucho cuidado de no cortar los hilos para no dañar nuestra pieza, luego colocamos silicon liquido o pega E6000 o la de su preferencia por la parte de atras y pegamos nuestra pieza al cuero, trata de no colocar pegamento por las orillas para que al momento de bordar la orilla no ensucies la aguja que se hará mas difícil coser así. Deja secar por un momento y luego cortamos el cuero que sobra dando la forma al angel recuerda es muy importante cortar con paciencia, preferible una tijera pequeña con bastante filo.
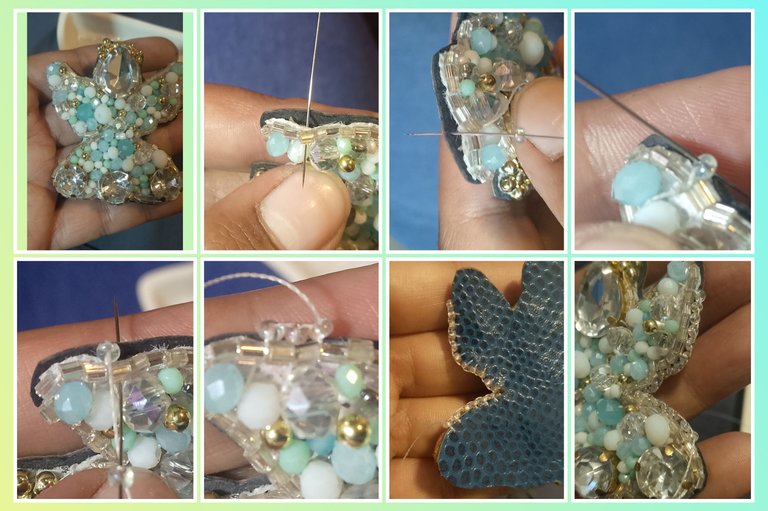
Ahora vamos a bordar toda la orilla del ángel con paciencia y si te gusta lo que estas haciendo será muy facil, vamos a levantar un poco el cuero, pasaremos la aguja de atrás hacia adelante como te muestro en la imagen 2, introduce una mostacilla en la aguja y pasa ahora la aguja de adelante hacia atrás saliendo por el cuero, y la subimos por la mostacilla, repite el procedimiento es decir nuevamente introduce una mostacilla en la aguja y pasa ahora la aguja de adelante hacia atrás saliendo por el cuero, y la subimos por la mostacilla y asi sucesivamente hasta llegar al punto inicial.
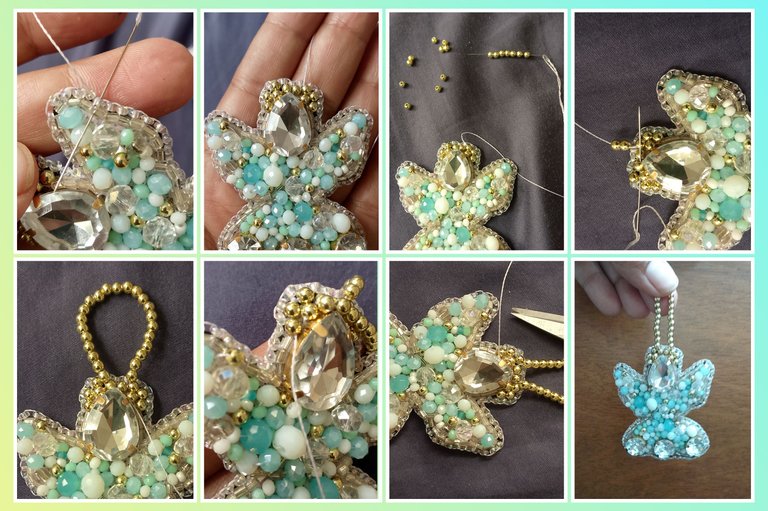

Cuando llegamos a esta parte vas a sacar la aguja por la primera mostacilla que cociste, y la regresas por la siguiente hasta sacarla por entre los cristales realizamos un nudo lo mas escondido posible y nuevamente pasamos la aguja por abajo de los cristales buscando salir por los balines dorados, de esta manera saliendo en el tercer balin dorado insertando en la aguja 22 balines dorados o tantos como el largo que desees regresa la aguja por el otro lado y nuevamente realiza un nudo escóndelo pasando la aguja por entre los cristales y de esta manera terminamos n
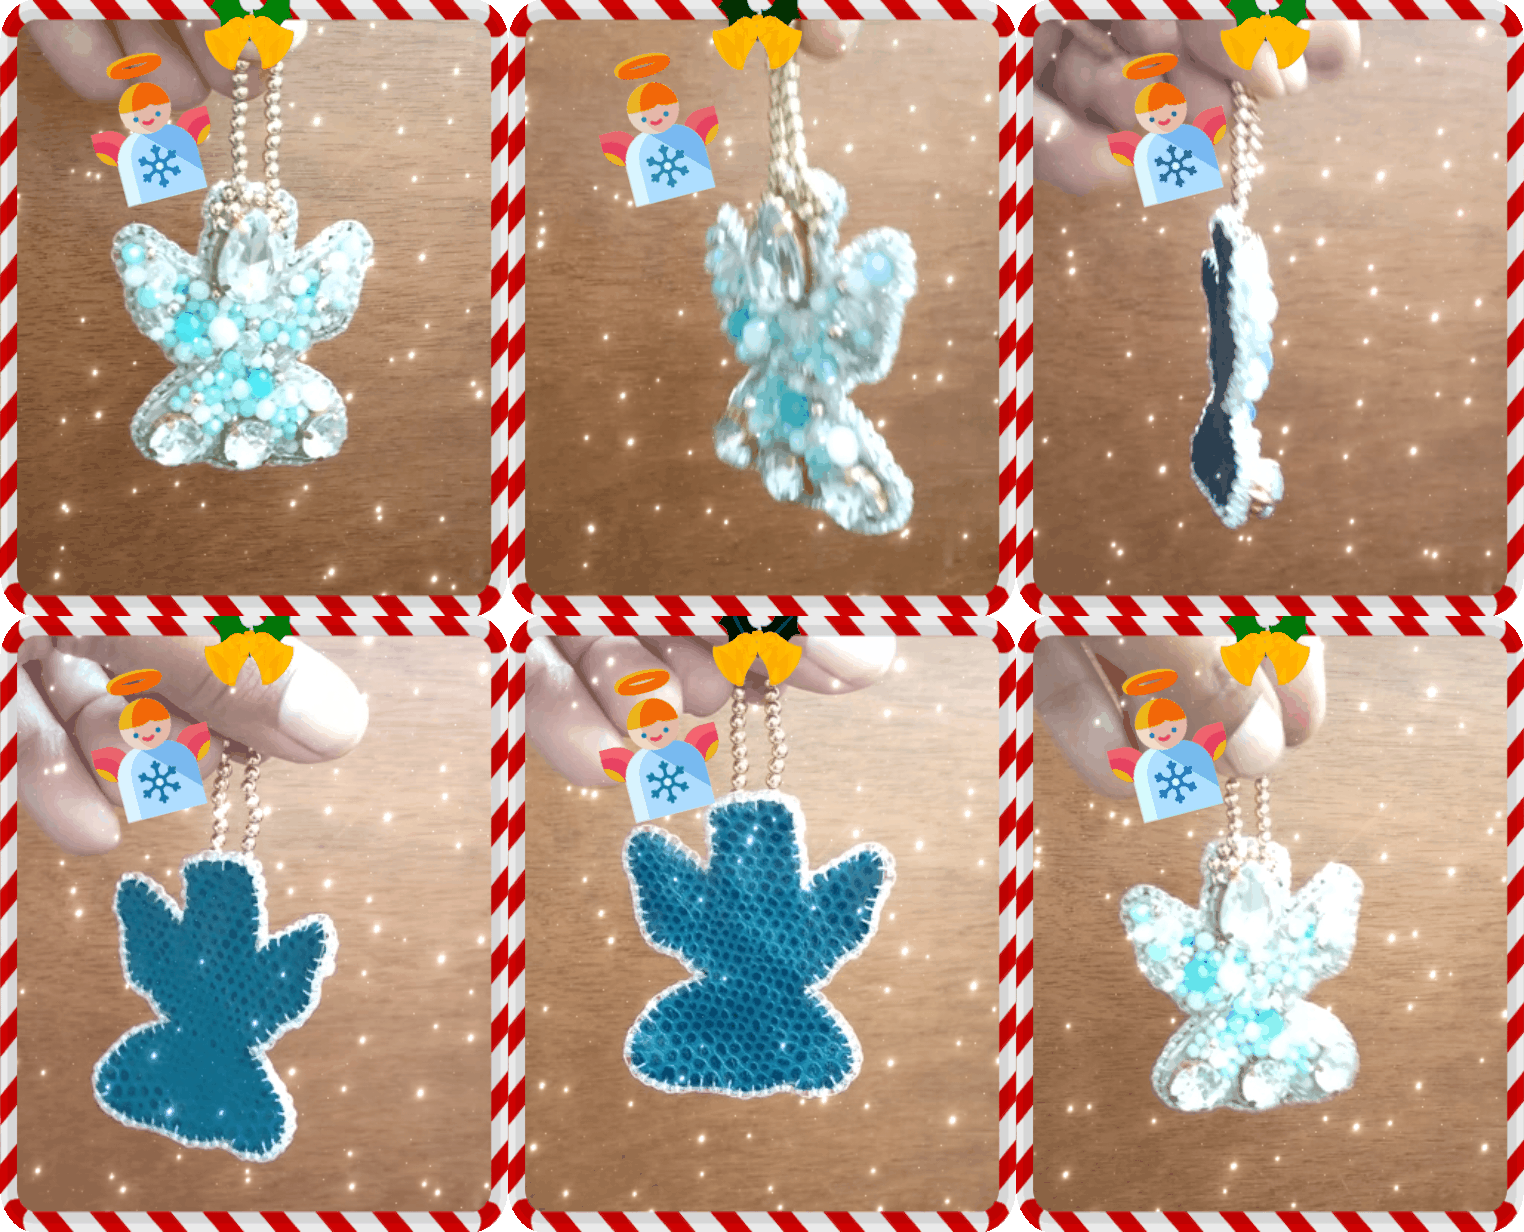
Ahora que has terminado tu adorno de Navidad con cristales y mostacillas, ¡es hora de colgarlo en tu árbol! Admira cómo refleja las luces del árbol y añade un toque brillante a tus decoraciones navideñas.
Consejos Adicionales
Experimenta con diferentes patrones y colores para crear una variedad de adornos únicos.
Invita a amigos o familiares a unirse a la actividad para compartir la creatividad y la diversión.
Con estos pasos, podrás crear un adorno navideño artesanal que será elogiado por todos tus invitados. ¡Feliz creación y felices fiestas!


Happy and blessed day, I hope you are well full of good energy, courage, always positive and happy!!! As you know I love to create, and I could not miss the opportunity to participate in this wonderful Initiative that @hivediy brings us, for me Christmas is a special time of the year that goes beyond gifts and shopping. It is a time to be with family, share meaningful moments and show gratitude for what we have. Creating Christmas ornaments is a wonderful way to add a personal touch to our celebrations, it is an activity that will remind us that Christmas is more than just commercial. It's a time to be thankful, be with family and enjoy the little things that really matter. By making ornaments by hand, we not only beautify our homes, but we also cultivate the Christmas spirit in its purest and most authentic form.
Decorating your home for Christmas can be a creative and fun activity. One of the most elegant ornaments you can make is a Christmas Angel Pendant with crystals and beads. Here's a step-by-step on how to create your own ornament.
Materials:
POP fabric or thin fabric for the embroidery base, Thick fabric or leather for the back base, 3 crystals set 1 centimeter in diameter, Drop set 2. 5 centimeters in diameter, silver plated split bead, angel template, beading needle, 2 mm gold Balin, white nylon thread, 8 mm clear Czech glass, 2 mm aquamarine green, matte white and sky blue Czech glass, 6 mm white and sky blue Czech glass, white, light blue and silver beads, liquid silicon or E6000 glue.

Select the template of your choice, cut and transfer the drawing to the fabric with the help of a pencil or a color if you know how to draw just draw it I do it this way because I am not very good at drawing.

Thread the thread on the needle, and start embroidering the silver-colored bobbins along the edge of our drawing to give it its shape, and at the top we will place 8 golden bobbins of 8 millimeters, it is very easy we will go from 6 to 6 that is to say introduce 6 split bobbins in the needle, check where it ends and there introduce the needle downwards, now take out the needle through the 3 split bobbin and pass the needle through the other 3 bobbins, when the needle comes out we return to place 6 split bobbins and repeat the process, you must be very aware that there will be parts of the embroidery that you will only place 3 bobbins or even only one, the idea is not to lose the shape that we have already traced with the pencil.


When we finish embroidering the edge of our piece, we are going to sew the set appliqués, I like the set appliqués because the metal piece below has 4 holes through which we can pass the needle to sew it very well to our piece, do it carefully on the bottom always when sewing an applique make a knot, and then continue with the other applique without cutting the thread, we do this because if at some point we burst the thread will only damage a part of the piece and not all of it.

At the top we will place the drop set this represents the face of our angel as I show you in the first picture bring 4 holes, where the needle passes perfectly and in this way the piece will be fixed very well to the fabric, after placing it we will place a golden ball in the blank space between the drop and the line of golden balls above.

As I show you in this picture this is how the golden top will look like, if you count from bottom to top on each side the third golden ball is lifted up, this is to take out the golden strip to hang it at the end of the piece.

I had everything separated very beautiful but I dropped it on the floor and all the crystals came together, that's why you see that mess .... Well let's start embroidering the crystals I'm doing it 3 by 3 without a special pattern just put the stones that seemed to me that one well in place and in order without an order really, the most important thing is not to leave empty spaces and play with colors and sizes so that in this way everything looks nice together, around the crystals try to place them as surrounding it , What I do is to place 3 crystals or beads or alternating between crystals and beads introduce the needle down where the last crystal ends and then raise the needle by the second crystal and pass it this is a way to secure the stones and that the movement does not break or loosen, remember every so often tie a knot in the back of the piece and then continue.

We continue embroidering in the upper part trying that in the part of the wings we use the same pieces so that it is symmetrical, that is to say to use for both parts the same sizes of crystals trying that it is seen equal in both parts. when finishing it makes several knots in the back part of the piece if you have much thread left in the needle do not cut it pass it up for one of the edges that with that same thread we will embroider the whole edge, if it is little cut it and to return to thread the needle.

We will cut the excess fabric being very careful not to cut the threads to avoid damaging our piece, then we put liquid silicone or glue E6000 or the one of your preference on the back and glue our piece to the leather, try not to put glue on the edges so that when embroidering the edge you do not dirty the needle that will be more difficult to sew this way. Let it dry for a moment and then cut the leftover leather giving the shape to the angel, remember it is very important to cut with patience, preferably a small scissors with enough edge.

Now we are going to embroider the entire edge of the angel with patience and if you like what you are doing it will be very easy, we will lift the leather a little, we will pass the needle from back to front as I show you in the image 2, introduce a bead in the needle and now pass the needle from front to back through the leather, and up through the bead, repeat the procedure that is again introduce a bead in the needle and now pass the needle from front to back through the leather, and up through the bead and so on until you reach the starting point.


When we get to this part you are going to take the needle out through the first bead you made, and return it through the next one until you take it out through the crystals, make a knot as hidden as possible and again pass the needle through the bottom of the crystals looking to exit through the golden beads, in this way exiting in the third golden bead inserting in the needle 22 golden beads or as many as the length you want, return the needle on the other side and again make a knot hiding it passing the needle through the crystals and in this way we finish.

Now that you've finished your crystal and bead Christmas ornament, it's time to hang it on your tree! Admire how it reflects the lights on the tree and adds a sparkling touch to your holiday decorations.
Additional Tips
Experiment with different patterns and colors to create a variety of unique ornaments.
Invite friends or family to join in the activity to share in the creativity and fun.
With these steps, you can create a handmade Christmas ornament that will be praised by all your guests. Happy crafting and happy holidays!


IMAGENES CREADAS EN CANVA
IMAGES CREATED IN CANVA

Posted Using InLeo Alpha
Qué trabajo tan precioso, este angelito Te quedó de ensueño.
Gracias por compartirnos tu proceso creativo con un paso a paso detallado y prolijo.
!discovery 45
!LADY
Your LOH token balance is not sufficient to send tips. Please hold a minimum of 25 LOH tokens to send tips.
This post was shared and voted inside the discord by the curators team of discovery-it
Join our Community and follow our Curation Trail
Discovery-it is also a Witness, vote for us here
Delegate to us for passive income. Check our 80% fee-back Program
A precious little angel, a pendant that I'm sure more than one person would like to have with them. Thank you for leaving us such a detailed step-by-step guide and an excellent creative process.
Tu trabajo esta precioso, esos colores y esa decoracion estan divinas 😍 quedaria muy bien en el arbolito navideño ❤️
te quedó espectacular
Congratulations @marleyn! You have completed the following achievement on the Hive blockchain And have been rewarded with New badge(s)
Your next target is to reach 48000 upvotes.
You can view your badges on your board and compare yourself to others in the Ranking
If you no longer want to receive notifications, reply to this comment with the word
STOP