Saludos apreciados amigos que hacen vida en esta innovadora comunidad #Hivediy. 🤗
Greetings dear friends who live in this innovative #Hivediy community. 🤗

Me complace poder compartir con ustedes una vez más, en esta oportunidad estaré presentando mi participación en el concurso titulado "Diorama de Plastilina" propuesto por nuestro querido @equipodelta, gracias al amigo moldeador y moderador de esta comunidad @gaboamc2393 por el apoyo y ayuda que a brindado a todos los participantes.
I am pleased to be able to share with you once again, this time I will be presenting my participation in the contest entitled "Plastilina Diorama" proposed by our beloved @equipodelta, thanks to the molding friend and moderator of this community @ gaboamc2393 for the support and help it has given to all the participants.
Recuerdo que cuando estaba en el colegio los profesores nos mandaban a hacer maquetas, las cuales se parecían mucho a este diorama que les compartiré hoy, en mi caso tenía años de años que no trabajaba con plastilina, la verdad ni recuerdo cuando fue la última vez y aunque pareciera demasiado fácil, tiene su técnica y debemos tener paciencia para poder moldear y diseñar los elementos que deseamos.
I remember that when I was in school the teachers sent us to make models, which were very similar to this diorama that I will share with you today, in my case I had not worked with clay for years , the truth is that I don't even remember when it was the last time and although it seemed too easy, it has its technique and we must have patience to be able to mold and design the elements that we want.
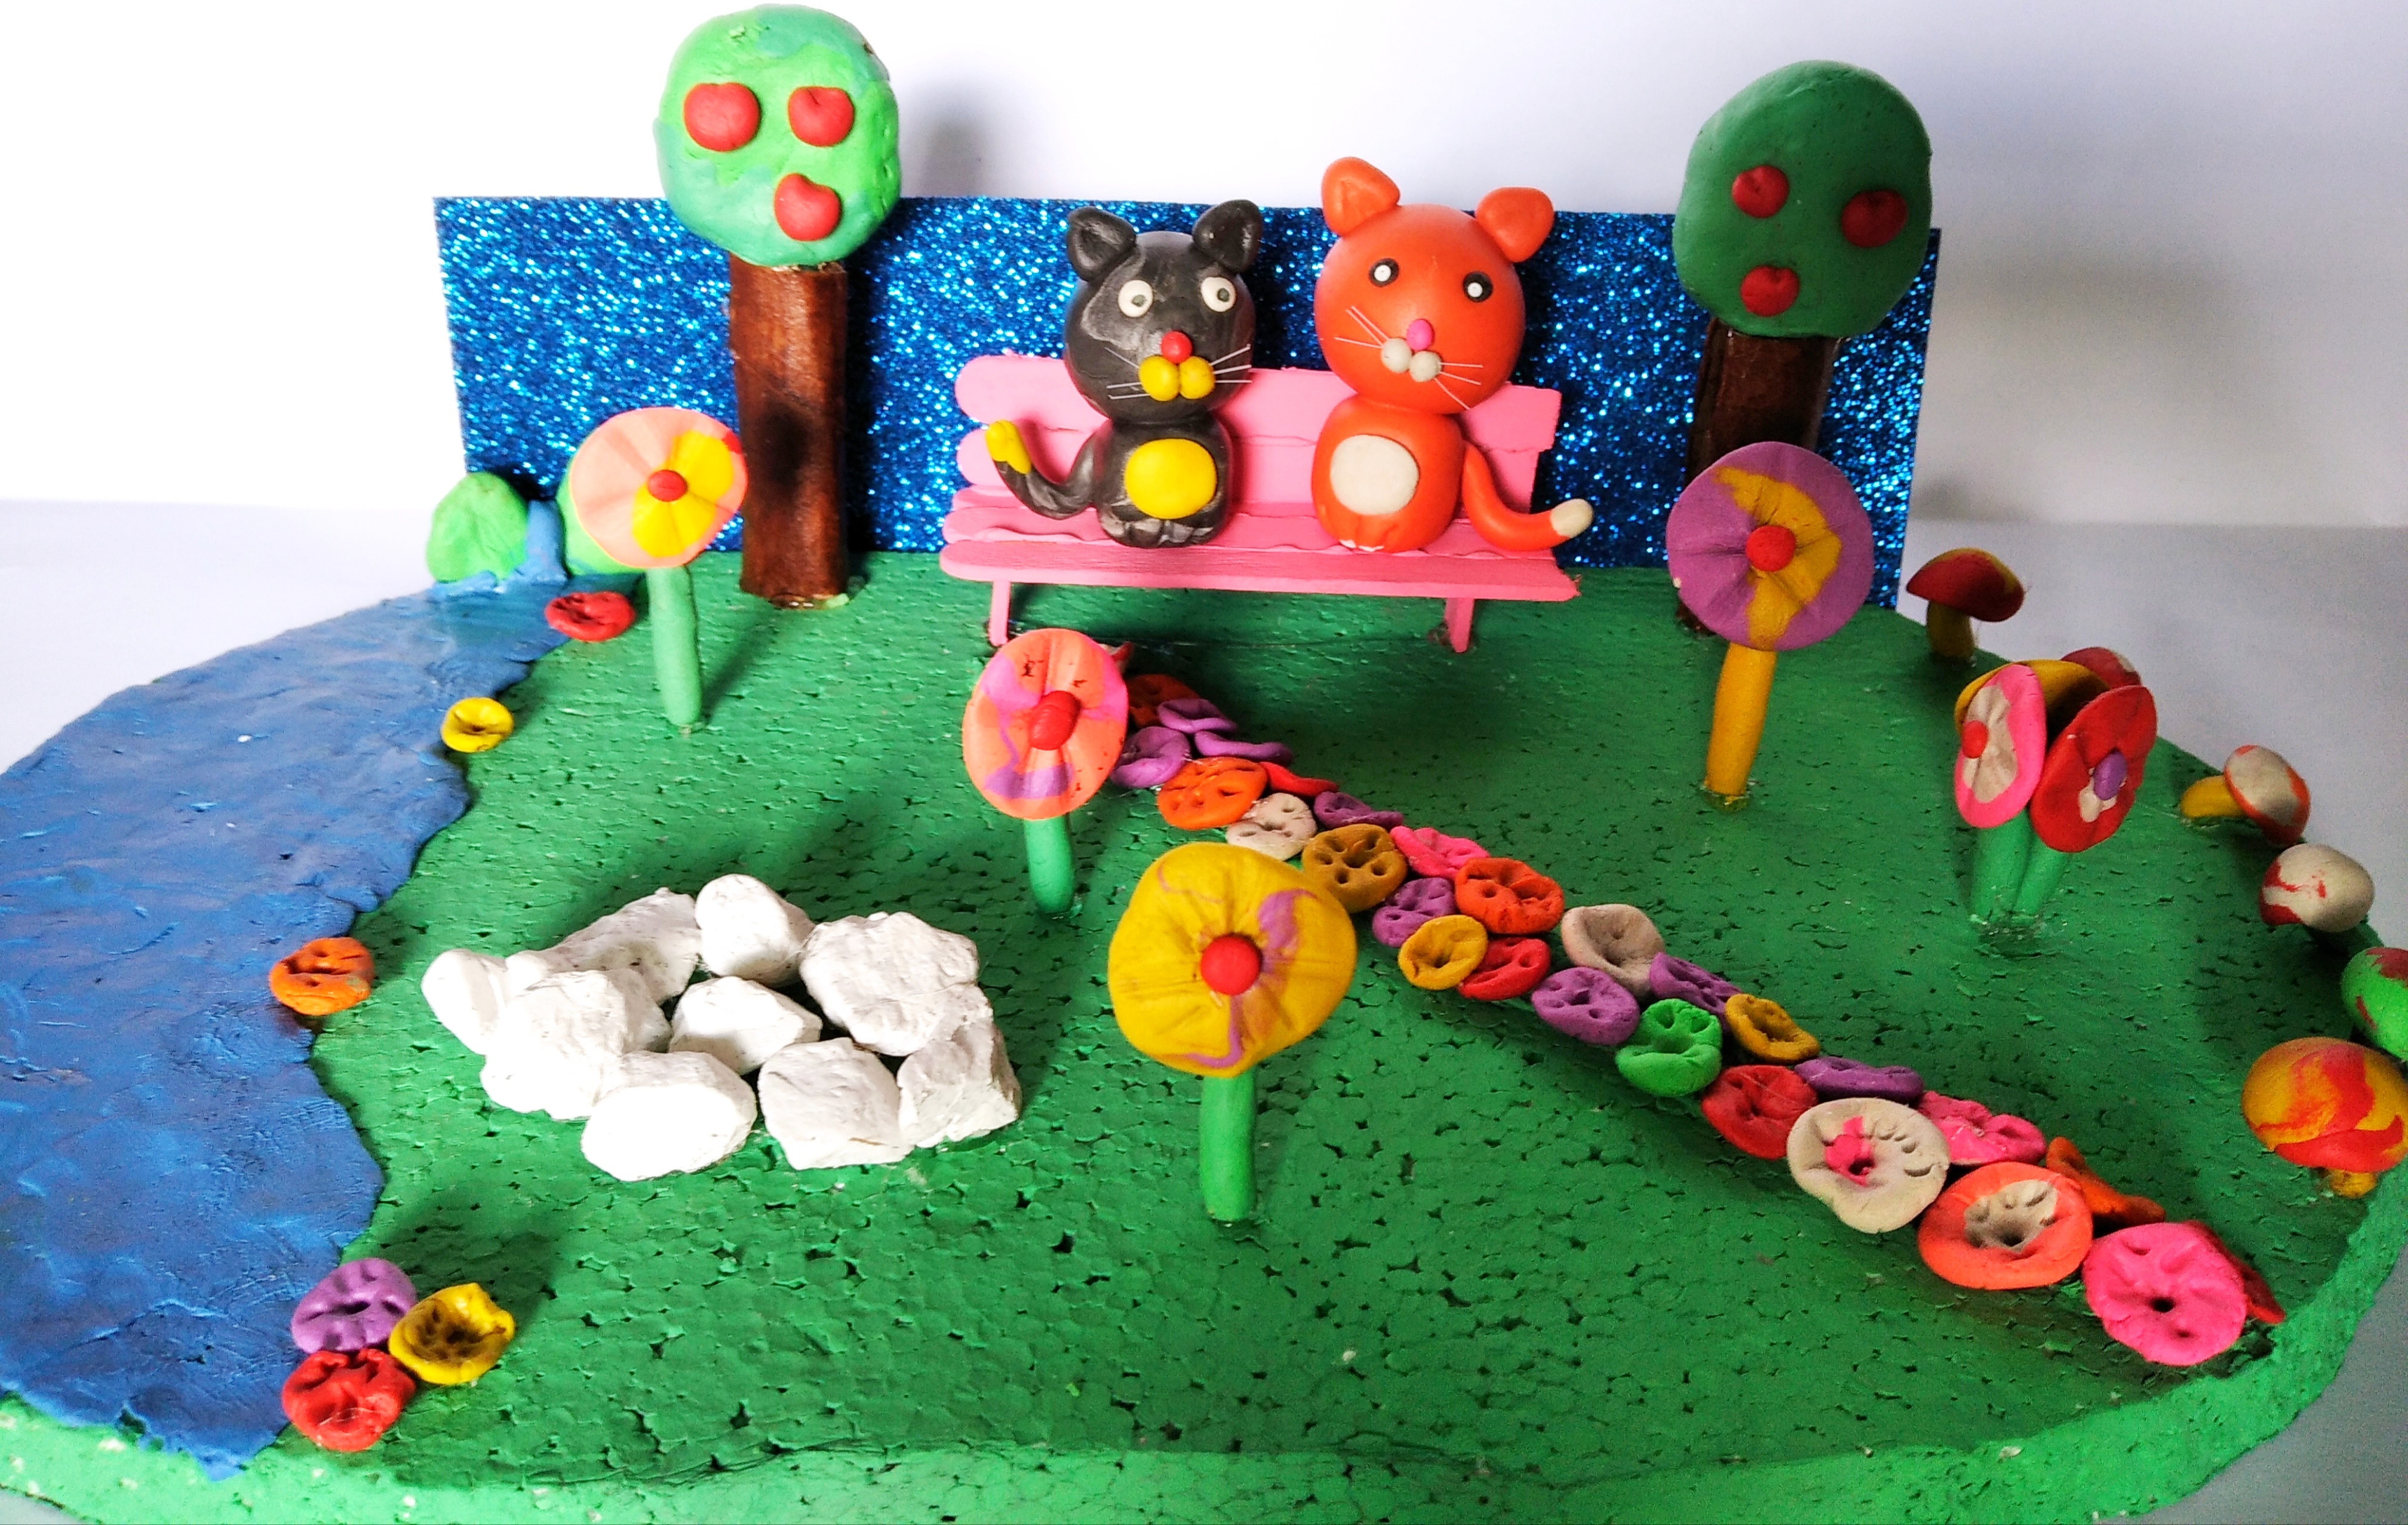
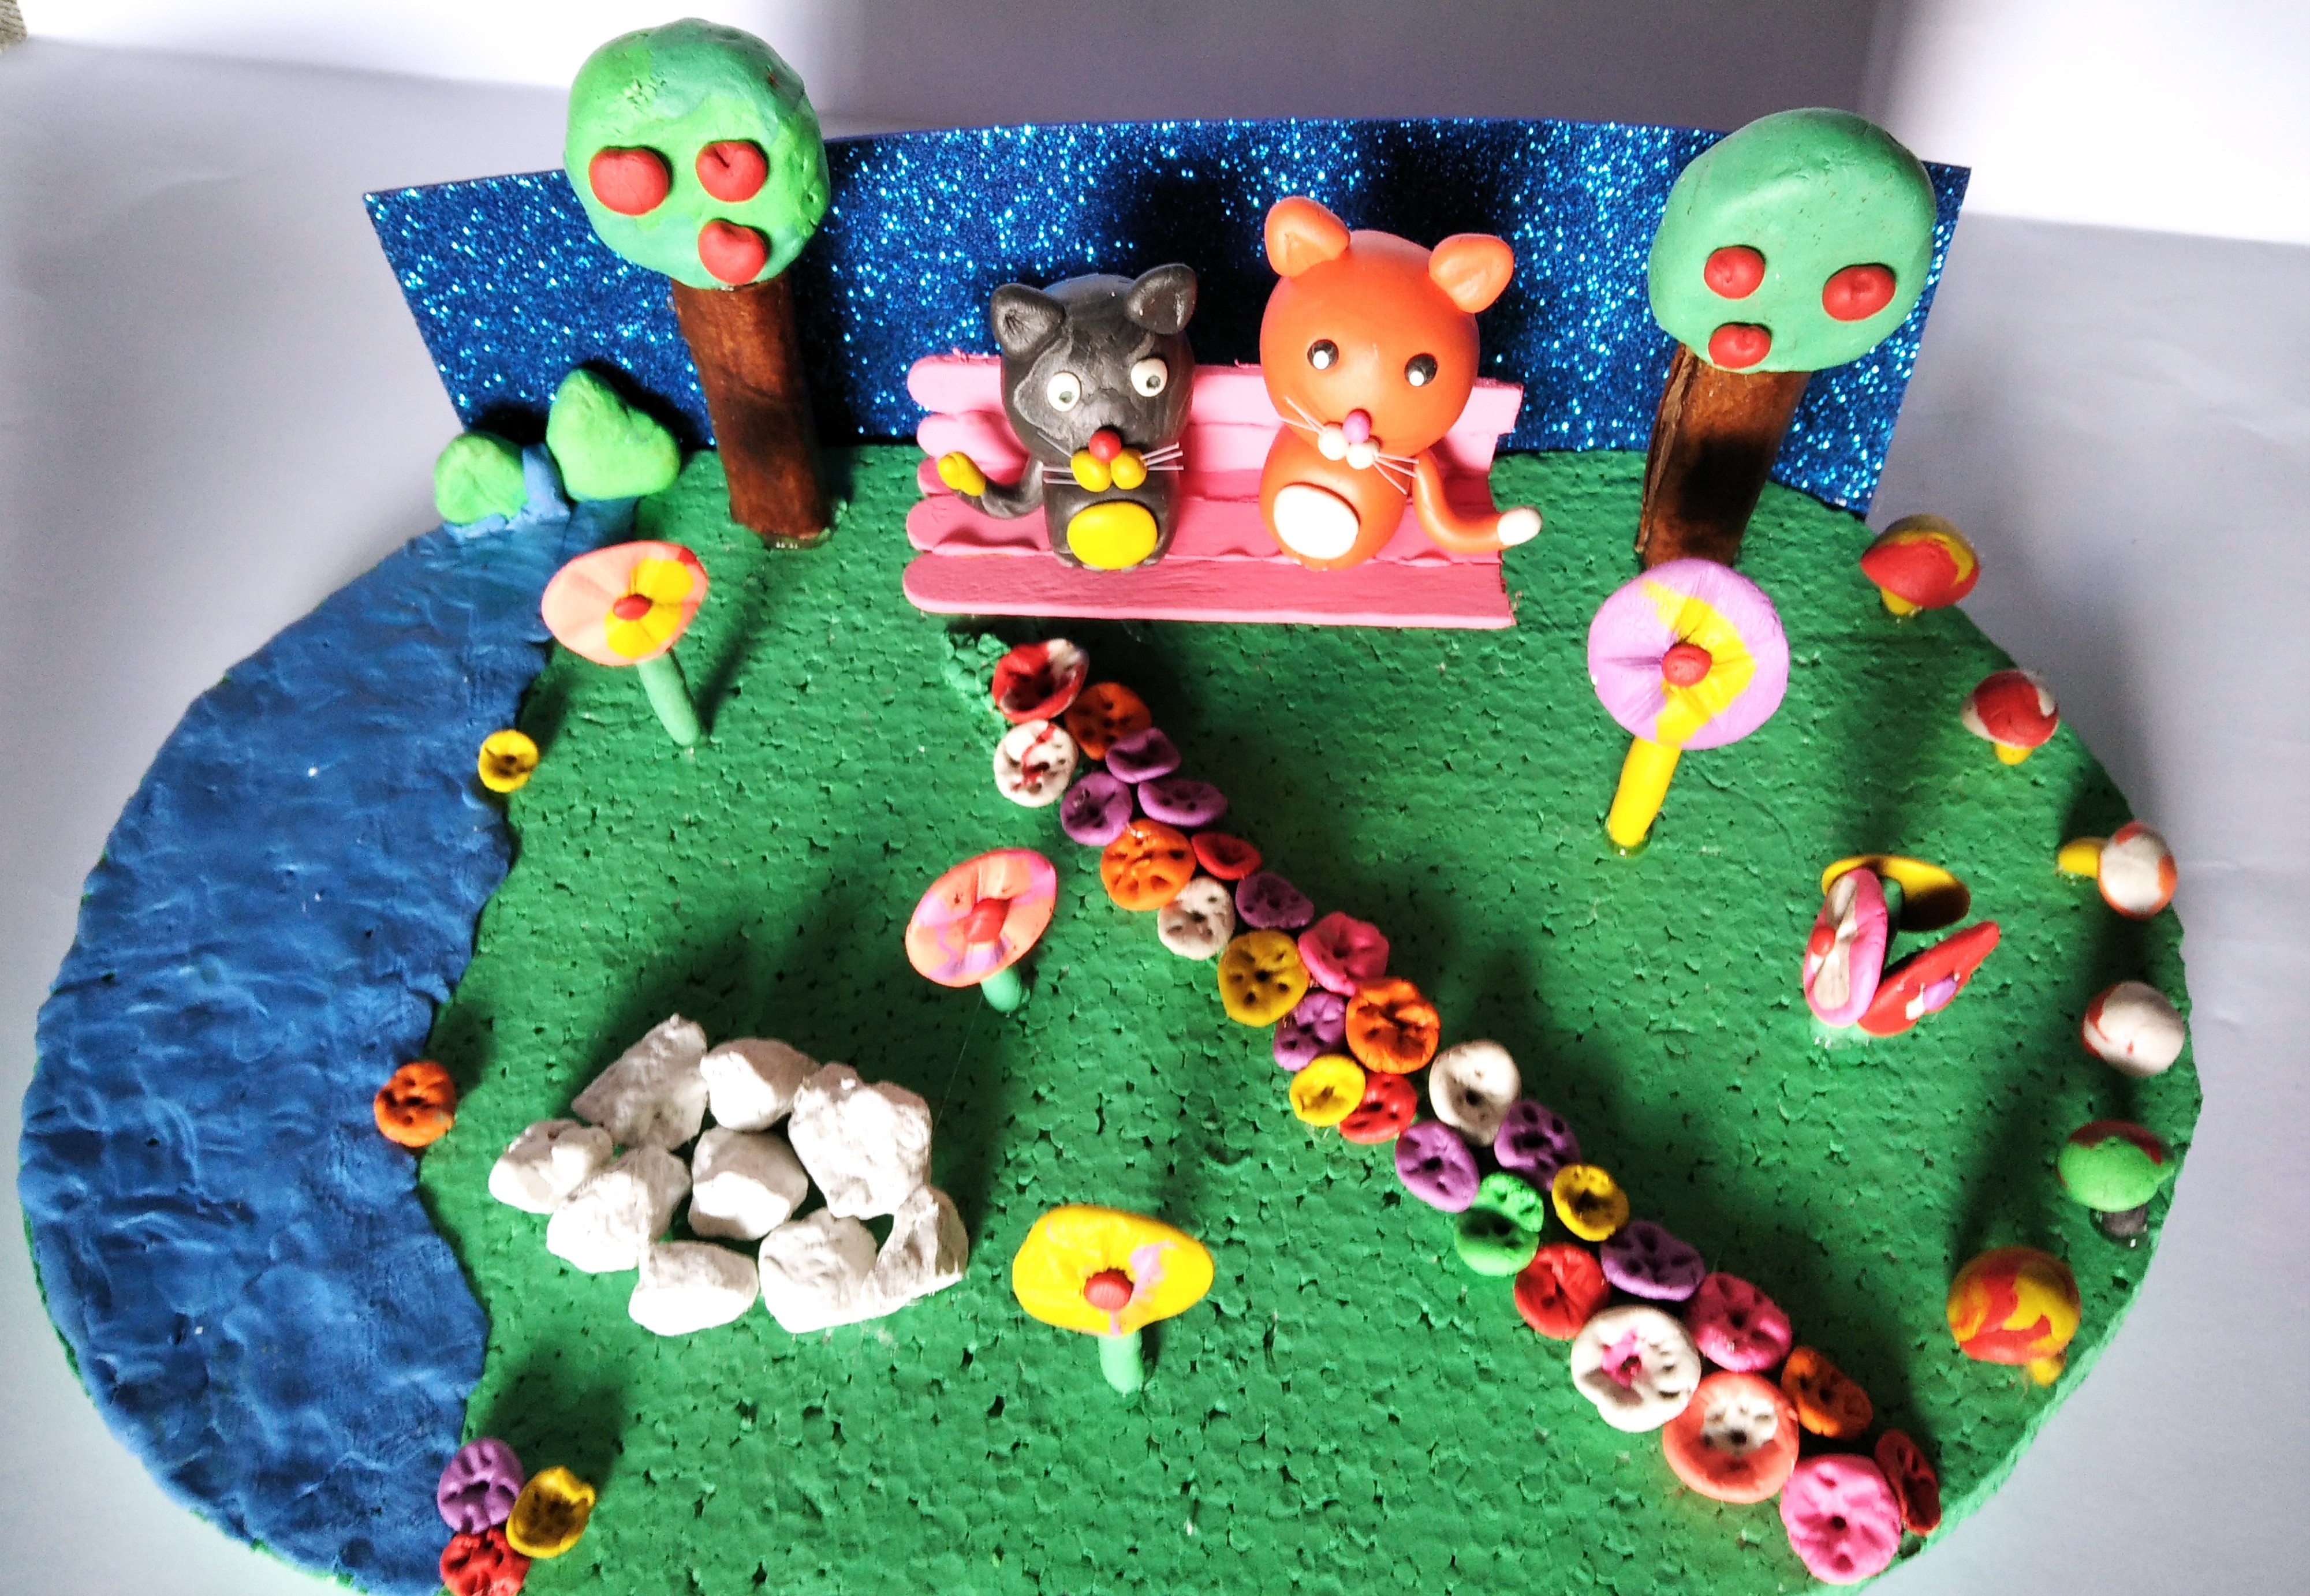
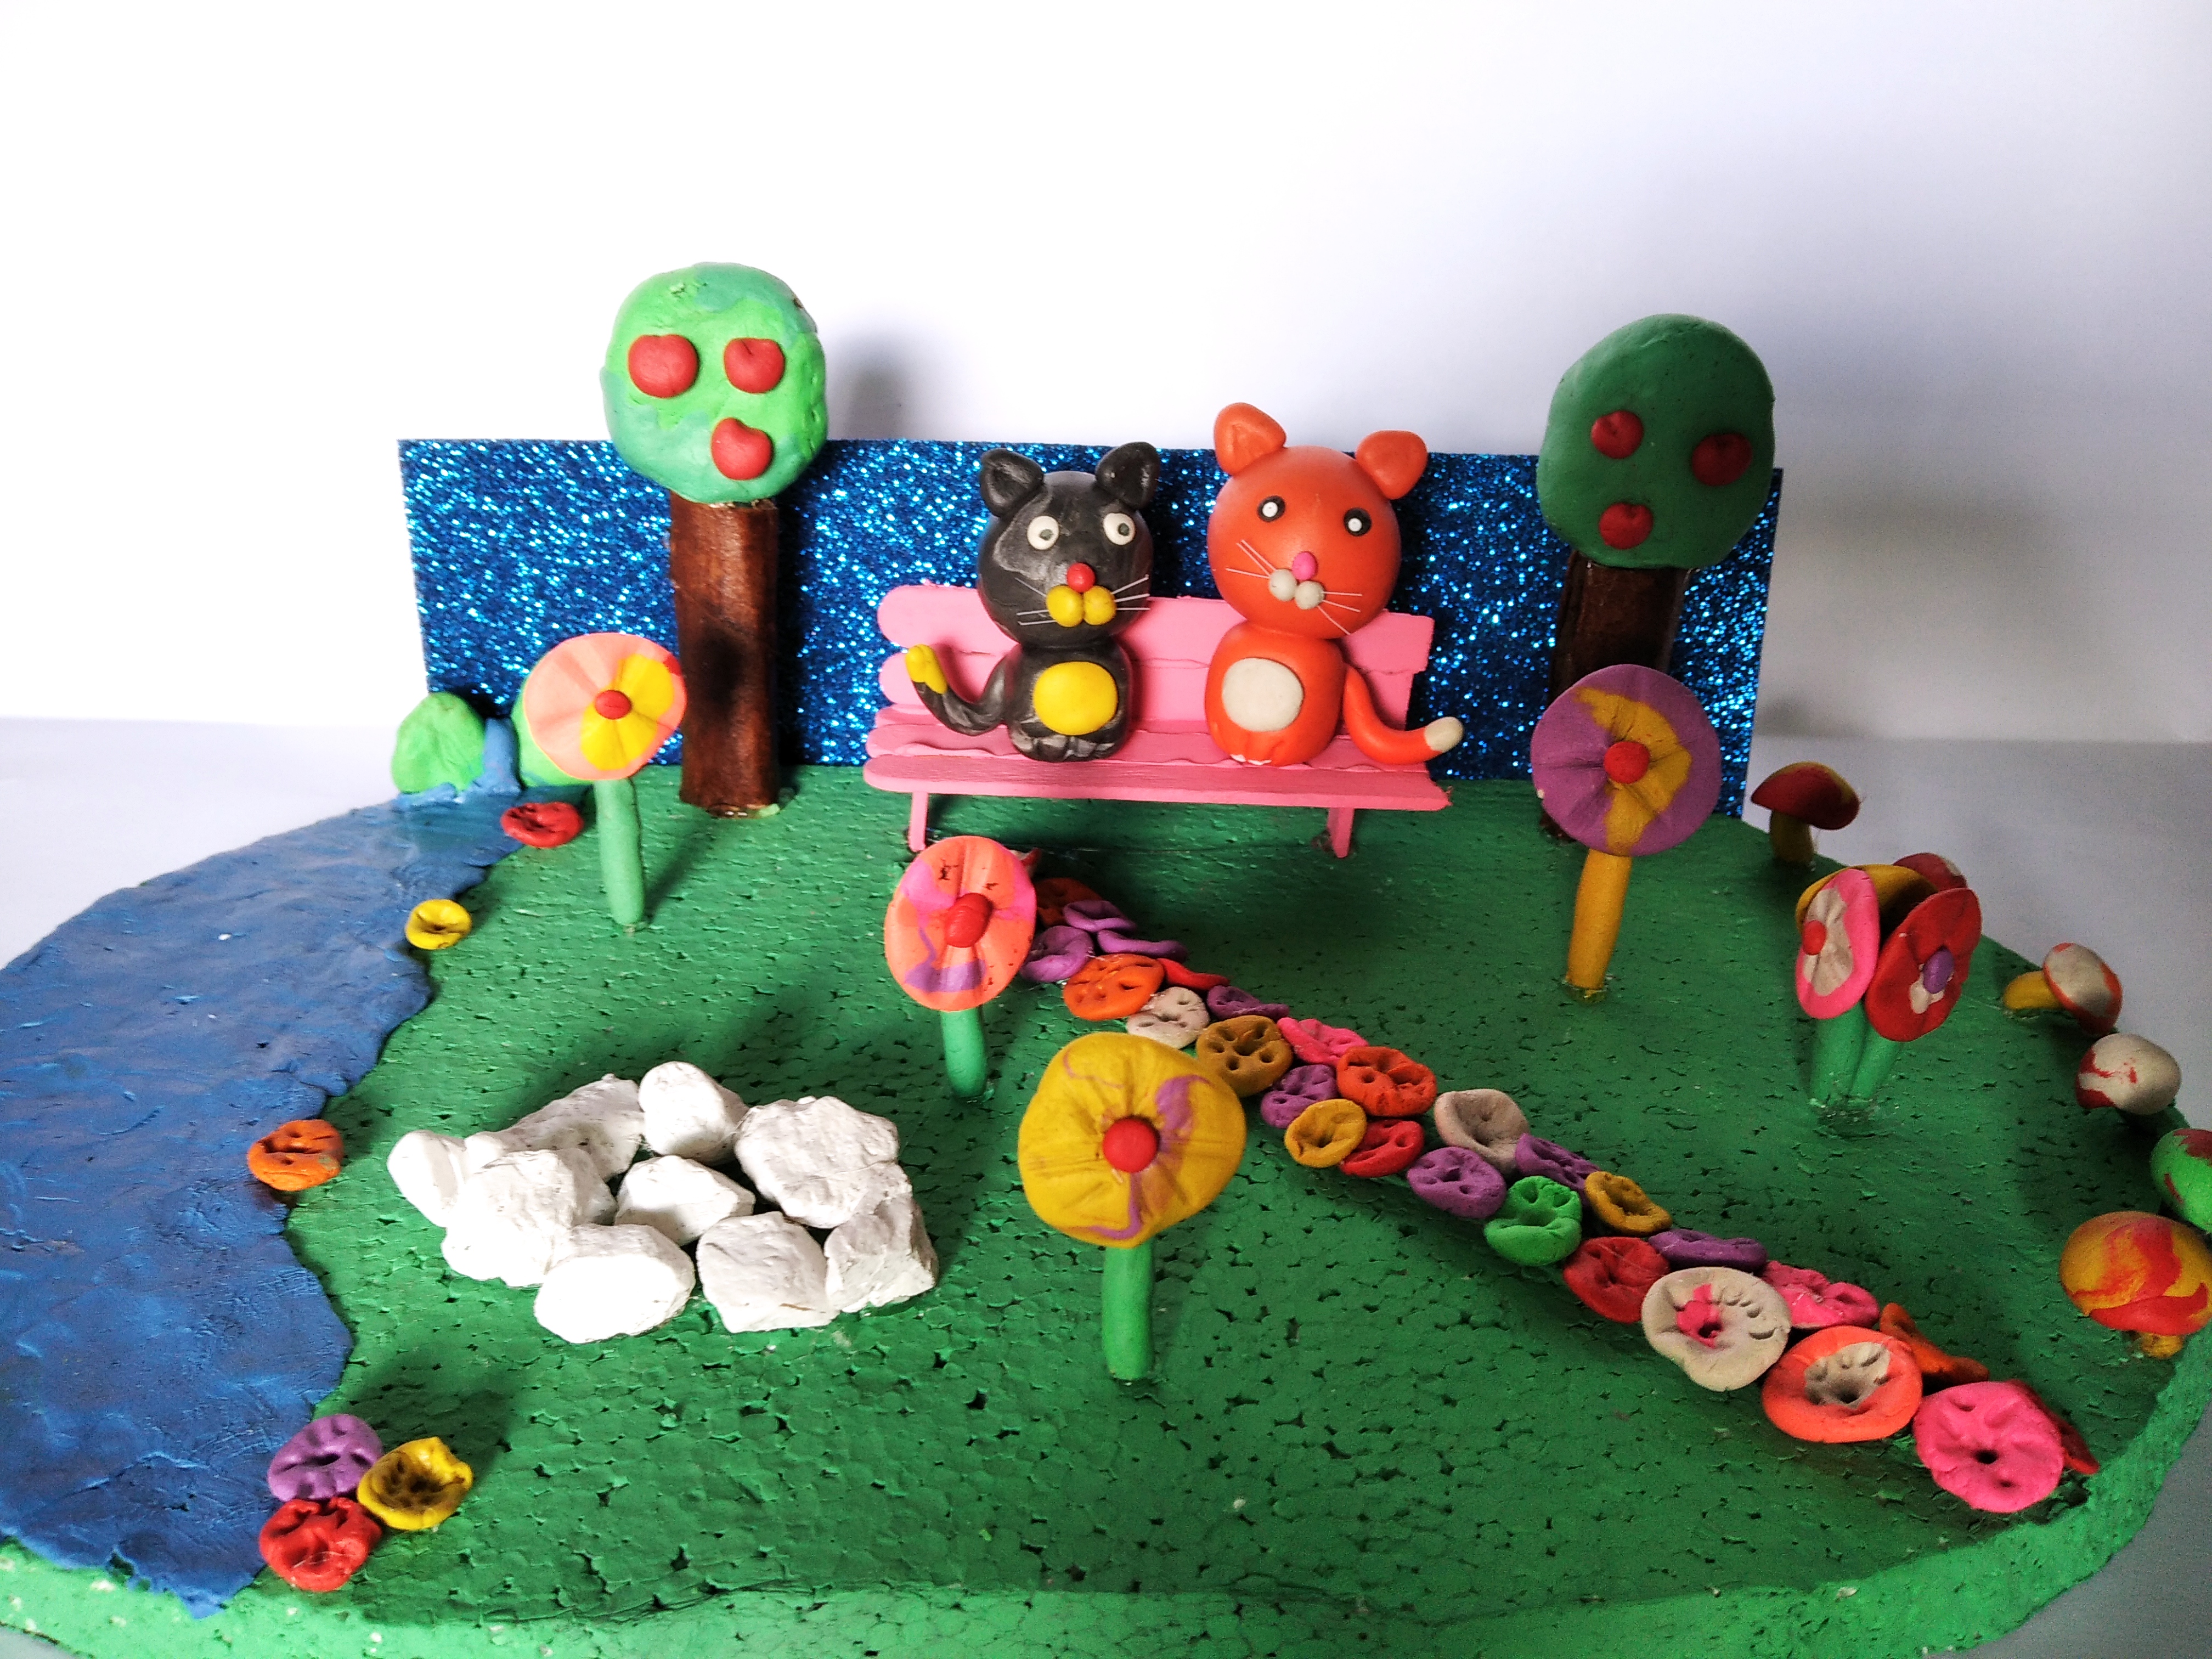
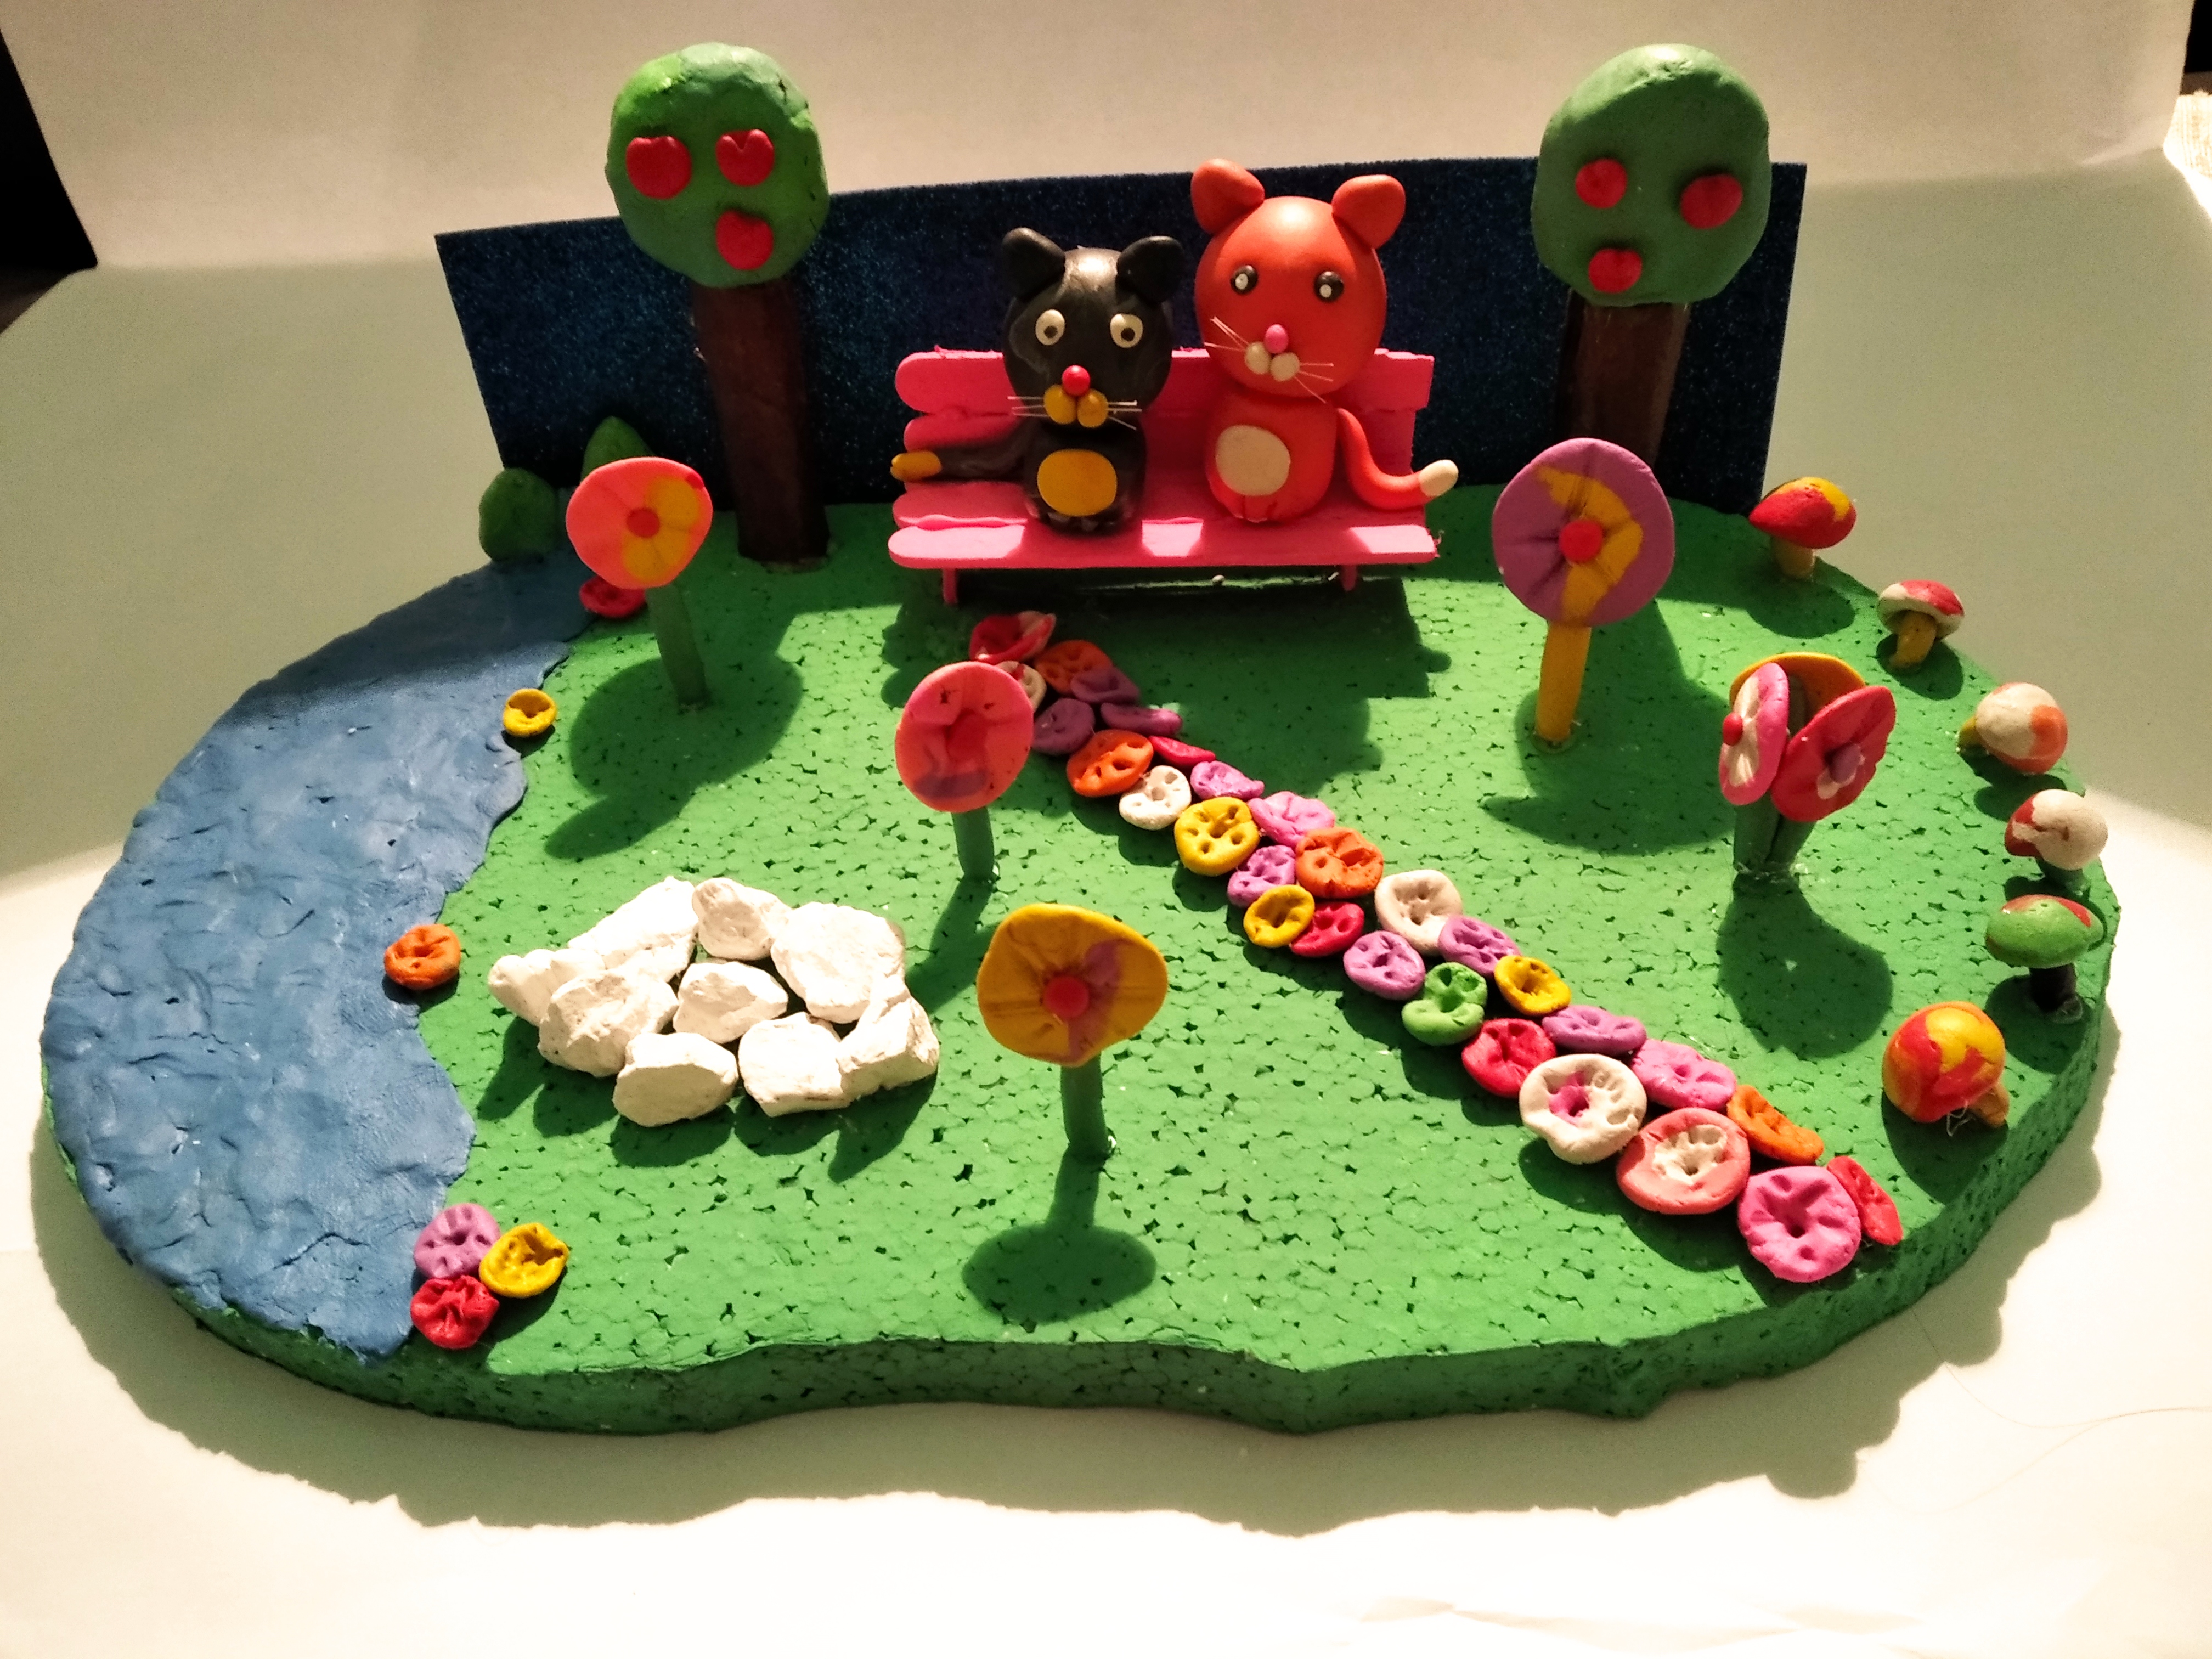
Bueno amigos creativos, ahora les contaré un poco sobre mi Diorama el cual está inspirado en un lindo lugar y como la creatividad no tiene límites, imaginé un hermoso lugar donde hay un río, árboles y muchas flores de todos colores, también encontramos un banquito dónde irán sentados mamá gatita y su hijito, ellos estarán allí sentados contemplando la belleza del lugar. Este diorama surgió ya que me imaginé con una de mis personas favoritas que es mi pequeña hija en un sitio así muy hermoso rodeado de naturaleza, son los sitios en los que más me agrada estar.
Well creative friends, now I will tell you a little about my Diorama which is inspired by a beautiful place and since creativity has no limits, I imagined a beautiful place where there is a river, trees and many flowers of all colors, we also found a stool where the mother cat and her son will sit, they will be sitting there contemplating the beauty of the place. This diorama came about because I imagined myself with one of my favorite people who is my little daughter in a very beautiful place surrounded by nature, these are the places where I like to be the most.
Veamos los materiales que he usado para este lindo diorama inspirado en "Mamá gatita y su hijito".
Let's take a look at the materials I used for this cute diorama inspired by "Mummy Kitten and Her Little Boy".
Materiales:
Materials:
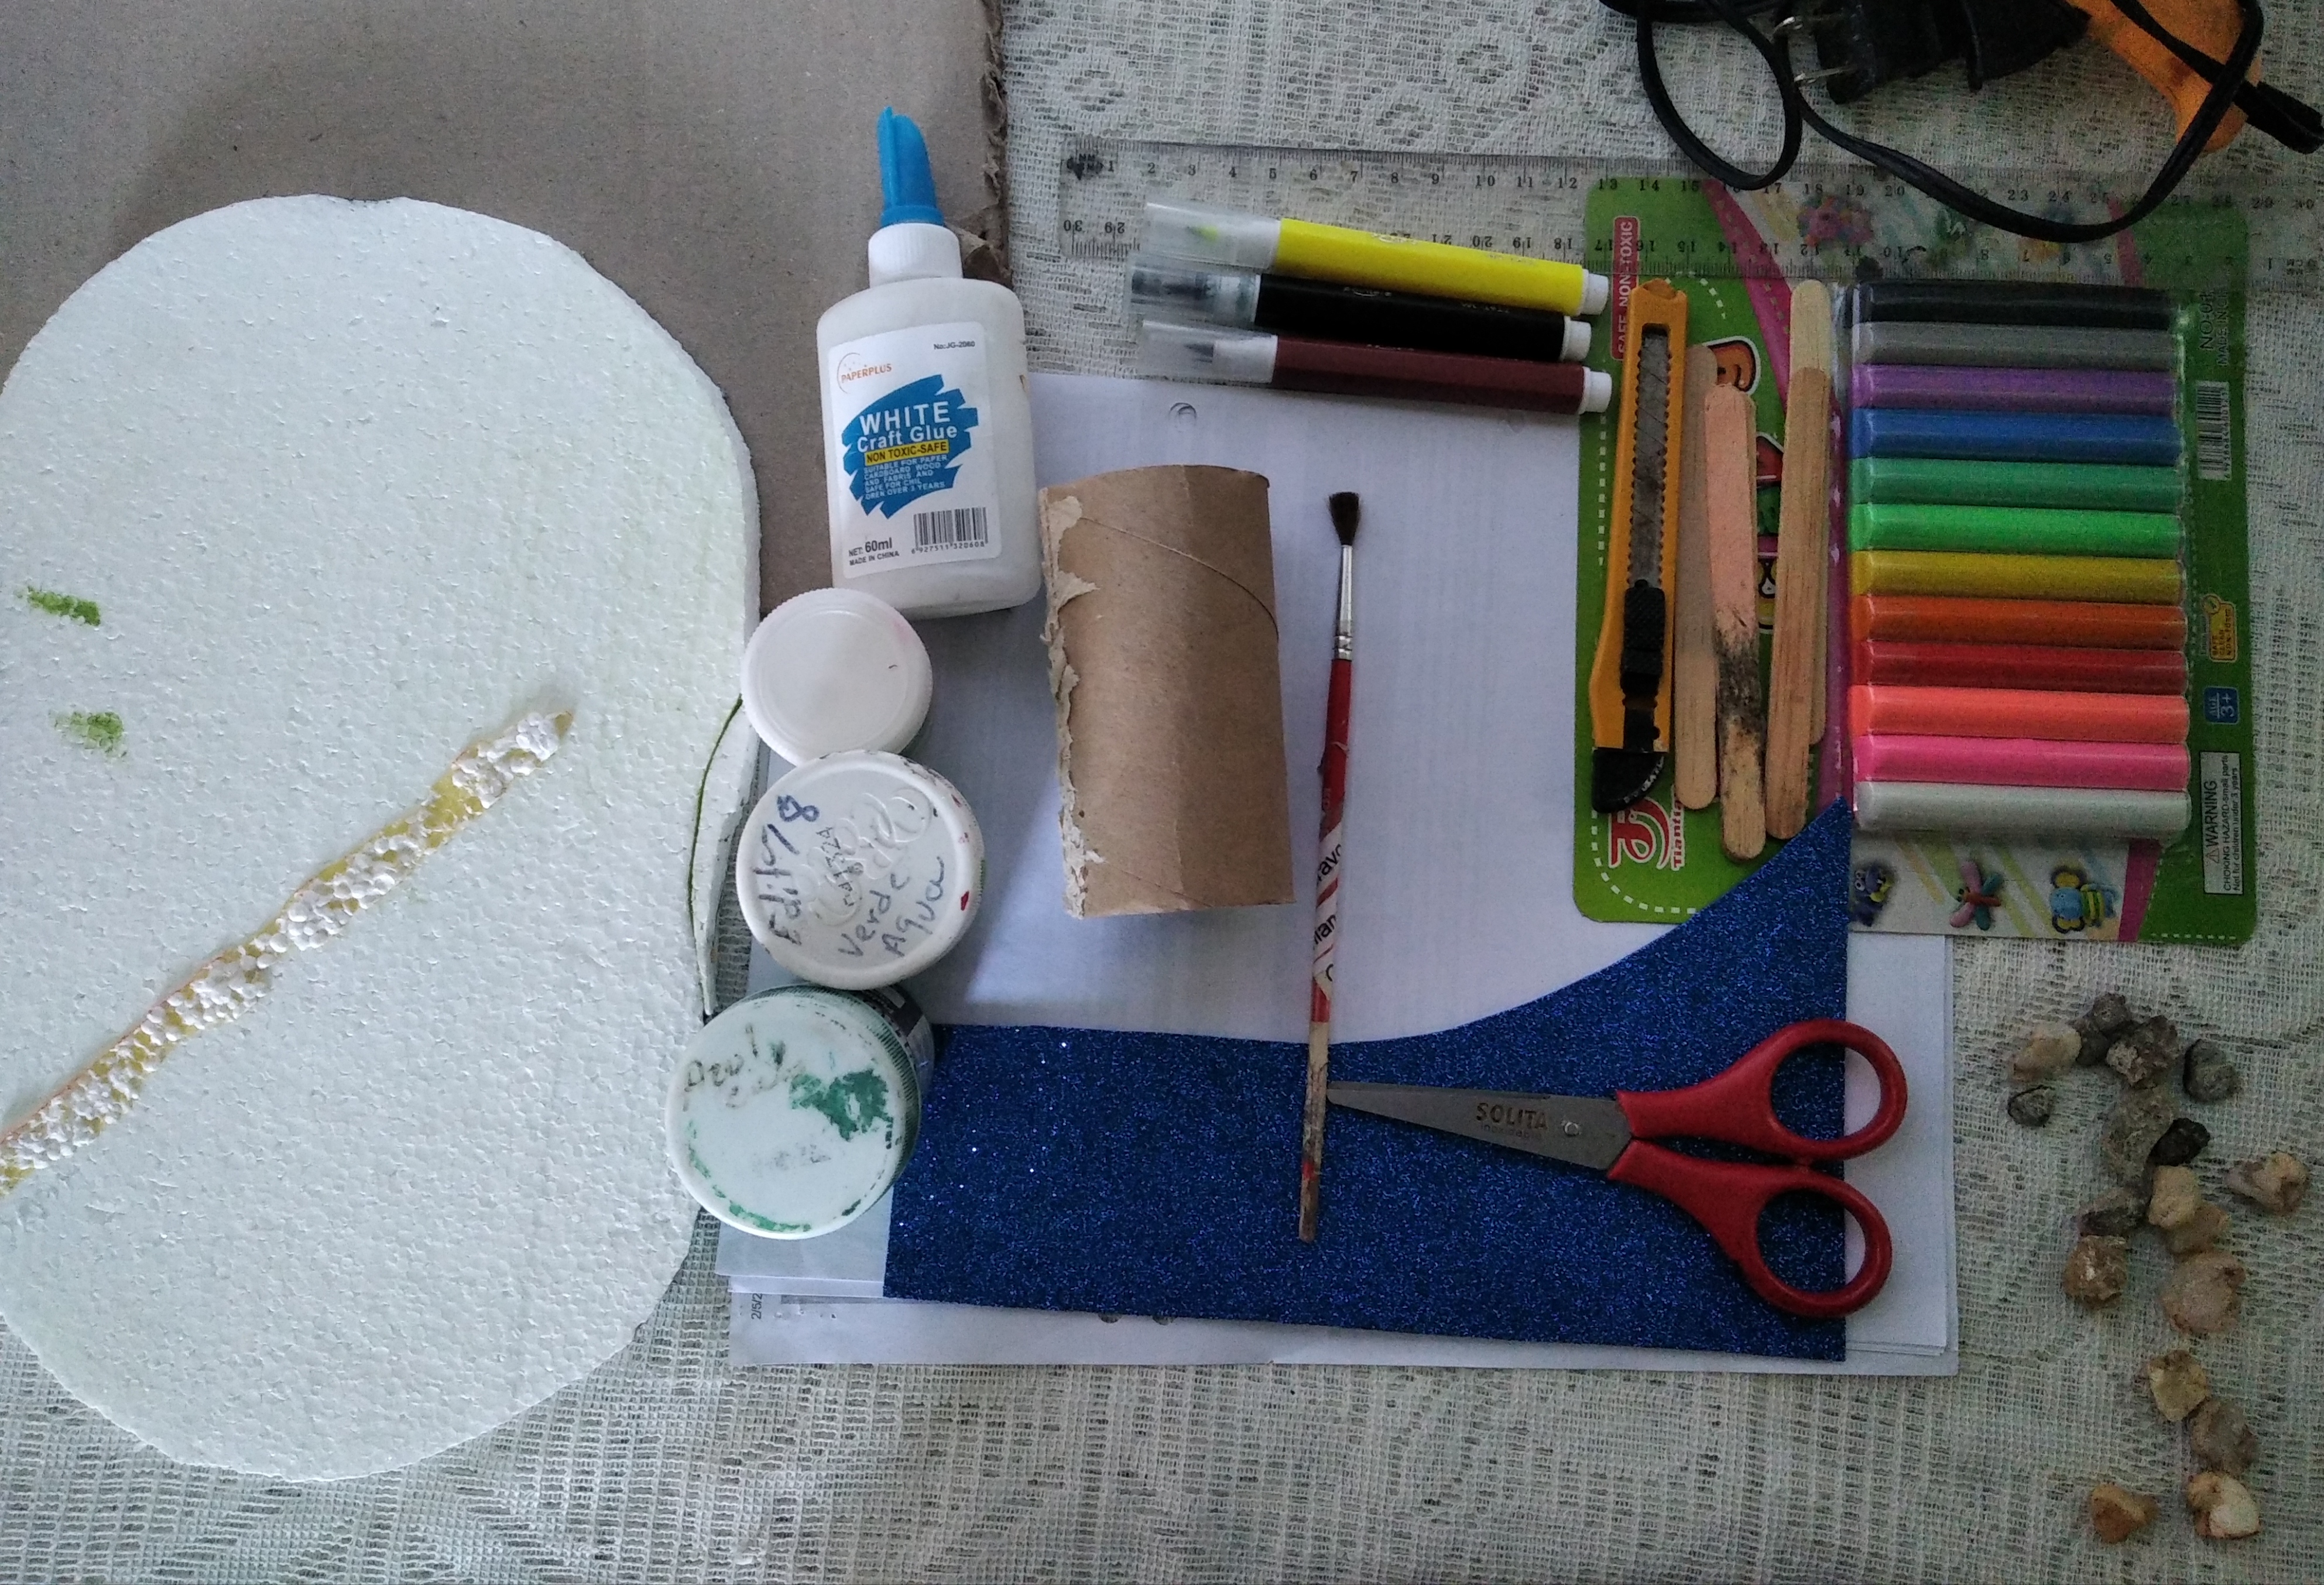
🐈 Plastilina.
🐈 Pinturas acrílico verde, blanca, roja, marrón.
🐈 Anime reusable.
🐈 Tijera.
🐈 Silicón en barra.
🐈 Pistola de silicón.
🐈 Pincel.
🐈Foami azul escarchado.
🐈 Rollo de papel higiénico.
🐈 Paletas de madera.
🐈 Lápiz de grafito.
🐈 Palitos de altura.
🐈 Regla.
🐈 Plasticine.🐈 Green, white, red, brown acrylic paints.🐈 Anime reusable.🐈 Scissors.🐈 Silicone stick.🐈 Glue gun.🐈 Brush.🐈 Frosty Blue Foami.🐈 Toilet paper roll.🐈 Wooden pallets.🐈 Graphite pencil.🐈 Height sticks.🐈 Rule.
Pasemos al procedimiento amigos, el paso a paso de esta creación.
Let's go to the procedure friends, the step by step of this creation.
Elaboración:
Crafting:
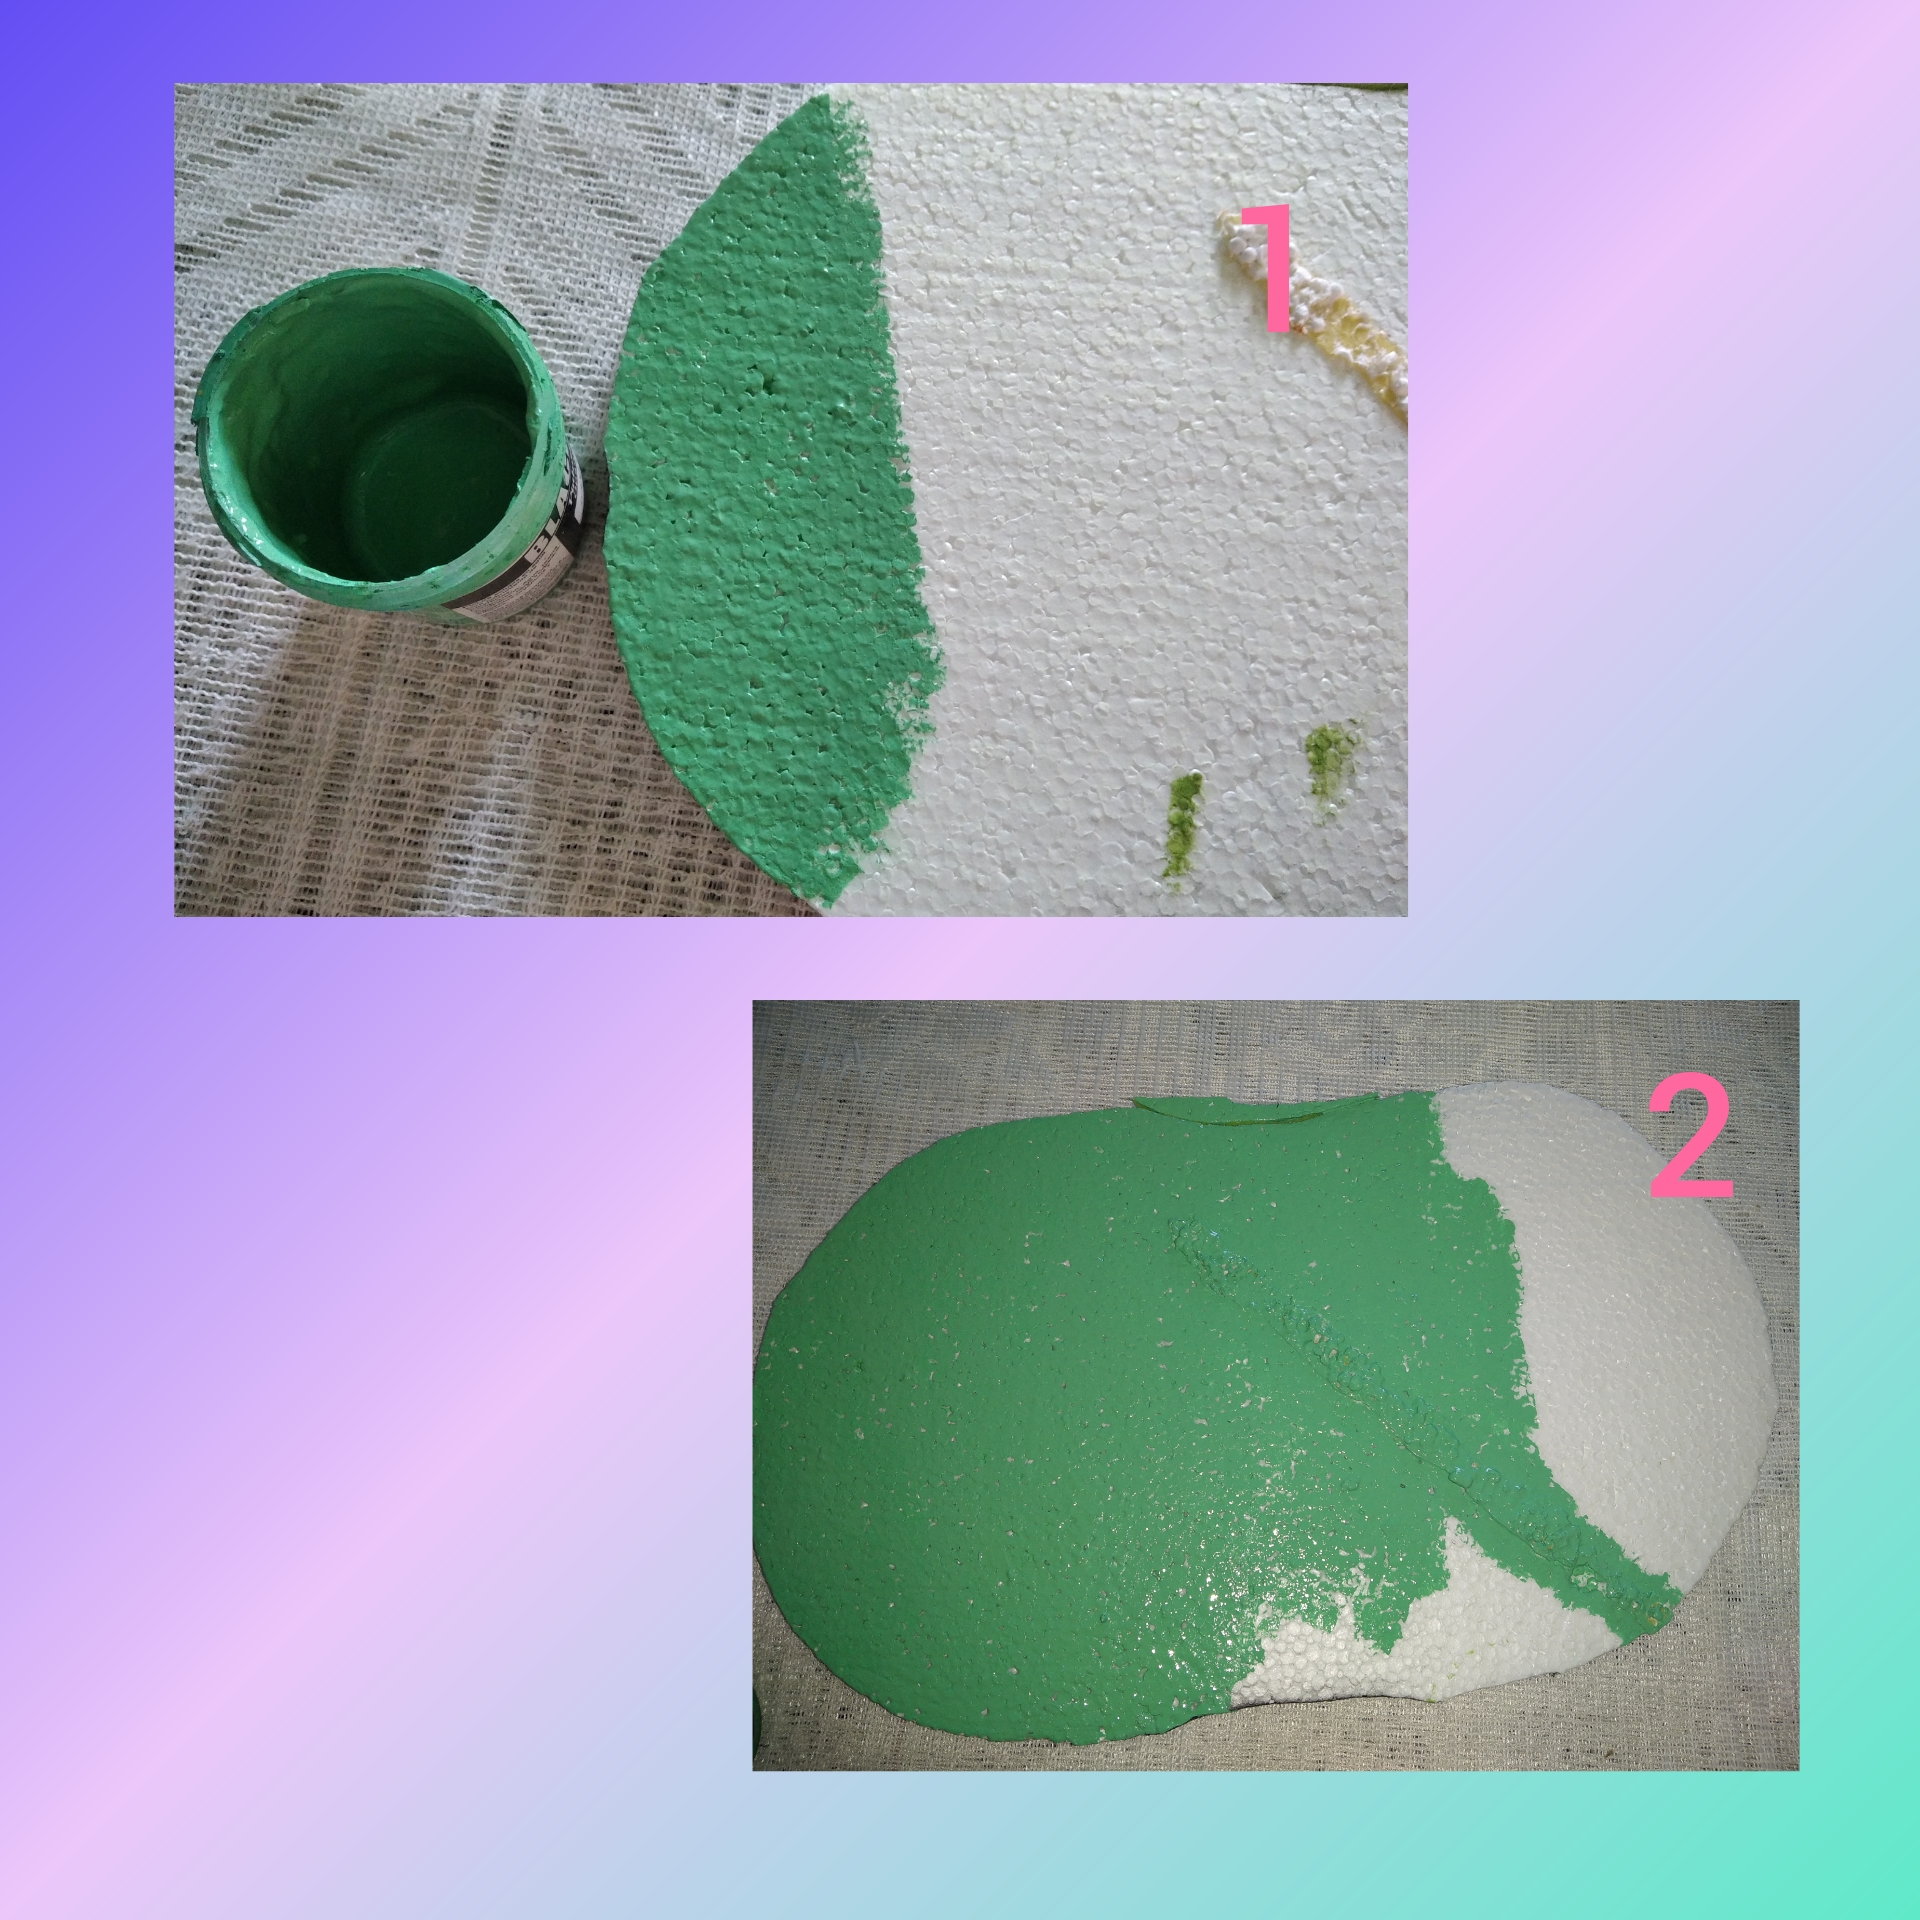
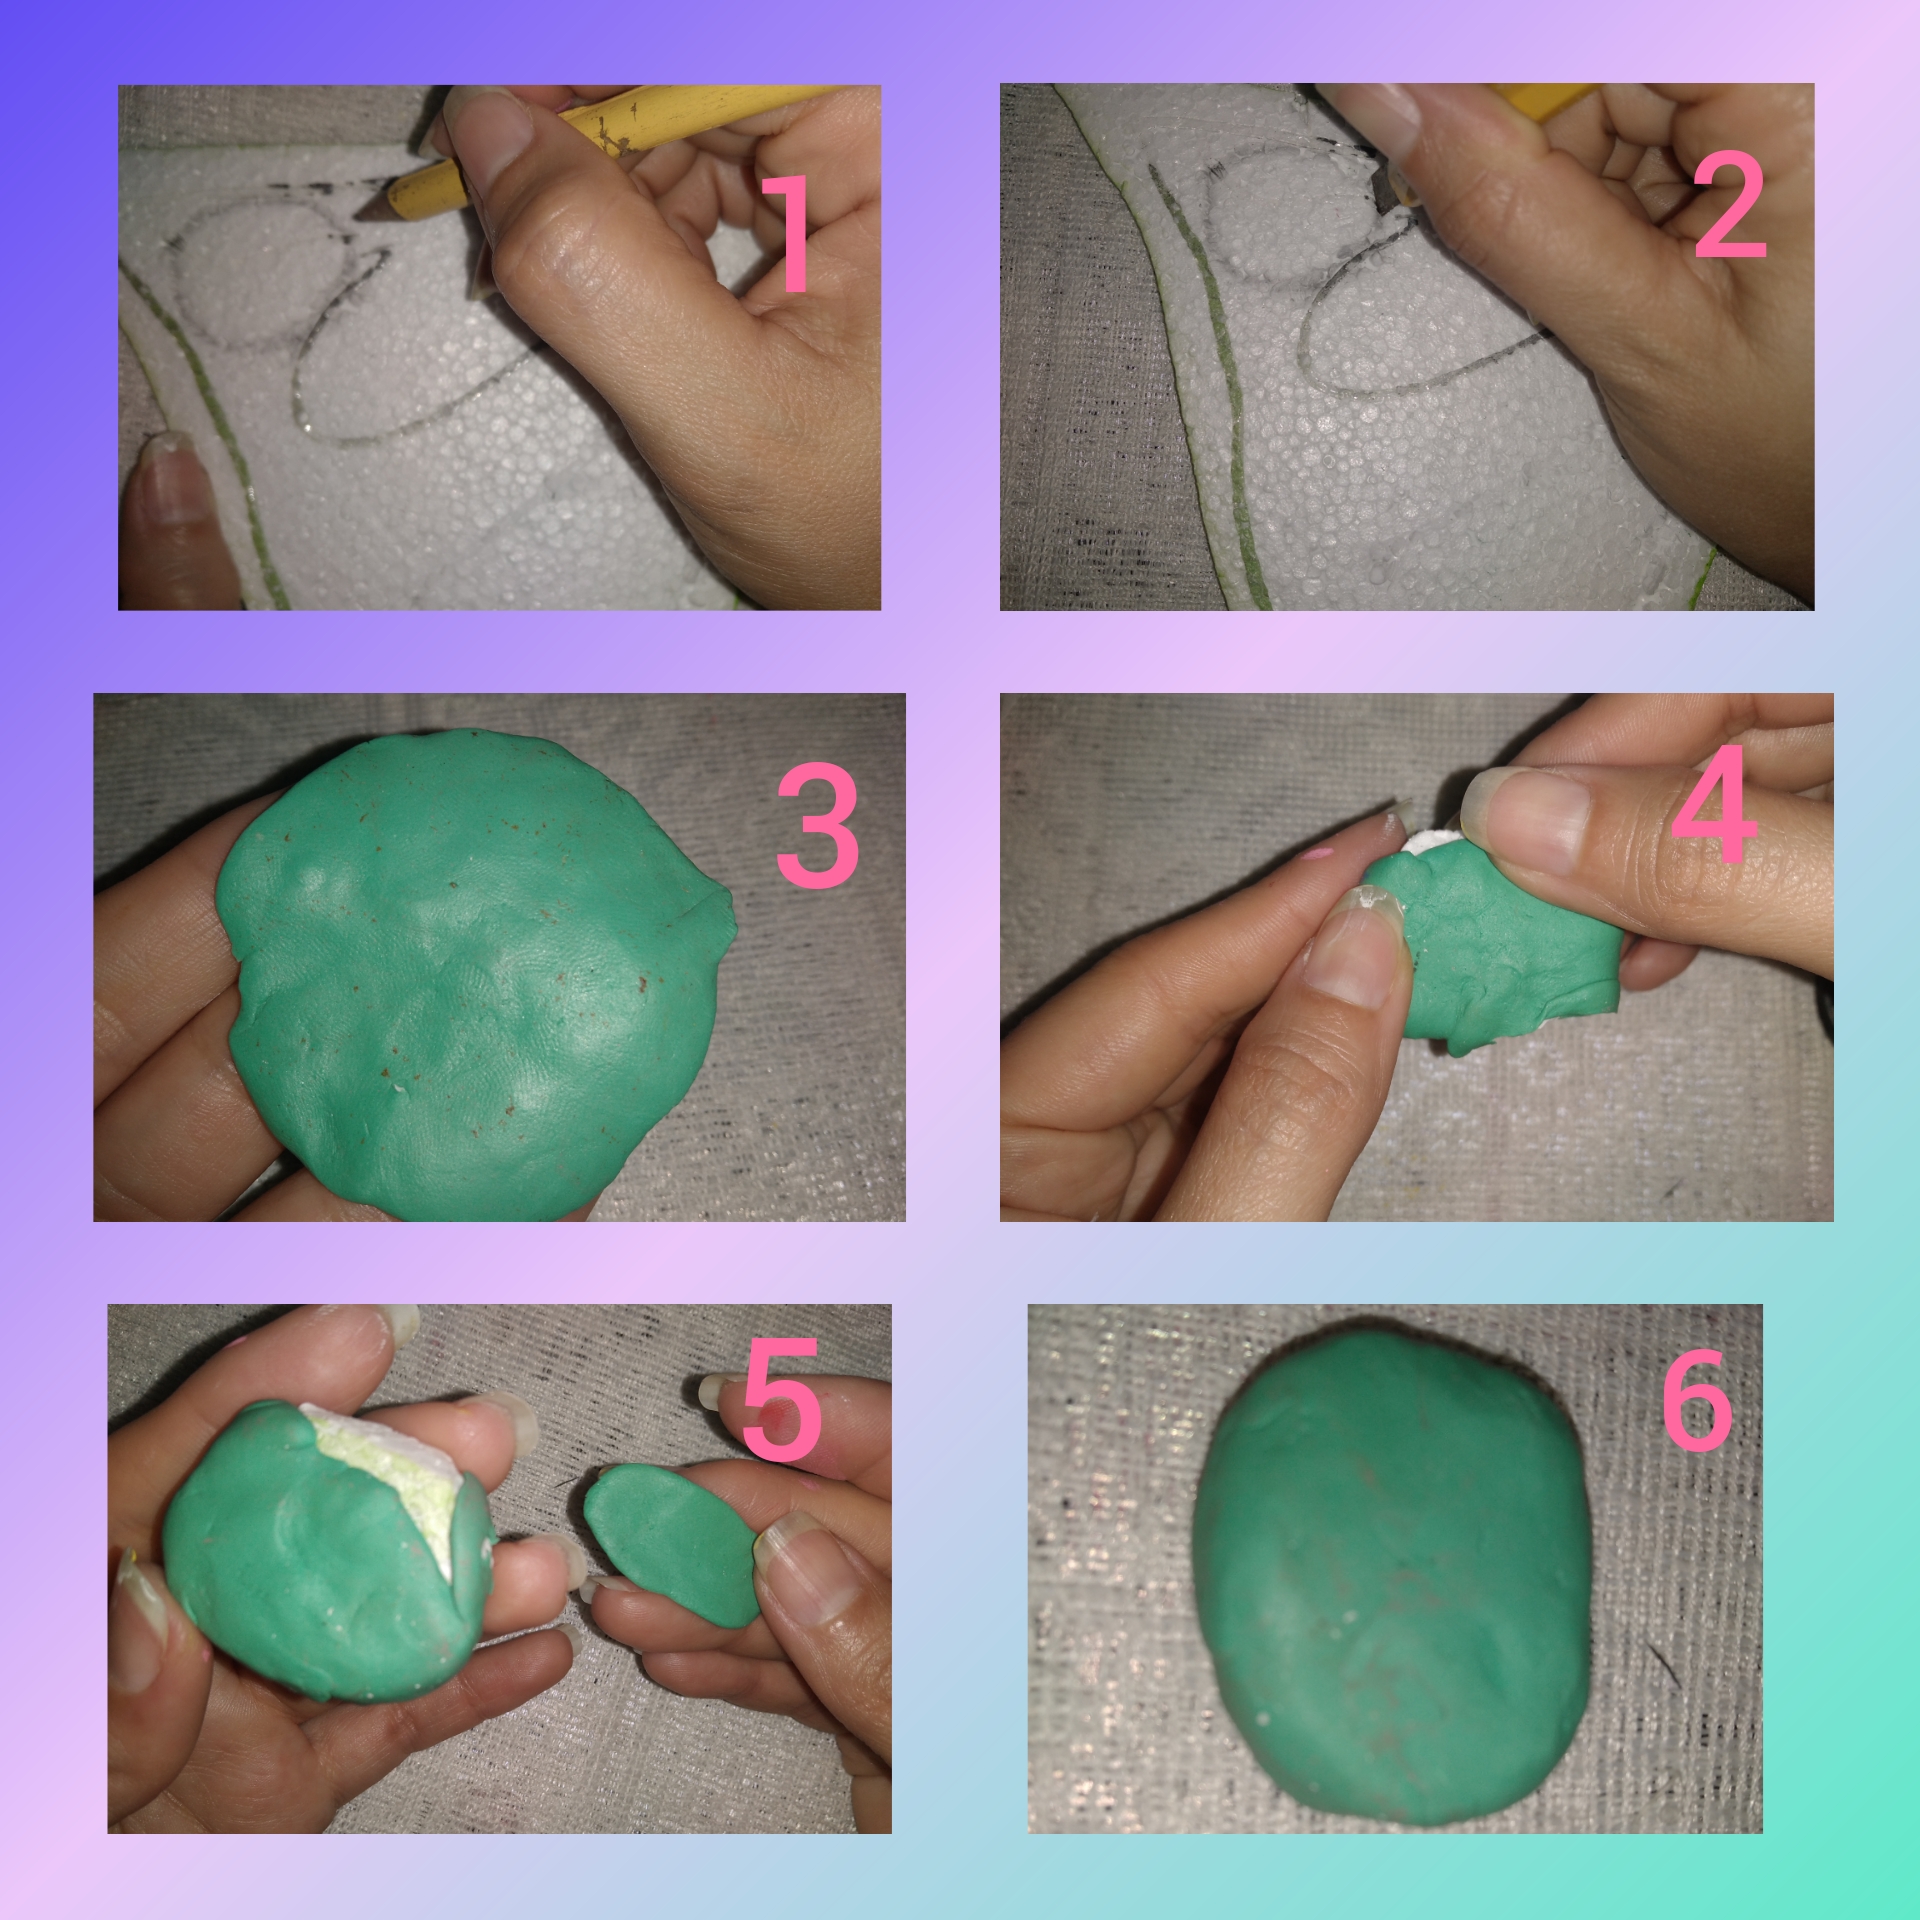
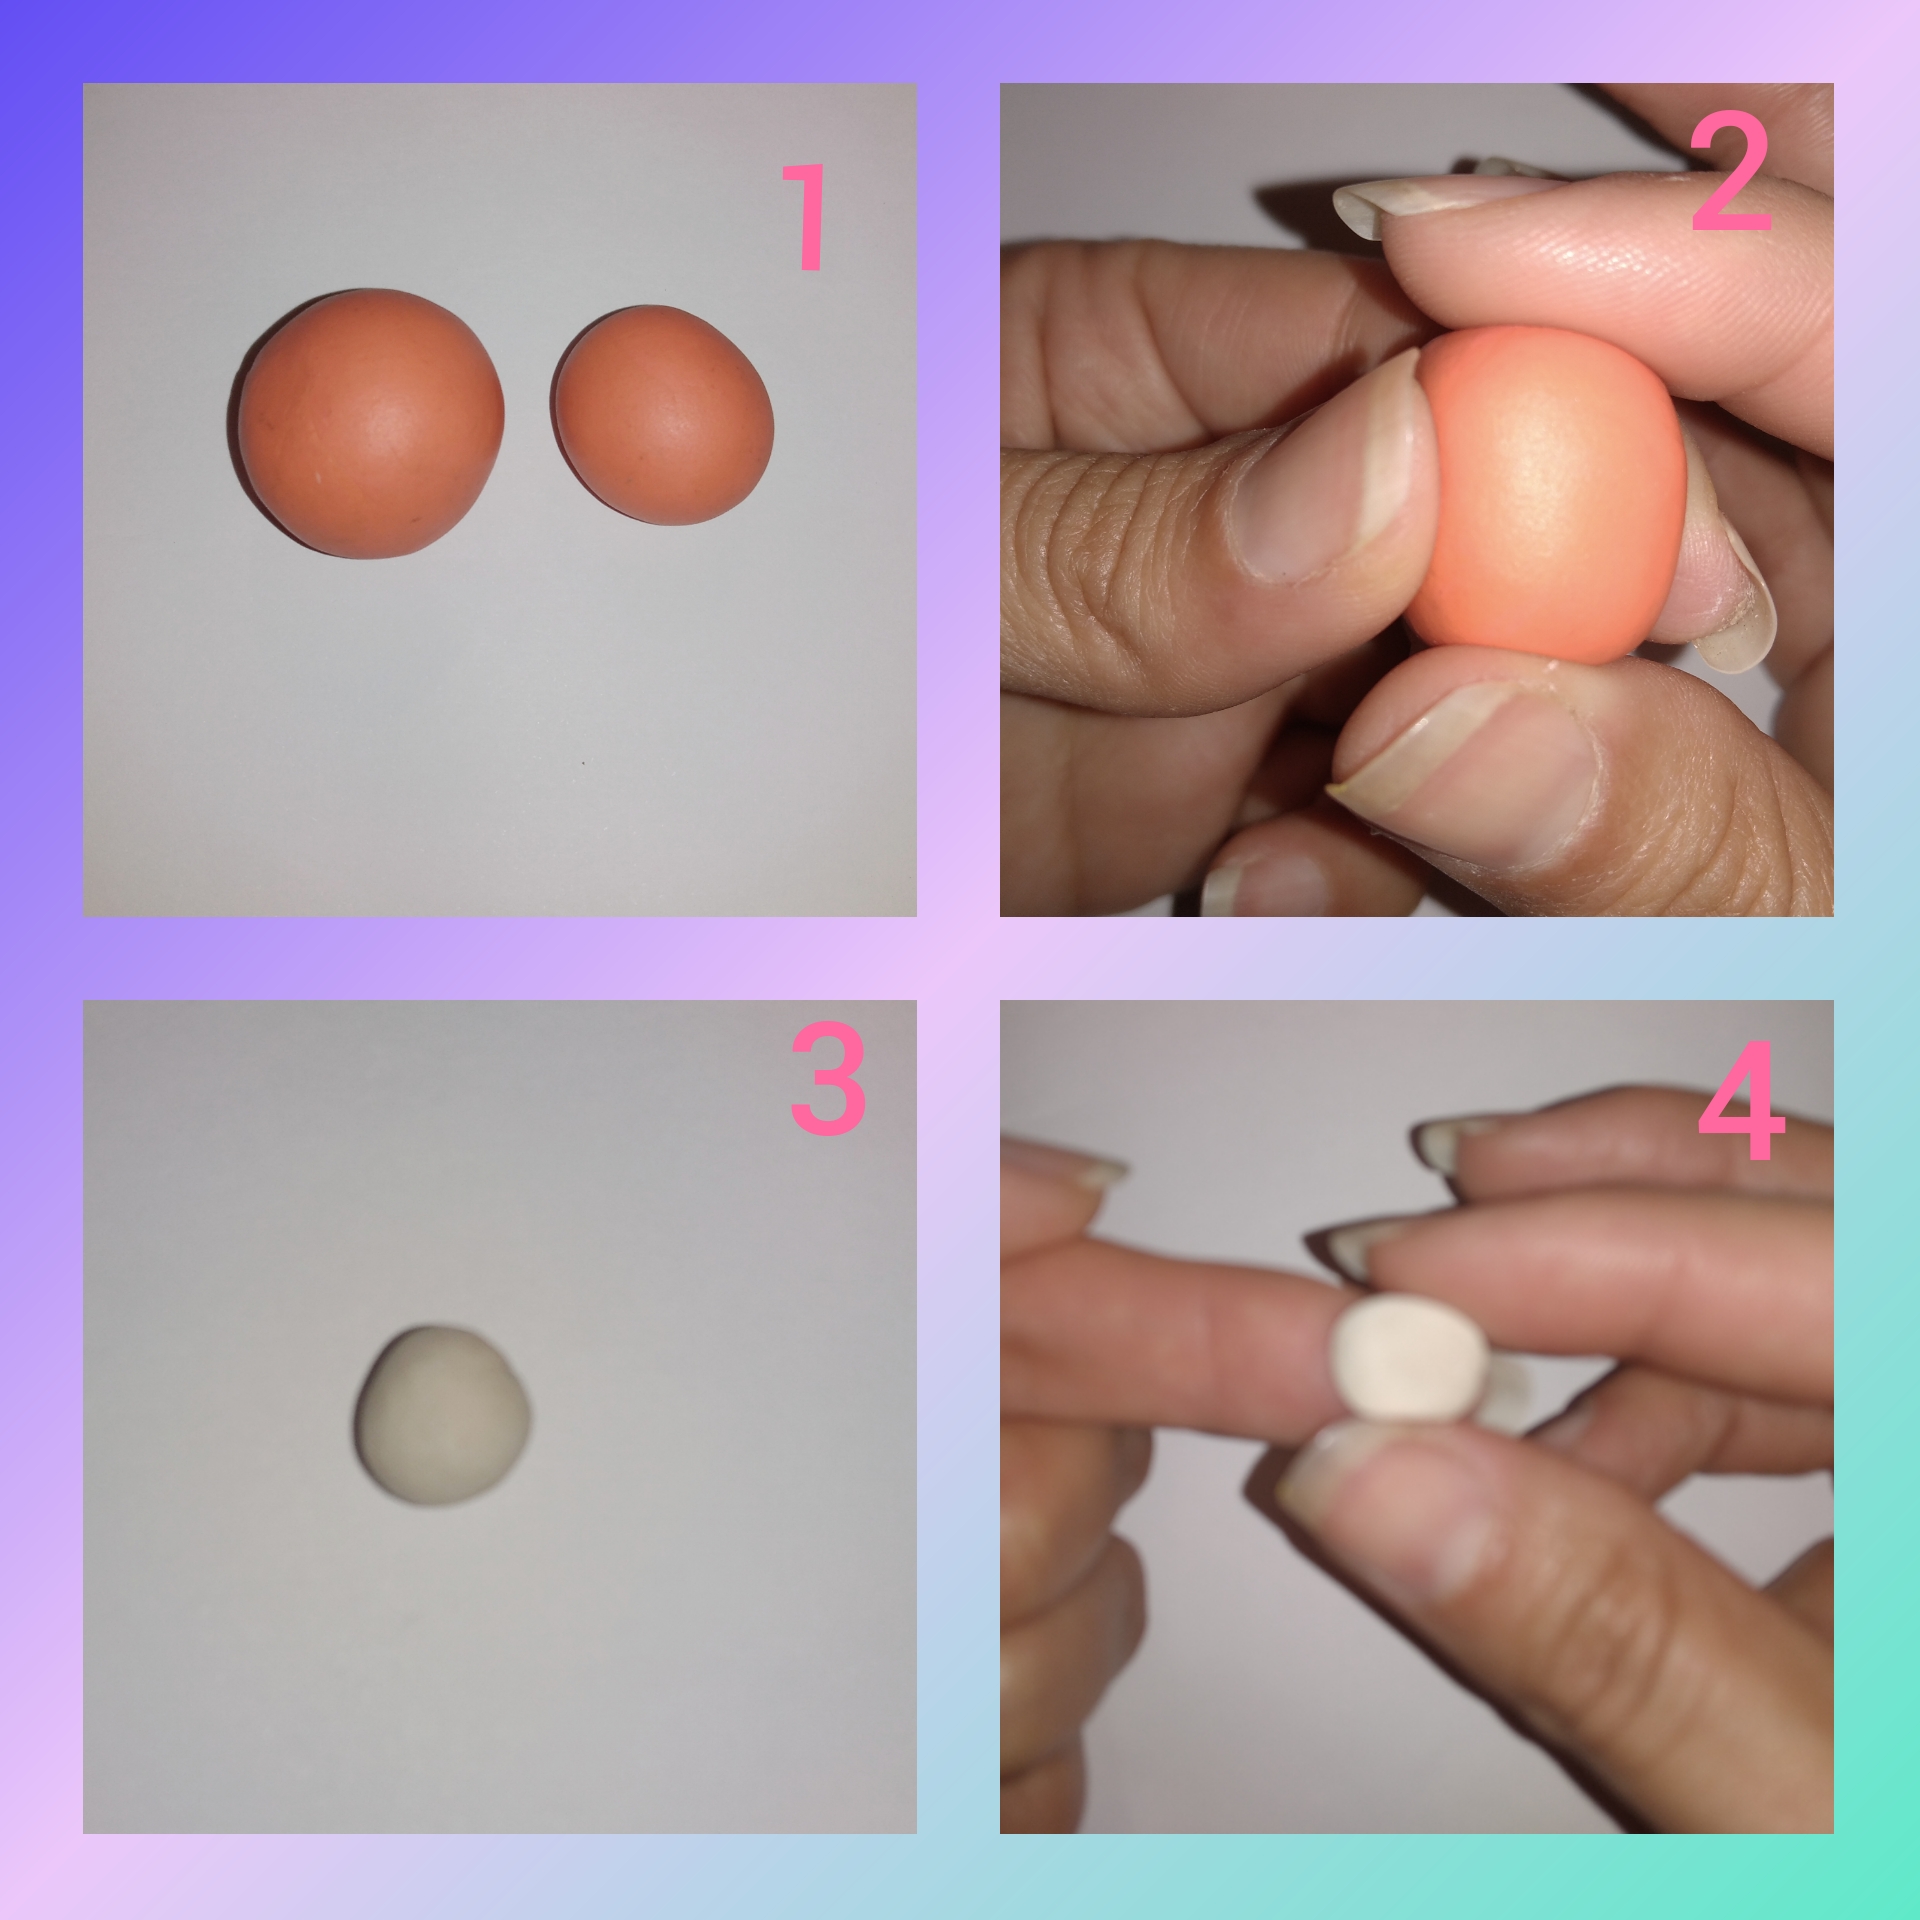
Paso 1.
Comenzamos por pintar el anime que servirá como base de este diorama, usamos anime ya que la base debe ser algo duro o resistente, que soporte el peso de los elementos que pondremos encima.
Step 1.We start by painting the anime that will serve as the base of this diorama, we use anime since the base must be something hard or resistant, that supports the weight of the elements that we will put on it.
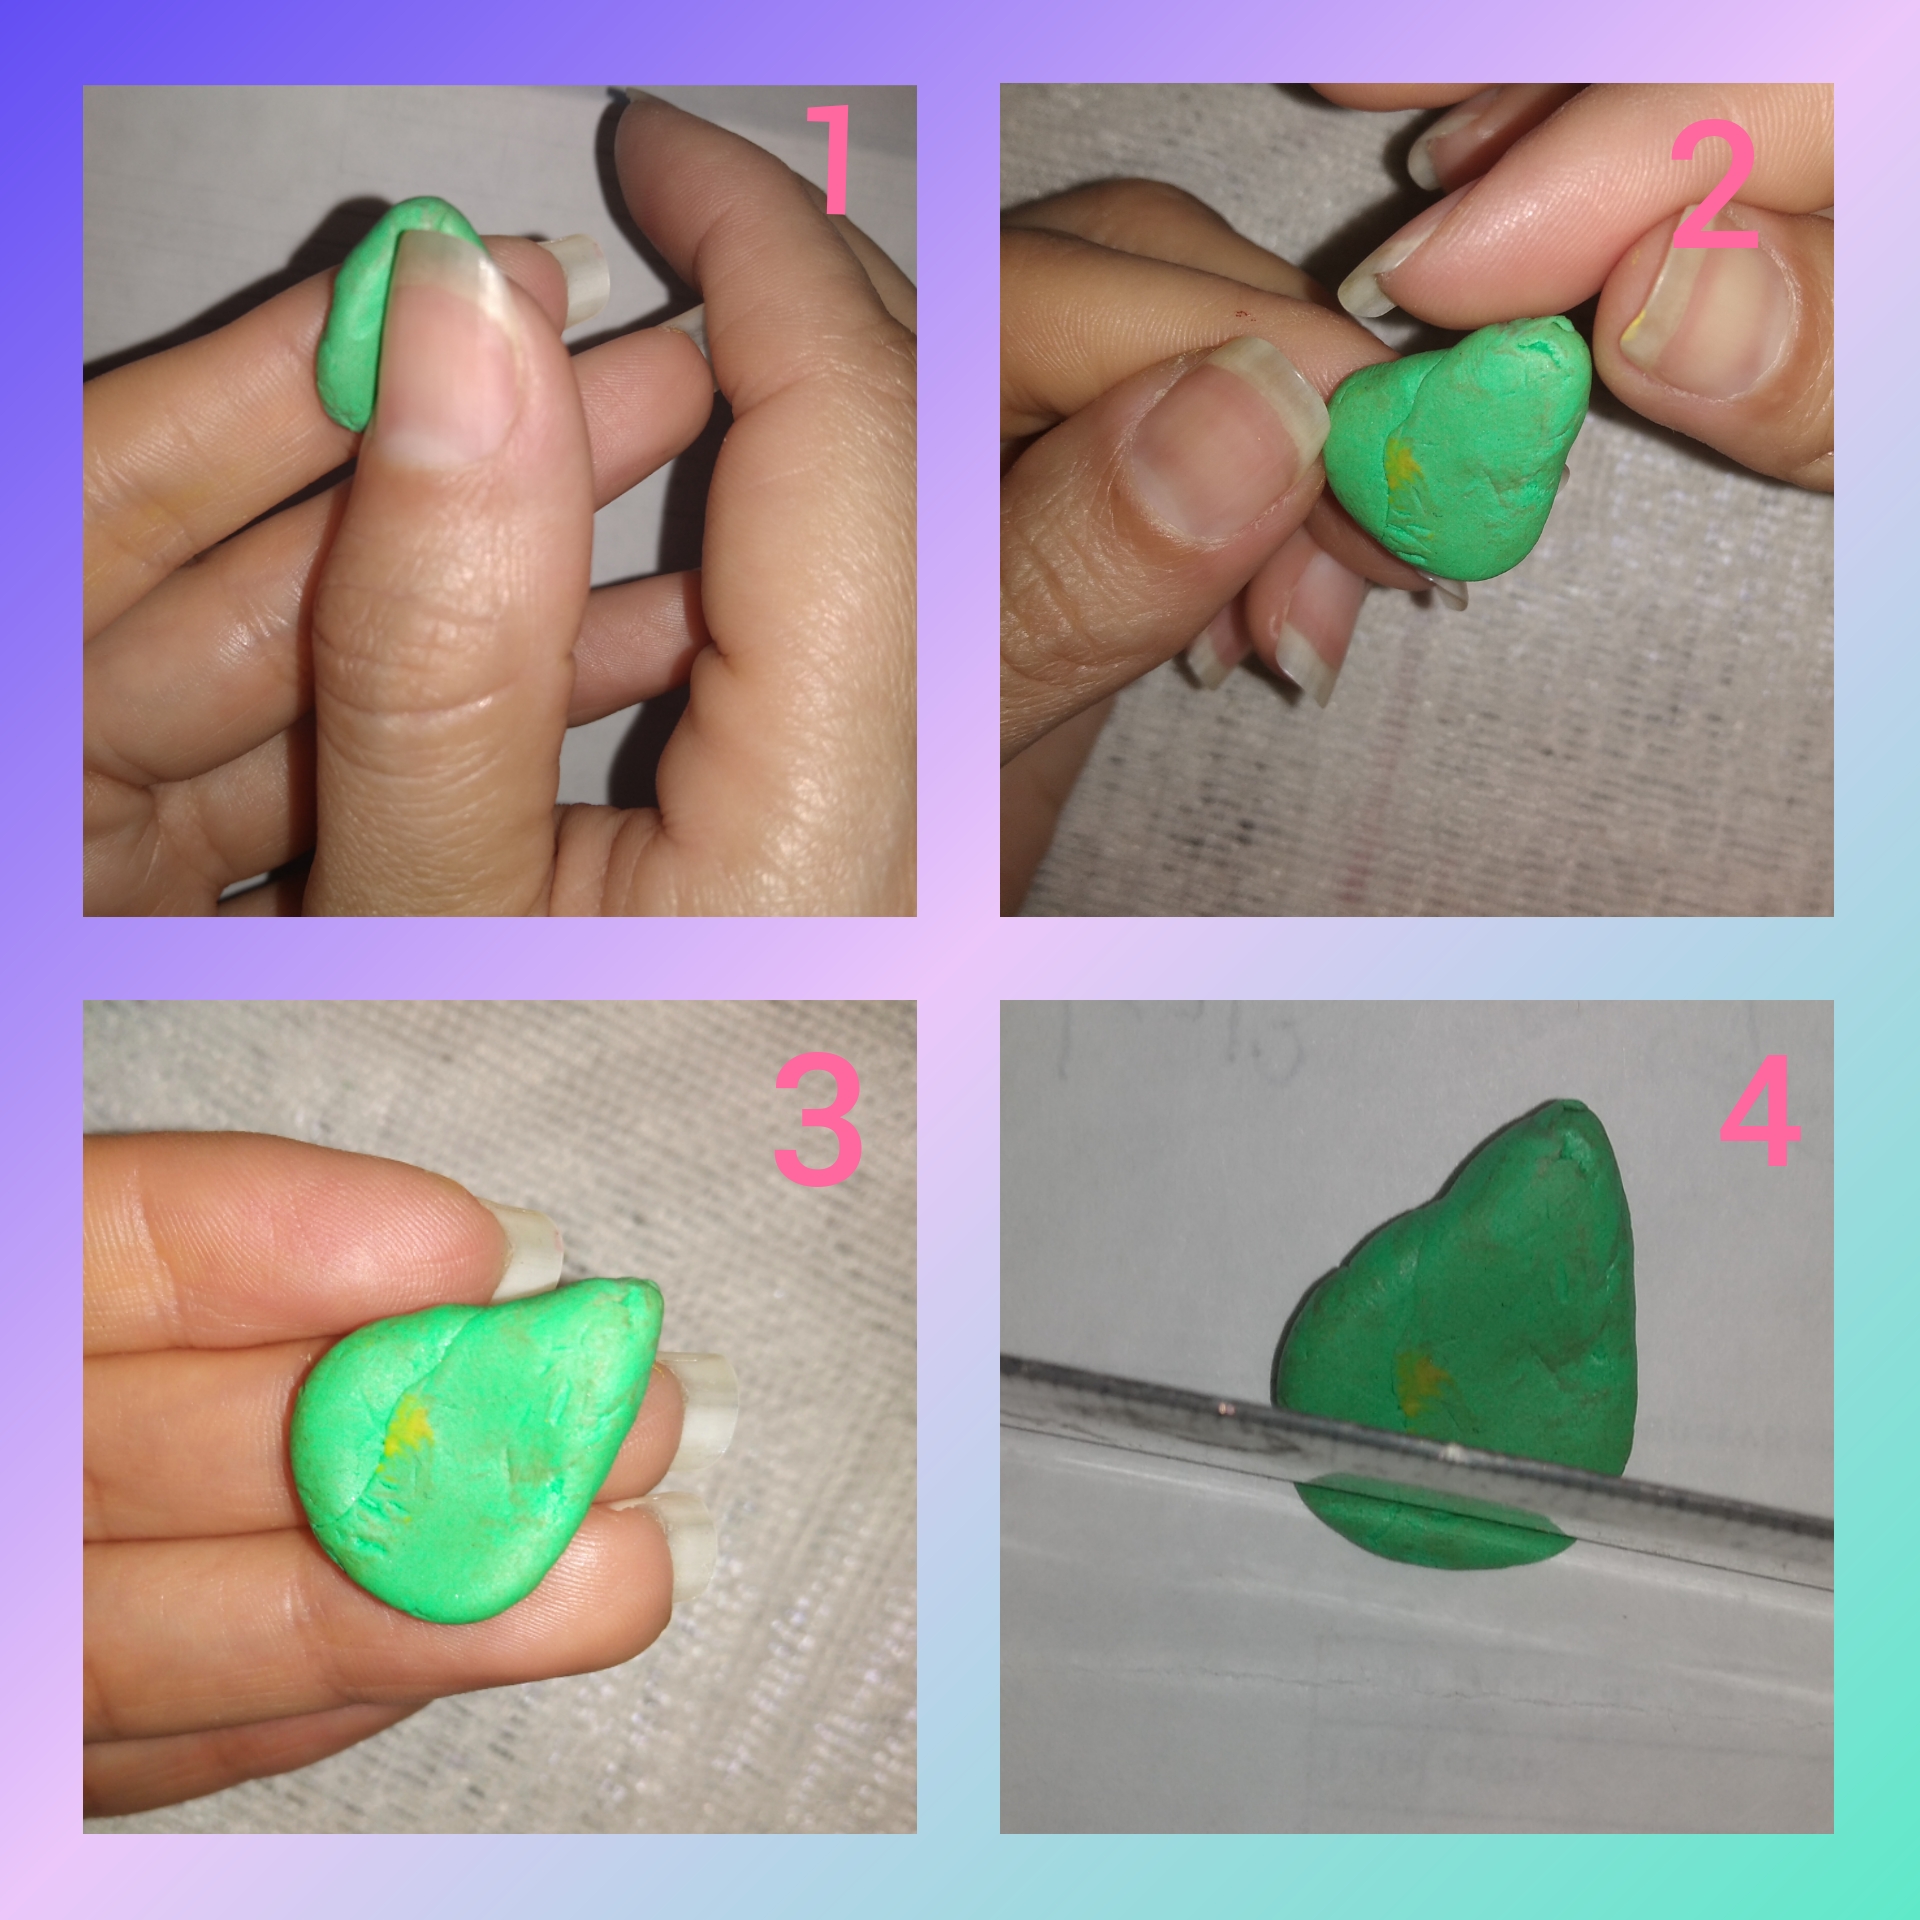
Paso 2.
Tomé la plastilina verde y con mis manos fuí moldeando en forma de montaña, luego con la regla retire la parte de abajo que hacía ver la montaña ovalada y de esta manera quedó más recta.
Step 2.>I took the green plasticine and with my hands I molded it into a mountain shape, then with the ruler I removed the bottom part that made the oval mountain look and in this way it was straighter.
Paso 3.
Ahora vamos a hacer el río, para el cual tomé un trozo de plastilina azul y la aplasté con mis dedos y luego fuí uniendo al anime, también uni las montañas a la punta del río y allí coloqué un palito de plastilina azul para parecer que el río sale desde las montañas.
Step 3.Now we are going to make the river, for which I took a piece of blue plasticine and crushed it with my fingers and then I joined the anime, I also joined the mountains to the point of the river and there I placed a stick of blue plasticine to make it look like the river comes out of the mountains.
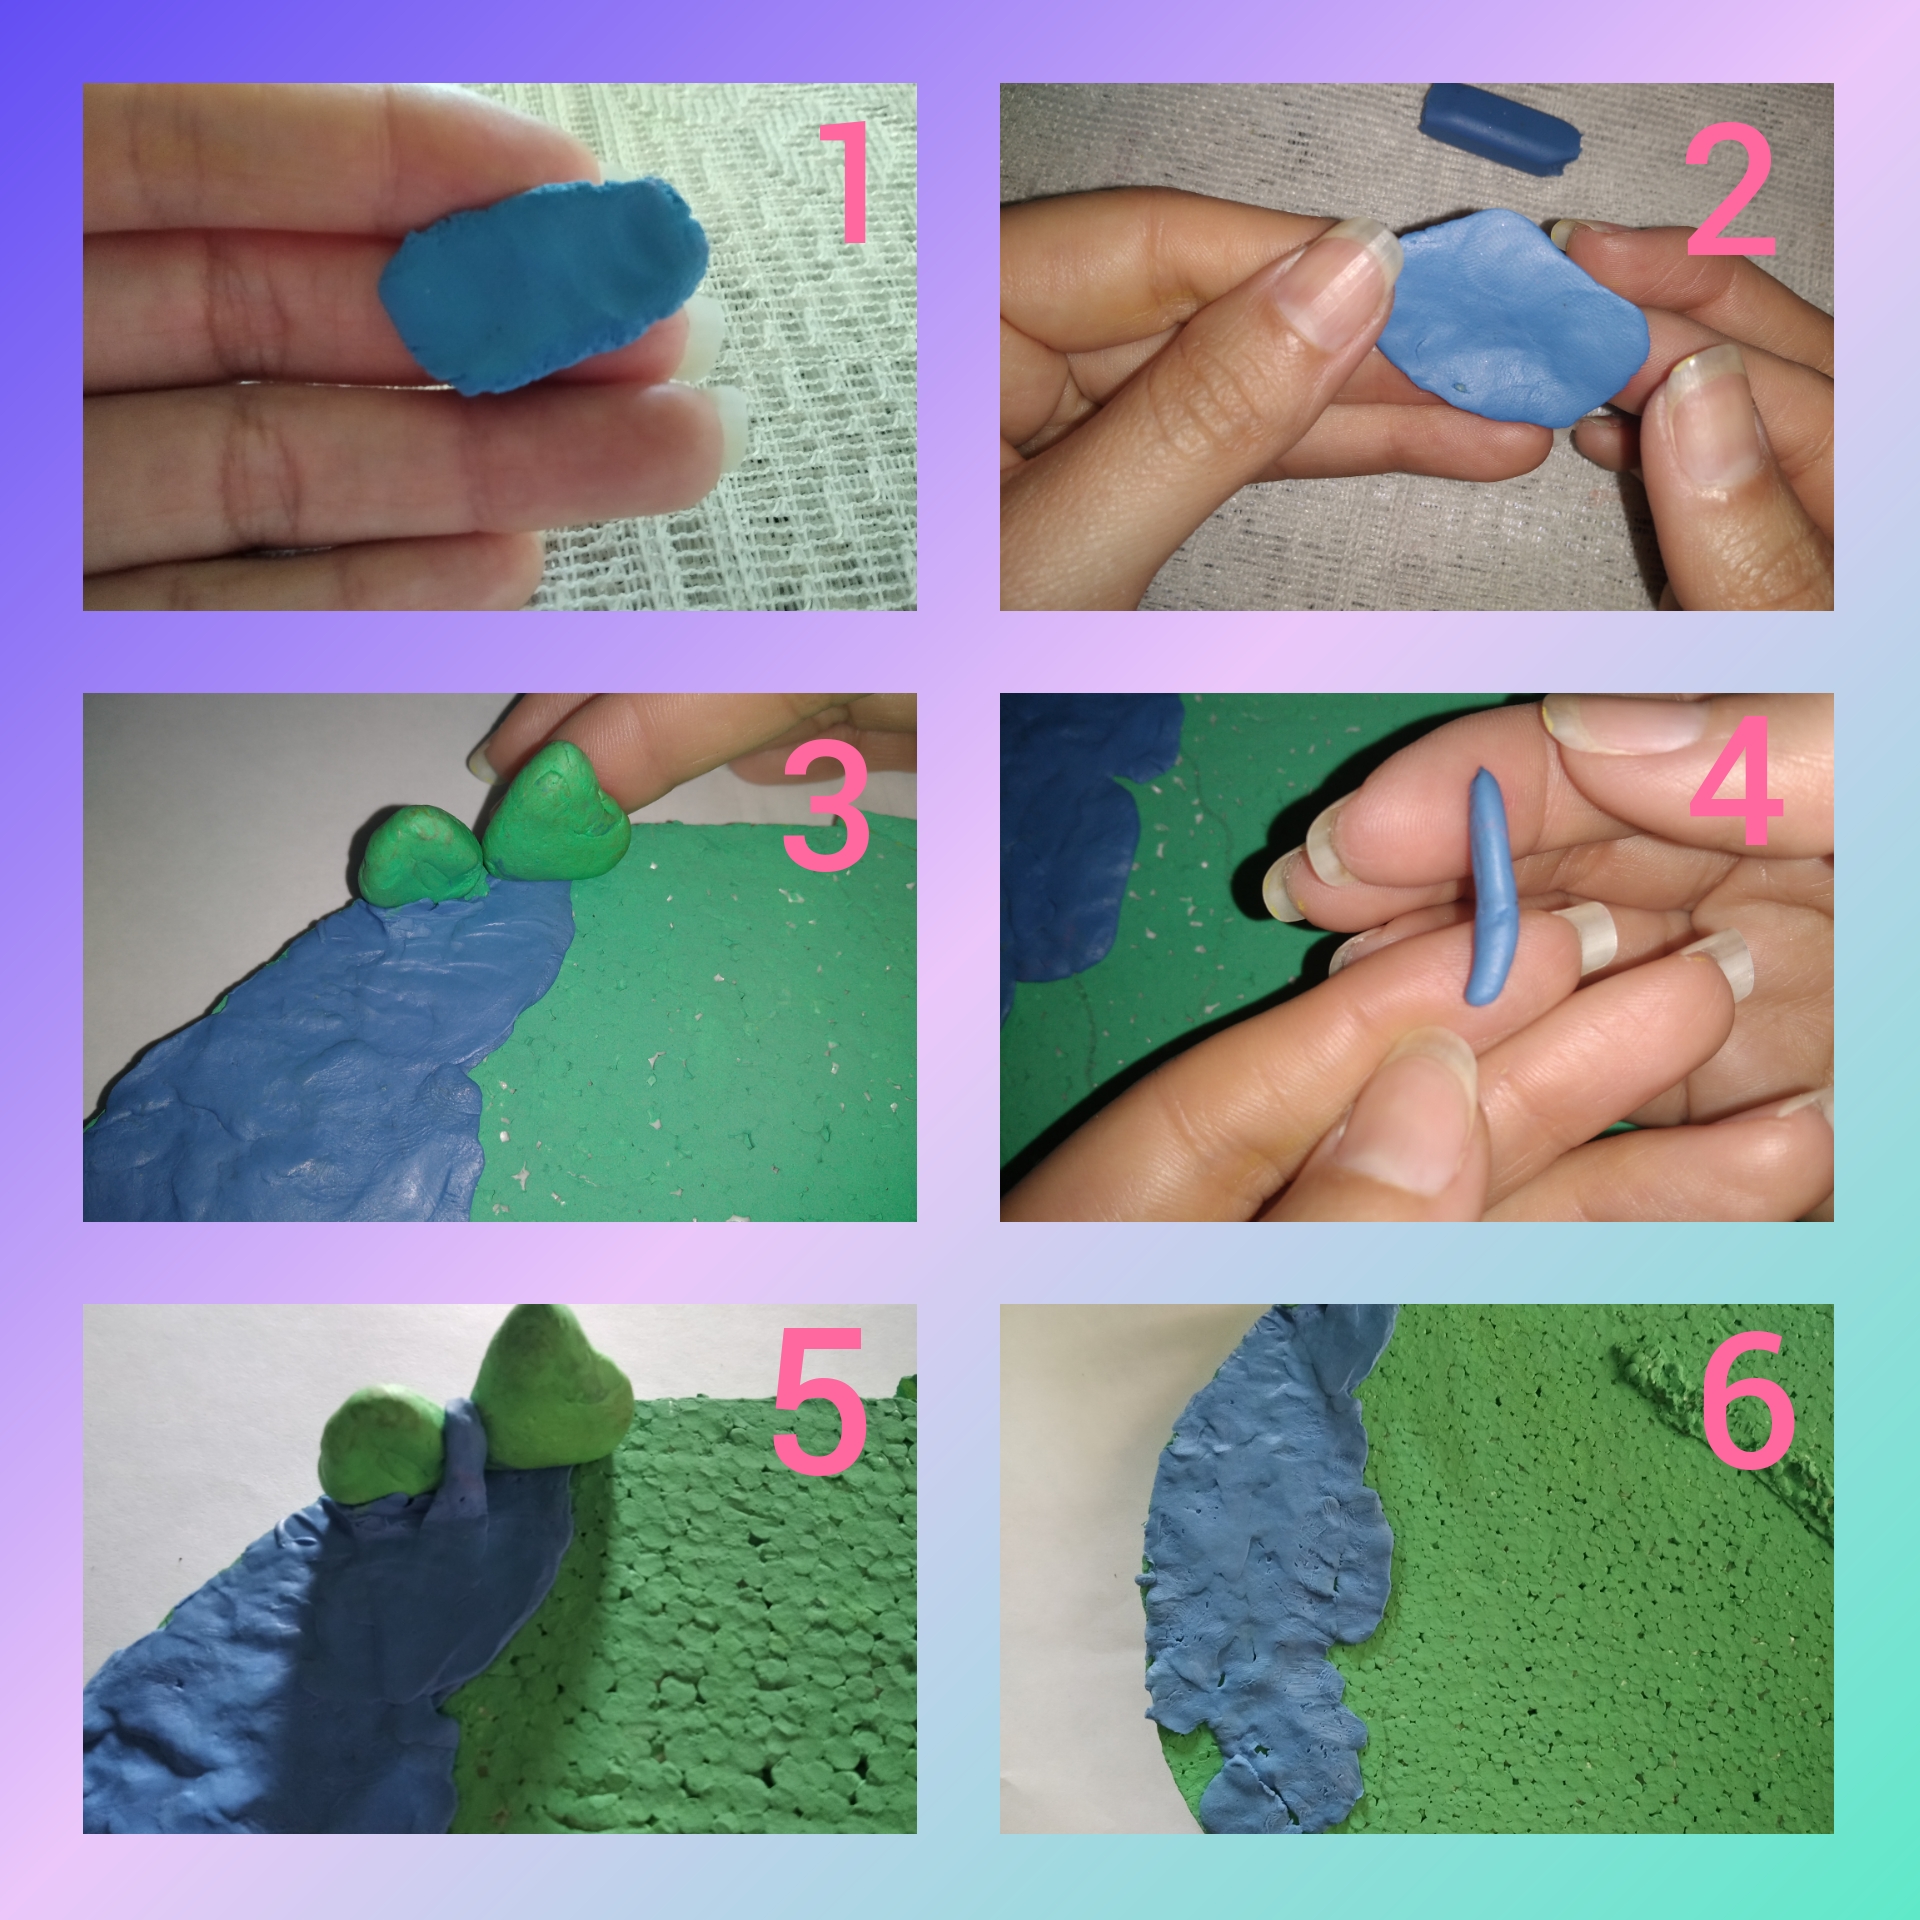
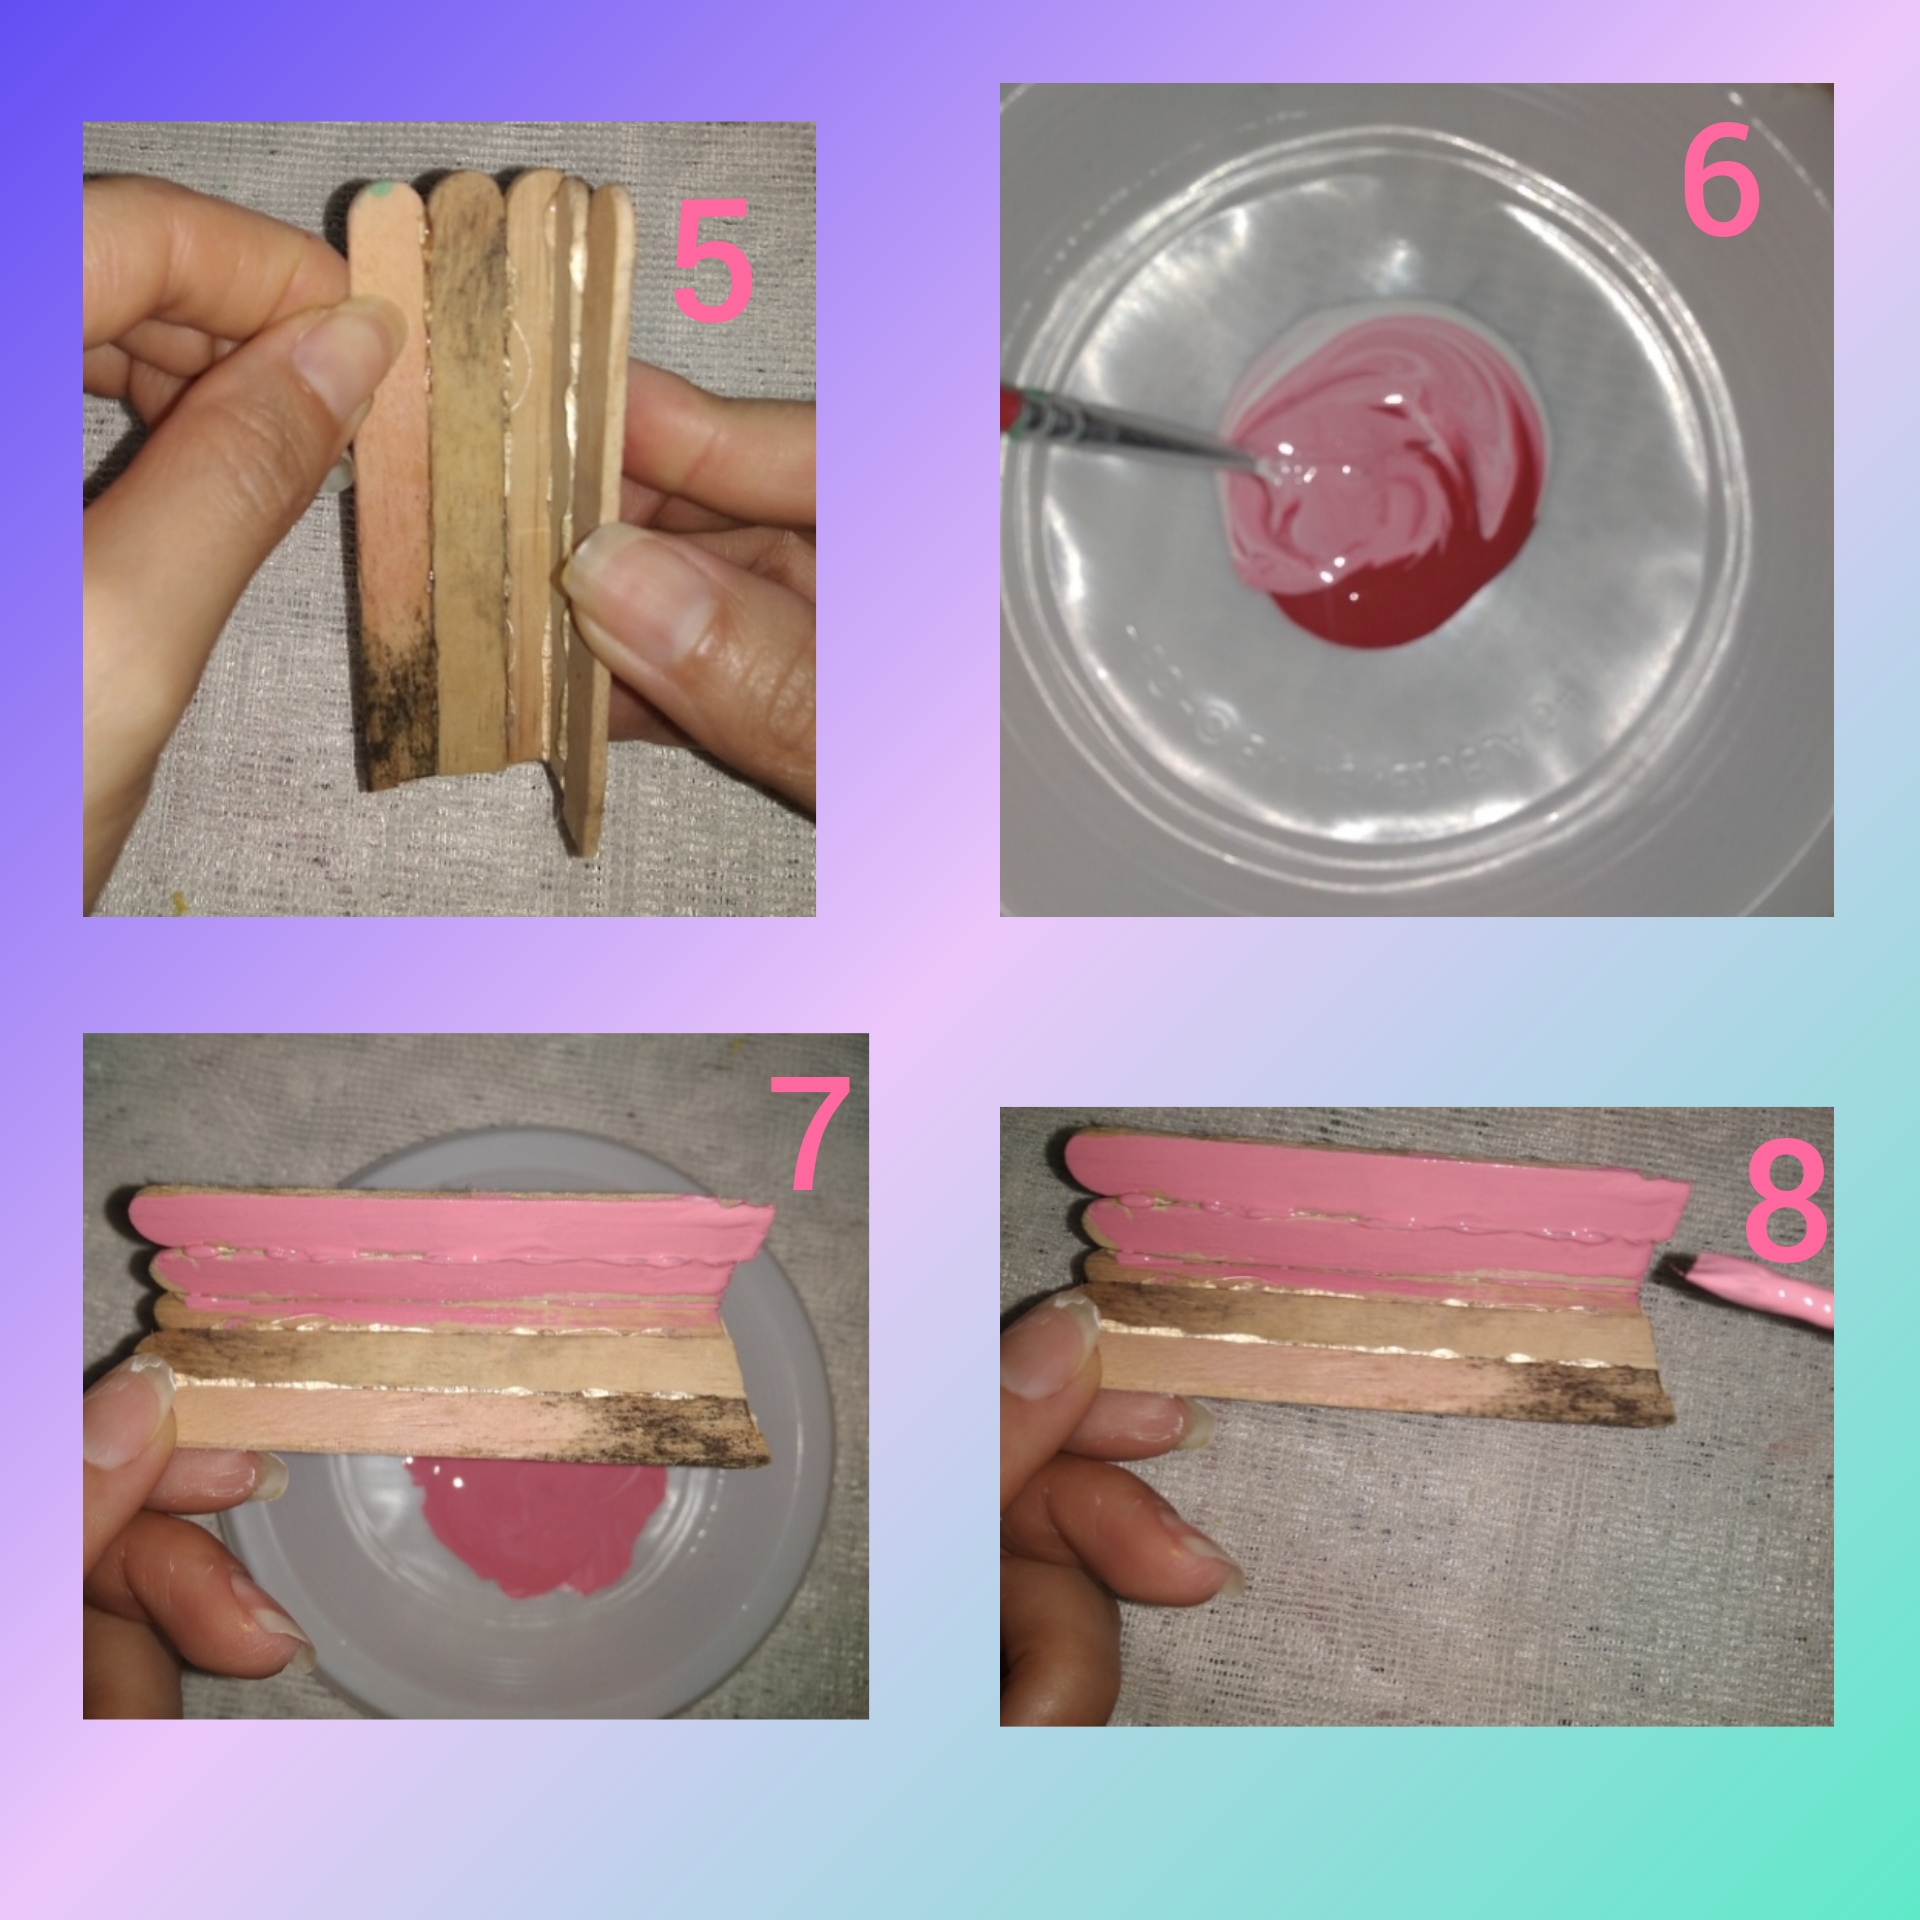
Paso 4.
Para elaborar el banco que será parte de este diorama, tomé 5 paletas de helado y con la tijera las corté, quitándole un 1.5 cm a cada una, luego con silicón de barra uni 2 paletas que serían el espaldar del banquito y 2 que serán la parte del asiento.
Step 4.>To make the bench that will be part of this diorama, I took 5 ice cream popsicles and cut them with scissors, removing 1.5 cm from each one, then with silicone bar I uni 2 popsicles that They would be the backrest of the bench and 2 that will be the part of the seat.
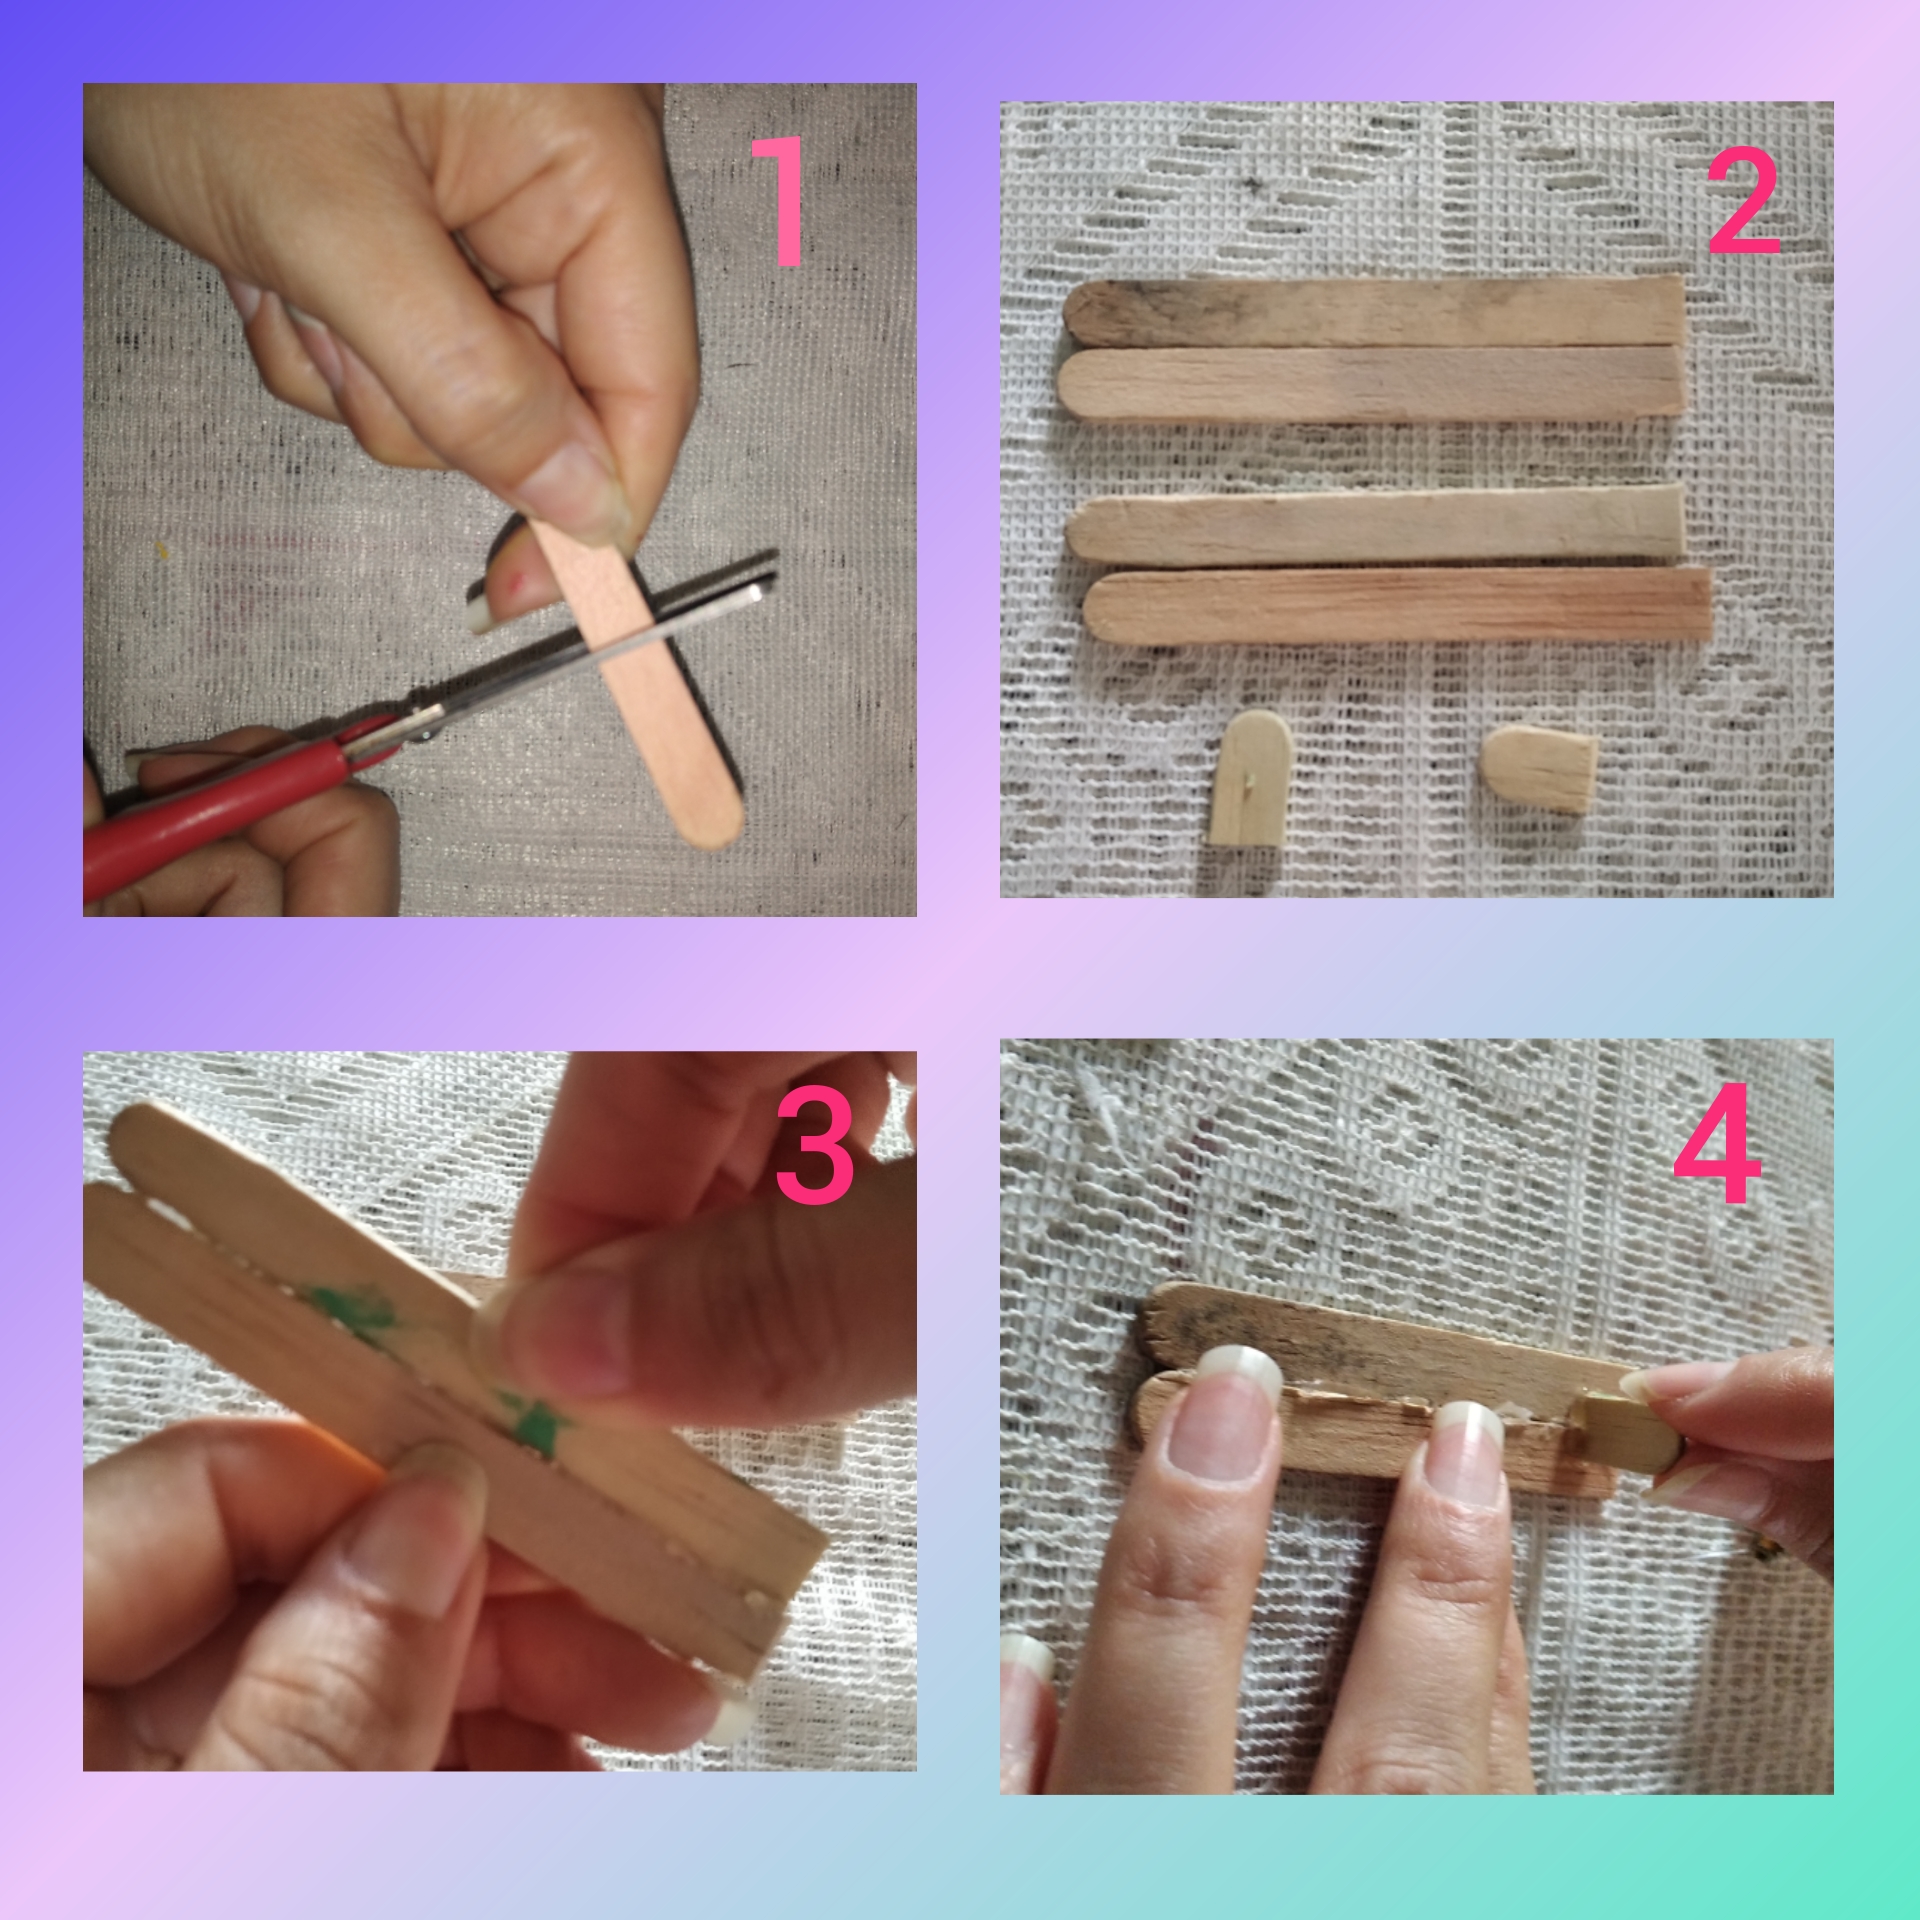
Uni las paletas y le coloqué los dos sobrantes de las paletas que corté que serían las patas, las coloqué en la parte de abajo, en un plato a parte mezcle pintura blanca con roja y la moví muy bien, luego con ayuda de un pincel pinté todo el banquito de color rosado.
I joined the palettes and I placed the two leftovers of the palettes that I cut that would be the legs, I placed them at the bottom, on a separate plate I mixed white paint with red and moved it very well, then with the help of a brush I painted the entire bench pink.
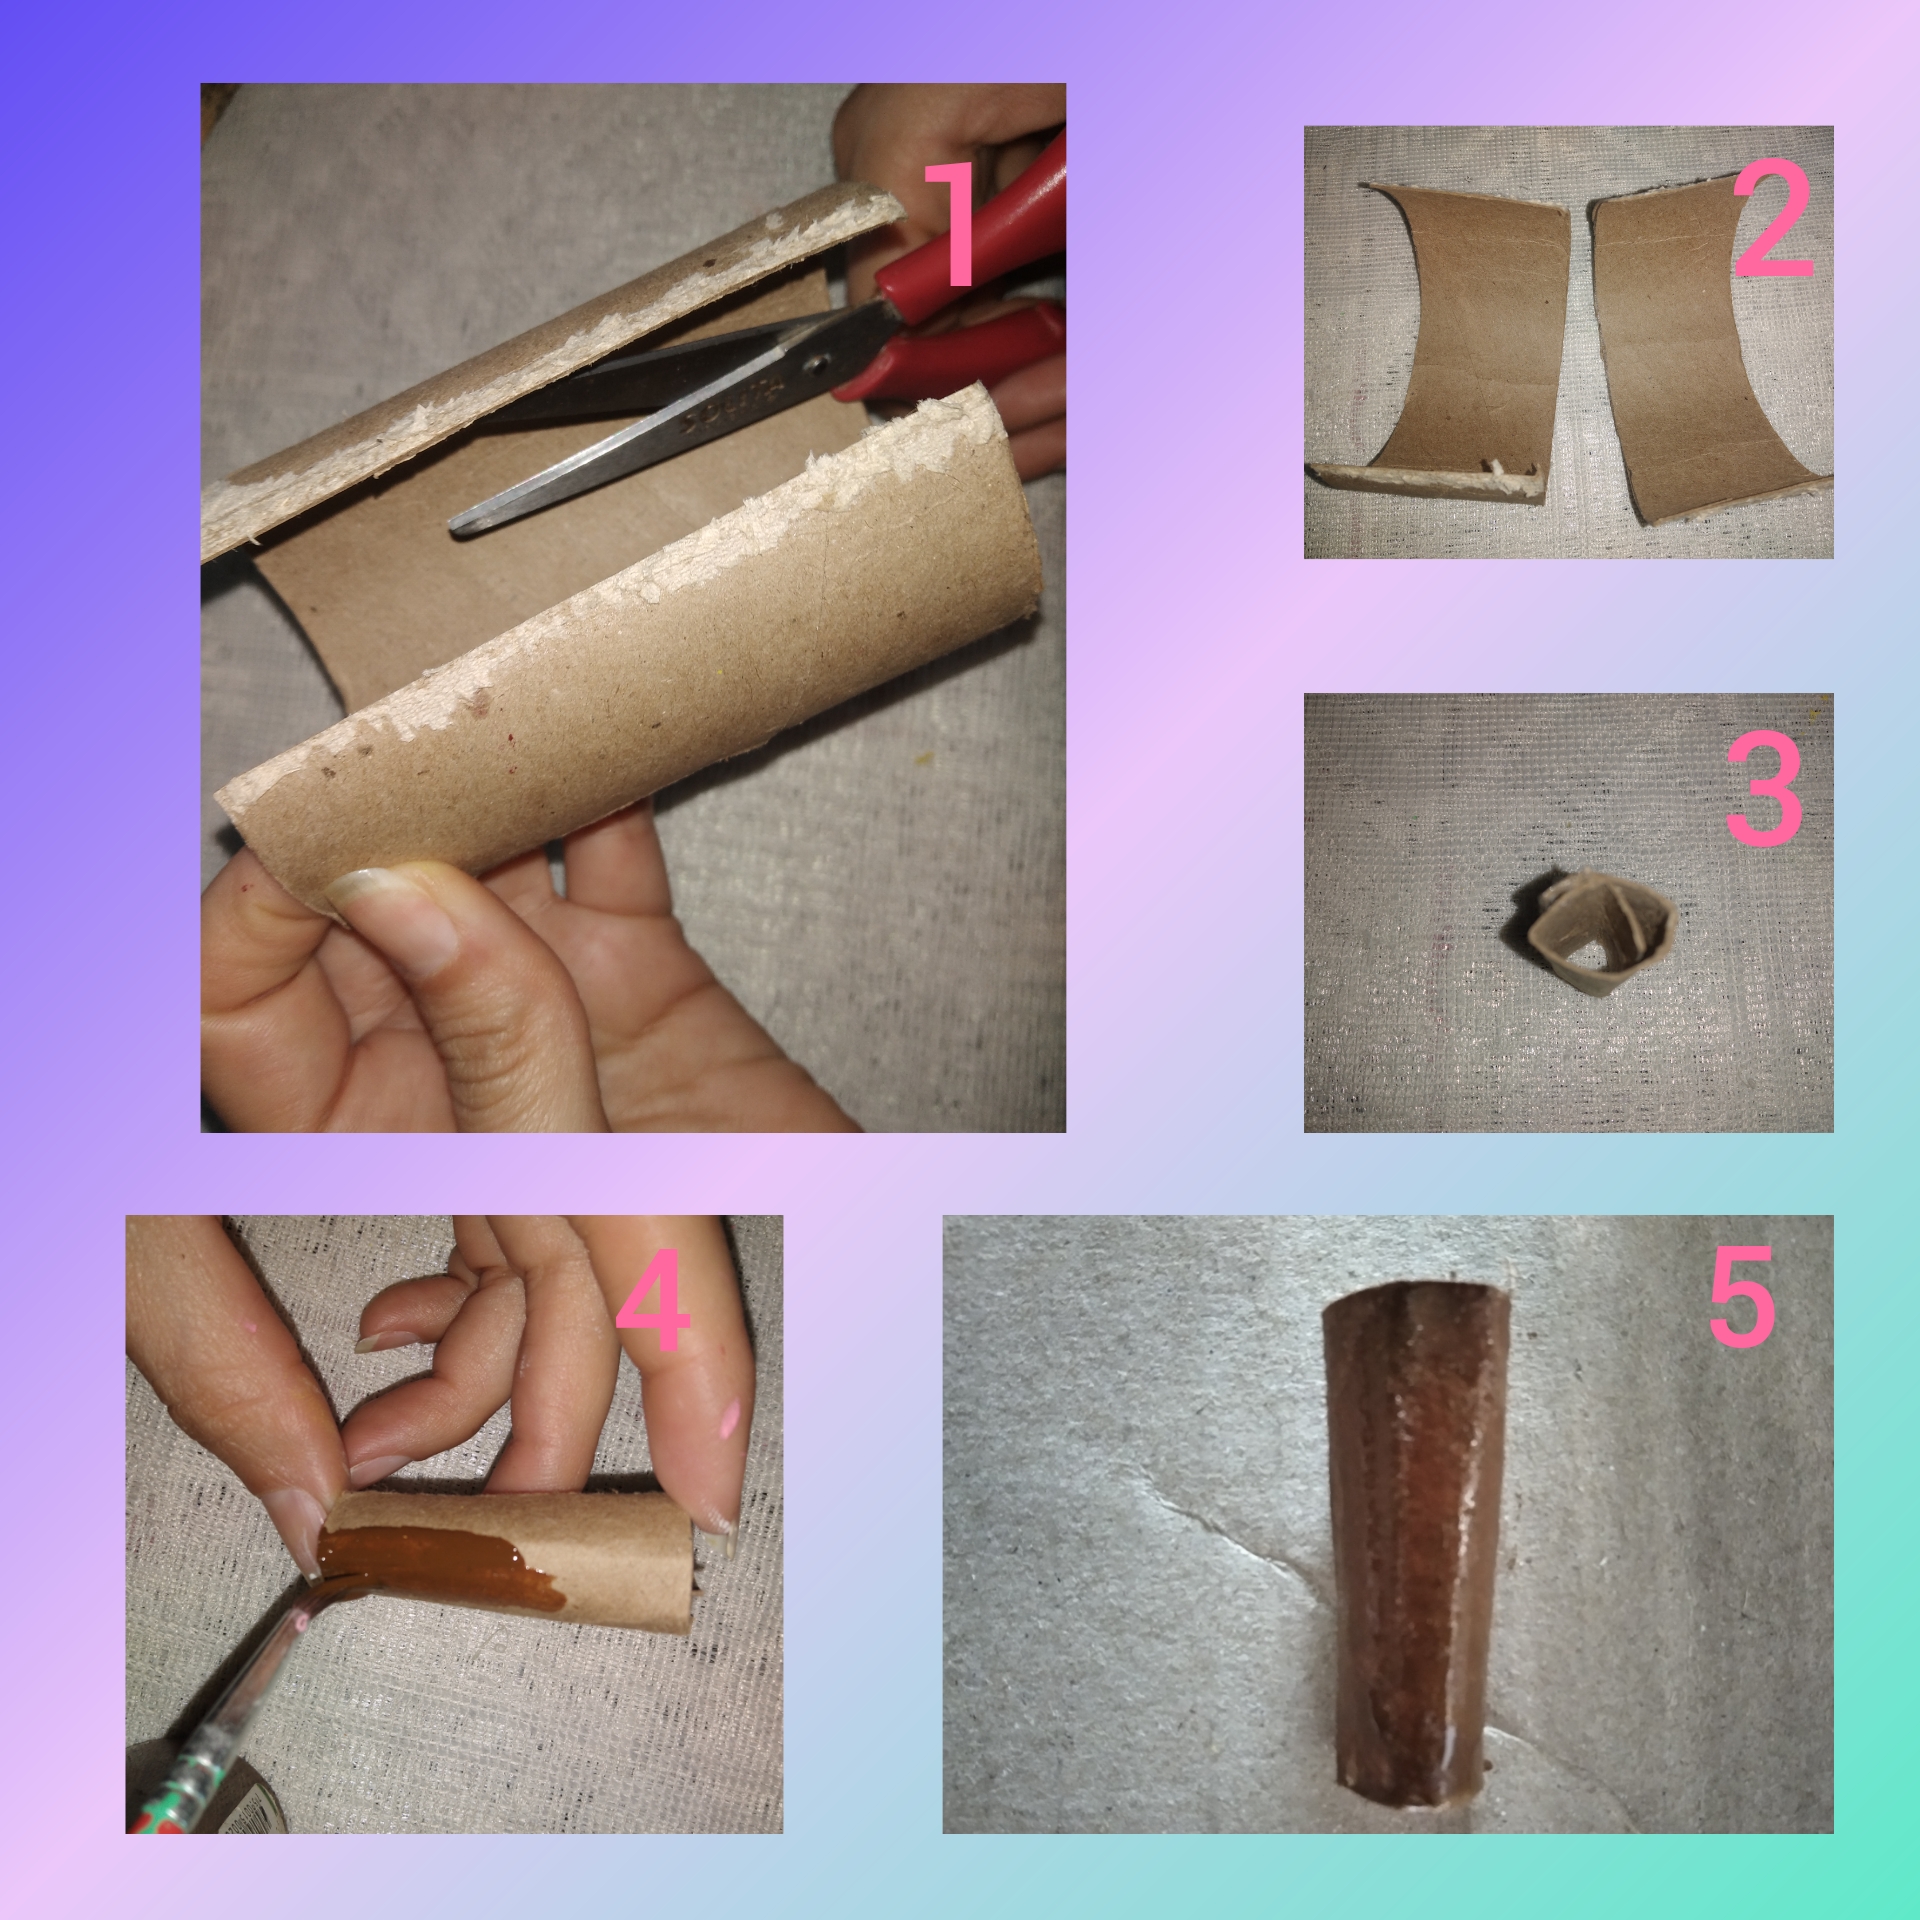
Paso 5.
Ahora vamos a hacer los árboles que llevará este diorama. Tomé el rollo de papel y lo corté Por el medio, luego enrollé un pedazo y pegué con silicón de barra, con un pincel pinté y este sería el tronco del árbol.
Step 5.>
Now we are going to make the trees that this diorama will carry. I took the roll of paper and cut it in the middle, then I rolled a piece and glued it with a silicone bar, with a brush I painted and this would be the trunk of the tree.
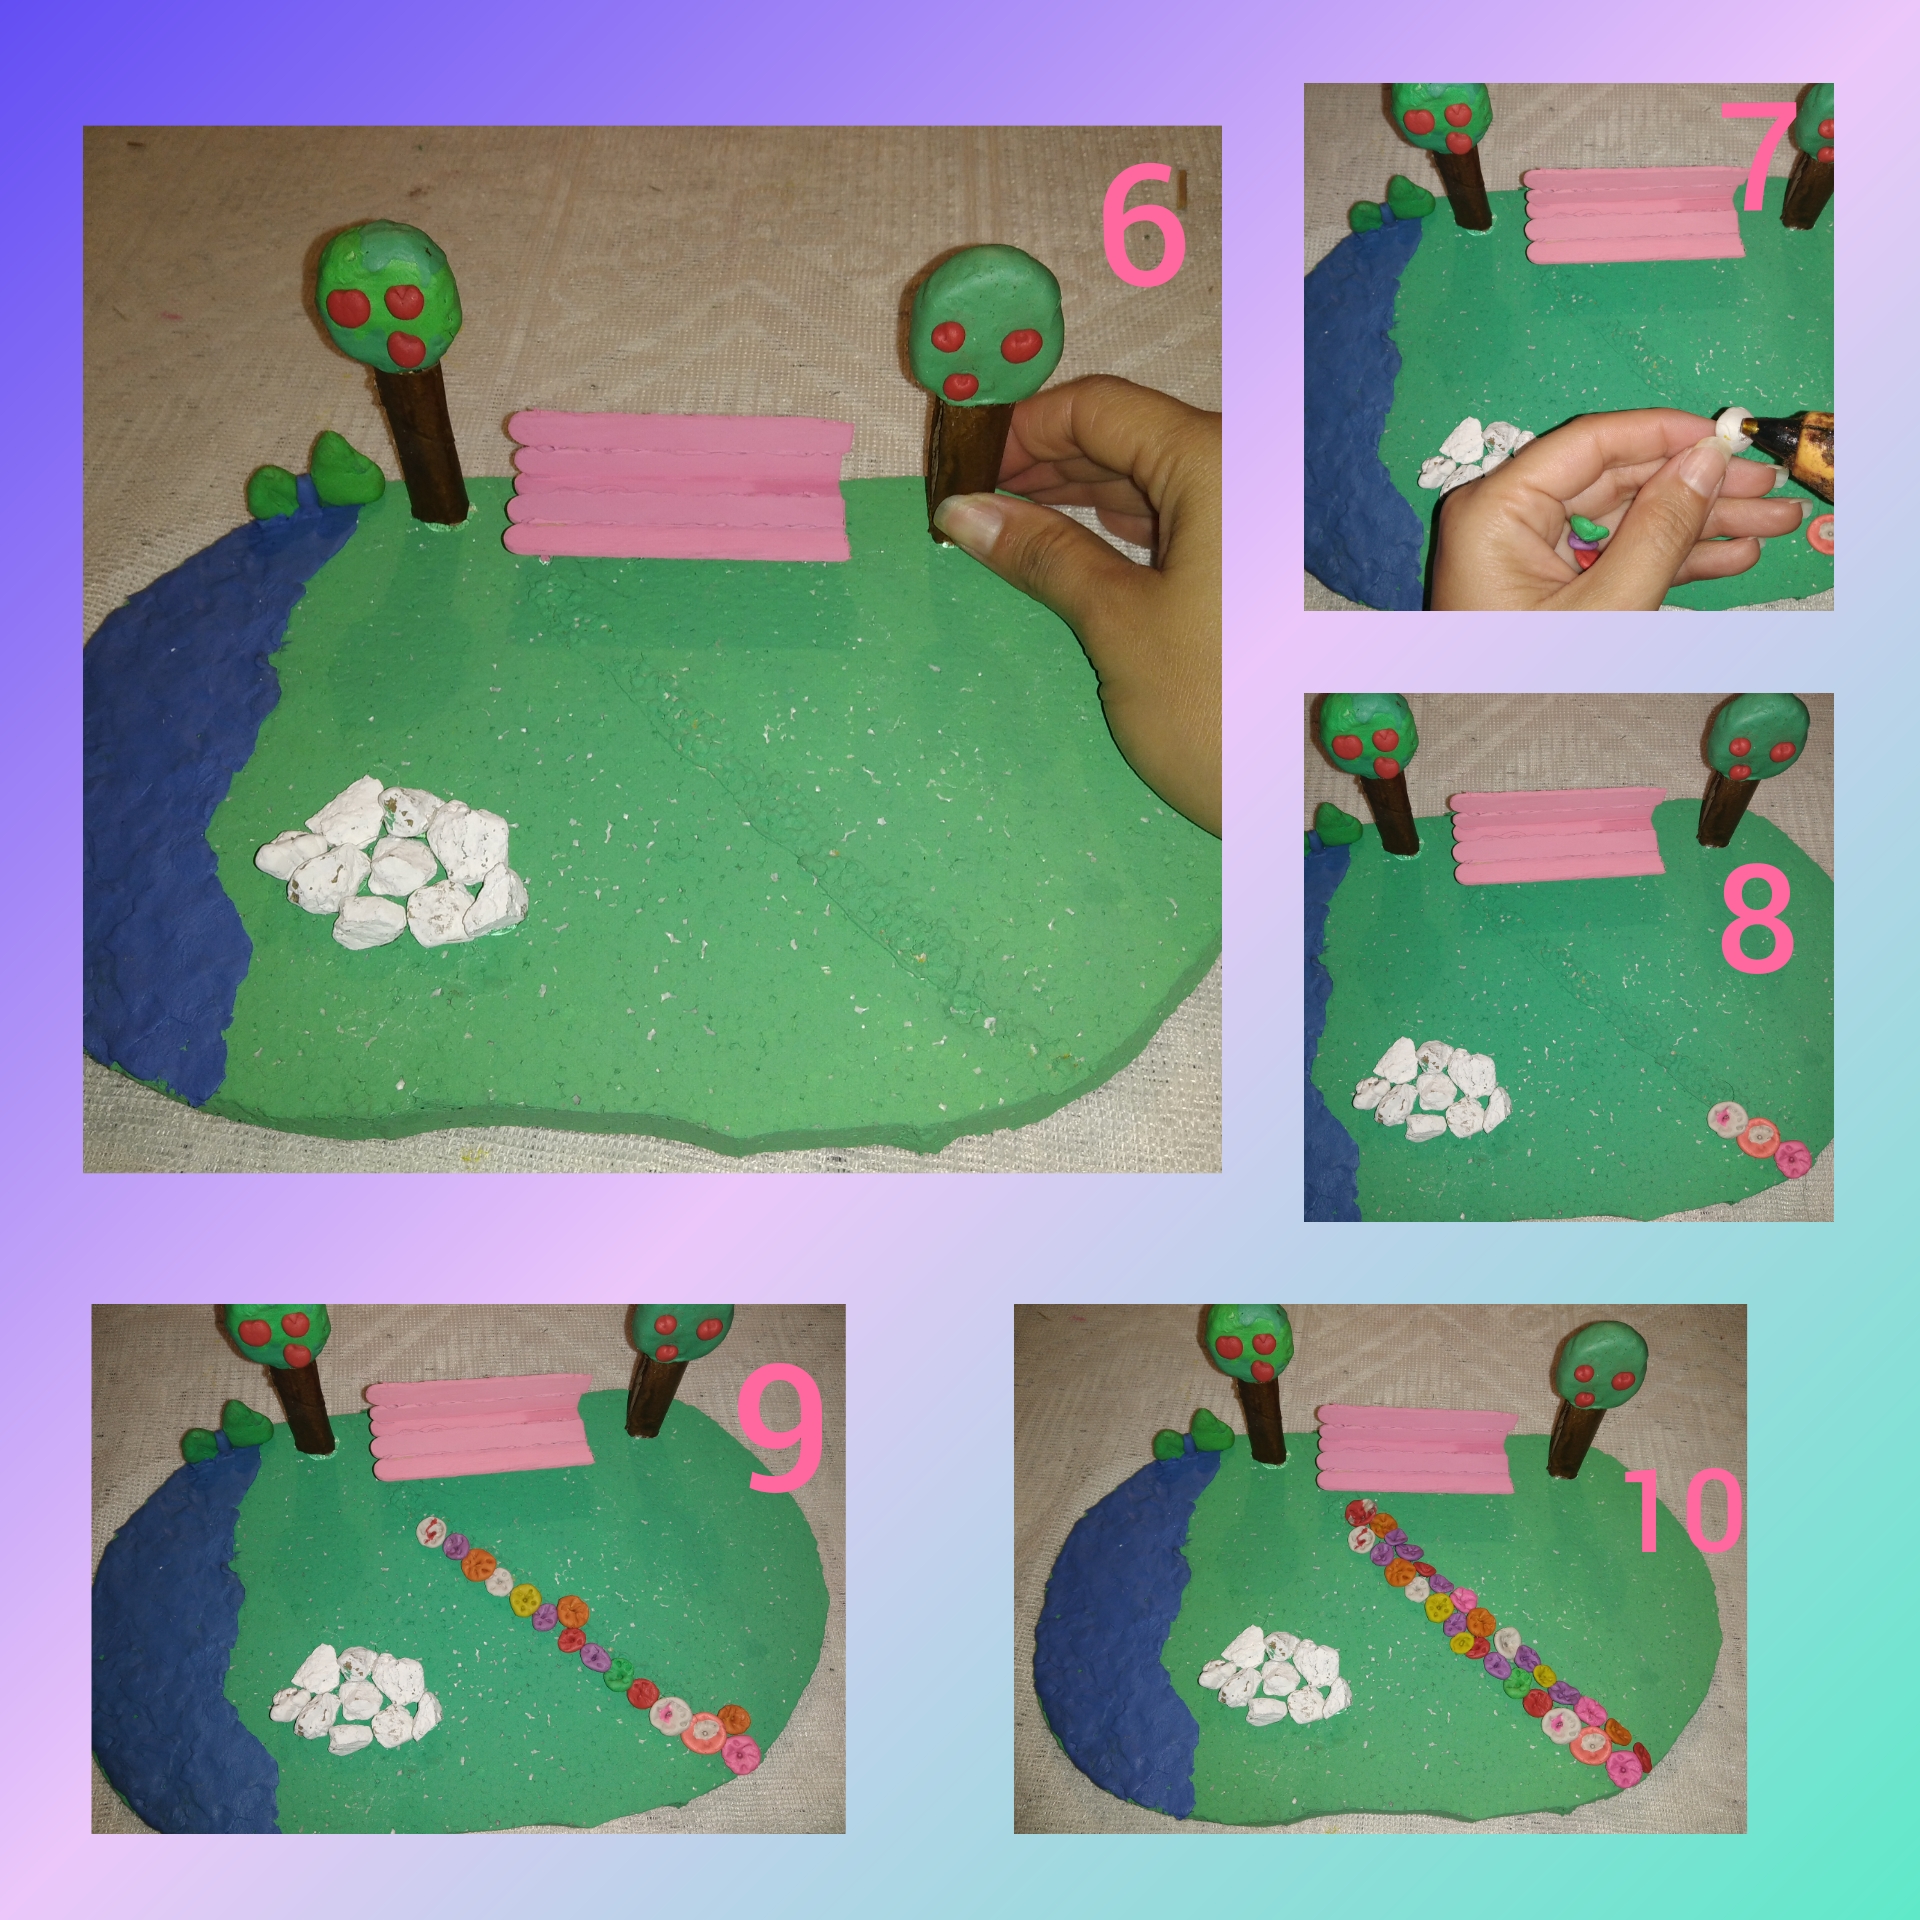
Paso 6.
Ahora vamos a completar la parte de encima del árbol, en un anime dibujé un círculo ovalado y con el exacto lo recorté, luego estiré plastilina verde y cubrí toda la zona.
Step 6.Now we are going to complete the top part of the tree, in an anime I drew an oval circle and with the exact one I cut it out, then I stretched green plasticine and covered the whole area.
Paso 7.
Uní el tronco por la parte de encima del árbol, luego con plastilina roja hice una bolita, la aplaste un poco con mi dedo, la moldee y le dí forma de manzanas, las uni al árbol. Este proceso lo hice doble ya que son dos árboles los presentes en este diorama.
Step 7.I joined the trunk at the top of the tree, then with red plasticine I made a ball, I flattened it a little with my finger, I molded it and gave it the shape of apples, I joined them to the tree . I did this process twice since there are two trees present in this diorama.

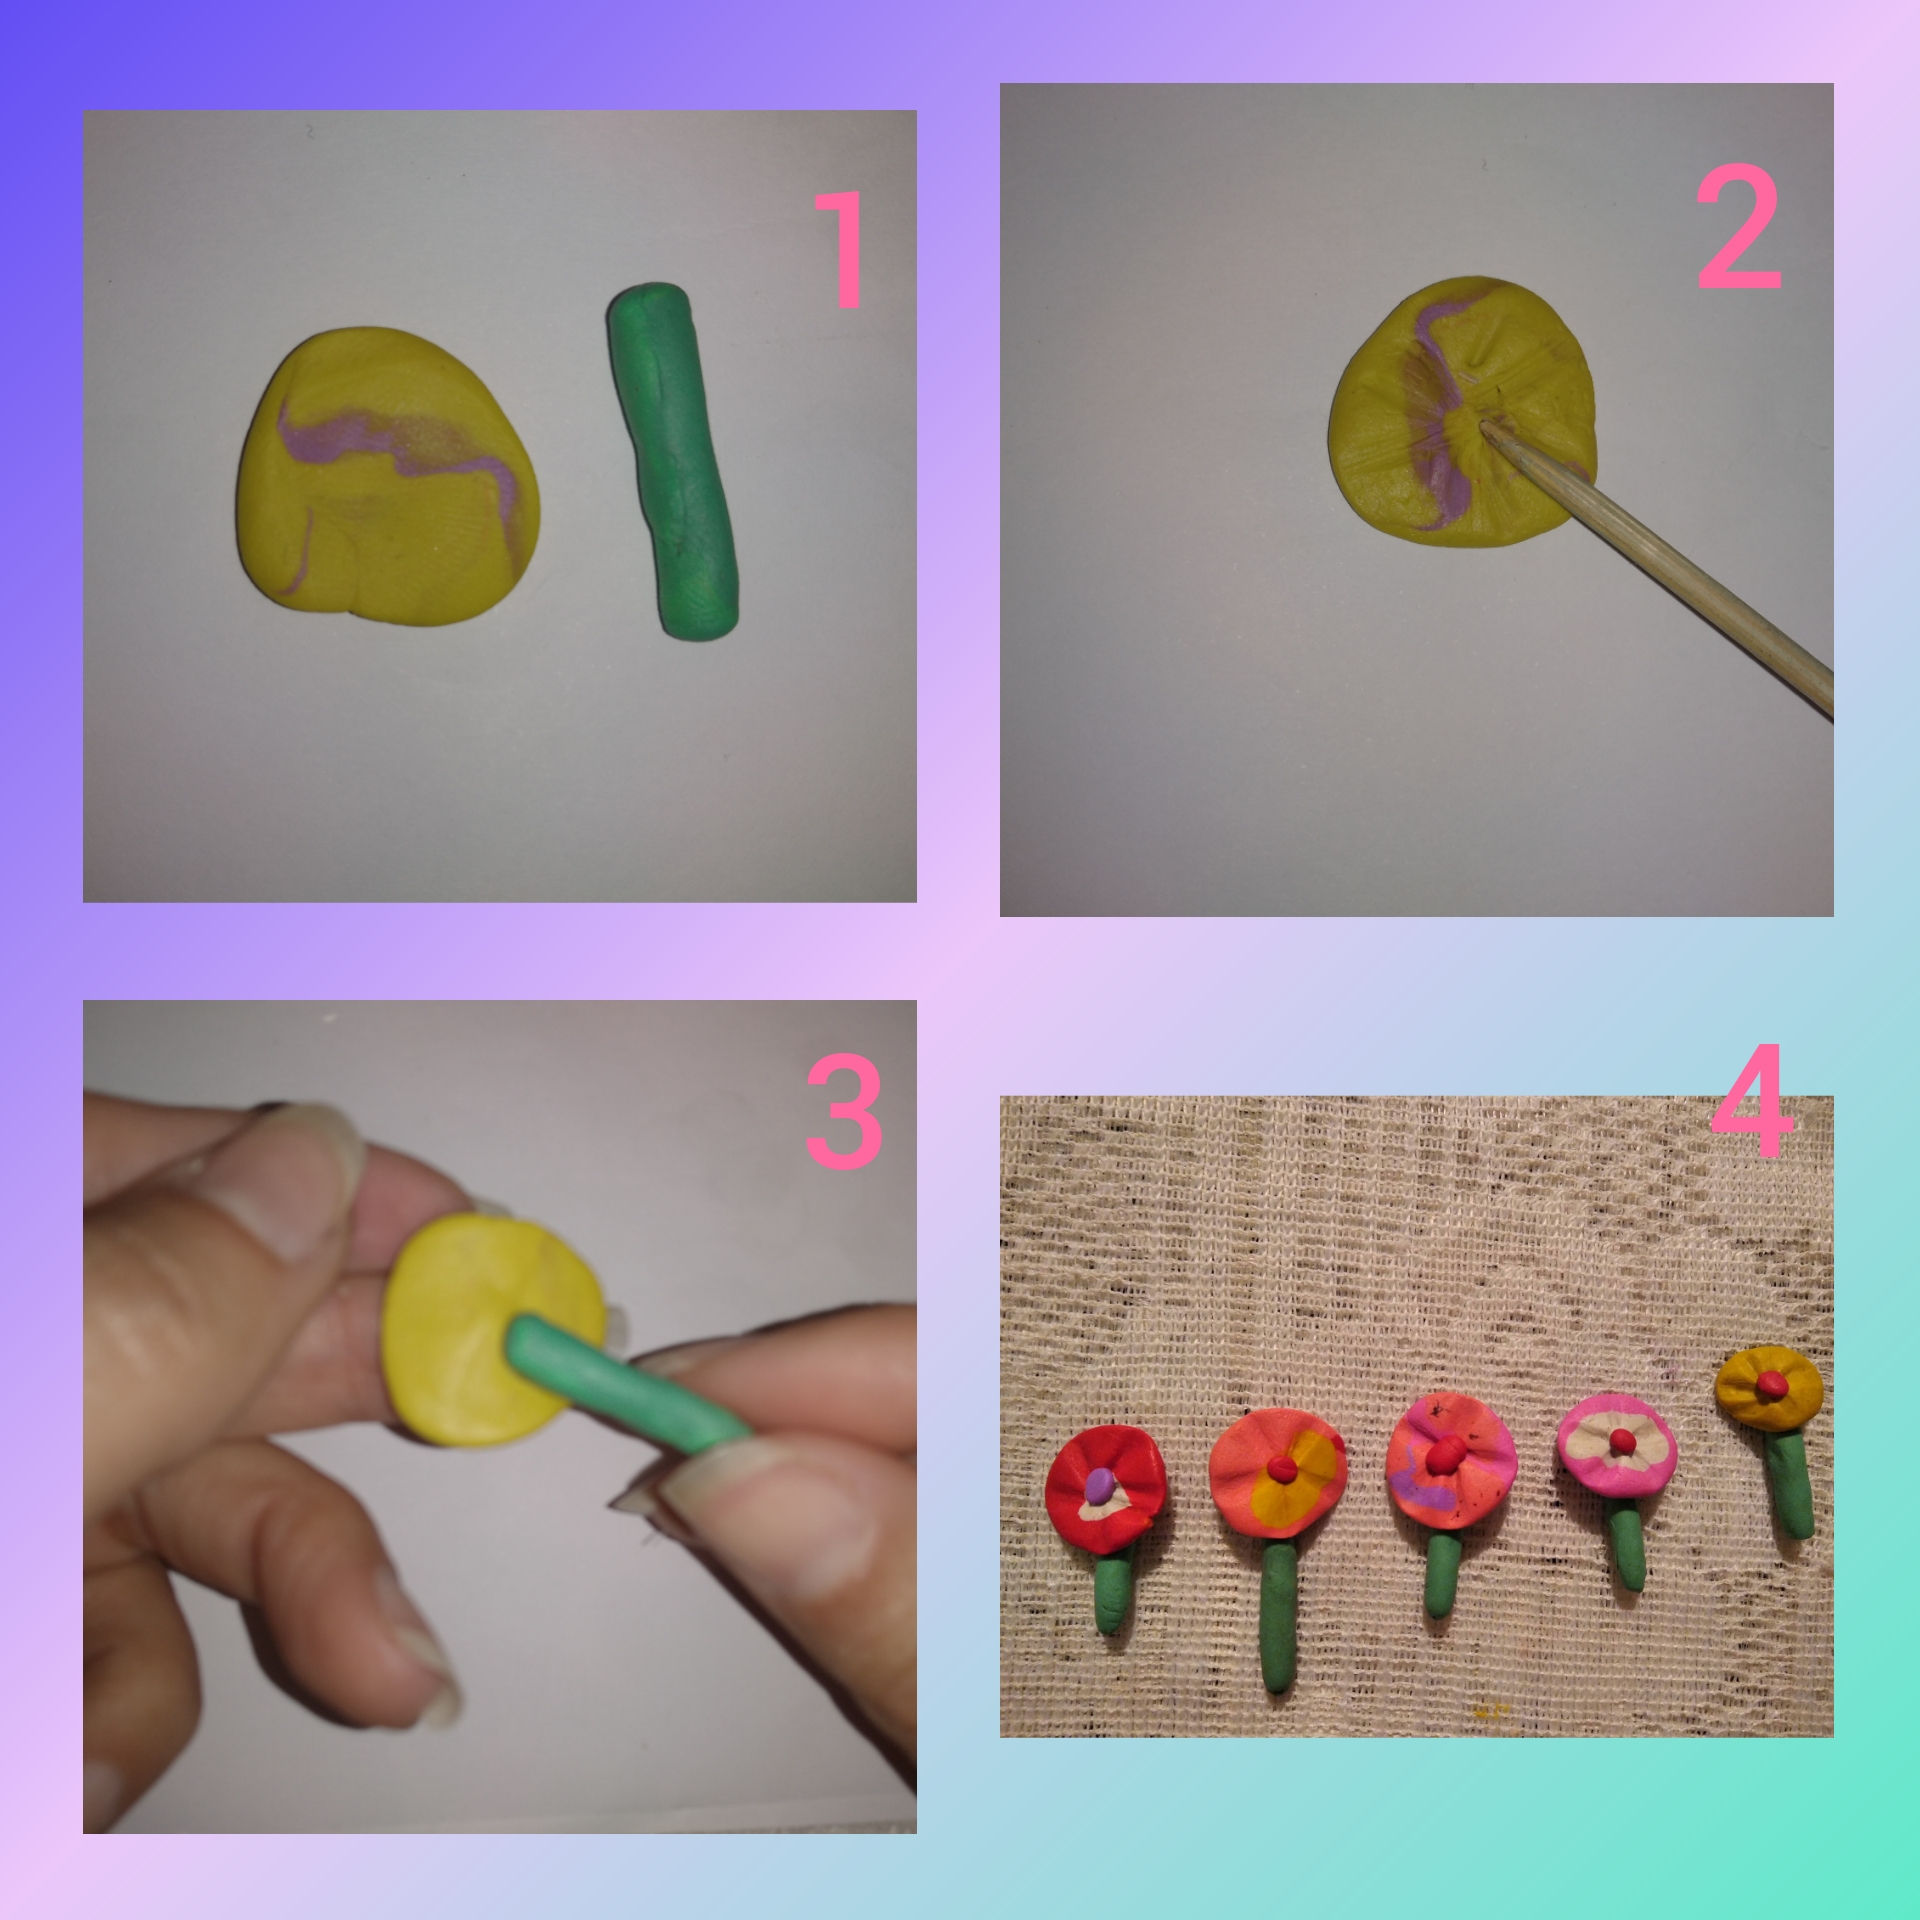
Paso 8.
En el siguiente paso vamos a elaborar las flores. Tomé unos pedazos de palitos de altura y estiré un poco la plastilina verde para cubrir estos palitos.
Step 8.In the next step we are going to make the flowers. I took a few pieces of tall sticks and stretched out the green playdough a bit to cover these sticks.
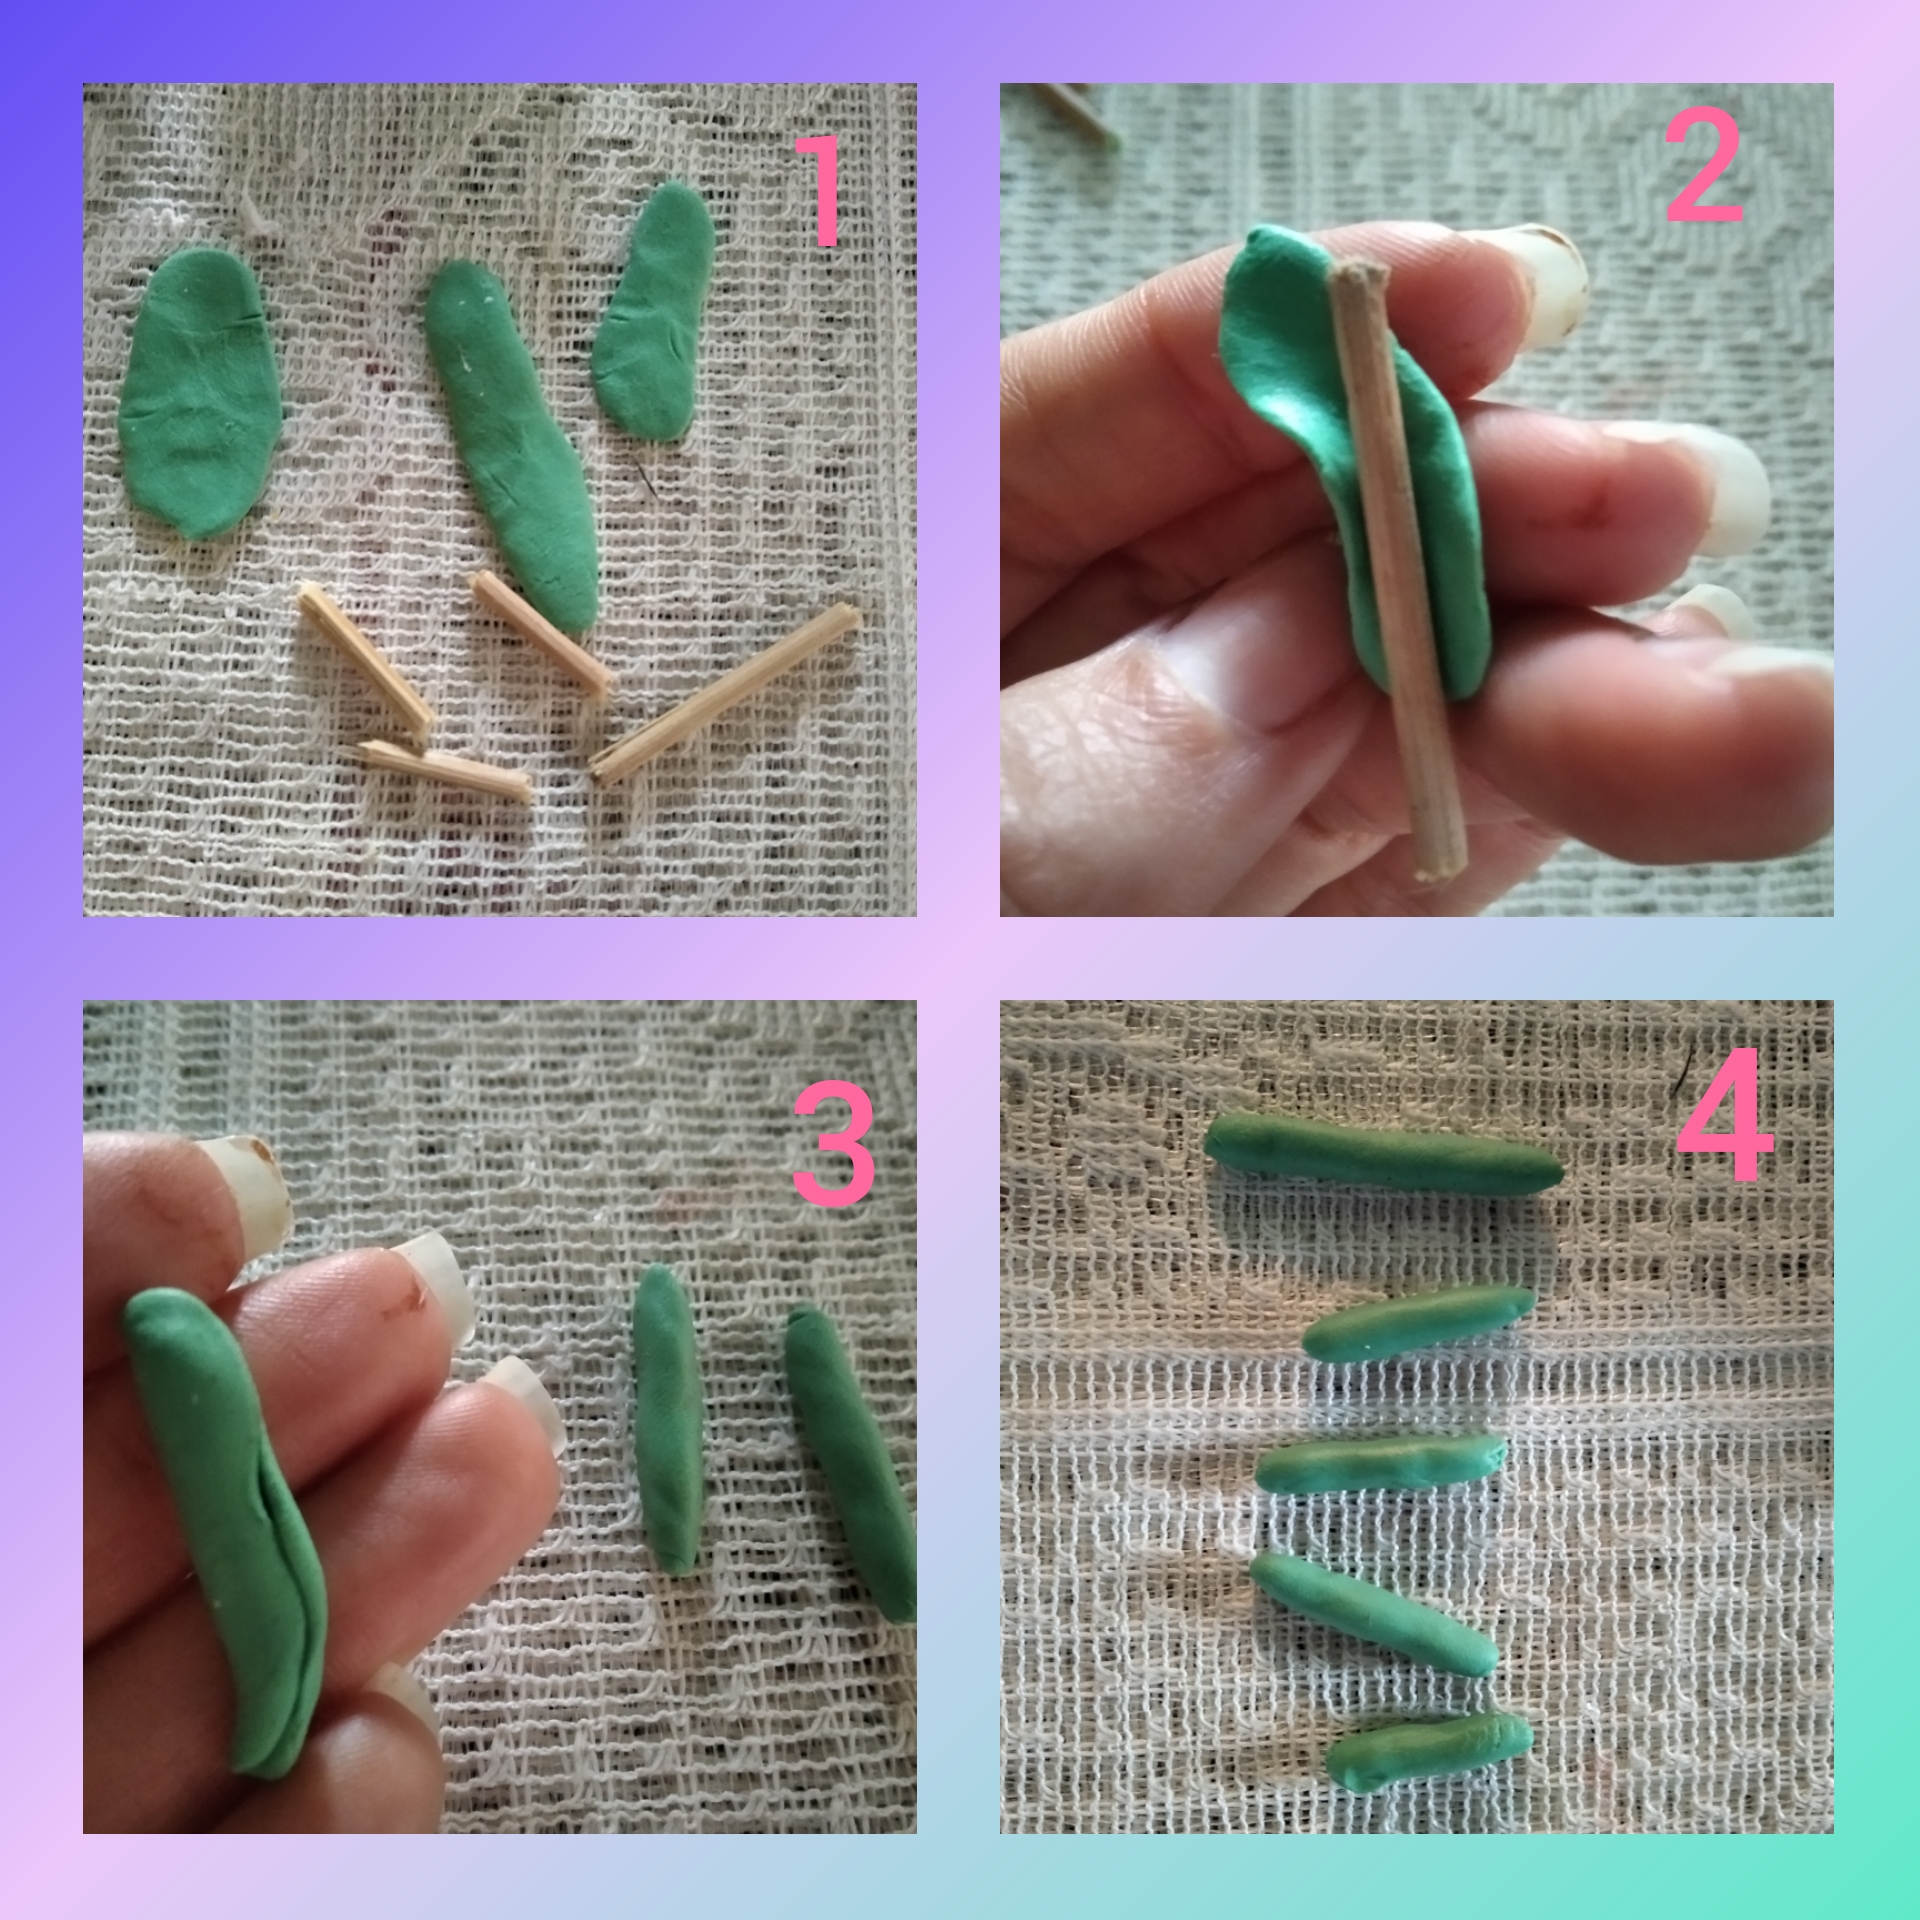
Paso 9.
Tomé plastilina amarilla y morada porque también podemos jugar con los colores y combinarlos, hice una bolita la aplaste y luego con la punta del palito de altura hice unas rayitas para darle forma de pétalos, en el centro coloqué una pepita pequeña, luego uni el palito con la flor y quedaron de esta manera.
Step 9.I took yellow and purple plasticine because we can also play with colors and combine them, I flattened it into a ball and then with the tip of the height stick I made some lines to give it the shape of petals, in the I placed a small nugget in the center, then I joined the stick with the flower and they were left like this.
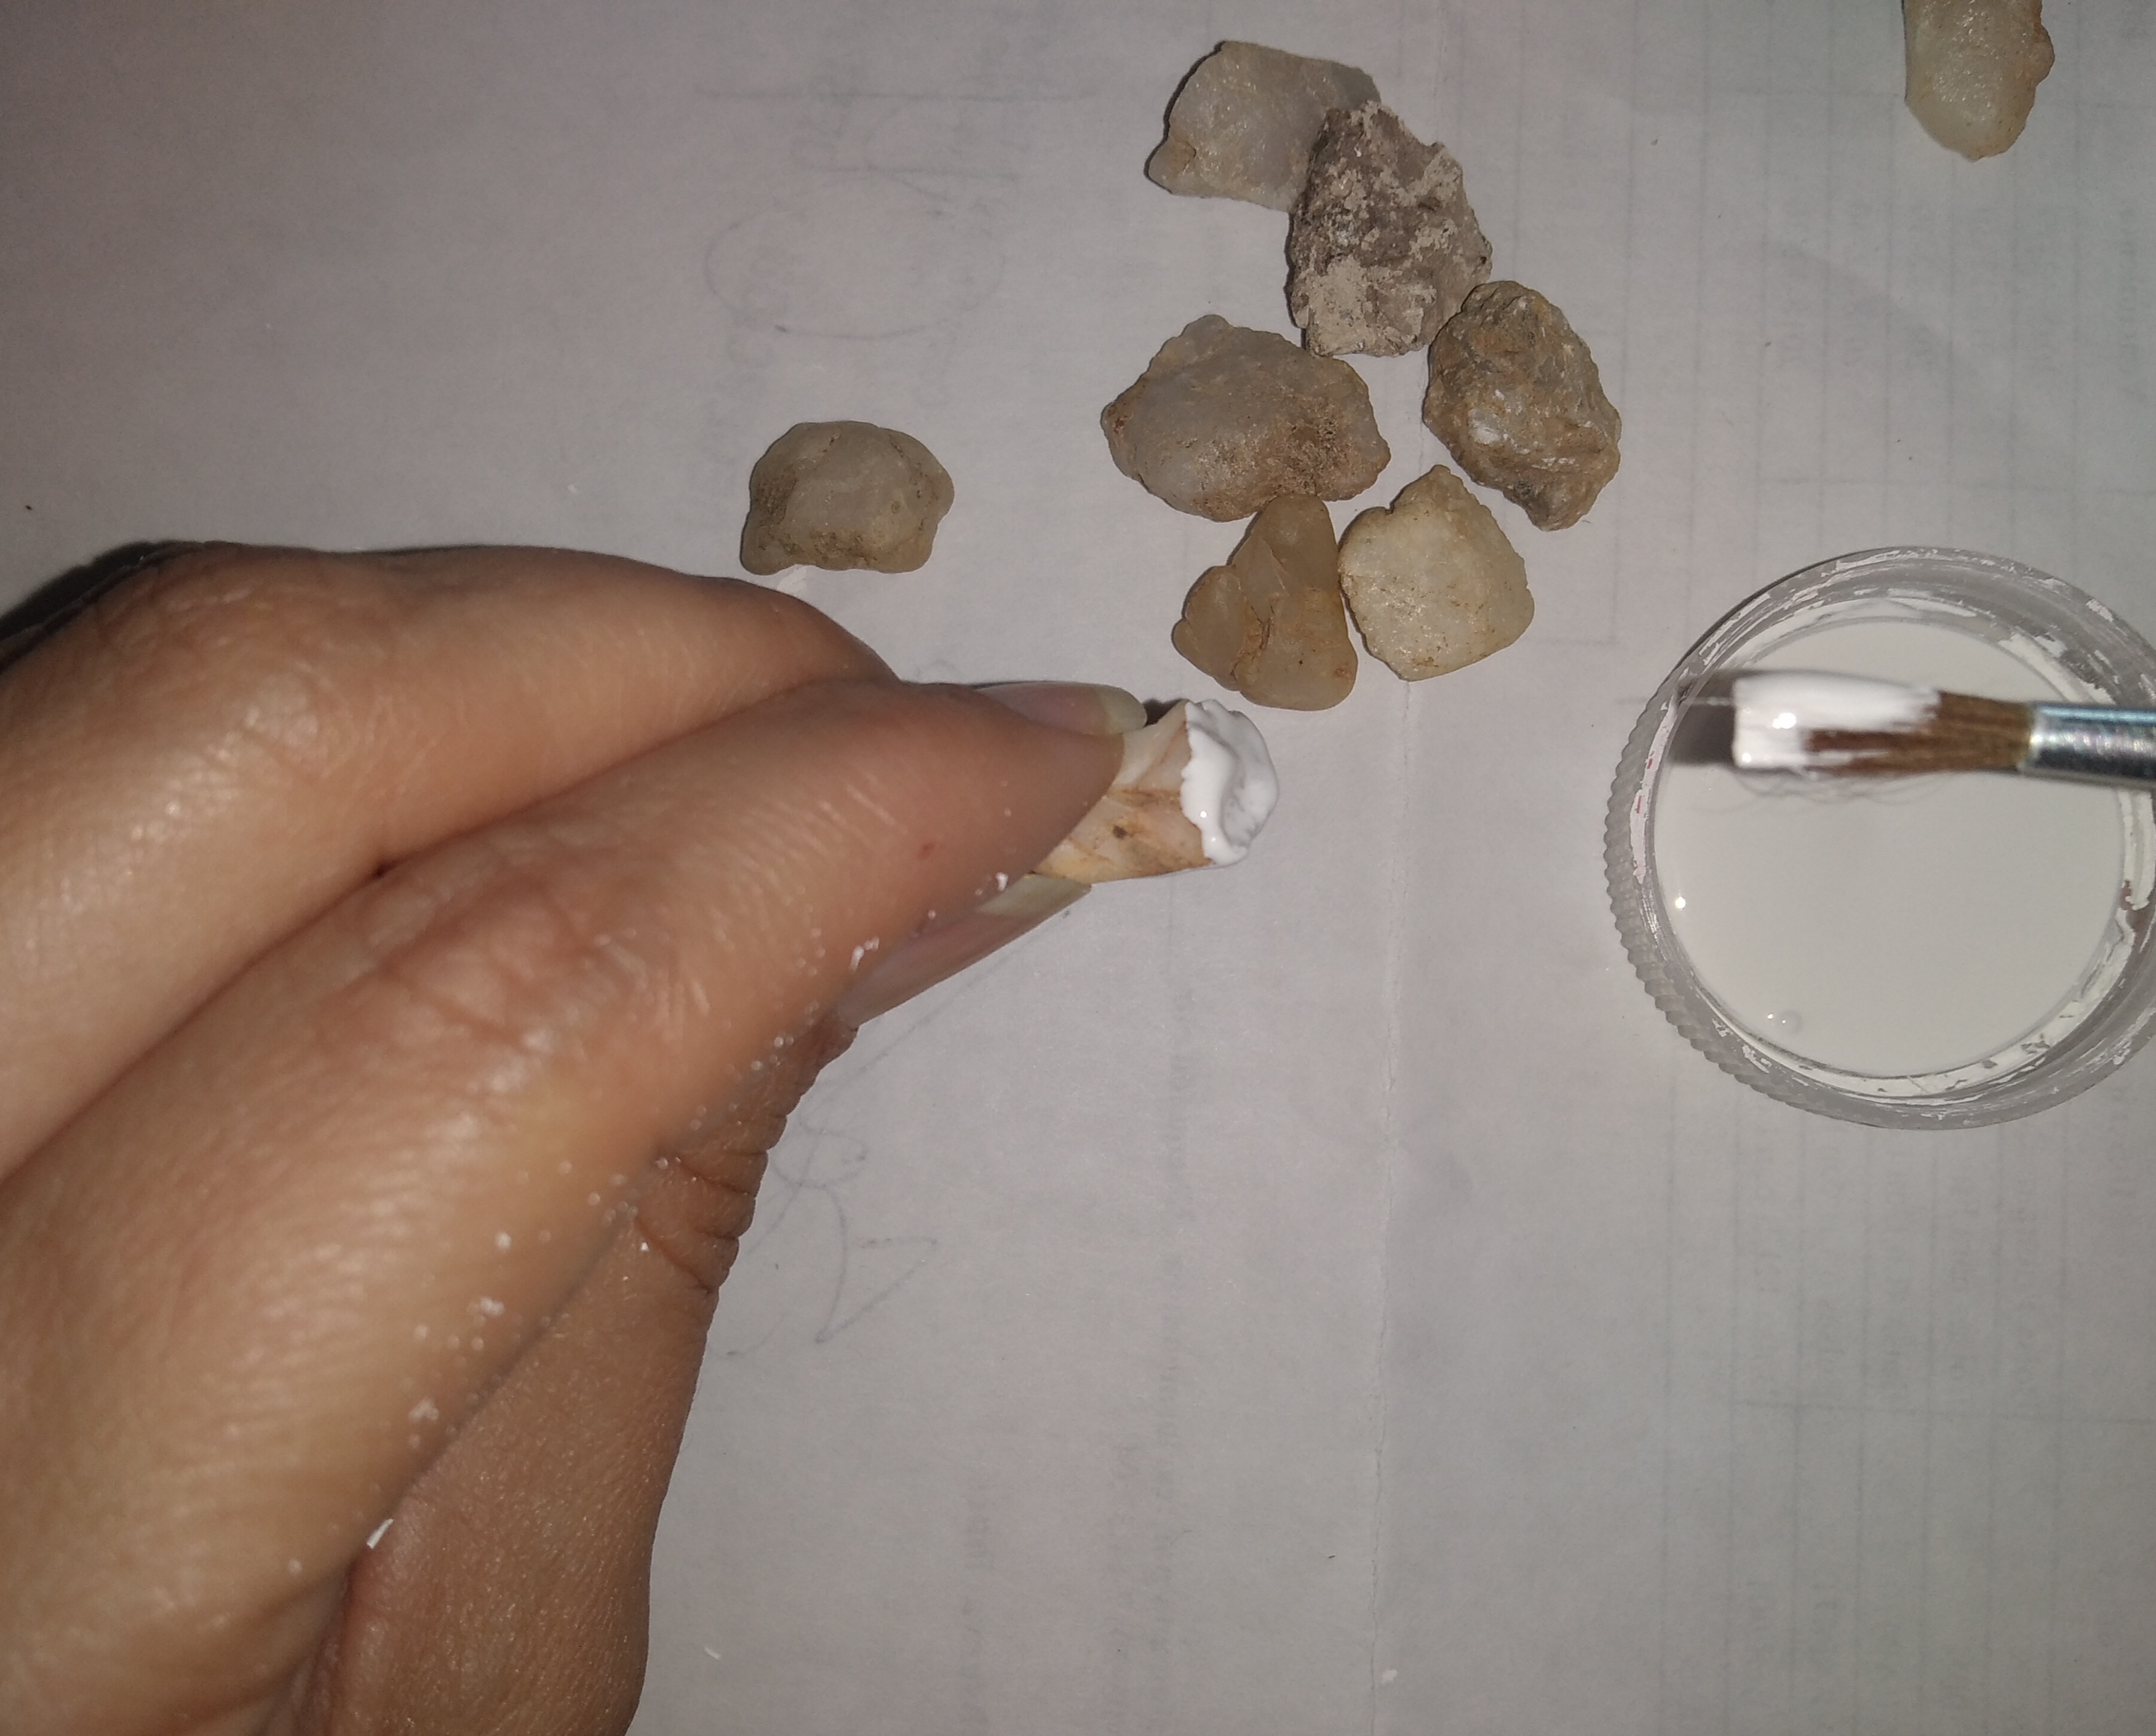
Paso 10.
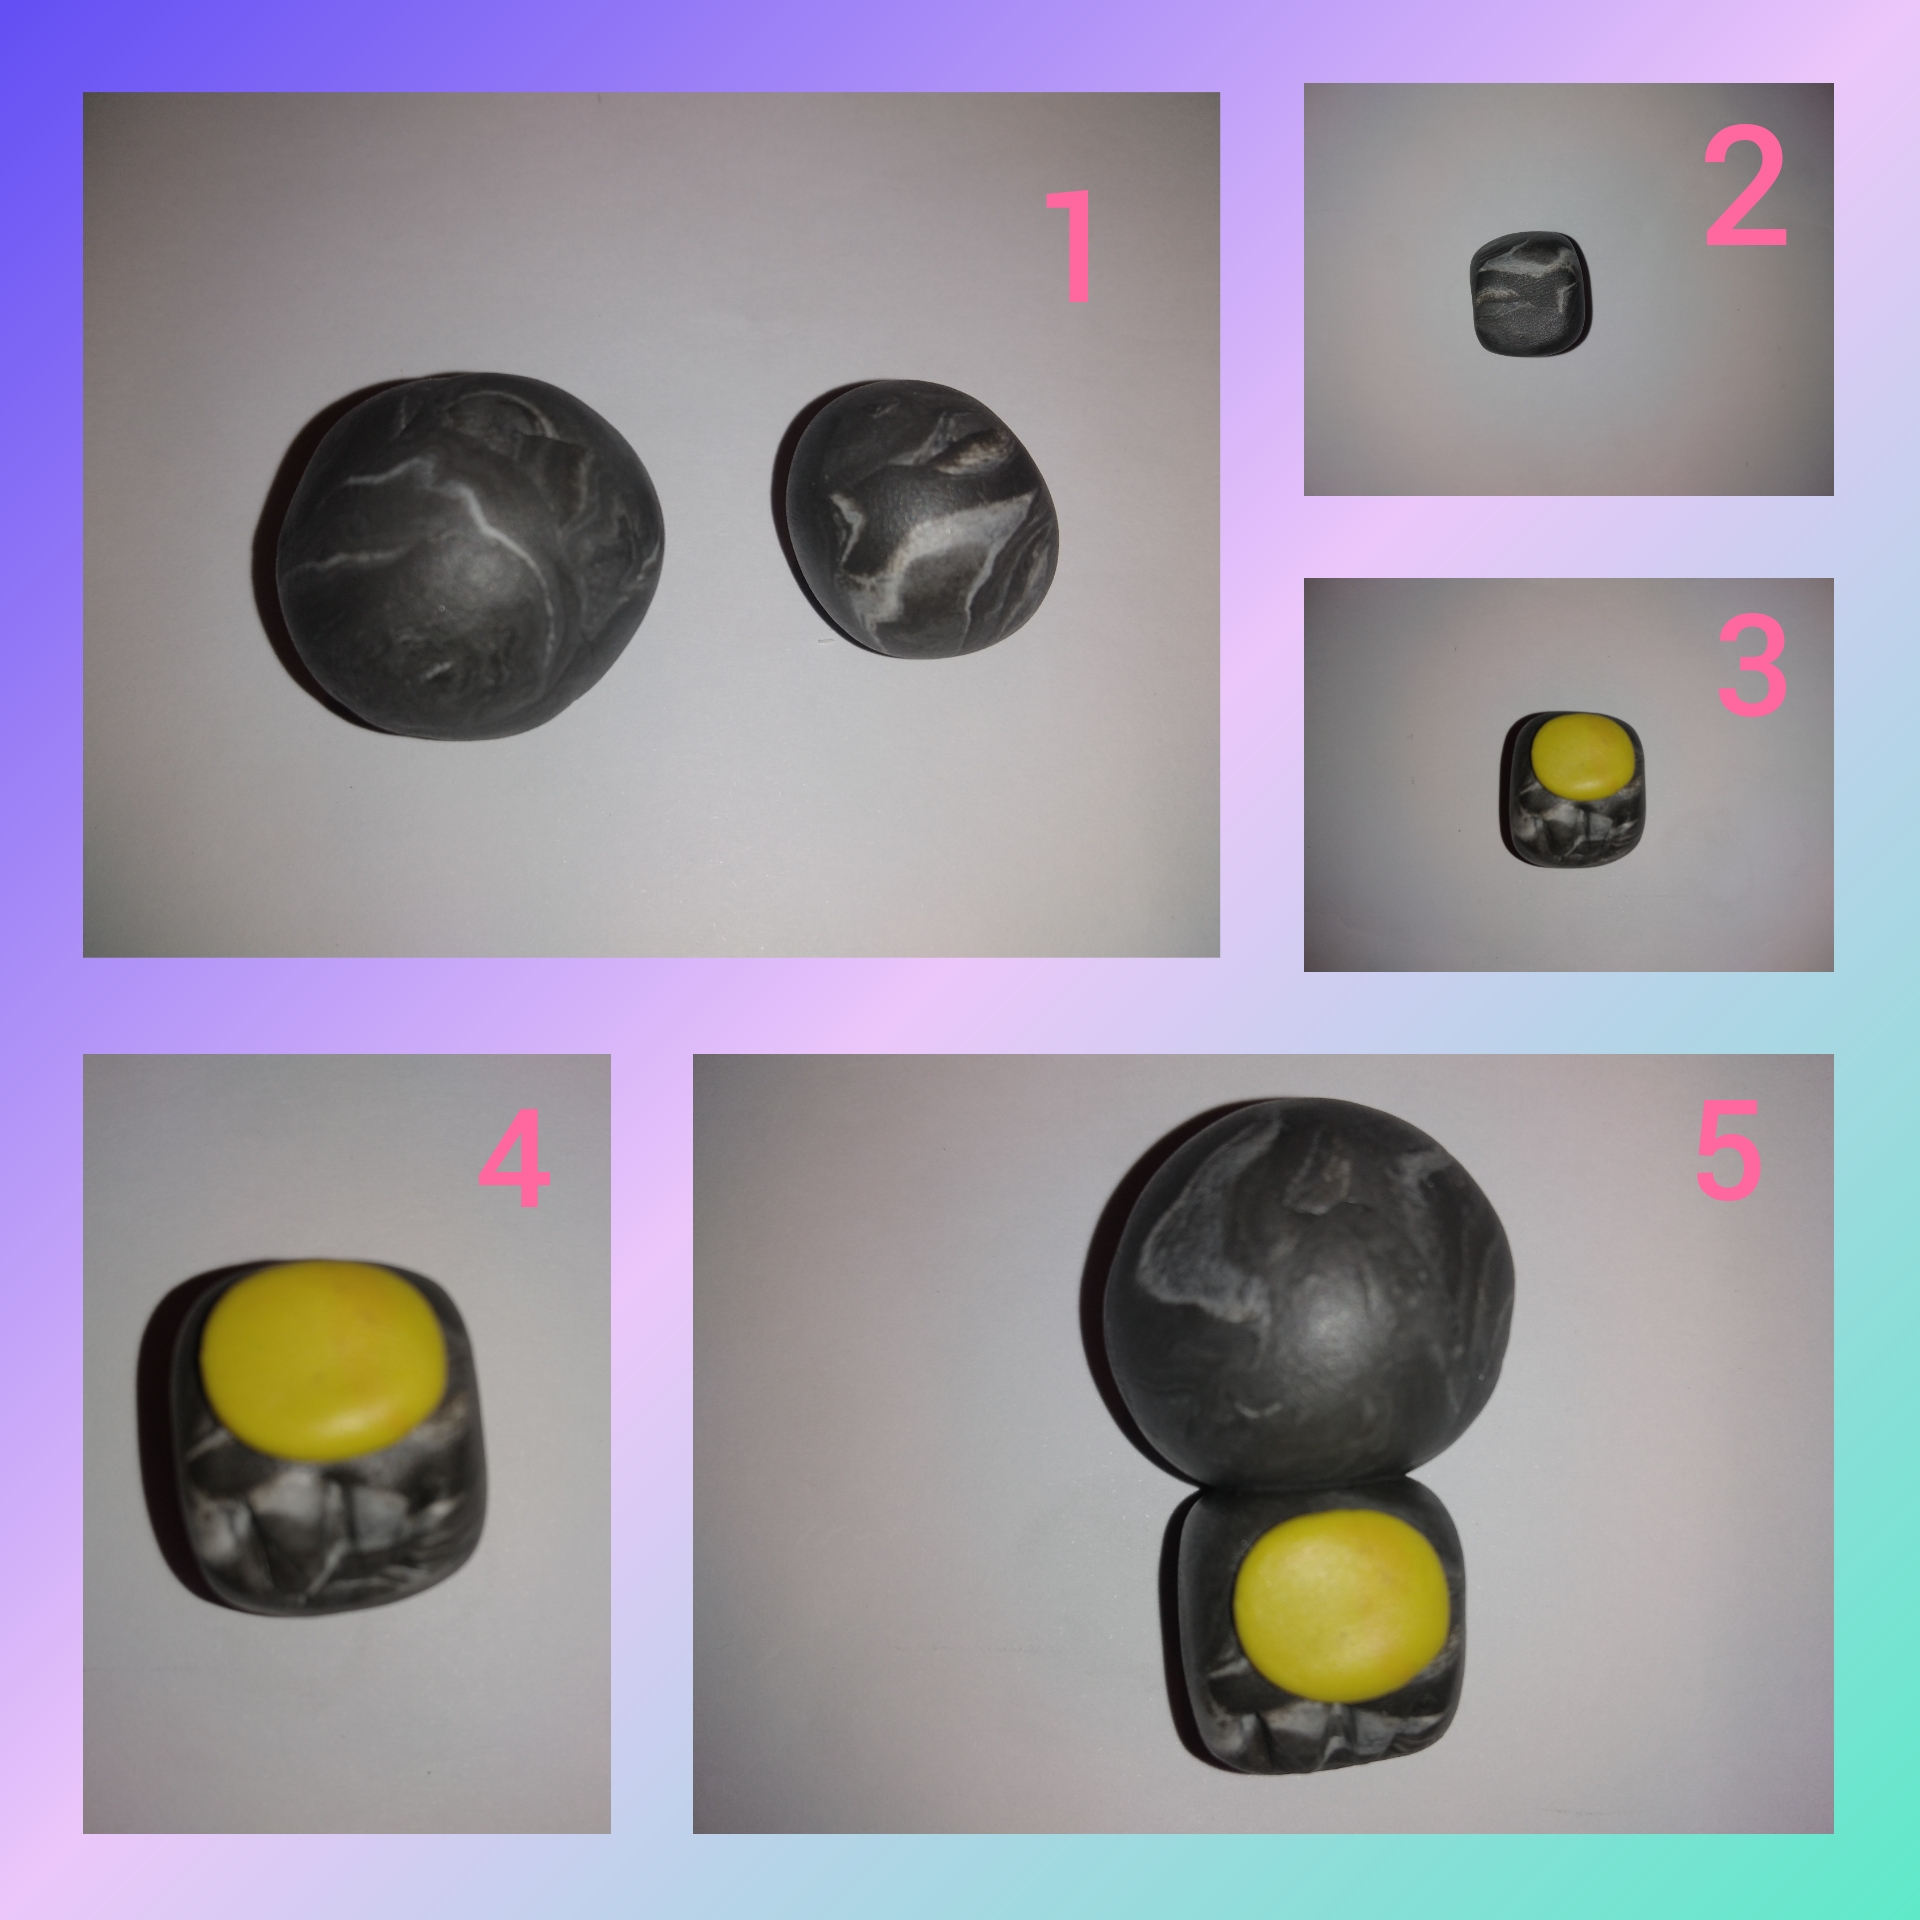
Tomé unas cuantas piedras y las pinté con pintura acrílico blanca.
Step 10.I took a few stones and painted them with white acrylic paint.
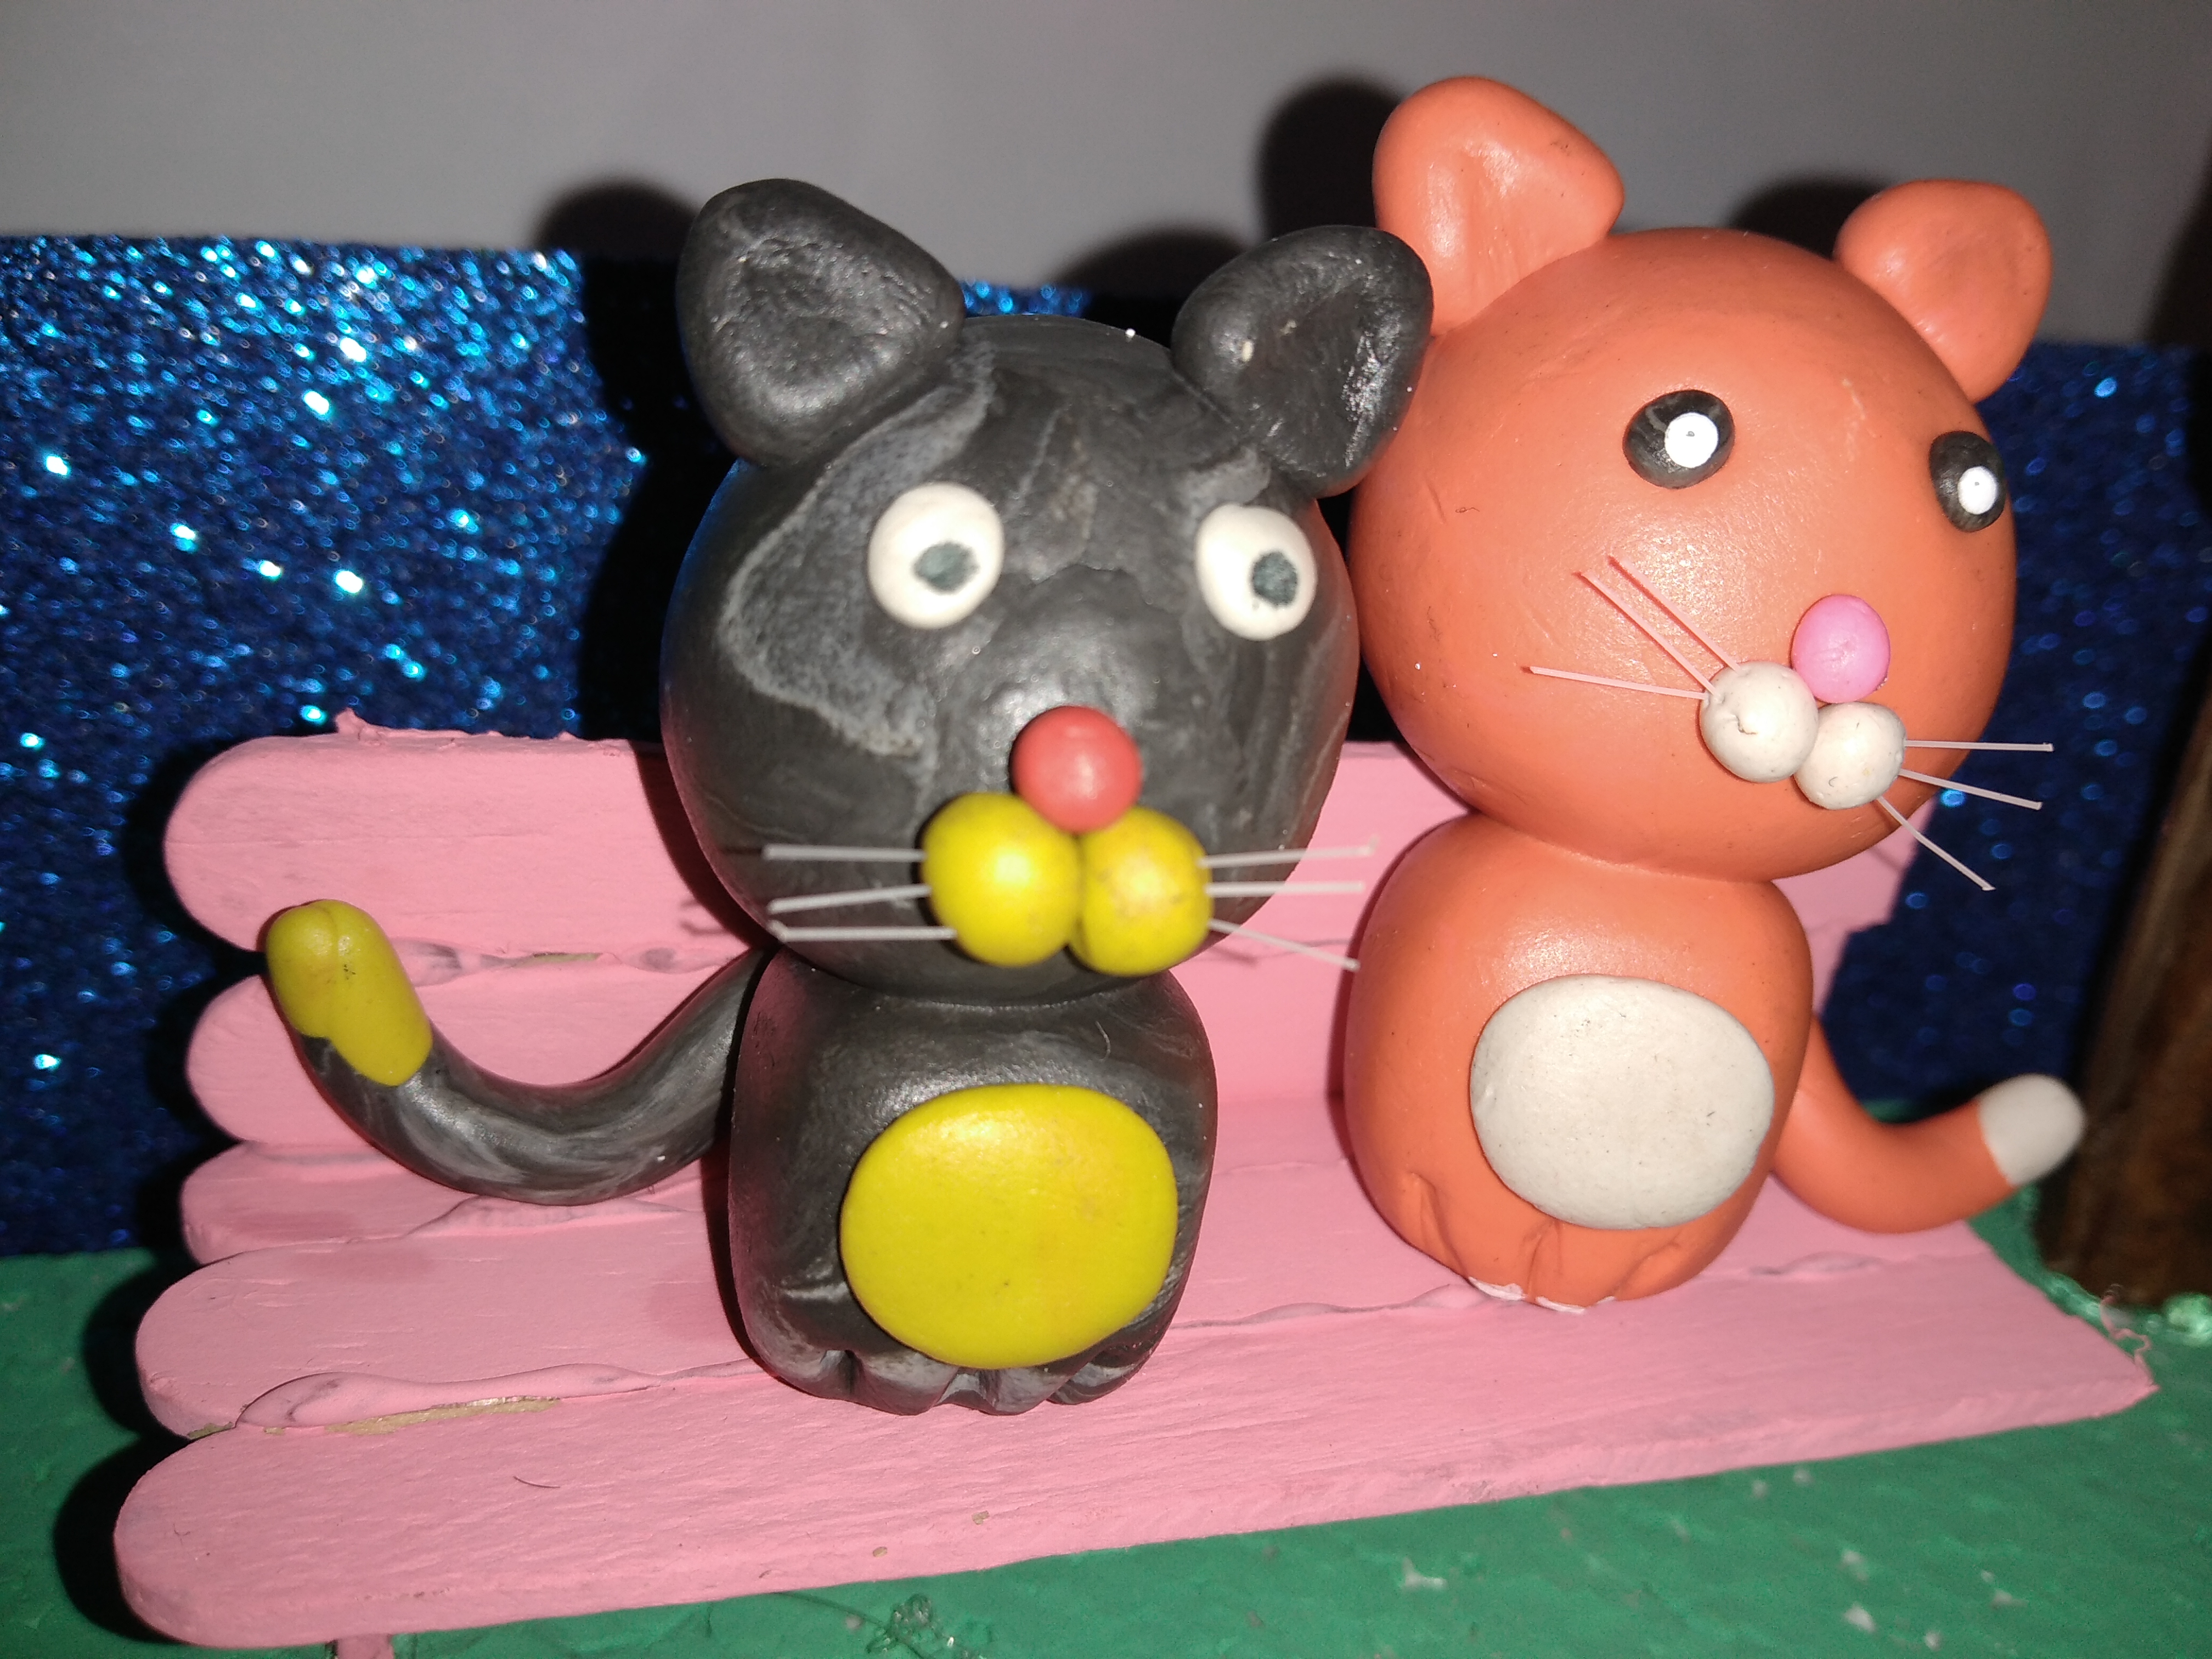
Teniendo todo los elementos que servirán de decoración para este diorama. Vamos a comenzar con un de los pasos más importante ya que es el de crear a mamá gatita que es uno de los animalitos que se está solicitando en el concurso.
Having all the elements that will serve as decoration for this diorama. We are going to start with one of the most important steps since it is to create a mother kitten that is one of the animals that is being requested in the contest.
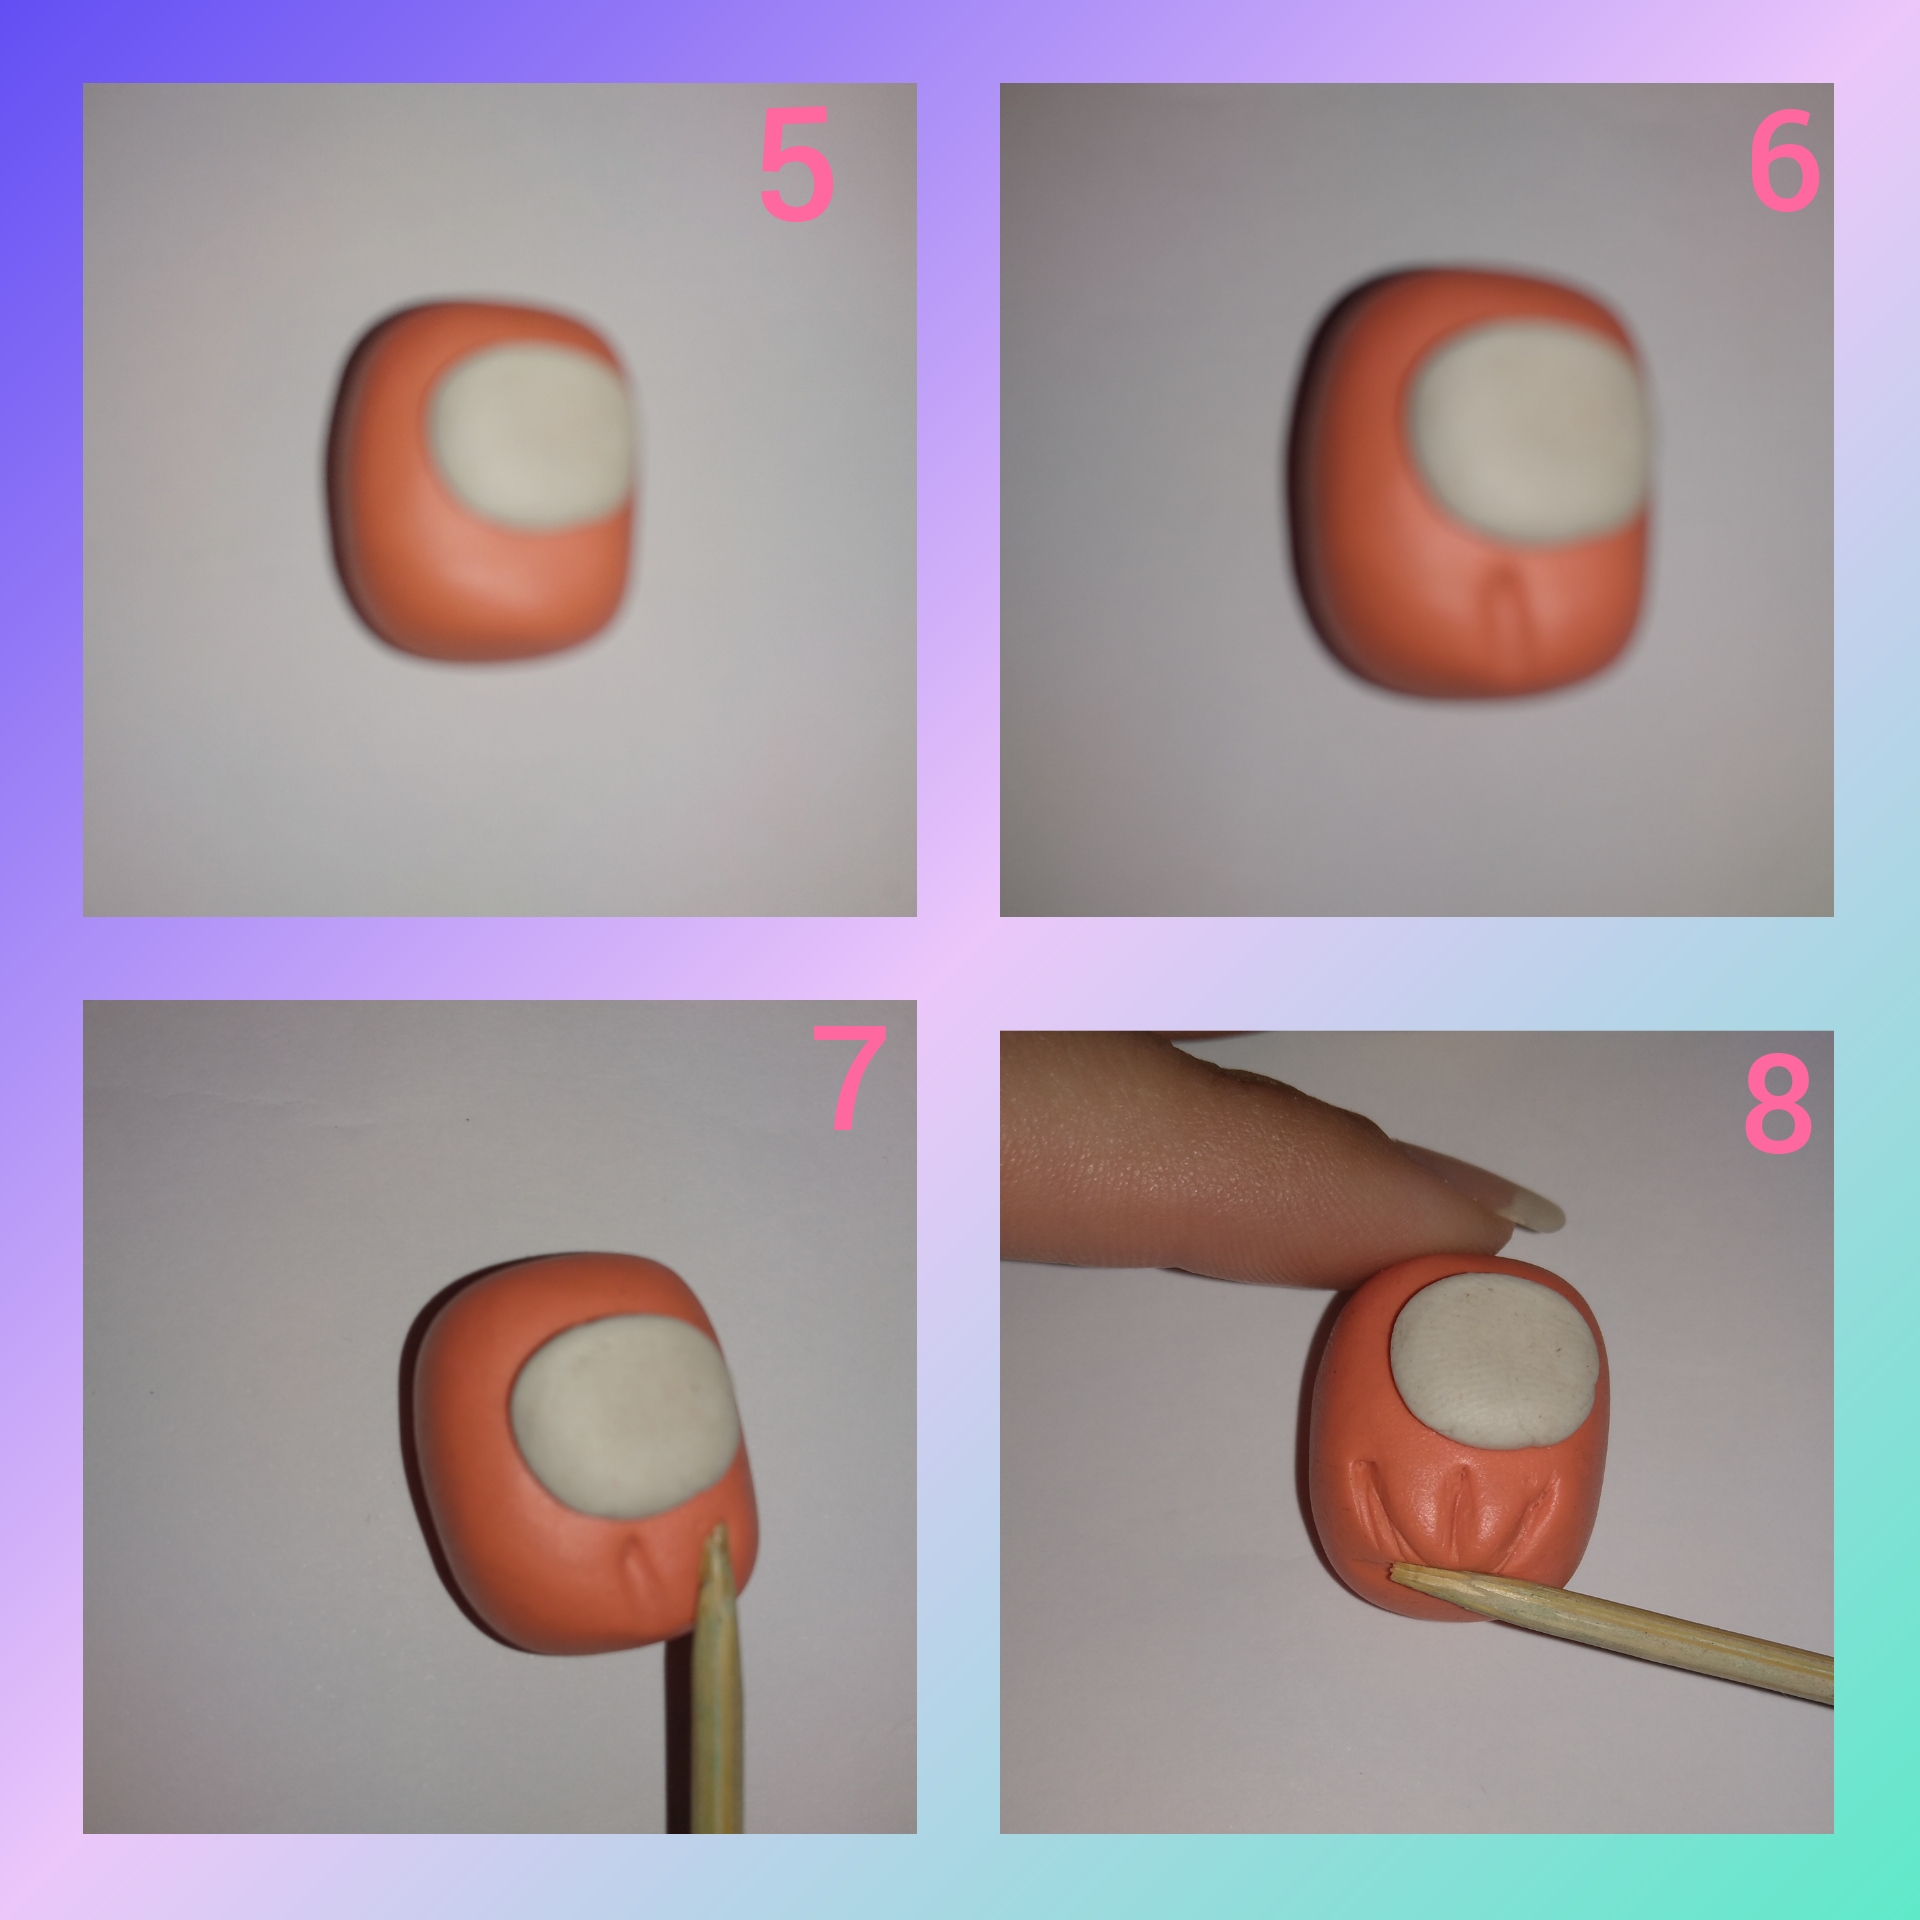
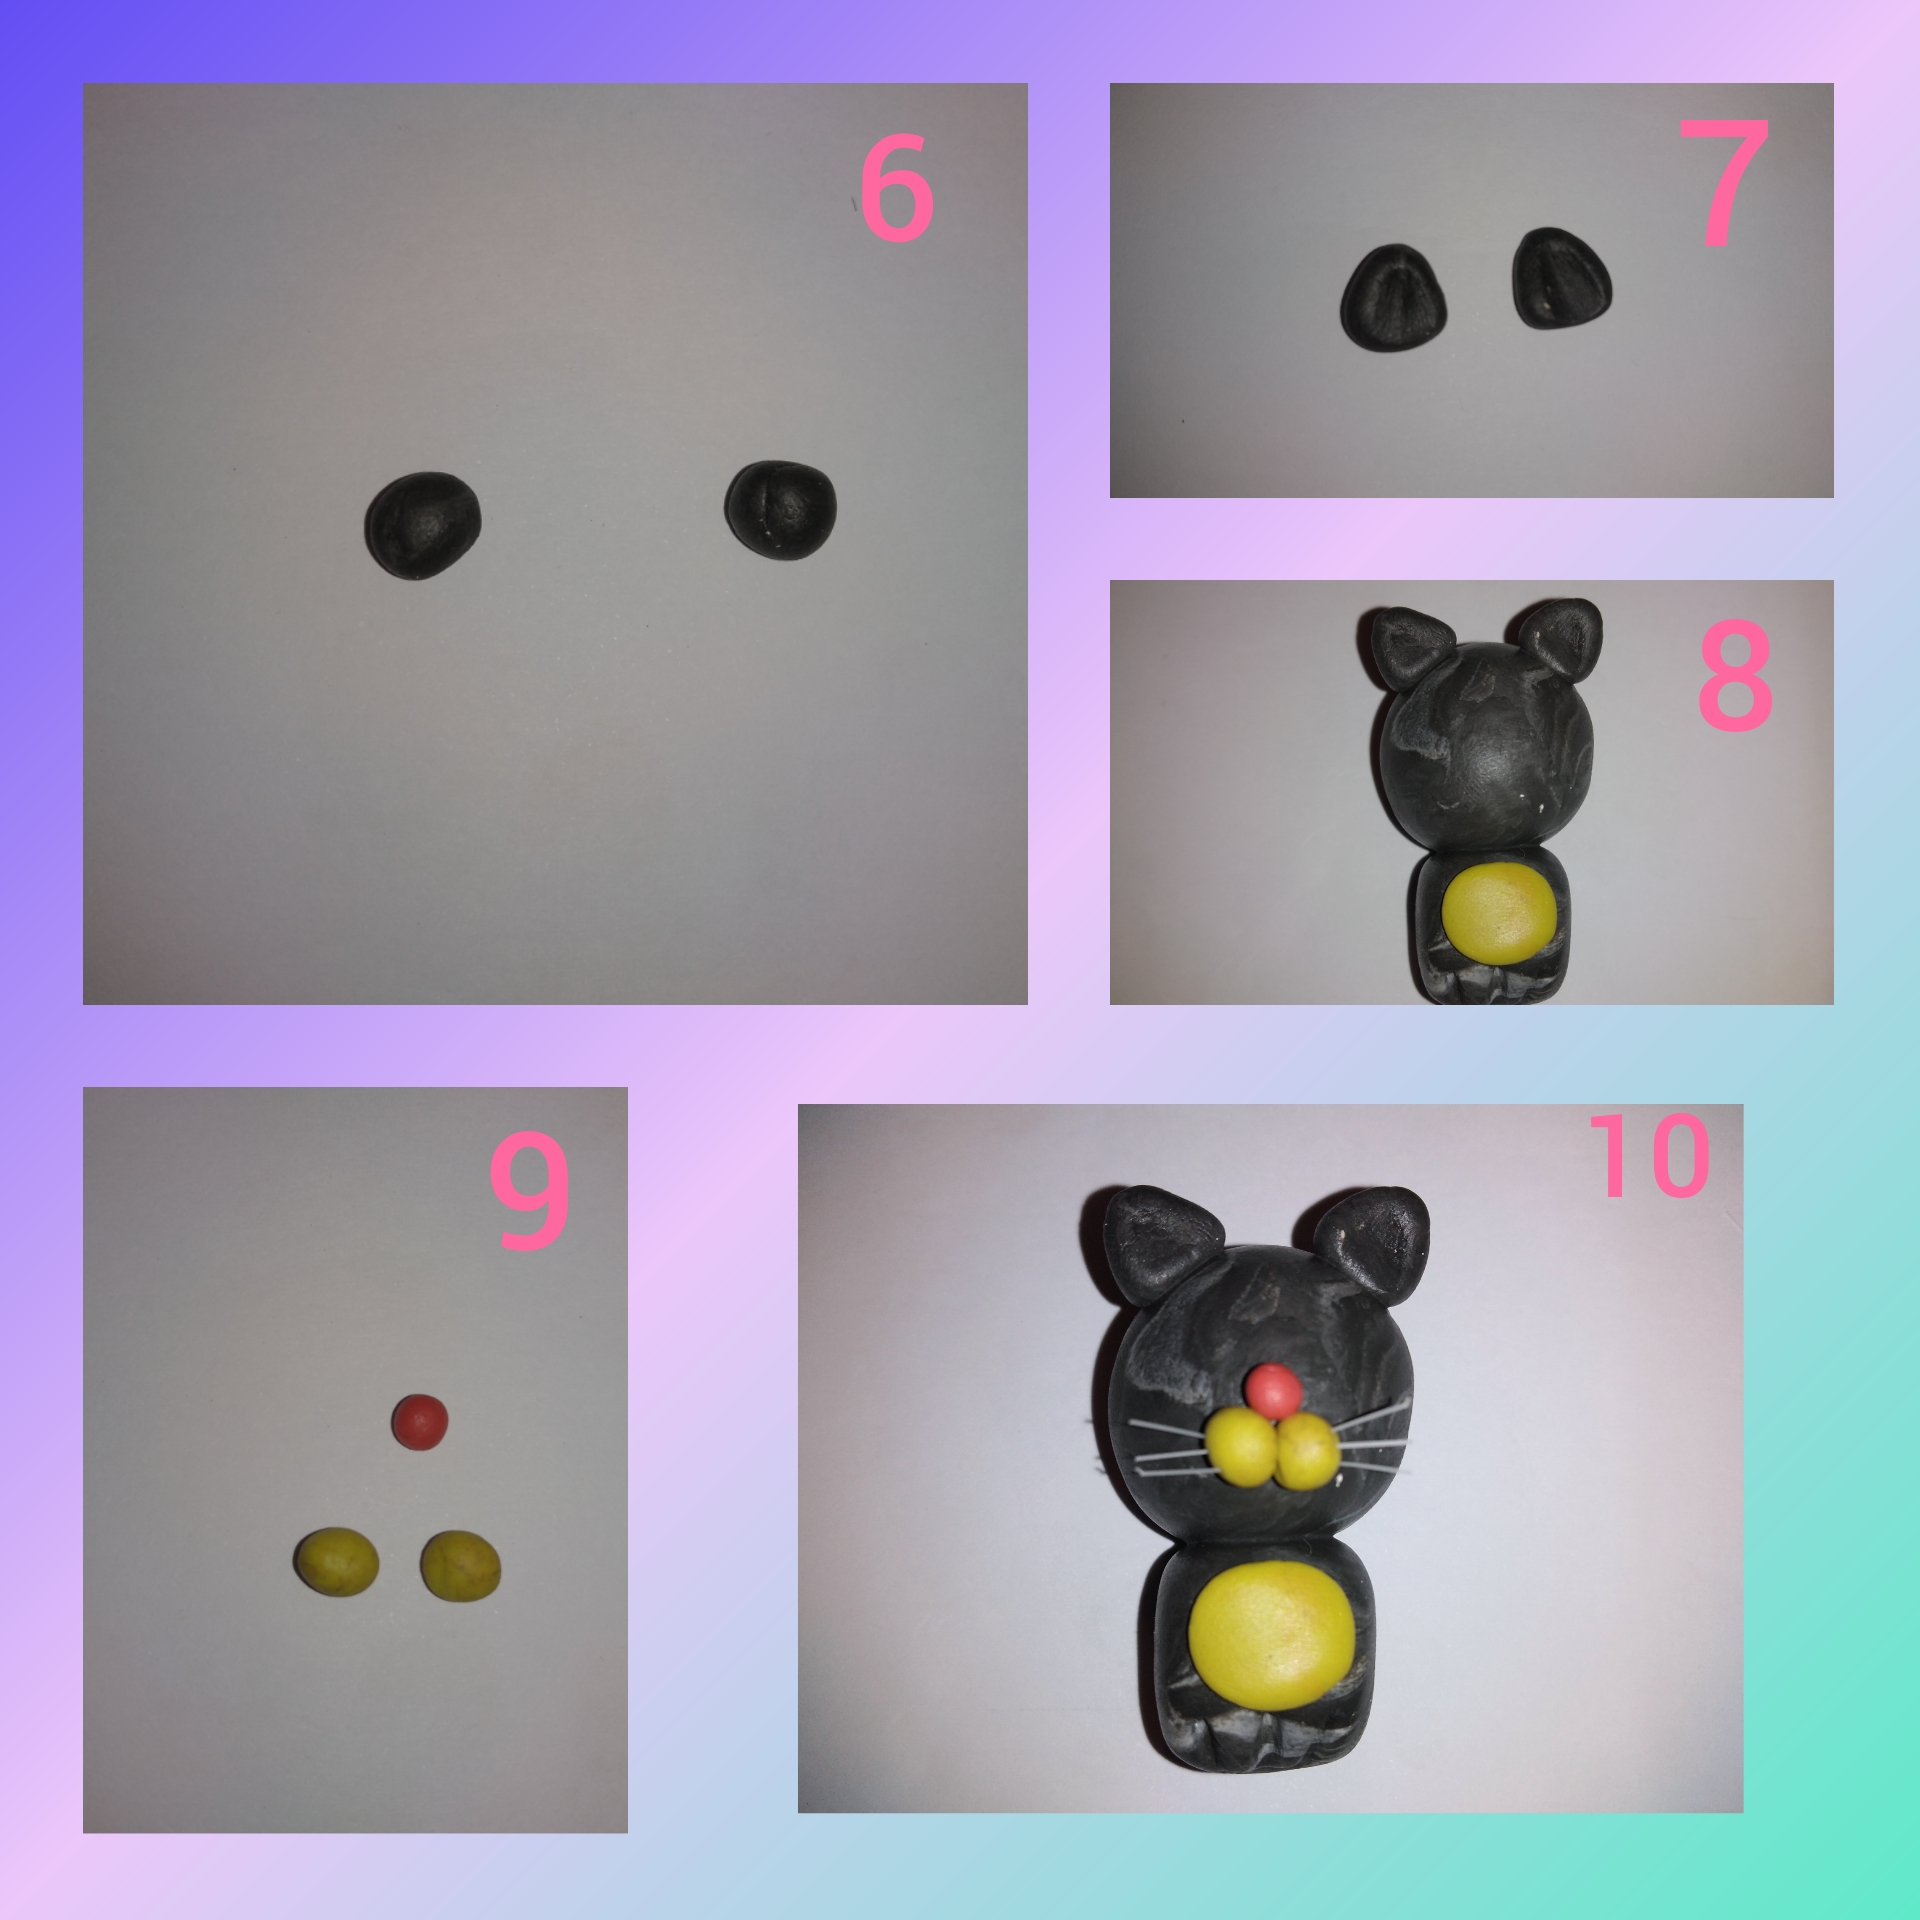
Paso 11.
Para crear a mamá gatita vamos a comenzar por hacer 2 bolitas de plastilina, una más grande que la otra. Tomamos la pequeña y con nuestros dedos vamos a darle forma de cilindro, el mismo será el cuerpo de mamá gatita, con plastilina blanca hacerlos una bolita, la cual la aplastamos un poco y de igual manera con nuestros dedos le damos forma de cilindro, este será la barriguita de mamá gatita.
Step 11.To create a mommy kitty we are going to start by making 2 balls of playdough, one bigger than the other. We take the small one and with our fingers we are going to shape it into a cylinder, it will be the body of the mother kitten, with white plasticine make them a little ball, which we flatten a little and in the same way with our fingers we shape it into a cylinder, this It will be mommy kitty's tummy.
Paso 12.
Vamos a unir la los dos cilindros que formamos, colocando la plastilina blanca sobre la naranja. Ahora con el palito de altura vamos a hacer una marca en la parte inferior del cilindro con el fin de marcar las garritas a mamá gatita, luego del lado derecho de manera diagonal hacemos una marca y del lado izquierdo de manera diagonal hacemos la otra, con el mismo palito cortamos un poco abajo para separar las patas.
Step 12.We are going to unite the two cylinders that we formed, placing the white plasticine on top of the orange one. Now with the height stick we are going to make a mark in the lower part of the cylinder in order to mark the paws of the mother kitten, then on the right side diagonally we make a mark and on the left side diagonally we make the other, with Cut the same stick a little below to separate the legs.
Paso 13.
Ahora vamos a unir el cuerpo con la cabeza, luego vamos a hacer dos pelotitas del mismo tamaño de color naranja para las orejitas, esos pelotitas las aplastamos un poco con los dedos y luego le damos forma de triángulos, el palito lo hundimos un poco en el centro para darle esa apariencia que tienen las orejitas de los gatitos y luego las fijamos a la cabeza.
Step 13.
Now we are going to join the body with the head, then we are going to make two orange balls of the same size for the little ears, we flatten those balls a little with our fingers and then we shape them of triangles, we sink the stick a little in the center to give it that appearance that the kittens' ears have and then we fix them to the head.
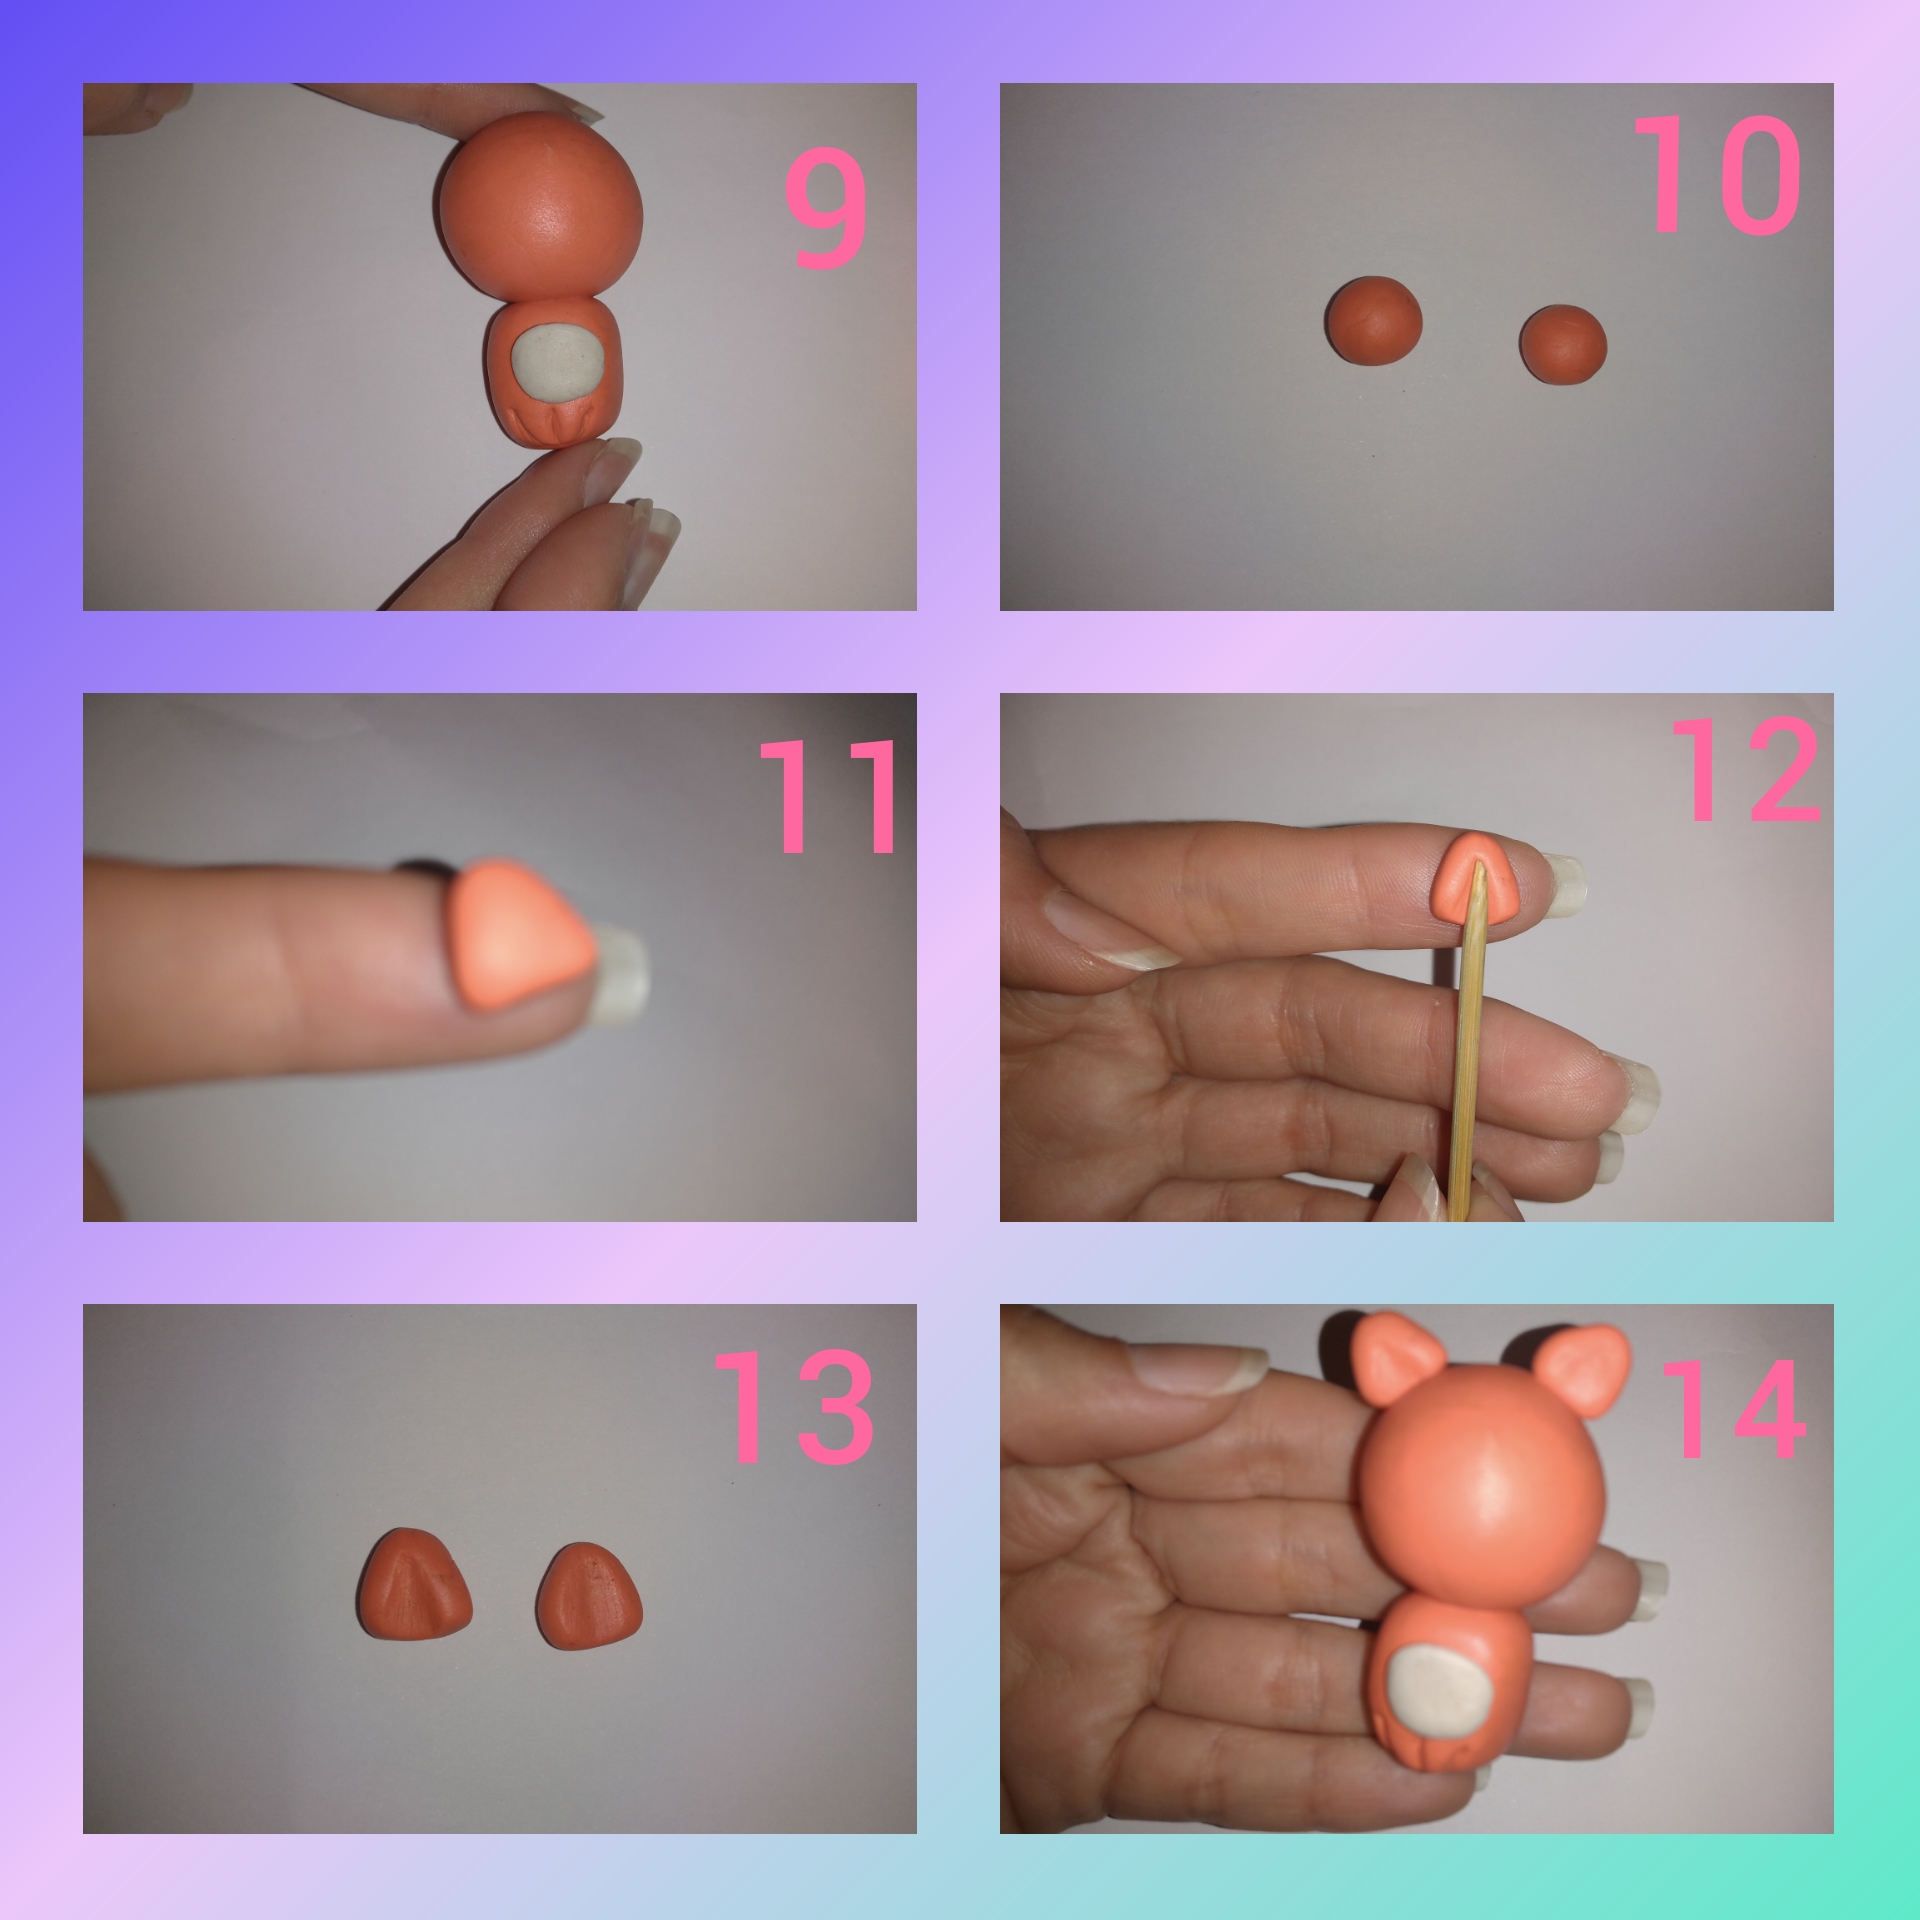
Paso 14.
Hacemos dos bolitas de plastilina blanca que serán la parte de los bigotes de nuestra mamá gatita, luego hacemos una pelotita roja pequeña y la colocamos encima será la nariz, cortamos unos pelitos de un cepillo de dientes que tengamos en casa sin usar y agregamos estos pelitos a las bolitas blancas y se verá de esta manera.
Step 14.We make two balls of white plasticine that will be the part of our mother kitten's whiskers, then we make a small red ball and place it on top, it will be the nose, we cut some hairs from a toothbrush that we have at home without using and add these hairs to the white balls and it will look like this.
Paso 15.
Ahora vamos a hacer la cola, tomamos un trozo de plastilina naranja y la estiramos con nuestro dedo, agregamos un poco de blanco en la punta y seguimos moldeando con nuestro dedo, luego pegamos la cola al cuerpo de mamá gatita.
Step 15.Now we are going to make the tail, we take a piece of orange plasticine and stretch it with our finger, add a bit of white on the tip and continue shaping with our finger, then glue the tail to the kitty mama's body.
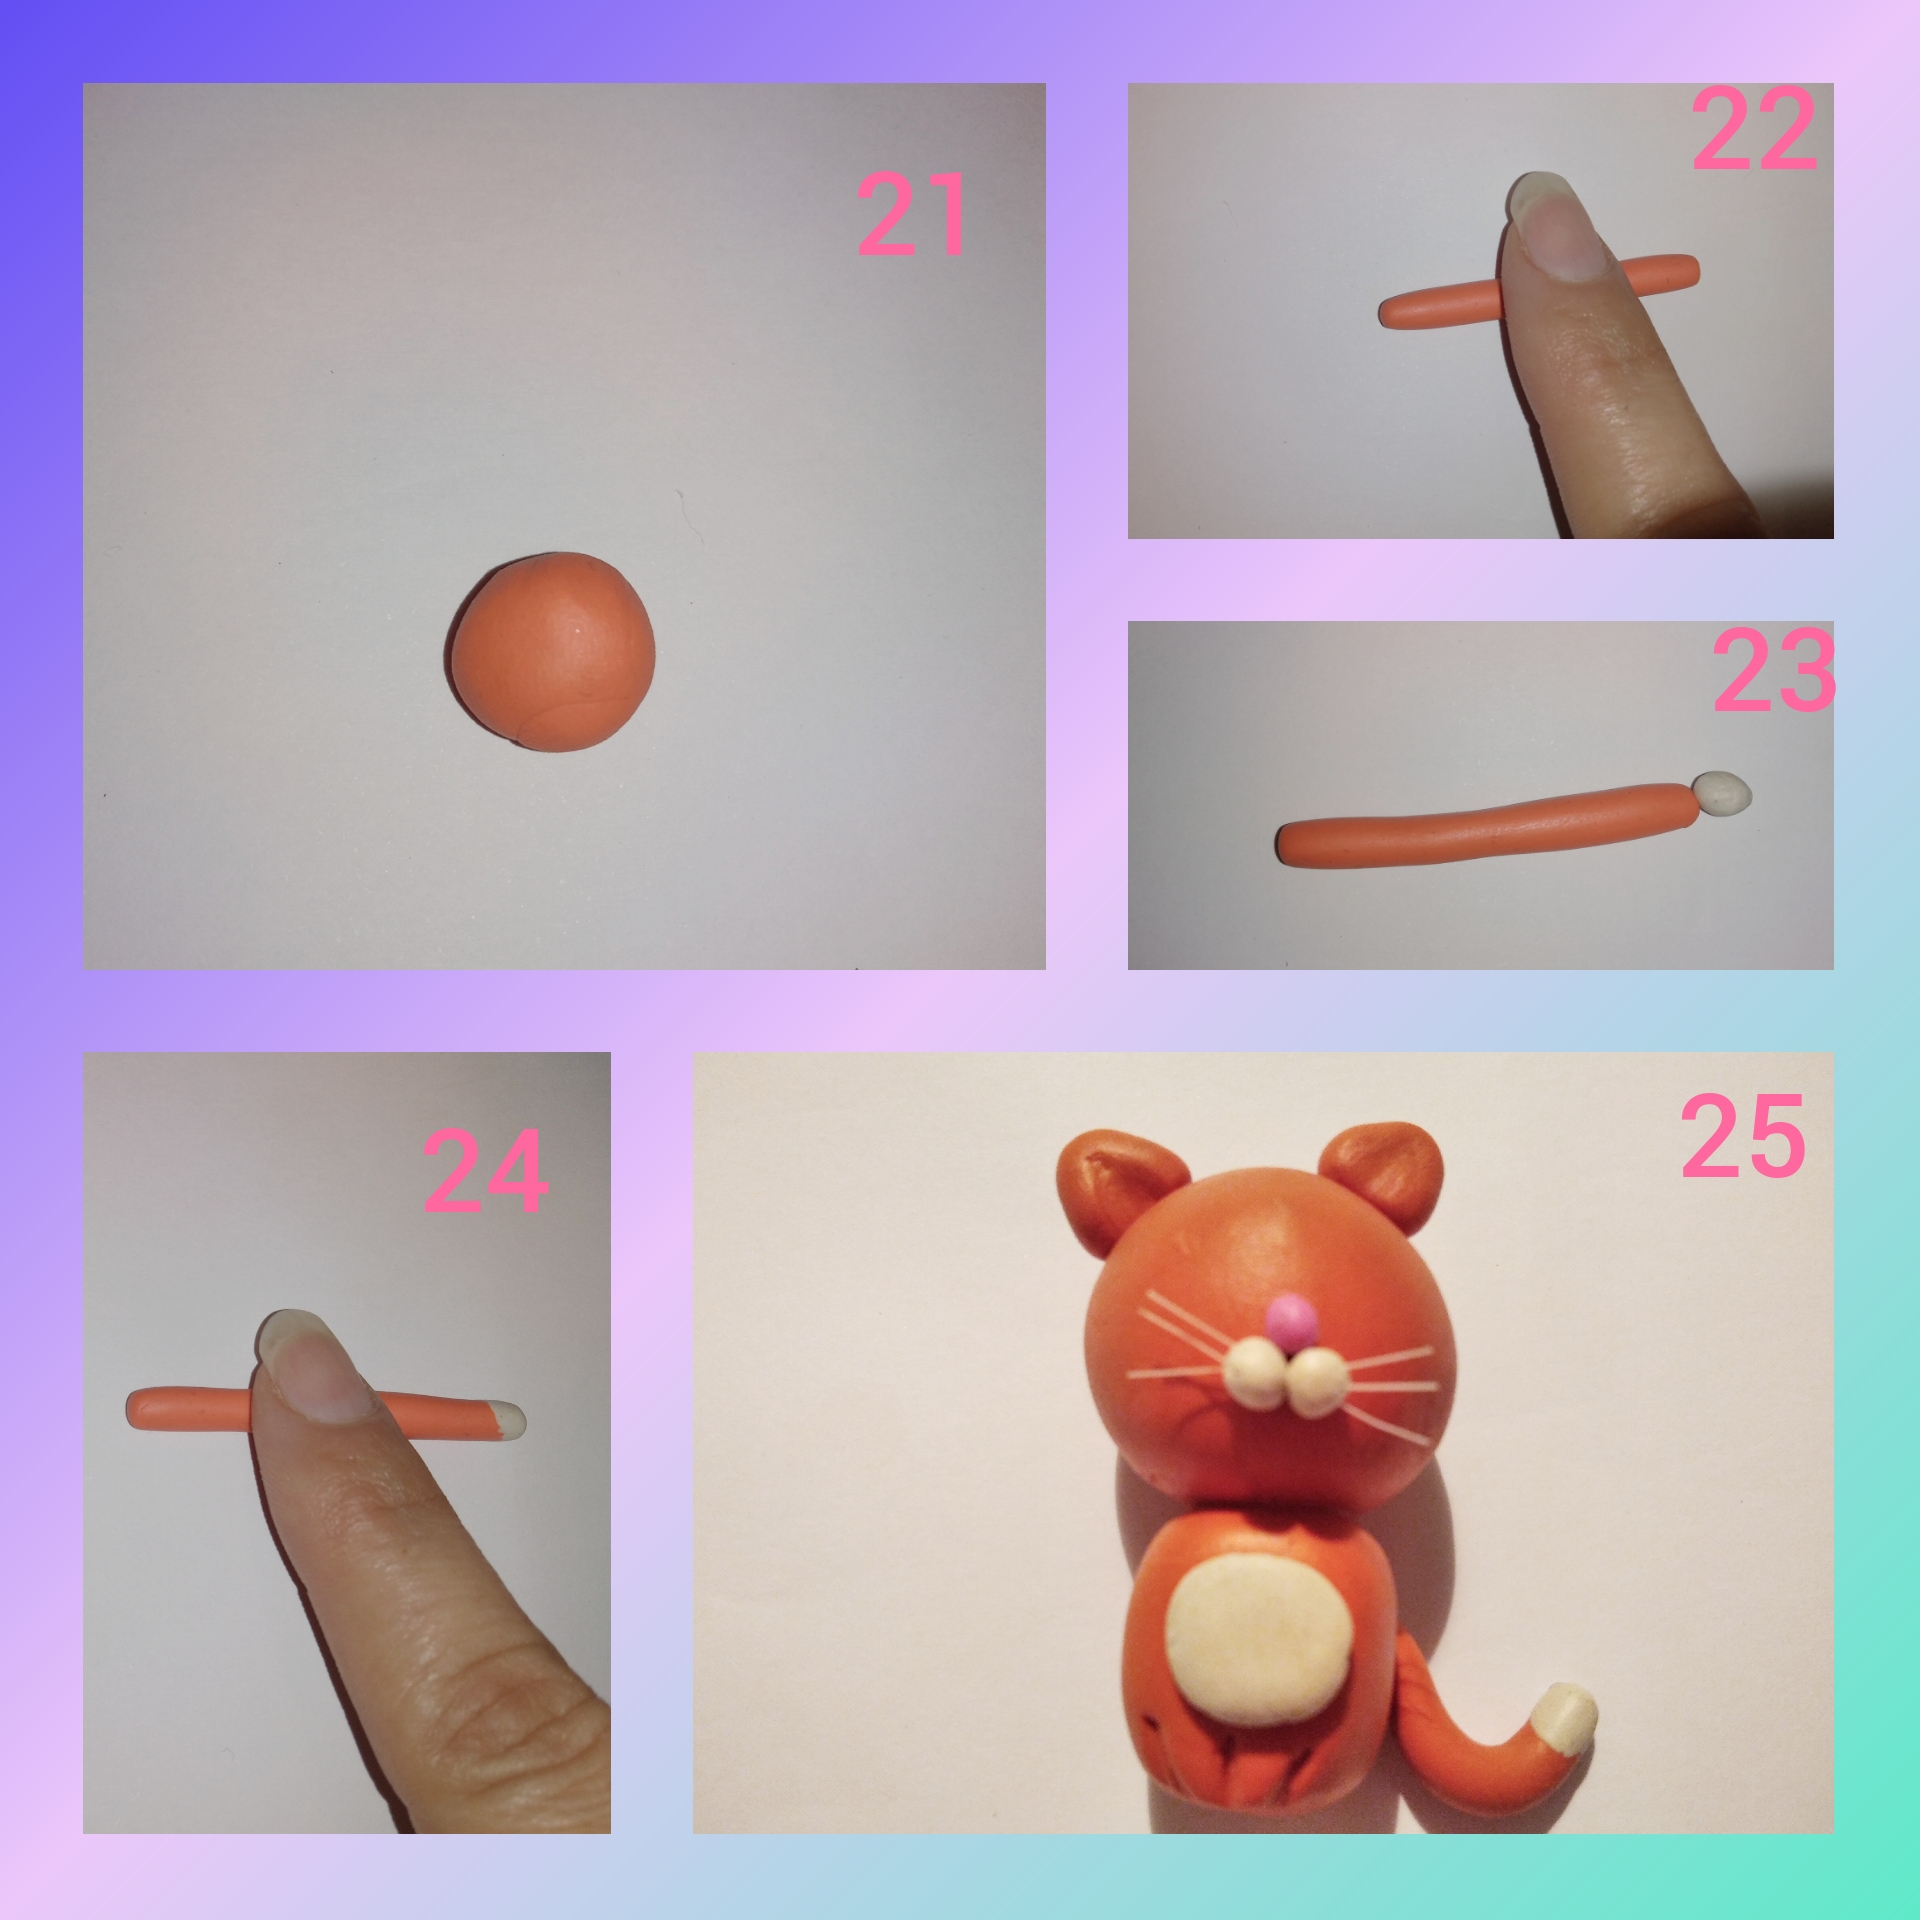
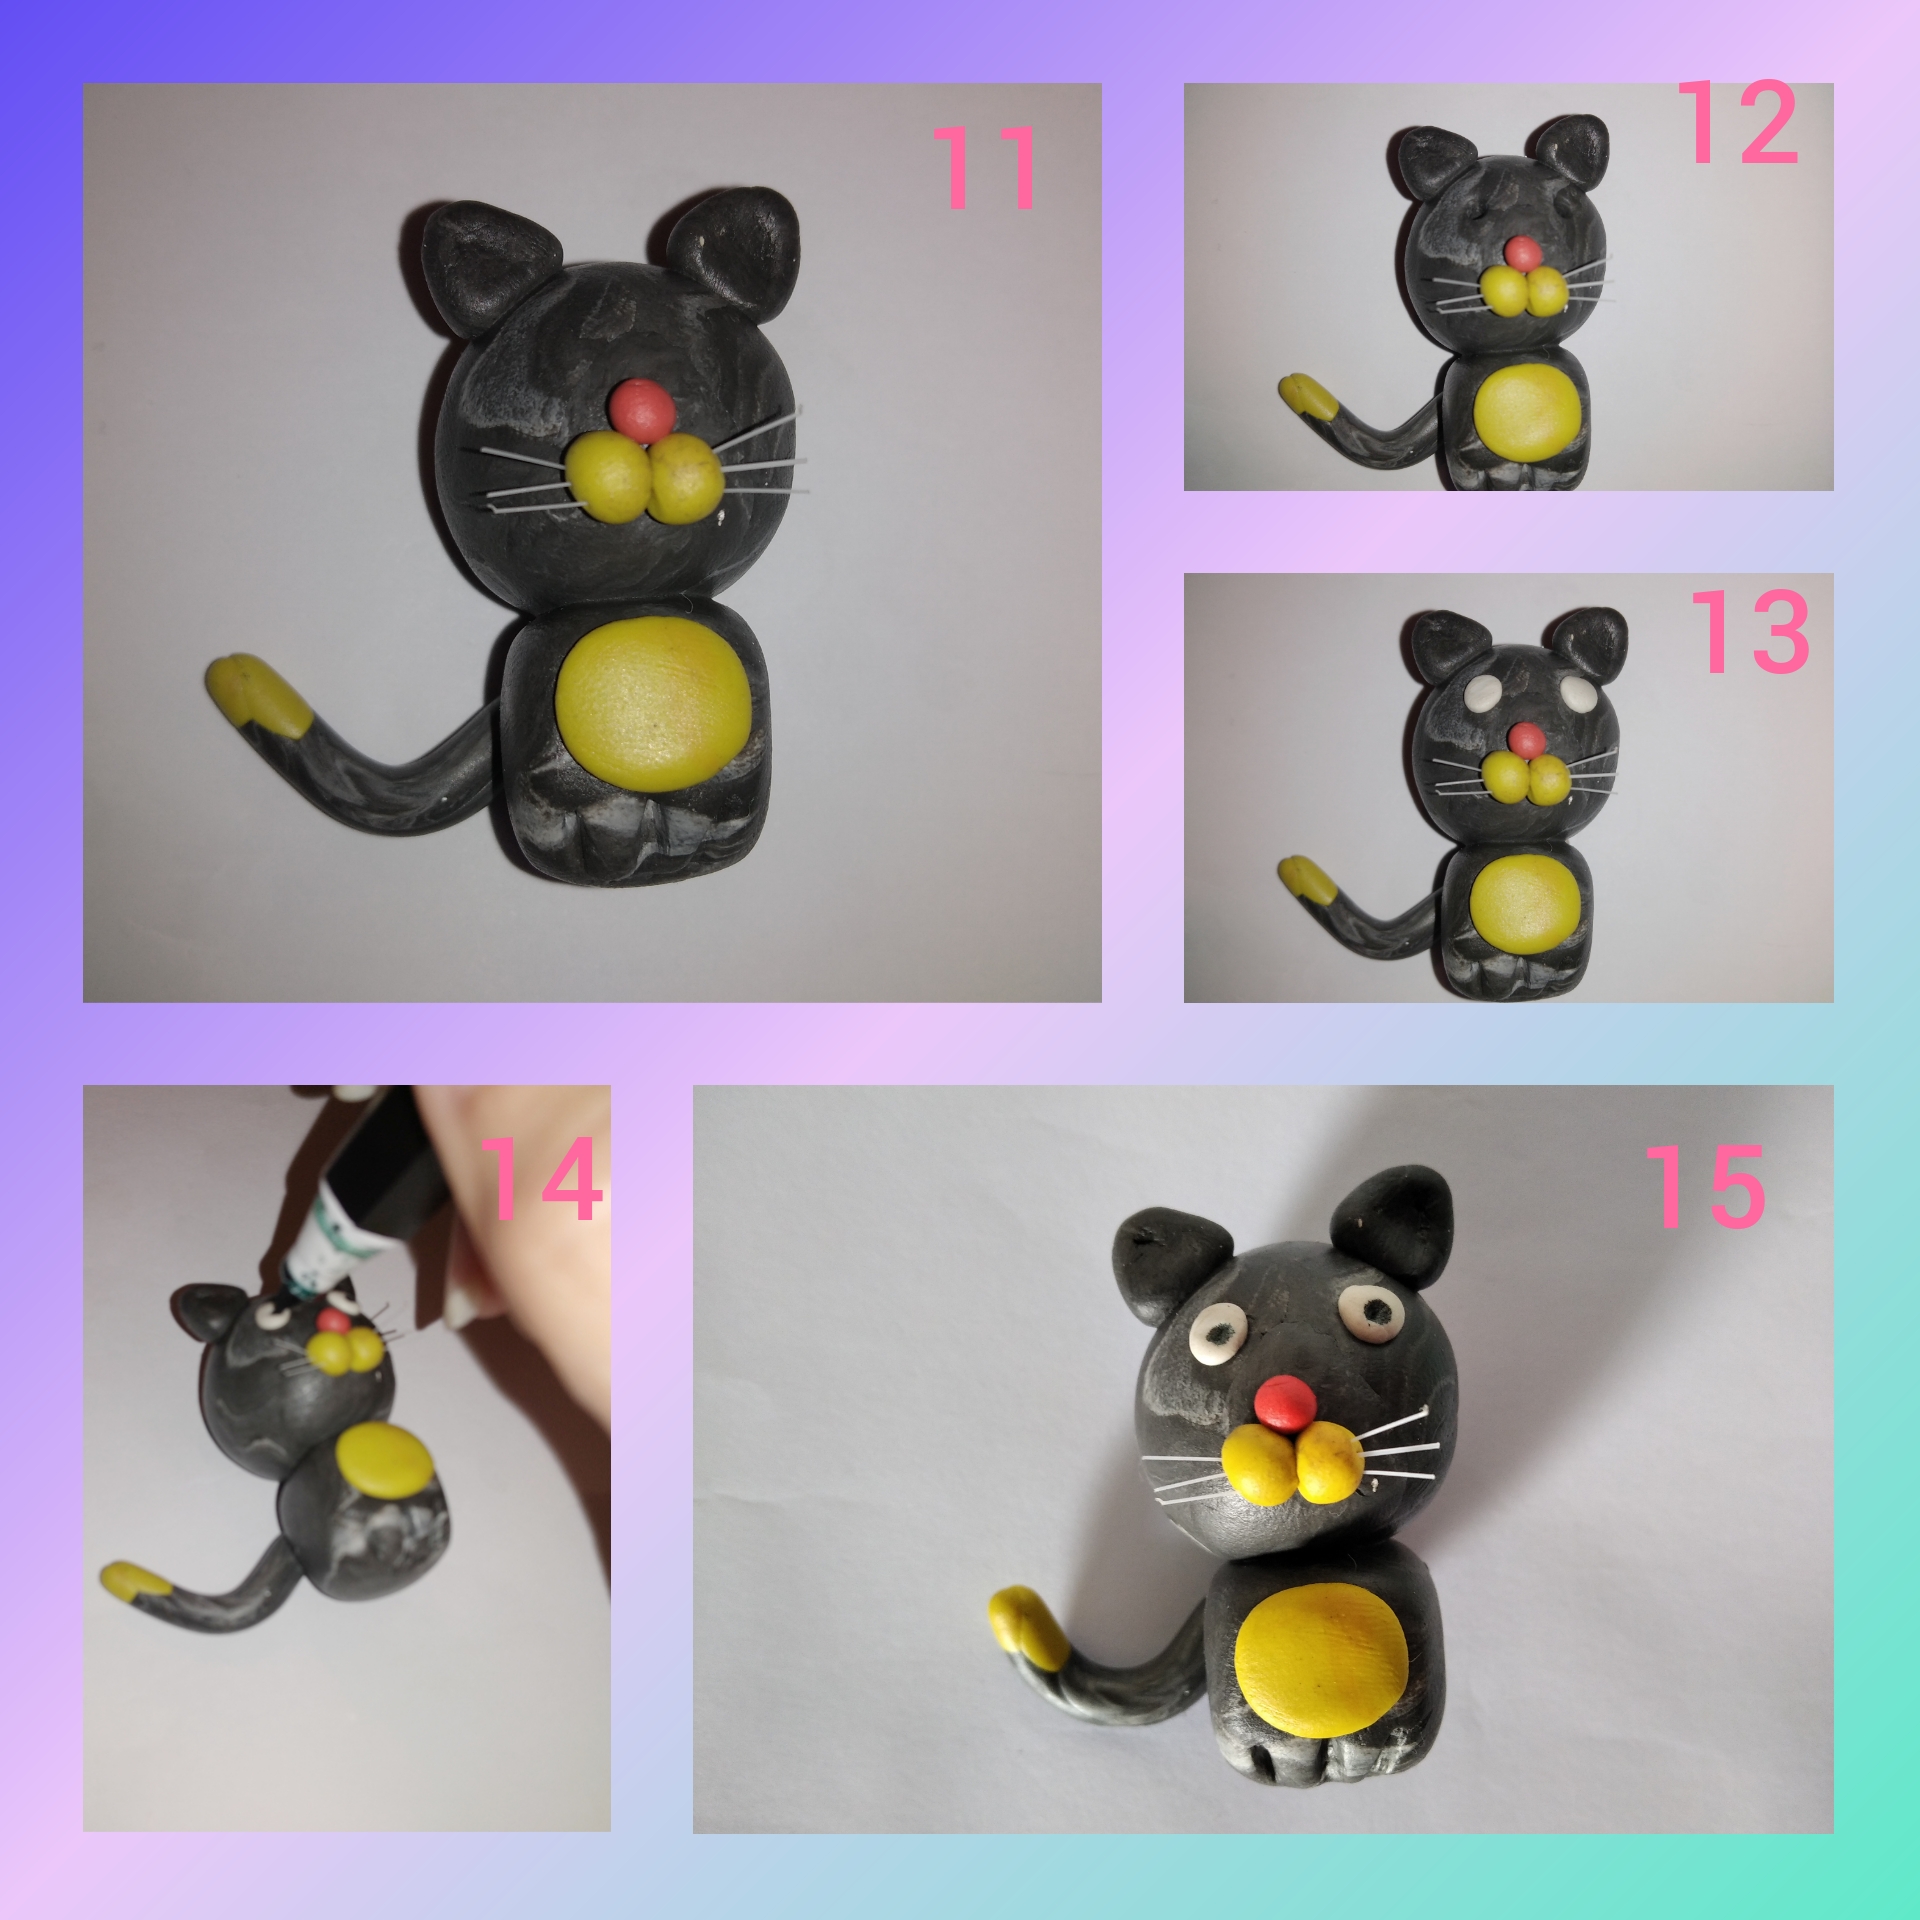
Paso 16.
Hacemos dos pelotitas pequeñas con plastilina negra, luego con el palito de altura en la cara de mamá gatita, hacemos dos orificio que serán lo ojitos, tomamos pelotitas de plastilina negra y las introducimos cada una en un orificio.
Step 16.We make two small balls with black plasticine, then with the height stick on the mother kitten's face, we make two holes that will be the little eyes, we take small balls of black plasticine and introduce each one in a hole.
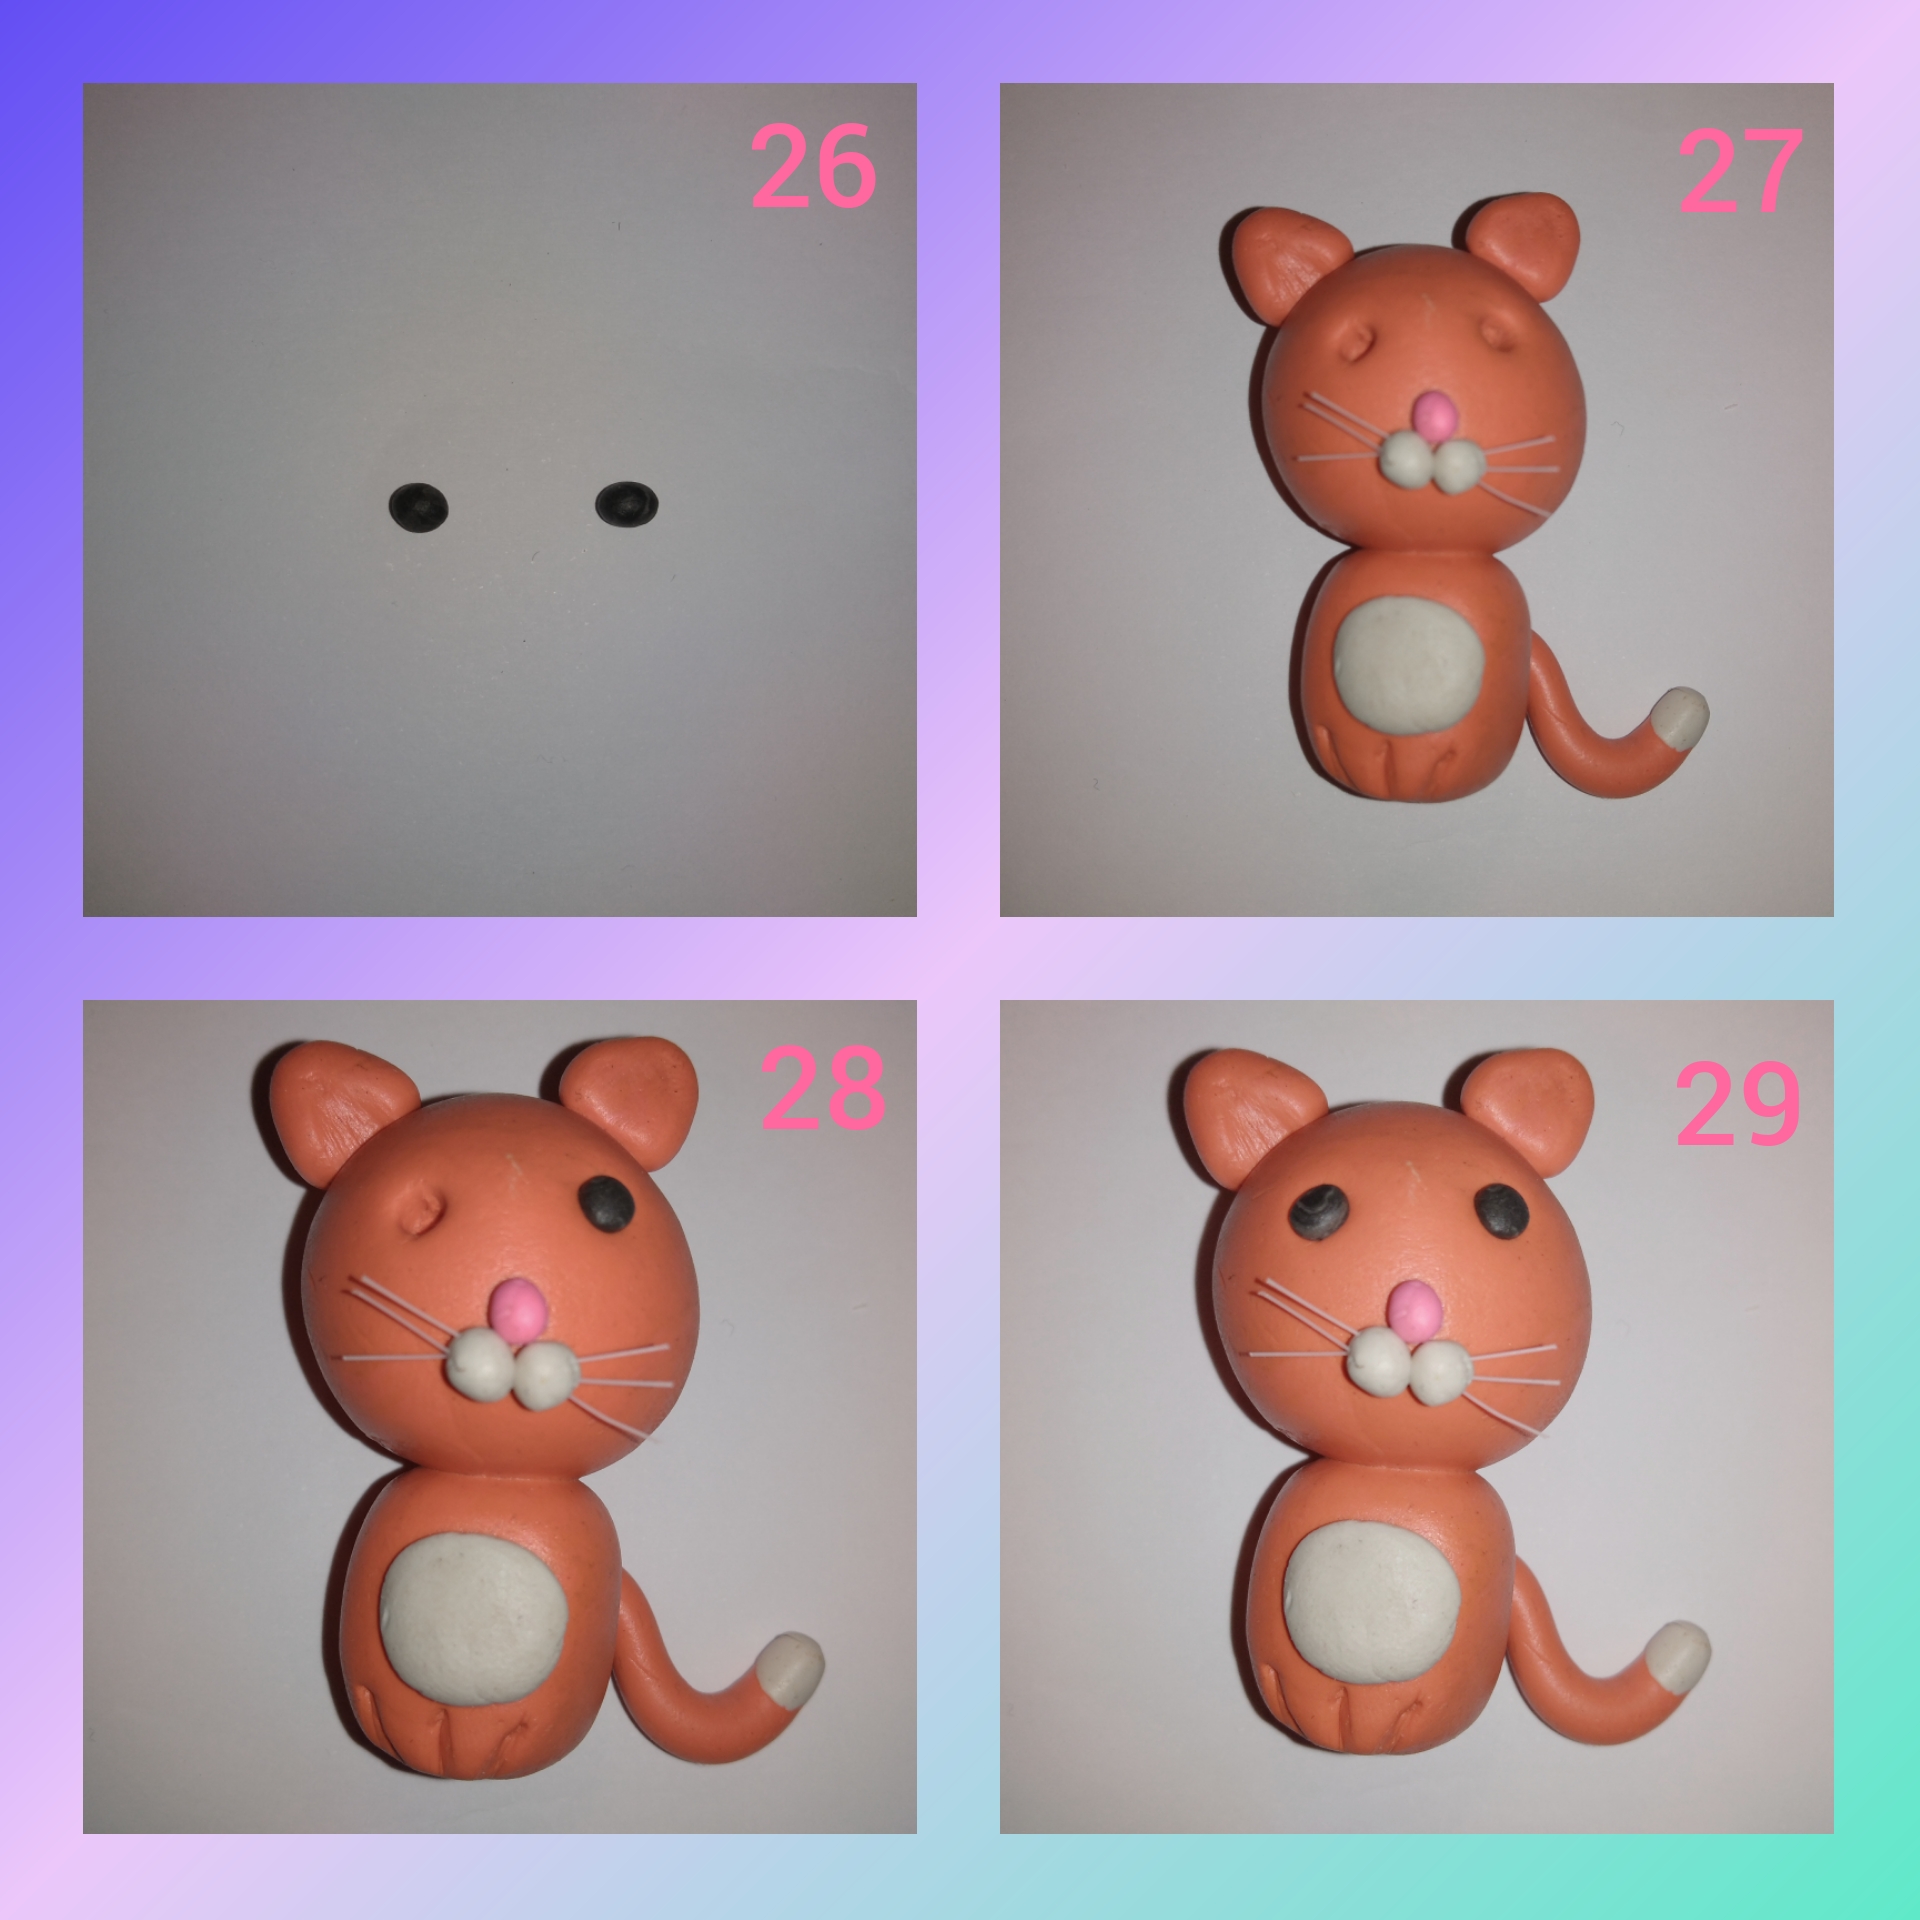
Paso 17.
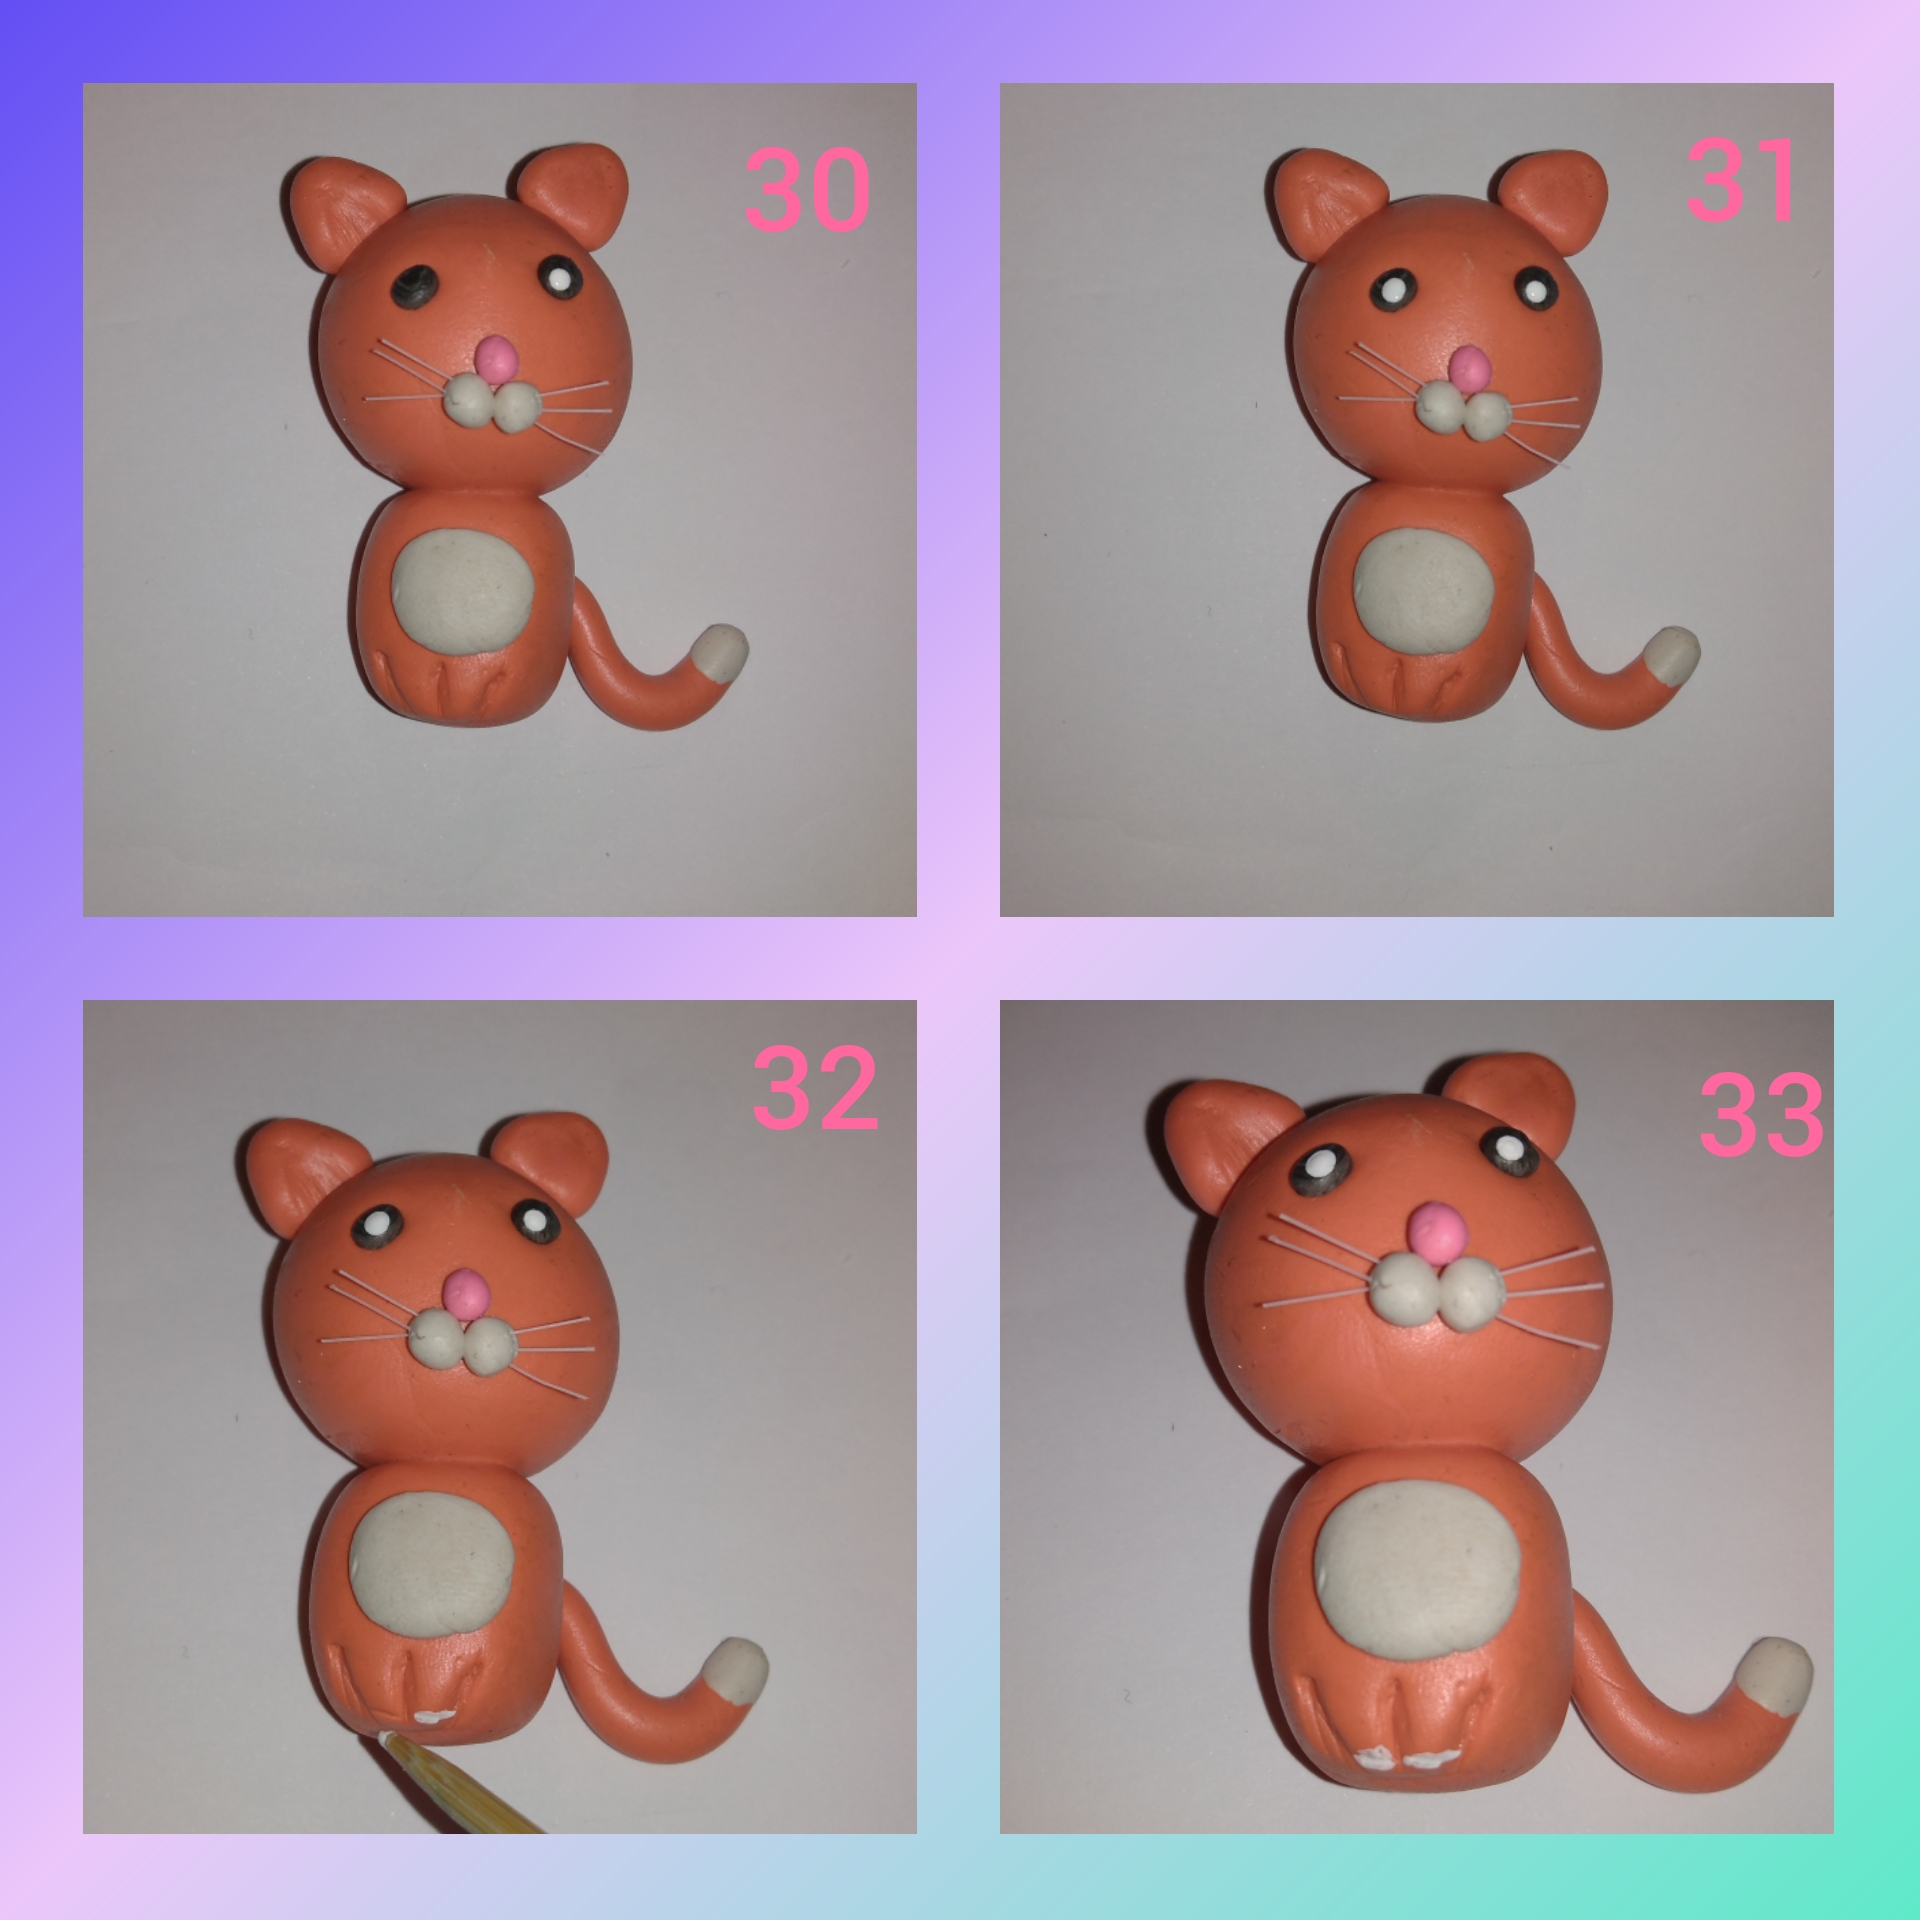
Con pintura blanca y el palito de altura hacemos un punto en la plastilina negra, este proceso se realiza en cada ojo, por último con la misma pintura blanca pintamos las rayitas de la patas y listo terminada nuestra mamá gatita.
Step 17.With white paint and the height stick we make a point in the black plasticine, this process is done in each eye, finally with the same white paint we paint the stripes of the legs and that's it our kitty mom.
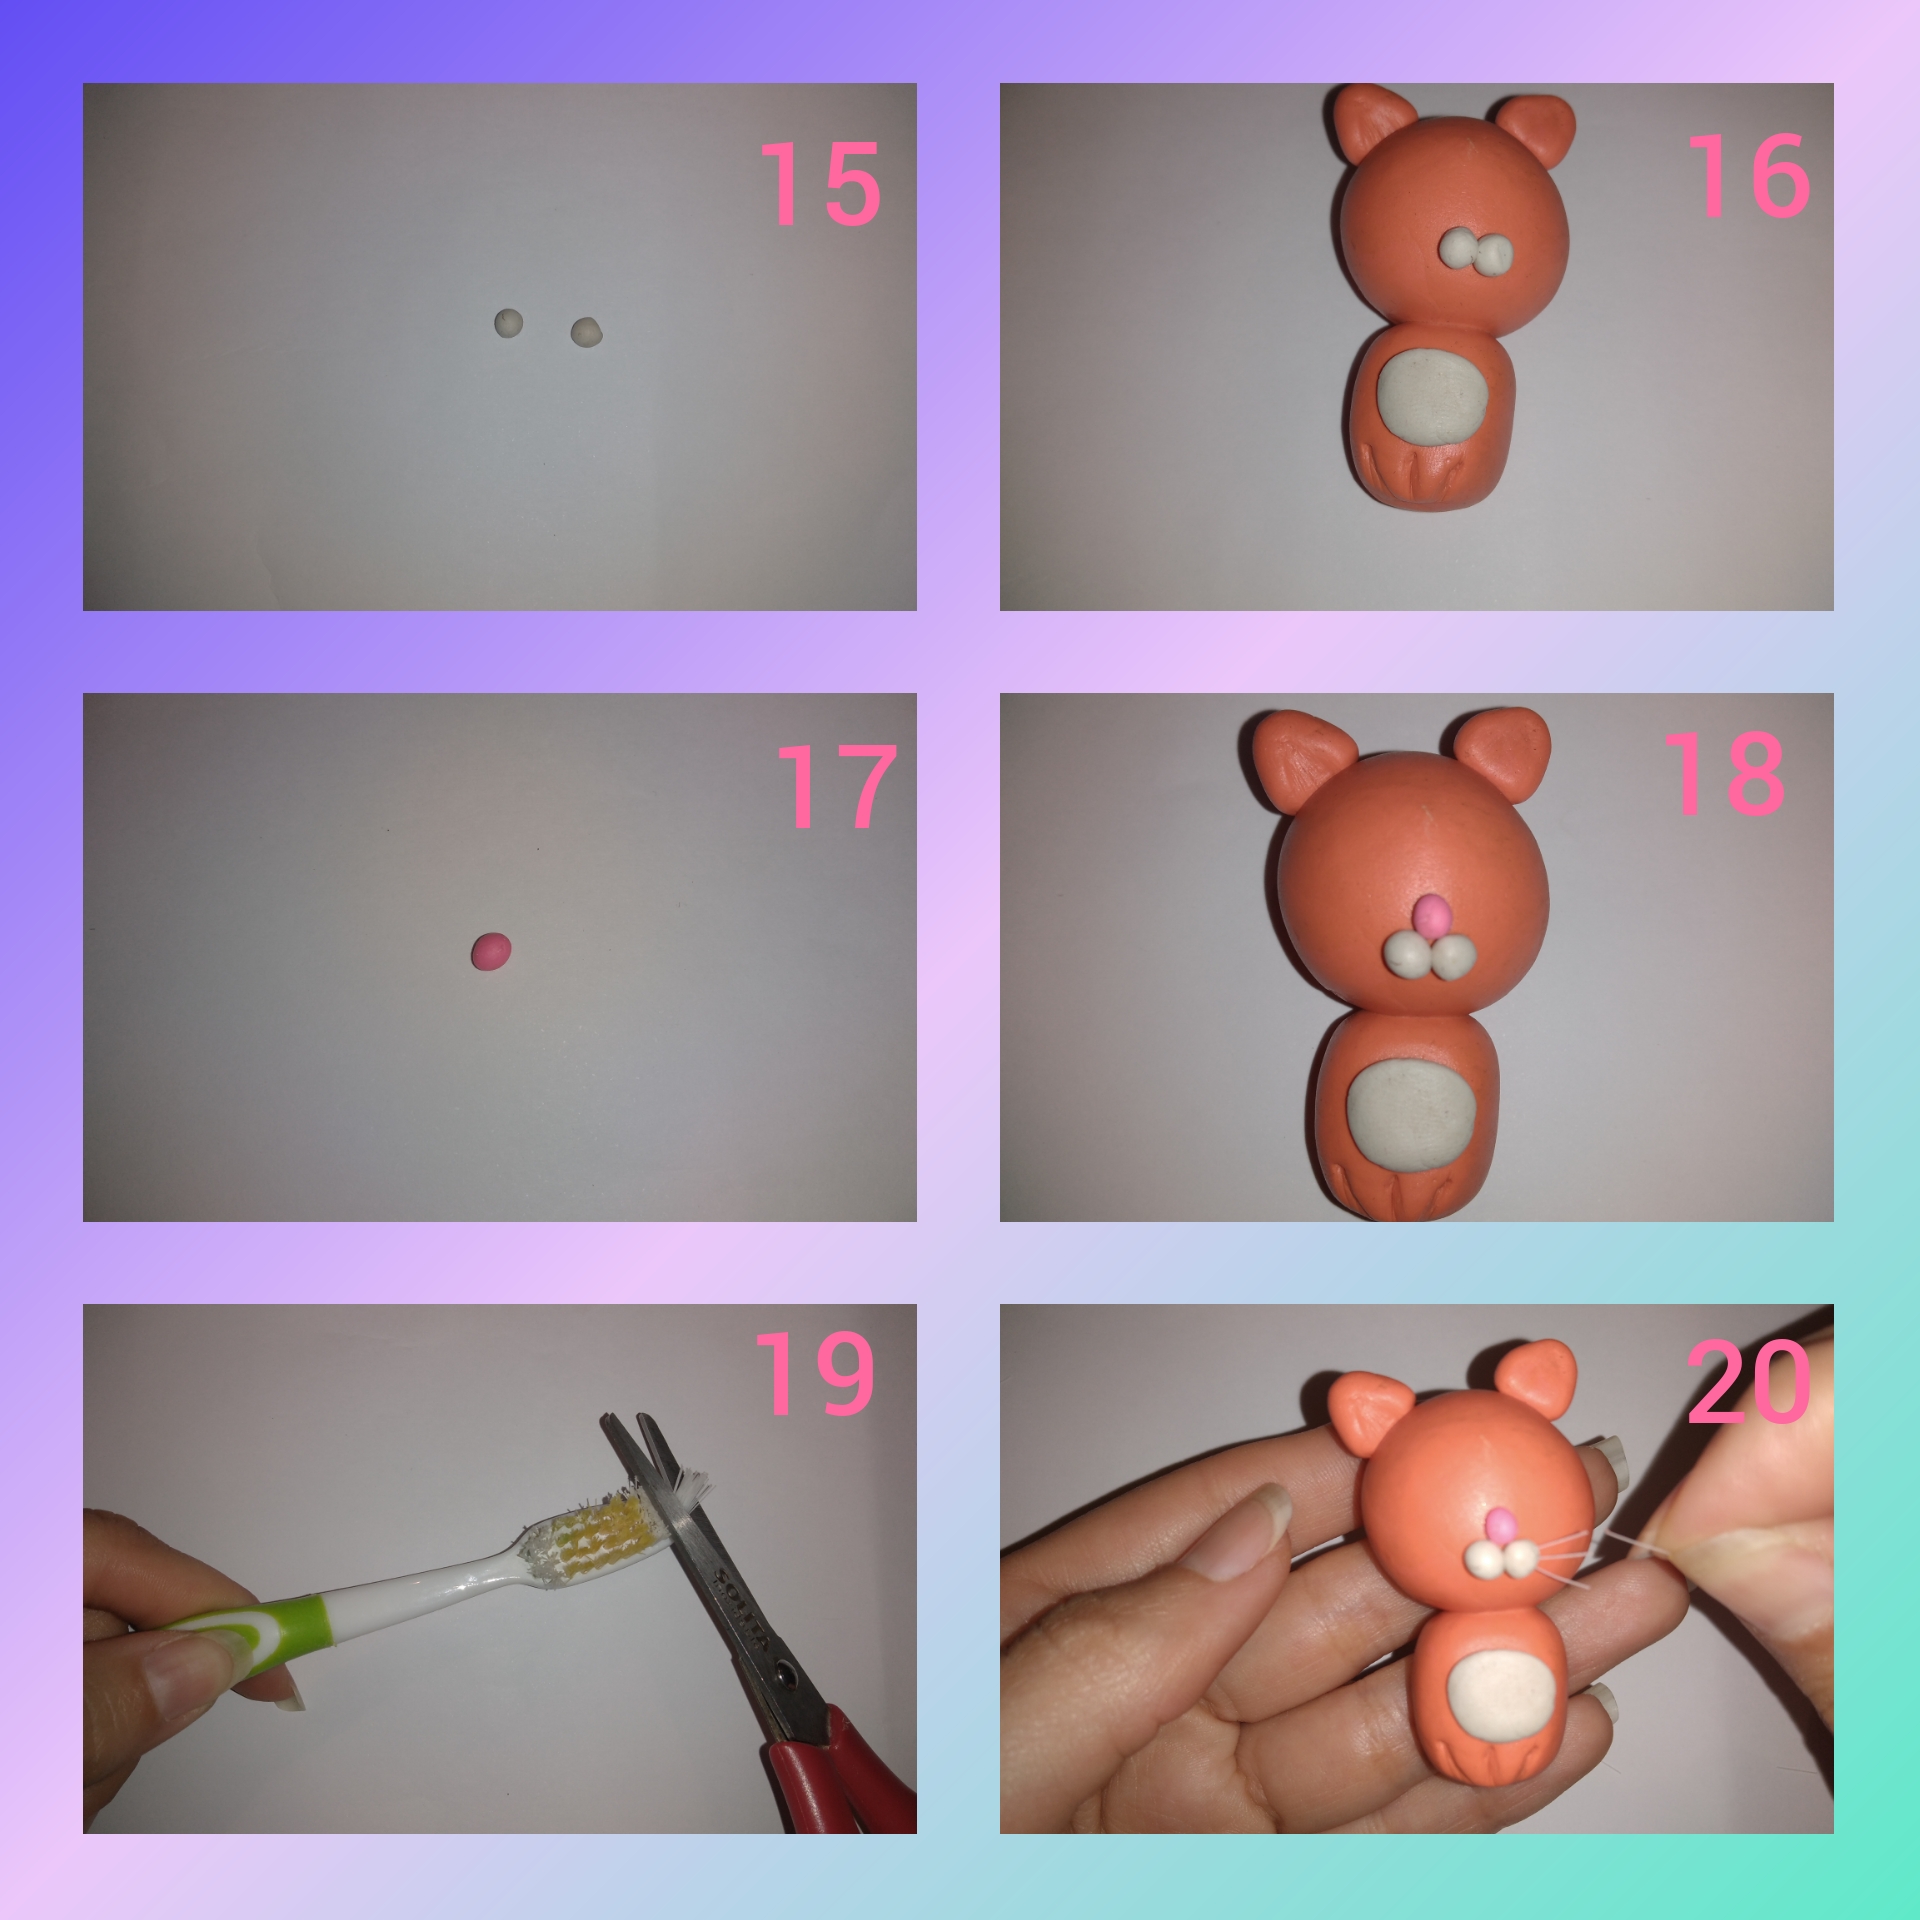
Ahora veremos al segundo minino que será el hijo de mamá gatita.
Now we will see the second kitty who will be the son of mommy kitty.
Paso 18.
Seguimos los pasos que hicimos anteriormente, comenzamos haciendo las dos pelotas de platilina, una más grande que la otra en este caso ligue las plastilina blanca con negro para darle un tono único a mi gatito. Hice el cilindro con la pelota más pequeña, luego la barriguita con plastilina amarilla y las uni.
Step 18.We follow the steps we did before, we start by making the two plasticine balls, one larger than the other. In this case, I linked the white and black plasticine to give my kitten a unique tone. I made the cylinder with the smallest ball, then the tummy with yellow plasticine and joined them.
Paso 19.
Después de unir el cuerpo con la cabeza, hice las orejitas las fijé a la cabeza, luego hice tres pelotas pequeñas dos amarillas y una roja para los bigotes, nariz los fijé a la cara y pegué los pelitos a las pepitas amarillas.
Step 19.After joining the body with the head, I made the little ears and attached them to the head, then I made three small balls, two yellow and one red for the whiskers, I attached the nose to the face and glued the hairs to the yellow seeds.
Paso 20.
Tomé un poco de plastilina negra la estiré con mi dedo y en la punta coloque un poco de amarillo, hice la colita del gatito la fijé al cuerpo, ahora los orificios de los ojos, en los cuales agregué unos pelotitas pequeñas de plastilina blanca y con el marcador negro le hice un punto y listo, terminando nuestro segundo gatito, ahora vamos a armar.
Step 20.I took a bit of black plasticine, I stretched it with my finger and put a bit of yellow on the tip, I made the kitten's tail and fixed it to the body, now the holes for the eyes, on the which I added some small balls of white plasticine and with the black marker I made a point and that's it, finishing our second kitten, now we are going to assemble.
Paso 21.
Comenzamos a colocar cada elemento que tenemos, pegamos el banco, las piedras, los árboles, un camino de flores, las flores individuales y por último los gatitos.
Step 21.We start to place each element we have, we paste the bench, the stones, the trees, a path of flowers, the individual flowers and finally the kittens.
Nos va quedaron muy lindo este diorama de plastilina.
We love this plasticine diorama.
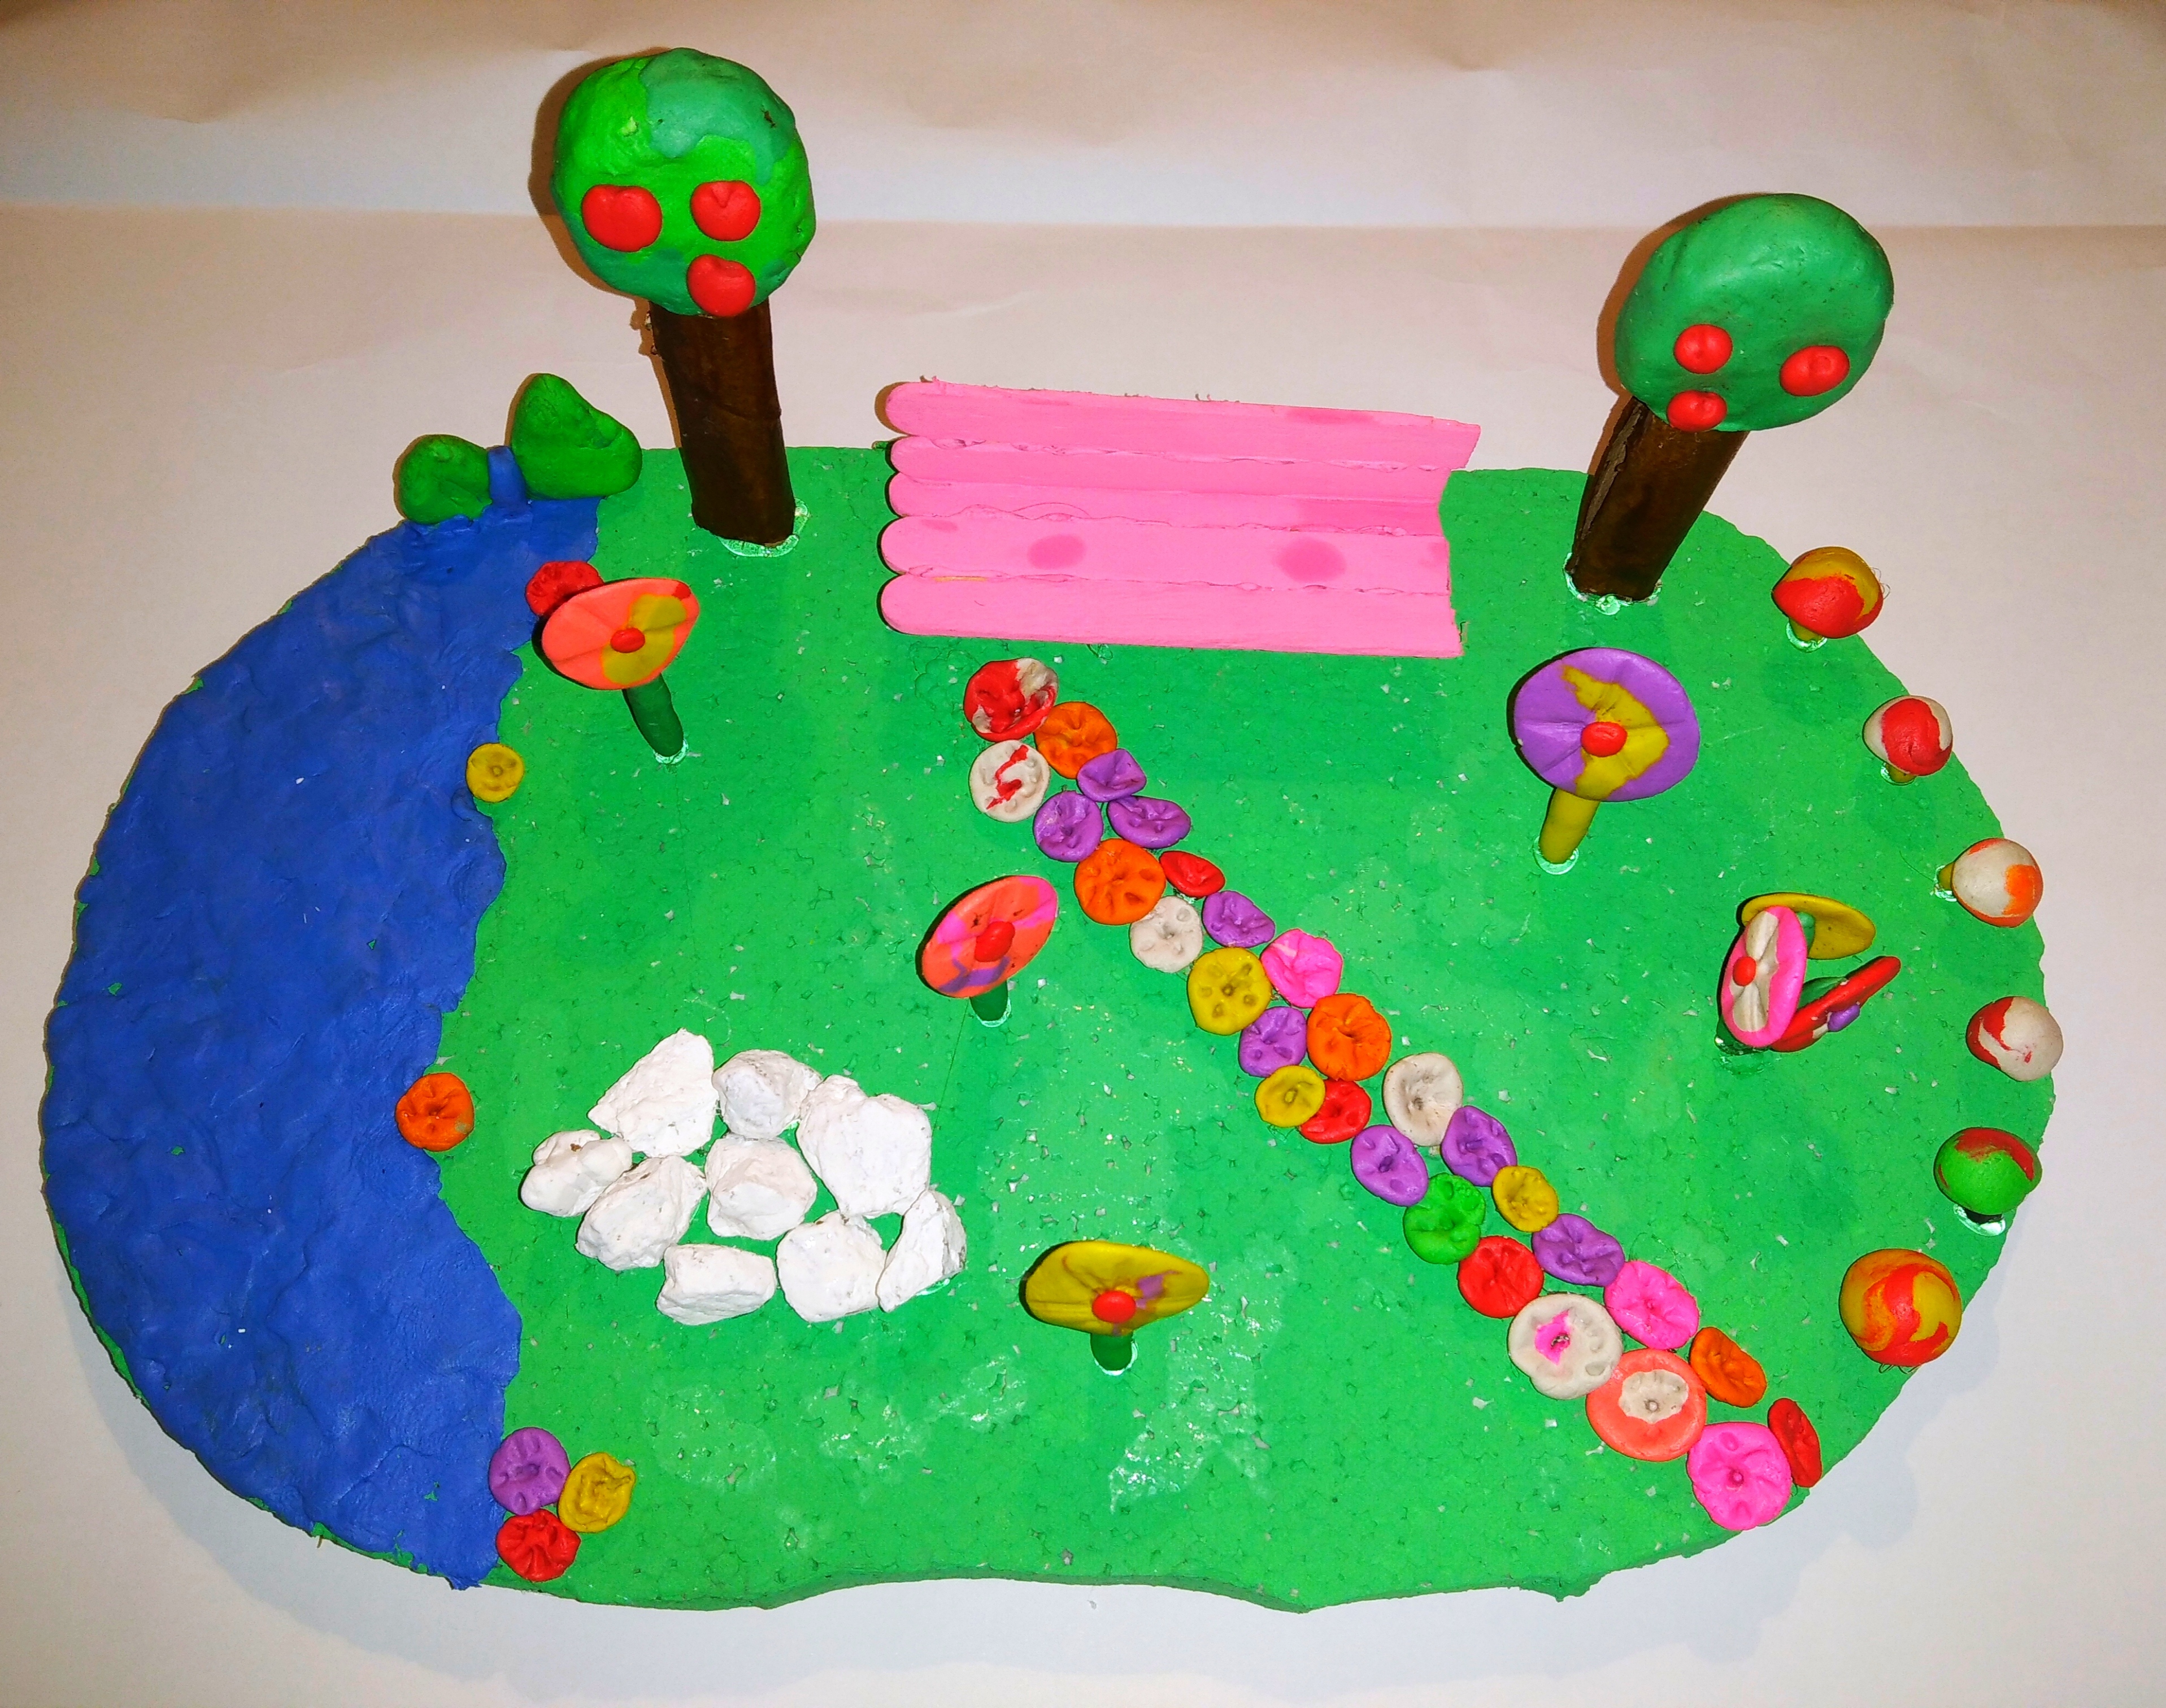

Presentación Final:
Final Presentation:

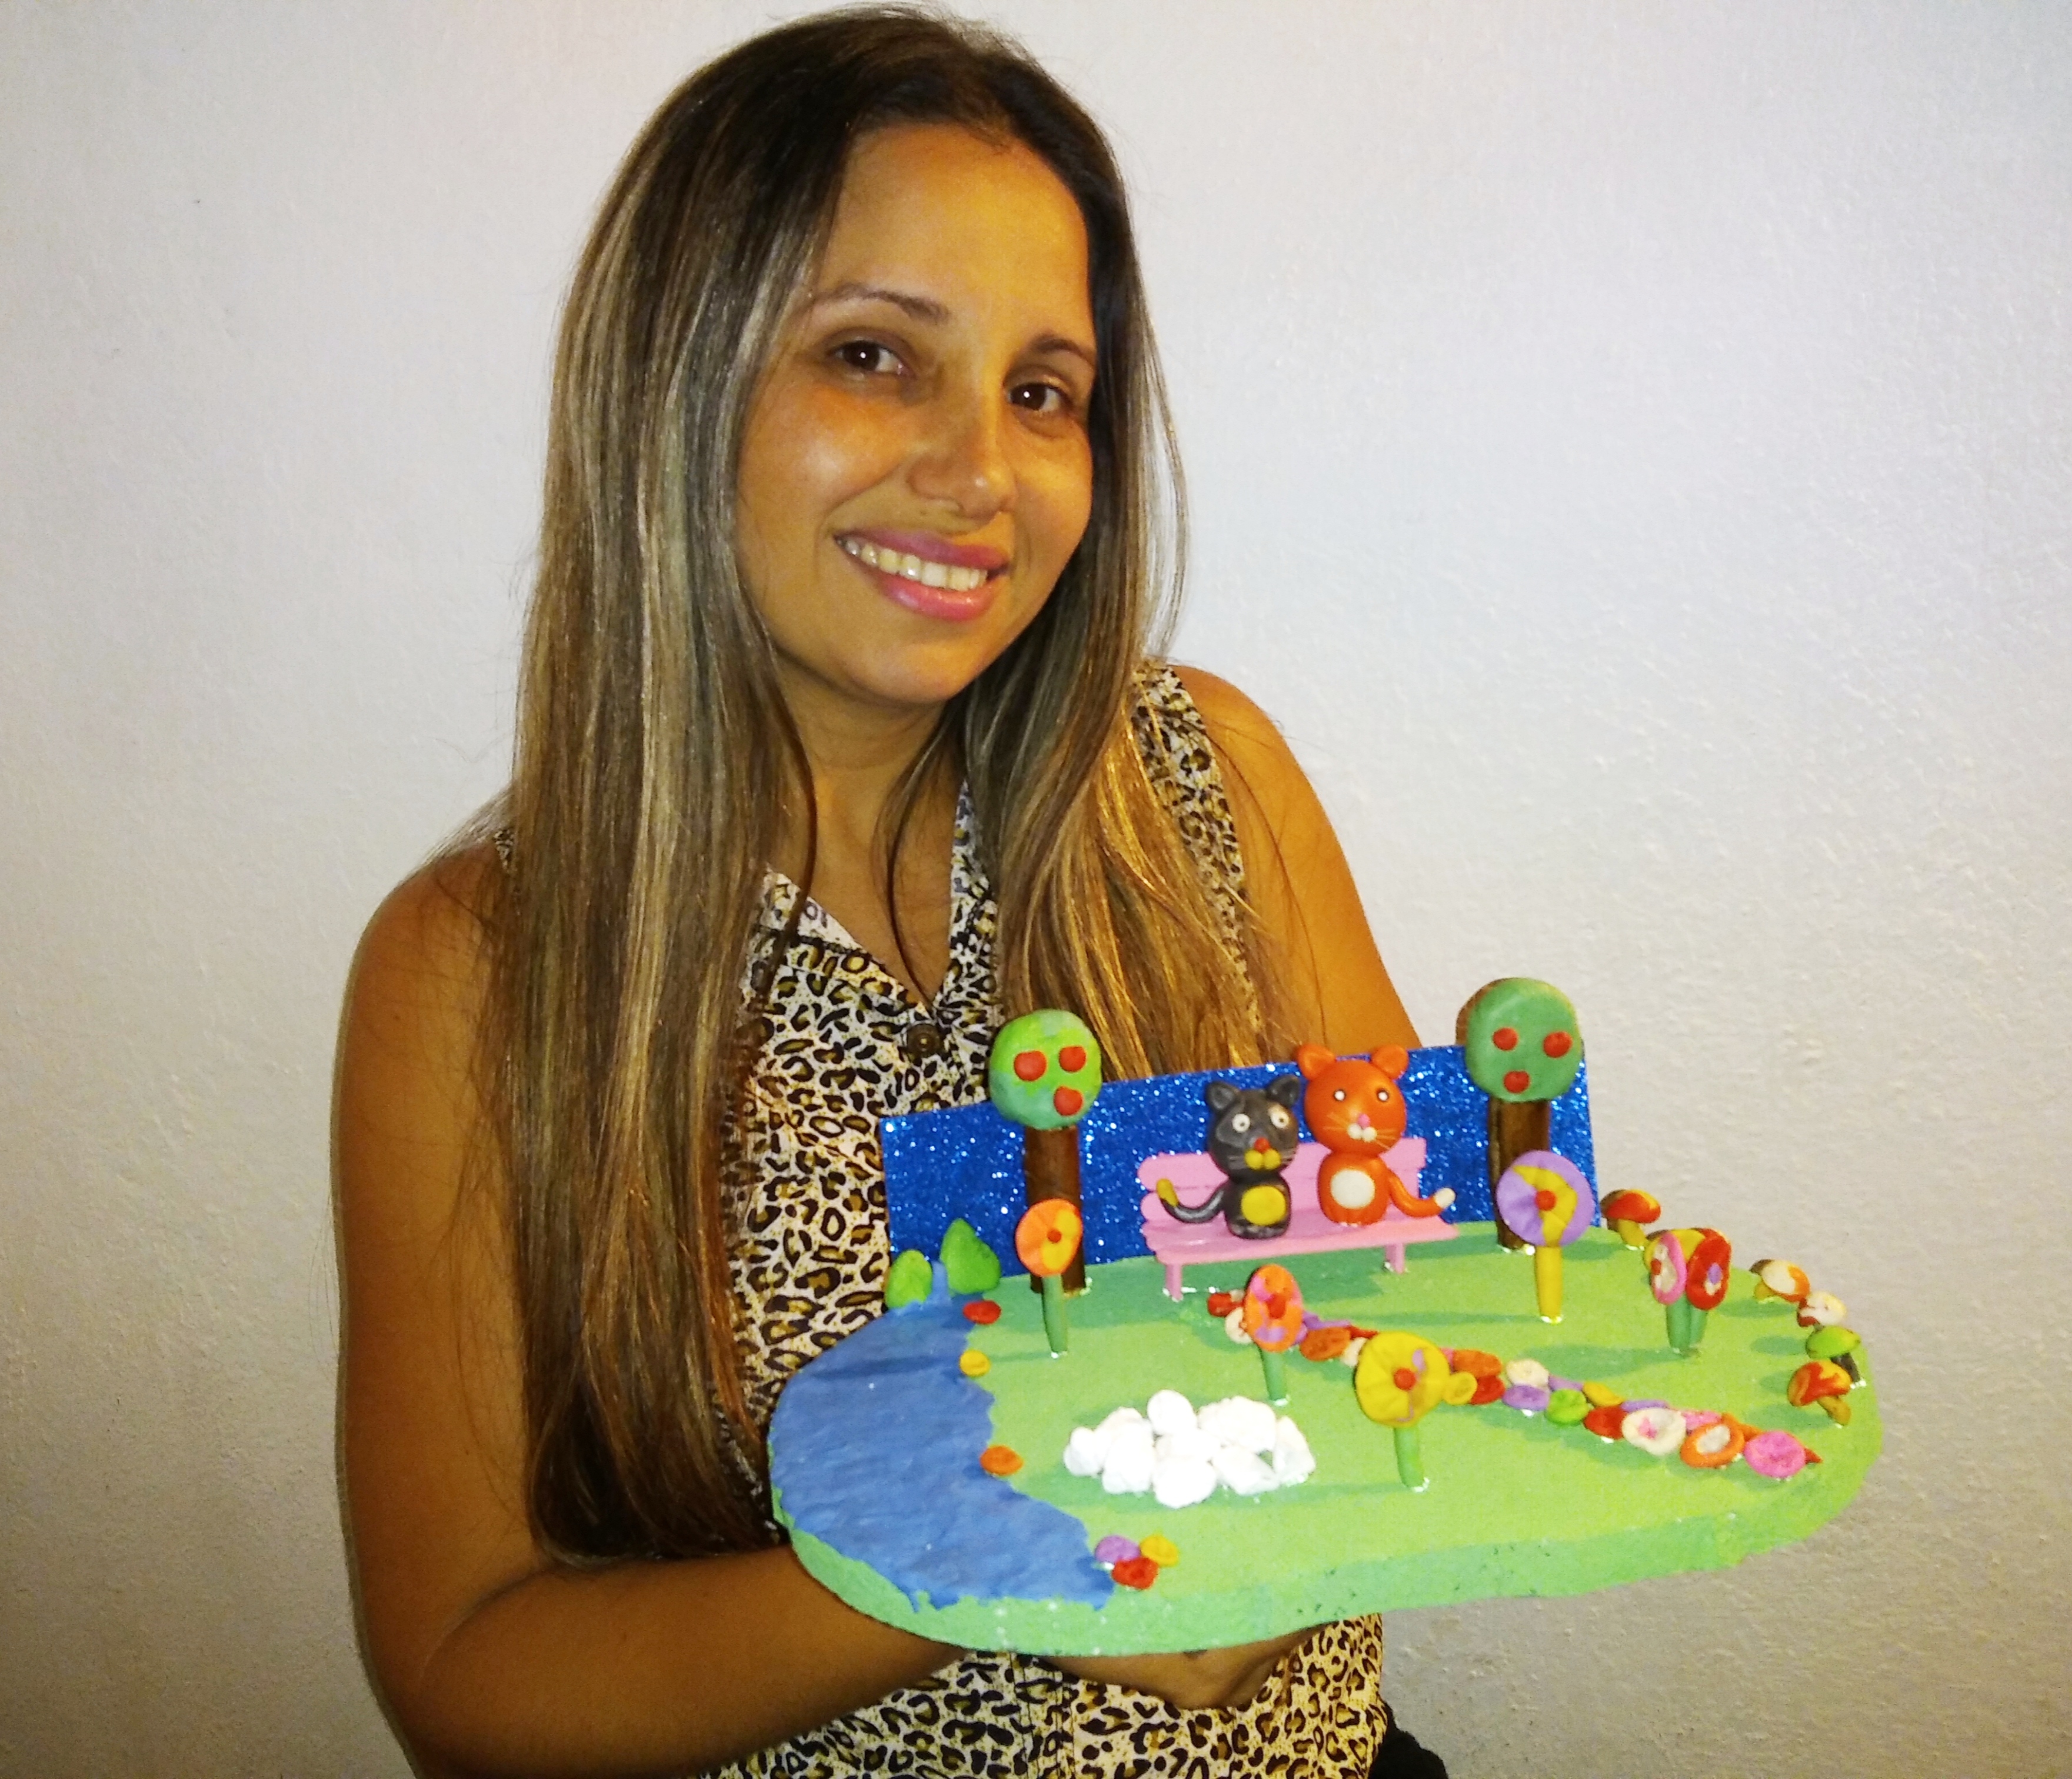
Gracias amigos por acompañarme hasta acá fué muy divertido esta experiencia vivida haciendo este diorama de plastilina, gracias a los que me leen y me comentan son muy amables.
Thank you friends for joining me here, this experience was very fun making this plasticine diorama, thanks to those who read me and comment on me, they are very kind.
Aprovecho para invitar a la amiga @editatovar y @oswaldomusic para que participen en este espectacular concurso.
I take this opportunity to invite my friend @editatovar and @oswaldomusic to participate in this spectacular contest.
Todas las fotografías son mi propiedad, tomada con mi teléfono Redmi 8A y editadas con la aplicación Polish.Traductor Googl.co.ve. Los separadores de texto usados. All photos are my property, taken with my Redmi 8A phone. Translator Googl.co.ve. The text separators used.
Congratulations @mayi04! You have completed the following achievement on the Hive blockchain and have been rewarded with new badge(s):
Your next payout target is 250 HP.
The unit is Hive Power equivalent because post and comment rewards can be split into HP and HBD
You can view your badges on your board and compare yourself to others in the Ranking
If you no longer want to receive notifications, reply to this comment with the word
STOPTo support your work, I also upvoted your post!
Check out the last post from @hivebuzz:
Support the HiveBuzz project. Vote for our proposal!
Tu participación está muy linda, que tierno🐈🐱. Bendiciones
Saludos amiga @zullyarte gracias por comentar mi publicación 😊 eres muy amable. ❤️
Qué bello te quedó! Me encantaron los bigotes! super creativa! y el efecto del gato negro con la mezcla entre la plastilina blanca y negra quedó bellísimo, eso es lo que más me gusta de la plastilina, la integración de colores... Mucho éxito!
Amiga que lindo comentario 😍 muchas gracias por observar cada detalle en esta elaboración 🥰😍😍 yo también disfrute la creación de colores amiga, es súper cool ver los resultados finales.😊
Hola que hermoso trabajo, lleva si tiempo realizarlo, te felicito, suerte en el concurso.
Hola amigo si lleva un poco de tiempo porque las piezas son moldeadas, pero es divertido realizarlas jaja.
Gracias por tu amable comentario lo agradezco. 😊
Hola amiguita, felicidades me encantó cómo te quedó tu diorama.
Te Desi mucha suerte en el concurso!!
Thank you for sharing this amazing post on HIVE!
non-profit curation initiative!Your content got selected by our fellow curator @stevenson7 & you just received a little thank you via an upvote from our
You will be featured in one of our recurring curation compilations and on our pinterest boards! Both are aiming to offer you a stage to widen your audience within and outside of the DIY scene of hive.
Join the official DIYHub community on HIVE and show us more of your amazing work and feel free to connect with us and other DIYers via our discord server: https://discord.gg/mY5uCfQ !
If you want to support our goal to motivate other DIY/art/music/homesteading/... creators just delegate to us and earn 100% of your curation rewards!
Stay creative & hive on!