<center


✨🪄✨🪄✨🪄✨🪄✨🪄✨🪄✨🪄✨🪄✨🪄
Hola querida comunidad de manualistas y artesanos ,como están ? Como pasaron los carnavales? , hoy les quiero compartir un post que sigue con la temática que he ido manejando en mis últimos post ,
Trayendoles tutoriales especiales para decorar sus fiestas o eventos si quieren hacerlo de este maravilloso universo de 🪄Harry Potter 🪄 nuestro mago favorito, y es hay tantas cosas que se pueden tomar y tantas ideas para hacer que ha estado hasta abrumador decidir que era
ló que iba a hacer por (presupuesto y tiempo) ,por lo que he estado haciendo los adornos y decoraciones para la fiesta de mi hermana, que cumplirá 17 años y vamos a celebrarlos con el niño que vivió, pero más que todo para reducir el tema sera con un temática tipo "casas de hogwarts" con los colores y estética de los escudos , aquí les dejo tres tutoriales cortos para que lo hagan en su casita.

🪄 Foami escarchado: rojo,azul,verde,dorado,plateado,negro, blanco
🪄 Foami Negro liso
🪄 Cartulina negra y cartulina dorada tipo espejo.
🪄 Barras de Silicón y pistola de silicón
🪄 Regla y tijeras.
🪄 Pintura dorada
🪄 Pintura de tela negra
🪄 Pincel fino y palitos de dientes
🪄 Compás
🪄 Teipe doble cara
Manos a la obra
English Version
✨🪄✨🪄✨🪄✨🪄✨🪄✨🪄✨🪄✨🪄✨🪄
**Hello dear community of craftsmen and artisans, how are you? How was the carnival? , today I want to share a post that continues with the theme that I have been handling in my last posts,
Bringing you special tutorials to decorate your parties or events if you want to do it from this wonderful universe of 🪄Harry Potter 🪄 our favorite wizard, and there are so many things that can be taken and so many ideas to do that it has been overwhelming to decide what I was going to do for (budget and time), so I have been making the ornaments and decorations for my sister's party, who will be turning 17 and we are going to celebrate it with the boy who lived, but more than anything to reduce the theme it will be with a "hogwarts houses" type theme with the colors and aesthetics of the shields, here I leave you three short tutorials so that you can do it in your little house. **
🪄 Frosted foam: red, blue, green, gold, silver, black, white
🪄 Plain black foam
🪄 Black cardstock and gold mirror-like cardstock.
🪄 Silicone bars and silicone gun
🪄 Ruler and scissors.
🪄 Gold paint
🪄 Black fabric paint
🪄 Fine brush and toothpicks
🪄 Compass
🪄 Double-sided tape
Let's get to work

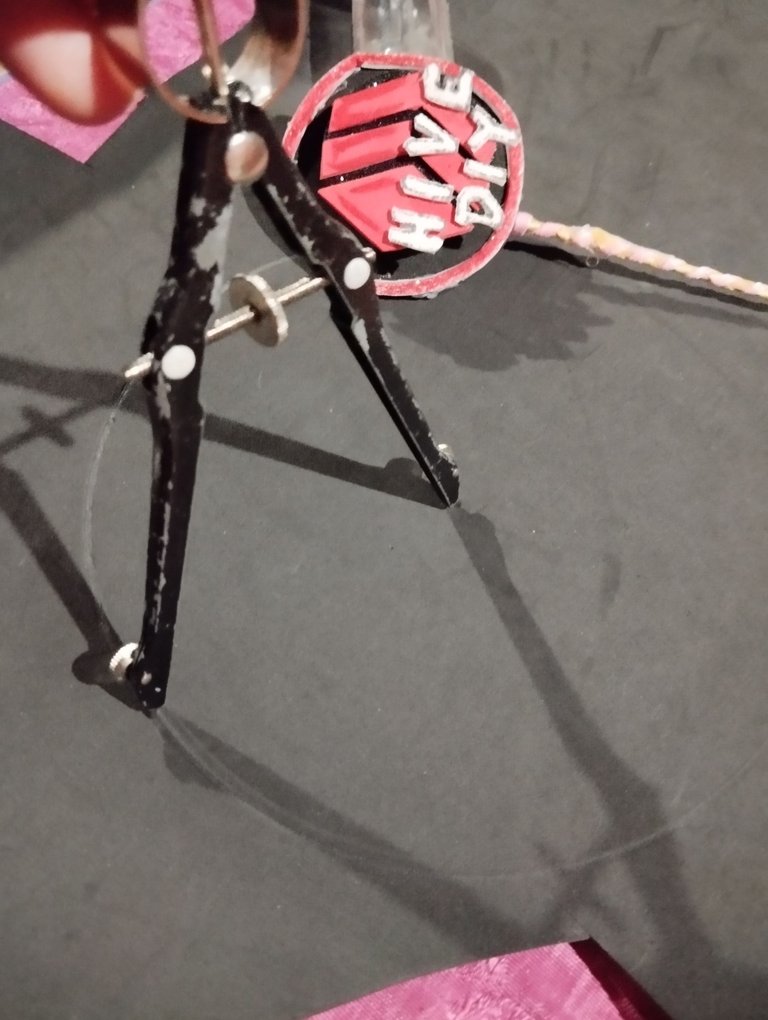 | 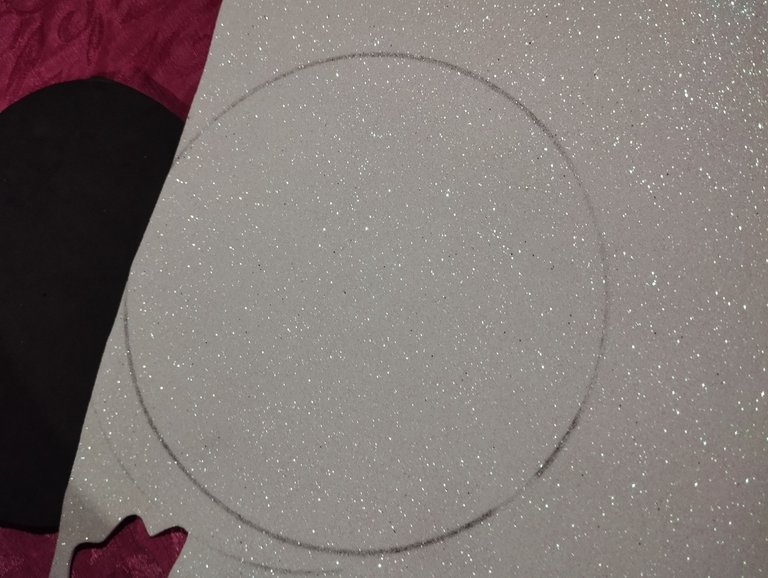 | 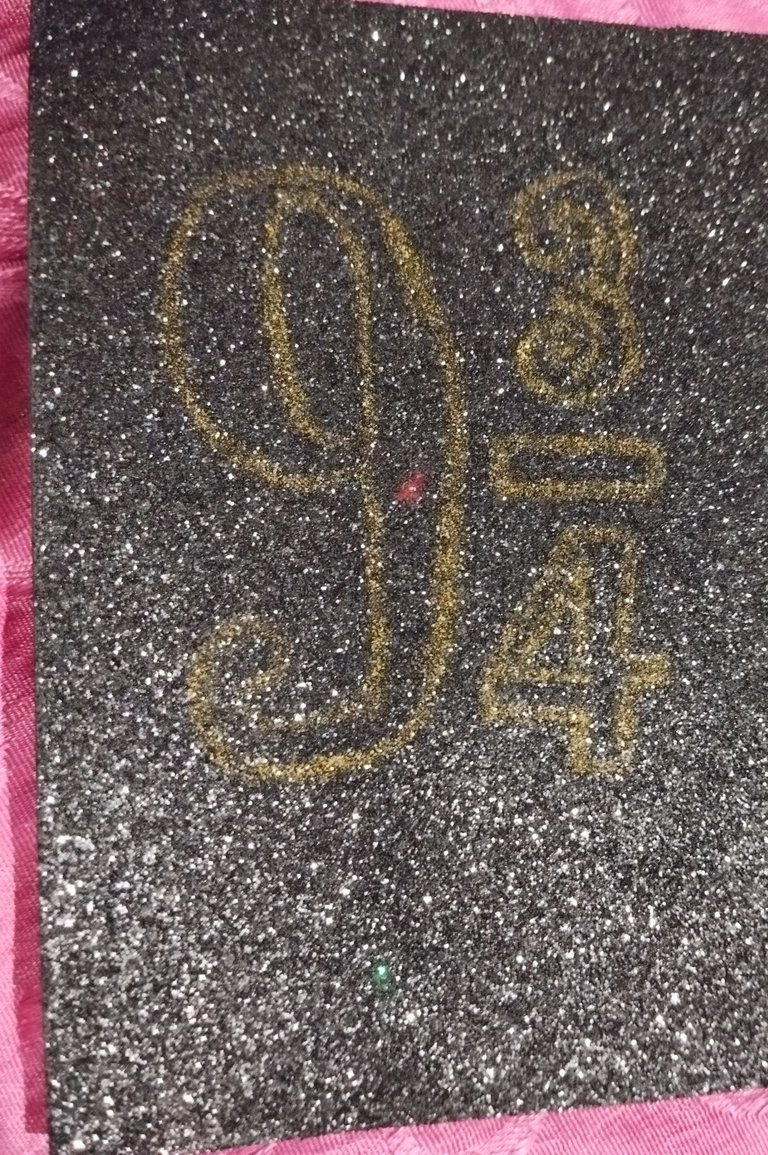 |
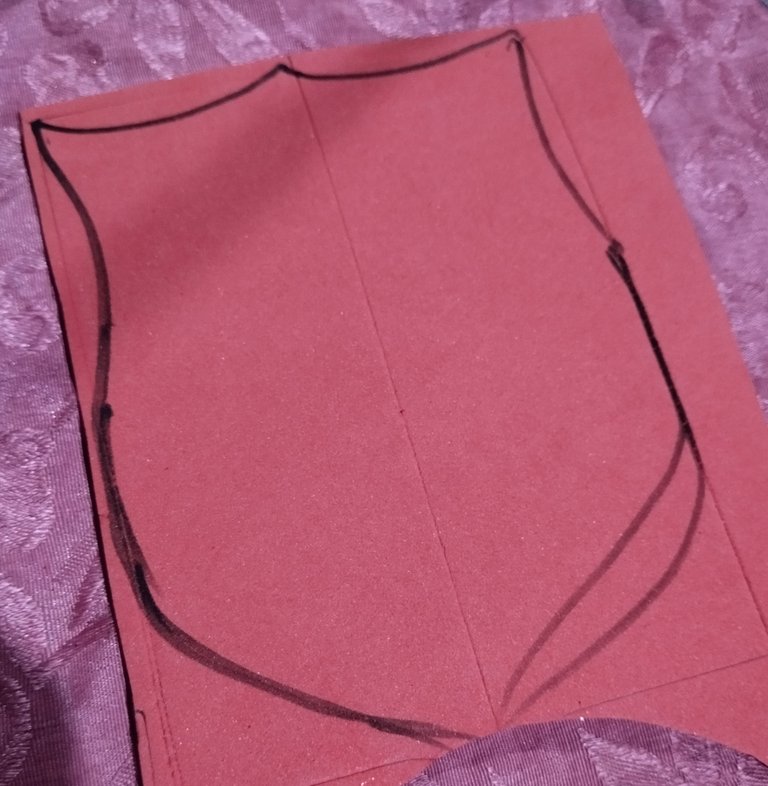
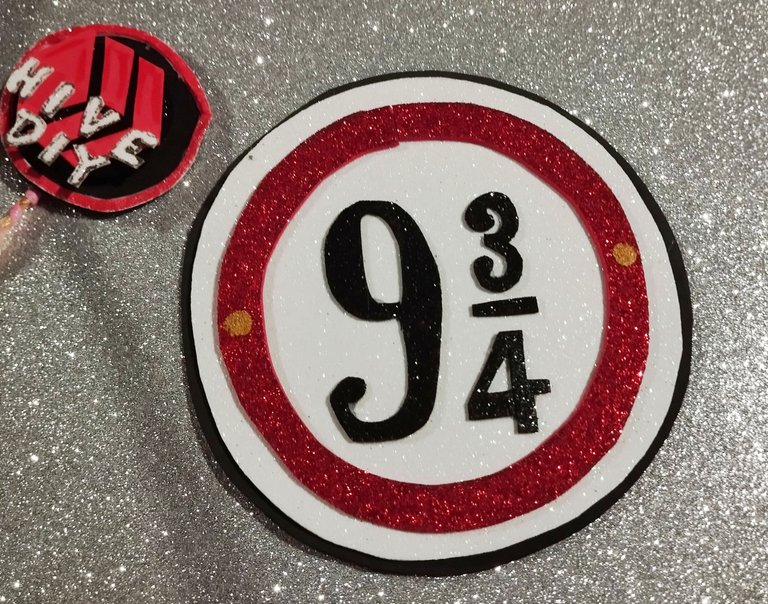
#1 Para este primera manualidad haremos la conocida señal de la plataforma /andén 9 3/4 ,este es el andén que indica a los estudiantes que van a ir a Hogwarts dónde tomar el tren mágico que los llevará hasta la escuela, aquí lo haremos cortando una base redonda de foami negro, yo lo hice con un diámetro de 16 cm de ancho, en un foami escarchado negro dibuje los números de la señal intentando hacerla lo mas parecido posible , quedando el 9 con unos 7,5cm de largo, y el 3 y 4 con 3,5 cm de largo cada uno.
English Version
#1 For this first craft we will make the well-known sign of platform 9 3/4, this is the platform that indicates to the students who are going to Hogwarts where to take the magic train that will take them to school, here we will do it by cutting a round base of black foam, I made it with a diameter of 16 cm wide, on a black frosted foam I drew the numbers of the sign trying to make it as similar as possible, leaving the 9 with about 7.5 cm long, and the 3 and 4 with 3.5 cm long each.
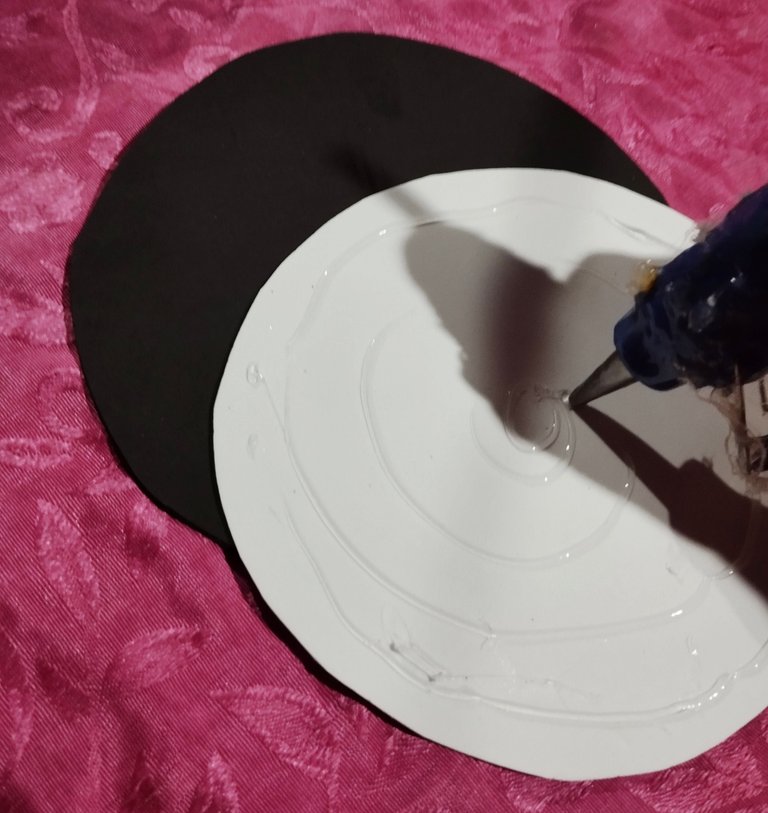 | 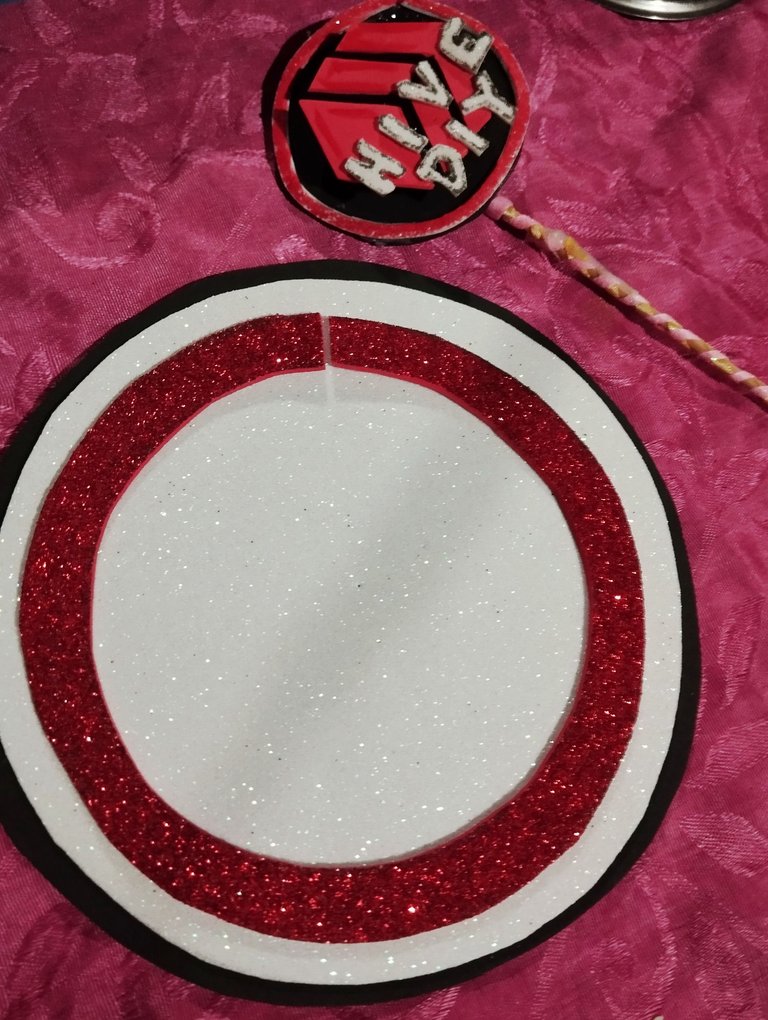 | 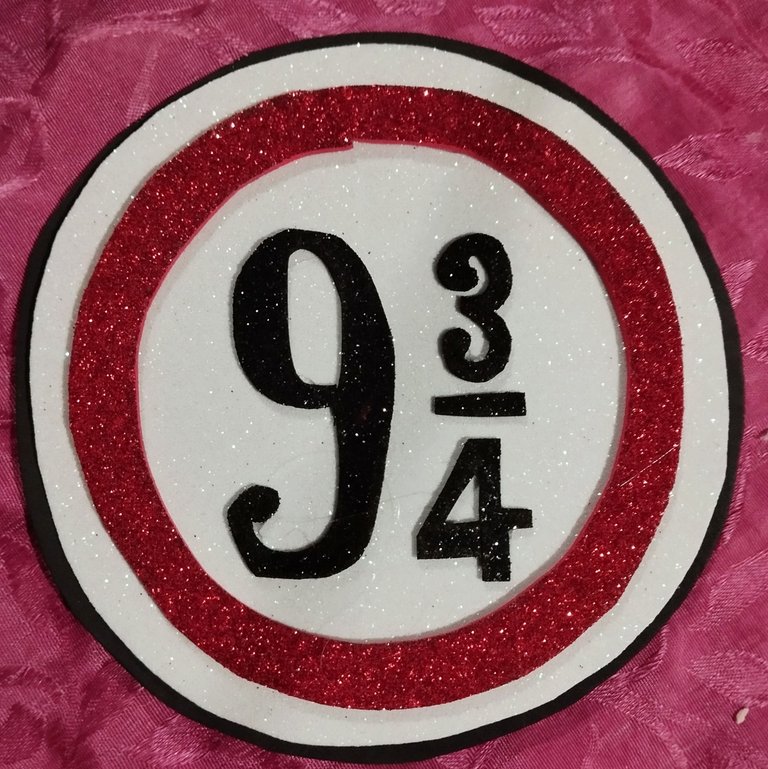 |  |
#2 Para el fondo usé un foami blanco escarchado de 15 cm de diámetro. Lo pegué con silicón caliente al fondo del Foami Negro dejándole un pequeño borde negro .Para hacer una aro ⭕ rojo de la la señal , hice una circunferencia de 13cm de diámetro, y adentro le quité el centro , me salió un círculo interno de 10,5 cm de diámetro, para dejarme la forma de un marco redondo, y este lo pegué al aro blanco. Ubiqué los números en el centro y los pegué con silicón, ya una vez teniendo la señal hecha ,le agregué dos puntos dorados a los lados laterales, para dar la apariencia de unos tornillos dorados. No quedó extremadamente preciso los cortes pero igual me gustó el resultado, en la parte de atrás le pegué Teipe doble cara para pegarlo a la pared para decorar.
English Version
#2 For the background I used a 15cm diameter frosted white foam. I glued it with hot silicone to the bottom of the Black Foam leaving a small black border. To make a red ring ⭕ for the sign, I made a 13cm diameter circle, and removed the center inside, I got an inner circle 10.5cm in diameter, to leave me the shape of a round frame, and I glued this to the white ring. I placed the numbers in the center and glued them with silicone, once I had the sign made, I added two gold dots to the sides, to give the appearance of gold screws. The cuts were not extremely precise but I still liked the result, on the back I glued double-sided Tape to stick it to the wall to decorate.
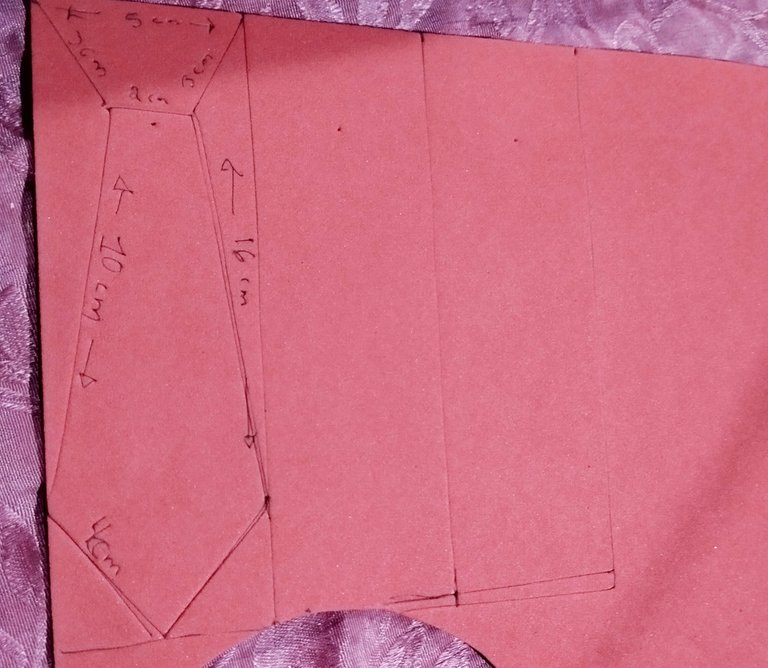 | 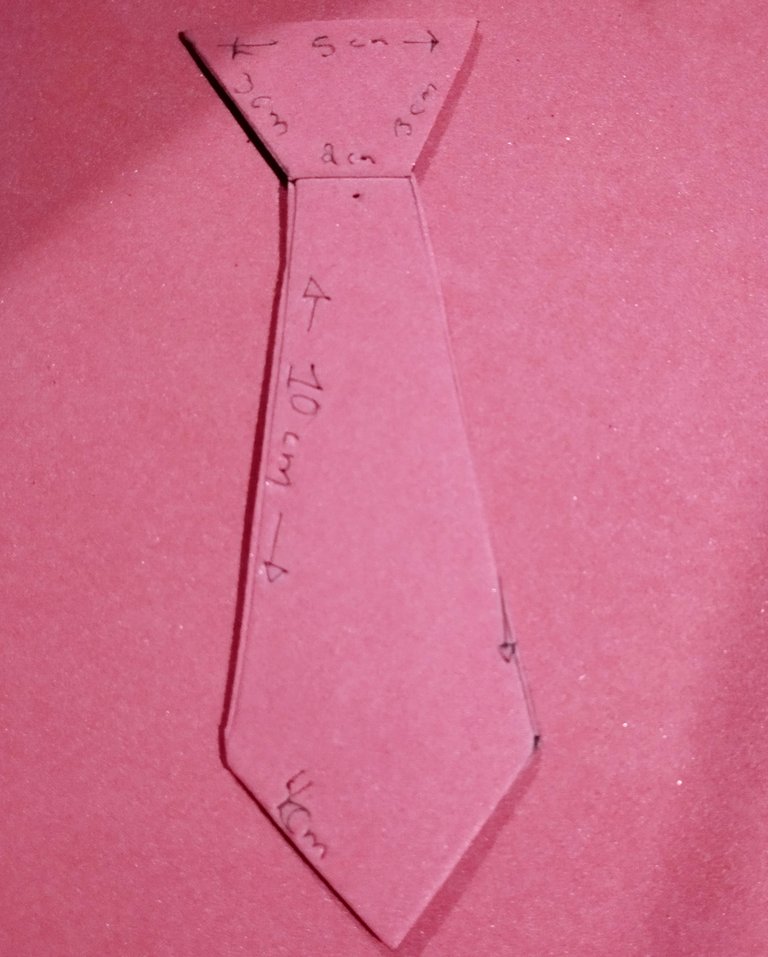 | 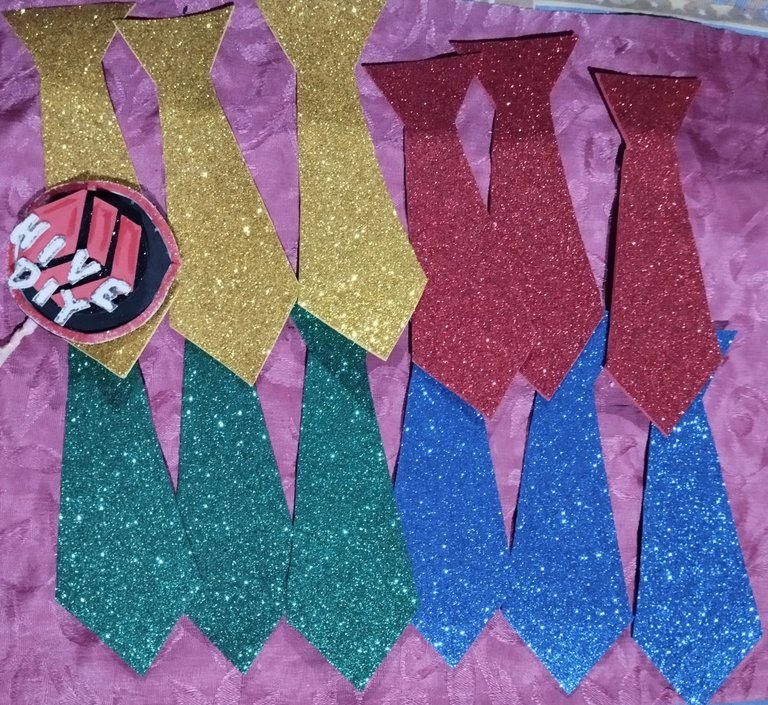 |
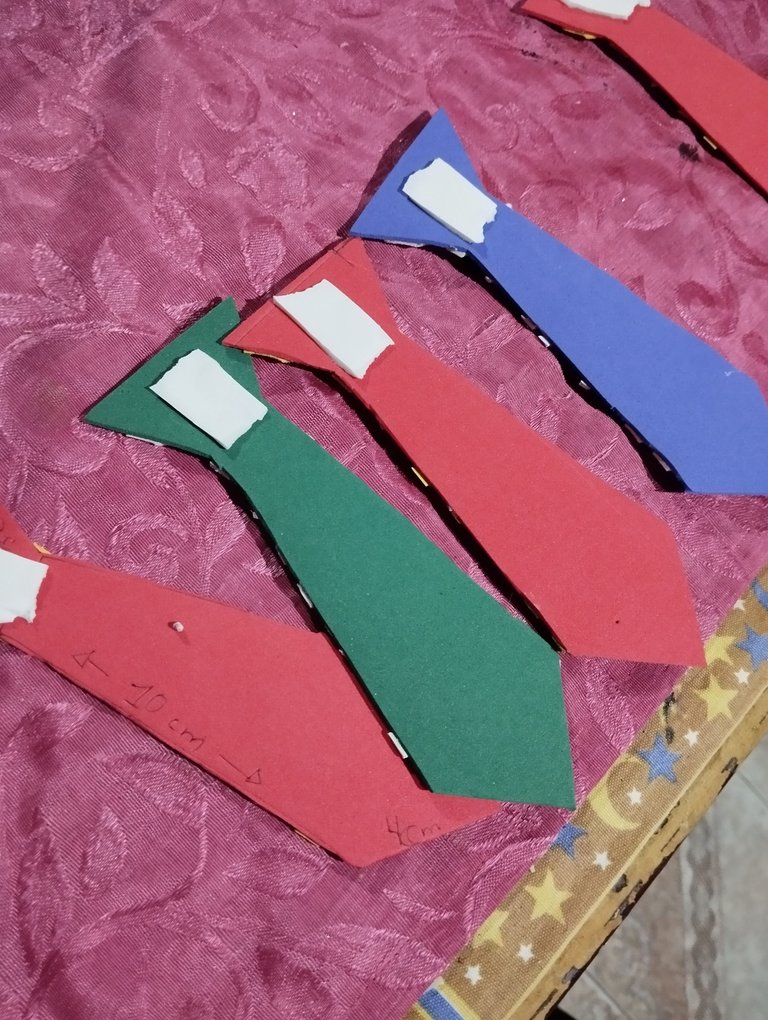
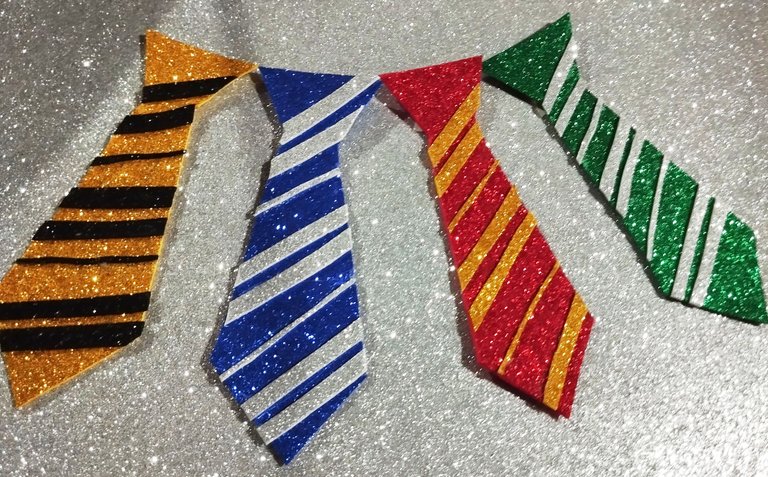
**#3 Para la segunda decoración, haremos unos corbatines o corbatas de foami, con cada casa de Hogwarts, 🗝️ cada cas se identifica con un color , para Gryffindor será rojo con rayas doradas, Hufflepuff será dorada con rayas negras, Ravenclaw será azul y rayas plateados y Slytherin verdes con rayas plateadas. Entonces usaremos un foami del color de la casa que queramos, y haremos la forma de la corbata, en la foto tienen las medidas ,las hice pequeñas así que me salió de unos 16 cm de largo, la parte de arriba del corbatín que haría el nudo mide 5 cm en la parte superior, 3 cm a los lados y 2 cm la parte inferior, el cuerpo de la corbata lo hice de 10 cm de largo hasta hacer la forma del pico con 4cm de cada lado. Con este modelo lo usé de guía para cortar 3 corbatas por cada color.
English Version
#3 For the second decoration, we will make some foam bow ties, with each Hogwarts house, 🗝️ each house is identified with a color, for Gryffindor it will be red with gold stripes, Hufflepuff will be gold with black stripes, Ravenclaw will be blue and silver stripes and Slytherin green with silver stripes. Then we will use a foam of the color of the house we want, and we will make the shape of the tie, in the photo you have the measurements, I made them small so it came out about 16 cm long, the top part of the bow tie that would make the knot measures 5 cm at the top, 3 cm on the sides and 2 cm at the bottom, the body of the tie I made 10 cm long until I made the shape of the peak with 4 cm on each side. With this model I used it as a guide to cut 3 ties for each color.
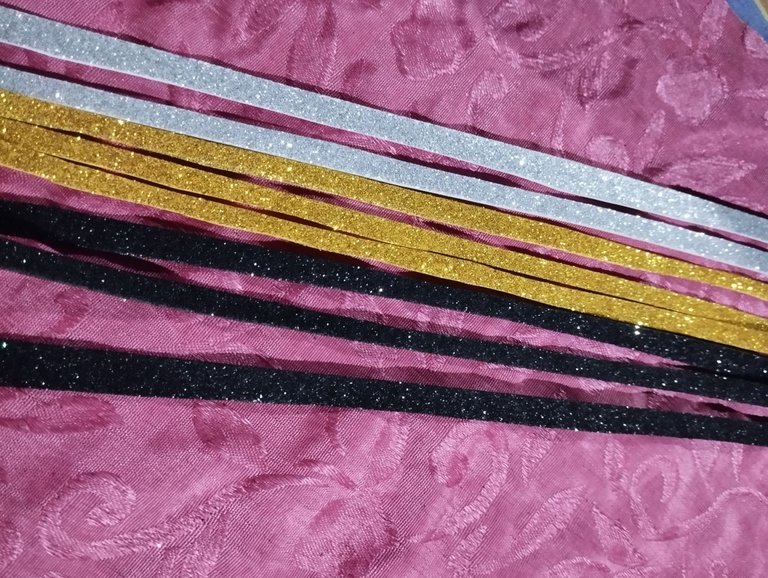 | 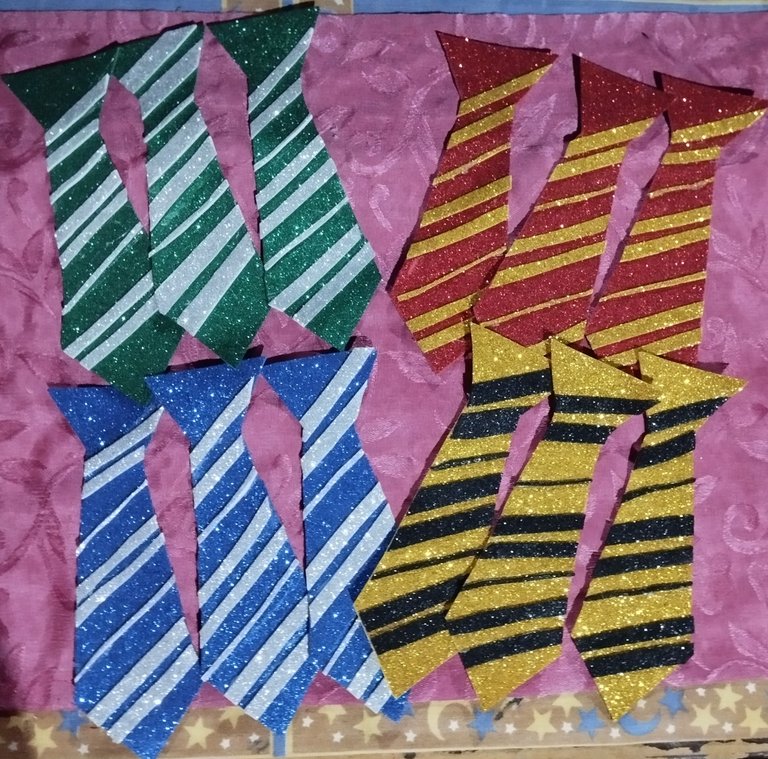 |  |
#4 Para hacer las rayas de las corbatas hice listones de 0,5cm de ancho, y estos los hice cortando todo el largo de las láminas de foami para practicidad, corté suficiente ya que serían varias corbatas ,y para las combinaciones, Hufflepuff son las únicas que llevan negro ,y las de Gryffindor dorado, las de Ravenclaw y Slytherin son doble listones porque ambas llevan plateado. Para hacerlos más rápido pegué dos listones de manera diagonal en el cuerpo de la corbata dejando un pequeño espacio entre ambas para crear el diseño de rayas y corté el excedente siguiendo la forma de la corbata, dejé un espacio y pegué dos listones con el mismo patrón, deje otro espacio y puse otras dos rayas diagonales 👔, para darle ese toque de patrón de rayas reales , corté líneas súper delgadas intercaladas entre las de dos rayas para completar el diseño.Para pegarlo a la ropa o a la pared le puse Teipe doble cara en la parte de atrás.
English Version
#4 To make the stripes on the ties I made 0.5cm wide strips, and I made these by cutting the entire length of the foam sheets for practicality, I cut enough since there would be several ties, and for the combinations, Hufflepuff are the only ones that have black, and Gryffindor's are gold, Ravenclaw and Slytherin's are double ribbons because they both have silver. To make them faster I glued two ribbons diagonally on the body of the tie leaving a small space between them to create the striped design and cut the excess following the shape of the tie, I left a space and glued two ribbons with the same pattern, I left another space and put another two diagonal stripes 👔, to give it that touch of real striped pattern, I cut super thin lines interspersed between those of two stripes to complete the design. To stick it to clothes or the wall I put double-sided Tape on the back.
 |  |  |
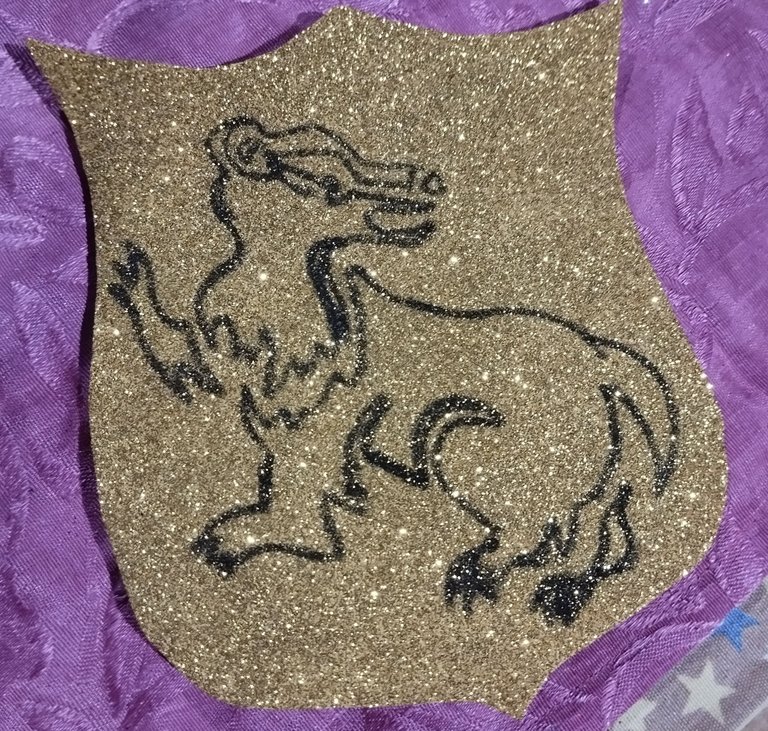 | 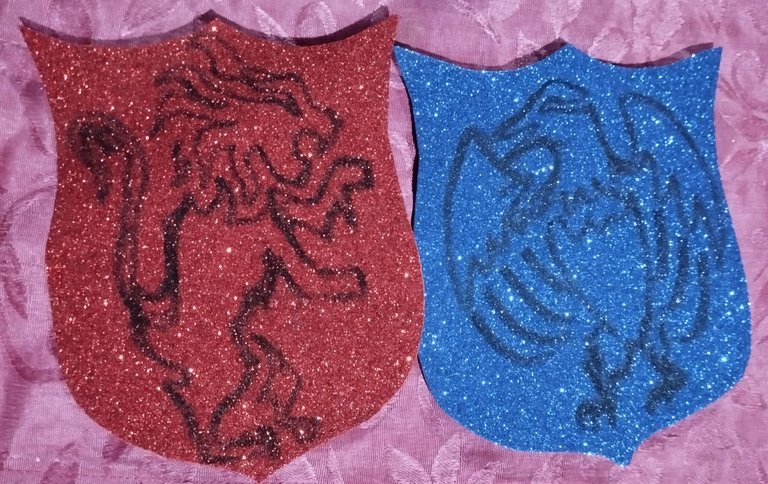 |
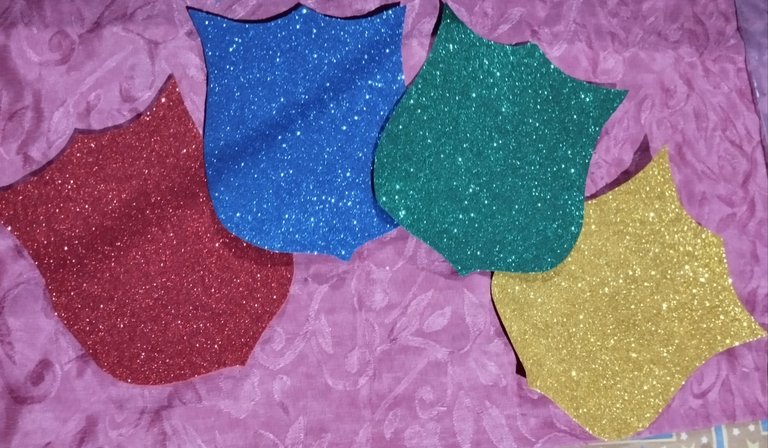
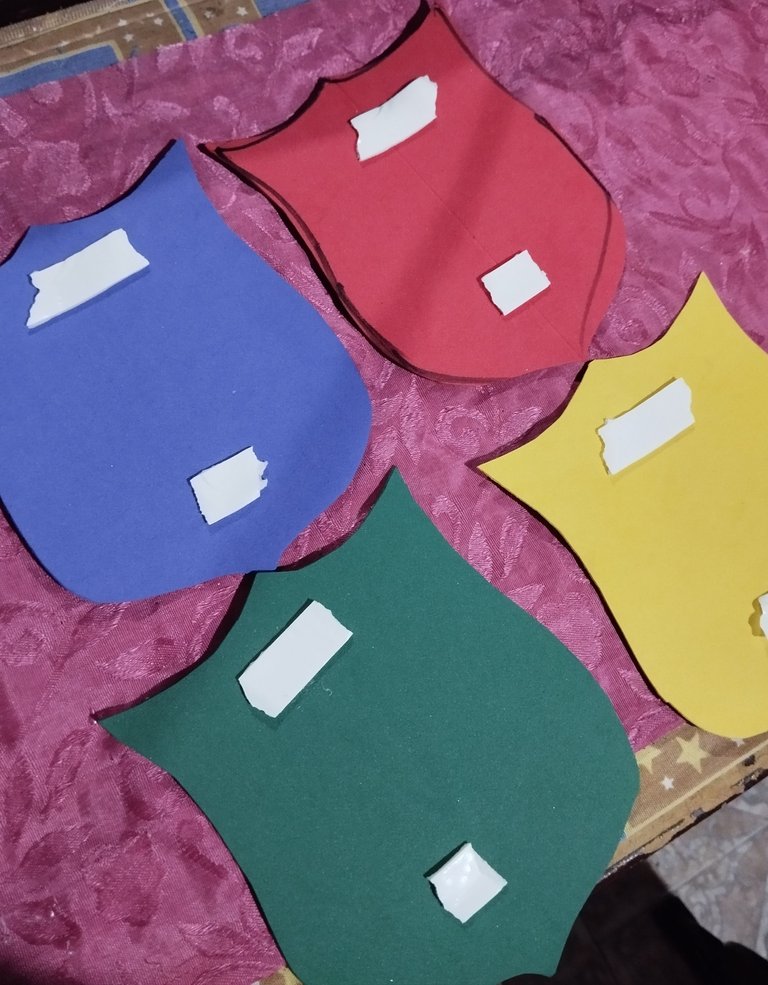
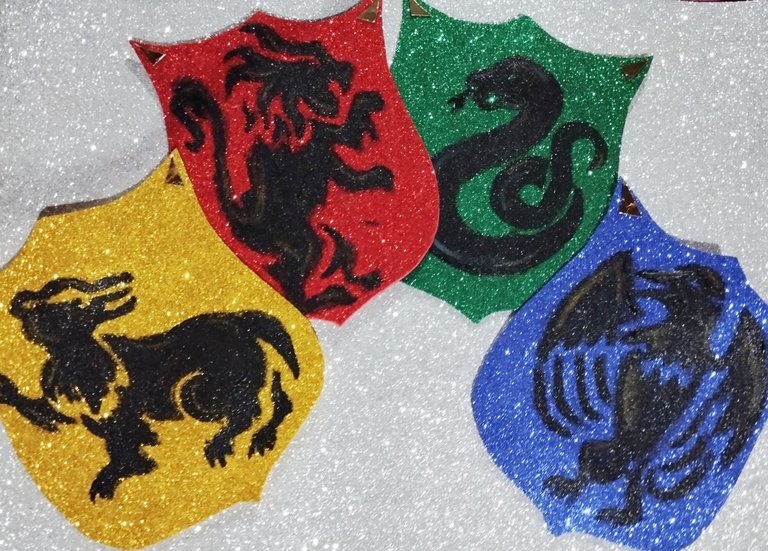
#5 Para la última decoración haremos los escudos de cada casa o bueno las mascotas de cada escudo, para esto haremos el boceto de un escudo en el foami de aprox, 15cm x 12 cm, haciendo
la forma del escudo ,luego hice el boceto de cada animal con un color amarillo, para que resaltara, para Hufflepuff con el fondo en foami dorado hice una especie de tejón 🦡, la de Gryffindor con el fondo rojo y un 🦁 león rugiendo , la de Ravenclaw en fondo azul con un águila 🦅 ,que quedó como una paloma jajaj y Slytherin que es la icónica serpiente con el fondo verde 🐍 que es mi favorita.
Fuente imágen:
https://pin.it/1Q2z0DFzc
English Version
#5 For the last decoration we will make the shields of each house or well the pets of each shield, for this we will make the sketch of a shield in the foam of approx, 15cm x 12 cm, making
the shape of the shield, then I made the sketch of each animal with a yellow color, so that it would stand out, for Hufflepuff with the background in yellow foam I made a kind of badger 🦡, the Gryffindor one with the red background and a roaring lion 🦁, the Ravenclaw one in a blue background with an eagle 🦅, which looked like a dove hahaha and Slytherin which is the iconic snake with the green background 🐍 which is my favorite.
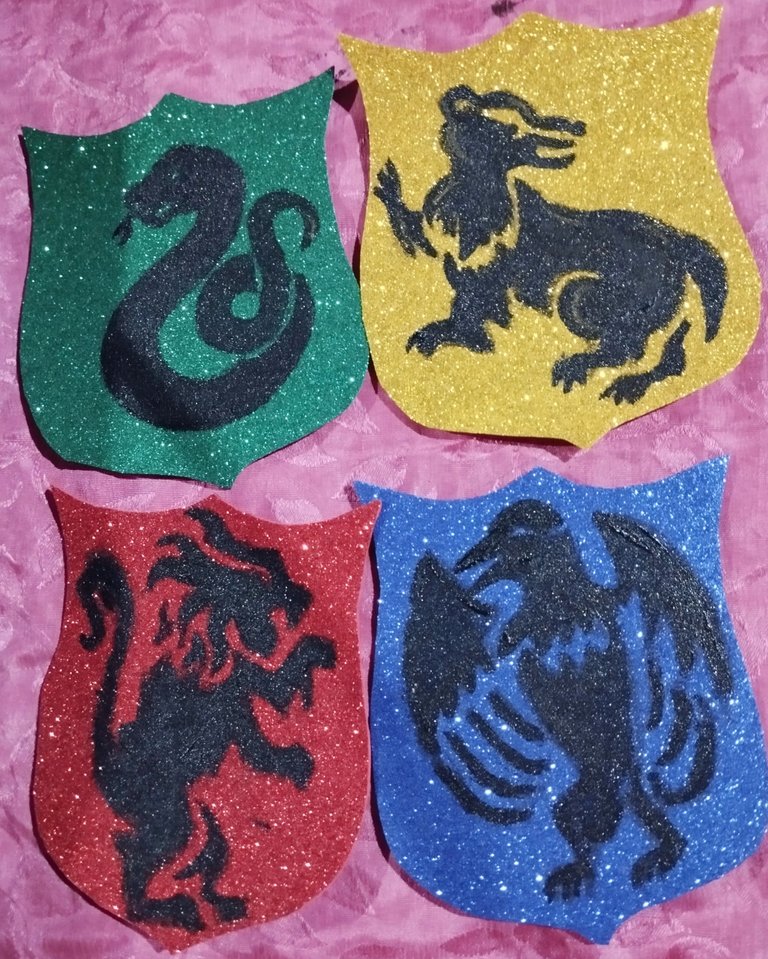 | 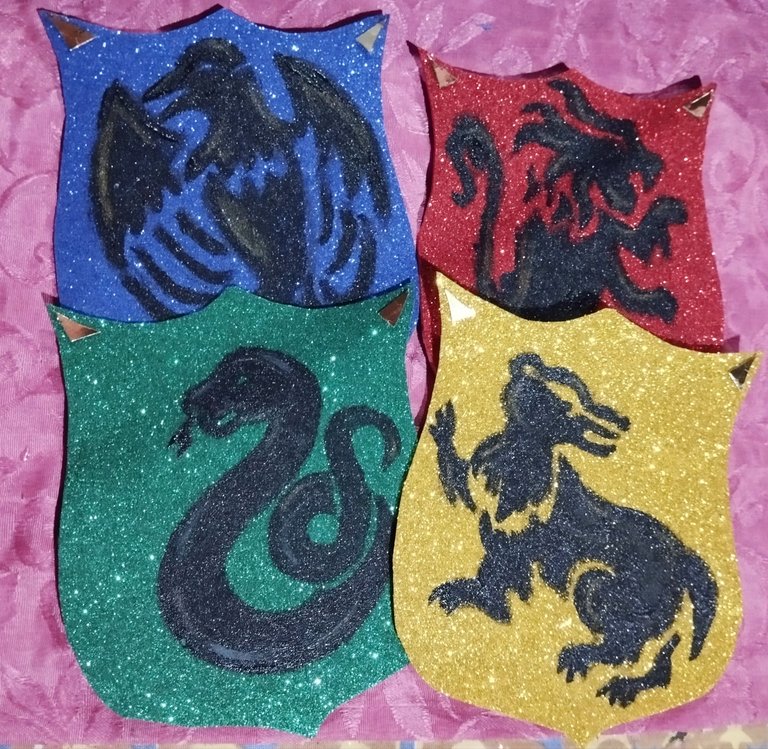 |  |
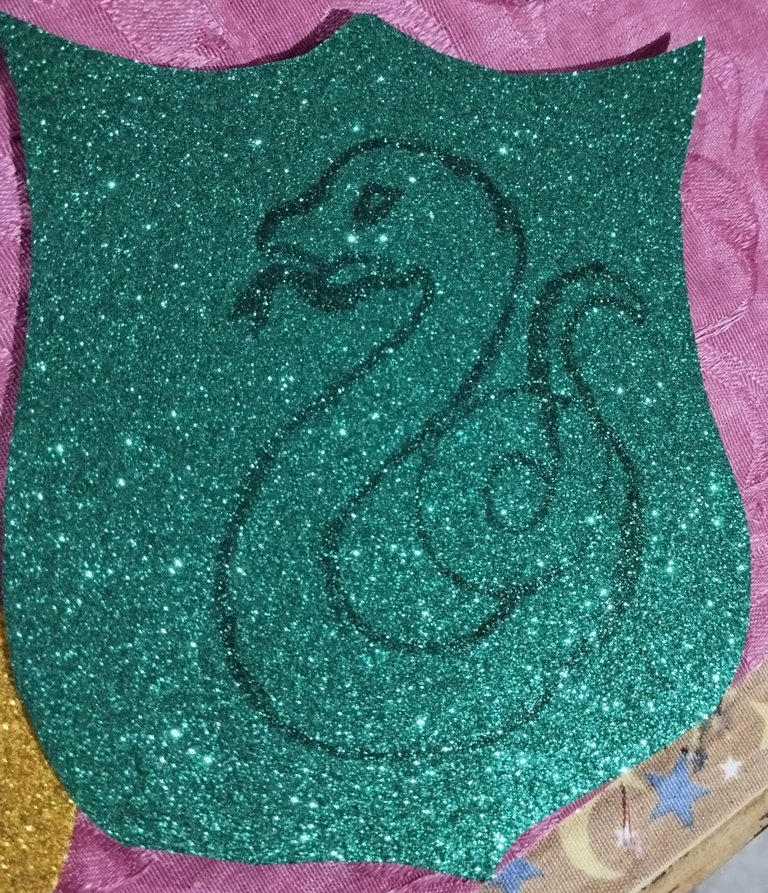
#6 Con pintura negra de tela y un pincel empecé a pintar cada boceto, para los detalles muy finos los hice con un palito, aquí usé una pintura de tela porque que me gustó bastante el resultado con un aspecto medio plastificado, y tenía mejor cobertura.Una vez secó todo con el color amarillo que es acuarelable le hice algo de destello en las líneas de cada animal, e hice unos triángulos pequeños y se los puse en cada esquina para darle un toque de elegancia.Para la parte de atrás le pegué también un pedazo de teipe doble cara para pegarlos.
English Version
#6 With black fabric paint and a brush I began to paint each sketch, for the very fine details I did them with a stick, here I used fabric paint because I really liked the result with a half plasticized look, and it had better coverage. Once everything was dry with the yellow color that is watercolorable I made some flash in the lines of each animal, and I made some small triangles and put them in each corner to give it a touch of elegance. For the back I also glued a piece of double-sided tape to stick them.
 |  |  |
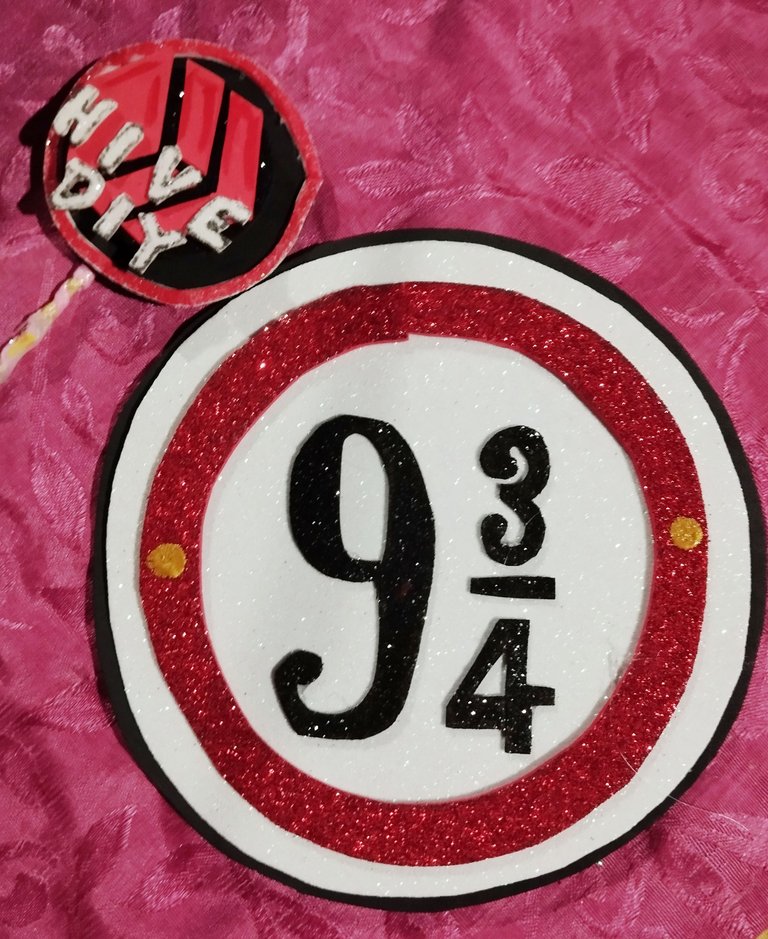
Y listo! Acá tenemos tres diferentes decoraciones que puedes hacer con Foami para decorar tu fiesta inspirada en Hogwarts ! Cómo si estuvieras en la sala comun de Hogwarts haciendo tu fiestita clandestina sin que Snape ni otro profesor se entere 🫢. Los escudos los pegaré debajo de las letras de feliz cumpleaños , y las corbatas mi idea es que en conjunto con las varitas los invitados las usen para diviértirse y tomarse fotos , y la señal la pondré
en la mesa junto el pastel/torta.
Muchas gracias por leerme ! ¿Ustedes que opinan de estos diseños? , harían su fiesta de sus libros o películas favoritas? Algún día haré la mía de Twilight!🤭💜✨ Espero que les haya gustado el post!
Fotos tomadas por mí en mi equipo Redmi note 12 editadas en Pics art y gif realizado en app creador de GIFs texto traducido en Google traductor.
English Version
** And that's it! Here we have three different decorations that you can make with Foami to decorate your Hogwarts-inspired party! As if you were in the Hogwarts common room having your clandestine party without Snape or any other teacher finding out 🫢. I will stick the shields under the happy birthday letters, and my idea is that the ties, together with the wands, the guests will use them to have fun and take photos, and I will put the sign
on the table next to the cake.**
Thank you very much for reading me! What do you think of these designs? Would you make your party based on your favorite books or movies? Someday I will make mine from Twilight! 🤭💜✨ I hope you liked the post!
Photos taken by me on my Redmi note 12 device edited in Pics art and gif made in GIF creator app text translated in Google translator.
Cuánta hermosura quedaron preciosas. Por cierto, ¡VIVA GRYFFINDOR! 😁😁😁
Todo te quedó genial amiga,esa fiesta va a tener una temática y decoración de lujo. 🥰🫰🏻
¿Alguien dijo Harry Potter? 👀 jajaja woow que lindos te quedaron, son unas bonitas decoraciones para celebrar una fiesta con la tematica del niño que vivio jeje ideal para todo fan de la saga 😍 los escudos te quedaron geniales 👌