These days I bought my son's school supply list and inadvertently bought one notebook too many. So I decided to use it for my notes.
But the notebook is quite ugly, the cover is pale and plain. Sure, my son's notebooks, I lined them with navy blue contact paper, because that's what his school requires, but I wouldn't do the same with mine. I wanted to give it a different touch.
So after a few days, I got down to work. Something simple to do, with things that we all have at home and that does not take much time to make.
So go ahead and make your own, with these simple steps!
En estos días compré la lista de útiles escolares de mi hijo y sin querer, compré un cuaderno de más. Así que decidí usarlo para mis anotaciones.
Pero el cuaderno es bastante feo, la portada es pálida y simple. Claro, los cuadernos de mi hijo, los forré con papel contact azul marino, porque así lo exigen en su colegio, pero no haría lo mismo con el mío. Quise darle un toque distinto.
Y después de algunos días, puse manos a la obra. Algo sencillo de realizar, con cosas que todos tenemos en nuestra casa y que no lleva mucho tiempo para hacer.
¡Así que anímate y haz la tuya, con estos sencillos pasos!

What you need:
Cold paints 📌
Brushes 📌
2 white sheets of paper 📌
School glue 📌
An unused toothbrush 📌
Scissors 📌
Lo que necesitas:
Pinturas al frío 📌
Pinceles 📌
2 hojas de papel blancas 📌
Pegamento escolar 📌
Un cepillo de dientes que no uses 📌
Tijeras 📌


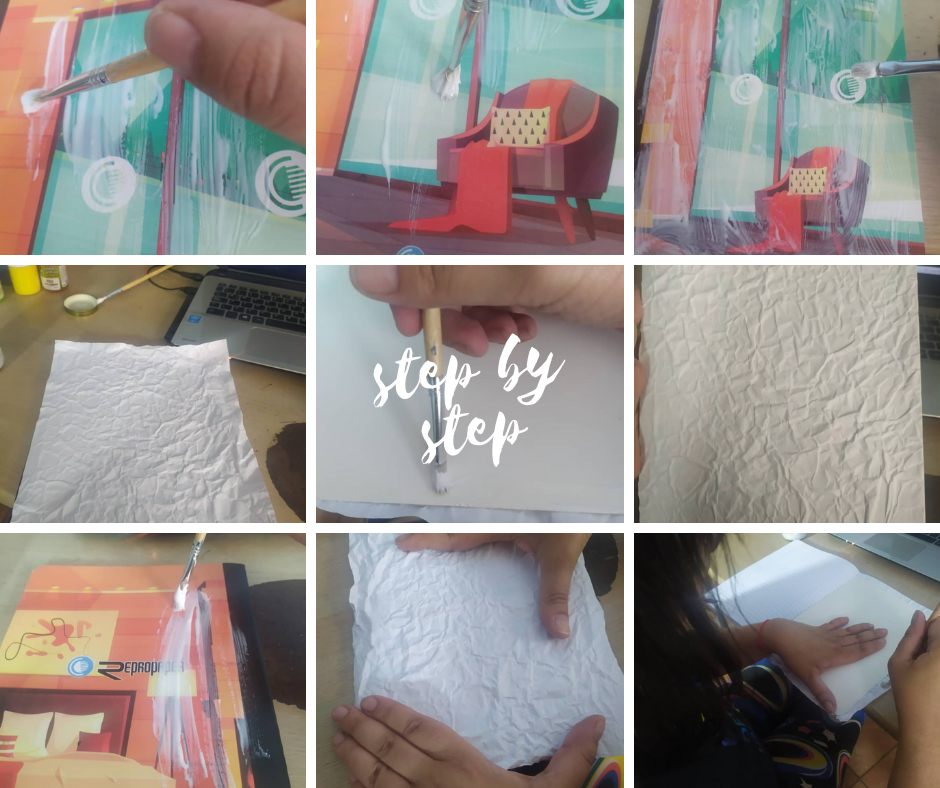
The first thing you will do is crumple the sheets of paper into small balls. Then you will stretch them again.
Lo primero que harás, será arrugar las hojas de papel hasta hacerlas unas bolitas. Luego las vas a estirar de nuevo.


After stretching them, you will take a paintbrush and apply school glue to the entire cover of the notebook.
Then you will glue one of the crumpled papers to the notebook where the glue is. Then, you will glue it on the inside in the same way as if you were lining a notebook.
You will do the same with the back cover of the notebook.
Después de estirarlas, vas a coger un pincel y le colocarás pegamento escolar a toda la portada del cuaderno.
Luego pegarás uno de los papeles arrugados al cuaderno donde está el pegamento. Después, vas a pegarlo por dentro de la misma forma como si estuvieses forrando un cuaderno.
Harás lo mismo con la contraportada del cuaderno.

Now you prepare your table where you are going to paint. Cover it with an old blanket or large paper so you won't stain anything. When you do this sparking technique, it tends to splatter everywhere if you don't do it carefully.
I have a work sheet type paper that I use for these.
Ahora preparas tu mesa donde vas a pintar. Cúbrela con una manta vieja o papel grande para que no vayas a manchar nada. Cuando haces esta técnica de chispas, suele salpicar por todos lados si no lo haces con cuidado.
Yo tengo un papel tipo folio de trabajo que uso para estos casos.

I then proceeded to the splash technique using the colors: blue, red and yellow. I loved how it turned out, but I didn't want the main cover to look the same. The idea is not to make it monotonous or boring, right?
Entonces procedí a la técnica del salpicado usando los colores: azul rojo y amarillo. Me encantó como iba quedando, pero no quería el la portada principal igual. La idea es no hacerlo monótono ni aburrido, ¿verdad?

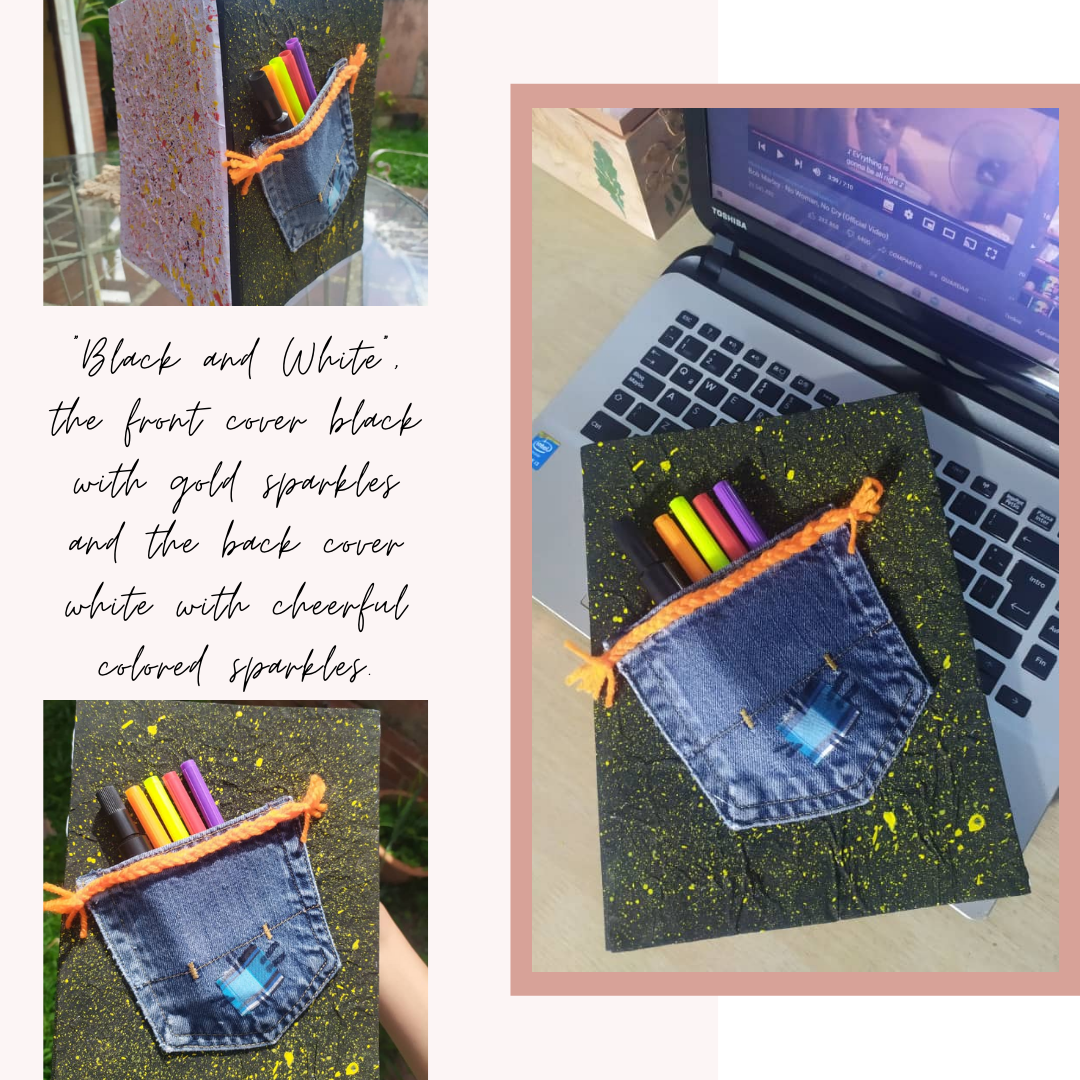
For the main cover I painted it all black and waited for it to dry. Then I applied the same stippling technique, but only with gold color. I waited again for it to dry.
Para la portada principal lo que hice fue pintarla toda de negro y esperé a que se secara. Luego apliqué la misma técnica del salpicado, pero solo con color dorado. Esperé nuevamente a que se secara.


I was still not satisfied with this result. It seemed too simple.
Then I thought of putting it in a kind of pencil holder and it came to my mind, a pair of jeans that my son no longer wears and I cut off one of the back pockets.
Then I glued it with liquid silicone.
No estaba aún satisfecha con este resultado. Me parecía muy simple.
Entonces pensé en ponerle en una especie de portalápices y me vino a la mente, un pantaloncito de mezclilla que a mi hijo ya no le sirve y le corté uno de los bolsillos traseros.
Luego lo pegué con silicón líquido.

Then it occurred to me to glue a patch on it and paint with a black marker something that looked like seams.
And since I had some school yarn, I thought of making an ornament for the pocket to give it a feminine touch. And I made this braid.
Here is the final result. I hope you like it:
Después se me ocurrió pegarle un parche y pintarle con un marcador negro algo parecido a costuras.
Y como tenía estambre escolar, pensé en hacer un adorno para el bolsillo que le diese un toque femenino. E hice esta trenza.
He aquí el resultado final. Espero que les guste:

All photos were taken with the camera of my Xiaomi Redmi Note 8 cell phone. The covers were made with Canva and PhotoScape.
Todas las fotos fueron tomadas con la cámara de mi celular Xiaomi Redmi Note 8. Las portadas fueron hechas con Canva y PhotoScape.

The rewards earned on this comment will go directly to the person sharing the post on Twitter as long as they are registered with @poshtoken. Sign up at https://hiveposh.com.
Te quedò muy bonito tu proyecto, nunca he intentado algo asi pero si me gusta recuperar las portadas de libros y cuadernos. me encanta el detalle del bolsillo de jean, excelente.
Muy buena idea, tu cuaderno está vibrante y es totalmente artesanal