Esp
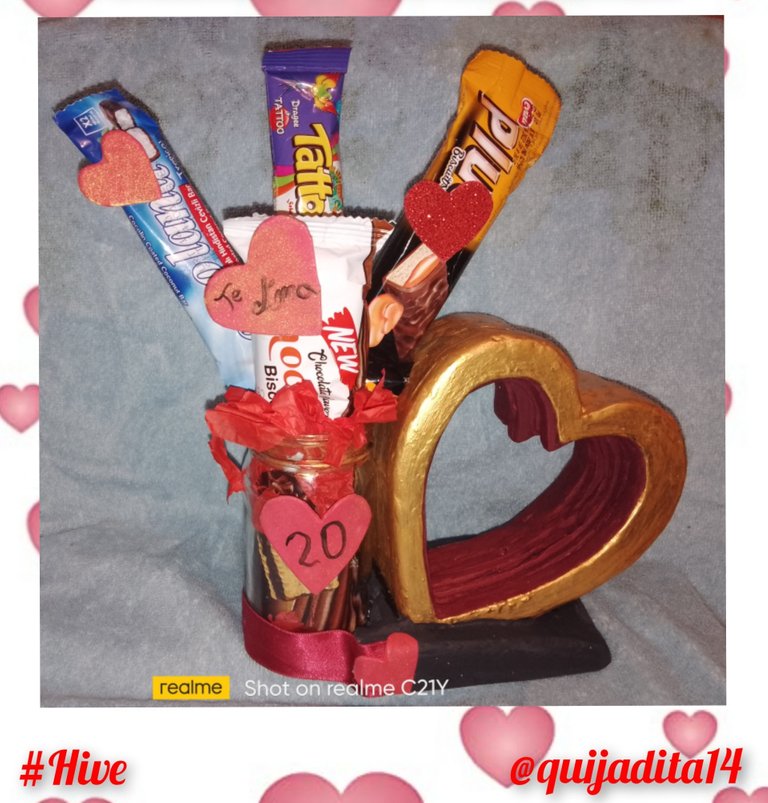
Buenos días amigos artesanos, espero se encuentren muy bien hoy! Aun nos encontramos en el mes del amor y por qué no hacer algo para nuestra persona especial? Acá les enseñare como realizar una piedra de amor, quería compartir con ustedes esta hermosa idea el 14 de febrero justo el día del amor y amistad pero se me hizo imposible pero bueno, lo importante es que de igual manera quiero llevar les esta nuevo material el cual estoy empleando en mis manualidades.
Eng
Good morning friends craftsmen, I hope you are very well today! We still find ourselves in the month of love and why not do something for our special person? Here I teach you how to make a stone of love, I wanted to share with you this beautiful idea the 14th February just the day of love and friendship but it was impossible but well, the important thing is that in the same way I want to take this new material which I am employing in my crafts.
Esp
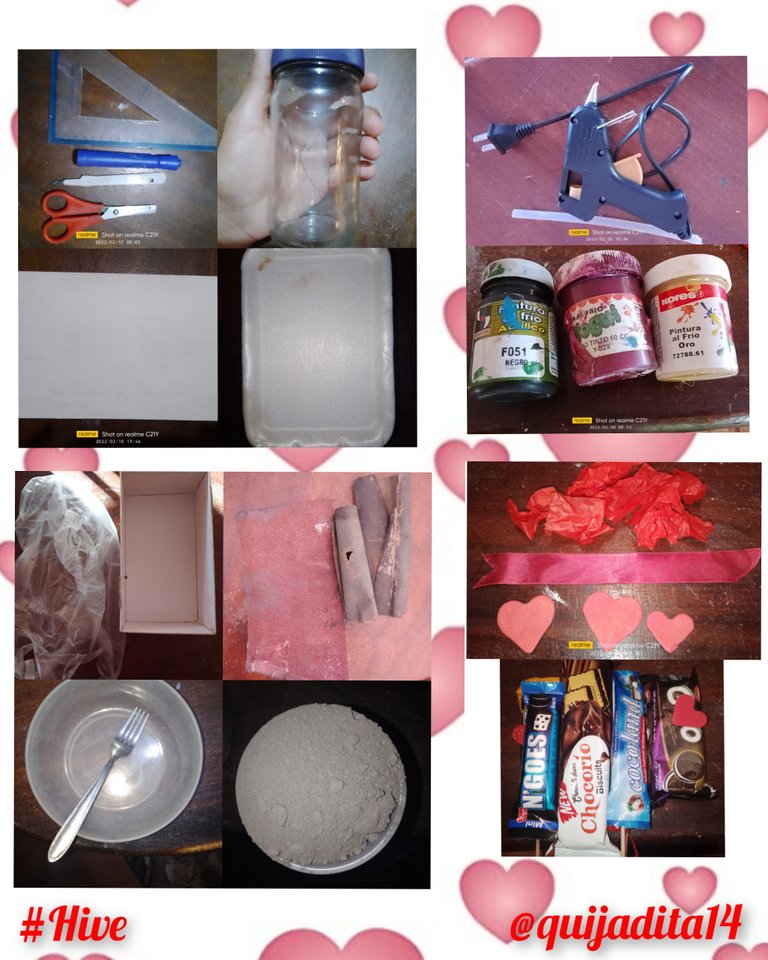
Los materiales que utilice para crear esta piedra de amor fueron:
- Regla, marcador, exacto y tijera
- Frasco de vidrio pequeño
- Bandejas de anime
- Hojas reciclables
- Silicón caliente
- Temperas de color negro, blanco, dorado y rojo
- Una caja de teléfono
- Una bolsa plástica
- Papel de lija
- Envase para mezcla y un tenedor
- Cemento
- Chocolates
- Corazones de fabuloso
- Cinta
- Papel de color rojo
Eng
The materials you use to create this love stone were:
- Rule, marker, exact and scissors
- small glass jar
- Anime trays
- Recyclable leaves
- Hot silicone
- Temperas black, white, golden and red
- A phone box
- A plastic bag
- Sandpaper
- Container for mixing and a fork
- Cemento.
- Chocolates.
- Fabulous Hearts
- Headband
- Red paper
Esp
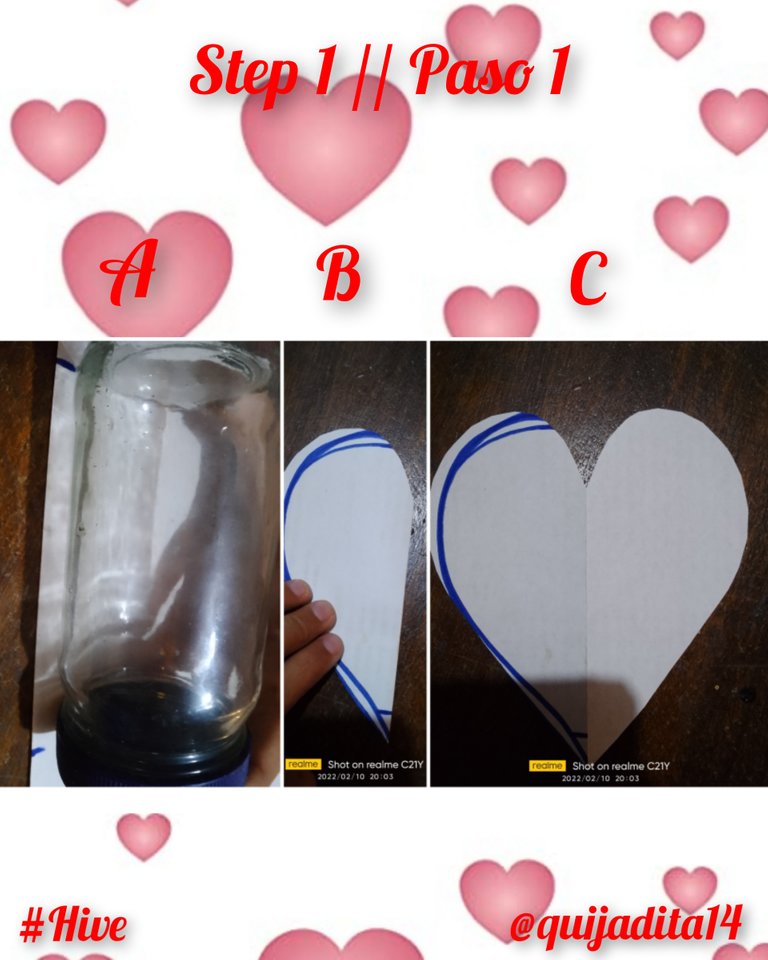
1.En este primer paso tomamos una hoja reciclable y la doblamos por la mitad, luego con el frasco de vidrio lo colocamos encima de dobles que hicimos en la hoja marcando el espacio que ocupa el frasco, luego retiramos el frasco y a partir de esa medida realizamos la mitad de un corazón lo recortamos con las tijeras sin dañar el dobles de la hoja para que al abrirlo nos quede un corazón proporcional a la medida del frasco.
Eng
1.In this first step we take a recyclable sheet and bend it in half, then with the glass bottle we place it on top of doubles that we did on the leaf marking the space that occupies the bottle, then we remove the jar and from that measure Half of a heart cut it with scissors without damaging the doubles of the leaf so that when we open it a proportional heart to measure the bottle.
Esp
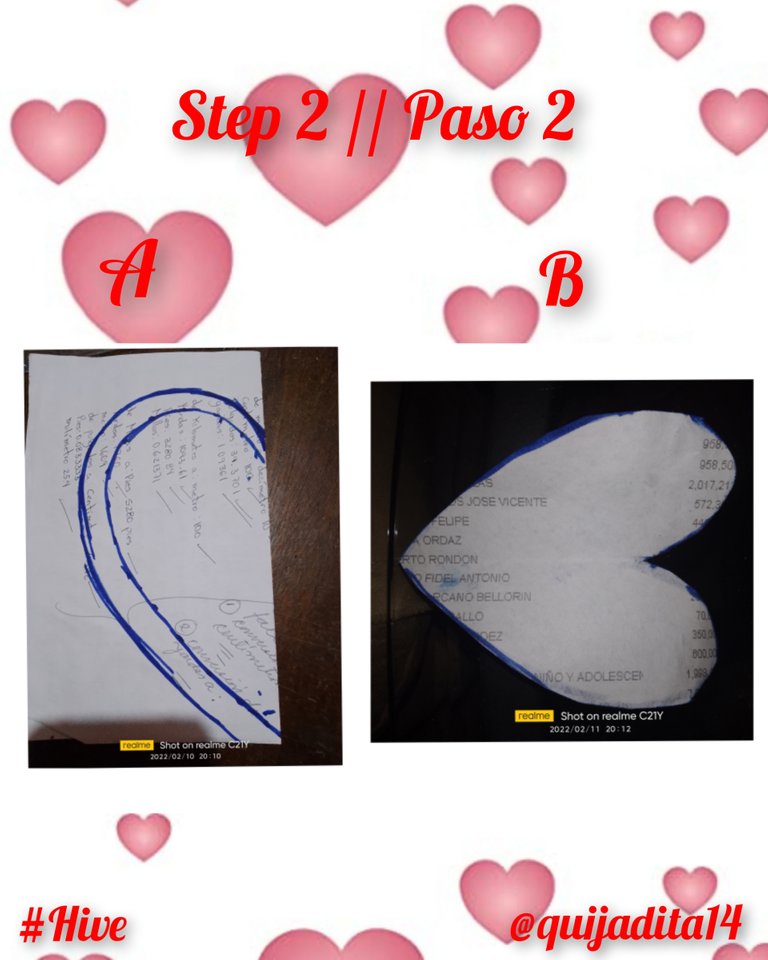
2.En el segundo paso tomamos otra hoja reciclable y la doblamos por la mitad y con el corazón que ya habíamos recortado lo utilizamos para a partir de ese sacar un corazón más pequeño, es por ello que marcaremos el corazón número 1 en la hoja doblada, y con ayuda de una regla iremos midiendo un centímetro hacia dentro del corazón, luego uniremos todos estos puntos y nos quedara exactamente el mismo corazón solo que un poco más pequeño, lo recortamos y al abrirlo nos quedara un corazón completo.
Eng
2.In the second step we take another recyclable sheet and we fold it in half and with the heart we had already trimmed, we used it from that take out a smaller heart, that is why we will mark the heart number 1 on the folded leaf, And with the help of a rule we will measure a centimeter into the heart, then we will unite all these points and stay exactly the same heart only that a little smaller, we cut it and when we open it a full heart.
Esp
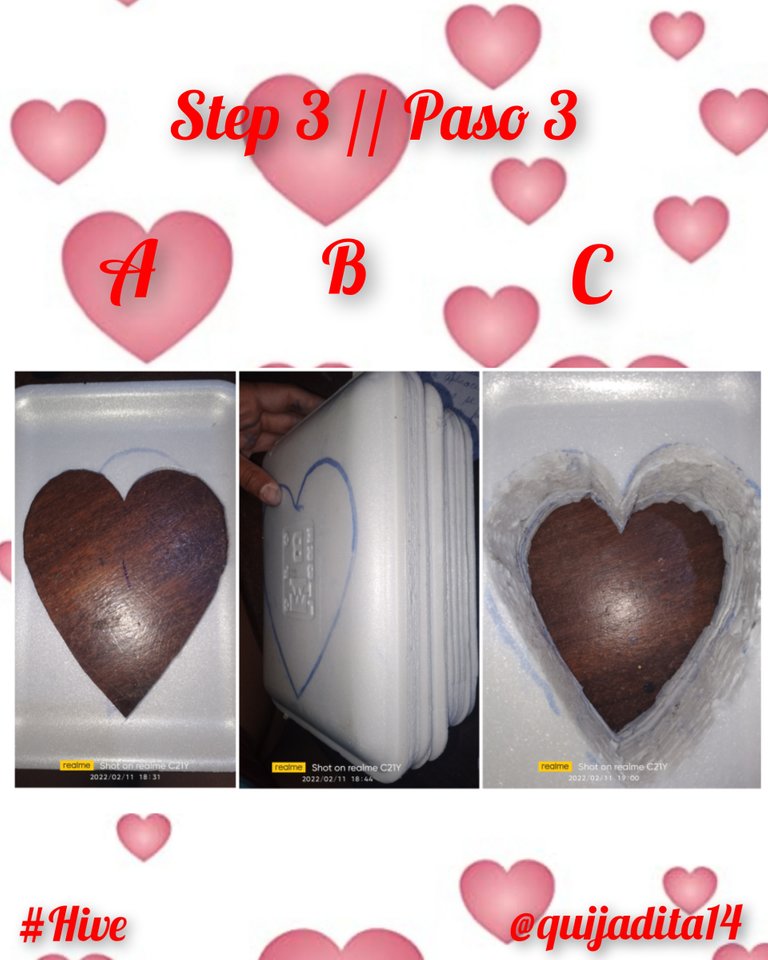
3.Este tercer paso es un poco más cuidadoso ya que tendremos que utilizar el exacto, acá tomamos las bandejas de anime y el corazón número 1 y lo iremos marcando en todas las bandejas y con ayuda del exacto iremos sacando la forma, yo utilice unas 17-20 bandejas así que tengan paciencia, luego de haber sacado todos los corazones las comenzaremos a pegar una sobre otra y la bandeja que estará de base no deben sacarle la forma ya que esta será como la tapa de nuestro molde.
Eng
3.This third step is a little more careful since we will have to use the exact, here we took the anime trays and the number 1 heart and we will mark it in all the trays and with the help of the exact we will take the form, I use about 17 -20 trays So have patience, after having taken all the hearts we will start to paste one over another and the tray that will be base should not get the way it will be like the cover of our mold.
Esp
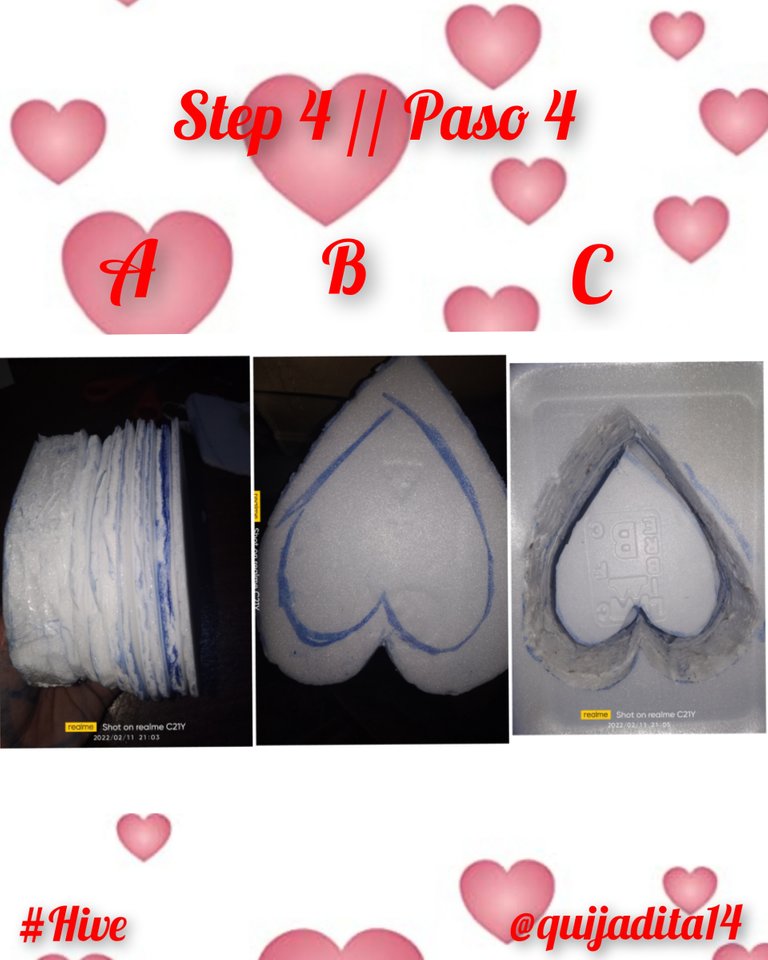
4.En este paso tomaremos todos los corazones que sacamos de las bandejas y los colocaremos uno sobre otro, le marcaremos el corazón numero 2 que recortamos, el cuales un centímetro más pequeño que el anterior, sacamos la forma con ayuda del exacto. Una vez que lo tengamos todos del mismo tamaño lo pegamos en todo el centro de la base anterior quedando de la forma C que aparece en la imagen.
Eng
4.In this step we will take all the hearts that we take out of the trays and we will place them one on top of the other, we will mark the heart number 2 that we cut out, which is one centimeter smaller than the previous one, we will take out the shape with the help of the exact one. Once we have it all the same size, we paste it in the entire center of the previous base, leaving it in the form C that appears in the image.
Esp
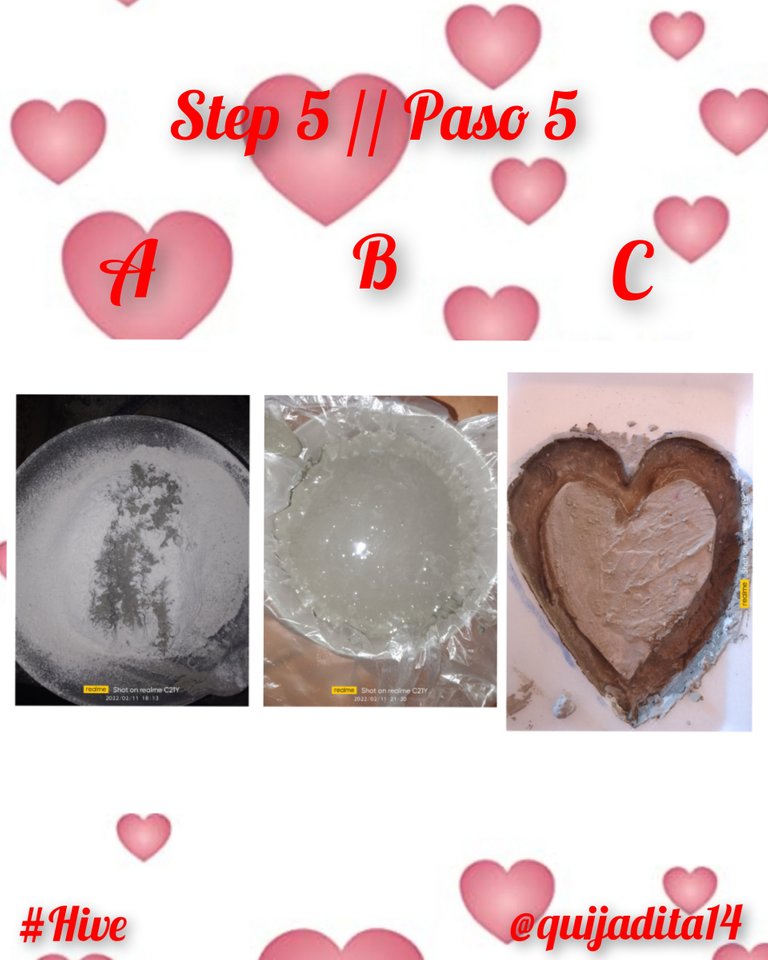
5.En este paso al tener nuestro molde listo solo nos queda preparar el cemento, entonces tomamos el envase para mezcla y colocamos cemento, un poquito de cal (opcional) y una cantidad de agua de acuerdo a la textura, es decir, esta mezcla no nos puede quedar tan agua pero tampoco tan seca, entonces lo haremos intermedia, si ustedes no conocen mucho de cemento y como prepararlo les daré un consejo cuando ustedes vean que esta todo el polvo húmedo y que se puede mover la mezcla sin esforzarse mucho sabremos que es el punto al que queremos llegar. Al tener la mezcla en ese punto la colocaremos toda en el molde que preparamos y dejaremos secar, normalmente dura un día en secar, pero les recomiendo dejarlo más de 24 horas.
Eng
5.In this step, having our mold ready, we only have to prepare the cement, then we take the container for mixing and place cement, a little lime (optional) and an amount of water according to the texture, that is, this mixture does not we can have so much water left but not so dry, then we will do it intermediate, if you do not know much about cement and how to prepare it I will give you some advice when you see that all the powder is wet and that the mixture can be moved without much effort we will know that This is the point we want to get to. Having the mixture at that point, we will place it all in the mold that we prepared and let it dry, it normally takes a day to dry, but I recommend leaving it for more than 24 hours.
Esp
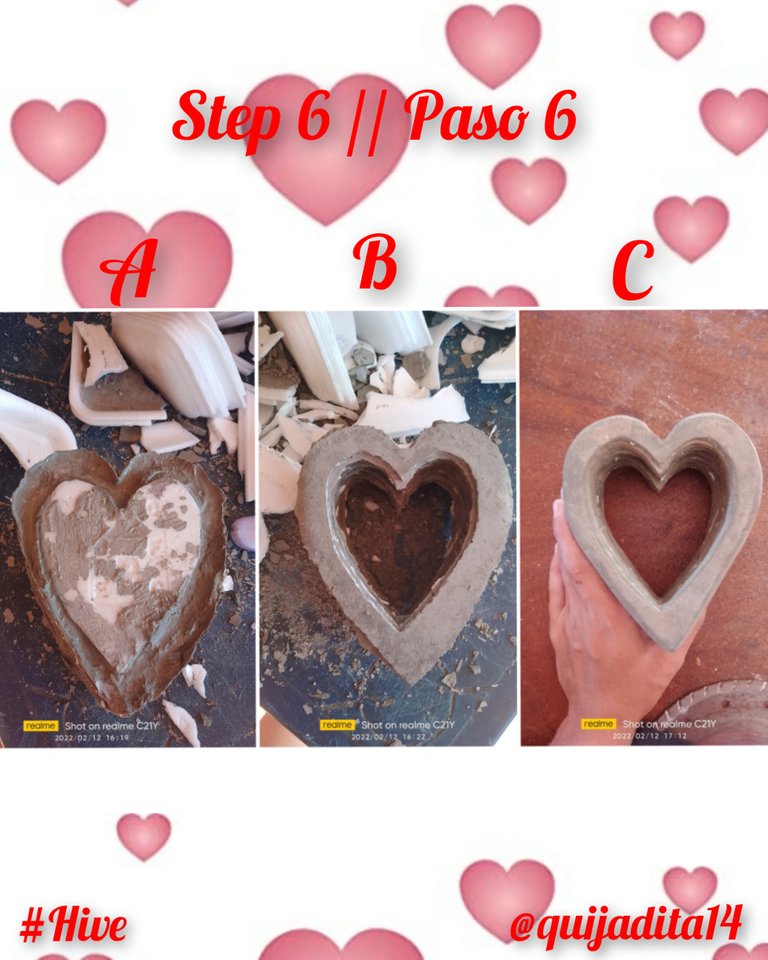
6.En este paso al tener el cemento completamente seco, comenzaremos a quitar todo el molde de bandejas de anime con ayuda del exacto e iremos dándole la forma con el mismo exacto y con ayuda del papel de lija, te recomiendo mojar la pieza antes de moldearla para que se te haga más fácil, se preguntaran ¿Cuándo dejo de lijar? Eso dependerá de la forma o textura que usted le quiera dar a su piedra de amor.
Eng
6.In this step, having the cement completely dry, we will begin to remove the entire anime tray mold with the help of the exact one and we will give it the shape with the same exact one and with the help of sandpaper, I recommend you wet the piece before molding it To make it easier for you, they will ask themselves: When do I stop sanding? That will depend on the shape or texture that you want to give your love stone.
Esp
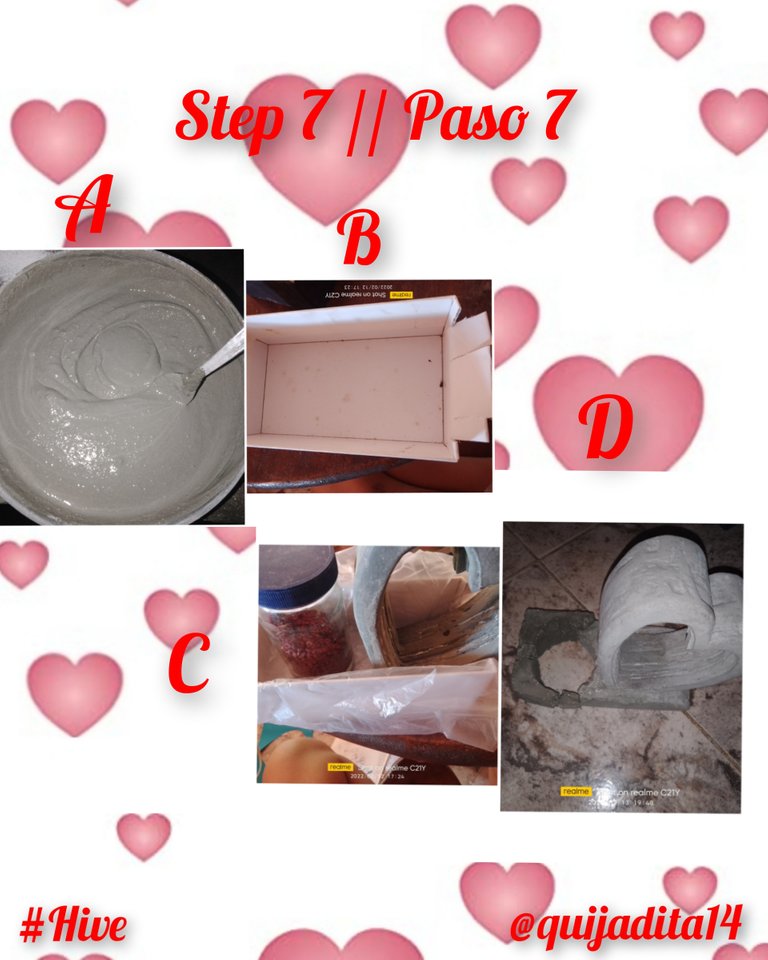
7.En este paso preparamos un poquito de cemento y tomamos la caja de teléfono a la cual le hacemos una caída para que el corazón quede de lado y pasaremos a meterla en una bolsa para que el cemento al estar seco se pueda despegar fácilmente. Colocamos el corazón y el frasco de vidrio con algunas piedras para que no se mueva, echamos el cemento que preparamos y lo dejamos secar por unas horas, al estar seco lo sacamos de la caja y con ayuda de la punta de la tijera le vamos a quitar lo que rodeaba el frasco de vidrio dejando nada más la caída donde se une el frasco a la piedra de amor.
Eng
7.In this step we prepare a little bit of cement and we take the telephone box to which we make a drop so that the heart is on one side and we will put it in a bag so that the cement, when dry, can be easily removed. We place the heart and the glass jar with some stones so that it does not move, we pour the cement that we prepared and let it dry for a few hours, when it is dry we take it out of the box and with the help of the tip of the scissors we are going to remove the surrounding glass jar leaving just the drop where the jar meets the love stone.
Esp
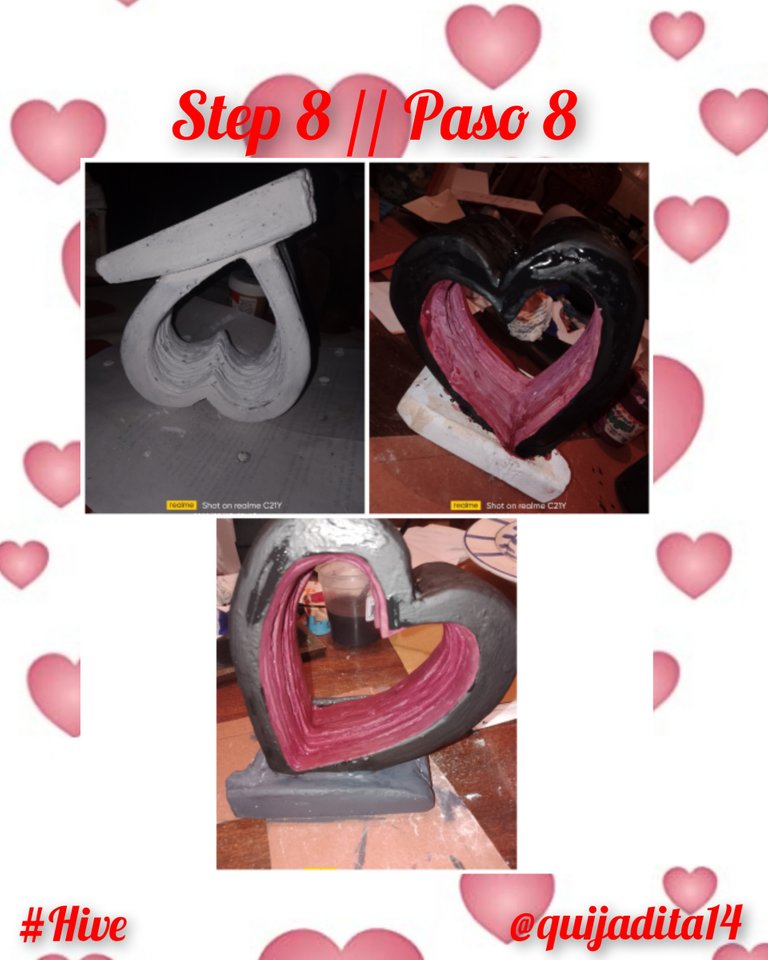
8.En este paso tomamos la pieza, las temperas y el pincel, comenzando a echarle una primera base blanca, luego en el exterior negro y en el interior rosa, para que al echar los colores fuertes estos puedan resaltar, una vez que tengamos toda la pieza denegro y rosa por dentro la dejamos secar unas horas.
Eng
8.In this step we take the piece, the tempera paints and the brush, beginning to add a white base first, then black on the outside and pink on the inside, so that when we add the strong colors they can stand out, once we have all the piece of black and pink inside we let it dry for a few hours.

Esp
9.En este paso tomamos el frasco de vidrio y en todo el borde superior lo vamos a pintar de dorado, tomamos nuestra pieza y le colocaremos el color rojo por dentro y dorado por fuera con ayuda de un pincel y lo dejamos secar.
Eng
9.In this step we take the glass jar and we are going to paint the entire upper edge gold, we take our piece and we will apply the color red on the inside and gold on the outside with the help of a brush and let it dry.
Esp
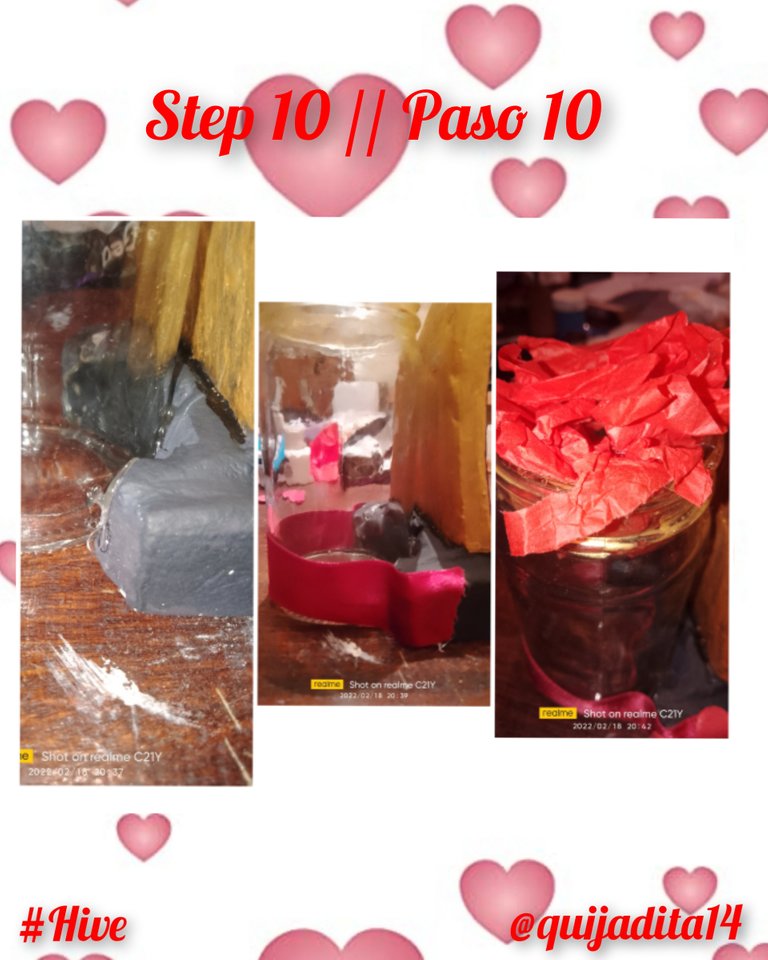
10.En este paso pegaremos el frasco de vidrio al a pieza lo fijaremos con el silicón caliente y luego le pasamos la cinta por todo el borde, aprovechando que tenemos el silicón caliente pegaremos los trozos de pape rojo en la parte de adentro del borde superior del frasco de vidrio.
Eng
10.In this step we will glue the glass jar to the piece, we will fix it with the hot silicone and then we will pass the tape around the edge, taking advantage of the fact that we have the hot silicone, we will glue the pieces of red paper on the inside of the upper edge of the glass jar.
Esp
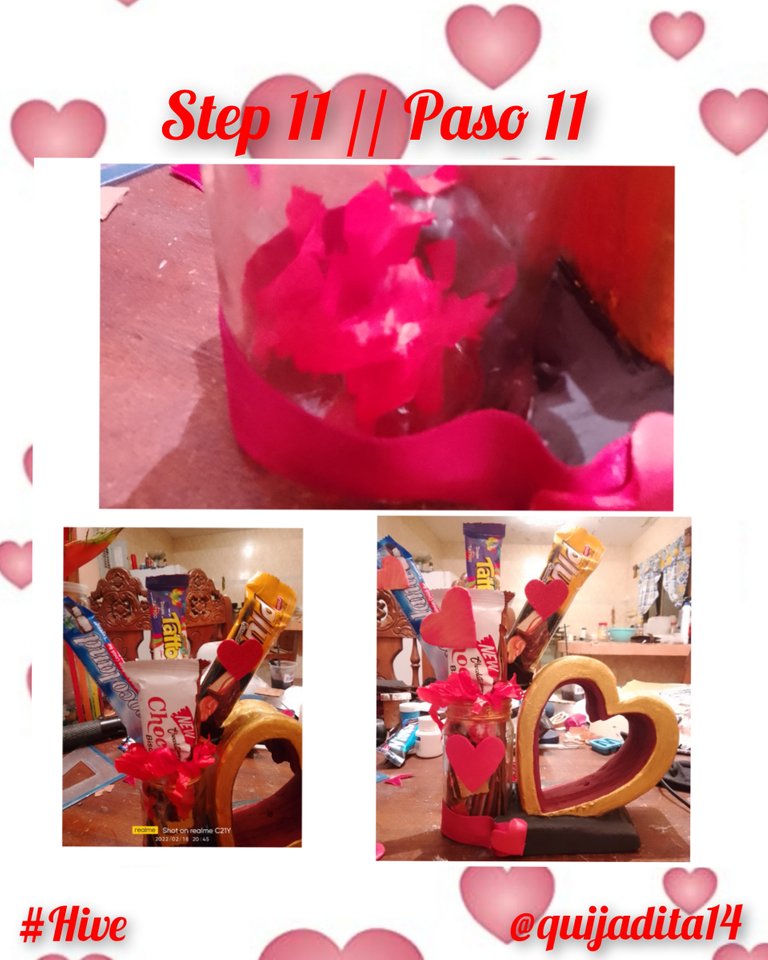
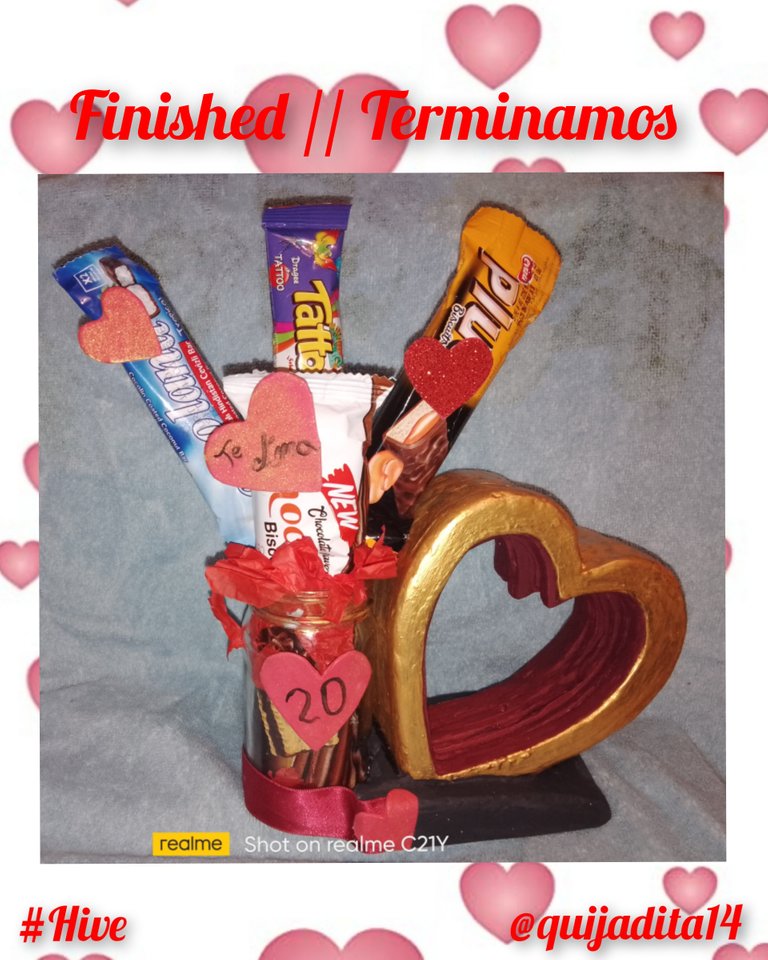
11.Para terminar en este paso agregamos unos trozos de papel rojo dentro del frasco de vidrio, y colocamos los corazones de fabuloso en el extremo de la cinta y en el centro del frasco, comenzamos a colocar los chocolates para terminar de darle nuestro toque a la piedra de amor, en los corazones pueden agregar frases o fechas para esa persona especial.
Eng
11.To finish in this step we add some pieces of red paper inside the glass jar, and we place the fabulous hearts at the end of the ribbon and in the center of the jar, we begin to place the chocolates to finish giving our touch to the stone of love, in the hearts you can add phrases or dates for that special person.

Esp
Las fotos fueron tomadas con un Realme C21Y, editadas en inCollage y el texto fue traducido al ingles en Google translator.
Eng
The photos were taken with a Realme C21Y, edited in inCollage and the text was translated into English in Google translator.
Hermoso detalle para regalar sin duda será un recuerdo que dure bastante fue súper interesante ver el paso a paso de su elaboración. @quijadita14
!discovery 25
This post was shared and voted inside the discord by the curators team of discovery-it
Join our community! hive-193212
Discovery-it is also a Witness, vote for us here
Delegate to us for passive income. Check our 80% fee-back Program