Si has pasado por mi blog en estos días sabrás que estamos pintando en casa, pero no solo eso, estamos cambiando un poco el estilo, los colores y algunos detalles decorativos para que la casa se sienta más acogedora, así que estamos pasando del rojo y blanco arena al gris y blanco, por lo que mi mural de letras que conduce a la cocina tenía que despedirse después de años acompañándonos, y por supuesto tenía que crear algo en su lugar ya que era mi pared focal.
Así que estuve pensando por días en algo sencillo, llamativo y por supuesto económico que pudiese hacer en su lugar y que amara tanto como mi antiguo mural, y fue así como di con esta belleza que les comparto hoy, una idea fácil y low cost para hacerte una pared focal bastante linda y llamativa, así que si te interesa, sigue leyendo.
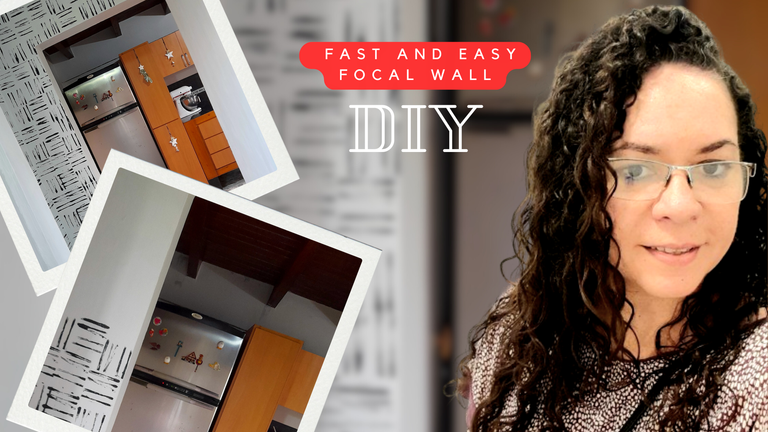
Este proyecto para mí no era tarea fácil ya que en primer lugar, me encantaba ese mural, pero después de tanto tiempo, ya era hora de cambiar, así que tocó decirle adiós y pintarlo de gris, pero por supuesto no podía dejarlo solo así, ya que a la vista, se veía sin vida, sobre todo si tomaba en cuenta cómo era, así que después de pensar y pensar decidí incorporar negro, pues es un tono que amo, y que está presente en casa, y la mejor manera de hacerlo era crear una especie de tapiz pero no tenía estenciles ni ninguna herramienta que pudiese utilizar para crear patrones en la pared, así que me tocó crearlo, y por aquí les comparto lo que utilicé, y mi paso a paso.
Materiales
Libro pequeño
Bolsa plástica
Cinta adhesiva
Estambre
Pintura al frío negra
Pincel
Como les digo, lo primero que tenía que hacer era idear una manera de crear un diseño que pudiera aplicar de forma rápida y sencilla a la pared, así que estuve entre utilizar una esponja o un rodillo con mecatillo para darle el toque negro a la pared, pero luego recordé que hace un tiempo cuando buscaba ideas para mi habitación vi una donde con un bloque de madera e hilo enrollado lograban un efecto muy lindo, y a falta de los materiales que se usaba para crear este patrón, lo creé yo partiendo de un libro pequeño, sigue leyendo para que sepas cómo.
Paso a paso
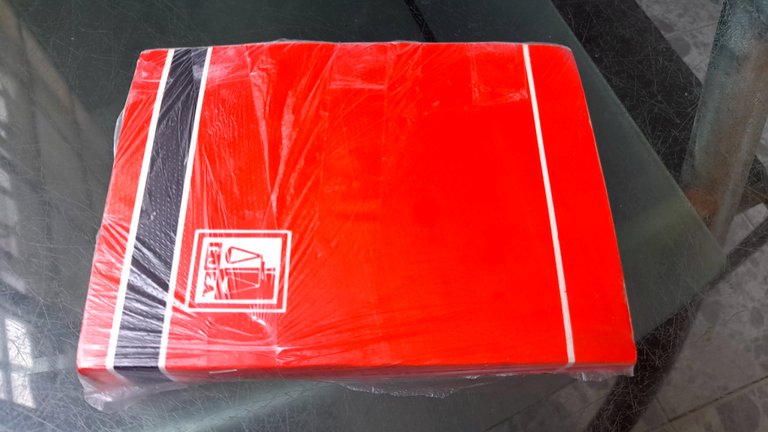
Lo primero que hice fue buscar en mi biblioteca un libro que me sirviera para sustituir el bloque de madera ya que no tenía, y una vez que dí con el tamaño ideal lo cubrí con una bolsa plástica para no dañarlo, así que con ayuda de la cinta adhesiva la pegué en el libro cubriéndolo muy bien.
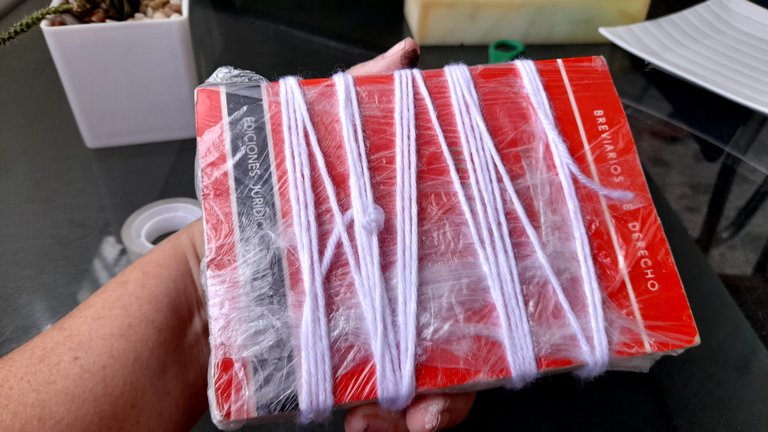
El siguiente paso fue hacer unas líneas desordenadas con estambre, lo que logré enrollandolo al rededor del libro y fijándolo también con cinta adhesiva.
Seguidamente con el pincel mojado con la pintura al frío lo pasé sobre el estambre hasta empaparlo muy bien y con mucho cuidado comencé a trabajar sobre la pared, y para esto solo tenía que presionar suavemente el libro contra ella, una y otra vez cambiando la orientación del libro para crear el diseño que ven.
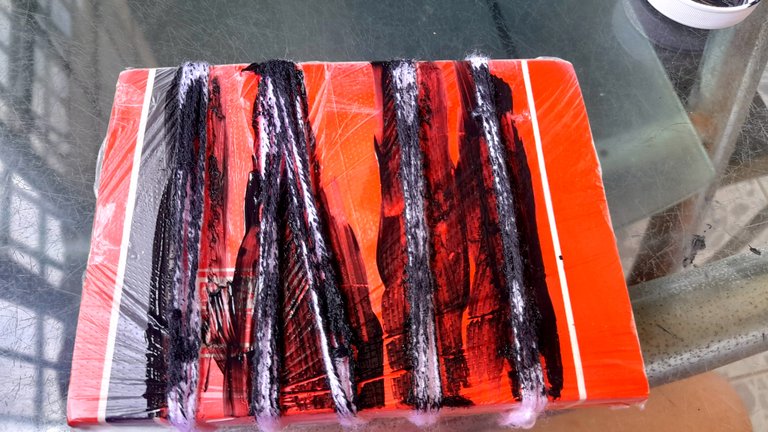
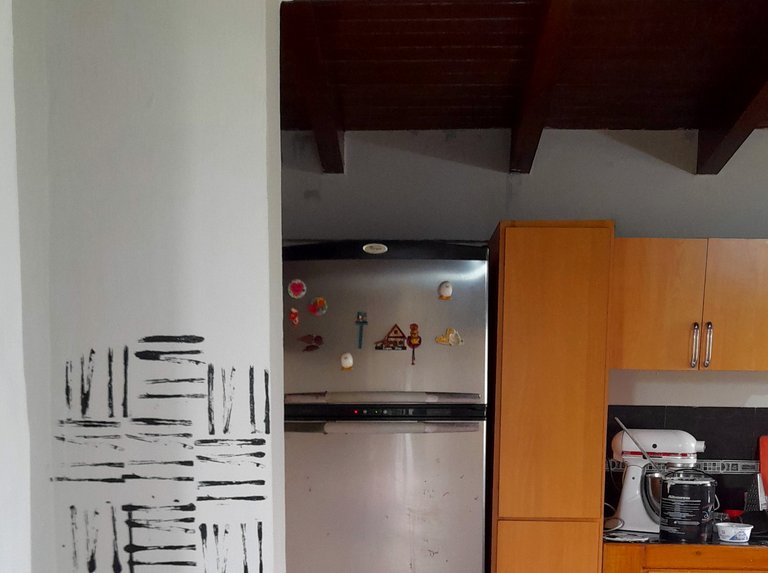
Por supuesto a medida que avanzaba tenía que recargar de pintura el estambre, y una vez cubierta toda la superficie de la pared, el proyecto estaba listo, y solo gasté 0,6$ en la pintura al frío la que prácticamente me quedó completa, ya que se usa muy poco, así que como ven, es un proyecto bastante económico, súper lindo y que aporta mucho carácter al espacio.
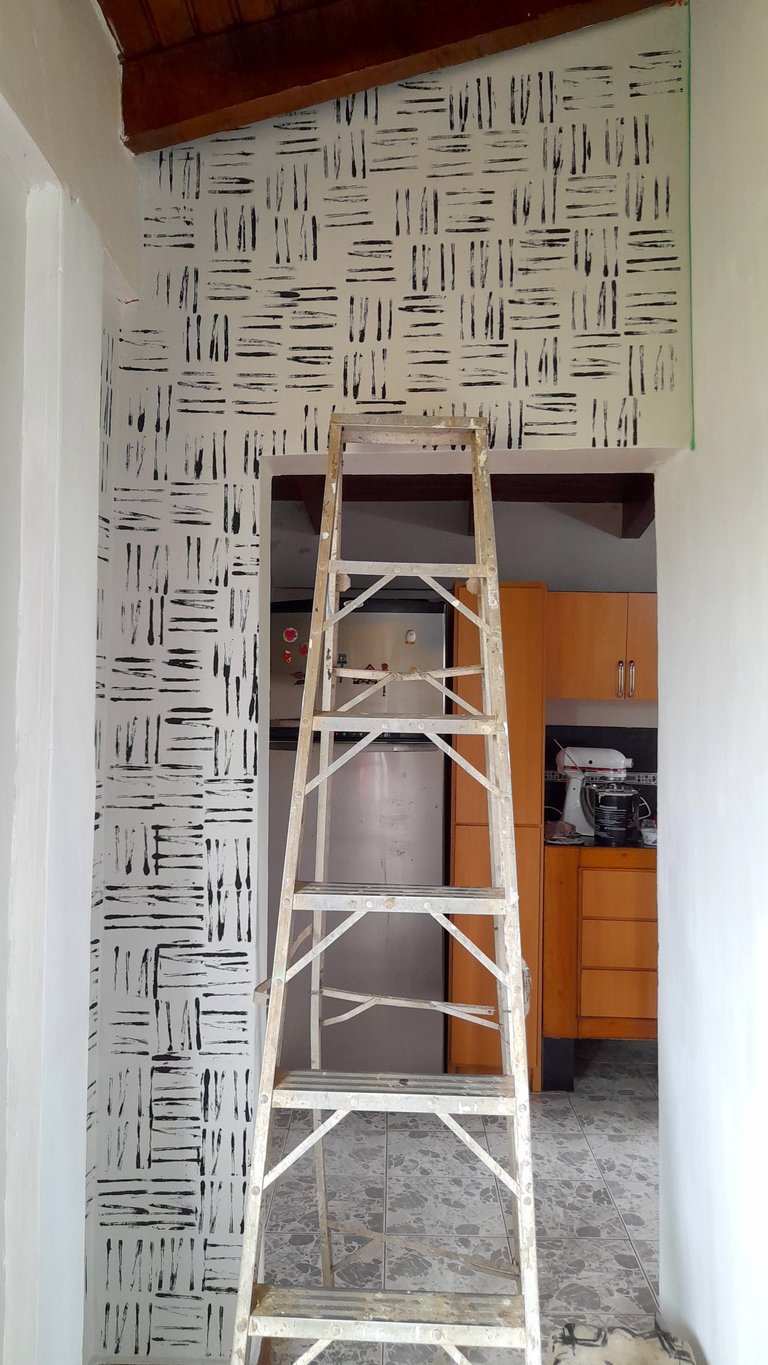
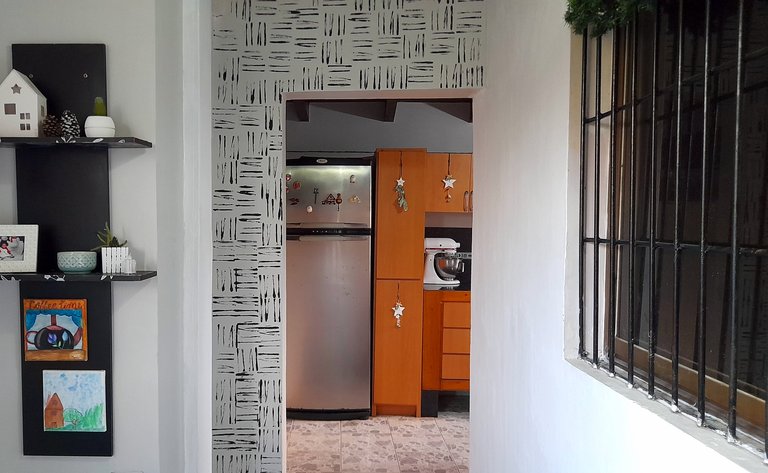
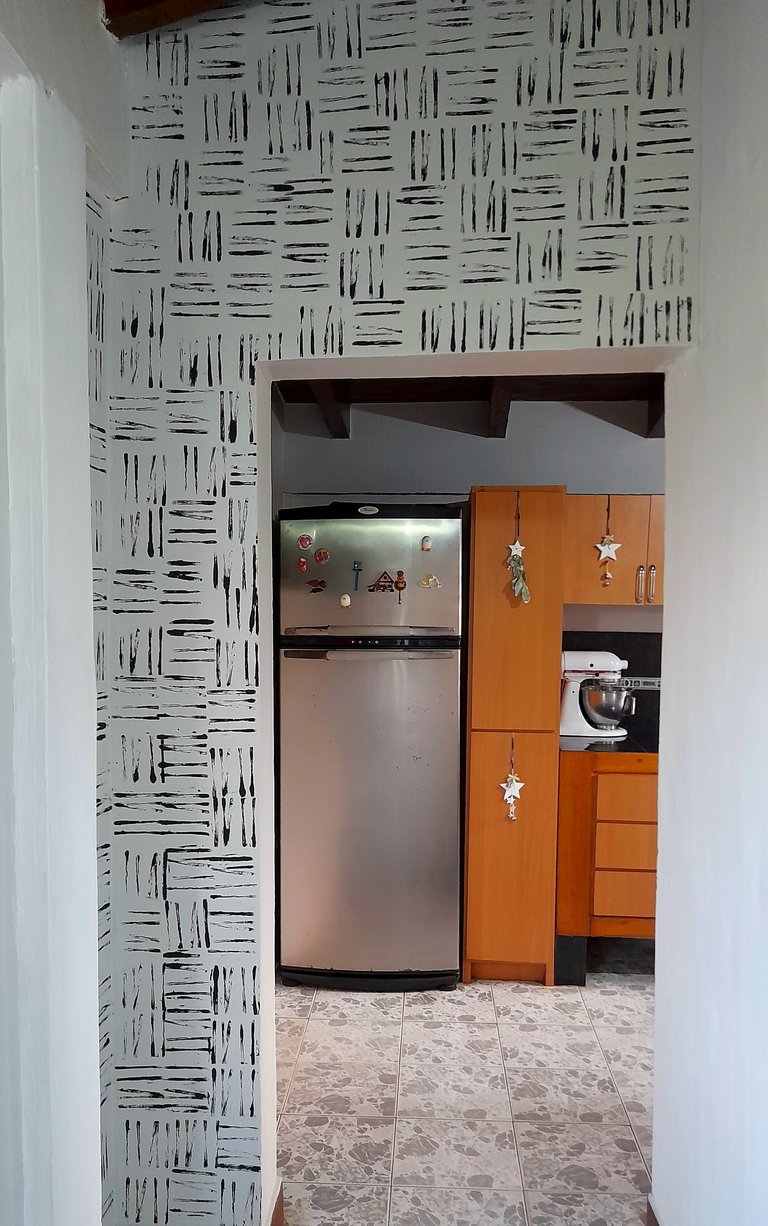
La verdad es que yo quedé más que satisfecha y a mí esposo y los niños también les encantó. Y a ustedes, ¿qué les parece?

If you have been going through my blog these days you will know that we are painting at home, but not only that, we are changing a bit the style, colors and some decorative details to make the house feel more cozy, so we are moving from red and white sand to gray and white, so my lettering mural that leads to the kitchen had to say goodbye after years accompanying us, and of course I had to create something in its place since it was my focal wall.
So I was thinking for days about something simple, eye catching and of course inexpensive that I could do in its place and that I loved as much as my old mural, and that's how I came up with this beauty I'm sharing with you today, an easy and low cost idea to make you a pretty cute and eye catching focal wall, so if you're interested, read on.

This project for me was no easy task since first of all, I loved that mural, but after so long, it was time for a change, so it was time to say goodbye and paint it gray, but of course I couldn't leave it alone like that, since to the eye, it looked lifeless, especially if I took into account how it was, so after thinking and thinking I decided to incorporate black, because it is a tone that I love, and that is present at home, and the best way to do it was to create a kind of tapestry but I had no stencils or any tool I could use to create patterns on the wall, so I had to create it, and here I share with you what I used, and my step by step.
Materials
Small book
Plastic bag
Tape
Straw Straw Stencil
Black cold paint
Brush
As I say, the first thing I had to do was to come up with a way to create a design that I could apply quickly and easily to the wall, so I was between using a sponge or a roller with mecatillo to give the black touch to the wall, but then I remembered that some time ago when I was looking for ideas for my room I saw one where with a block of wood and rolled thread they achieved a very nice effect, and in the absence of the materials used to create this pattern, I created it myself from a small book, read on to find out how.
Step by step
The first thing I did was to look in my library for a book that I could use to replace the wood block since I didn't have one, and once I found the ideal size I covered it with a plastic bag to avoid damaging it, so with the help of the adhesive tape I stuck it on the book covering it very well.

The next step was to make some messy lines with yarn, which I did by wrapping it around the book and fixing it with tape.

Then with the brush wet with the cold paint I passed it over the yarn until it was very well soaked and very carefully I began to work on the wall, and for this I only had to gently press the book against it, again and again changing the orientation of the book to create the design you see.


Of course as I went along I had to refill the stamen with paint, and once the entire surface of the wall was covered, the project was ready, and I only spent $0.6 on the cold paint which was practically complete, since it is used very little, so as you can see, it is a very economical project, super cute and adds a lot of character to the space.


The truth is that I was more than satisfied and my husband and the kids loved it too. And you, what do you think?

Amooooo🥰🥺
Quedó realmente hermosa está Pared amiga bella!
Gracias ami, yo estaba medio preocupada al principio pero me gustó mucho y los niños cuanto llegaron de la escuela se quedaron sorprendidos jeje porque lo hice súper rápido
Me encantó con locura😍
Super preciosa te quedó amiga
Que bonita mi Yage, gracias! Me alegra que te gustará.
Te mando abrazos
Amiga esto te quedó súper bello. Me encanta..
Tu idea está buenísima, súper sencilla Pero elegante....
Felicidades
Gracias amiga bella, tu no te quedas atrás con el diseño precioso que están haciendo.
Te mando abrazos
El resultado de esta pared, que realmente es un foco total en la decoración completa, quedó como papel tapiz. Ahora los papel tapiz son más modernos y con diseños muchas veces así simples pero que hacen un gran efecto al colocarlos.
Me impresiona que sea tan fácil de hacer la plantilla para lograr este patrón. Amiga te felicito por atreverte a dejar atrás ese mural que amabas y atreverte a hacer algo distinto, que combinará con cualquier color que tengan de fondo los objetos grandes o pequeños. Un 10/10 perfecto
Ay qué bella amiga, muchísimas gracias! Yo estaba asustada pensando que si no se veía bien iba a parir para tapar el negro jeje, pero me gustó mucho el resultado y creo que la amo tanto como a la otra jeje
Te mando abrazos
Wowww esta idea y diseño esta definitivamente genial, se ve tan moderno, Me Encanta 😍
Aww qué linda amiga, me alegra que te haya gustado. Yo quedé enamorada
Wow, me encantó, es una idea genial, queda preciosa la pared y con un estilo moderno.😍
Gracias amiga, estaba un poco preocupada por el resultado pero gracias a Dios quedó bien
Mami quedó bien bonita me gusta mucho
Gracias hija, eso quería, que ustedes les gustara
Justo estaba buscando un diseño para pintar mi cuarto. Este me encantó. Para nada complicado, y se ve diferente y especial. Saludos
Gracias amiga, espero que te sirva de inspiración porque fijate que sin grandes cosas puedes hacer algo lindo.
Abrazos
Love how creative and resourceful this project is. The new focal wall looks stunning, and the use of simple materials is so inspiring. It’s amazing how much character it adds to the space. Great job.
Thank you very much, when you don't have the resources you have to be creative hehe. Your comment made me happy 💗
Quedó precioso! 🥺 No amiga , de verdad que amo todo lo que haces. De la nada decidiste quitar el mural y no puede ser algo sin estilo, ella se las ingenia para hacer algo original.💕
Tan bella! Gracias ami, tu sabes como soy yo, no puedo estar quieta, y mira que he estado full pero pues tengo problemitas jaja
Hiciste un gran trabajo, gracias por compartirnos los tips, luce espléndida la combinación.
Felicitaciones.
Muchísimas gracias amiga 🤗
Siempre a la orden amiga 🤗🙂
@tipu curate
Upvoted 👌 (Mana: 7/37) Liquid rewards.
Me encanto el diseño, esta super original amiga 😉👍
Gracias mi bella. Abrazos
¡Amiga, qué belleza! Me encantó cómo se ve, ha sido una idea genial y la ejecución es muy fácil, todo se trata de creatividad y tú tienes de sobra, Dios te bendiga. Un abrazo fuerte y bendiciones 🤗