Greetings to my dear Hive DIY community. I hope you have a great week, full of creative and interesting ideas.
This time, I'm sharing a short and simple post from my series, "First Aid," on how to maintain some of these inexpensive and practical Chinese horns.
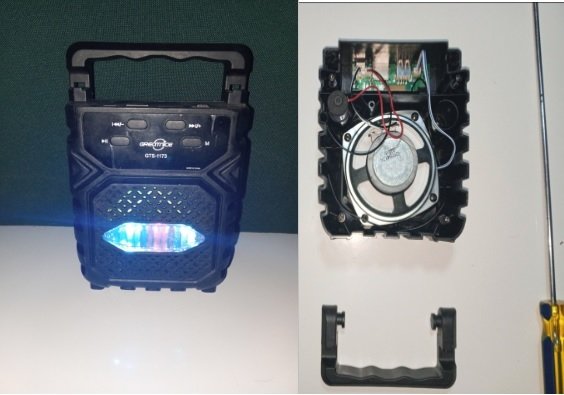
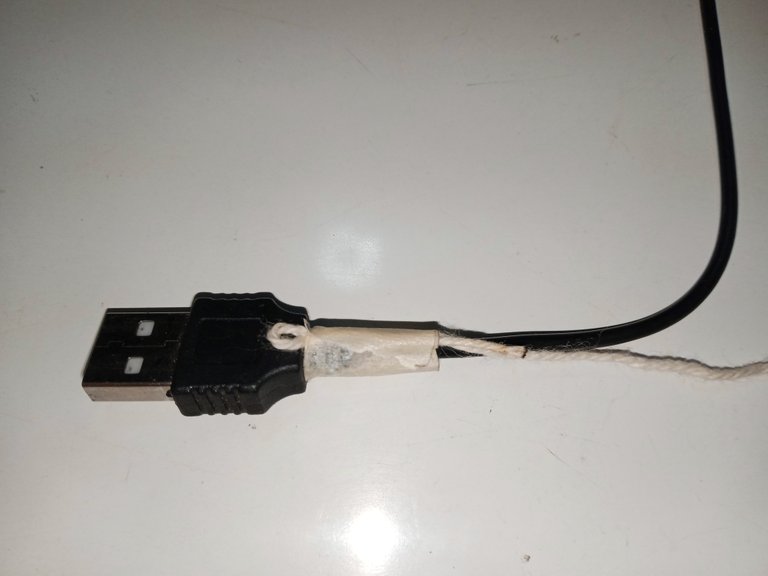
I'm going to use the horn I received as a birthday gift last year (coincidentally, the first week of March). A year has passed, and the horn is already showing signs of wear from so much use.
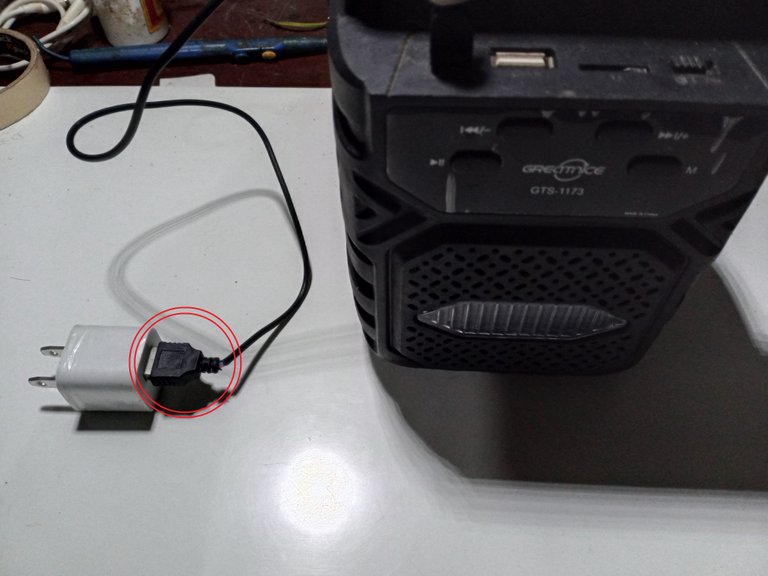
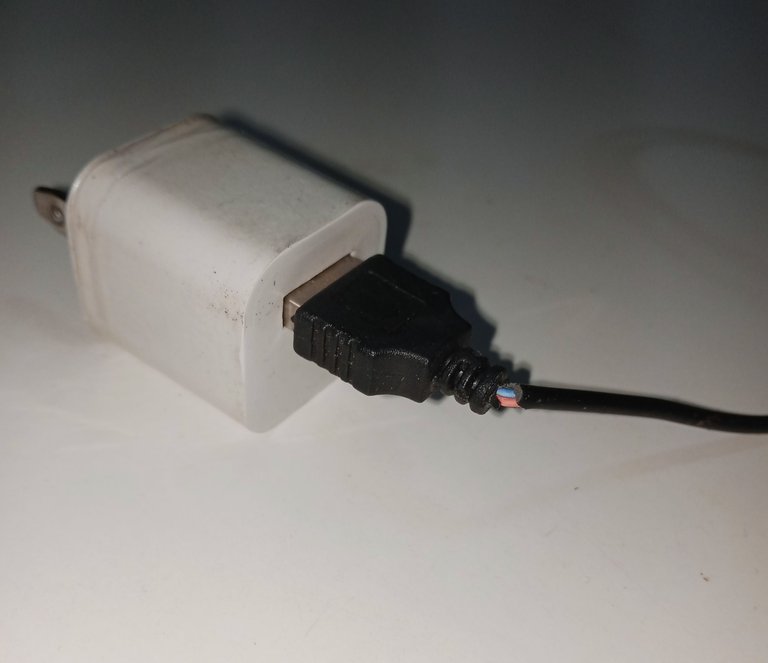
The USB cable is often the first thing to break; it snaps at the junction with the connector.
If the USB cable is still working, it's worth fixing.
I used a thick cord; thin wire and some tape also work.
I secured the piece of cord over the USB cable, in the same position as the cord shown in the photo, using the adhesive tape. This way, I give more rigidity to the reinforcement I'm making.
I leave a small eyelet, wide enough to pass the final knot through.
I firmly weave the thread cord over the cable until I reach the eyelet or loop I had left at the beginning, and I thread the last loop of cord through the eyelet.
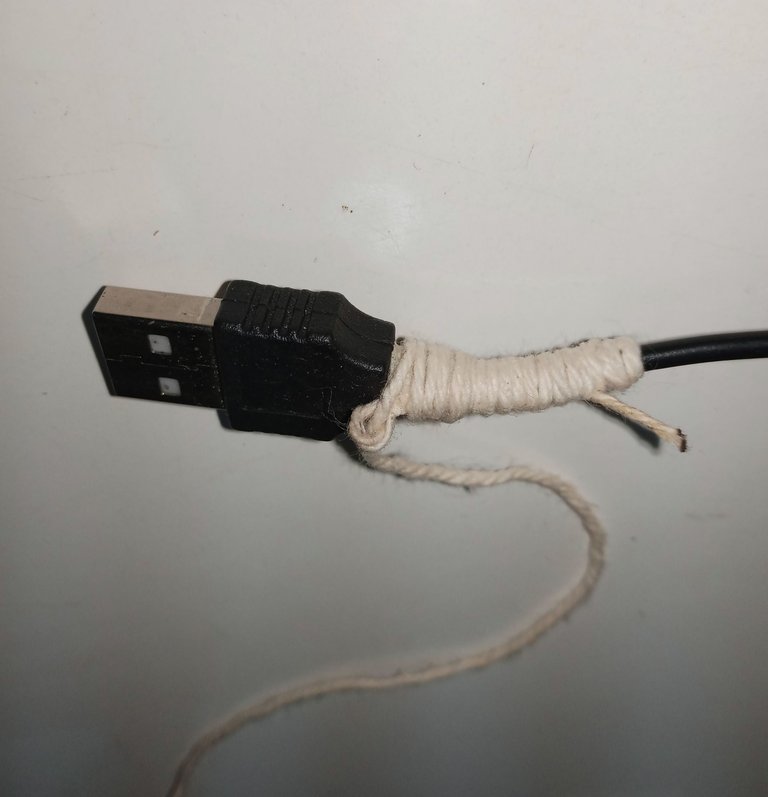
To secure the cord, we pull the other end through the eyelet.

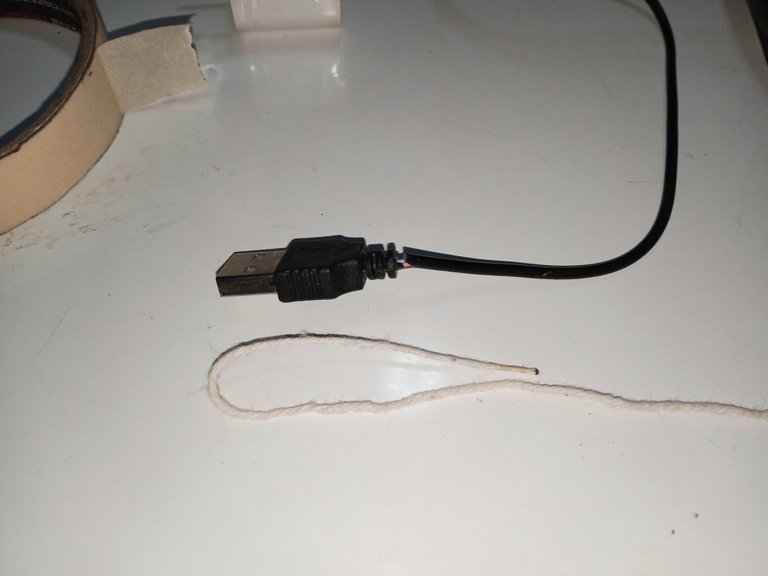
Cut off the excess cord, and in no time, we've extended the life of our USB cable.
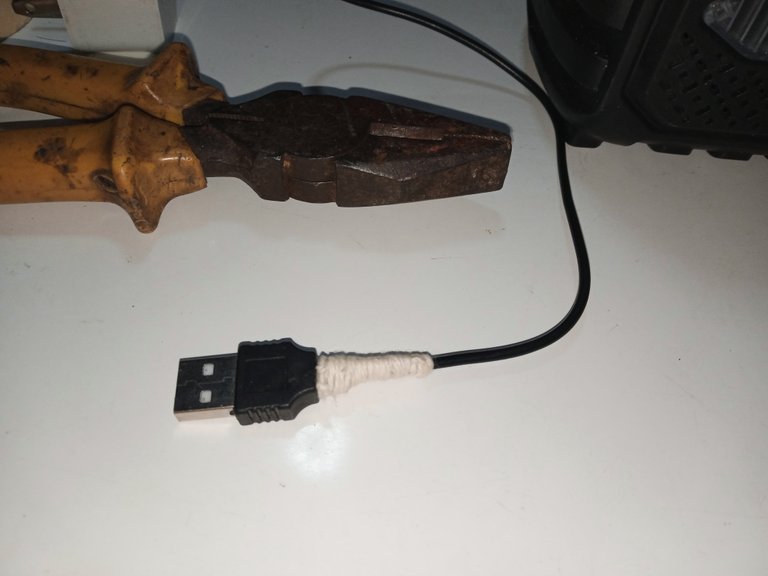
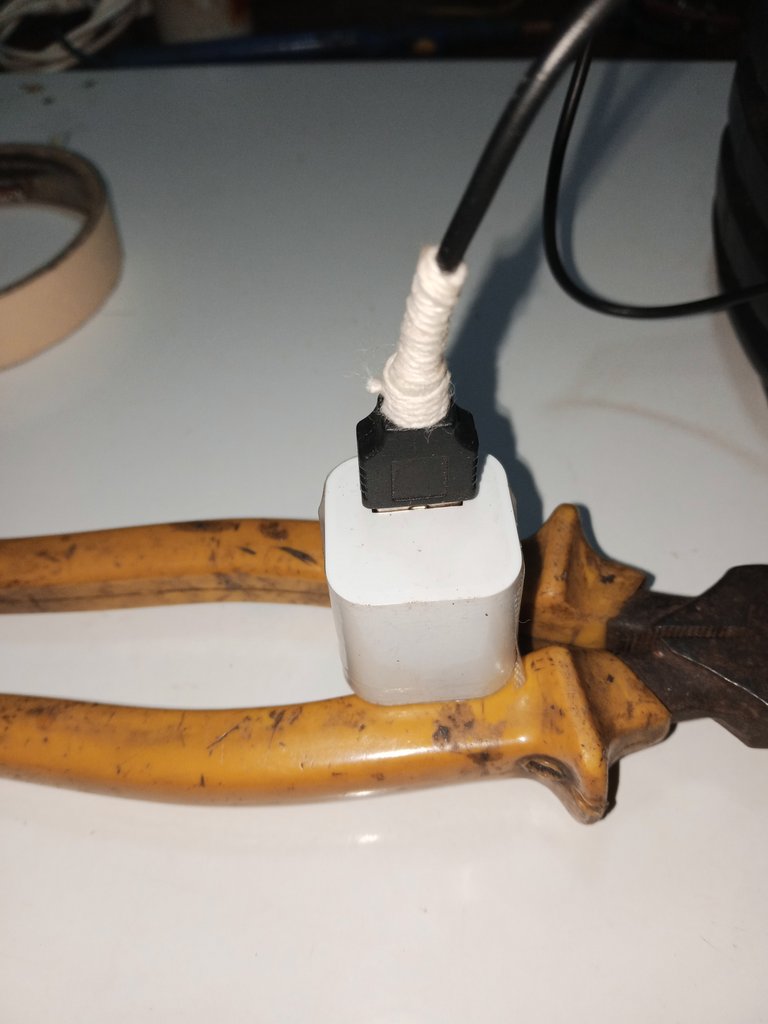
The USB cable with the reinforced sheath is no longer bending or breaking.
Now let's get into disassembling the horn.
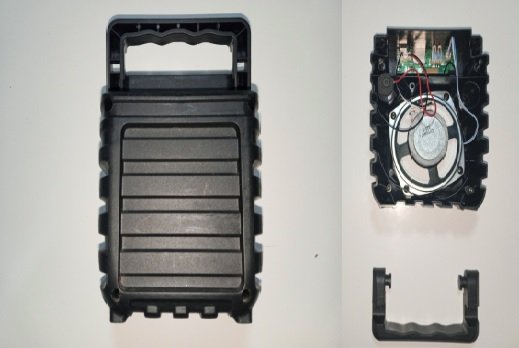
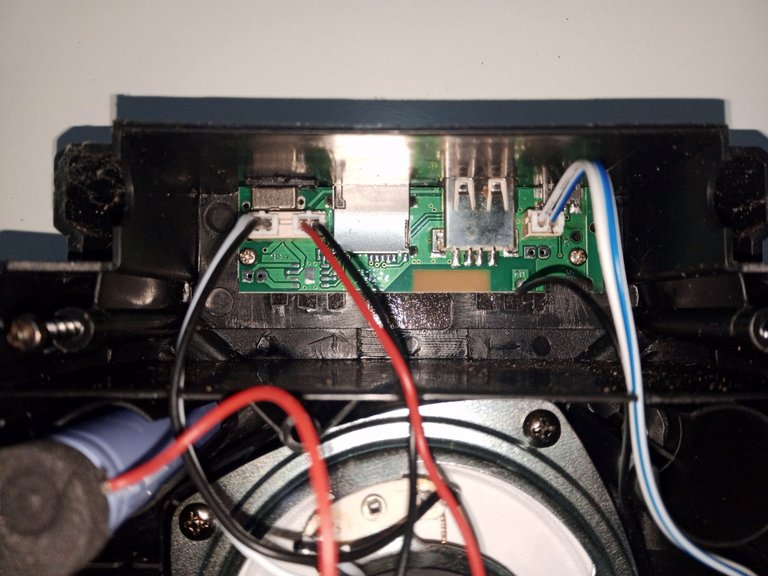
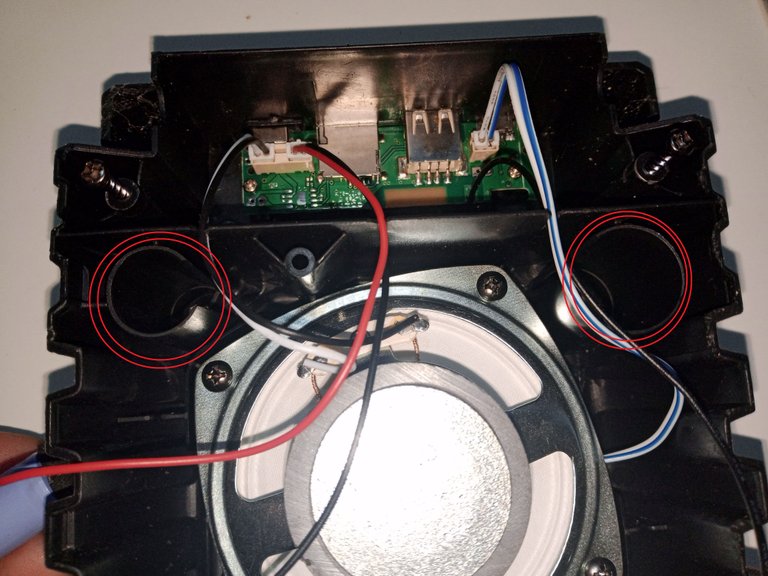
Disassembling the horn isn't complicated. They don't usually have hidden screws. The plastic horn housings can vary greatly in design, but the circuit boards themselves are actually quite small.
Nowadays, it's common practice to have the same circuit board for a device, mounted in different chassis, so different prices are charged for the same card; they only change the speaker chassis.
The same applies to generic testers; just changing the case charges a higher price, and many are exactly the same tester. You can tell by removing the chassis and looking at the card.
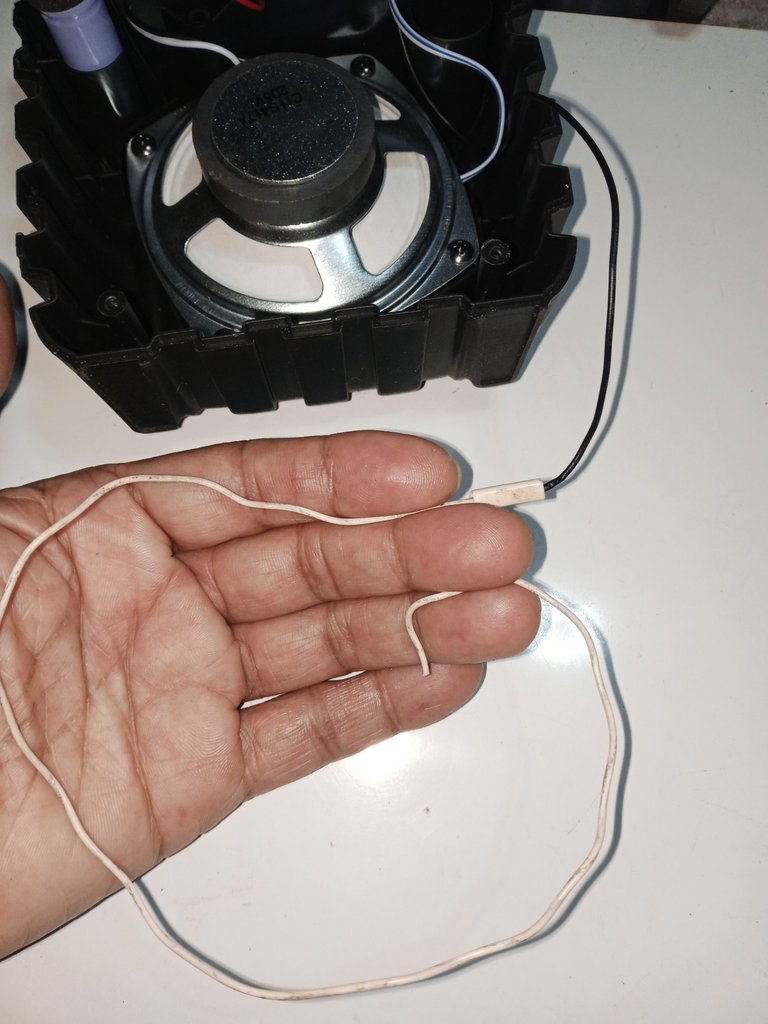
The cable with one loose end that we find inside the speaker box is the cable that serves as the antenna.
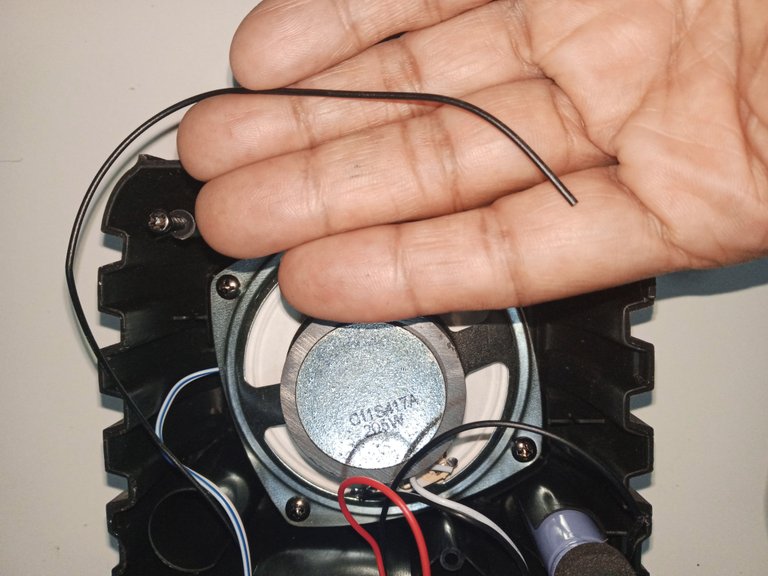
For horn models that include FM radio functionality, extending this cable improves the quality of radio signal reception.
Horn batteries are the first to be damaged with use and are usually the most frequently replaced.
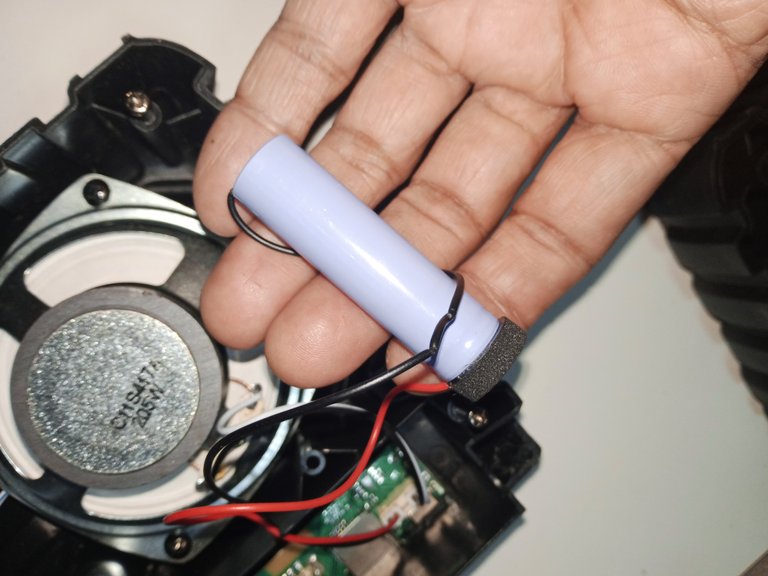
These horns have space for more than one battery, but the inexpensive models only come with one battery installed.
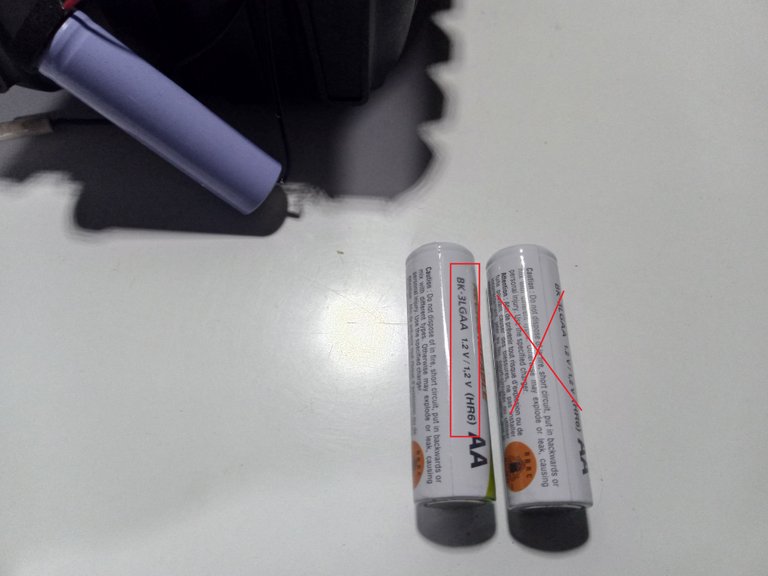
If you're replacing worn-out horn batteries, don't confuse them with common 1.5-volt rechargeable batteries.
These horns have 3.7-volt Li-ion rechargeable batteries.
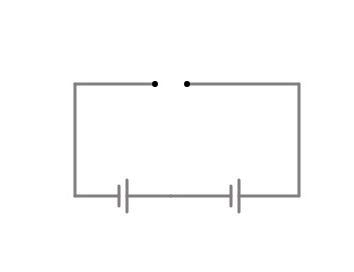
Two batteries can be connected in parallel, maintaining the same voltage and prolonging the charge life.
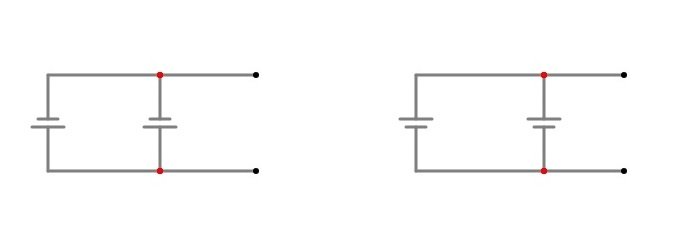
In a parallel battery connection, the positive terminal is connected to the positive terminal of the other battery and the negative terminal to the negative terminal of the other battery.
Batteries should not be connected in series unless the original batteries are connected in this manner.
In a series battery connection, one battery is connected after another. In this case, the negative pole of one battery is connected to the positive pole of the other battery. The final voltage is the sum of the voltages of each battery.
You must always respect the way of connecting the batteries that comes by default, if it only comes with one battery and you want to install an additional battery, it is connected in parallel.
You can connect a single battery if it has the same or higher amperage than the original battery. Never connect a battery with a different voltage to avoid circuit failures. (Higher amperage takes longer to charge the battery through the charging circuit, and the charging time also lasts longer.)
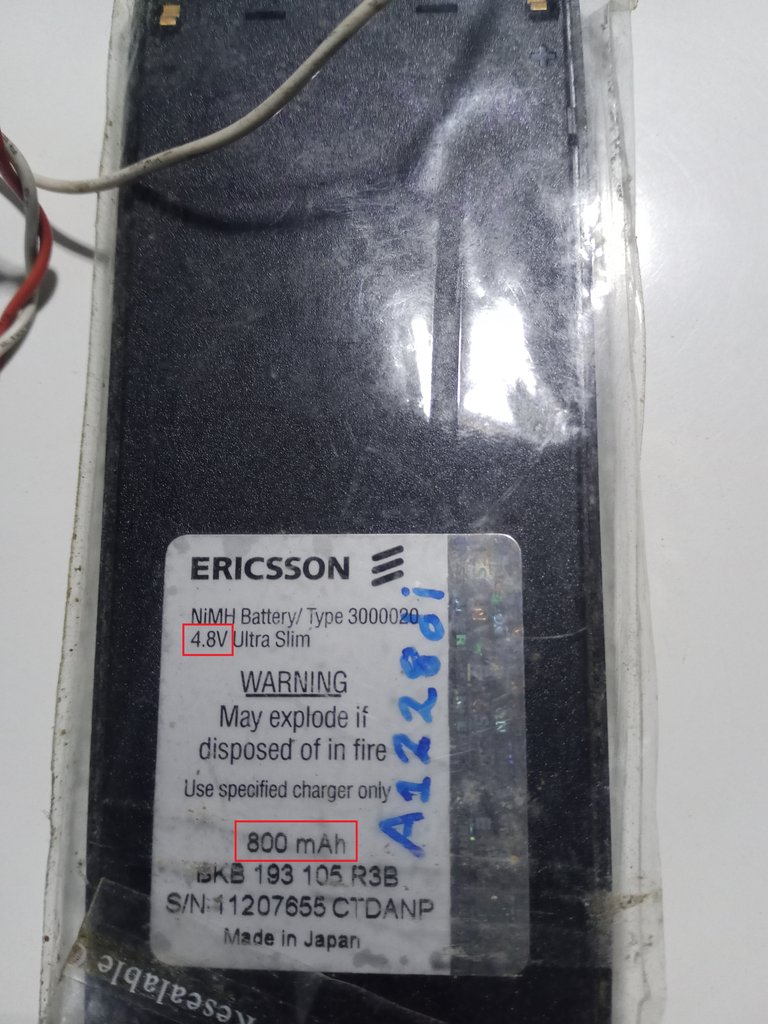
I had a battery from an old 4.8-volt Ericsson phone. I wanted to use it in the speaker, but after checking and consulting on the matter, I'm going to look for another battery like the one the speaker already had and connect them in parallel.
A quick note, friends: I may not be online frequently for a few days.
The house water pump shorted out, and I urgently need to fix it.
It's going to take some time to disassemble it, replace the burned-out parts, and reconnect it.
Thank you very much for stopping by and reading.
Have a great week.
Peace.

- I used Google Translate for the English language.
- I used TextStudio for the Spanish header.
- I used the MasterPLC circuit simulator to draw the circuits.
- The images, unless otherwise noted, are screenshots of my work in the workshop.

Saludos a mi estimada comunidad de Hive DIY, Espero que tengan una excelente semana, llena de ideas creativas y muy interesantes.
En esta oportunidad les comparto una publicación cortita y sencilla, de mi serie, a la que llamo: "primeros auxilios", de como mantener algunas de estas cornetas chinas, que son tan económicas y prácticas.
Voy a usar la corneta que recibí como regalo, el año pasado por mi cumpleaños, (casualmente la primera semana de este mes de marzo) que ha pasado el año y la corneta ya va mostrando fallas de tanto uso.
El cable del USB comúnmente es lo primero que se daña, se parte en el punto de unión con el conector.
Si el cable USB aún funciona bien, vale la pena hacerle un arreglo.
Yo usé un cordón de hilo grueso, también sirve usar un cable delgado y un poco de cinta adhesiva.
Fije el trozo de cordón sobre el cable USB, en la misma posición en que el cordón aparece en la foto, con la ayuda de la cinta adhesiva. De esta manera le doy más rigidez al refuerzo que estoy haciendo.
Dejo un pequeño ojal, lo suficientemente ancho como para pasar el amarre del nudo final.
Con firmeza voy tejiendo el cordón de hilo sobre el cable, hasta llegar al ojal o lazo que había dejado al inicio, y paso la última vuelta del cordón por el ojal.
Para asegurar el tejido jalamos el otro extremo del ojal.
Se corta el sobrante del cordón, y en un momento ya alargamos la vida de nuestro cable USB.
El cable USB con la cubierta reforzada ya no se está doblando para partirse.
Ahora sí entramos en el tema, desarmando la corneta.
Desarmar la corneta no es complicado, no suelen tener tornillos ocultos, las carcasas plásticas de las cornetas, pueden variar mucho en el diseño, pero la placas de circuito en realidad tienen poca variedad.
Hoy día es una práctica común tener una misma placa de circuito para un artefacto, que se monta en chasis diferentes, así se cobran precios diferentes con la misma tarjeta, solo cambian el chasis de la corneta.
Pasa también con los tester genéricos, solo por cambiar la carcasa te cobran un precio mayor, y muchos son exactamente el mismo tester, te puedes dar cuenta si quitas el chasis y ves la tarjeta.
El cable con un extremo suelto que encontramos dentro de la caja de la corneta, es el cable que sirve como antena.
En los modelos de las cornetas, que incluyen la función de radio FM, el alargar este cable, aumenta la calidad de la recepción de la señal de la radio.
Las baterías de la corneta, son lo primero que se daña con el uso y por lo general es lo que se modifica con más frecuencia.
Estas cornetas traen espacio para montar más de una batería, pero los modelos económicos solo traen instalada una de las baterías.
Si se van a cambiar las baterías desgastadas de la corneta, no hay que confundirse con las baterías recargables comunes de 1,5 volts.
Estas cornetas tienen baterías recargables que son de 3,7 volts del tipo Li-ion.
Se pueden colocar dos baterías en paralelo, así se mantiene el mismo voltaje, y la duración de la carga es mucho mayor.
En una conexión de baterías en paralelo, el polo positivo se conecta al positivo de la otra batería y el polo negativo al polo negativo de la otra batería.
No se deben colocar las baterías, conectadas en serie, a menos que las baterías originales, estén conectadas de esa manera.
En una conexión en serie de baterías, se conecta una batería a continuación de otra, en este caso de conexión en serie, el polo positivo de una batería va conectado al polo negativo de la otra batería, el voltaje final es la suma de los voltajes de cada batería.
Siempre hay que respetar la forma de conectar las baterías que viene por defecto, si solo trae una batería y se quiere colocar una batería adicional, se conecta en paralelo.
Se puede conectar una sola batería, si tiene igual o más amperaje que la batería original, nunca conectar una batería con un voltaje diferente, para evitar fallas en el circuito. (con un mayor amperaje se tarda más en cargar la batería por el circuito de carga y la duración de la carga también tiene un tiempo mayor)
Tenía una batería de un viejo teléfono Ericsson de 4,8 Volts, y quería usarla en la corneta, pero después de revisar y consultar sobre el tema voy a buscar otra batería igual a la que ya tenía instalada la corneta y la conectaré en paralelo.
Una pequeña nota, amigos, puede que no esté conectado con frecuencia por algunos días.
La bomba de agua de la casa hizo un corto circuito, y me urge repararla.
Va a llevar algo de tiempo, desmontarla, cambiar las partes quemadas, y conectar nuevamente.
Muchas gracias por pasar y leerme.
Que tengan una excelente semana.
Paz.
- He usado el traductor de Google para el idioma inglés.
- Use el programa de TextStudio para el encabezado en español.
- Use el simulador de circuitos Masterplc para dibujar los circuitos.
- Las imágenes a menos que lo indique son capturas de mi trabajo en el taller.
He llegado un poco tarde para votarte amigo, lo siento. Pero bueno aquí estoy para ponerme al dia con tus trabajos, es realmente molesto cuando el puerto USB se rompe en esa zona
No te preocupes amigo, ando atareado con los repuestos de la bomba de agua y estuve con laberintitis, así que te puedes imaginar que estos días ni estuve pendiente de publicar.
Cuídate y mucho ánimo.
Buen método el del hilo para reparar el cable, sencillo pero efectivo jj. Esas bocinas se escuchan bien pero siempre le ponen la menor cantidad de batería posible para economizar, lo bueno es modificarla y ponerle como bien dices un par en paralelo para aumentar la autonomía. Saludos y que resuelvas pronto el problema de la bomba de agua.
very good you have the time and disposition to fix stuff
That's true, thank you very much for reading and commenting.
Have a great week.
Saludos amigo. Estoy seguro de que luego del mantenimiento esa bocina durará mucho tiempo. En cuanto al cable USB, puedes probar a colocarle un resorte de bolígrafo y así evitas que se doble en ángulos de 90º, lo cual provoca que se quiebre el filamento interno. No es lo más estético, pero funciona al 100%.
Esa es una muy buena idea también, creo que colocaré el resorte encima del cordón tejido, quiero ver como será el resultado.
Muchas gracias por pasar y comentar.
Discord Server.This post has been manually curated by @bhattg from Indiaunited community. Join us on our
Do you know that you can earn a passive income by delegating to @indiaunited. We share more than 100 % of the curation rewards with the delegators in the form of IUC tokens. HP delegators and IUC token holders also get upto 20% additional vote weight.
Here are some handy links for delegations: 100HP, 250HP, 500HP, 1000HP.
100% of the rewards from this comment goes to the curator for their manual curation efforts. Please encourage the curator @bhattg by upvoting this comment and support the community by voting the posts made by @indiaunited.
Your support is encouraging, and it's greatly appreciated.Thanks to my friend @bhattg and the @indiaunited community.
Congratulations @soltecno! You have completed the following achievement on the Hive blockchain And have been rewarded with New badge(s)
Your next target is to reach 8000 comments.
You can view your badges on your board and compare yourself to others in the Ranking
If you no longer want to receive notifications, reply to this comment with the word
STOPCheck out our last posts:
I'm so glad you're stopping by my post.
Have a great month and good health.
Guao! qué estupendos hacks que voy a implementar de ahora en adelante!!!
Siento mucho lo de tu bomba de agua :( Espero logres repararla rápido.
Congratulations @soltecno! You received a personal badge!
You can view your badges on your board and compare yourself to others in the Ranking
Check out our last posts:
For me, it feels like a couple of months ago; I hadn't realized it was that long.Thank you very much, friend @hivebuzz, for reminding me of the anniversary date, time flies.
🎉🎈🎂🎉🎈