Hello, my creative Hive Diy family! Very good afternoon, happy and blessed Sunday to all of you around here family. I hope you are feeling great and that this month has brought you and will continue to bring you great moments, beautiful days, health, lots of productivity, creativity and of course lots of crafts full of love.
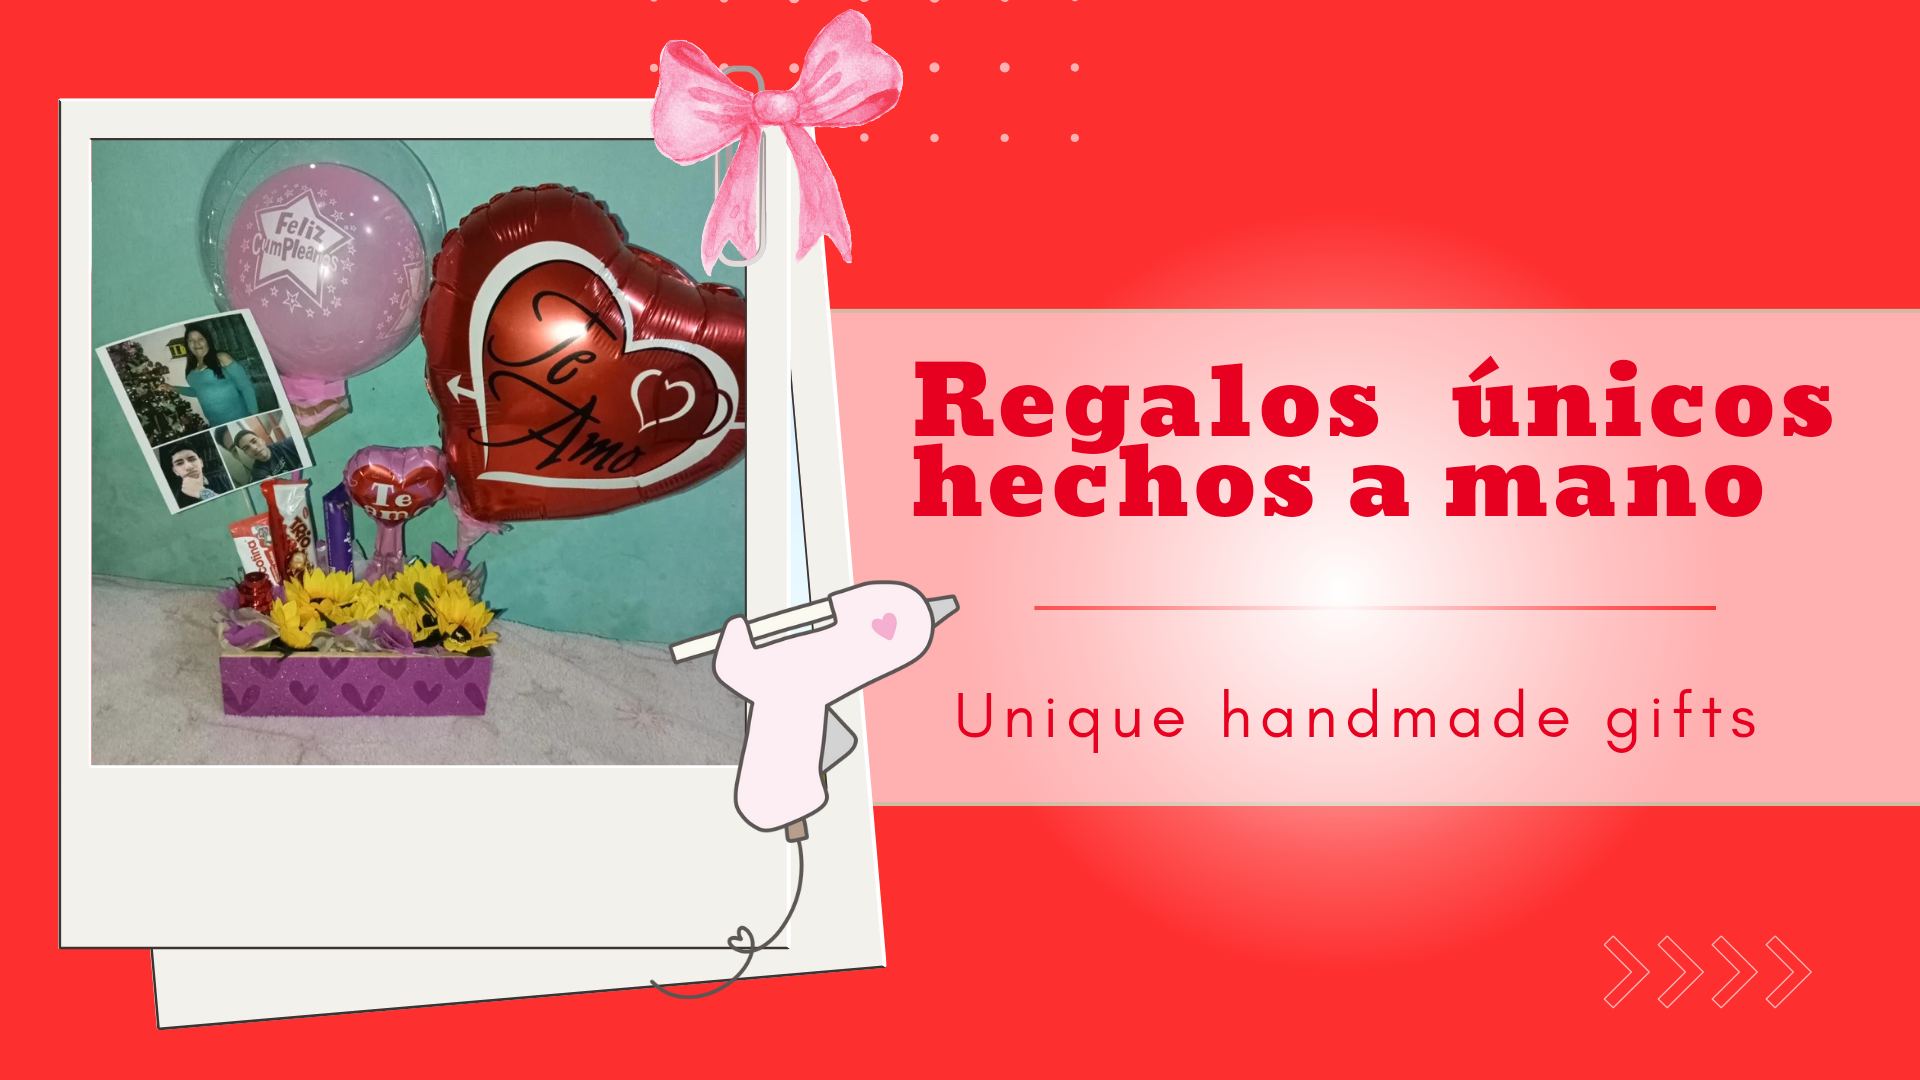
He vuelto por aquí con las pilas recargadas, después de un poco más de dos semanas, la verdad ya los extrañaba, sentí que fue una eternidad, aún así, no deje de crear manualidades para traerles hoy y después, solo no me había dado el tiempo para compartir con ustedes, porque inicié la universidad y se me ha dificultado la organización de mi tiempo, pero ya estoy de vuelta, para seguir manteniendo la constancia que me identifica.
I'm back here with my batteries recharged, after a little more than two weeks, the truth is that I missed you, I felt like it was an eternity, even so, I didn't stop creating crafts to bring you today and later, I just hadn't given myself the time to share with you, because I started university and it has been difficult to organise my time, but I'm back, to continue to maintain the constancy that identifies me.
En está oportunidad, les traigo un tutorial paso a paso, donde les comparto como realice desde casa un hermoso arreglo sencillo, con pocos materiales, de una forma fácil y rápida. Este fue un obsequio para mí tía que cumplió años hace unos cuantos días, así este fue unos de los regalos de nuestra parte, algo sencillo, pero lleno de mucho cariño.❤️
In this opportunity, I bring you a step by step tutorial, where I share with you how to make from home a beautiful and simple arrangement, with few materials, in an easy and quick way. This was a gift for my aunt who had her birthday a few days ago, so this was one of the gifts from us, something simple, but full of love.❤️
Ahora sí, vamos con el proceso paso a paso, a continuación.
Now, let's go through the step-by-step process, below.
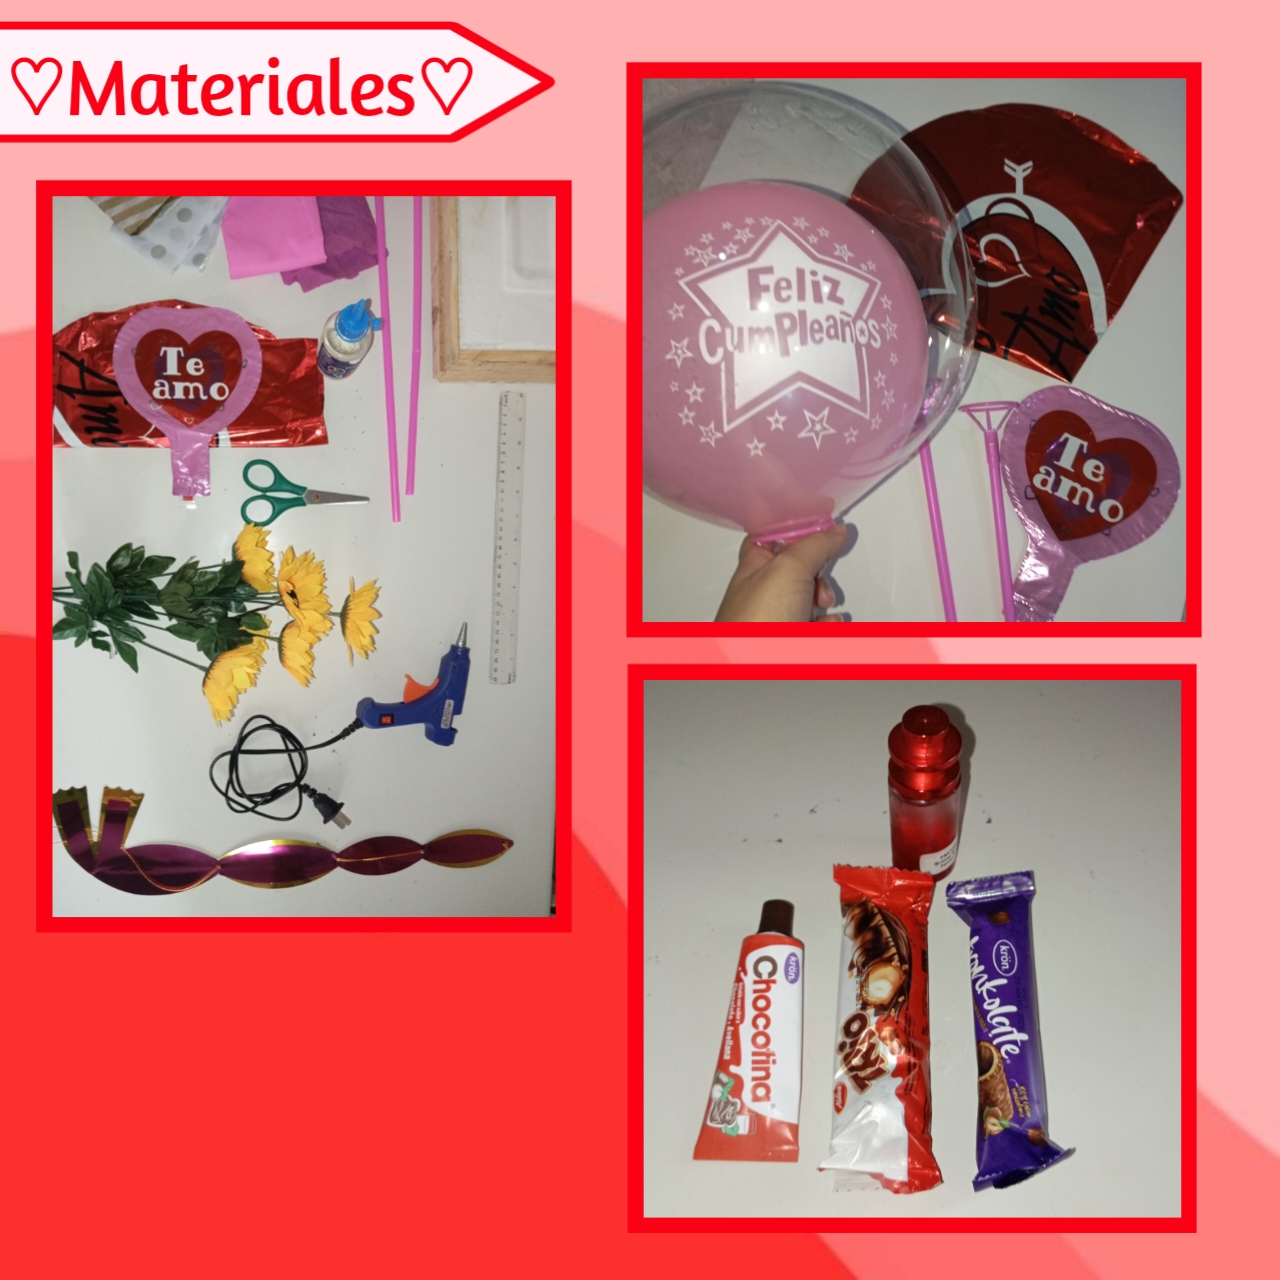
♡❤️🤍Materials🤍❤️♡
- Caja de madera
- Anime
- Flores artificiales
- Globos
- Dulces
- Soporte de globos
- Papel crepe o seda
- Cartulina decorativa
- Silicón
- Tijeras
- Regla
- Lápiz
- Wooden box
- Anime
- Artificial flowers
- Balloons
- Candies
- Balloon stand
- Crepe or tissue paper
- Decorative cardboard
- Silicone
- Scissors
- Ruler
- Pencil
♡❤️🍭Step By Step🍭❤️♡
Paso 1:
Step 1:
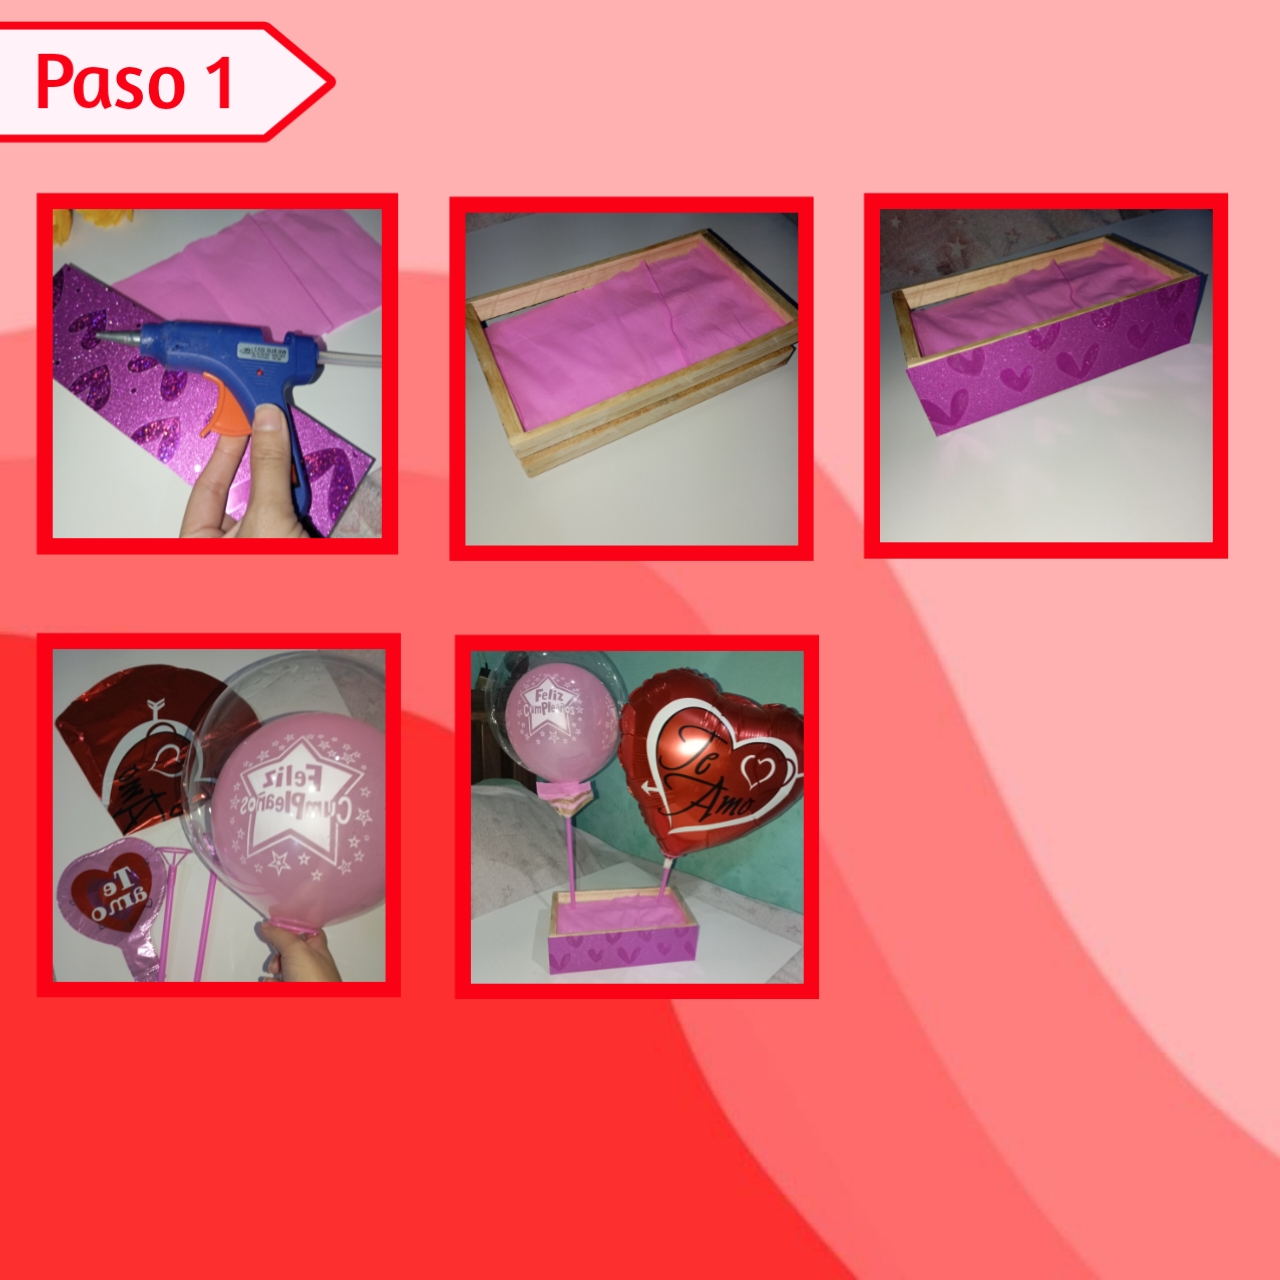
Lo primero que haremos, es tomar nuestro anime y lo acomodaremos en nuestra pequeña caja, luego recortaremos un pequeño rectángulo de cartulina decorada que mida lo mismo que el frente de la caja y también un rectángulo en papel de seda o crepé que usaremos para tapar el anime, para pegar esto nos ayudaremos del silicón.
The first thing we will do is to take our anime and place it in our little box, then we will cut out a small rectangle of decorated cardboard that measures the same as the front of the box and also a rectangle of tissue paper or crepe paper that we will use to cover the anime, to stick this we will use silicone.
Continuamos tomando nuestros globos e inflándolos, lo colocamos en sus bases, recortamos un poco el largo de los palitos a nuestra elección y clavamos en el anime muy bien fijándolos.
We continue taking our balloons and inflating them, we place them on their bases, we cut a little bit the length of the sticks of our choice and we stick them in the anime very well fixing them.
Paso 2:
Step 2:
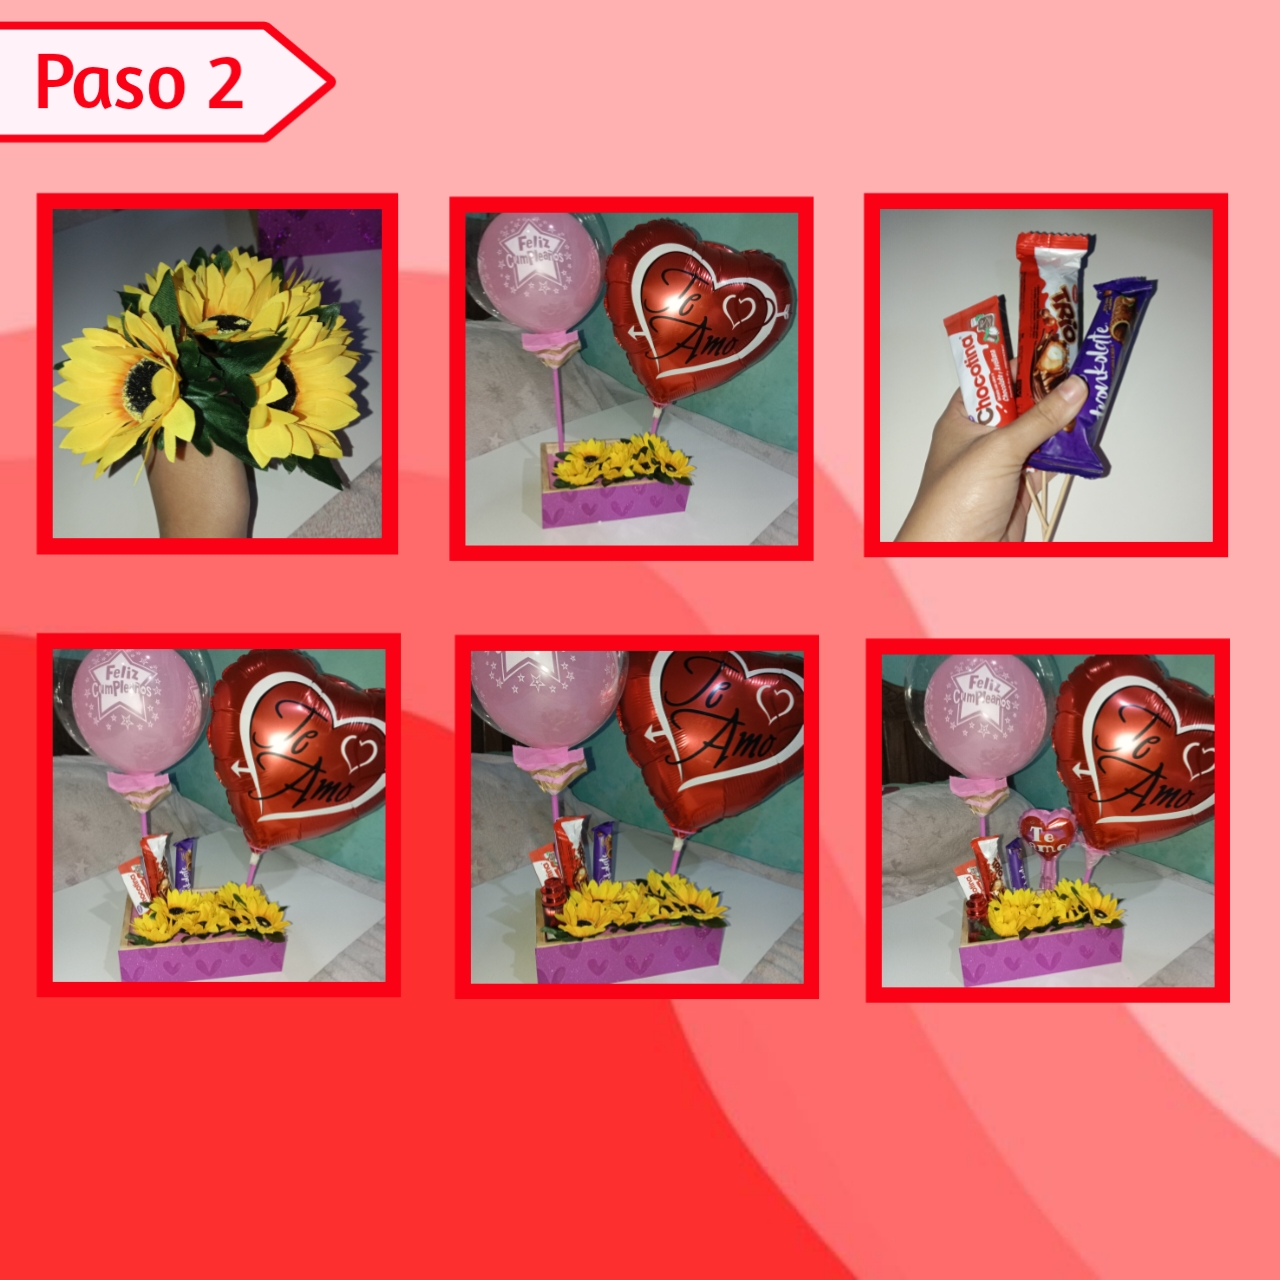
Ahora bien, vamos a tomar nuestras flores artificiales y le vamos a hacer algunos ajustes necesarios, en este caso tuve que recortar el tallo un poco y separarlas una por una, luego fui agregando estás en la caja una a una. Después tomé los dulces y les agregué con ayuda del silicón caliente palitos de altura en la parte de atrás, seguidamente introduje estos en el anime, también agregué un perfume, al que le puse cinta doble cara en la parte de abajo, además agregue otro globo pequeño.
Now, we are going to take our artificial flowers and we are going to make some necessary adjustments, in this case I had to cut the stem a little bit and separate them one by one, then I added them in the box one by one. Then I took the sweets and added them with the help of hot silicone sticks of height in the back, then I introduced these in the anime, I also added a perfume, to which I put double-sided tape on the bottom, I also added another small balloon.
Paso 3:
Step 3:
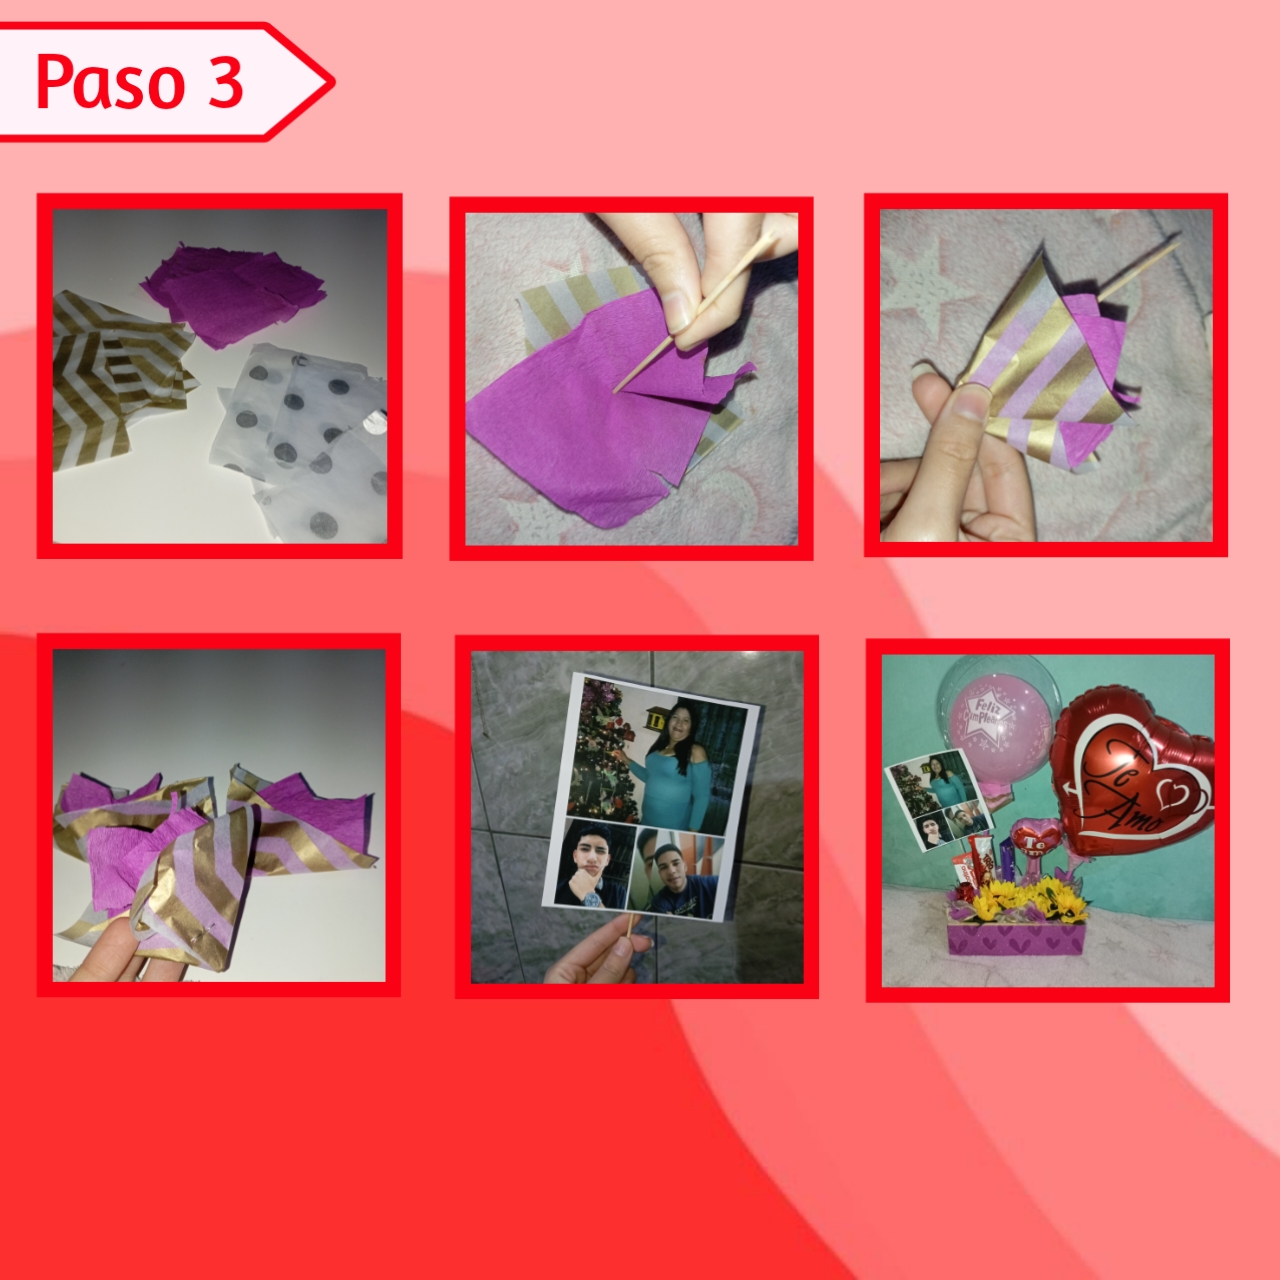
Por último, toca agregar detalles, así recorte varios cuadrados de papel crepé y seda, y con dos puse uno encima de otro, después puse el palito de altura en el medio y fui doblando hasta formar una especie de triángulo, es algo sencillo. Al tener el triangulo listo grapé en la parte de abajo para que no se suelte y con silicón lo pegué alrededor de toda la caja, cubriendo sus espacios vacíos, así para finalizar agregué una foto y ya estaría listo.
Finally, it was time to add details, so I cut out several squares of crepe and tissue paper, and with two I put one on top of the other, then I put the height stick in the middle and folded it until it formed a kind of triangle, it's a simple thing to do. Once the triangle was ready I stapled the bottom so that it wouldn't come loose and with silicone I stuck it around the whole box, covering the empty spaces, and to finish I added a photo and it was ready.
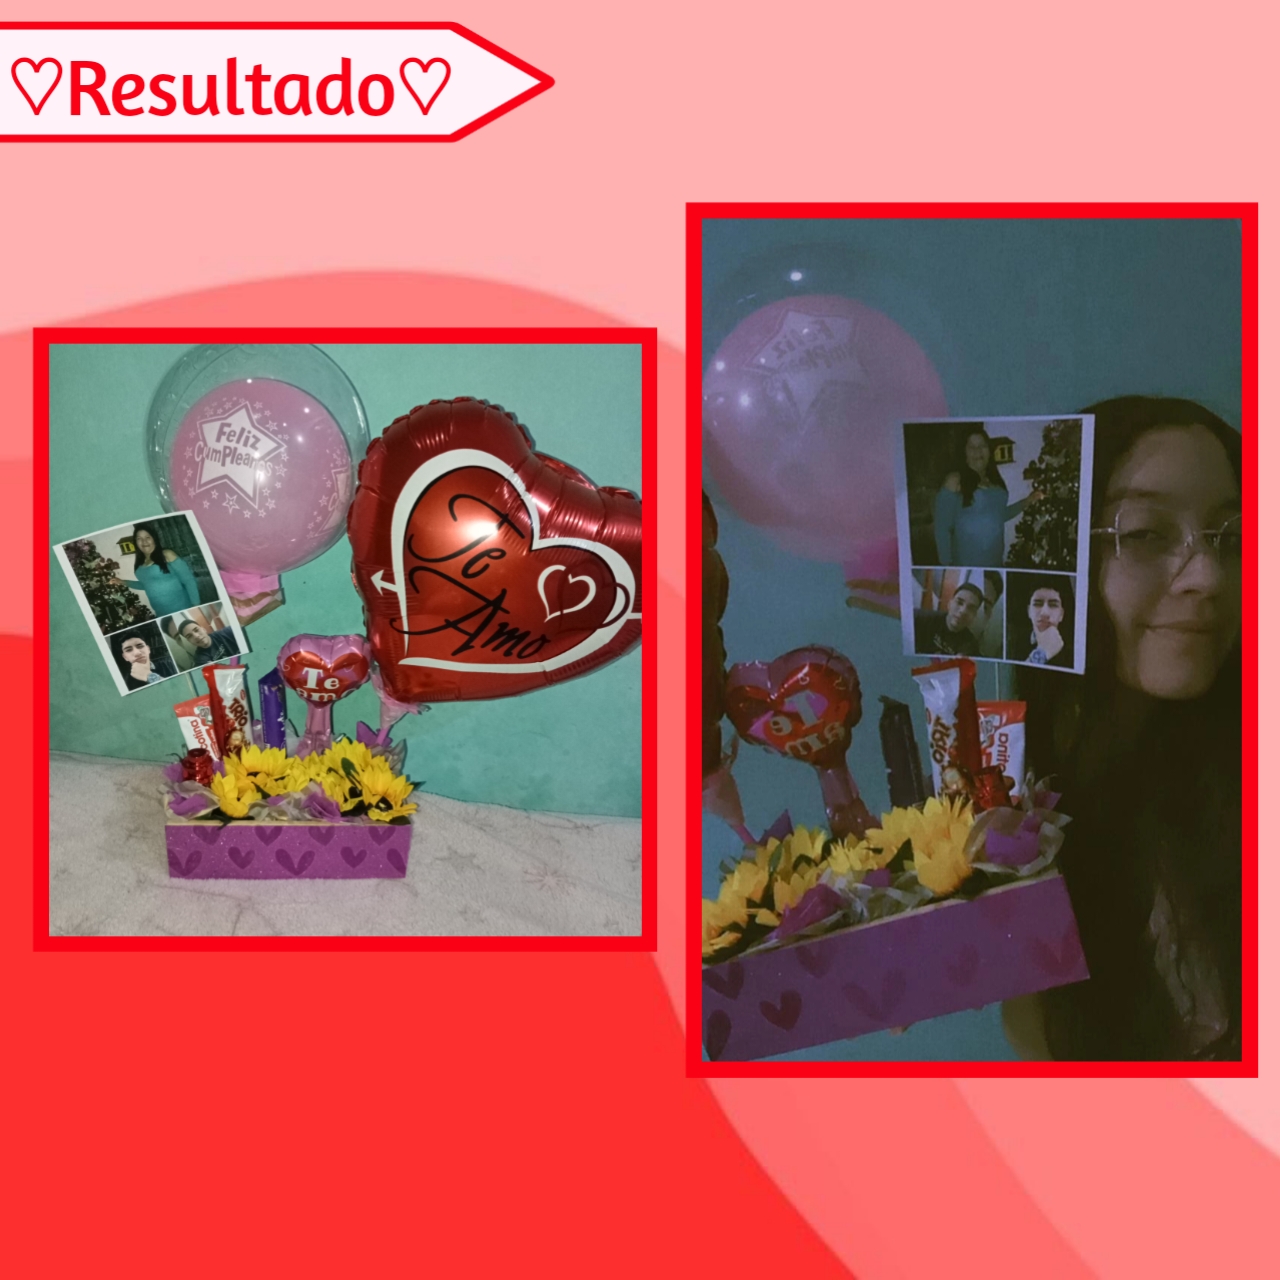
De está forma, es como podemos hacer un pequeño arreglo sencillo y ajustándolo a un bajo presupuesto, lo importante es el amor y el detalle con que cuenta este regalo, este fue un regalo que salió de último momento, así que nos puede sacar de apuros sin dudarlo, lo mejor es que hay muchas formas de perzonalizarlo, desde los colores, hasta el relleno del mismo, solo hay que ponerle creatividad y mucho amor.❤️
This is how we can make a small simple arrangement and adjusting it to a low budget, the important thing is the love and detail that this gift has, this was a gift that came out at the last minute, so we can get out of trouble without hesitation, the best thing is that there are many ways to customize it, from the colours, to the filling of the same, you just have to put creativity and love.❤️
Esto es todo por el tutorial de hoy, es algo sencillo pero es una idea para que cualquiera empiece a hacer sus arreglos desde casa de una forma rápida y fácil. Espero les haya gustado este DIY y que les sea de utilidad, me alegra volver a compartir con ustedes después de este corto tiempo lejos.🥺❤️
That's it for today's tutorial, it's something simple but it's an idea for anyone to start making their arrangements from home in a quick and easy way. I hope you liked this DIY and that you find it useful, I'm glad to share with you again after this short time away 🥺❤️
❤️💗¡Gracias por leer! Hasta el próximo DIY creativo💗❤️
❤️💗Thanks for reading! See you next creative DIY💗❤️
Photos I took from my Xiaomi Redmi 13C phone, edited in the free version of PixelLab and Canva.
Bienvenida de nuevo querida @stefania16 nos alegra que ya hayas hecho tu planificación y estés más tranquila, casualmente también estuve ausente como 2 semanas, tuve a mi madre con problemas de salud, pero vamos mejorando, estoy feliz de estar de vuelta, extrañe mucho este espacio maravilloso, los extrañe todos.
Y aquí estoy disfrutando de este hermoso y provocativo arreglo que le hiciste a tu tía, felicidades por tan lindo detalle.
Abrazos.🤗❤️
¡Muchas gracias! Bueno la bienvenida es Mutua, me alegro de que ya estes por aquí también, además espero que tú madre tenga una pronta recuperación, bendiciones para ti y para ella amiga.✨
Gracias nuevamente, un abrazo también, saludos.🫂❤️✨
Así es mi linda, amén por ese buen deseo, te lo agradezco.
Un gran abrazo y bendiciones para ti y los tuyos.💞✨
Este tipo de detallada alegra el corazón❤️.
Te quedó lindo❤️✅
Sii, es algo sencillo, pero lleno de amor para nuestras personas especiales.✨✨
Muchas gracias por el apoyo, un abrazo amiga.❤️🫂
Un regalo lleno de amor y se nota en la delicadeza y en los detalles que le pusiste, algo tan personal que perfectamente conoces sobre tu tía
Siii, un regalo con sus flores favoritas y mucho sentimiento y cariño hacia ella, saludos y un abrazo.❤️✨