Hello a huge greeting and hug for me Family Friends Family! Happy and blessed night dear family, I wish you had a nice day full of good things, also I hope the rest of the weekend is productive, joyful, creative, full of enthusiasm, love and above all that we can enjoy next to our loved ones, my most beautiful and sincere wishes for you.♡
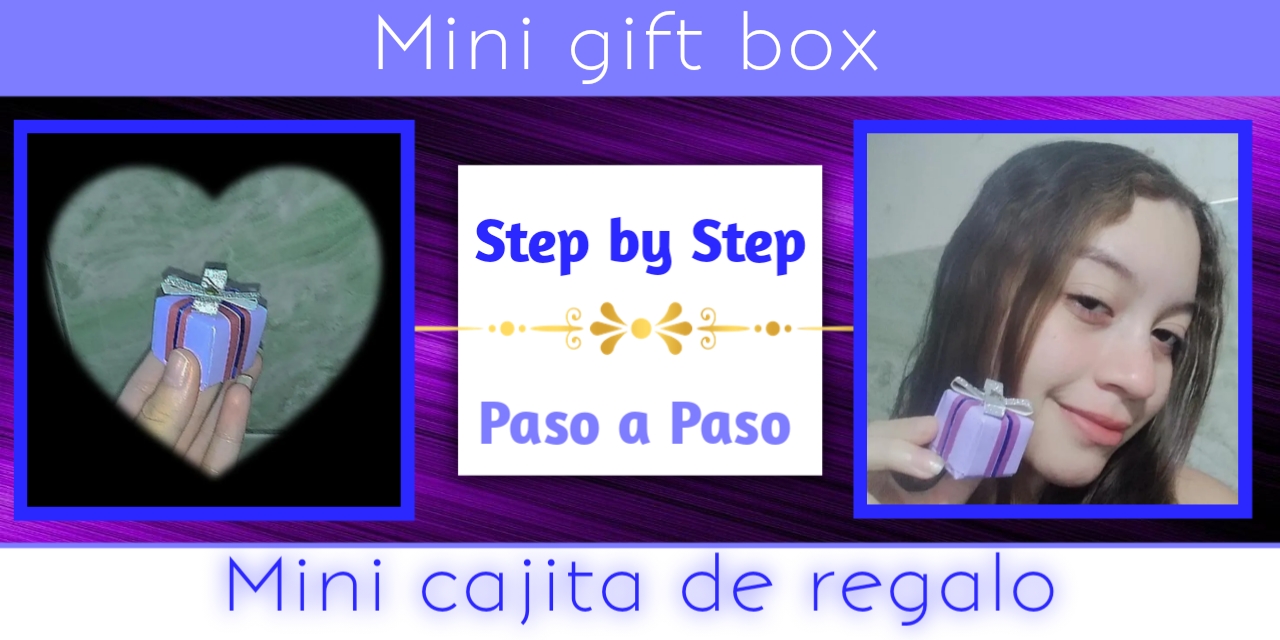
Por aquí les traigo un Diy pequeño y no me refiero a lo corto que pueda ser, sino más bien a que es una mini manualidad, un pequeño empaque más que perfecto para un pequeño regalo, porque muchas veces no encontramos el empaque ideal, respecto al tamaño de nuestro regalo y un pequeño obsequio en una caja enorme no es lo que siempre queremos, así que les mostraré este Diy sencillo de como hacer una mini caja de regalo con origami, a continuación todo el proceso.
Here I bring you a small Diy and I do not mean how short it can be, but rather that it is a mini craft, a small packaging more than perfect for a small gift, because many times we do not find the ideal packaging, regarding the size of our gift and a small gift in a huge box is not what we always want, so I will show you this simple Diy of how to make a mini gift box with origami, then the whole process.
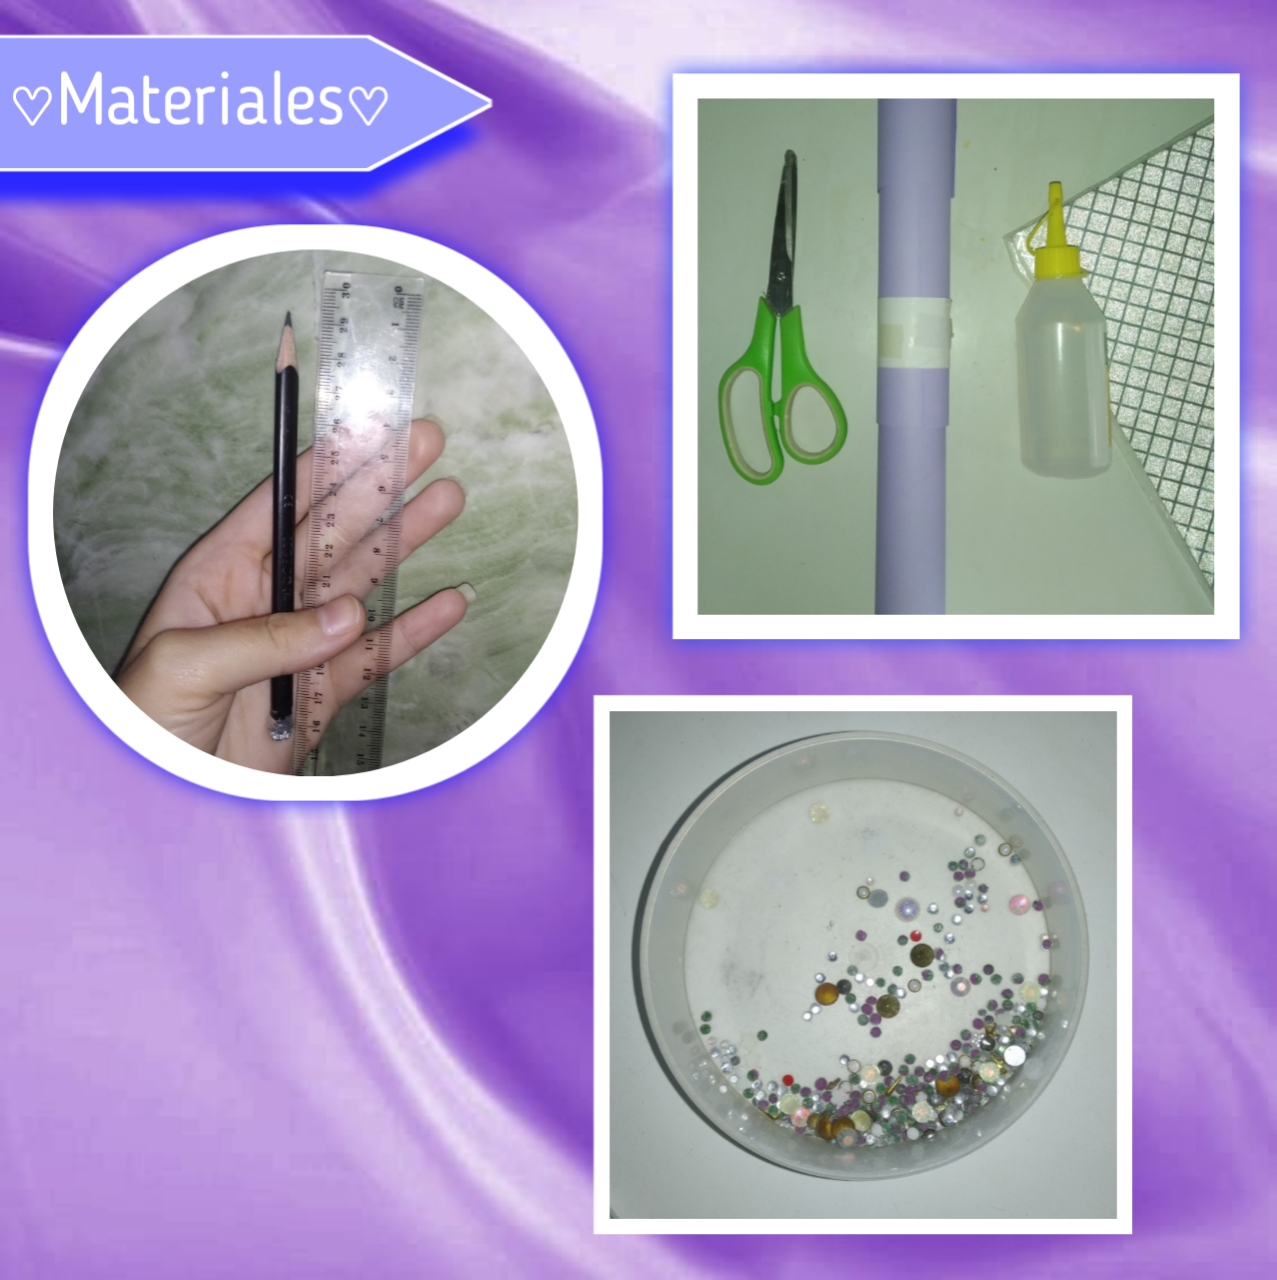
♡✨Materials✨♡
- Cartulinas unicolor
- Cartulina decorada
- Piedritas decorativas
- Regla
- Tijeras
- Lápiz
- Silicón
- Unicolor cardstock
- Decorated cardboard
- Decorative pebbles
- Ruler
- Scissors
- Pencil
- Silicone
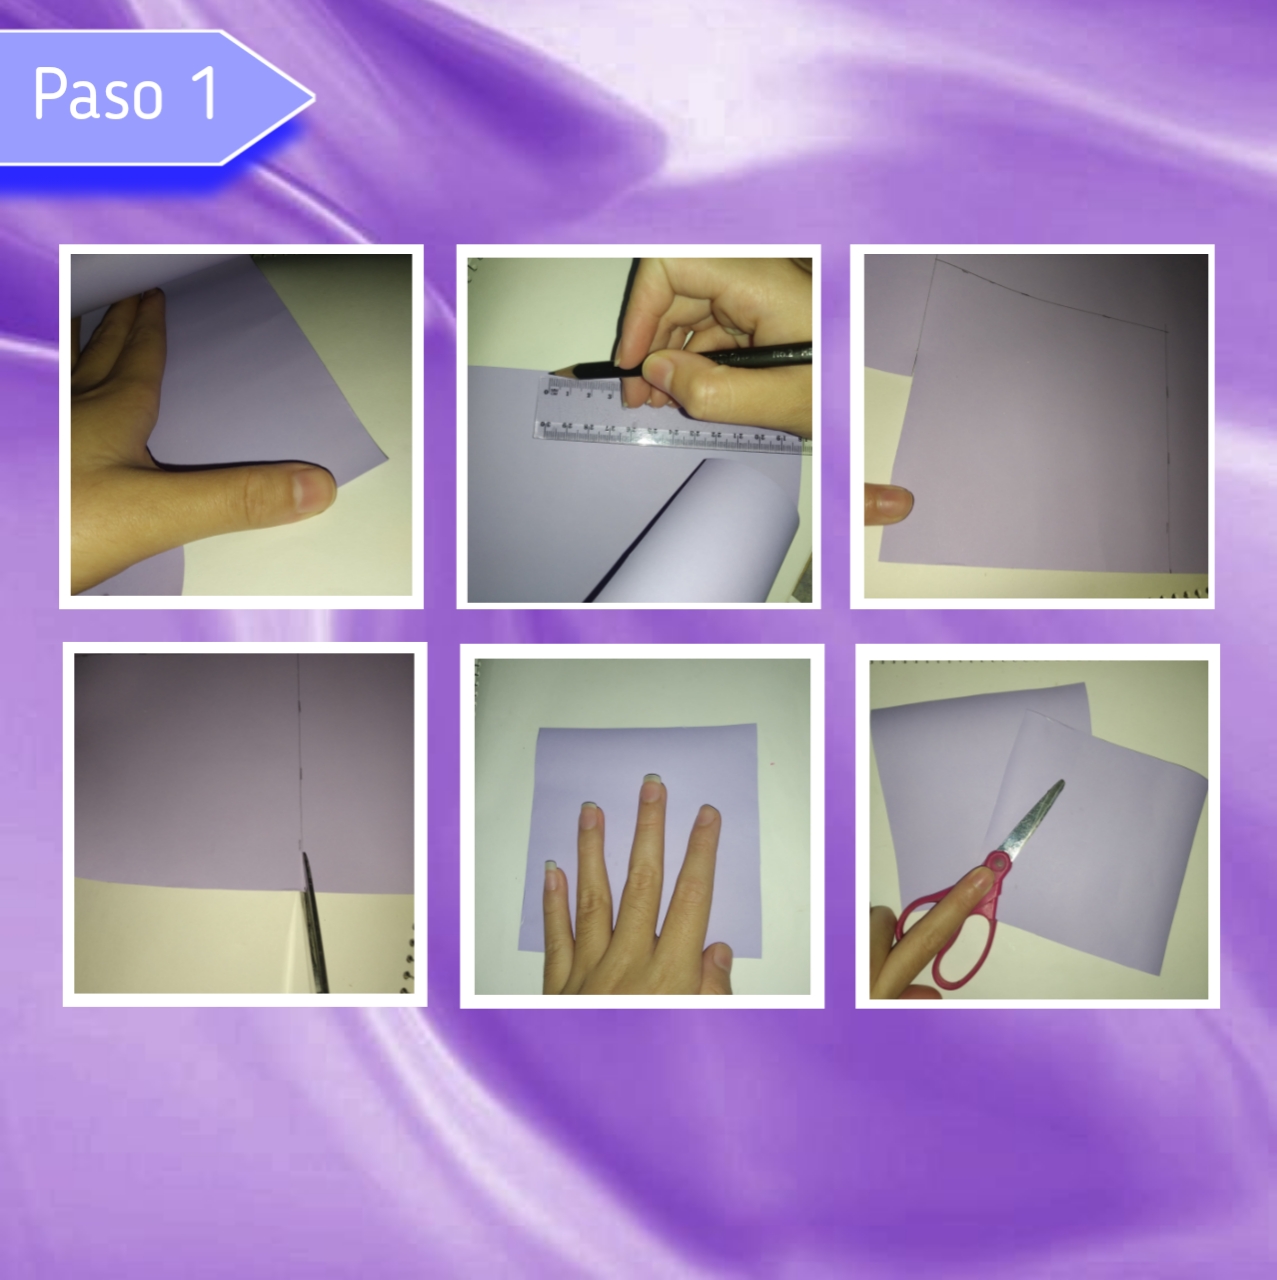
Paso 1:
Step 1:
Para comenzar extenderemos la cartulina, tomaremos nuestra regla, al igual que nuestro lápiz y marcaremos un cuadrado teniendo en cuenta el tamaño deseado de la caja, así este es de 12cm por 12cm, un poco pequeño. Continuamos tomando nuestra tijera y recortando está figura muy bien, así conseguimos un pequeño cuadrado, de la misma manera, haremos otro exactamente igual, obteniendo en total dos.
To begin we will extend the cardboard, we will take our ruler, as well as our pencil and we will mark a square taking into account the desired size of the box, so this is 12cm by 12cm, a little small. We continue taking our scissors and cutting this figure very well, so we get a small square, in the same way, we will make another exactly the same, obtaining a total of two.
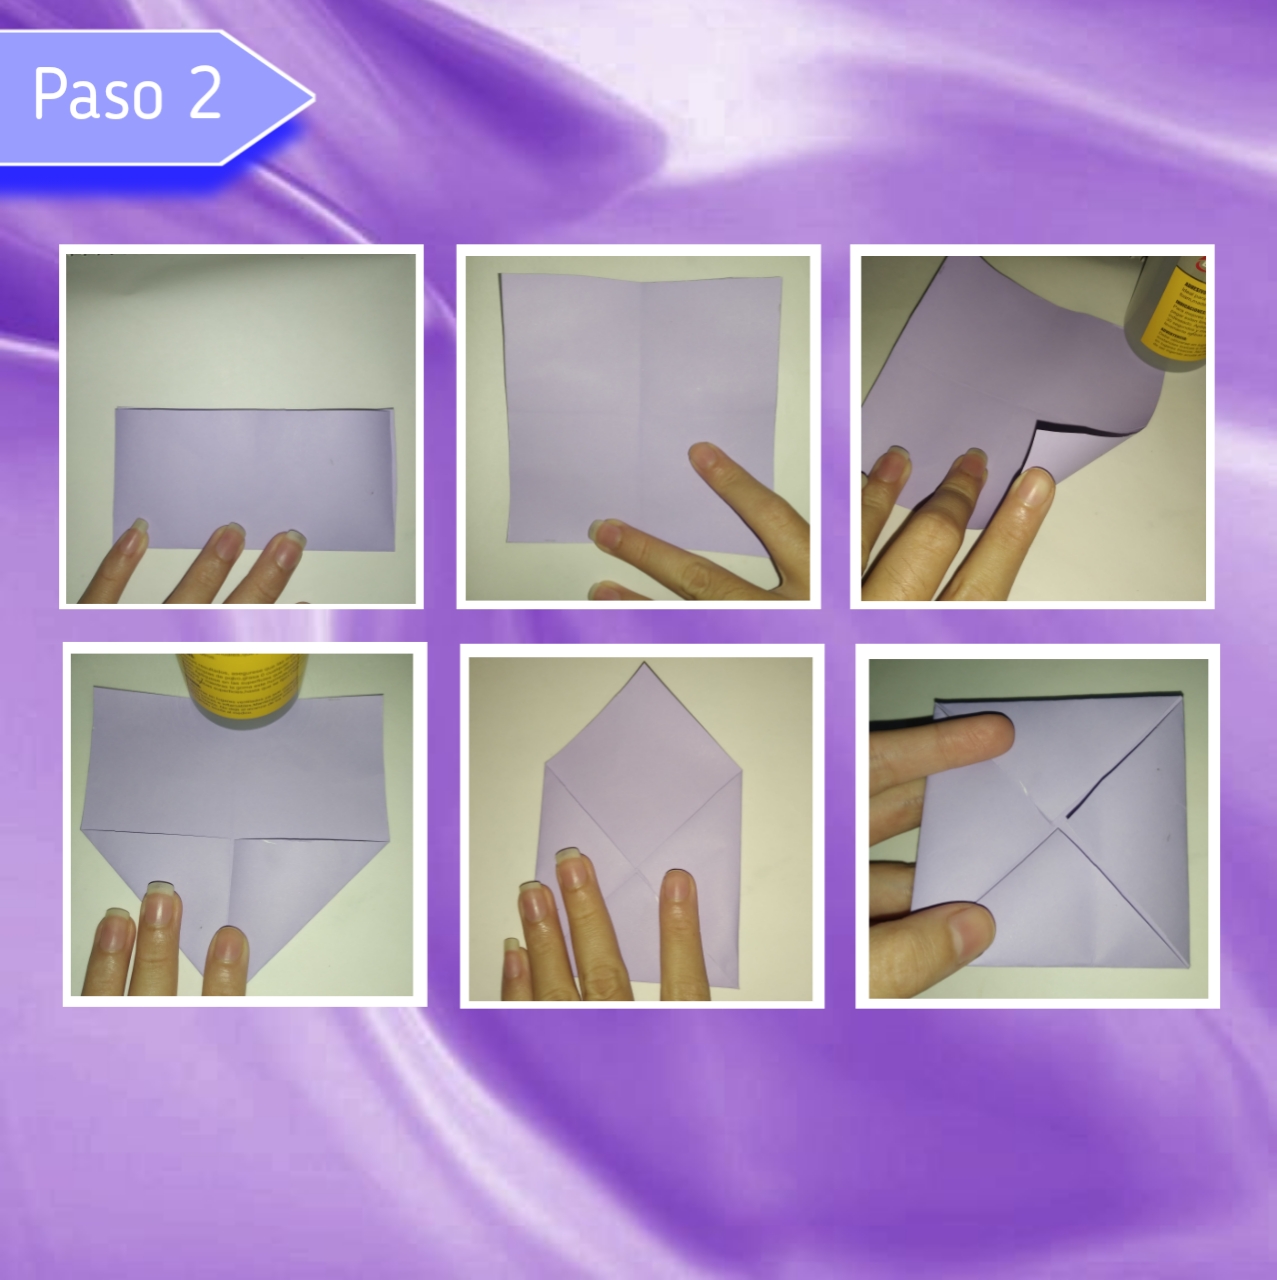
Paso 2
Step 2:
Ahora bien, vamos a tomar nuestro cuadrado de cartulina por las esquinas y llevaremos estás dos esquinas hacía las otras, doblando exactamente a la mitad, damos un pequeño giro y hacemos justamente lo mismo, teniendo así marcada dos líneas rectas, una cruzada sobre la otra en el centro. Al observar nuestro cuadrado veremos cuatro pequeños cuadrados dentro de este, así tomaremos una esquina y la llevaremos hacia el centro haciendo un pico, igualmente haremos con cada uno de los demás hasta obtener la figura con las cuatro esquinas dobladas que pueden apreciar en la imágen.
Now, we are going to take our square of cardboard by the corners and we will take these two corners towards the others, folding them exactly in half, we make a small turn and we do just the same, thus having marked two straight lines, one crossed over the other in the center. When we look at our square we will see four small squares inside it, so we will take a corner and bring it to the center making a peak, likewise we will do with each of the others until we get the figure with the four folded corners that you can see in the image.
Paso 3:
Step 3:
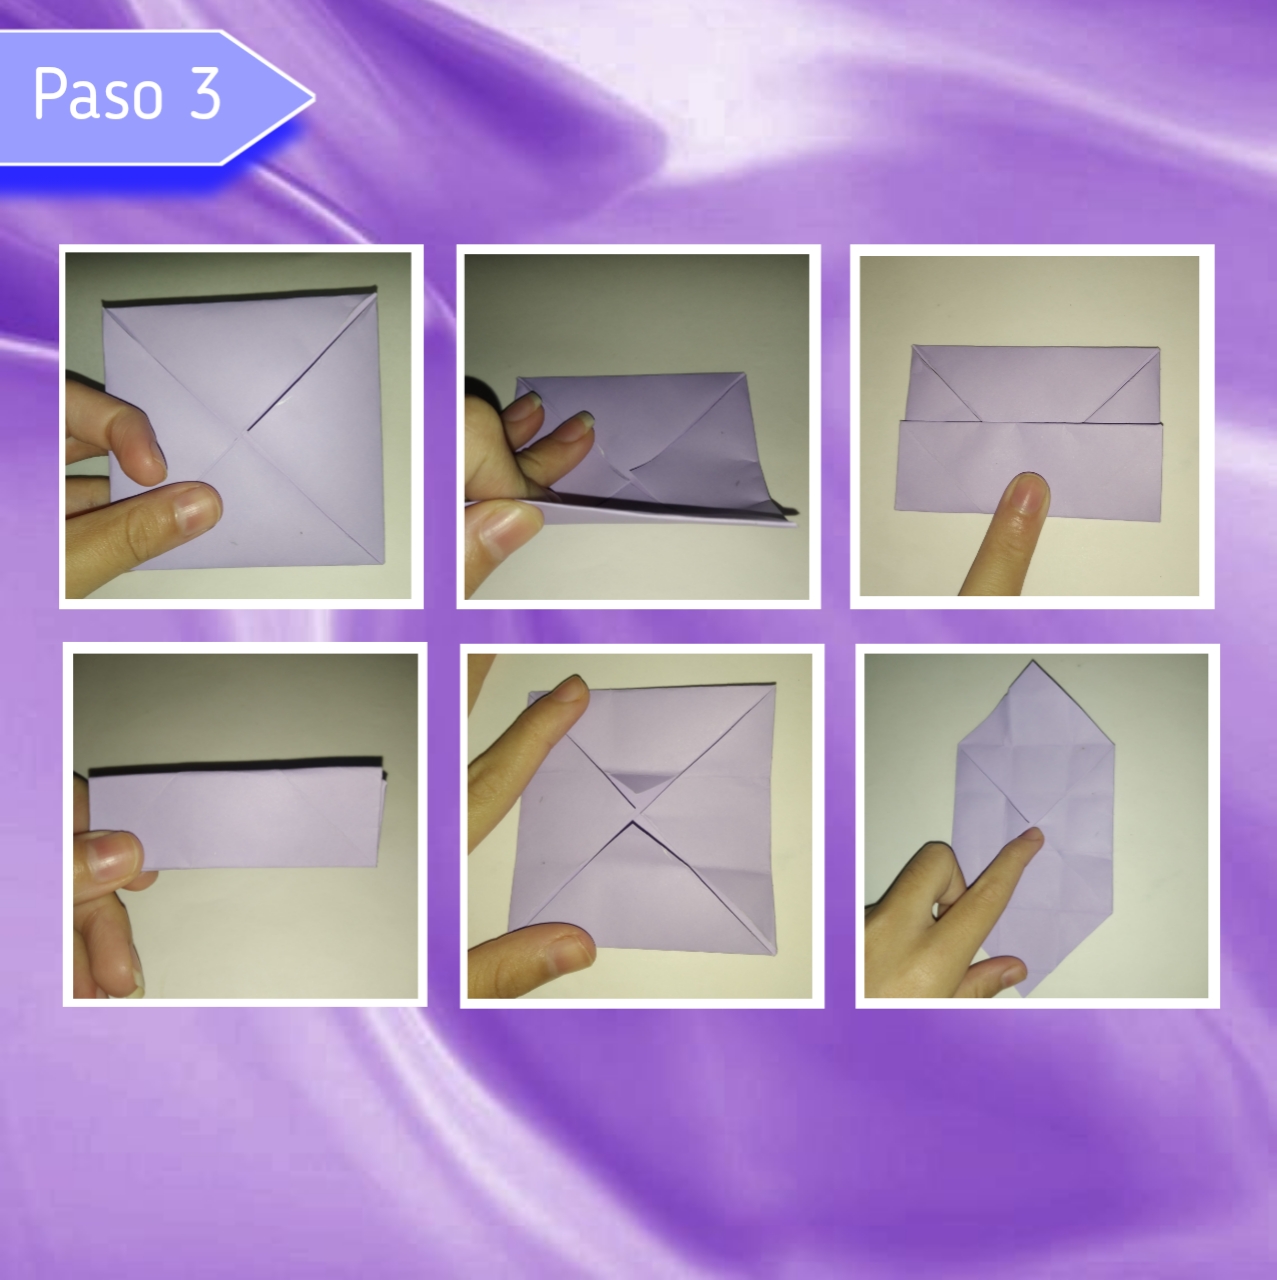
Seguidamente vamos a tomar nuestra pieza anterior y continuaremos trabajando en ella, así como está, vamos a doblar la pieza en tres partes, haciendo que queden lo más iguales posibles y remarcando muy bien como pueden ver. Damos la vuelta y repetimos del otro lado, es decir que tenemos que hacerlo de forma horizontal y vertical igualmente, luego teniendo la pieza en frente abriremos y extenderemos las puntas de arriba y debajo.
Next we are going to take our previous piece and continue working on it, as it is, we are going to fold the piece in three parts, making them as equal as possible and marking them very well as you can see. We turn and repeat on the other side, that is to say that we have to do it horizontally and vertically equally, then having the piece in front we will open and extend the ends above and below.
Paso 4:
Step 4:
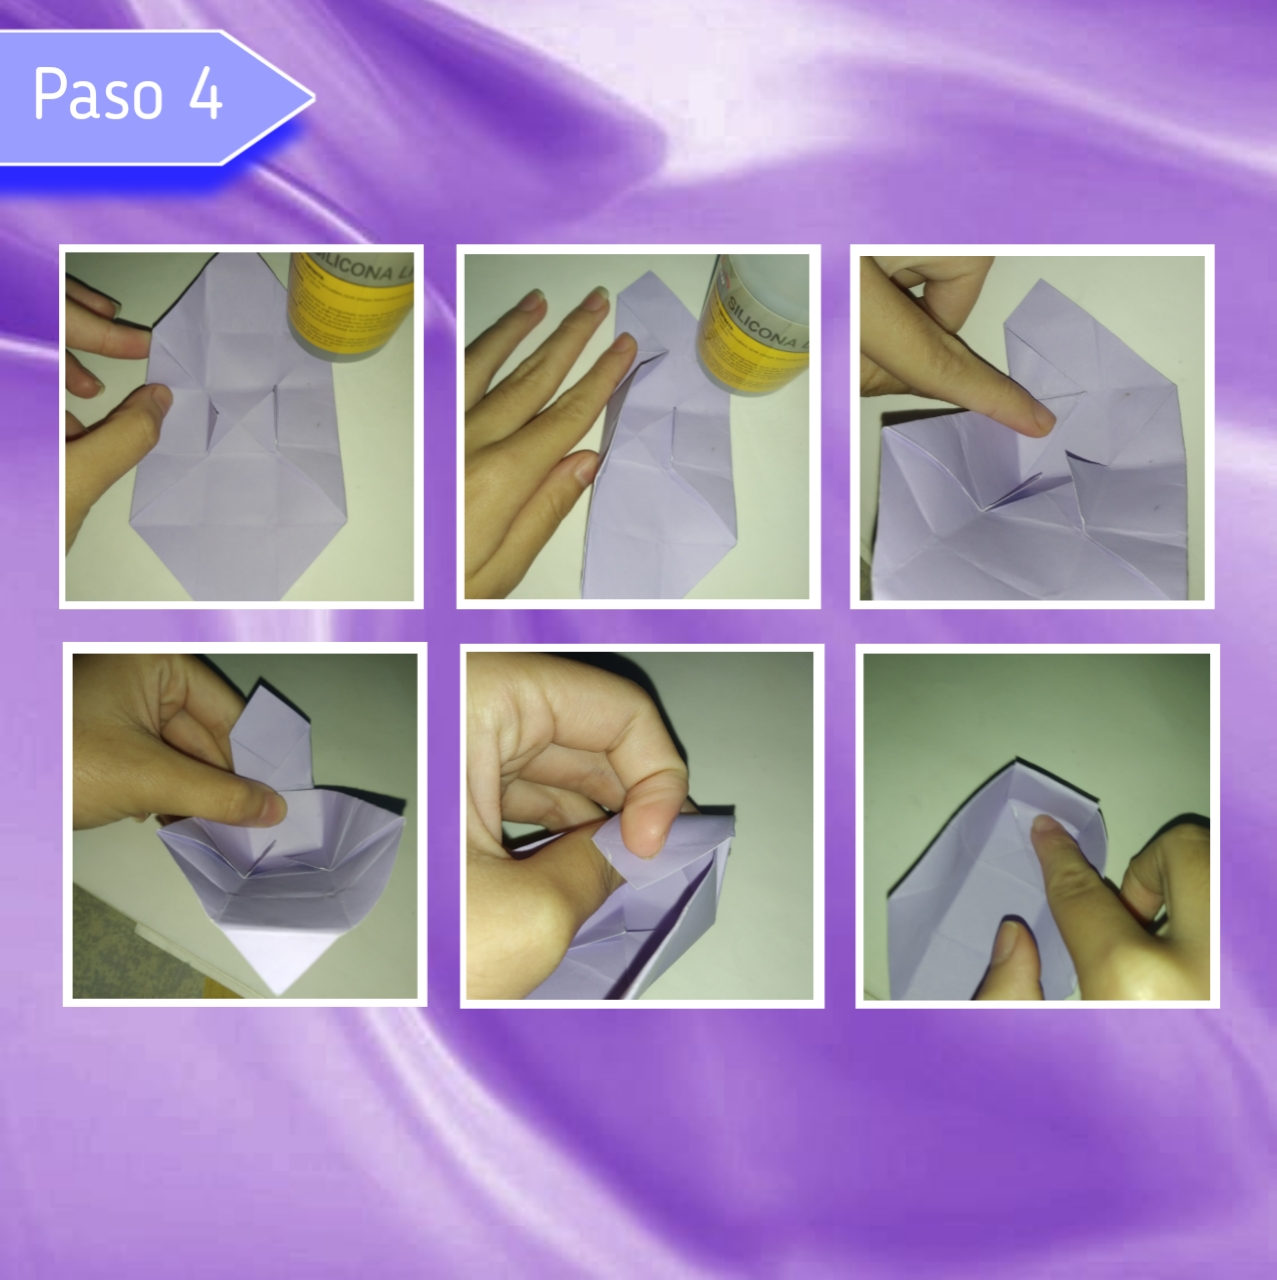
En este paso teniendo nuestra figura exactamente como la dejamos hace un momento, continuaremos tomando una esquina (en está esquina se puede observar un pequeño cuadrado dividido con una línea diagonal) y la llevaremos justo al centro de la línea por la que empieza este cuadrado, también doblaremos la diagonal que tiene el cuadrado a la mitad por dónde está el dobles, de forma diagonal, formando un pico en triángulo. Siguiendo, haremos exactamente lo mismo con el otro lado y la figura sobresaliente que queda arriba la doblaremos hacía adentro, formando un lado de la caja.
In this step having our figure exactly as we left it a moment ago, we will continue taking a corner (in this corner you can see a small square divided with a diagonal line) and we will take it right to the center of the line where this square starts, we will also fold the diagonal that has the square in half where the double is, diagonally, forming a triangle peak. Continuing, we will do exactly the same with the other side and the protruding figure at the top we will fold it inwards, forming a side of the box.
Paso 5:
Step 5:
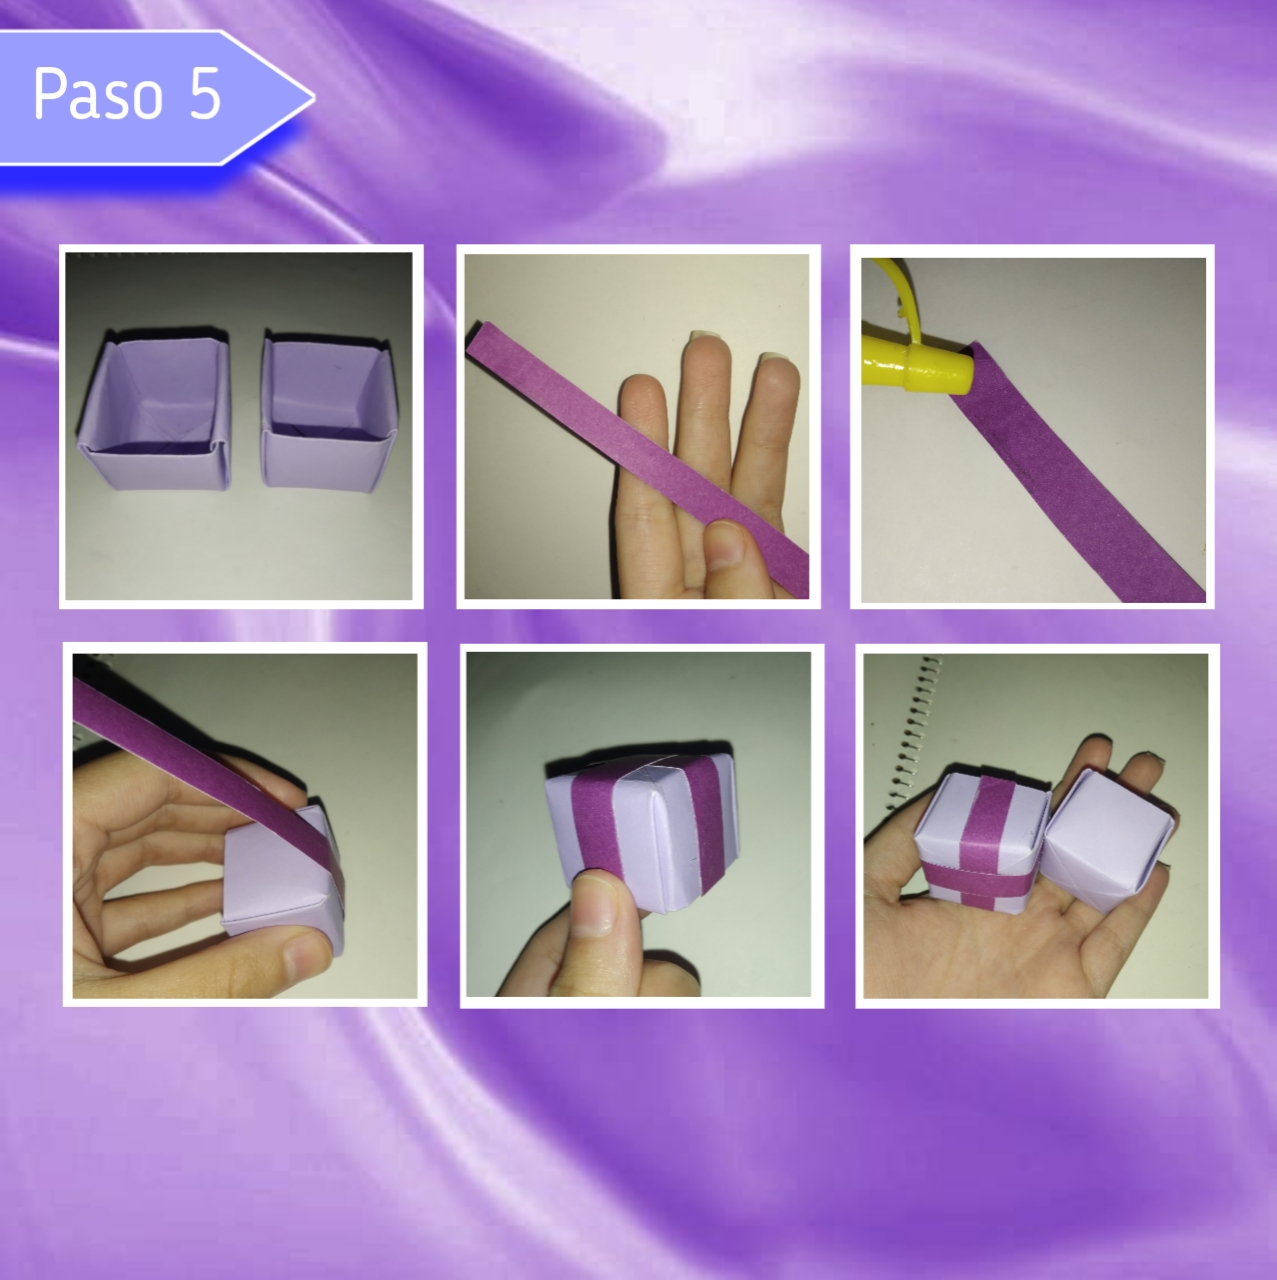
De igual manera como hemos hecho anteriormente haremos con el otro extremo restante, hasta formar la pequeña caja. De está manera al terminar hacemos otra pequeña caja justamente igual o con milímetros un poquito más grande, obteniendo dos iguales. Iniciaremos ahora una pequeña parte de la decoración, así recortaremos una tira del color de nuestra preferencia y la pegaremos en el centro de cada lado de la caja, pero solo de una, como pueden ver.
In the same way as we have done before we will do with the other remaining end, until we form the small box. In this way, when we finish, we will make another small box just the same or a little bit bigger, obtaining two equal ones. We will now start a small part of the decoration, so we will cut a strip of the color of our preference and glue it in the center of each side of the box, but only one, as you can see.
Paso 6:
Step 6:
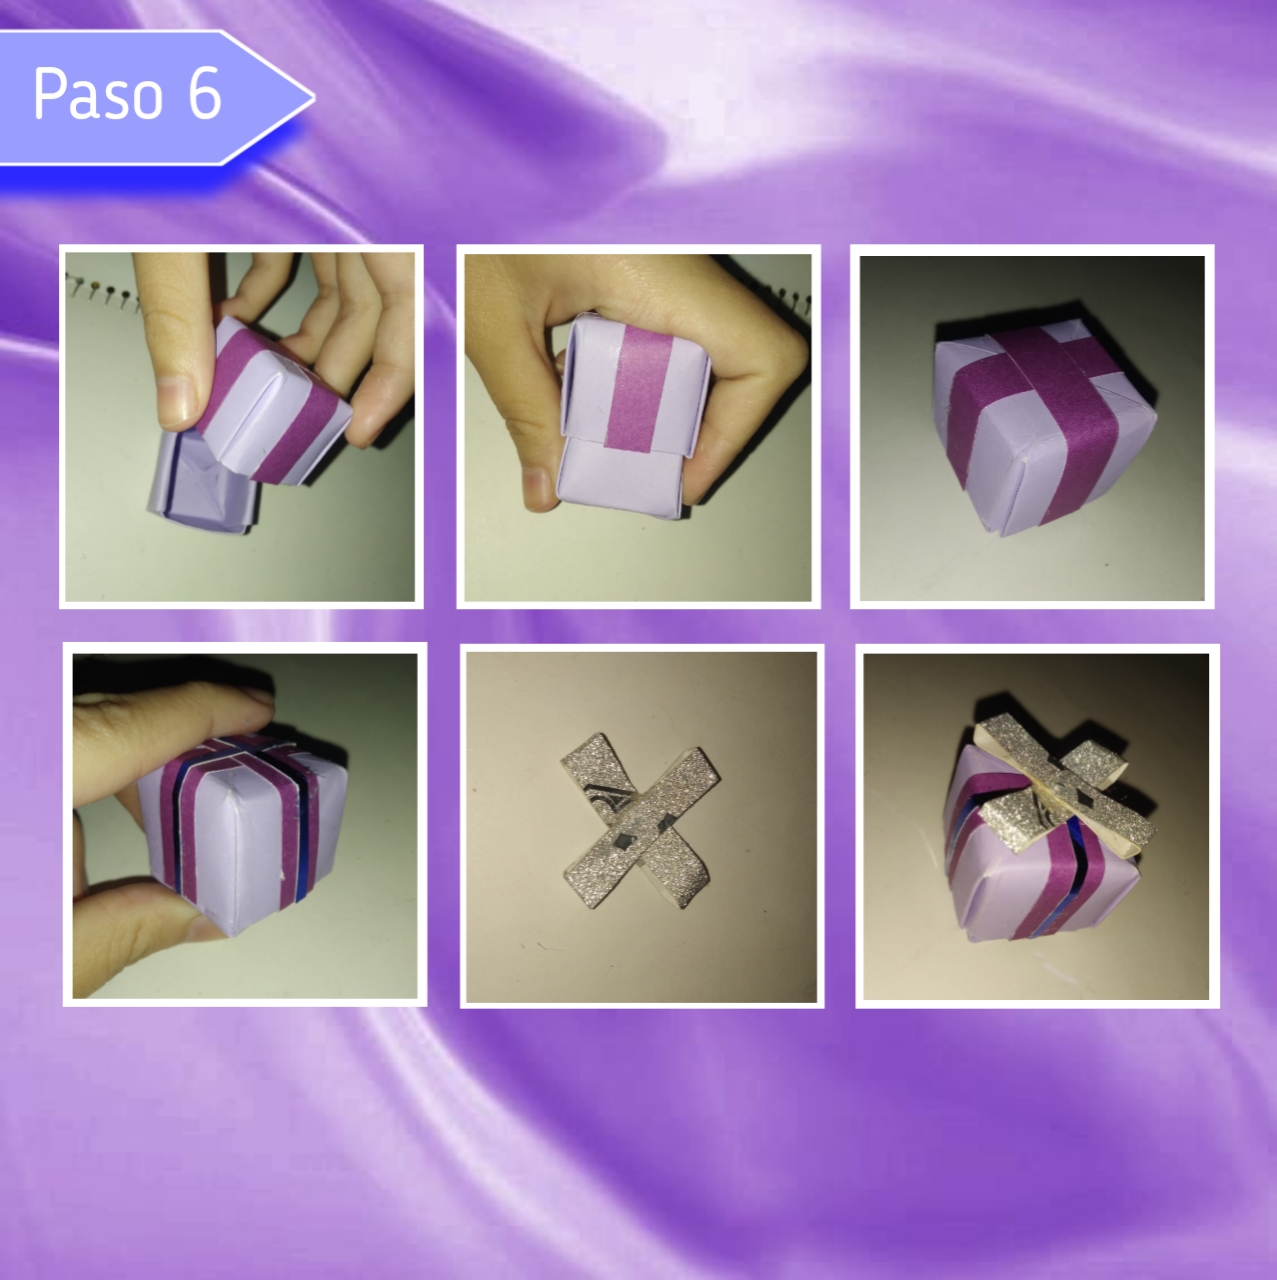
Para terminar introduciremos cuidadosamente con un poco de presión la caja sin decorar dentro de la otra hasta que cierre, y quedé unificada ante la vista, después de esto agregué unas tiras finas en el medio de las que habíamos pegado anteriormente, por último tomé cartulina decorada en color plateado e hice un especie de lazo con tiras gruesas de está, pegué el lazo en la parte de arriba, de forma centrada y agregué una pequeña piedrita con silicón.
To finish we will carefully introduce with a little pressure the undecorated box inside the other until it closes, and it was unified at sight, after this I added some thin strips in the middle of the ones we had previously glued, finally I took cardboard decorated in silver color and made a kind of bow with thick strips of it, I glued the bow on the top, centered and added a small stone with silicone.
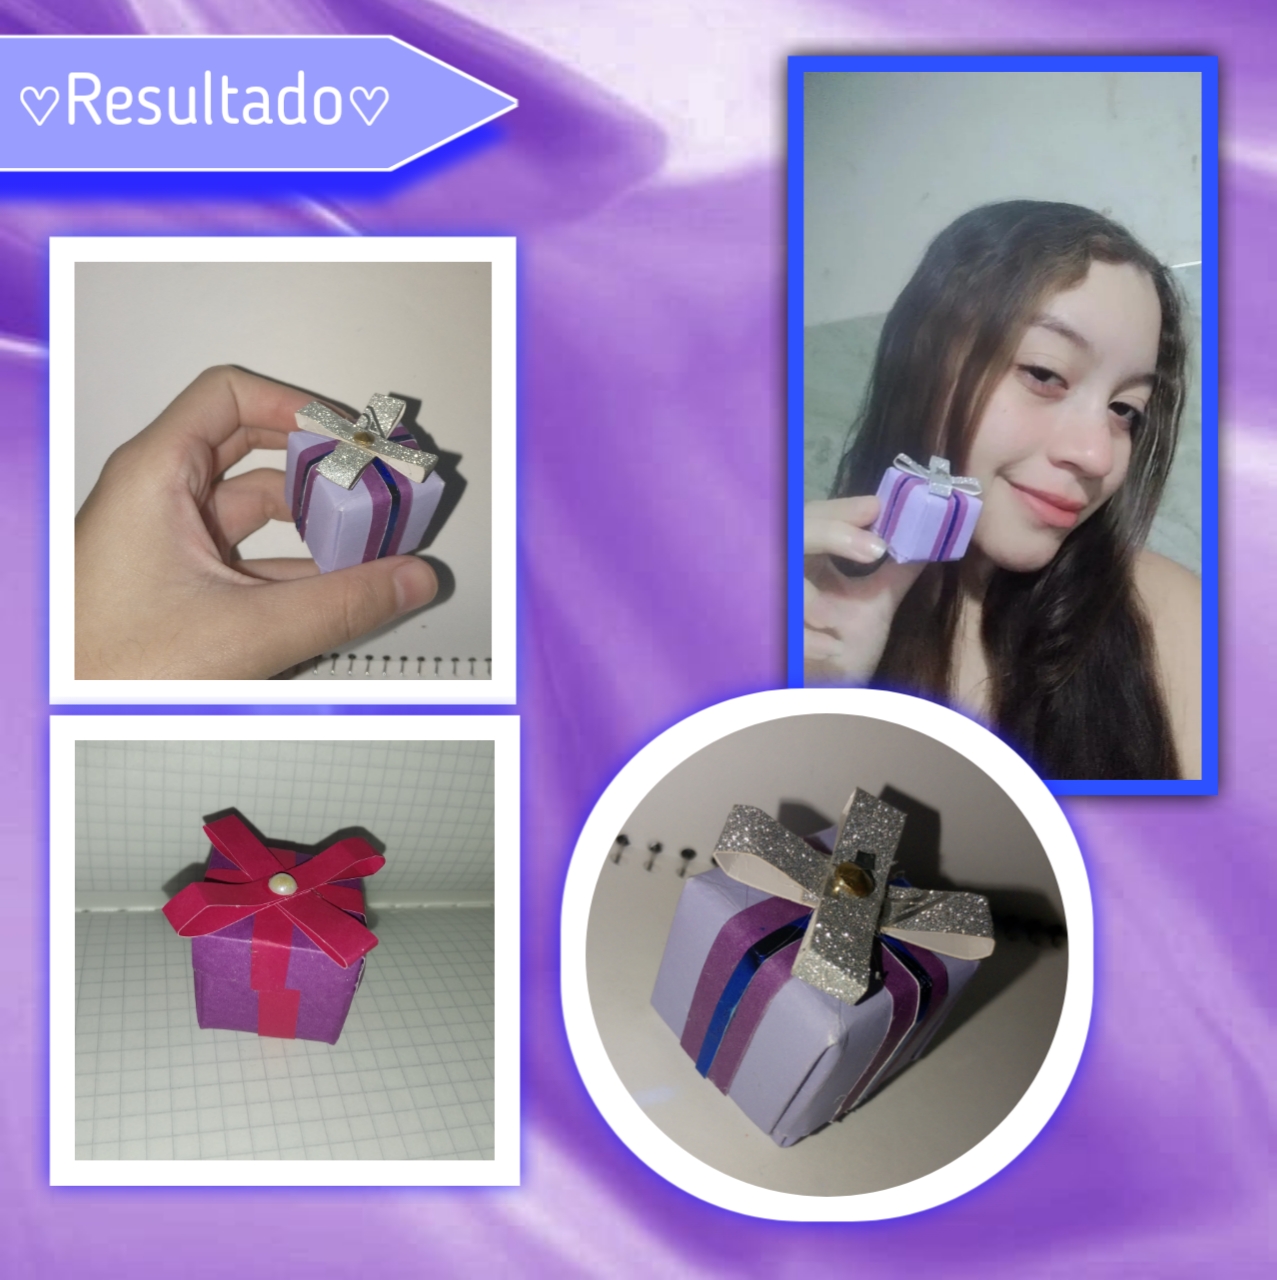
Así en unos cuantos sencillos pasos podemos obtener el empaque perfecto, para nuestro pequeño regalo, que puede ser un anillo, zarcillos, un collar, un dije, entre muchas otras cosas a nuestra elección, una caja pequeña, para un pequeño regalo lleno de mucho amor. Además nos podría servir para decorar en estás fechas navideñas, para guindarlo en nuestro arbolito o colocarlos de decoración, lo mejor de todo esto es que lo podemos hacer completamente personalizados a nuestro gusto, les dejó está bonita idea con mucho amor.💜
So in a few simple steps we can get the perfect packaging for our small gift, which can be a ring, earrings, a necklace, a pendant, among many other things of our choice, a small box for a small gift full of love. In addition we could serve to decorate in these Christmas dates, to hang it on our tree or place them decoration, the best of all this is that we can make it completely customized to our liking, I leave you this beautiful idea with love.💜
Hemos llegado al fin de la manualidad de hoy📌, explicar alguna manualidad con origami no es de lo más fácil, pero espero que hayan entendido y les haya gustado el tutorial de hoy. Les deseo un bendecido y felíz martes, espero que desde temprano sea un día bastante productivo y bonito para todos, un abrazo enorme mi familia creativa.💜✨
We have come to the end of today's craft📌, explaining some craft with origami is not the easiest, but I hope you understood and liked today's tutorial. I wish you a blessed and happy Tuesday, I hope that early on it will be a very productive and nice day for everyone, a big hug my creative family💜✨
🌠✨Gracias por leer y acompañarme una vez más, los quiero ✨🌠
🌠✨Thank you for reading and joining me once again, I love you all✨🌠
Photos of my authorship taken from my Xiaomi Redmi 7 phone, edited in the free version of PixeLab
Que cuchi queda, imagino hacer muchas y colgarlas en el arbolito 😊🌲
Sii, también es buena idea, agregaré unos cuantos al árbol, gracias por comentar, saludos.✨🎄
Congratulations @stefania16! You have completed the following achievement on the Hive blockchain And have been rewarded with New badge(s)
Your next target is to reach 200 posts.
You can view your badges on your board and compare yourself to others in the Ranking
If you no longer want to receive notifications, reply to this comment with the word
STOPTo support your work, I also upvoted your post!
Check out our last posts:
🌠🧡
👍😄
Awww me encanto 💟 es perfecto para colocar collar o anillos. Regalar un obsequio 🎁 para alguna amigas o familias. Definitivamente se ve que es especial. Cuando se trata de hacerlo uno mismo. Te felicito por esta increíble manualidad con la cartulina
Ideal para adornar el árbol de navidad, ha quedado muy lindo.🌻🌼
Siii, quedaría bastante bonito también, graciasss amiga.💜✨
Excelente tu paso a paso se entiende bien y te felicito por compartir este hermosa cajita de regalo para uno meter cosas pequeñas para obsequiar muy lindo detalle.
¡Saber eso me alegra! Esa es la idea, muchas gracias, saludos.💜✨
Bendiciones y feliz tarde fue un placer visitarte.