Hello my fantastic and creative Hive Diy community! First of all very good morning, afternoon or evening, I wish your day is going great and full of good things, also I hope you have showers of blessings and lots of creativity for all of you, wherever you are I wish you are doing super well, happy and blessed Tuesday.♡
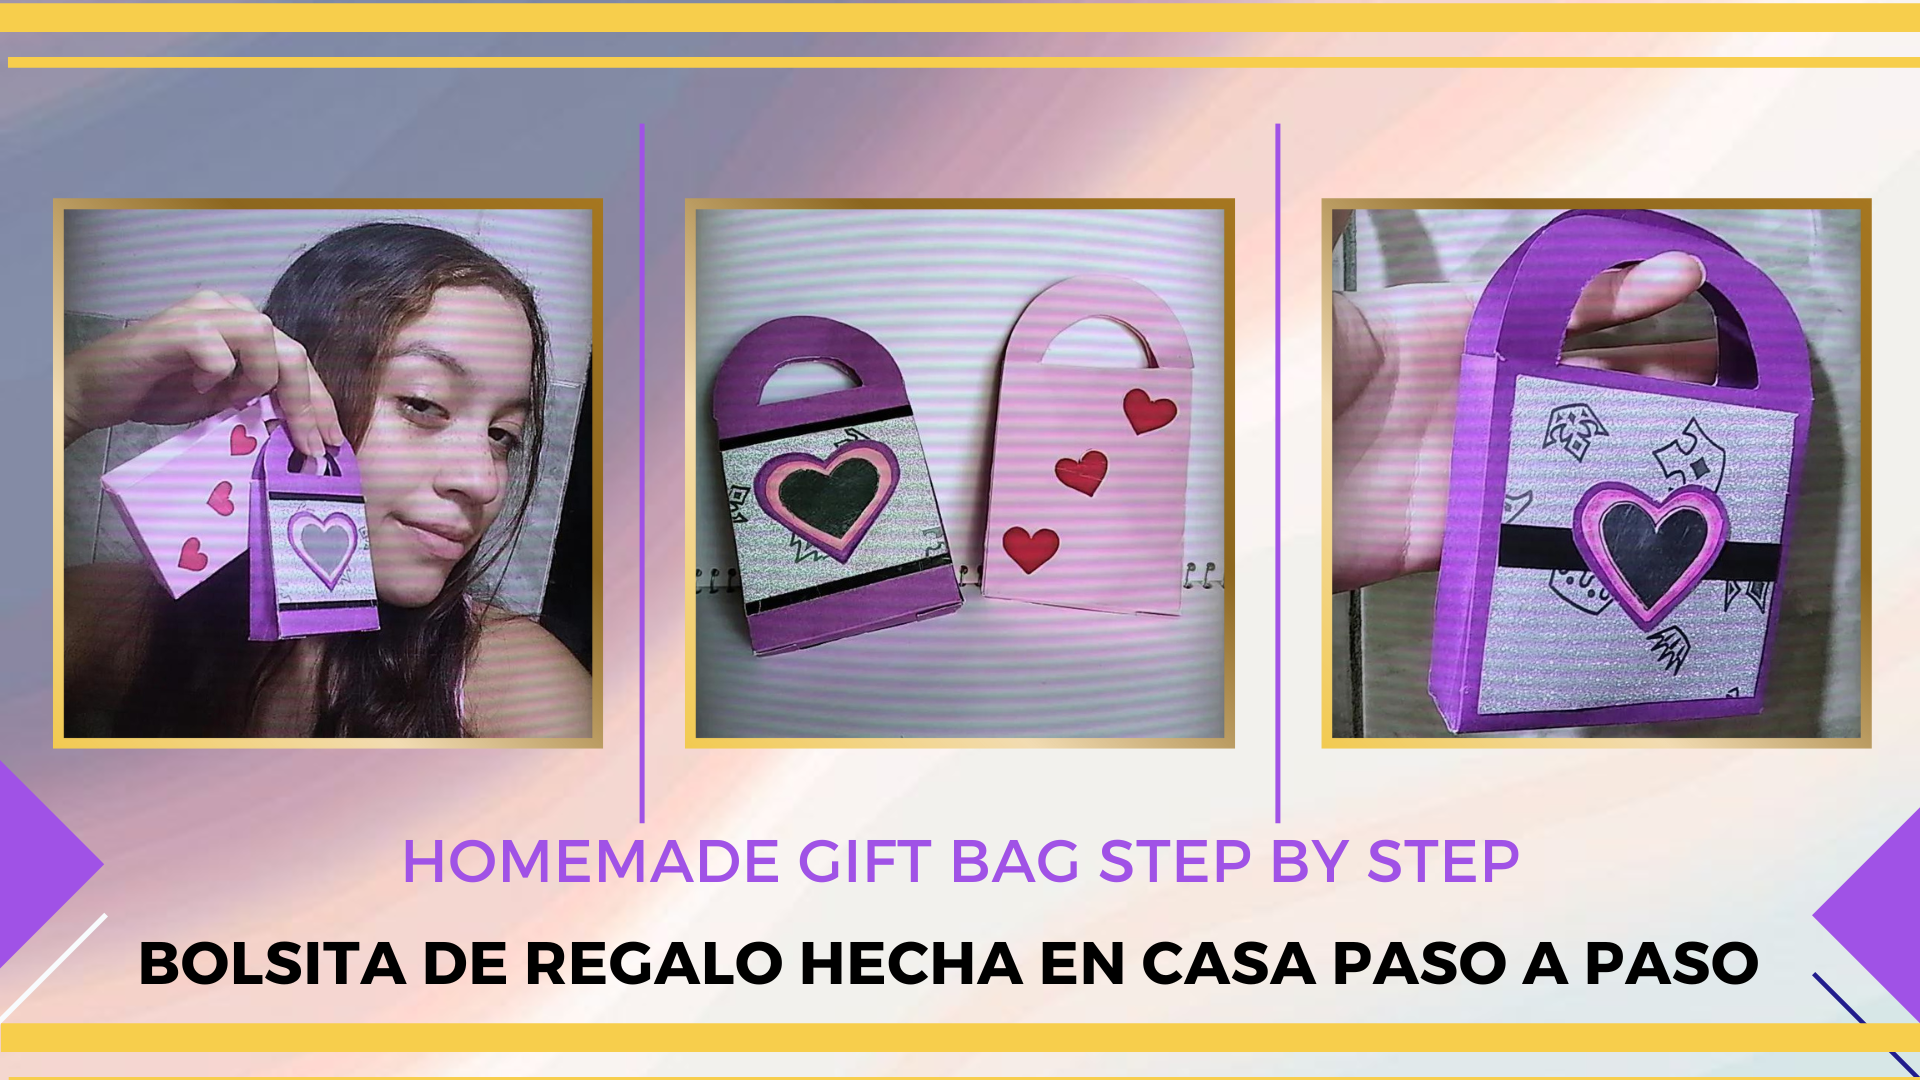
Estoy complacida de iniciar publicado está semana por aquí, el día de hoy les traigo un tutorial algo sencillo para elaborar de manera rápida una hermosa bolsita de regalo que nos puede sacar de apuros al no encontrar una bolsita pequeña, así la podemos elaborar en casa del tamaño que queramos y como suelo decir lo mejor de hacer estás manualidades en casa es que le podemos poner toda nuestra creatividad y crear algo a nuestro gusto o al de la persona a la que se le va a obsequiar, de forma que la podemos personalizar como queramos, desde el color hasta la decoración, todo comienza por nuestra creatividad y termina por la misma, cada detalle es nuestra elección, así que ¡Vamos a comenzar!.♡
I am pleased to start this week published here, today I bring you a simple tutorial to quickly develop a beautiful gift bag that can get us out of trouble when we can not find a small bag, so we can make it at home the size we want and as I usually say the best thing about making these crafts at home is that we can put all our creativity and create something to our liking or the person to whom it will be given, so that we can customize it as we want, from color to decoration, everything starts with our creativity and ends with it, every detail is our choice, so let's get started! .♡
♡Mini gift bag♡
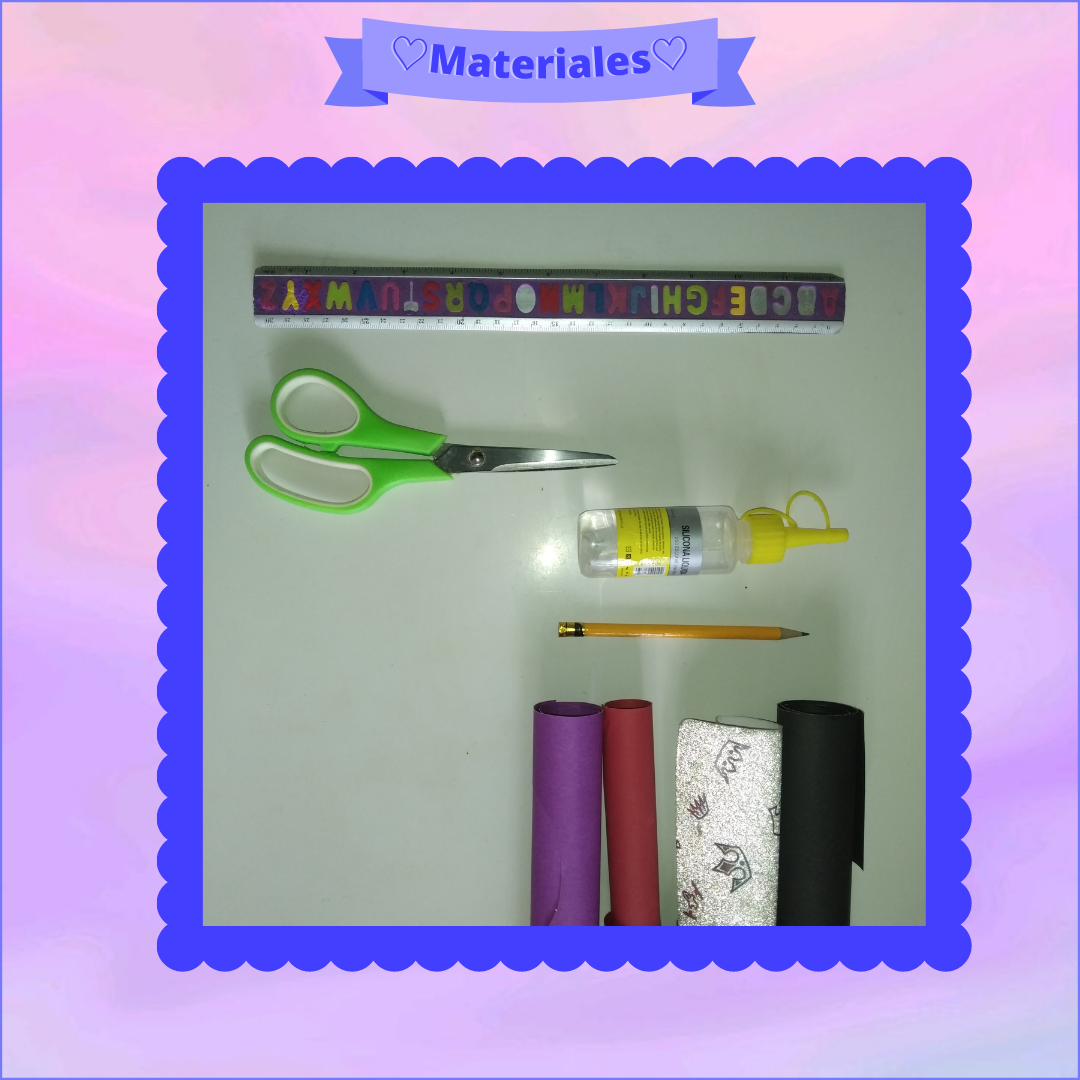
♡Materials♡
- Cartulinas unicolor
- Cartulina decorada
- Silicón frío
- Regla
- Tijeras
- Lápiz
- Unicolor cardstock
- Decorated cardboard
- Cold silicone
- Ruler
- Scissors
- Pencil
Step by Step
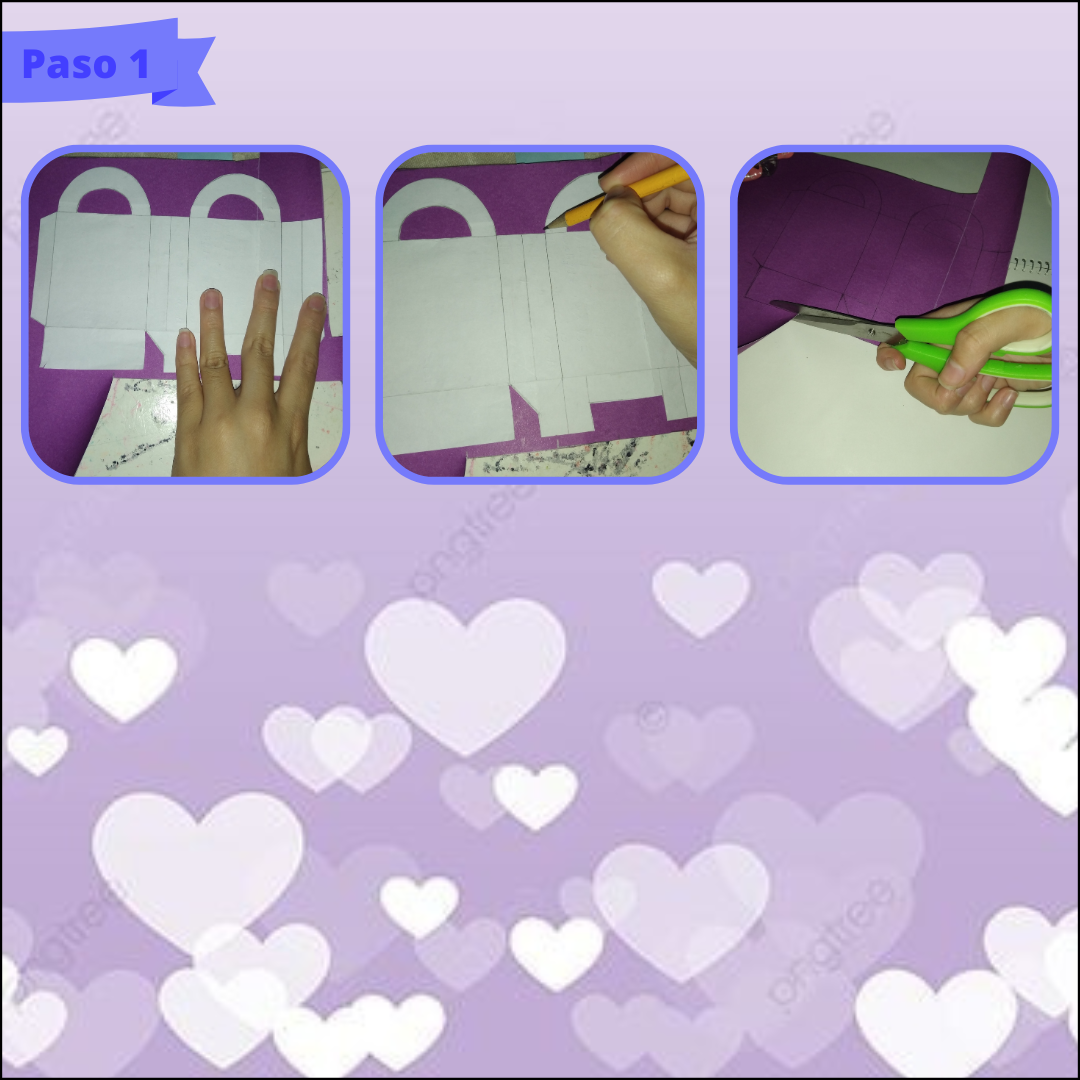
Paso 1:
Step 1:
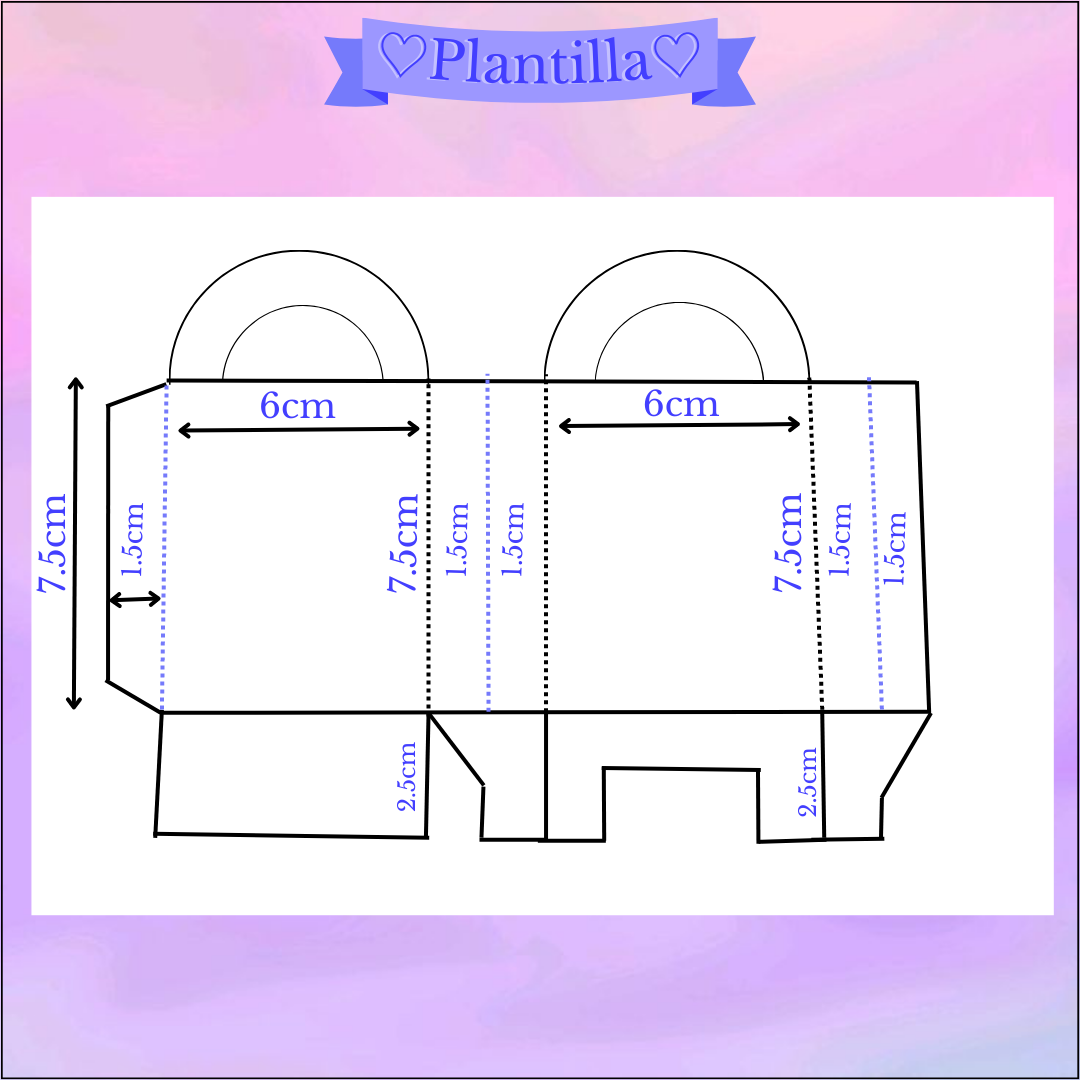
Lo primero que necesitamos para empezar es nuestra plantilla, que como siempre les dejo en la parte de arriba para que puedan guiarse, después extendemos nuestra cartulina unicolor (principal), para así colocar cuidadosamente nuestra plantilla y proseguir a marcar con un lápiz mientras sostenemos sin mover está, para luego recortar con ayuda de nuestra tijera toda la figura.
The first thing we need to start with is our template, which as always I leave at the top so you can be guided, then we extend our unicolor cardboard (main), to carefully place our template and proceed to mark with a pencil while we hold without moving it, and then cut with the help of our scissors the whole figure.
Paso 2:
Step 2:
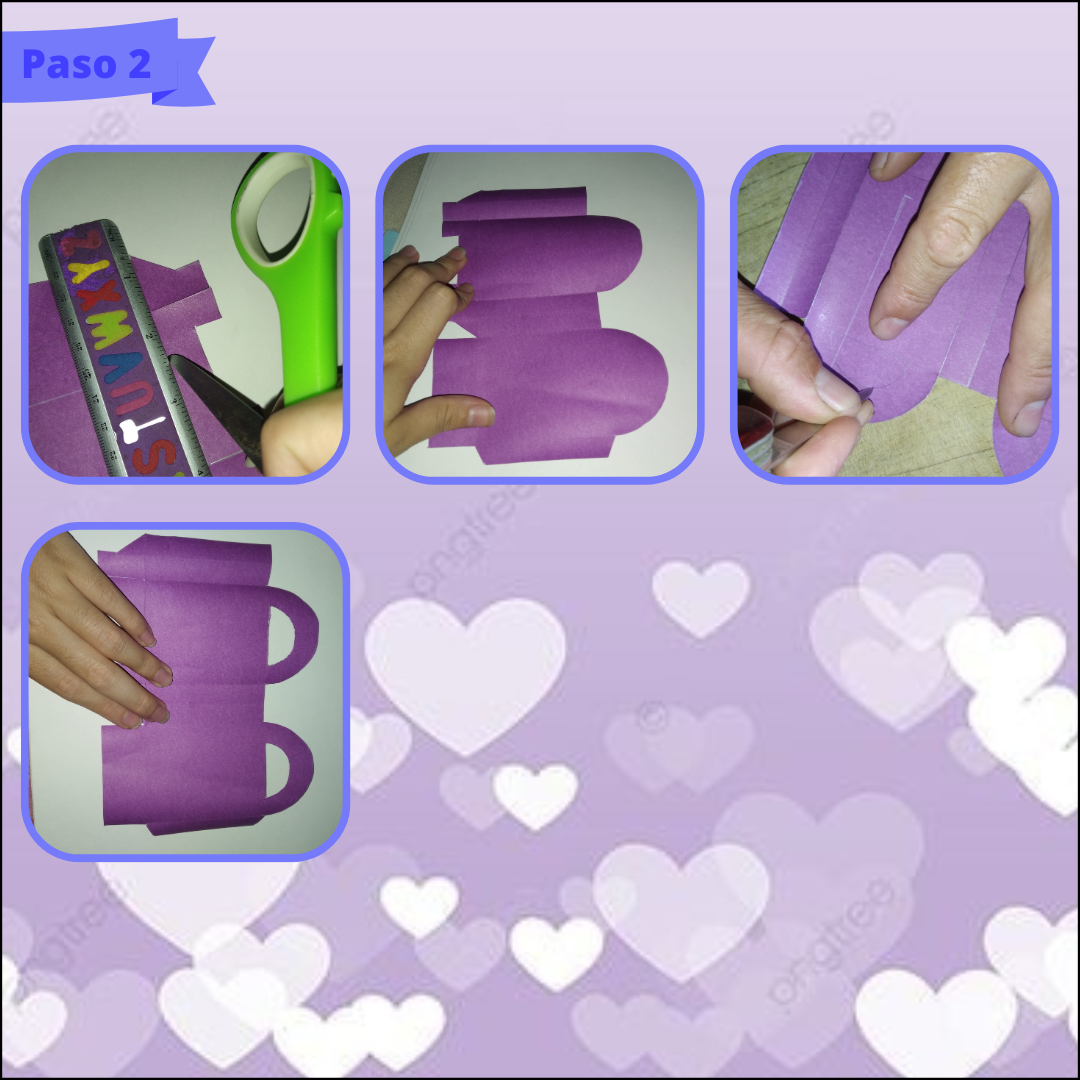
A continuación nos apoyaremos con nuestra regla, para así abrir nuestra tijera y con la ayuda de la punta filosa de está marcamos cada uno de los dobleces sutilmente aplicando un nivel intermedio de presión, luego con un cúter o un exacto vamos a recortar los orificios de la parte de arriba que es de dónde sujetaremos la bolsa, para esto debemos tener cuidado y marcar con precisión, así le pedí ayuda a mi padre en esta parte por mayor seguridad.
Next we will support ourselves with our ruler, in order to open our scissors and with the help of the sharp end of it we mark each of the folds subtly applying an intermediate level of pressure, then with a cutter or an exacto we will cut the holes in the top part which is where we will hold the bag, for this we must be careful and mark accurately, so I asked my father for help in this part for safety.
Paso 3:
Step 3:
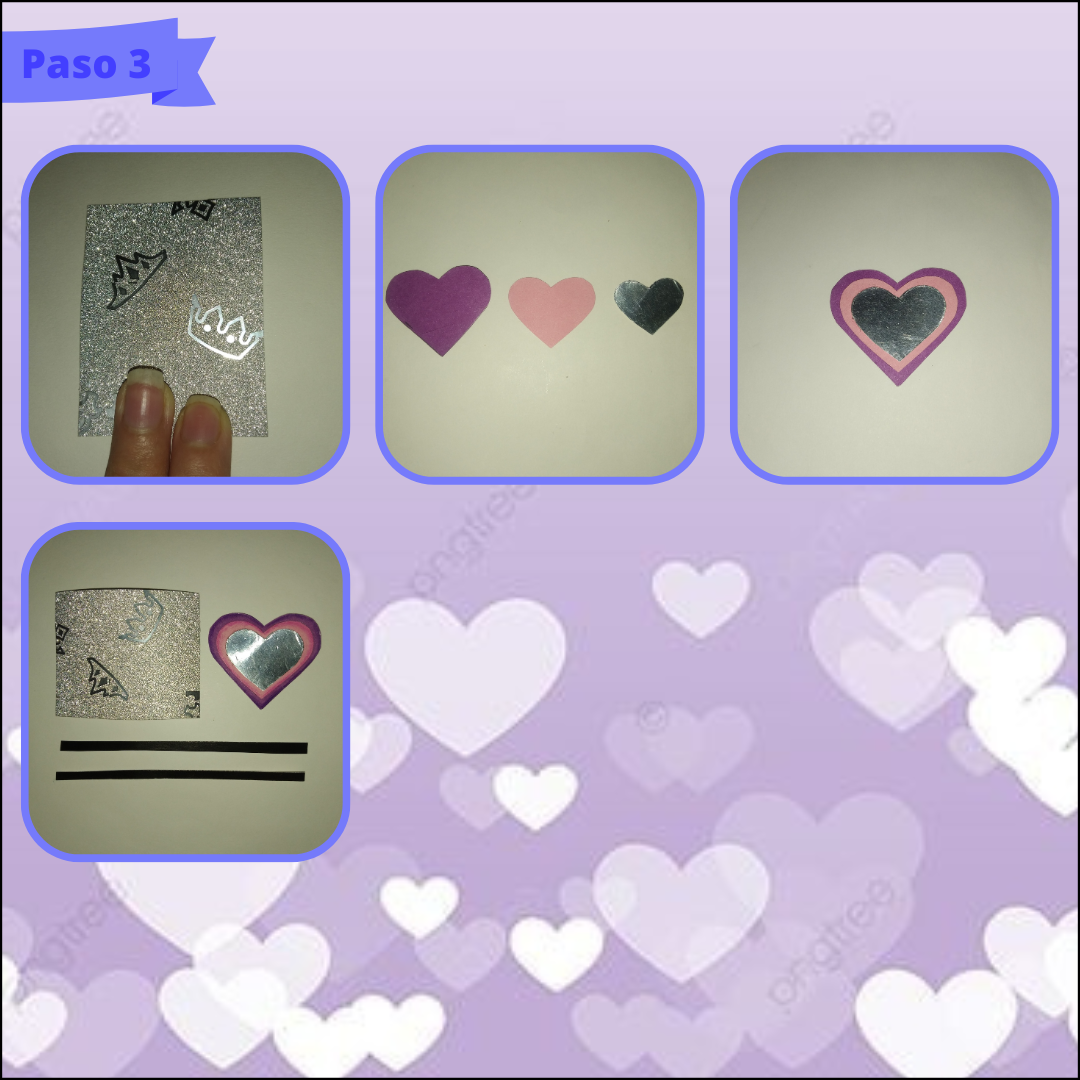
Ahora es hora de comenzar con la decoración, antes de terminar de armar la bolsita, porque así se nos hace más fácil pegar los detalles, vamos a empezar recortando un pequeño rectángulo de 6cm x 6.5cm en nuestra cartulina decorada, luego tomaremos las cartulinas unicolor a nuestro gusto y recortaremos tres corazones cada uno más pequeño que el anterior, para pegar con silicón frío uno sobre otro y hacer un solo corazón con varias capas, así para terminar con los elementos de la decoración recortaremos dos pequeñas tiras en cartulina color negro, estos aproximadamente de 0.6cm de grosor y 6cm de largo.
Now it's time to start with the decoration, before we finish assembling the bag, because it makes it easier to glue the details, let's start by cutting a small rectangle of 6cm x 6. 5cm in our decorated cardboard, then we will take the unicolor cardboard of our choice and cut out three hearts each one smaller than the previous one, to glue with cold silicone one over the other and make a single heart with several layers, so to finish with the elements of the decoration we will cut out two small strips in black cardboard, these approximately 0.6cm thick and 6cm long.
Paso 4:
Step 4:
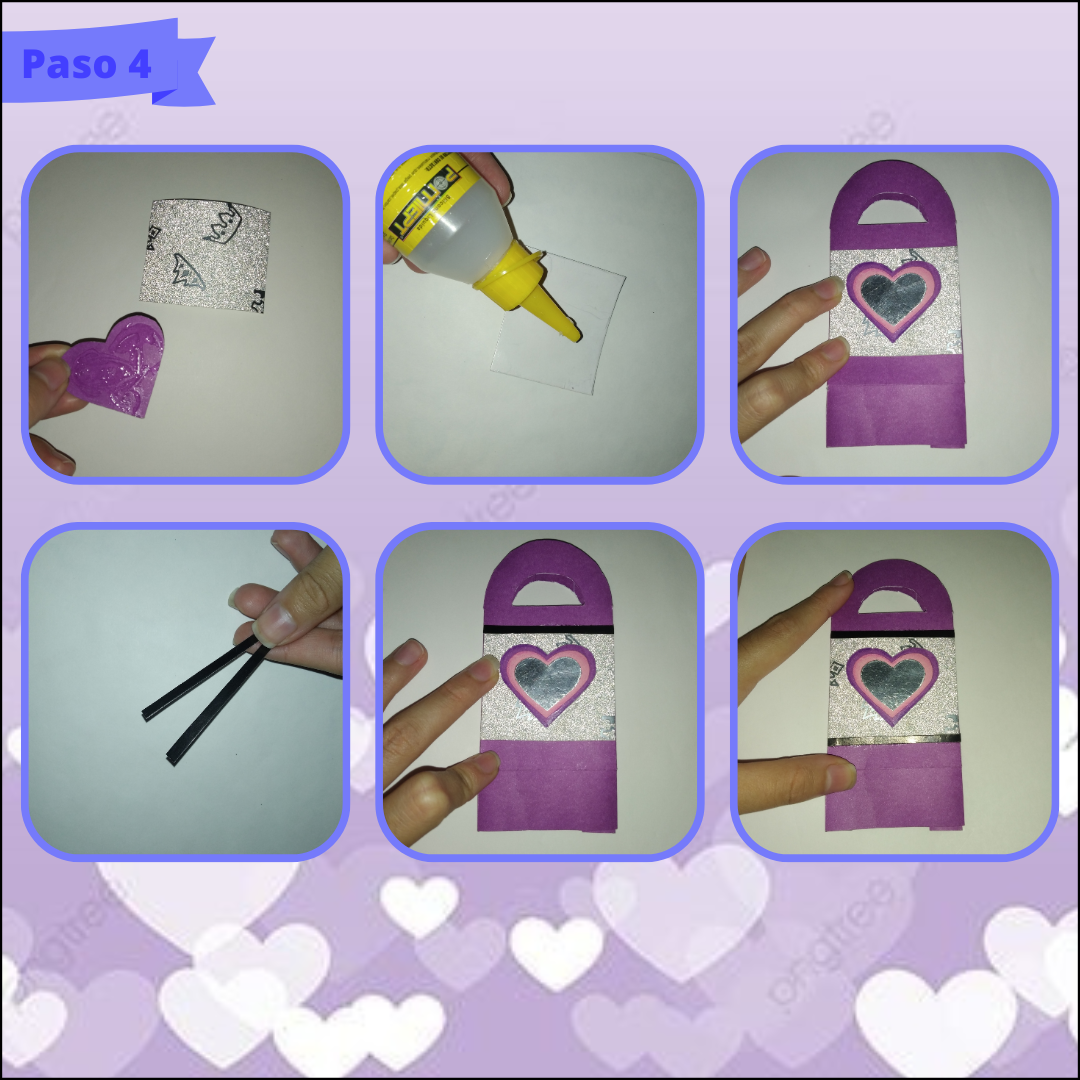
Continuando con la decoración tomamos el corazón le esparcimos silicón frío en la parte de trasera y lo pegamos en el pequeño rectángulo aplicando presión por unos cuantos segundos, proseguimos a agregar silicón a esta pieza y pegar de forma centrada en la bolsita, después tomamos las pequeñas tiras de cartulina, le agregaremos silicón y colocaremos una en cada borde, de la parte de arriba y de abajo del rectángulo.
Continuing with the decoration we take the heart, we spread cold silicone on the back and glue it on the small rectangle applying pressure for a few seconds, we continue to add silicone to this piece and glue it centered on the bag, then we take the small strips of cardboard, we will add silicone and place one on each edge, on the top and bottom of the rectangle.
Paso 5:
Step 5:
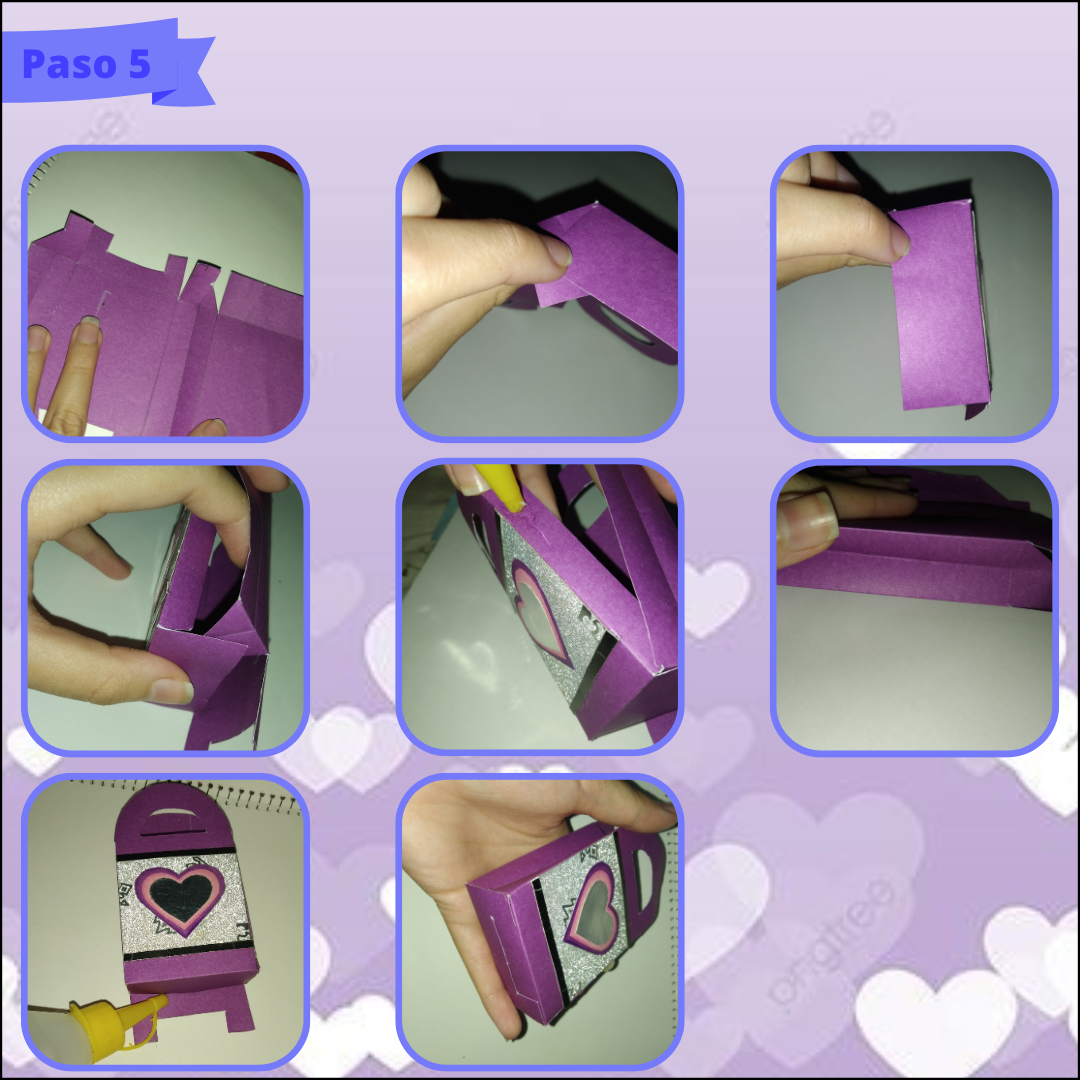
Ya con la decoración lista solo nos faltaría armar la bolsita, primero la extenderemos y tomaremos las dos solapas de cada extremo y ambas las vamos a pegar en la parte interior de la solapa de la parte de abajo, la cuál es un simple rectángulo, ahora al pegar esto nos queda una solapa en un extremo la cuál procedemos a pegar con silicón, haciendo que está quedé por la parte de adentro y por último nuevamente tomaremos el silicón lo vamos a esparcir en la última solapa que queda de la parte de abajo y simplemente lo unimos con la pieza, para finalizar acomodamos un poco hacía adentro los dobleces de los extremos por la línea que se nos indica, todo como se puede observar en la imágen.
Now with the decoration ready we only need to assemble the bag, first we will extend it and take the two flaps at each end and both we will paste them on the inside of the flap of the bottom, which is a simple rectangle, now when we paste this we have a flap at one end which we proceed to paste with silicone, and finally again we will take the silicone and spread it on the last flap that remains on the bottom and simply join it with the piece, to finish we accommodate a little inside the folds of the ends by the line that is indicated, all as you can see in the image.
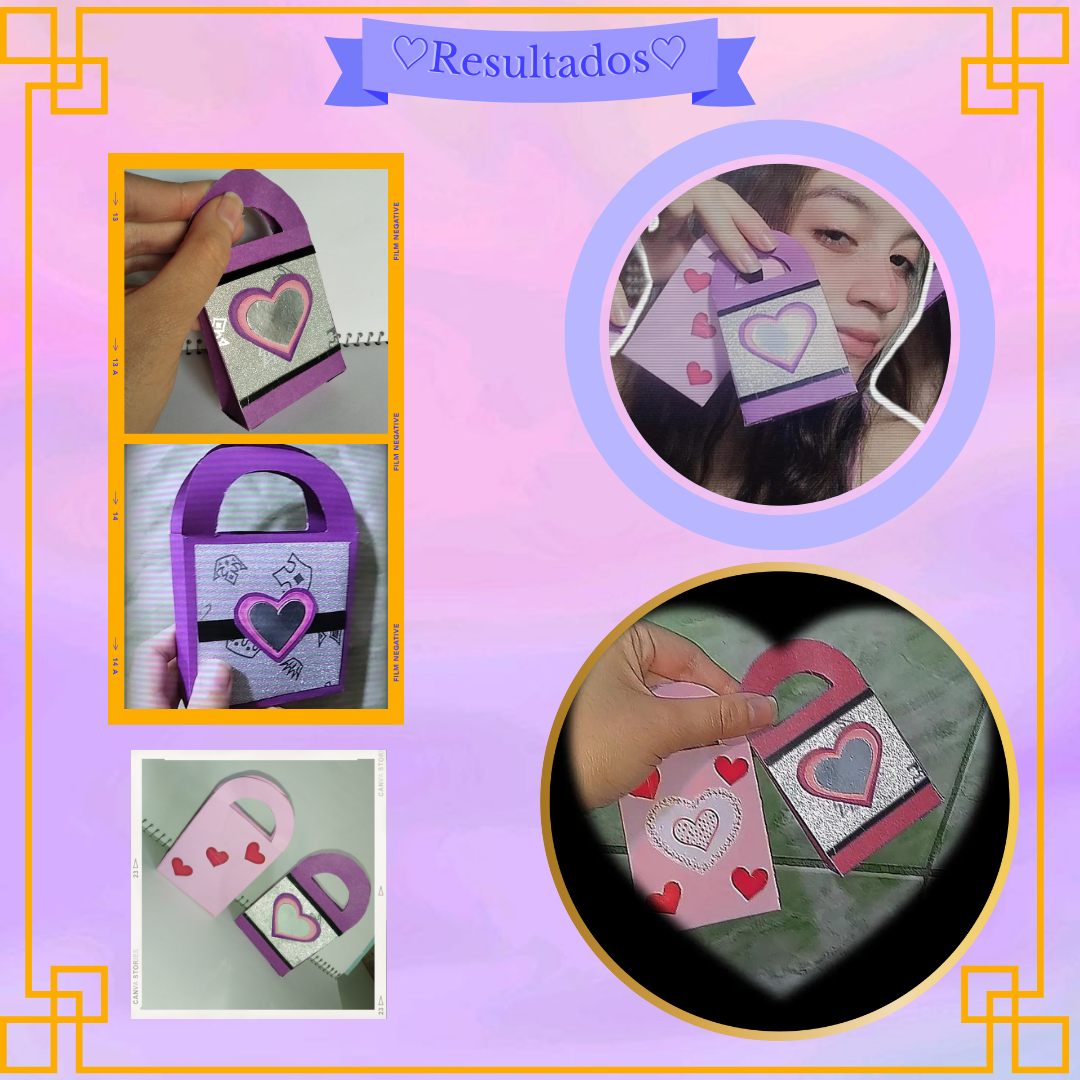
Y así de fácil, rápido y sencillo, en unos cuantos pasos tenemos una linda bolsita de regalo que podemos adaptar al tamaño que queramos solo cambiando las medidas de la plantilla, también cabe señalar que se pueden hacer infinitos modelos de estas, solo cambiando el color y los detalles al decorar ¡Las posibilidades son muchas! Ya que al ser personalizadas podemos jugar libremente con los detalles, así que considero que es una gran idea para algún emprendimiento que venda desde anillos hasta prendas, es muy versátil y funcional, lo mejor es que es algo diferente y muy lindo, así que espero que les sirva de lo mejor, les dejo tres modelitos para que vean la versatilidad de estos.
And so easy, fast and simple, in a few steps we have a nice little gift bag that we can adapt to the size we want just by changing the measurements of the template, also note that you can make infinite models of these, just changing the color and details to decorate the possibilities are many! Since they are personalized we can play freely with the details, so I think it's a great idea for any venture that sells from rings to clothing, it is very versatile and functional, the best thing is that it is something different and very nice, so I hope it serves you the best, I leave three models so you can see the versatility of these.
Deseo que les sea de gran ayuda este tutorial y que en cualquier ocasión, ya sea algo rápido o planeado puedan hacerlas con mucho amor, la verdad son muy lindas, ahora bien, les agradezco por llegar hasta aquí una vez más, un abrazo amigos de la colmena, nos vemos en una próxima manualidad hecha en casa.♡
I wish that this tutorial will be of great help to you and that in any occasion, whether it is something quick or planned you can make them with lots of love, the truth is they are very cute, now then, I thank you for getting here once again, a hug friends of the hive, see you in a next homemade craft.♡
Gracias por leer.♡
Thank you for reading.♡
Photos of my authorship taken from my Xiaomi Redmi 7 phone, edited in the free version of Canva.
Congratulations @stefania16! You have completed the following achievement on the Hive blockchain And have been rewarded with New badge(s)
Your next target is to reach 10000 upvotes.
You can view your badges on your board and compare yourself to others in the Ranking
If you no longer want to receive notifications, reply to this comment with the word
STOPCheck out our last posts:
Support the HiveBuzz project. Vote for our proposal!
🧡
Graciass, saludos.✨
Si te gustan nuestras insignias y que sigamos tu progreso en Hive, ¡necesitamos tu ayuda!
Gracias. 🙏
🧡🧡
Quedó un cuchitura @stefania16 Te felicito amiga
Gracias lindaaa, un abrazo.❤️✨
The rewards earned on this comment will go directly to the people( @yennysferm71 ) sharing the post on Twitter as long as they are registered with @poshtoken. Sign up at https://hiveposh.com.
😍💜
Hola, muy lindas bolsas de regalos.
¡Saludos! Muchas gracias, apreció el comentario.✨