Hello my creative Hive DIY family! How are you all doing here? I sincerely hope very well, we are almost halfway through the month, time is flying by, no doubt. My wishes for this beautiful month of December, is that we enjoy every day and take advantage of making Christmas crafts that we love so much, to share with family and decorate our homes.♡
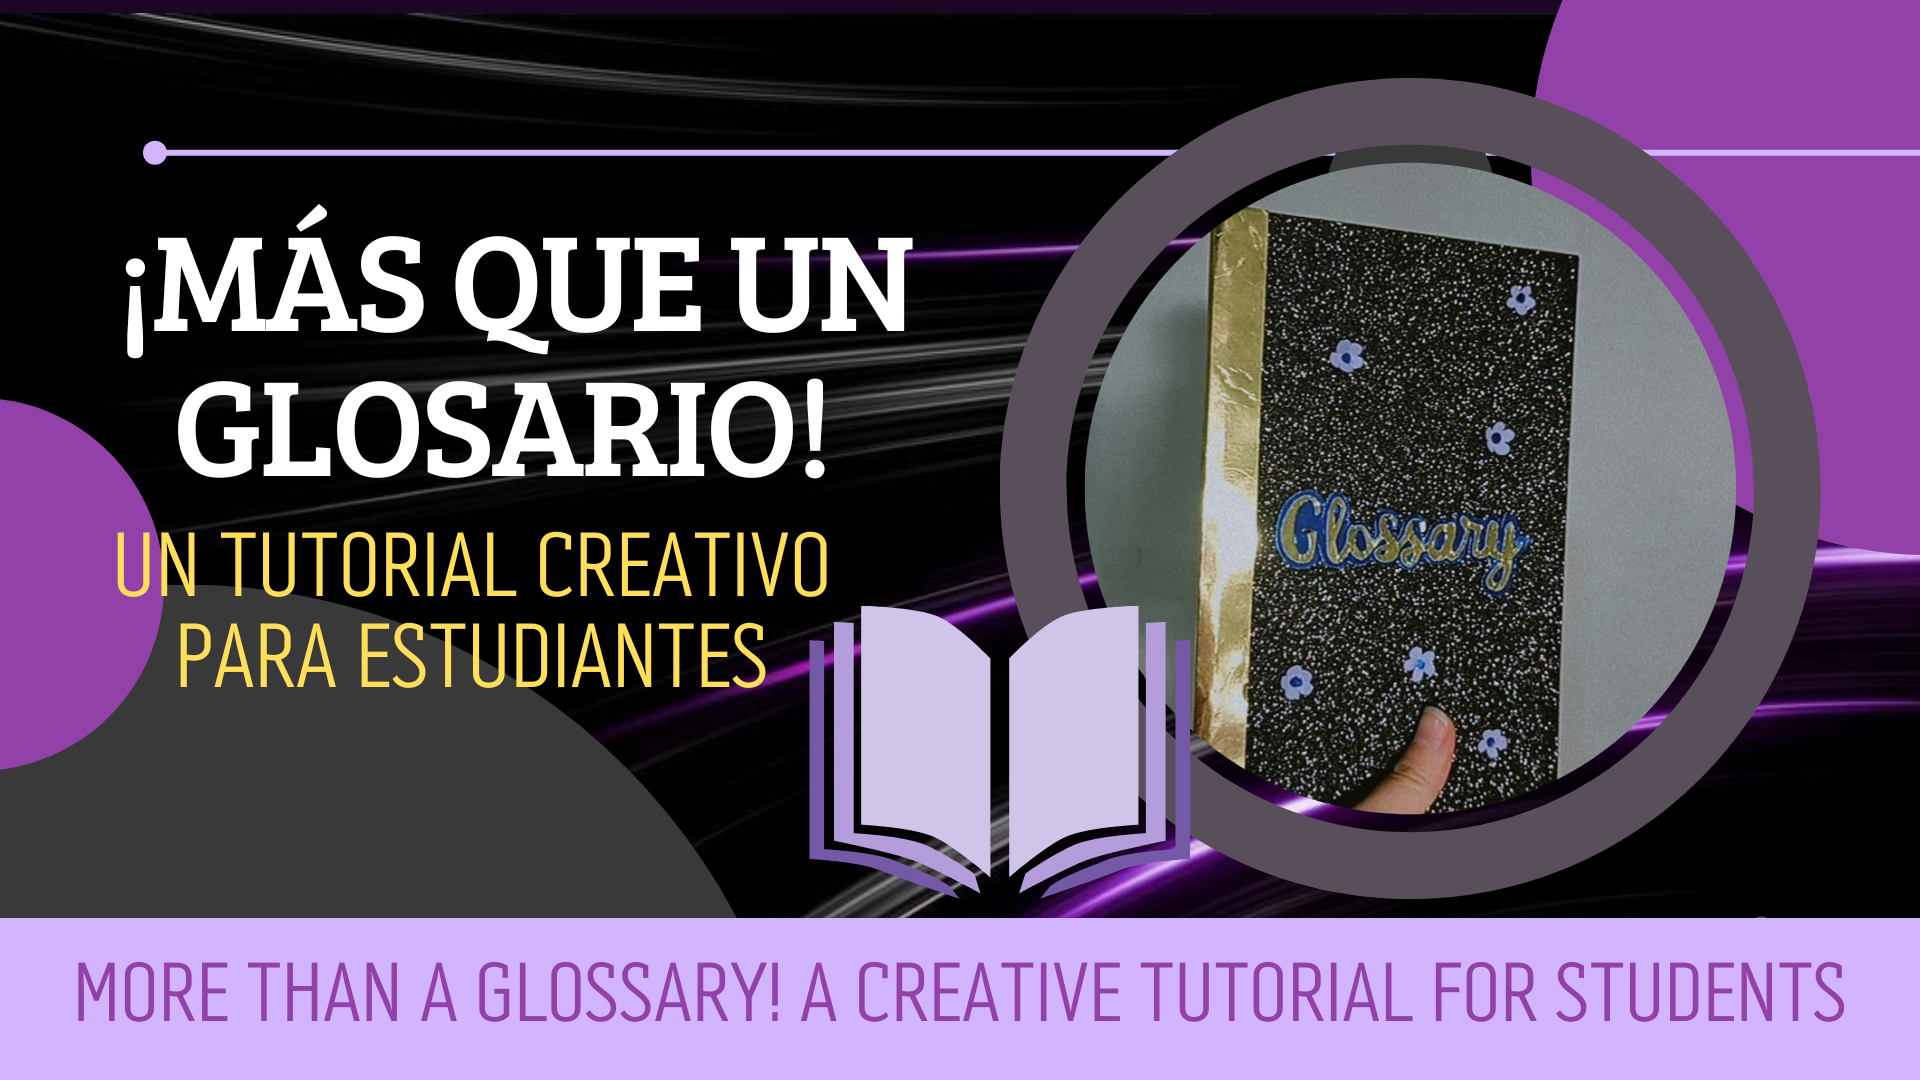
Bienvenidos a un nuevo DIY familia, deseo que este mes nos vaya bonito todos, y que los días restantes y el siguiente año, sean prósperos, felices y compartamos siempre en familia.♡
Welcome to a new DIY family, I wish that this month goes beautifully for all of us, and that the remaining days and the following year, be prosperous, happy and always share as a family.♡
En está oportunidad, les tengo un tutorial de cómo armé un pequeño glosario de inglés, estilo libro, que quedó espectacular, es una idea sencilla, fácil y rápida de hacer, sin duda, el resultado es espectacular y vale la pena, nada mejor que una buena presentación para nuestras asignaciones. Así, continuo mostrando a todos este proceso de elaboración paso a paso, que les preparé con mucho amor.♡
This time, I have a tutorial on how I put together a small English glossary, book style, which was spectacular, it is a simple idea, easy and quick to do, no doubt, the result is spectacular and worth it, nothing better than a good presentation for our assignments. So, I continue showing everyone this step by step elaboration process, which I prepared for you with a lot of love.
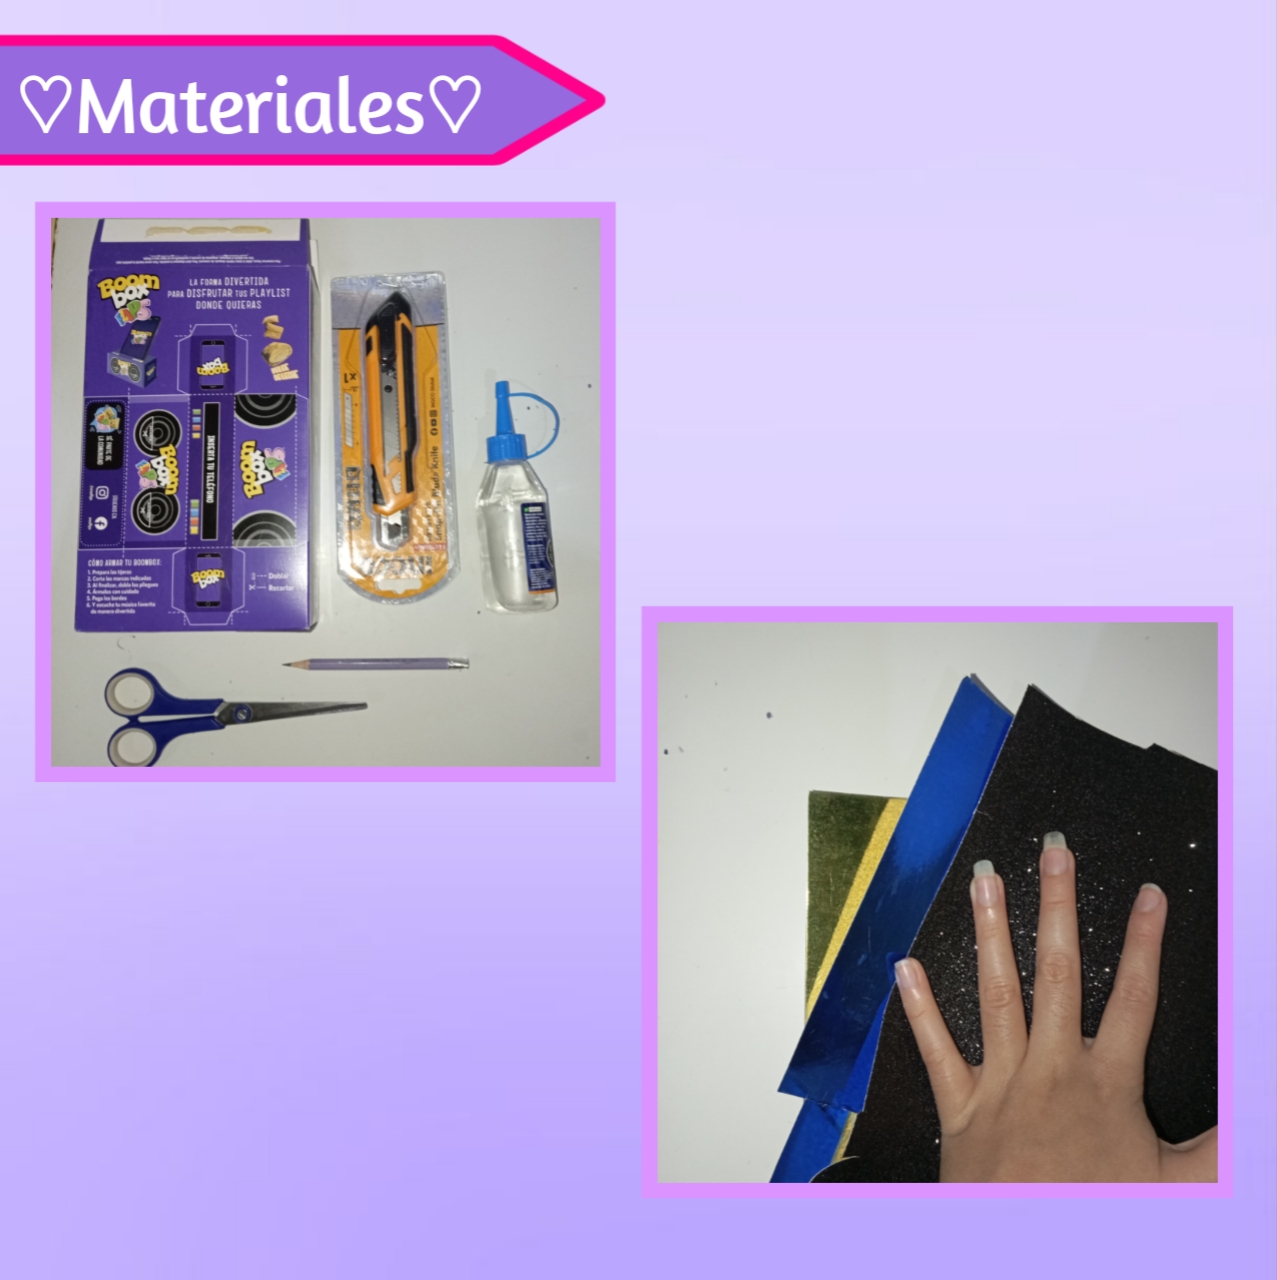
♡🖤✨Materials✨🖤♡
- Cartulinas decoradas
- Cartón Reciclado
- Cutter
- Tijeras
- Silicón
- Pegamento/Pega blanca
- Lápiz
- Decorated cardboard
- Recycled cardboard
- Cutter
- Scissors
- Silicone
- Glue/white glue
- Pencil
♡🖤✨Step by Step✨🖤♡
Paso 1:
Step 1:
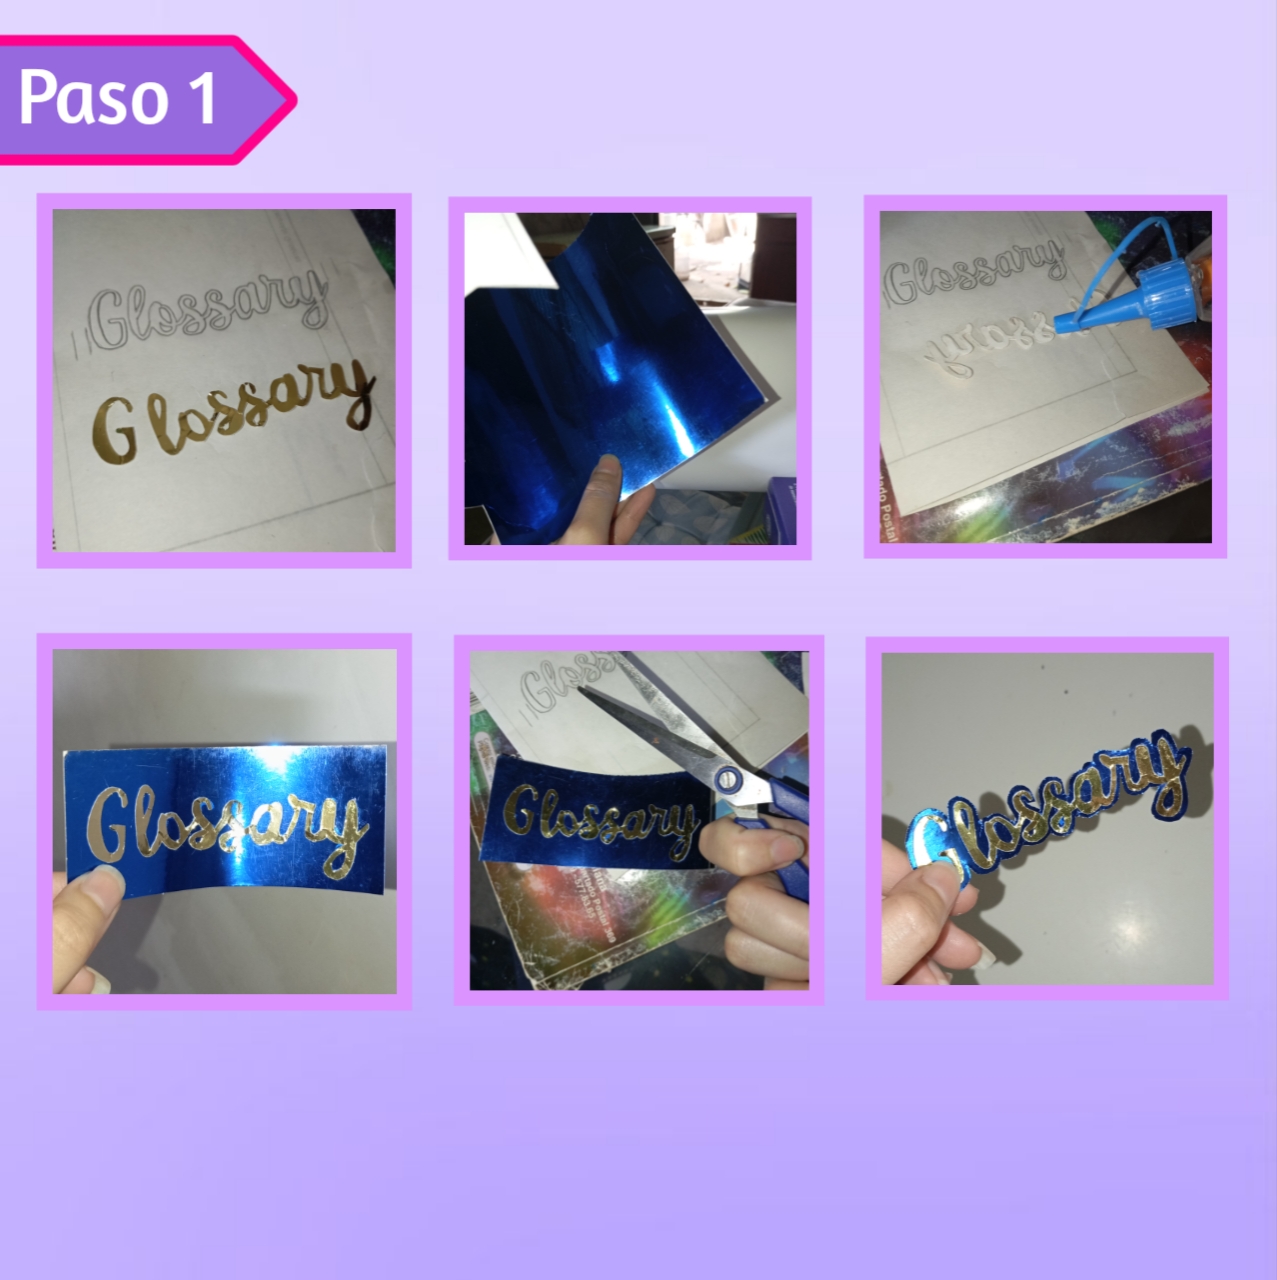
Para comenzar, saque la plantilla de la palabra "Glossary", en cursiva, así pase el diseño al revés en la parte trasera de la cartulina, antes la palabra debe ser remarcada y luego repasar cuando esté bien posicionada con la parte de atrás de una tijera. Luego recortamos, le agregamos silicón en la parte de atrás de la palabra y la pegamos sobre la otra cartulina, así luego recortamos y apartamos la palabra para ahorita agregarla a la carátula.
To begin, take out the template of the word "Glossary", in italics, and then turn the design upside down on the back of the cardboard, first the word must be highlighted and then go over it when it is well positioned with the back of a scissors. Then we cut it out, add silicone on the back of the word and glue it on the other cardboard, then we cut it out and put the word aside to add it to the cover.
Paso 2:
Step 2:
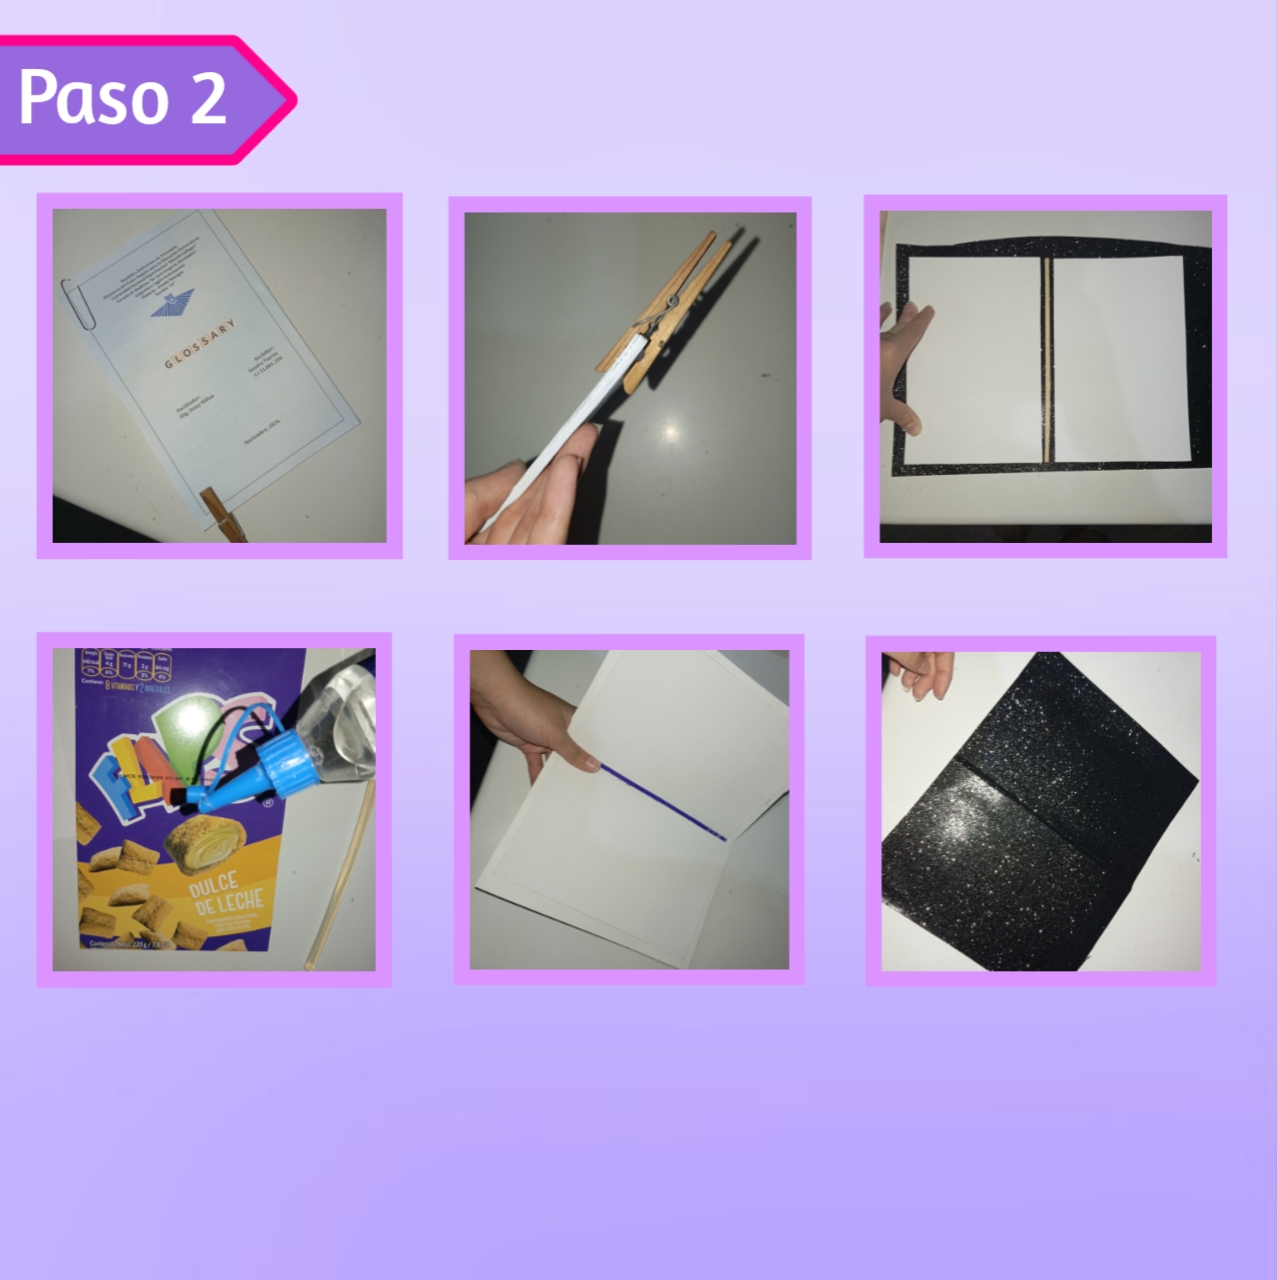
Por otro lado, fui armando el mini libro, así recorte cada una de las páginas, dividiéndo la hoja a la mitad, organicé las páginas una detrás de otra, acomode estás al ras, luego sostuve con una pinza y un clip (con otra pinza sería mejor), así agregué una pequeña cantidad de pega blanca por todo ese lado y lo deje secando.
On the other hand, I was assembling the mini book, so I cut out each one of the pages, dividing the sheet in half, organized the pages one after the other, arranged them flush, then held them with a clamp and a paper clip (with another clamp would be better), added a small amount of white glue all over that side and let it dry.
Continúe, recortando dos rectángulos, cuya medida es 0.5mm más grande que las hojas, también recorte una tira de cartón un poquito más gruesa que el lomo del libro, luego puse las piezas encima de la cartulina, y recorte la medida que iba a usar, agregué silicón a las apartes y pegue en la pared interior de la cartulina muy bien, también remarque los dobleces.
I continued, cutting out two rectangles, whose measure is 0.5mm bigger than the leaves, I also cut a strip of cardboard a little bit thicker than the spine of the book, then I put the pieces on top of the cardboard, and cut out the measure I was going to use, I added silicone to the sections and glued them on the inside wall of the cardboard very well, I also marked the folds.
Paso 3:
Step 3:
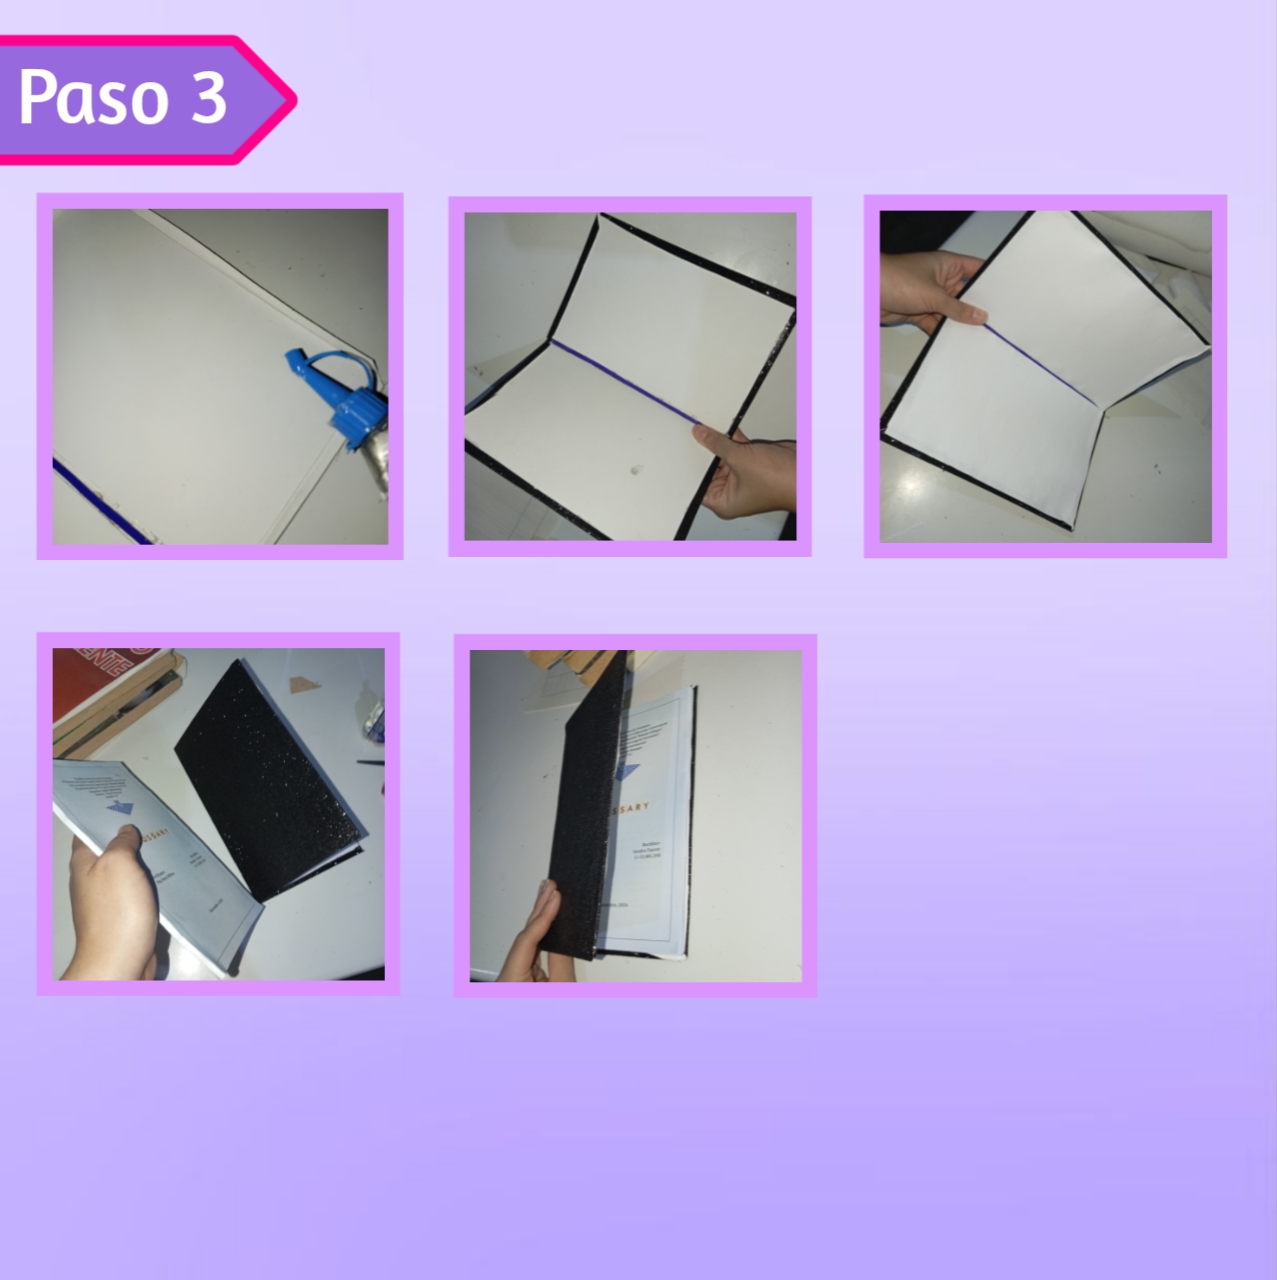
Para continuar, agregué silicón en los bordes internos corté las esquinas de la cartulina y doble hacia adentro, sellando el forrado, después para que se vea más prolijo, recorte dos rectángulos en cartulina blanca y pegue encima. De esta forma, agregue silicón en el lomo del libro y lo pegué a la carátula sosteniendo unos cuantos segundos hasta que se pegara bien.
To continue, I added silicone to the inside edges, cut the corners of the cardboard and folded inwards, sealing the lining, then to make it look neater, I cut out two rectangles of white cardboard and glued on top. In this way, I added silicone to the spine of the book and glued it to the cover, holding it for a few seconds until it stuck well.
Paso 4:
Step 4:
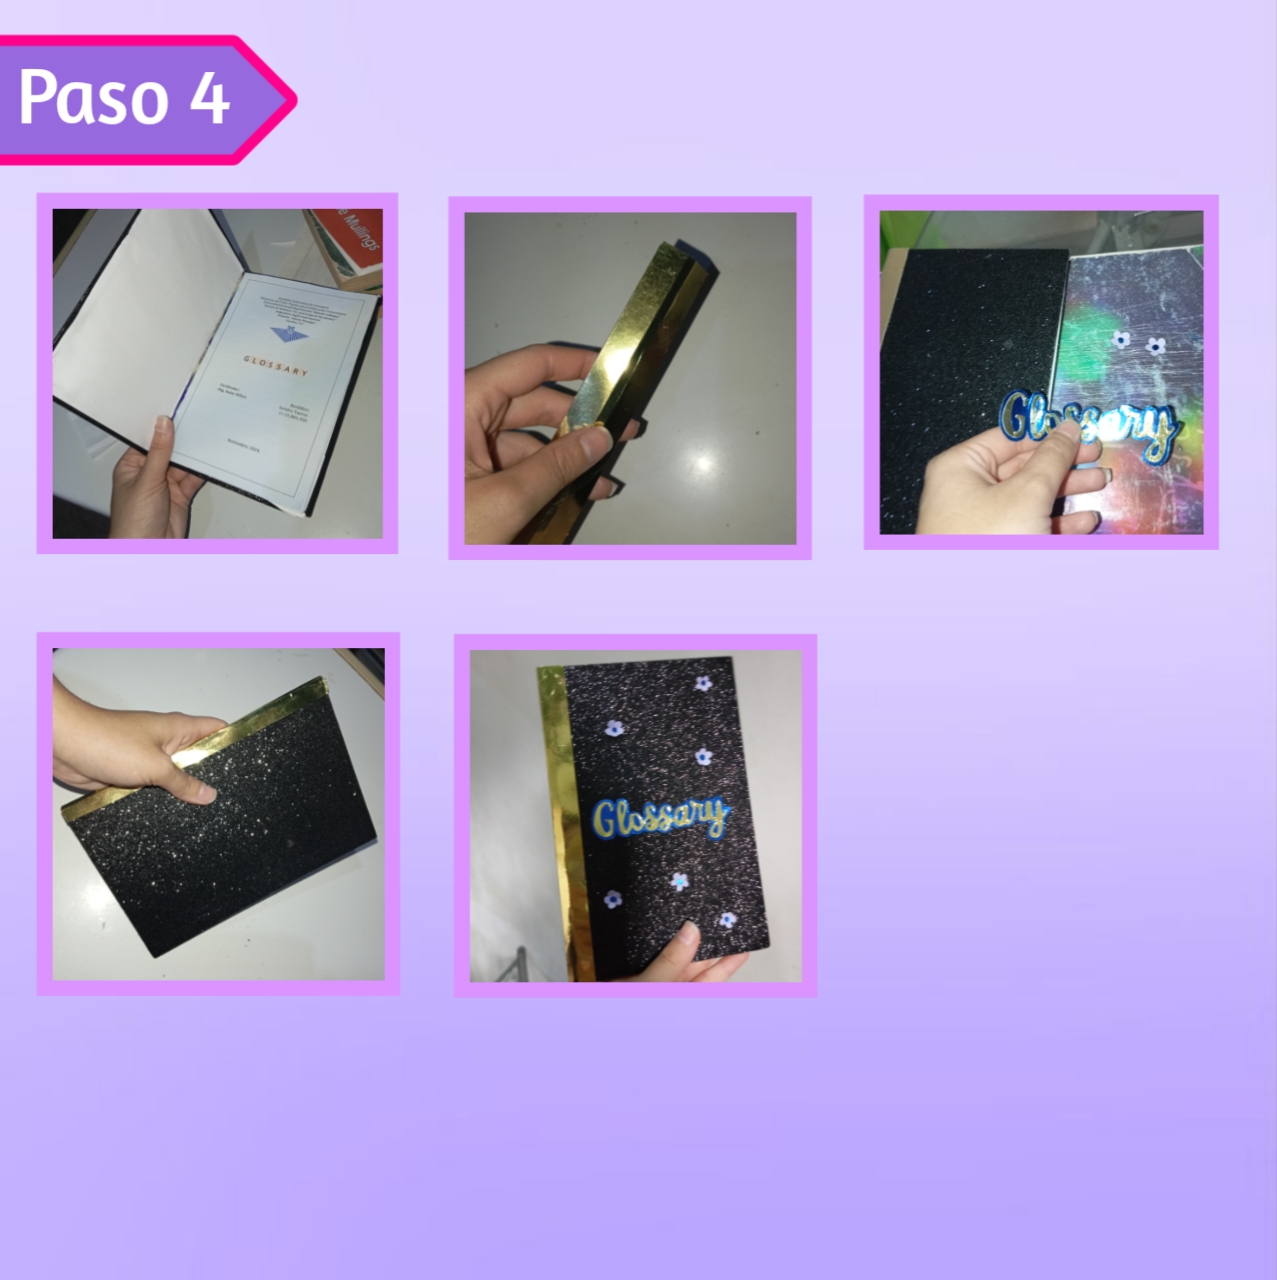
Por último, solo nos queda agregar la decoración a nuestro gusto, recorte una tira en cartulina dorada de 5 o 6 cm de ancho aproximadamente, le hice los dobleces y lo pegué para reforzar el lomo y decorar. Después tomé la palabra que había hecho en capas de cartulina, le agregué silicón y la pegué encima de la carátula. Así, el toque final que le puse fueron pequeñas flores en color lila, alrededor de la carátula, estás salteadas, el resultado me encantó.
Finally, we only have to add the decoration to our liking, I cut a strip of gold cardboard about 5 or 6 cm wide, made the folds and glued it to reinforce the spine and decorate. Then I took the word I had made in layers of cardboard, added silicone and glued it on top of the cover. The final touch I added were small flowers in lilac color, around the cover, these were dotted, I loved the result.
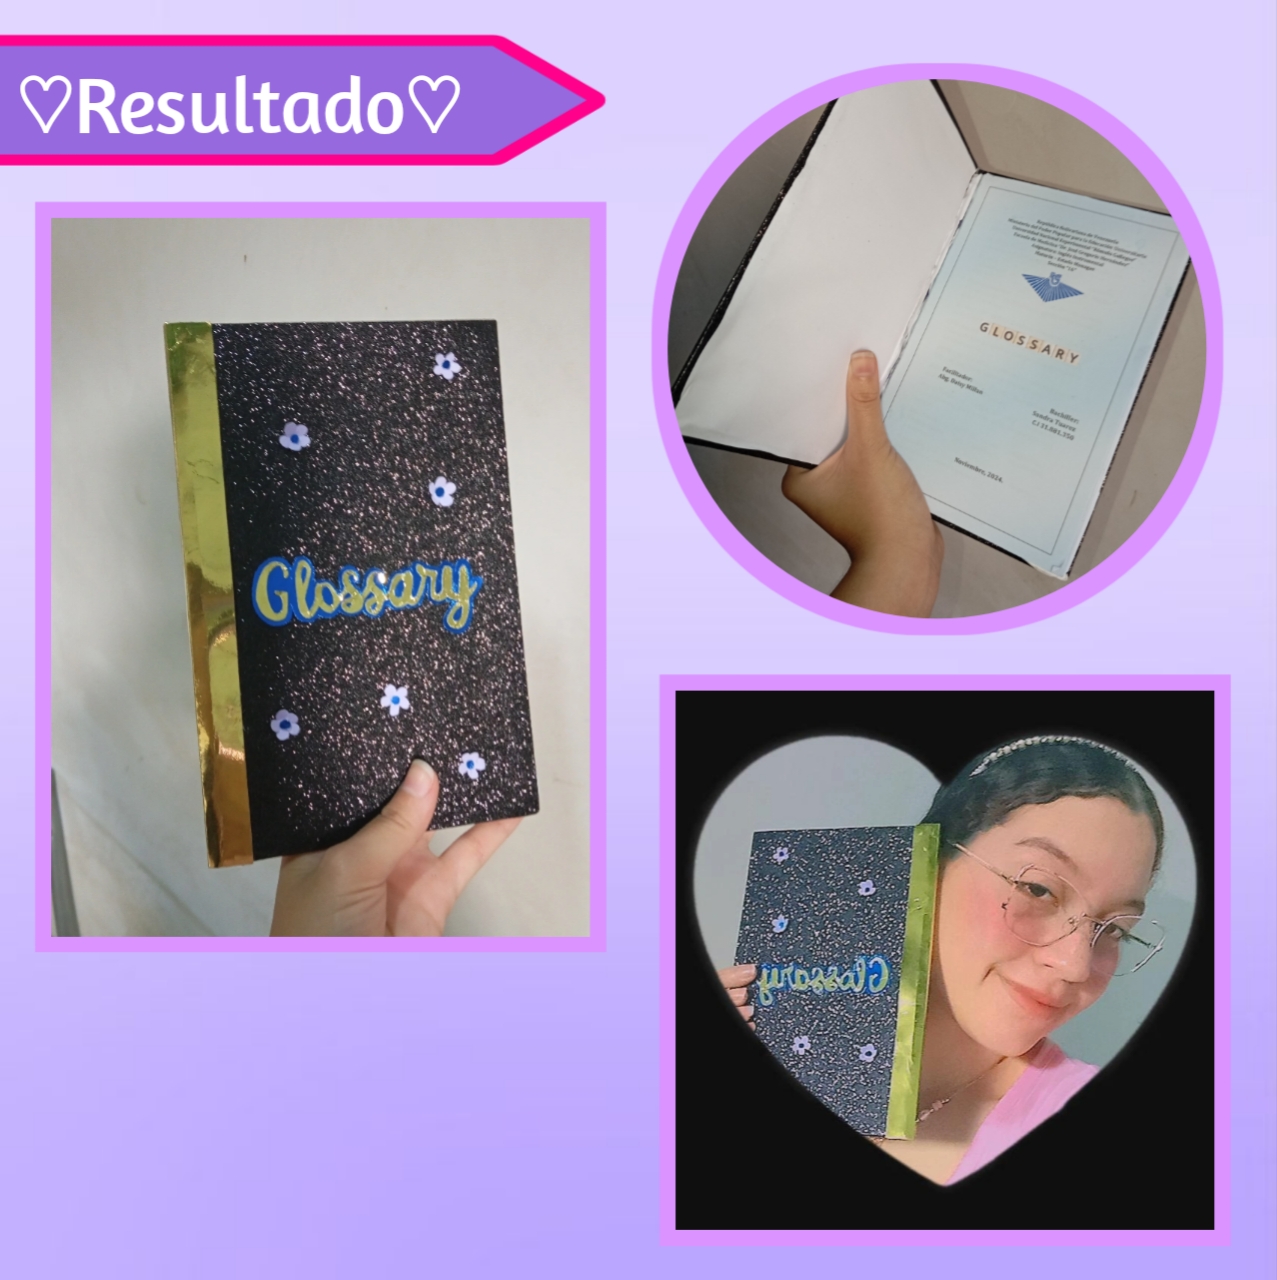
Así es como nos queda nuestro pequeño librito, ideal para hacer glosarios o trabajos creativos, los podemos decorar a nuestro gusto, variar colores y materiales. En lo personal el resultado Me fascinó, es una idea sencilla, fácil y rápida, pero sobre todo, el resultado es elegante y muy hermoso, esta idea nos puede sacar de puros en cualquier ocasión y a la vez mantener la creatividad y un trabajo espectacular.🖤✨
This is how we get our little book, ideal for glossaries or creative work, we can decorate them to our liking, varying colors and materials. Personally I was fascinated by the result, it is a simple, easy and quick idea, but above all, the result is elegant and very beautiful, this idea can get us out of cigars on any occasion and at the same time maintain creativity and a spectacular work.🖤✨
Así es como llegamos al final de este tutorial paso a paso, espero les haya gustado y les sea de utilidad para alguna tarea, trabajo o incluso para alguna manualidad creativa libre, es bonito dar buena apariencia y presentación a nuestros trabajos. Les agradezco llegar hasta el final y acompañarme en un nuevo tutorial, pronto les estaré compartiendo las manualidades navideñas que estaré elaborado y unas que ya hice, Dios mediante ¡Felíz sábado!🎄💚✨
This is how we reached the end of this step by step tutorial, I hope you liked it and that it will be useful for any task, work or even for any free creative craft, it is nice to give good appearance and presentation to our work. Thank you for coming to the end and join me in a new tutorial, soon I will be sharing with you the Christmas crafts that I will be making and some that I have already made, God willing, Happy Saturday!🎄💚✨
🖤✨Gracias por leer familia, hasta la próxima aventura✨🖤
🖤✨Thanks for reading family, see you next adventure✨🖤
Photos of my authorship taken from my Xiaomi Redmi 13C phone, edited in the free version of Canva and PixelLab.✨
Congratulations @stefania16! You have completed the following achievement on the Hive blockchain And have been rewarded with New badge(s)
Your next target is to reach 300 posts.
You can view your badges on your board and compare yourself to others in the Ranking
If you no longer want to receive notifications, reply to this comment with the word
STOPCheck out our last posts:
The final result is lovely and this glossary would be super useful. Awesome job friend and thank you for the detailed tutorial.
Que lindo, te quedo muy bien trabajado.
Te quedó muy lindo el trabajo 😊
Me encanta, te ha quedado hermoso, el dorado con negro lo hace lucir elegante.
Aprovecho la ocasión de dejarte la actualización de las reglas para publicar en Hive DIY, de modo que las que falten las apliques en tu siguiente publicación.
https://peakd.com/hive-130560/@hive-130560/actualizacion-de-nuestras-reglas-en-la-comunidad-updating-our-community-rules-espeng
Tambien puedes dar un vistazo las formas que puedes invertir en tu comunidad artesana y recibir retribución por ello.
https://peakd.com/hive-130560/@hive-130560/unete-y-se-parte-de-hive-diy-invirtiendo-join-and-be-a-part-of-hive-diy-by-investing-espeng