✦ Ideal for sewing amateurs, this is an effective and inexpensive way to achieve an incredible fit! - Collage & Edition in FotoJet and remove.bg, photos by @Tesmoforia ✦

🇪🇸 ~ Mi gran batalla sobre los pantalones por ajustar en la cintura ha llegado a su fin.
Por muchos años Dios sabe cuántos pantalones de tiro alto he dañado tratando de modificarlos para que me queden:
Haciendo pinzas que terminan no solo viéndose feas sino que son súper incómodas contra la piel, cosiendo elástico que deforma la forma del jean, y haciendo canales para cintas que solo amontonaban horriblemente la tela.
Y aunque me estoy divorciando de los pantalones para entrar en mi era de vestidos y faldas largas, ¡HE ENCONTRADO EL MÉTODO 100% EFECTIVO PARA LOGRAR EL AJUSTE IDEAL!
✨ Un ajuste cómodo, una modificación limpia, y por fin, ¡una instalación de elástico que no baila ni se deforma! ✨
🇺🇸 ~ My great battle over pants that fit at the waist has come to an end.
For many years God knows how many high-waisted pants I've damaged trying to modify them to fit me:
Making pin-ups that not only look ugly but are super uncomfortable on the skin, sewing elastic that warps the shape of the jean, and making channels for ribbons that just bunch up the fabric horribly.
And even though I'm divorcing pants to enter my era of dresses and long skirts, I HAVE FOUND THE 100% EFFECTIVE METHOD TO GET THE IDEAL FIT!
✨ A comfortable fit, a clean modification, and finally, a stretch installation that won't dance or warp! ✨
✦ "¿Por qué realizar este proyecto?" ✦
Esta es una manera efectiva y económica de lograr un ajuste correcto en prendas que te gustan mucho pero no se adaptan a tu silueta. También es un método que puedes utilizar para ayudar a amigos y familiares con sus prendas.
⏳ Tiempo: ⭐⭐⭐/ 5.
🚀 Dificultad: ⭐⭐/ 5.
🪙 Costo aproximado: ⭐⭐/ 5.
✦ "Why do this project?" ✦
This is an effective and economical way to get a correct fit* on garments that you really like but don't fit your silhouette. It is also a method you can use to help friends and family with their clothing.
⏳ Time: ⭐⭐⭐/ 5.
🚀 Difficulty: ⭐⭐/ 5.
🪙 Approximate cost: ⭐⭐/ 5.

« 𝕋 𝕆 𝕆 𝕃 𝕊 • 𝔸 ℕ 𝔻 • 𝕄 𝔸 𝕋 𝔼 ℝ 𝕀 𝔸 𝕃 𝕊 »
 |
|---|
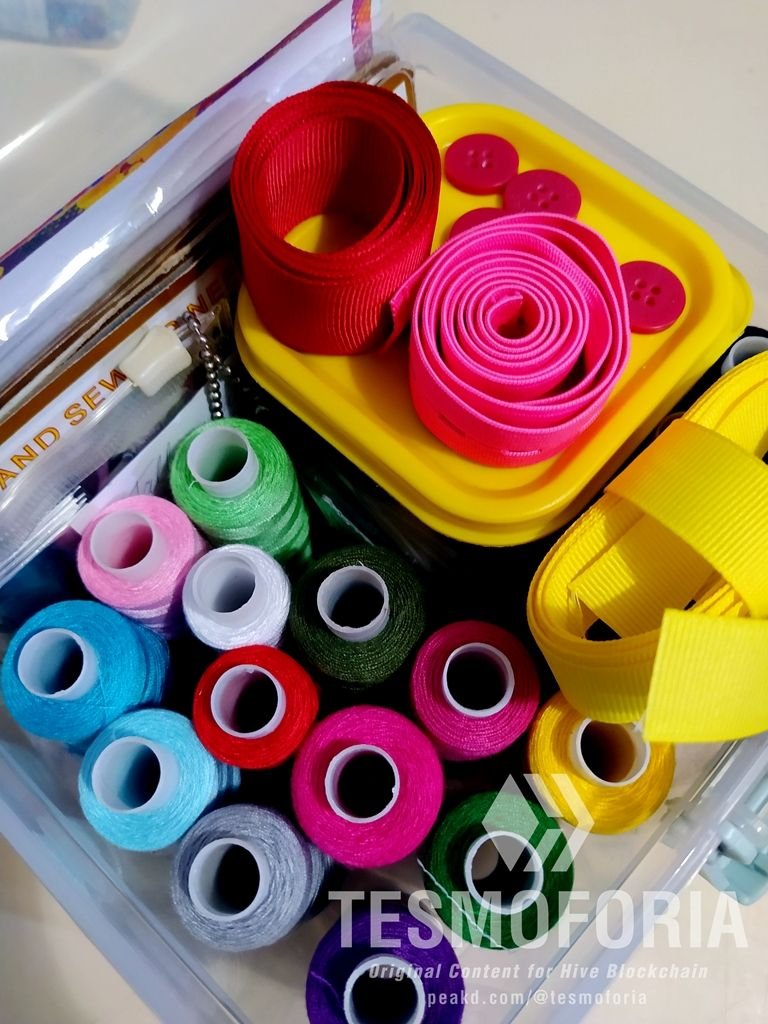
| 🇪🇸 ✦ Las herramientas y materiales que necesitas para elaborar este proyecto son: Pantalón jean, hilo, botones, cinta elástica con ojales, aguja regular, maquina de coser, cinta métrica, regla, bolígrafo, descosedor, plancha para ropa, alfileres, pinzas de costura, 1 imperdible o 1 clip para papel. |
| 🇺🇸 ✦ The tools and materials you need to make this project are: Jeans, thread, buttons, elastic band with eyelets, regular needle, sewing machine, measuring tape, ruler, pen, unstitcher, clothes iron, pins, sewing clothespins, 1 safety pin or 1 paper clip. |
• ℙ ℝ 𝕆 𝕐 𝔼 ℂ 𝕋 •
« "How to get a perfect fit in the waistband of your jeans without undoing them" »

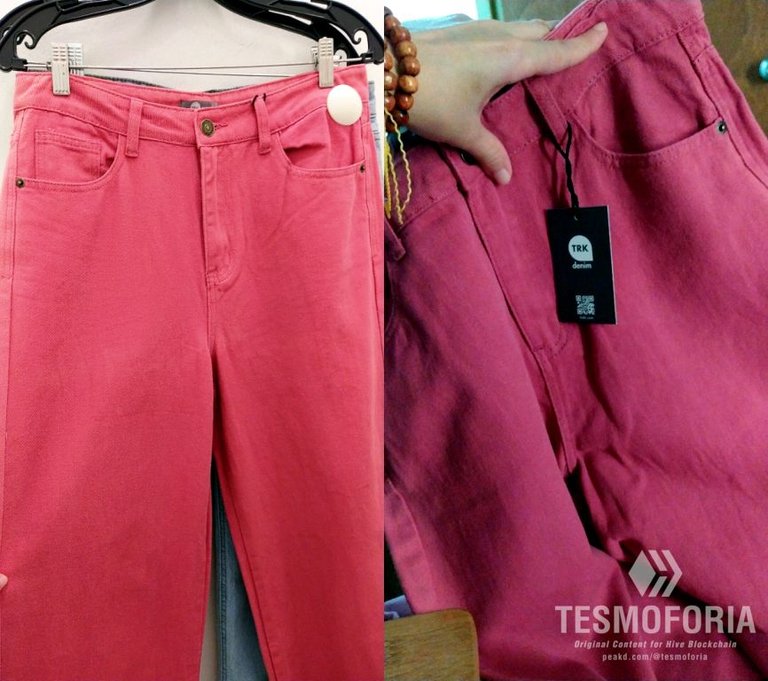
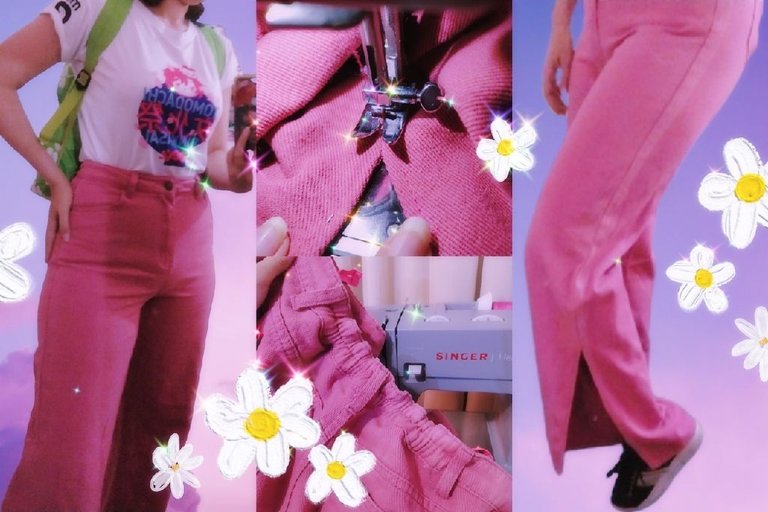
✦ I was in a very popular department store in town and there were ridiculously cheap deals. I LOVE the color of these pants but they were only a size 8 and they fit me well in the hips but huge in the waist, they fall down. It's also the first wide boot pant I've ever bought, a style I'm not used to ✦
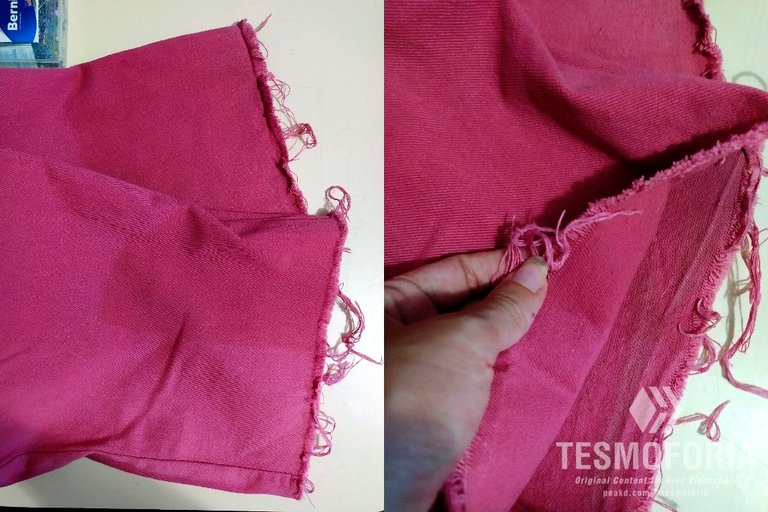
✦ Also, the bottom was a bit saggy and I hate torn or faded clothes. So before I adjusted the waist, I wanted to fix that part to my liking ✦
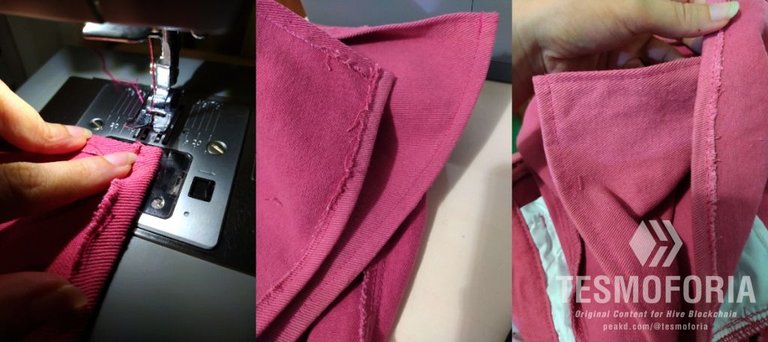
【 PASO 1 】 Antes del ajuste principal de la pretina, vamos a cortar el excedente de tela de las piernas a nuestra altura y hacer una abertura por motivos fashionistas. También aunque muy personalmente, no me gusta la moda que simula estar rota, por eso lo primero que hice fue cortar toda esa sección.
【 STEP 1 】 Before the main waistband adjustment, we cut the excess fabric off the legs at our height and make a slit for fashionista reasons. Also, though very personally, I don't like fashion that pretends to be torn, so the first thing I did was cut off that whole section.

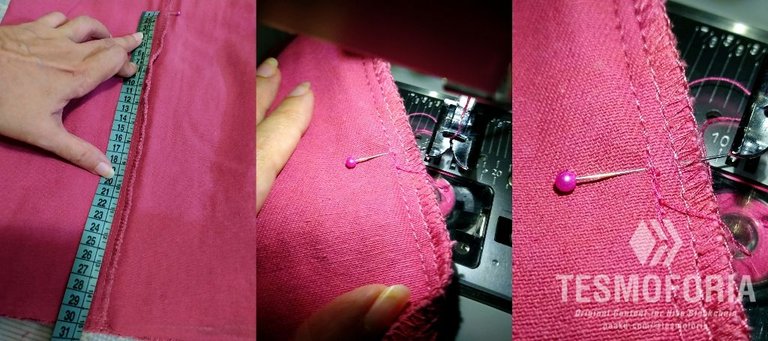
✦ Turn the pants inside out and mark the seam corresponding to the outer part of each leg at 30 cm, mark it with a pin and sew a double safety seam with the sewing machine ✦
✦ Open the seam very carefully with a seam ripper, stopping at the safety seam you made earlier ✦
✦ Clean all loose threads with the scissors ✦
✦ Fold this opening inward and secure with small pins ✦
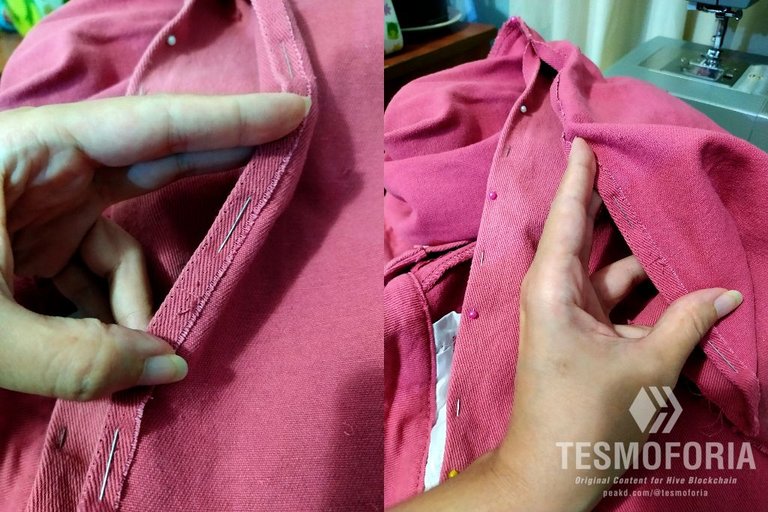
✦ Repeat the same sequence with the other leg ✦
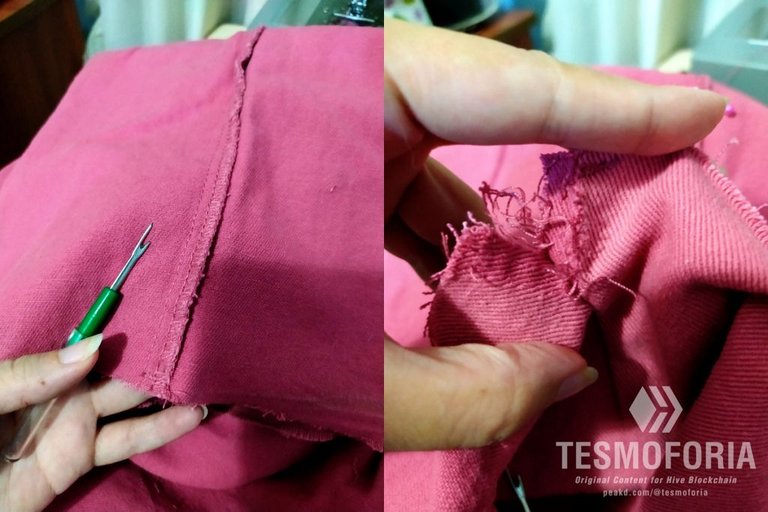
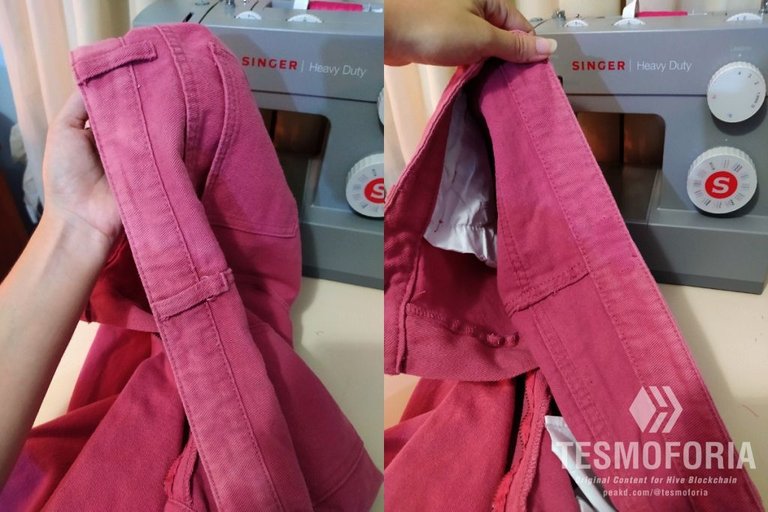
【 PASO 2 】 Ahora para elaborar las aberturas, antes de coser el ruedo de las botas, en la costura que mira hacia el lado exterior de cada pierna vas a marcar la altura máxima donde quieres que llegue las aberturas. Puedes hacer una costura de seguridad a mano o con la máquina de coser, y luego con ayuda del descosedor vas a abrir la costura original de cada pierna. Asegura todos los ruedos con alfileres.
【 STEP 2 】 Now, to make the openings, before sewing the hem of the boots, mark the maximum height where you want the openings to be on the seam facing the outside of each leg. You can make a safety seam by hand or machine and then use the unstitching device to open the original seam of each leg. Secure all hems with pins.
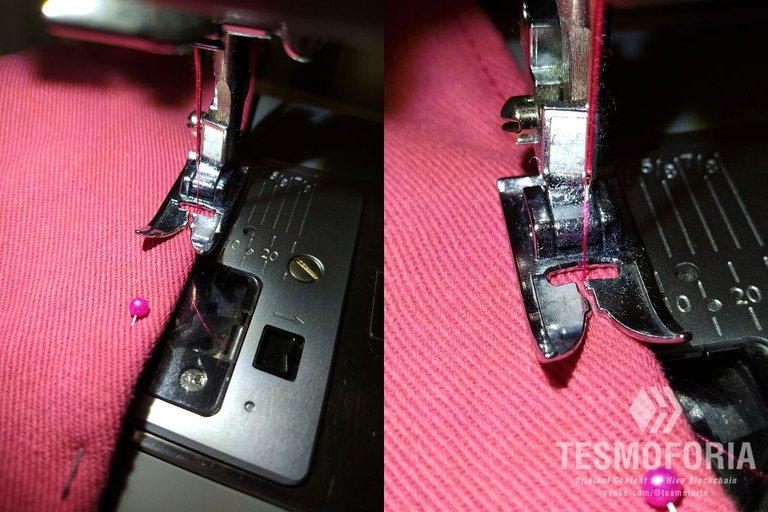
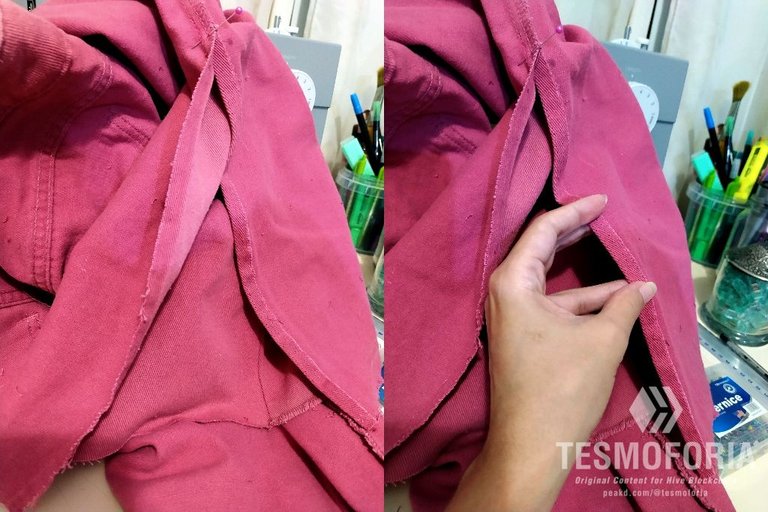
✦ Use a number 4 straight stitch and a number 16 needle ✦
✦ The trick to making it look nice is to bring the seam in a straight line until it touches the original seam of the pants ✦
✦ Without removing the needle, turn the trousers and continue sewing until you reach the final hem of the trousers ✦
✦ Now you can sew the end of the pants ✦
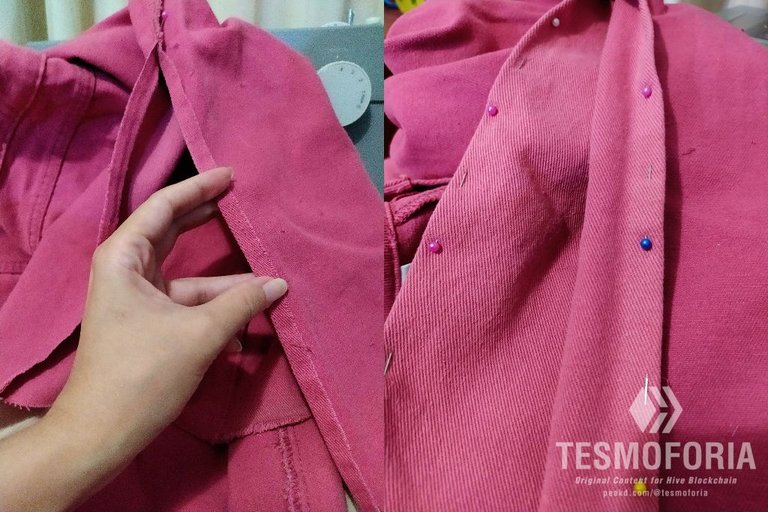
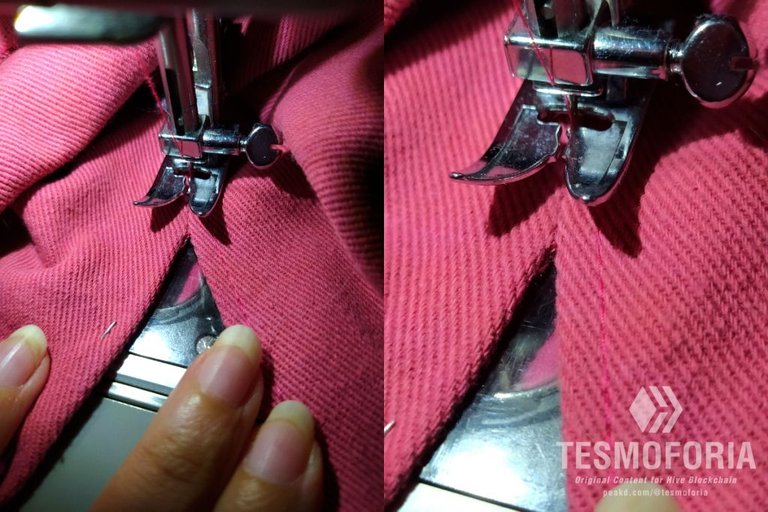
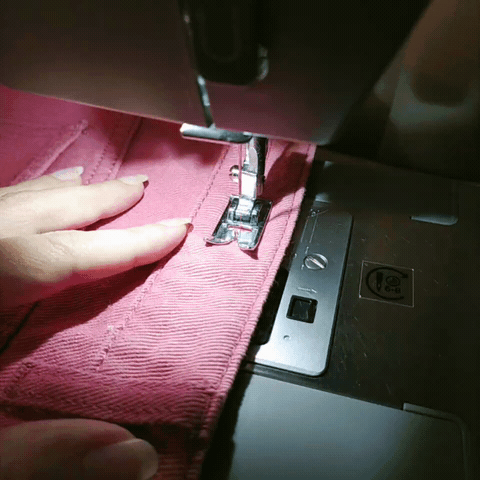
【 PASO 3 】 Lleva a la máquina de coser con puntada número 3.5 o 4, y utiliza una aguja número 16 o 18, y cose todo el borde de las aberturas y el final de cada bota con una puntada recta. Utiliza hilo del color más cercano posible al color del jean.
【 STEP 3 】 On a sewing machine with size 3.5 or 4 and a size 16 or 18 needle, sew a straight stitch around the edge of the openings and the end of each boot. Use thread as close to the color of the jeans as possible.
✦ Let's iron a little waistband before we start ✦
✦ We stop right at the center strap pass, lift the machine foot, cut the thread, move the strap pass, place it on top of the seam where you finished, and continue to the next strap pass ✦
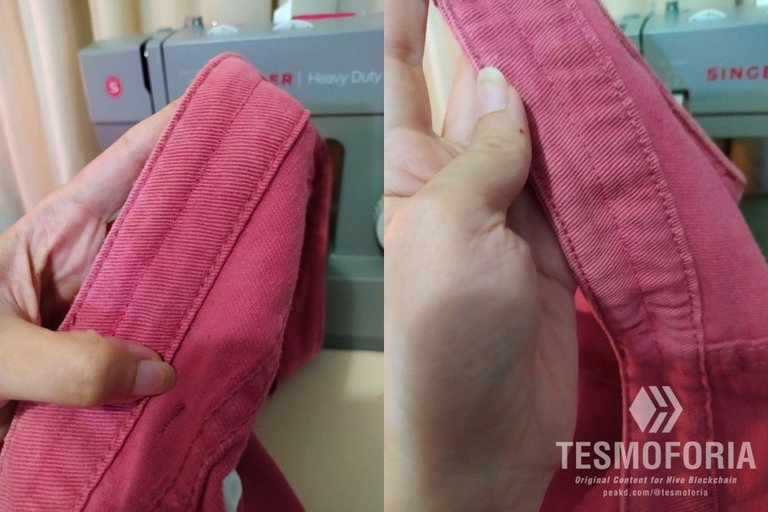
✦ 💕 This is how it should look 💕 ✦
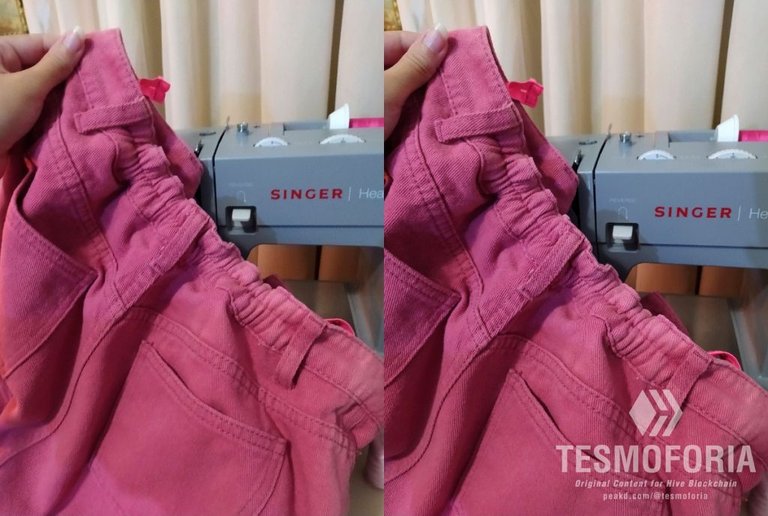
【 PASO 4 】 ¡AHORA SÍ! PARA LA PRETINA: Vamos a elaborar 2 canales haciendo una costura recta en todo el centro de la cintura de pantalón, solamente en la parte posterior, y que coincida con el centro de los pasadores de correa de la espalda.
【 STEP 4 】 NOW IT'S ON! FOR THE WAISTBAND: Let's draw up 2 channels by making a straight seam all the way down the center of the pant waistband, **only in the back, and matching the center of the back strap pins.
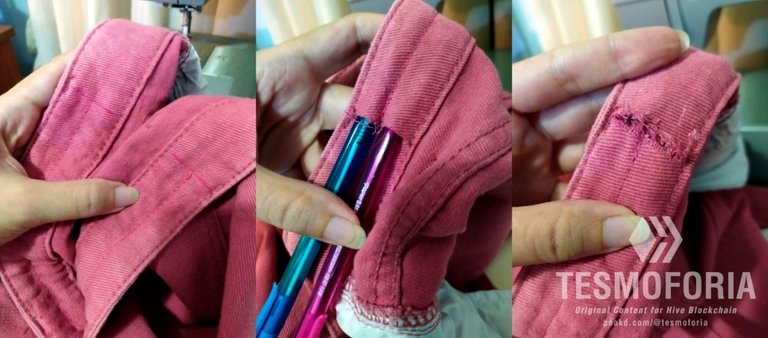
✦ With the unstitcher we will make 2 openings to make 2 buttonholes, opening carefully so as not to mistreat the fabric which frays very easily ✦
✦ Charge a needle with a double strand of thread and make a 2 eyelets by hand at the end of the canals ✦

✦ Cut 2 strips of elastic with eyelets and take 4 buttons ✦
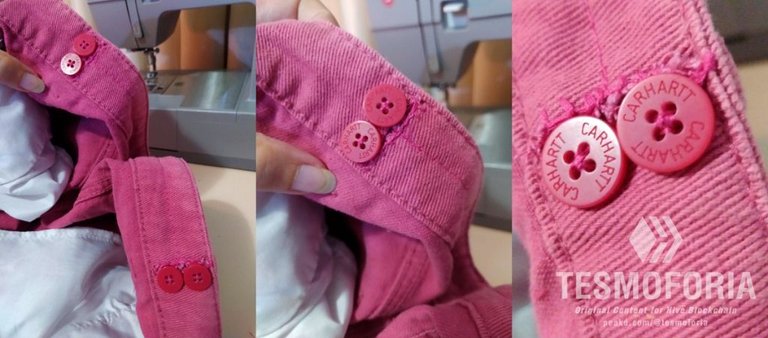
✦ Sew the buttons at the end of the buttonholes as shown in the reference photos ✦
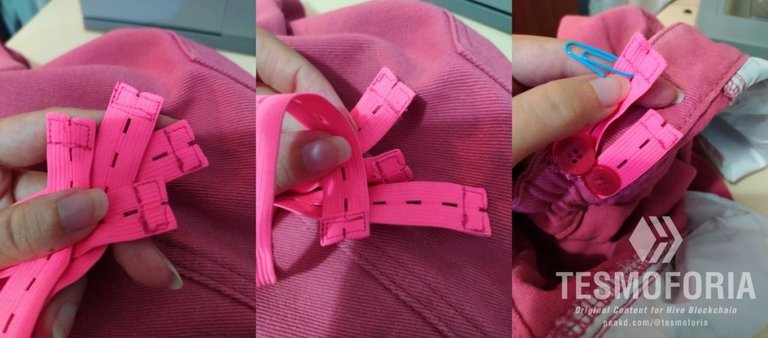
✦ Secure with the sewing machine some safety tabs on the elastic straps as shown in the pictures ✦
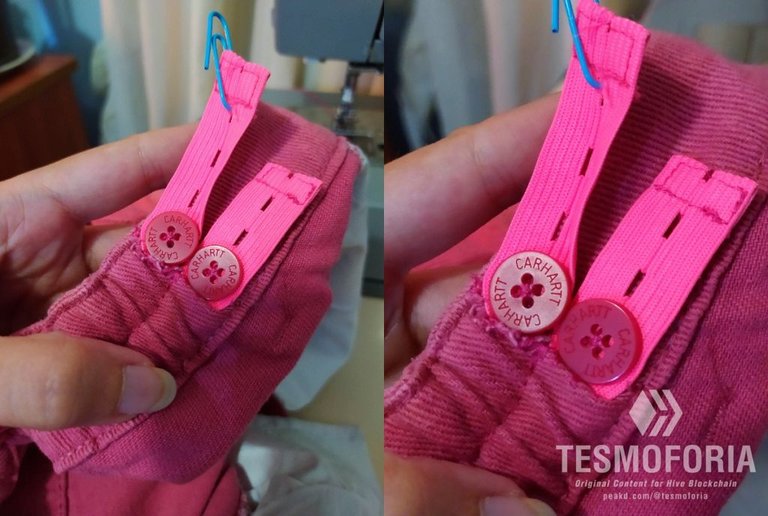
✦ Using a paper clip, thread the rubber bands through the channels one at a time ✦
✦ Adjust the buttons on the elastic eyelets of your choice! ✦
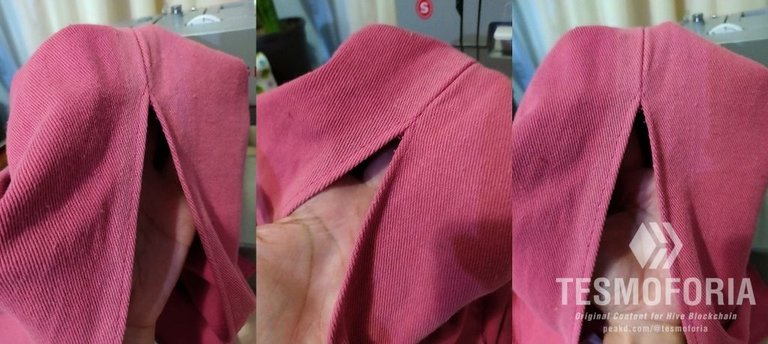
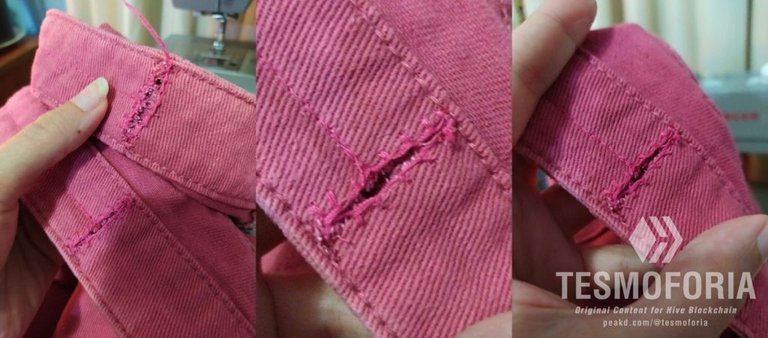
【 PASO 5 】 A continuación, elabora unos cortes grandes pero con mucho cuidado lo mas cerca posible del final de la costura de seguridad de los canales que has creado, y con aguja e hilo a mano elabora ojales con suficiente hilo. Cose 1 botón frente al final de cada canal, y pasa 1 tira de elástico en cada una con ayuda de un imperdible o un clip de papel. ¡Ajusta en la medida de tu preferencia y listo!
【 STEP 5 】 Next, make large but very careful cuts as close as possible to the end of the safety stitching of the channels you have created, and with needle and thread by hand make buttonholes with plenty of thread. Sew 1 button in front of the end of each channel and thread 1 strip of elastic through each using a safety pin or paper clip. Adjust to the size of your choice and you're done!
« ℂ 𝕆 𝕄 ℙ 𝕃 𝔼 𝕋 𝔼 • ℙ ℝ 𝕆 𝕁 𝔼 ℂ 𝕋 »
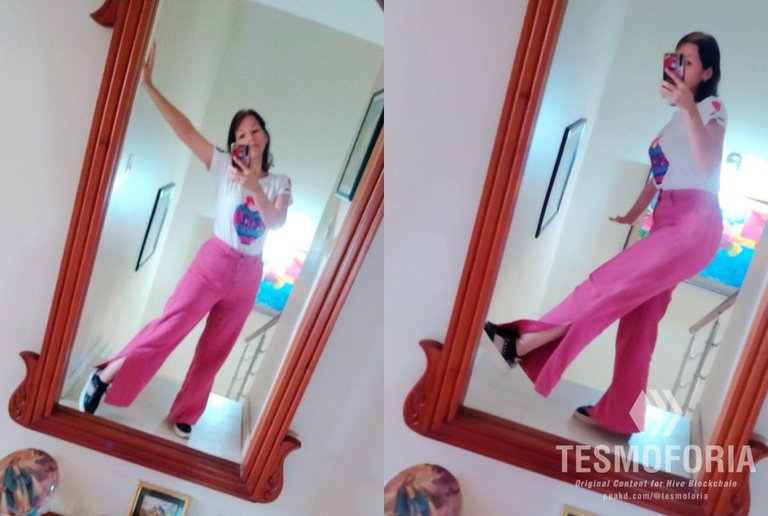
✦ I am crazy about the color of these pants! It's not pink, it's not pastel, it's not brick, it's not magenta, it's COLOR GUAYABAAAA! ✦
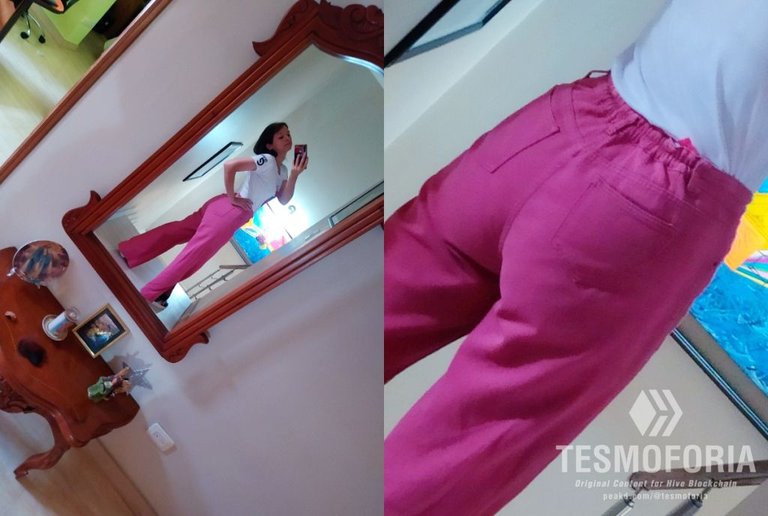
✦ They're very comfortable and although it's not my current style of dress, I like having something nice to wear when I have a busy day and little time to dress up. Although I have to say it makes me look heavier than I am, hahaha! (check out the comments) ✦
 |  | |
|---|
『 Resumen 』~ Es posible lograr un ajuste bonito en la cintura de pantalones jeans sin necesidad de pinzas o desarmar le prenda. Esta es una forma de modificación no agresiva, económica y efectiva.
『 Recomendaciones Finales 』~ Para un resultado ULTRA LINDO, utiliza hilo, elástica y botones del color mas parecido al pantalón que puedas conseguir.
『 Summary 』~ It is possible to achieve a nice fit in the waistband of jeans without using darts or disassembling the garment. This is a non-aggressive, economical and effective method of alteration.
『 Final Tips 』~ For an ULTRA CUTE result, use thread, elastic and buttons as close to the color of the pants as possible.

 |  |  |  |  |  |  |  |  |
|---|
✨ 🍓 All texts and images by @Tesmoforia 🍓 ✨
📸 Tools: Smartphone 📲 Snow 🎬 Remini 🌓 FotoJet 📐
🚨 ¡Please do not take, edit or republish my material without my permission! 🚨
💌 ¿Do you wish to contact me? Discord #tesmoforia 💌
🌙 Banner, signature and separators by Keili Lares
Posted Using InLeo Alpha
This picture was taken the same day! This is what I mean when I say that the pants make me look more chubby than I really am xD
Decir que es hermoso sería decir poco. Excelente trabajo.
¡Muchas gracias Edey! | ▽ //)
As always, wonderful work and a great idea. Thank you so much for sharing this great way to adjust your pants without dying in the attempt. Thank you for sharing your step by step and creative process with us. Thank you for sharing your step by step and creative process with us.
Thank you for telling me such nice things! I hope all the staff have a great start of the new year 2025 ~
Siempre encuentro pantalones buenos pero que no me queden.
Además, he perdido mucho peso
Hoy en la mañana, hasta dije, "me quiero enseñar a arreglar pantalones grandes!"
Antes conseguía la ayuda de mi mamá pero entiendo que todos estamos ocupados...
Gracias por esto!
Entonces este post es como una mágica coincidencia jajaja ¡vaya sincronización! Te entiendo muy bien en el tema de perder peso :/ pero todo tiene solución, estoy segura que podras ajustar tus pantalones para que te duren mucho tiempo mas ~
View or trade
BEER.BEERHey @proto26, here is a little bit of from @isnochys for you. Enjoy it!BEER at dCity game to buy cards to rule the world.Did you know that <a href='https://dcity.io/cityyou can use
Thank you for your witness vote!
Have a !BEER on me!
To Opt-Out of my witness beer program just comment STOP below
View or trade
BEER.BEERHey @proto26, here is a little bit of from @isnochys for you. Enjoy it!Do you want to win SOME BEER together with your friends and draw the
BEERKING.Thank you for your witness vote!
Have a !BEER on me!
To Opt-Out of my witness beer program just comment STOP below
Queda muy bien esta forma, la he visto que la hacen en ropas de niños pero no me habìa interesado en como hacerla, justamente tengo un pantalón de mi hermana que necesita arreglarlo, creo que lo tomaré como experimento, espero me salga bien. Gracias por compartir tan buenas ideas.
¡Estoy segura que te saldrá muy bien Yale! Yo dañe muchos pantalones siguiendo otro tipo de tutoriales, en el caso de la elástica, después del primer lavado se enrollaba dentro de la pretina y nunca volvía a verse bonito, por eso se me ocurrió lo de los dos canales y usar una elástica mas pequeñita oxo ¡gracias a ti! ~
Discord Felicitaciones, su publicación ha sido votada por @ dsc-r2cornell. Puedes usar el tag #R2cornell. También, nos puedes encontrar en
Hola lindura, feliz año nuevo. Bendiciones para ti, que este año traiga muchas cosas maravillosas.
Adore esta nueva versión de tu pantalón y lo bien ajustado que te quedo, se ve cómodo, y perfecto con esas aberturas en la bota, me gusta muchísimo.
Muchos abrazos.💞
Feliz Año Nuevo Laura preciosaaaaa ! ! Amen amen, bendiciones para ti también, espero estos primeros días del año vayan super genial para ti, justo estaba paseando por tu blog, y que lindo saber que te gustaron los pantalones omg, ahorita estoy entrando en la onda de modificar mas mi ropa o comprar ropa que pueda ajustar sin ahorcarme, que no me ahogue ; u ; (tu sabes jaja, el trauma del cuerpo latino en jean de cintura demasiado baja o botas demasiado ajustadas) ~
Mucho cariño para ti tambien! (* ^ Ω ^) 人 (^ ω ^ *)
Gracias mi linduraaaaa!!!! ¡Amén!!!.🙏🙏🙏🙏🙏🙏❤️❤️❤️❤️❤️❤️❤️❤️❤️❤️❤️❤️❤️
La idea de modificar, transformar u adaptar un poco más esas prendas a tus exigencias me parece súper, es una de esas cosas que me encanta hacer, tengo algunas prendas que también pienso transformar, para sentirme más cómoda.
Abrazos de gigante y una lluvia de bendiciones para ti.
Muy originales y 100% dicen tu estilo personal, realmente hermoso.
Muchas gracias Yenny cutie patotei ~ ! (☞ ゚ ヮ ゚) ☞ ☜ (゚ ヮ ゚ ☜)
Wow this trouser look so nice. The material is cool. Thanks for sharing
Thanks for your comment @mosupholstery I hope you have a nice day! 💖