✦ Here you will find all the steps you need to make your own Hoshino Ai, hair ornament from the "Oshi No Ko" series. All the tools and materials needed are mentioned throughout this post. Enjoy! ✦

🇪🇸 ~ Este año la serie de "Oshi No Ko" ha sido un verdadero fenómeno y es que las primeras imágenes que vemos de la serie nos engañan con sus ilustraciones hermosas y colores super llamativos: Porque la realidad es que es una obra que aborda temas muy adultos como lo es el embarazo adolescente y la cara oculta al público de la industria del entretenimiento japonés.
🇺🇸 ~ This year the "Oshi No Ko" series has been a real phenomenon and the first images we see of the series deceive us with its beautiful illustrations and super flashy colors: Because the reality is that it is a work that addresses very adult themes such as teenage pregnancy and the hidden face of the Japanese entertainment industry to the public.
✦ I think this will be the most popular song of 2023 ✦
Es por eso y por muchas razones más que su protagonista "Ai Hoshino" es actualmente un personaje súper cotizado entre las Cosplayers alrededor del mundo.
Sin embargo, y aunque existen muchas representaciones espectaculares de la idol, como Cosmaker noto un patrón constante en la ejecución de este conjunto y es que muchos están teniendo dificultades para recrear el broche de cabello de conejito de la protagonista.
Entonces, decidí hacer este accesorio yo misma para generar las medidas y patrón exactos para que otros puedan ayudarse en caso de necesitarlo, y lo he dividido en 2 partes porque "el cuerpo del conejito" es la pieza protagonista de este accesorio y la que al parecer más dolores de cabeza ha generado a los Cosplayers.
It is for this and many other reasons that her protagonist "Ai Hoshino" is currently a very sought after character among cosplayers around the world.
However, and although there are many spectacular representations of the idol, as a Cosmaker I notice a constant pattern in the execution of this set and that is that many are having difficulty recreating the protagonist's bunny hair clip.
So, I decided to make this accessory myself to generate the exact measurements and pattern so that others can help themselves in case they need it, and I have divided it in 2 parts because "the bunny's body" is the protagonist piece of this accessory and the one that apparently has generated more headaches to Cosplayers.
• 𝕊𝕋𝔼ℙ 𝔹𝕐 𝕊𝕋𝔼ℙ 𝕋𝕌𝕋𝕆ℝ𝕀𝔸𝕃 •
« How to make the hair ornament of the "Oshi No Ko" series (PART ONE) »

✦ That same day, when this idea started, I also found on my way to throw away the garbage (GET OUT OF THIS BODY XIE LIAN) this box that I needed to keep the tapes I still have left from past projects. Don't worry, of course I disinfected it with ENOUGH alcohol hahaha ✦
Antes de comenzar me gustaría decir que esta idea también esta motivada por el consejo de una buena amiga, que me esta motivando a generar items de Cosplay pequeños o muy puntuales para la venta, o para reservar cuando recibo Invitaciones Cosplayer (para colocarlos en mi mesa de SpecialGuest y las personas tengan la oportunidad de comprar algo hecho por mi).
Before I start I would like to say that this idea is also motivated by the advice of a good friend, who is motivating me to generate small or very punctual Cosplay items for sale, or to reserve when I receive Cosplayer Invitations (to place them on my SpecialGuest table and people have the opportunity to buy something made by me).
✦ Quickly taking screenshots from your phone is an efficient way to make a quick tally of guides and references, especially if you are not very proficient at using Pinterest ✦
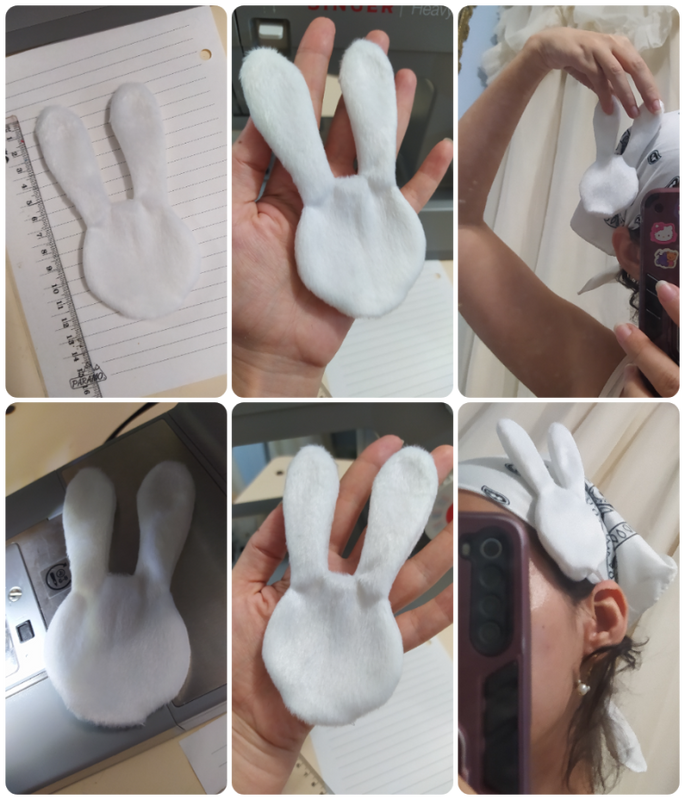
📌 PRIMER PASO: Todo comienza por las referencias, y si se trata de este personaje, encontraras que existen varios diseños canónicos donde el accesorio del cabello de conejito tiene variantes.
📍 STEP ONE: It all starts with references, and if it's this character, you'll find that there are several canonical designs where the bunny hair accessory has variations.
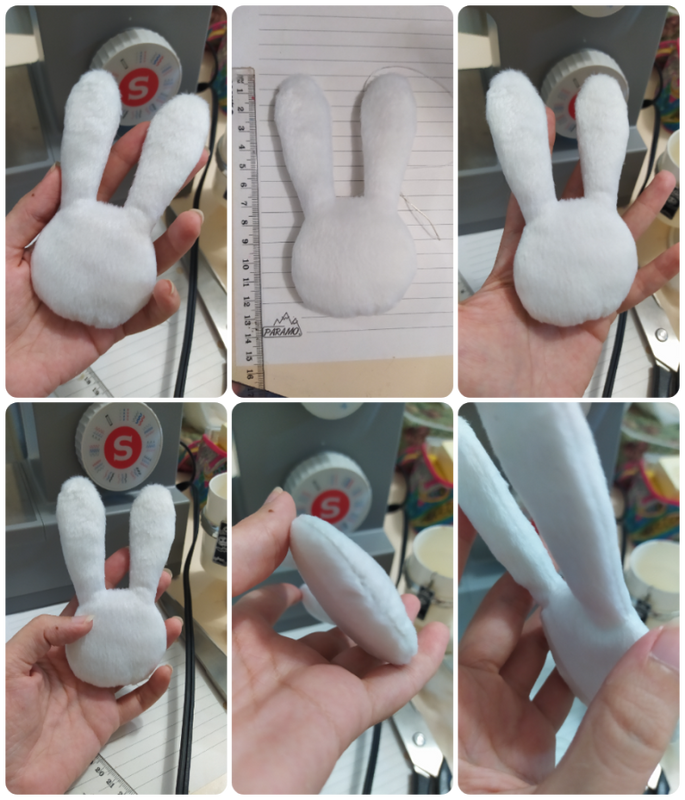
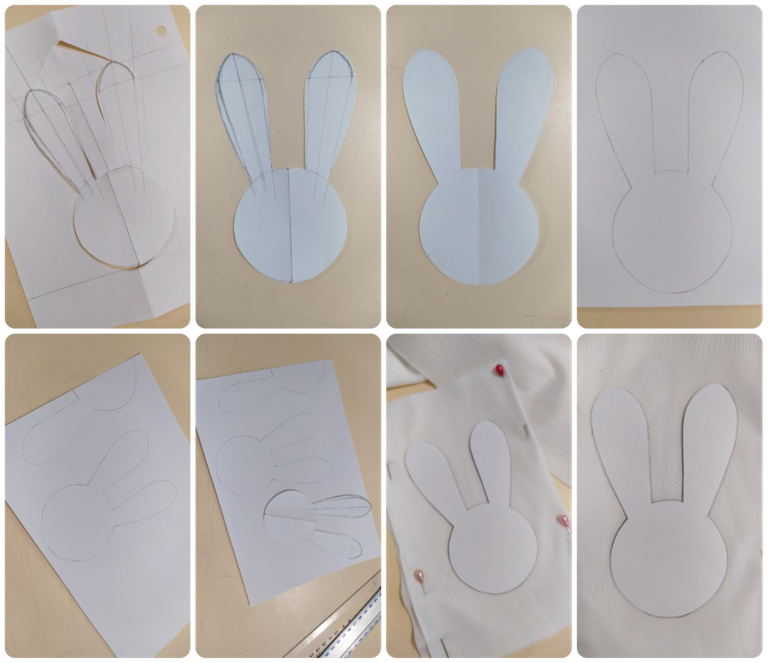
✦ After marking guide lines with the ruler I proceed to draw freehand until I obtain the to obtain the aspect that seemed to me the most appropriate. Then I polished the measurements of the circle using a compass. Then you cut out the figure with the scissors and transfer it to a cardboard. Replicate the pattern on cardboard at least 3 times for safety ✦
📌 SEGUNDO PASO: Para generar el patrón guía primero necesitas marcar las medidas estándar de alto y ancho del mini peluche de conejito. Las medidas que yo utilice fueron:
13,5 cm de alto general - 6,5 cm de ancho para el circulo - 7,5 cm de alto para las orejas en su parte externa, e interna 7 cm exactos - 2 cm de distancia en la base de las orejas - 3cm de ancho para las orejas en su parte mas "rellenita", y 1,5 cm en su parte mas angosta.
📍 STEP TWO: To generate the pattern guide you first need to mark the standard height and width measurements of the mini bunny stuffed animal. The measurements that I used were:
13.5 cm high overall - 6.5 cm wide for the circle - 7.5 cm high for the ears on the outside, and exactly 7 cm inside - 2 cm distance at the base of the ears - 3 cm wide for the ears at their "fullest" part, and 1.5 cm at their narrowest part.
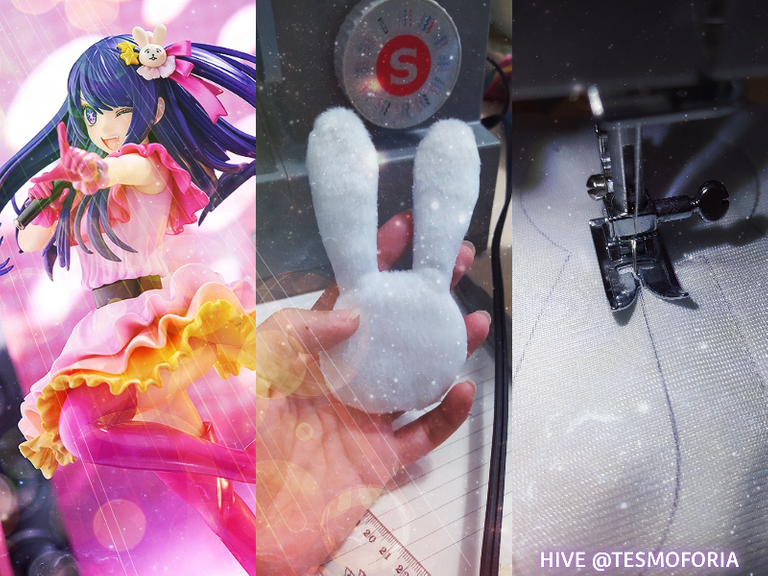
✦ The fabric I chose was short hair plush fabric, very low, I recommend it because it is easier to handle if you are an amateur, especially to avoid difficulties when sewing and to take care of the direction of the fiber ✦
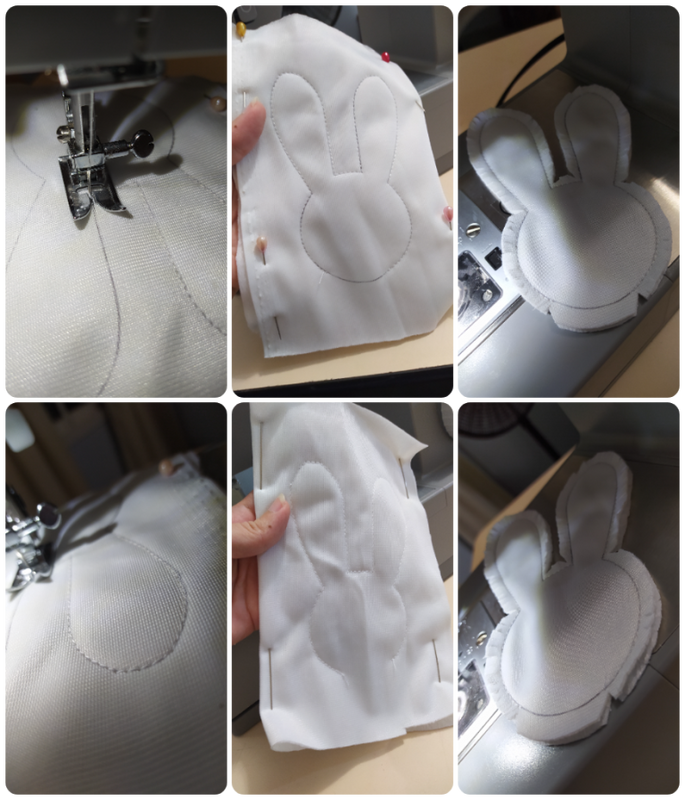
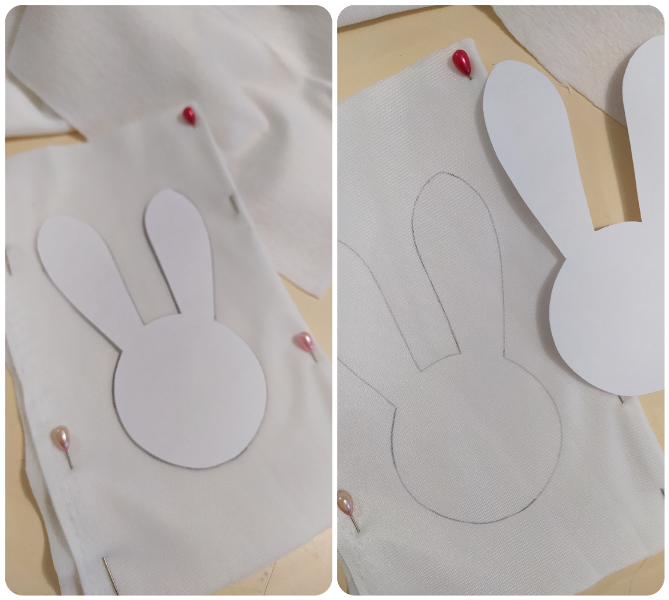
📌 TERCER PASO: Se traslada la silueta de conejito con ayuda del patrón, a un rectángulo de tela doblado por la mitad con su reverso interior hacia afuera (es decir, que la parte "peluda" quede hacia dentro).
📍 THIRD STEP: Transfer the bunny silhouette, with the help of the pattern, to a rectangle of fabric folded in half with the inside back facing out (i.e., the "furry" side facing in).
✦ If the margin is too small, the fabric will tear when you turn it over or stuff it ✦
📌 CUARTO PASO: Tanto si la costura es en máquina o a mano, la indicación para un buen resultado es que debe ser una puntada ajustada muy pequeña, preferiblemente N° 2, y el margen MÍNIMO que se debe dejar es de 0,5 cm antes de voltear la pieza.
📍 FOURTH STEP: Whether sewing by machine or by hand, the indication for a good result is that it should be a very small tight stitch, preferably N° 2, and the MINIMUM margin to be left is 0.5 cm before turning the piece over.
✦ If at the beginning the pattern seemed large, do not worry, at this stage of the process you will notice that the figure reduces its dimensions by at least 0.5 cm, giving you as a result round measurements ✦
📌 QUINTO PASO: Para voltear la pieza, puedes ayudarte con cualquier objeto de punta redonda como el reverso de un pincel o de una paleta de repostería. Debe ser un objeto largo y fino de punta redonda porque si no dañaras la pieza. Mucha paciencia en este paso es necesaria.
📍 FIFTH STEP: To turn the piece, you can help yourself with any round-tipped object such as the back of a paintbrush or a pastry trowel. It must be a long, thin, round-tipped object or you will damage the piece. A lot of patience in this step is necessary.
✦ The opening at the bottom is closed with white thread and invisible hand stitching ✦
📌 SEXTO PASO: Suavemente y con mucha gentileza, vamos a rellenar poco a poco esta pequeña almohada de conejito, para eso separamos felpa o relleno sintético para almohadas y peluches, en pequeñas bolitas que iremos empujando con el reverso de un lápiz, primero en cada oreja hasta rellenar ambas, y luego finalmente todo el cuerpo. No debes colocar demasiado relleno o la figura se deformará, y si colocas poco, quedara endeble.
📍 SIXTH STEP: Gently and with much gentleness, we are going to fill little by little this little bunny pillow, for that we separate plush or synthetic stuffing for pillows and stuffed animals, in small balls that we will push with the back of a pencil, first in each ear to fill both, and then finally the whole body. Do not put too much stuffing or the figure will be deformed, and if you put too little, the figure will be weak.
« 𝔽𝕀ℕ𝔸𝕃 ℝ𝔼𝕊𝕌𝕃𝕋 »
✦ In the next post I will show you how to make his face, and we will assemble all the parts of this super popular accessory! ✦

Te garantizo que el resultado en persona es muy limpio y de buena calidad; si es de tu agrado puedes utilizar una tela y color diferente, ten presente que tus creaciones deben gustarte primero a ti, y que las medidas que aquí indico pueden ser modificadas a tu gusto si así lo prefieres. ¡Yo te apoyo! 💕
I guarantee that the result in person is very clean and of good quality; if it is to your liking you can use a different fabric and color, keep in mind that your creations must please you first, and that the measures that I indicate here can be modified to your liking if you prefer. I support you! 💕
Cualquier duda que tengas puedes escribirla en los comentarios y estaré mas que feliz de responderte. Disfruté mucho este delicado proceso hasta ahora y aunque no esta en mis planes representar a la idol de "Oshi No Ko", quiero que sepas que no estas obligado a hacer el Cosplay completo de ese personaje que tanto te gusta, si el caso es que solo quieres una parte de su atuendo nada más. Eso esta bien 💯 👏
Any questions you have you can write them in the comments and I'll be more than happy to answer you. I really enjoyed this delicate process so far and although it's not in my plans to represent the idol of "Oshi No Ko", I want you to know that you are not obligated to make the complete cosplay of that character you like so much, if the case is that you only want a part of her outfit nothing else. That's ok 💯 👏

🍓 All texts and images by @Tesmoforia ✦ Translation: Deepl ✨
🚨 ¡Please do not take, edit or republish my material without my permission! 🚨
💌 ¿Do you wish to contact me? [email protected] 💌
🌙 Banner, signature and separators by Keili Lares


Que esperas para unirte a nuestro trail de curación y formar parte del "proyecto CAPYBARAEXCHANGE", tu casa de cambio, rapida, confiable y segura