✨👛👜Hola amigos, amantes de la creatividad. Espero se encuentren de lo mejor en este día.👜👛✨
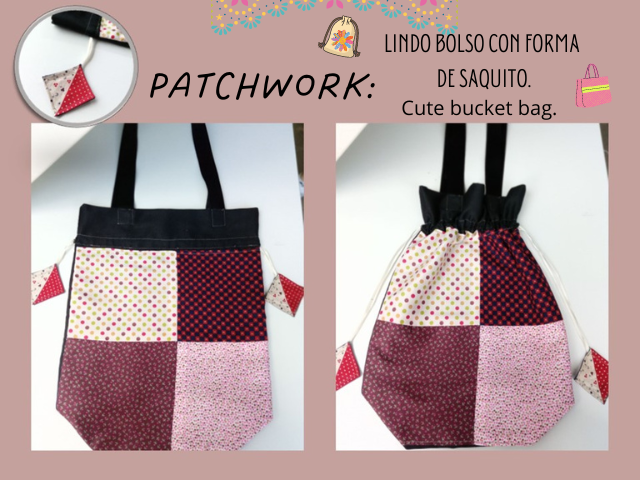
Hoy les comparto mi participación en el concurso de esta semana en la hermosa comunidad #hivediy con un lindo bolso. Estoy muy contenta de participar en este concurso, por fin llegué a tiempo para poder participar. El patchwork es una técnica que consiste en coser piezas de tela para armar una pieza completa, ya sea: cobijas, bolsas, ropa, etc… Me gusta mucho esta técnica, pero realmente fue un reto para mí hacer esta bolsita; Ya que, intenté hacerlo tres veces porque las medidas no coincidían, lo dejaba a un lado por unas horas y nuevamente le daba otra oportunidad. Hasta que al final me di cuenta que valió totalmente la pena todo el enredo que tuve al principio, quedé totalmente satisfecha con el resultado final.
Como he dicho anteriormente; el tema de internet en mi zona ha estado fallando mucho; Por lo tanto, es muy difícil para mí participar en estos concursos, pero esta vez tuve que hacer mi mejor esfuerzo para participar, justo el día anterior de enterarme sobre el tema del concurso, mi papá trajo a casa dos bolsas con retazos muy lindos de tela. Me puse a pensar que podia hacer con tantos retazos para traerles una linda idea, y justo al día siguiente salio este concurso que me llamo mucho la atencion, no soy profesional ni amante de la costura, pero es verdad que hace un tiempo mi abuela me prestó su máquina de coser y comencé a inventar un poco con mi madre, haciendo: bolsos, cubrecamas, ropa y bueno, entre mil cosas más.
🔸A continuación, los dejo con el paso a paso:
✨👛👜Hello friends, lovers of creativity. I hope you are all the best on this day.👛👜✨
Today I share with you my participation in this week's contest in the beautiful #hivediy community with a nice bag. I am very happy to participate in this contest, I finally arrived on time to participate. Patchwork is a technique that consists of sewing pieces of fabric to assemble a complete piece, be it: blankets, bags, clothes, etc… I really like this technique, but it was really a challenge for me to make this little bag; Since, I tried to do it three times because the measurements didn't match, I put it aside for a few hours and again gave it another try. Until in the end I realized that it was totally worth all the mess I had at the beginning, I was totally satisfied with the final result.
As mentioned above; the internet issue in my area has been failing a lot; Therefore, it is very difficult for me to participate in these contests, but this time I had to do my best to participate, just the day before I found out about the contest theme, my dad brought home two bags with very cute scraps of cloth. I began to think what I could do with so many scraps to bring you a nice idea, and just the next day this contest came out that caught my attention, I am not a professional or a lover of sewing, but it is true that some time ago my grandmother He lent his sewing machine and I began to invent a little with my mother, making: bags, bedspreads, clothes and well, among a thousand other things.
🔸Here I leave you with the step by step:
♥️ESPERO QUE TE GUSTE,
¡Empecemos!
♥️I HOPE YOU LIKE IT,
Let's start!

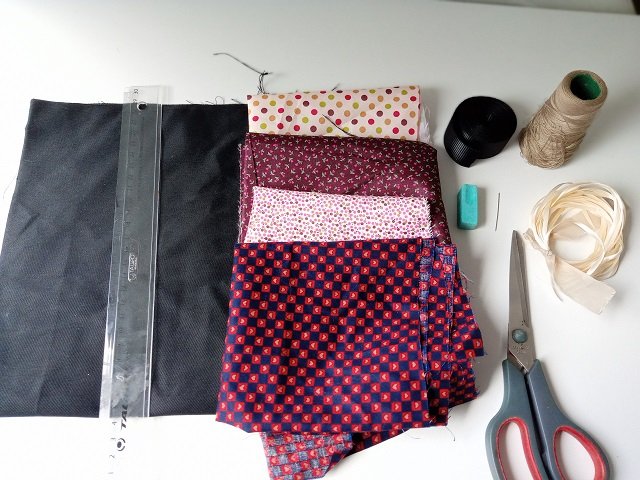
👛 MATERIALES | 👛 MATERIALS
Retazos de tela.
2 retazos de tela extras de 50x30cm
Cinta negra de 3cm.
Cinta blanca de ½ cm.
Agujas o máquina de coser.
Hilo.
Regla.
Tijeras.
Pieces of cloth.
2 extra pieces of fabric 50x30cm
3cm black ribbon.
½ cm white ribbon.
Needles or sewing machine.
Thread.
Rule.
Scissors.
👜 PROCEDIMIENTO | 👜 PROCESS
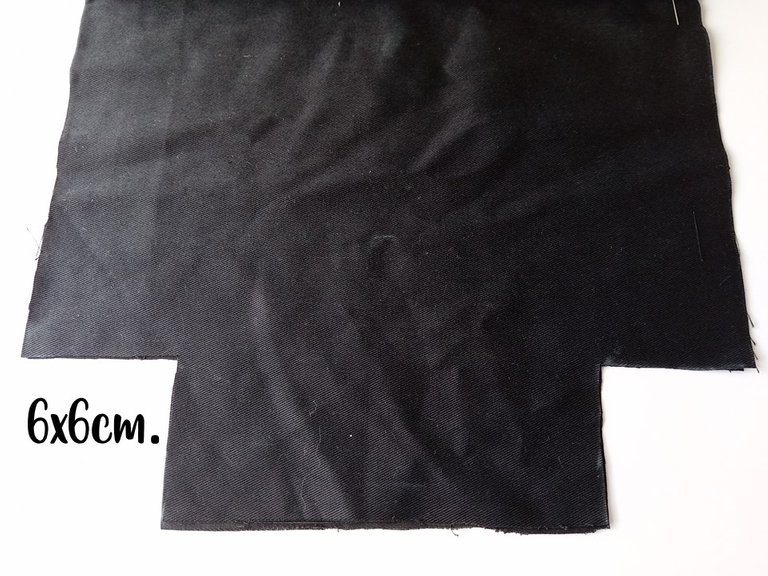
- PASO 1:
Comencé buscando un retazo grande de tela para que tuviera las medidas principales del bolso, lo corté en dos partes con las siguientes medidas: 50 cm de largo y 30 cm de ancho. Coloca una tela encima de la otra y corta dos cuadrados de 6x6 cm en los extremos inferiores. En cada lado.
- STEP 1:
I started looking for a large piece of fabric to have the main measurements of the bag, I cut it into two parts with the following measurements: 50 cm long and 30 cm wide. Lay one fabric on top of the other and cut two 6x6 cm squares at the bottom ends. On each side.

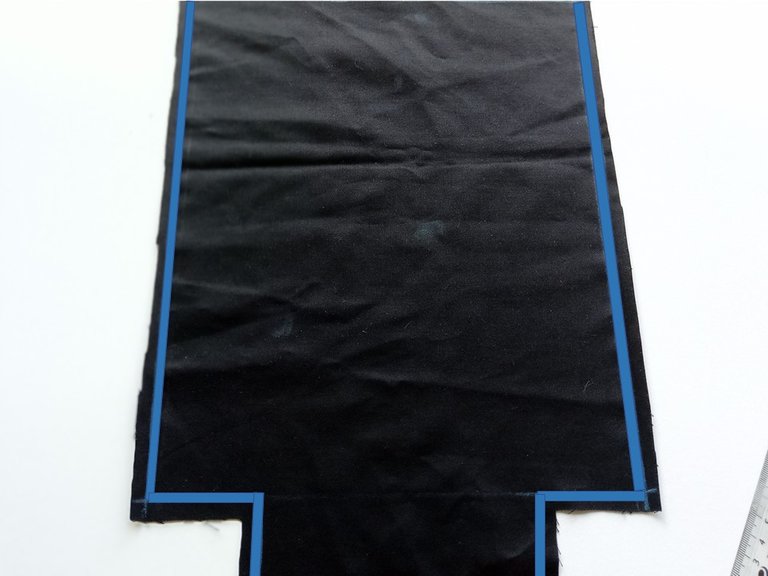
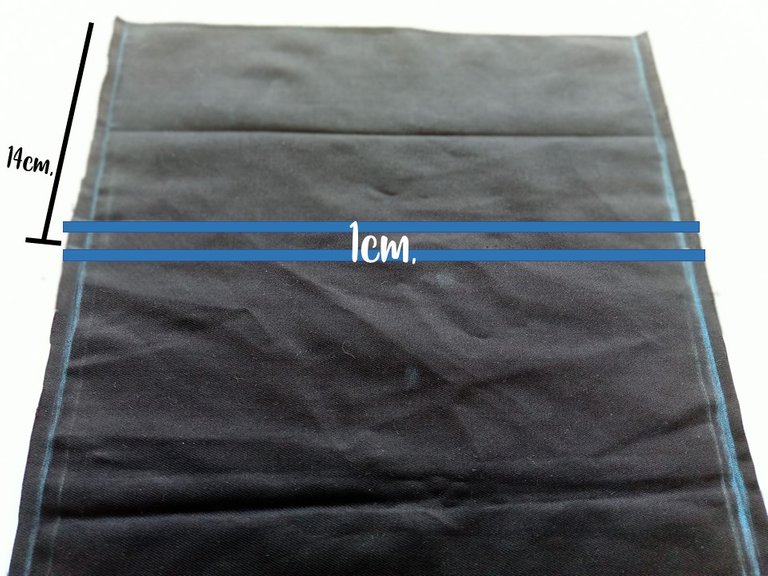
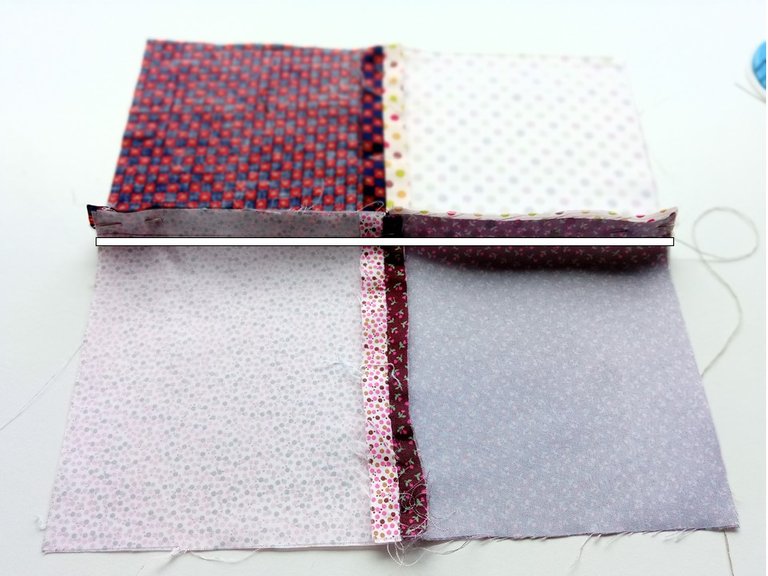
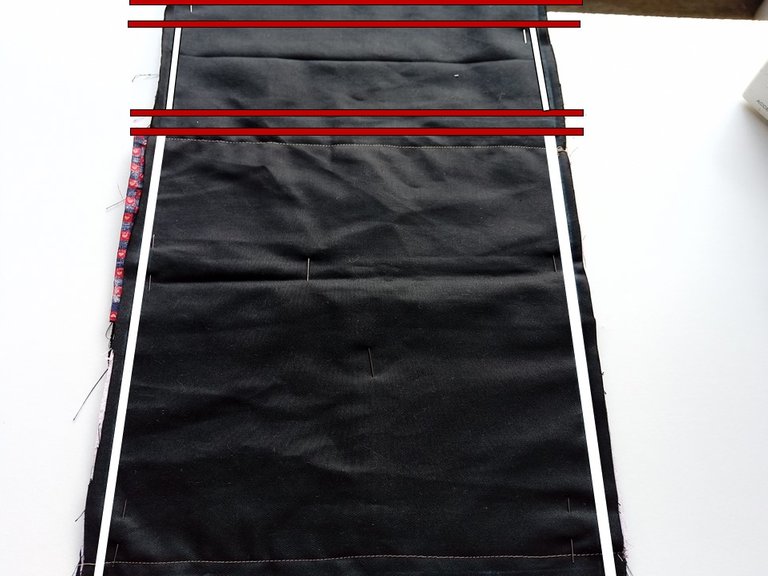
- PASO 2:
Luego, en los lados y en los cuadrados que acabamos de cortar, dibuja una línea con una distancia de ½ cm donde será la guía para coser después. Luego, en la parte superior a 14 cm, dibuja una línea horizontal y sobre ella a una distancia de 1 cm otra como se muestra en las imágenes a continuación. Repite el proceso con la otra tela.
- STEP 2:
Then, on the sides and in the squares that we just cut, draw a line with a distance of ½ cm where it will be the guide to sew later. Then, at the top at 14 cm, draw a horizontal line and on it at a distance of 1 cm another one as shown in the images below. Repeat the process with the other fabric.
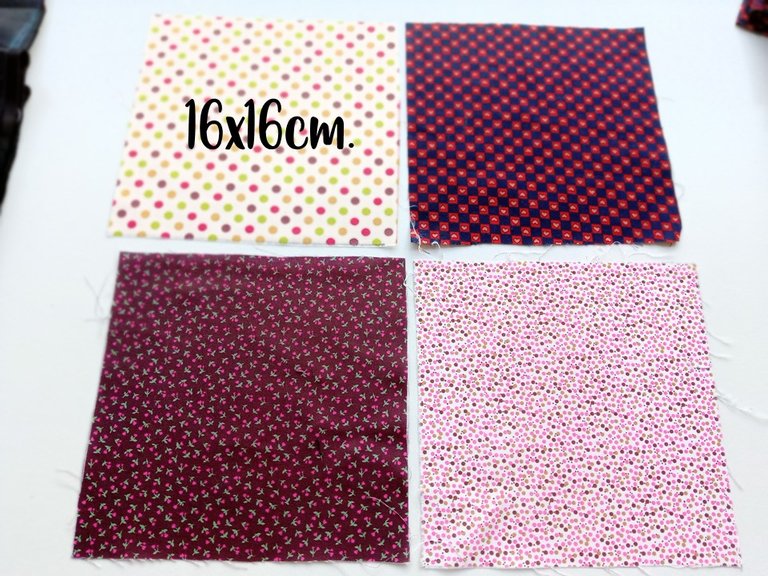
- PASO 3:
Una vez hecho esto, corta 4 piezas de tela de 16x16cm y plancha. Tomar 2 piezas, trazar ½ cm que será la guía donde vamos a coser, unir con alfileres y empezar a coser a mano o con ayuda de la máquina de coser. Después de unir estas piezas, abre las dos pestañas y plancha un poco por ambos lados, repite el proceso con las otras 2 piezas de tela.
- STEP 3:
Once this is done, cut 4 pieces of fabric measuring 16x16cm and iron. Take 2 pieces, trace ½ cm that will be the guide where we are going to sew, join with pins and start sewing by hand or with the help of the sewing machine. After joining these pieces, open the two tabs and iron a little on both sides, repeat the process with the other 2 pieces of fabric.
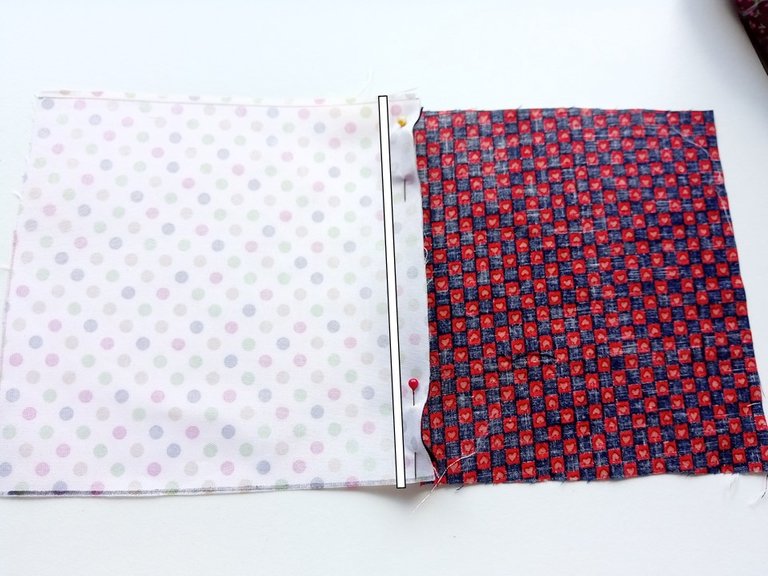
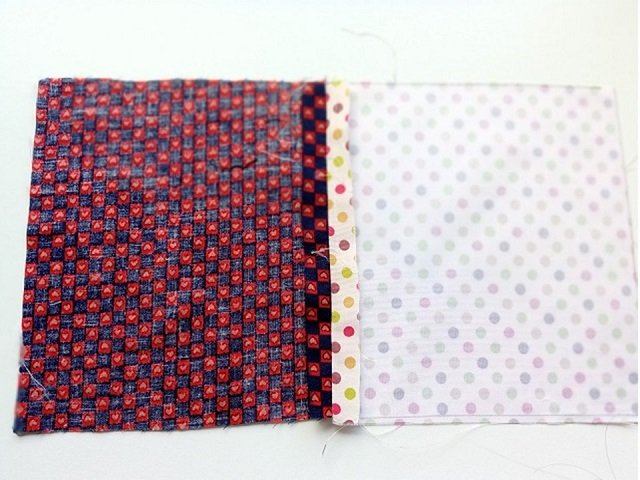
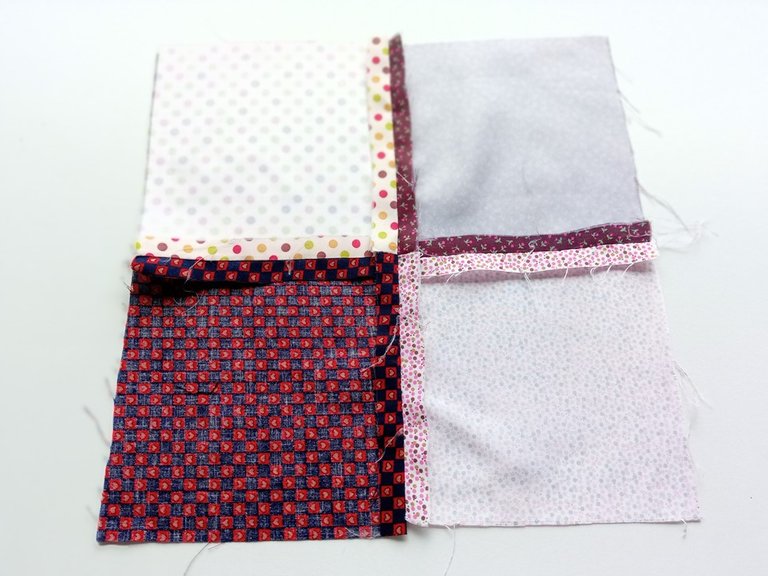
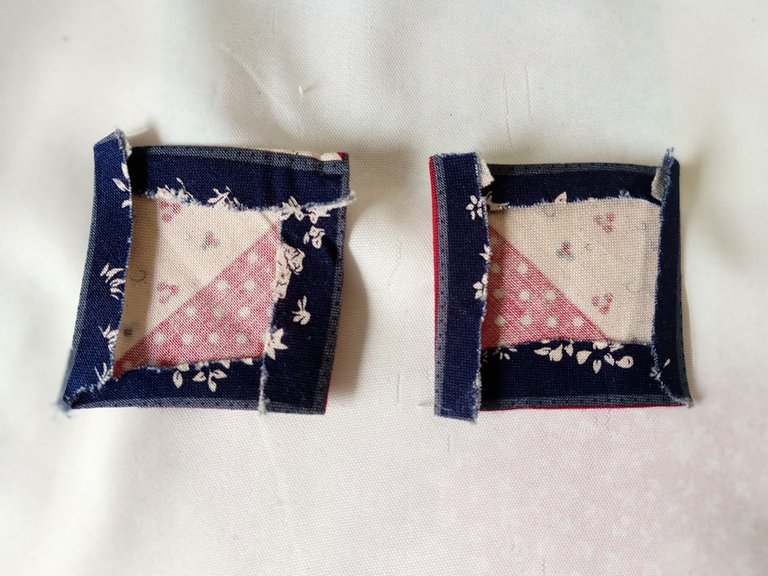
- PASO 4:
Una vez listas, coser estas dos piezas por la mitad repitiendo el mismo proceso: trazar ½ cm como guía para la costura, unir con alfileres para que la tela no resbale al coser; ya sea a mano o máquina. Luego, planchamos muy bien las pestañas que cosimos.
- STEP 4:
Once ready, sew these two pieces in half repeating the same process: trace ½ cm as a guide for the seam, join with pins so that the fabric does not slip when sewing; either by hand or by machine. Then, we iron very well the tabs that we sewed.
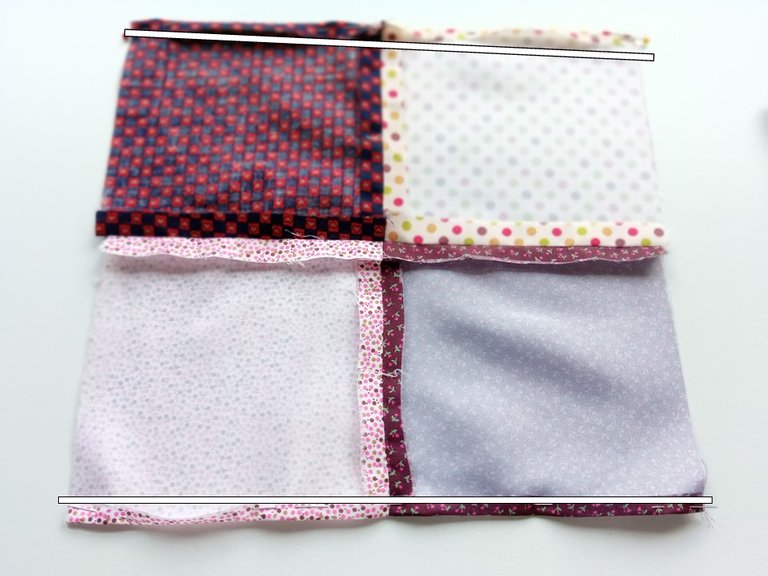
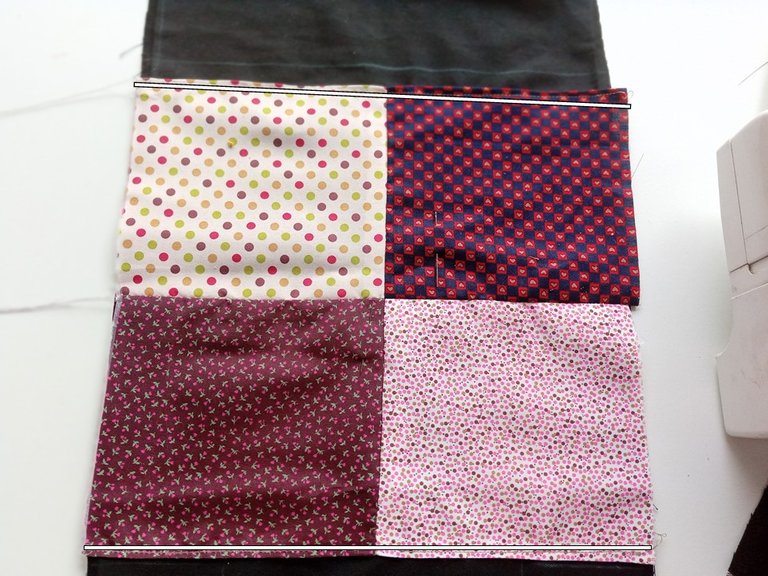
- PASO 5:
Doblar y mantener con alfileres la parte superior e inferior de la tela con una medida de ½ cm, planchar para que se mantengan, retirar los alfileres y volver a unir con alfileres a la tela negra la pieza que acabamos de coser, justo por debajo de la línea en forma horizontal que trazamos anteriormente en la parte superior.
- STEP 5:
Fold and pin the top and bottom of the fabric to a ½ cm measurement, iron to hold, remove the pins and pin the piece we just sewed to the black fabric again, just below the the line horizontally that we drew earlier at the top.
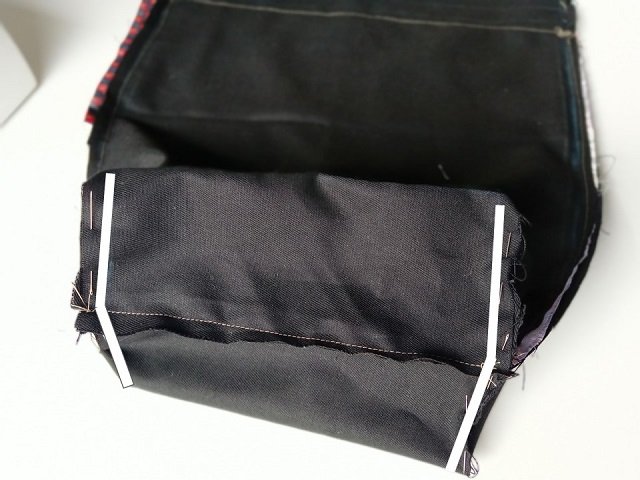
- PASO 6:
Seguimos colocando las dos telas cara a cara, coser los bordes izquierdo y derecho excepto 1 cm en la parte de arriba y 1 cm que trazamos al principio. Luego une los cuadrados inferiores en forma de triángulo, sujeta con alfileres y cose.
Blanco: Coser. (✓)
Rojo: no coser. (x)
- STEP 6:
We continue placing the two fabrics face to face, sew the left and right edges except 1 cm at the top and 1 cm that we traced at the beginning. Then join the bottom squares in a triangle shape, pin and sew.
White: Sew. (✓)
Red: do not sew. (x)

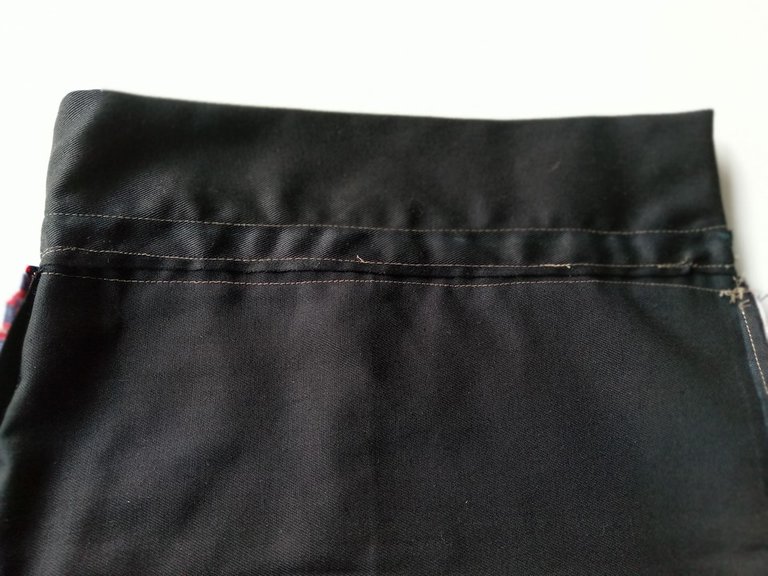
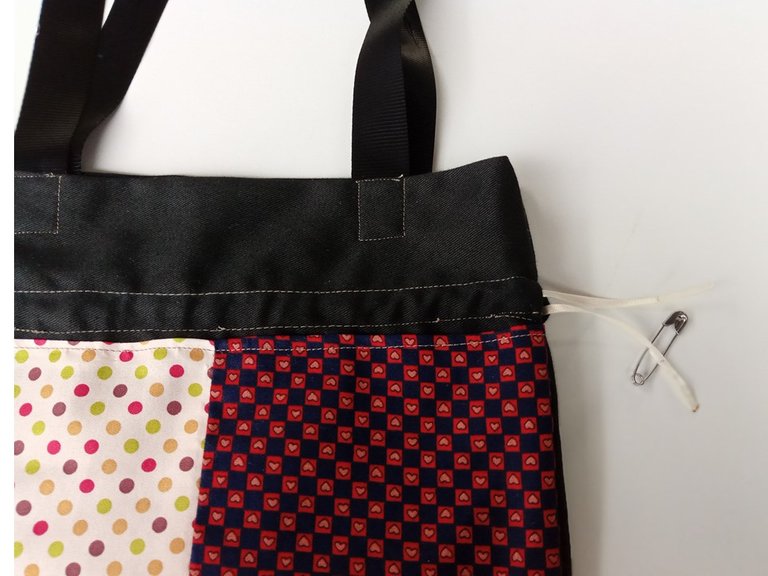
- PASO 7:
Para la parte superior donde irá la cinta arrugada: hacer un dobladillo por la mitad uniendo las dos medidas de 1 cm dibujadas anteriormente, coser en línea horizontal de un extremo al otro, en ambos lados, con cuidado de no unir ambas telas.
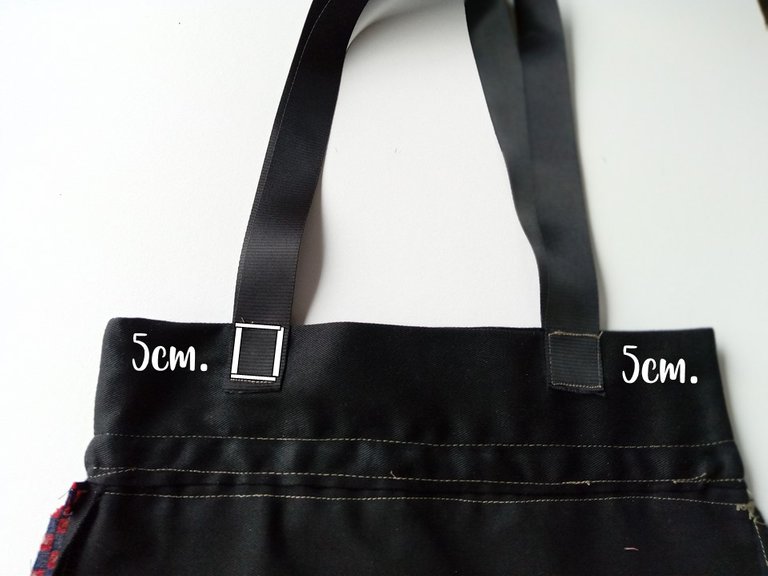
Para los tirantes: cortar 2 piezas de 60 cm de largo, coser las puntas de una tira a 5 cm de distancia de cada extremo y repetir el proceso del otro lado.
- STEP 7:
For the upper part where the wrinkled ribbon will go: make a hem in the middle joining the two 1 cm measurements drawn previously, sew in a horizontal line from one end to the other, on both sides, being careful not to join both fabrics.
For the straps: cut 2 pieces 60 cm long, sew the ends of one strip 5 cm apart from each end and repeat the process on the other side.
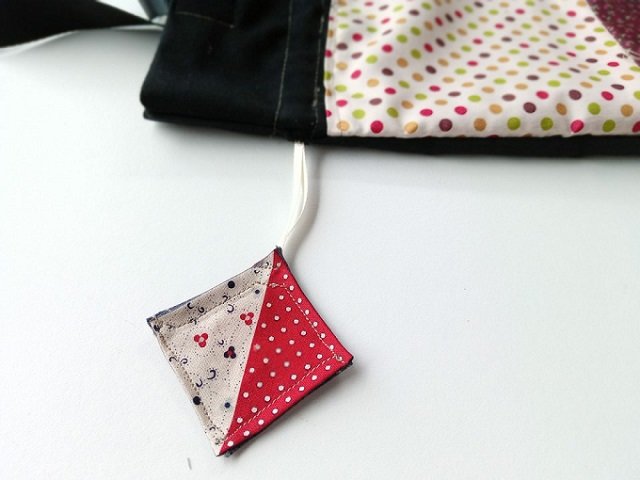
- PASO 8:
Para terminar, corta 2 cintas de 60 cm, primero introduce una de las cintas, de manera que los extremos den ambas hacia un lado. Recortar 2 cuadrados con retazos de tela de 6x6 cm, hacer un doblez de ½ cm a cada lado, colocar uno encima del otro, coser dejando un espacio en un extremo donde introduciremos los dos extremos de la cinta, coser y repetir el proceso con la otra cinta.
- STEP 8:
To finish, cut 2 ribbons of 60 cm, first introduce one of the ribbons, so that the ends give both to one side. Cut out 2 squares with 6x6 cm scraps of fabric, make a ½ cm fold on each side, place one on top of the other, sew leaving a space at one end where we will insert the two ends of the tape, sew and repeat the process with the other tape.
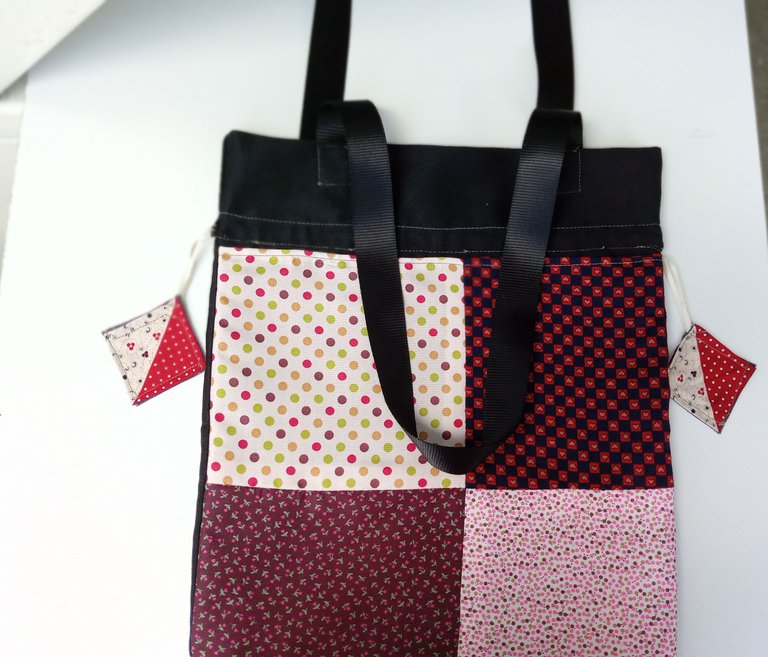
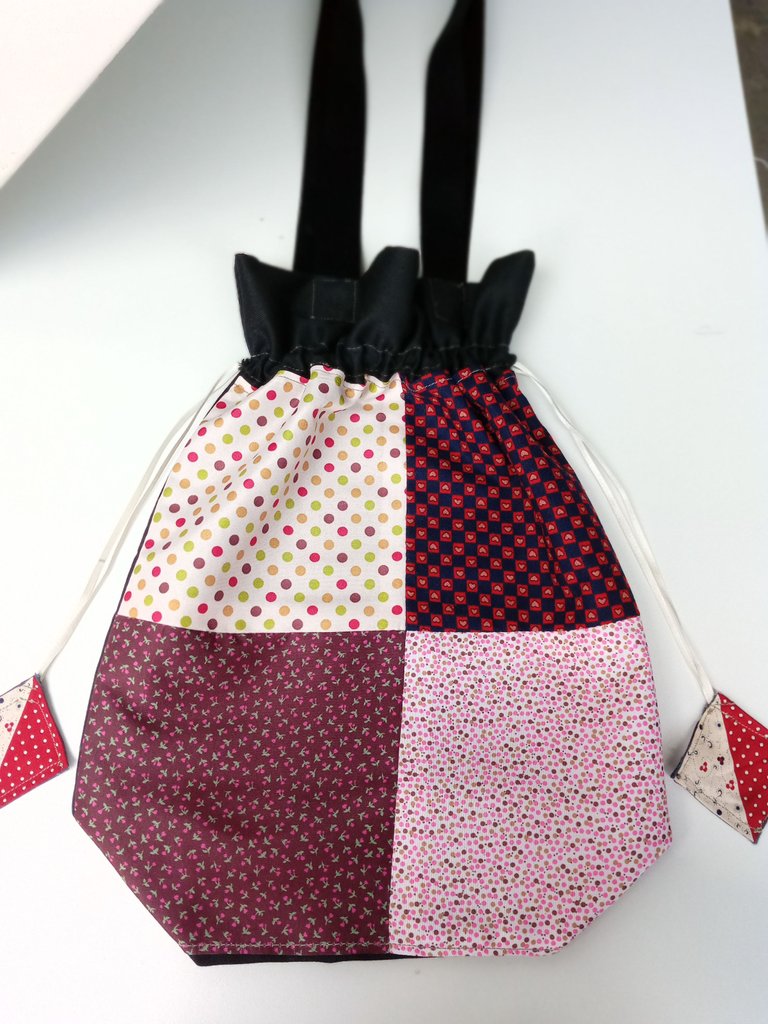
✨👜👛¡Y listo!👜👛✨ Así realice este lindo bolsito con forma de saquito para participar en el concurso de esta semana. Creo que es ideal para esas ocasiones en las que salimos con un outfit unicolor, por lo que el bolso será el centro de atención en ese momento. Espero que te animes a hacerlo.
✨ Me gustaría felicitar a todos los que participan en el concurso, han hecho piezas muy bonitas con esta técnica. ✨
✨👛👜¡And ready!👜👛✨ That's how it ends with this cute bag!
shaped like a sack to enter this week's contest. I think it's ideal for those occasions when we go out with a plain outfit, so the bag will be the center of attention at that moment. I hope you are encouraged to do so.
✨ I would like to congratulate all those who participate in the contest, they have made very nice pieces with this technique. ✨


Todas las fotografías son de mi propiedad.
Separador y Fotos editadas en Canva
All photographs are my property.
Photos edited in Canva
The rewards earned on this comment will go directly to the people sharing the post on Twitter as long as they are registered with @poshtoken. Sign up at https://hiveposh.com.
Hermoso bolsito amiga @valenpba me encantó,suerte en el concurso 🌸👍
Hola amiga! 💕✨ Muchas gracias por tus lindas palabras, leer y comentar.
Me alegra mucho que te haya gustado. 😊
Saludos. 💕
Thank you for sharing this amazing post on HIVE!
non-profit curation initiative!Your content got selected by our fellow curator @rezoanulvibes & you just received a little thank you via an upvote from our
You will be featured in one of our recurring curation compilations and on our pinterest boards! Both are aiming to offer you a stage to widen your audience within and outside of the DIY scene of hive.
Join the official DIYHub community on HIVE and show us more of your amazing work and feel free to connect with us and other DIYers via our discord server: https://discord.gg/mY5uCfQ !
If you want to support our goal to motivate other DIY/art/music/homesteading/... creators just delegate to us and earn 100% of your curation rewards!
Stay creative & hive on!
Muchas gracias por el apoyo amigos de @diyhub y @rezoanulvibes. 🤭💕✨
You're welcome! Keep up the great work!
Maravillosa idea @valenpba, me encanto el resultado final y sus bellos colores al igual que los bellos estampados de las telas, es un bolso muy bonito y útil 💓 💕 💜 gracias por compartir tu creatividad ¡Éxitos y saludos! 😊
🤭 muchas gracias por tan lindas palabras.
La verdad que me costó un poco elegir colores que combinarán, quería algo que llamara la atención pero no tanto, para poder combinar la ropa y que no se viera tan recargado.
Saludos.✨💕
Me encanta esos colores 🥰
Me alegra que te guste 😊. Muchísimas gracias por leer y comentar amiga @somethingnice.
Congratulations @valenpba! You have completed the following achievement on the Hive blockchain and have been rewarded with new badge(s):
Your next target is to reach 500 comments.
You can view your badges on your board and compare yourself to others in the Ranking
If you no longer want to receive notifications, reply to this comment with the word
STOPTo support your work, I also upvoted your post!
Check out the last post from @hivebuzz:
Support the HiveBuzz project. Vote for our proposal!