| Esp | Eng |
|---|---|
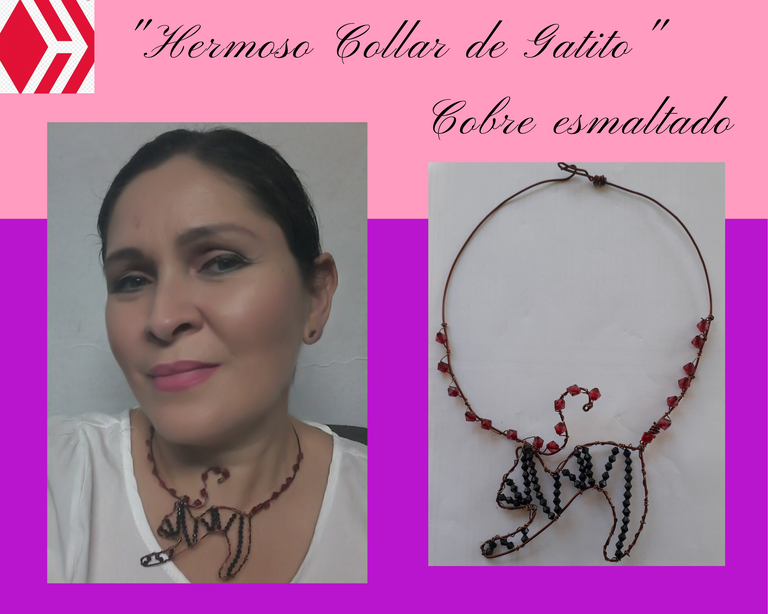
| Un gatito con una colita muy larga. A las mujeres nos gusta estar bellas y si conseguimos algo que nos pueda ayudar a incrementar esa belleza no dudamos en usarlo. Tenemos muchas cosas de las que podemos disponer desde maquillajes, cremas, y los accesorios: collares, sarcillos, sortijas y un sin fin de cosas que tenemos a nuestro favor. Muchas veces pensamos que la inversión para ser bellas debe ser grande, y yo concuerdo con eso, Para ser bellas hay que ver estrellas, y si tiene su cuota el ser bella. Pero también hay cosas que podemos hacer a muy bajo costo para ayudarnos, por ejemplo a mi me encantan los accesorios, y si no tengo para comprarlos los hago. Y hoy hice este hermoso collar de gato y me salió muy económico. Este collar comienza con el gatito en el centro del cuello y lo rodea todo culminando con su colita enrollada. Es decir un ** Gatito con una colita muy larga**. Espero les guste y lo disfruten. | A kitten with a very long tail. We women like to be beautiful and if we get something that can help us to increase that beauty we don't hesitate to use it. We have many things that we can have from makeup, creams, and accessories: necklaces, earrings, rings and an endless number of things that we have in our favor. Many times we think that the investment to be beautiful must be big, and I agree with that, To be beautiful you have to see stars, and yes it has its share to be beautiful. But there are also things that we can do at very low cost to help us, for example I love accessories, and if I do not have to buy them I make them. And today I made this beautiful cat necklace and it was very inexpensive. This necklace starts with the kitten in the center of the neck and goes all the way around it culminating with its little rolled up tail. That is a ** Kitty with a very long tail. I hope you like it and enjoy it. |
| Materiales | Materials |
| Alambre de cobre esmaltado calibre 16 preferí esmaltado, para que el contacto con la piel no lo ponga negro, alambre de cobre calibre 26 o 28, yo use calibre 26, cristales (imitaciones) negros y rojos, pinzas para bisutería, cinta adhesiva. | 16 gauge enameled copper wire, I preferred enameled, so that the contact with the skin does not turn it black, 26 or 28 gauge copper wire, I used 26 gauge, black and red crystals (imitations), jewelry pliers, adhesive tape. |
|Instrucciones |Instructions|
| Paso 1 | Step 1 |
|---|---|
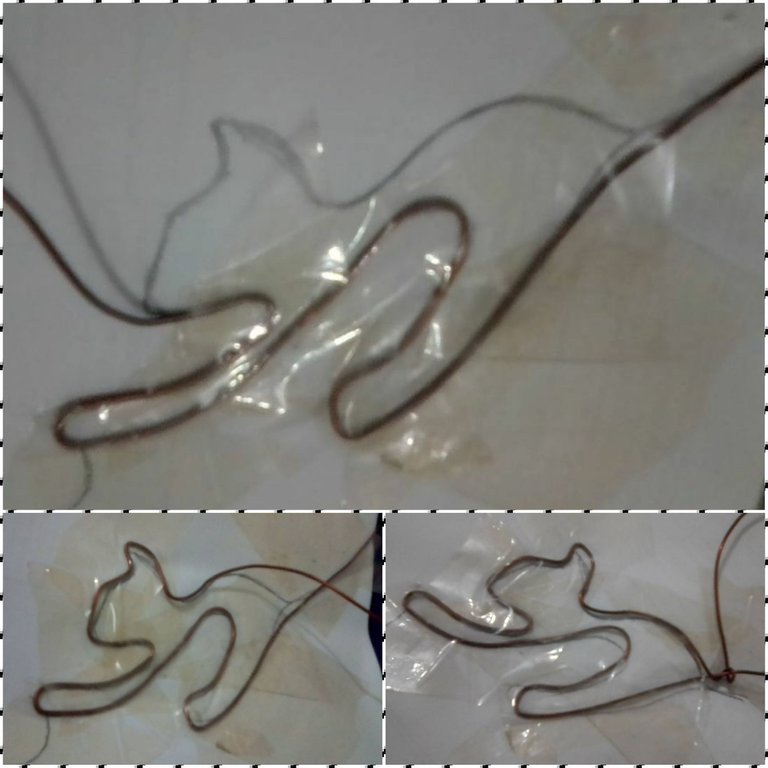
| Calque en una hoja el gatito que quiero modelar en alambre. Es una réplica de un trabajo publicado en Pinterest. | Trace on a sheet the kitten I want to model in wire. It is a replica of a work published on Pinterest. |

| Paso 2 | Step 2 |
|---|---|
| Corté 2 pedazos de alambre calibre 16, un pedazo un metro aproximado para trabajar tranquilos, con esa parte formare el gato, y no quiero que nos falte alambre, mejor que sobre y no falte. El otro 30 cm aproximados. | I cut 2 pieces of 16 gauge wire, one piece approximately one meter to work calmly, with that part I will form the jack, and I don't want us to lack wire, better to have more than enough. The other piece is approximately 30 cm. |
| Paso 3 | Step 3 |
|---|---|
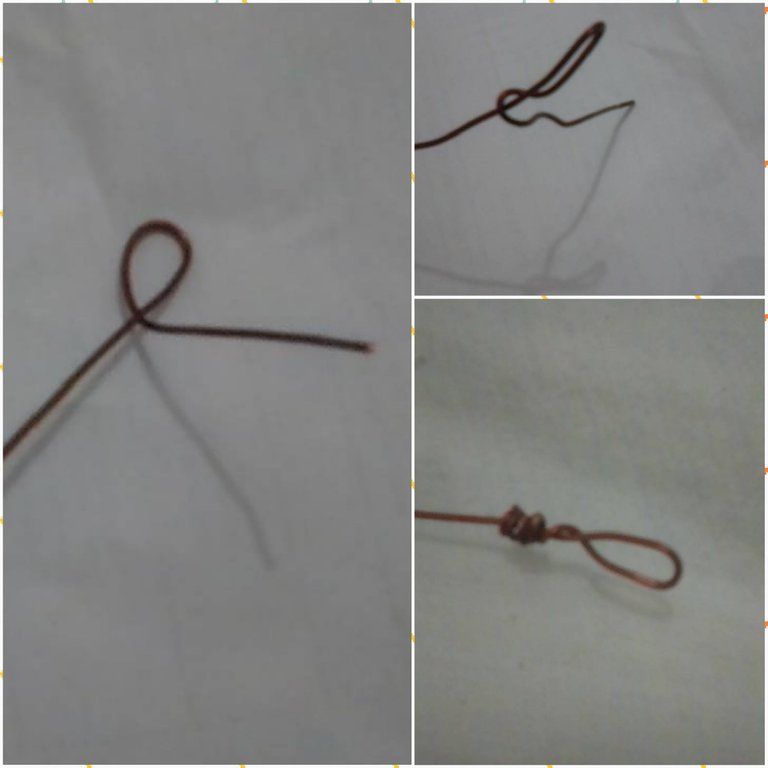
| Comencé haciendo el broche en uno de los extremos del alambre más largo, doble en forma de lágrima, haciendo un nudo para asegurar y no se mueva. | I started by making the clasp on one end of the longer wire, bending it into a teardrop shape, tying a knot to secure it and keep it in place. |
| Paso 4 | Step 4 |
|---|---|
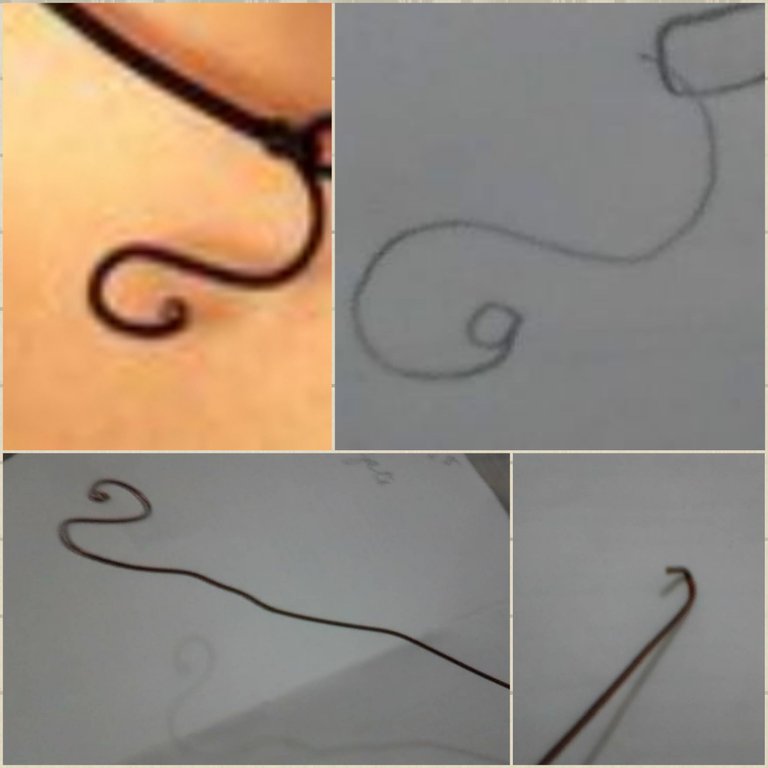
| En el otro alambre más pequeño hice una especie de ancla de un sólo pelo para enganchar, en ese mismo alambre hice la cola del gato, le di la forma según el dibujo. | In the other smaller wire I made a kind of anchor of a single hair to hook, in that same wire I made the tail of the cat, I gave it the shape according to the drawing. |
| Paso 5 | Step 5 |
|---|---|
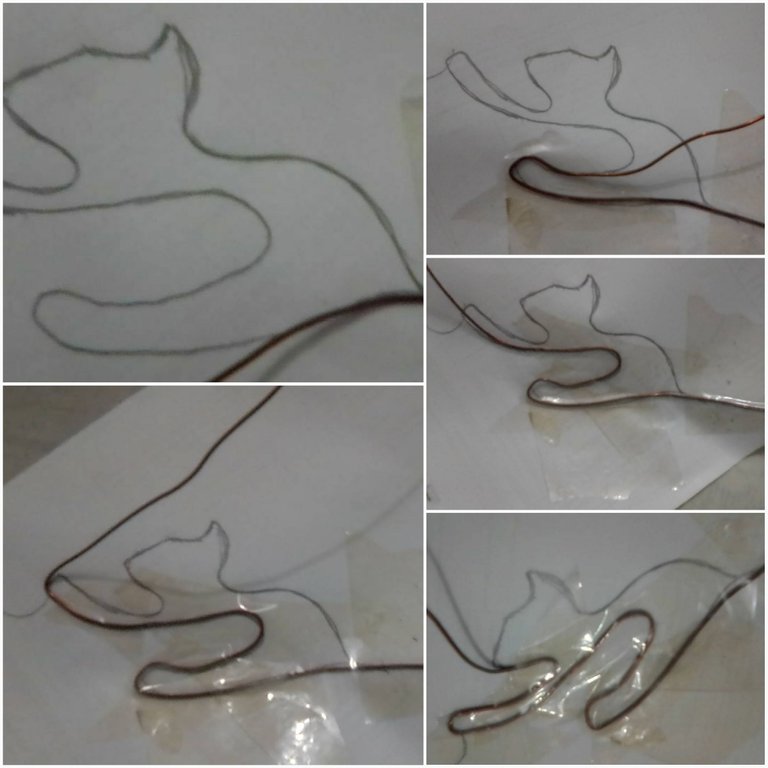
| El siguiente paso es comenzar a modelar mi gatito con el alambre, para eso necesitaré la cinta adhesiva y el dibujo. Usaré el alambre largo por supuesto. Comencé con la cola y le coloque cinta adeshiva para sujetar el alambre y no se mueva. | The next step is to start modeling my kitty with the wire, for that I will need the tape and the drawing. I will use the long wire of course. I started with the tail and put some masking tape to hold the wire in place so it won't move. |
| Paso 6 | Step 6 |
|---|---|
| Comencé a pegar alrededor de la figura el alambre y ajustando con la cinta, hasta completar toda figura. | I started gluing the wire around the figure and adjusting it with the tape, until the whole figure was completed. |
| Paso 7 | Step 7 |
|---|---|
| Asegure al culminar la figura con un nudo que quede bien ajustado y no se mueva. Despegue la cinta adeshiva y listo el gatito. | Secure at the end of the figure with a knot so that it fits tightly and does not move. Remove the adhesive tape and the kitten is ready. |
| Paso 8 | Step 8 |
|---|---|
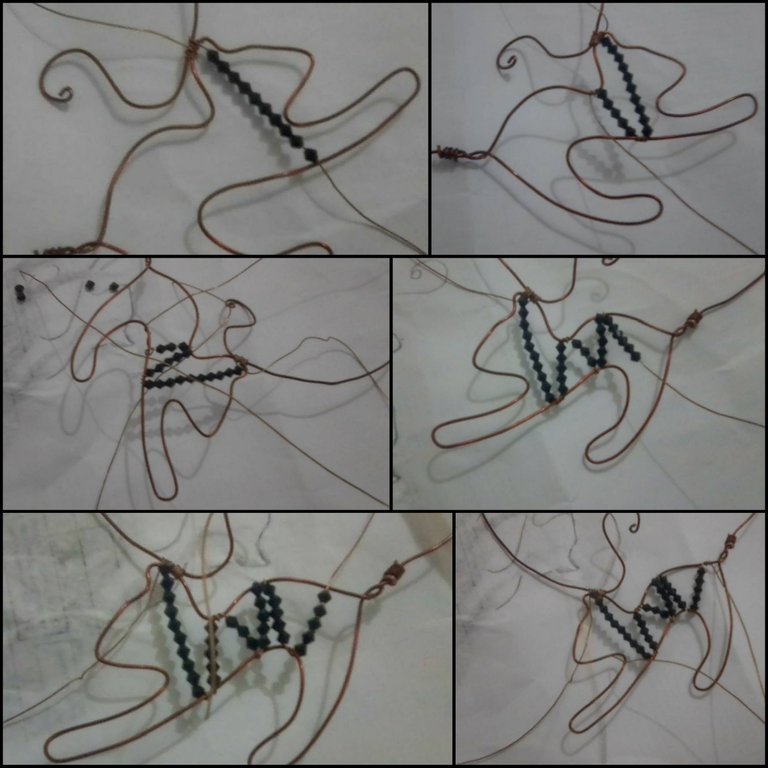
| Corté un pedazo de 2 metros de alambre calibre 26 y ajuste la colita al gatito. Por supuesto sobrara de lado a lado unos pedazos de alambre considerables que serán usados para los cristales. Listo mi collar. Ahora agregare detalles para personalizarlo. También hago la observación que pegue la cola del gato diferente de la imagen que use como modelo. | I cut a 2 meter piece of 26 gauge wire and attached the tail to the kitty. Of course there will be a few sizable pieces of wire left over from side to side that will be used for the crystals. My necklace is ready. Now I will add details to personalize it. I also note that I glued the tail of the cat different from the image I used as a model. |

| Paso 9 | Step 9 |
|---|---|
| Con los alambres 26 que sobran comence a hacer los detalles al gato, quise hacer líneas de cristales negros. Hice 12 líneas de cristales negros alrededor del cuerpo del gato. Comenzando por la patita en el extremo de la cola, primera línea de 13 cristales, después la segunda línea de 5 cristales, la tercera línea 5 cristales, la cuarta línea 4 cristales, la quinta línea 3 cristales, la sexta línea 5 cristales. | With the 26 wires left over I started to make the details of the cat, I wanted to make lines of black crystals. I made 12 lines of black crystals around the cat's body. Starting with the paw at the end of the tail, first line of 13 crystals, then the second line of 5 crystals, the third line 5 crystals, the fourth line 4 crystals, the fifth line 3 crystals, the sixth line 5 crystals. |
| Paso 10 | Step 10 |
|---|---|
| Sig haciendo líneas para cubrir el gato la séptima línea 9 cristales la que va en la altura de la oreja, la octava línea 7 cristales, la novena línea 4 cristales, la décima línea 3 cristales, y para formar la patita que está debajo de la cabeza 3 líneas de 2 cristales cada una, y así cubrimos todo el gatito. | I continue making lines to cover the cat the seventh line 9 crystals the one that goes at the height of the ear, the eighth line 7 crystals, the ninth line 4 crystals, the tenth line 3 crystals, and to form the paw that is under the head 3 lines of 2 crystals each, and so we cover the whole kitten. |

| Paso 11 | Step 11 |
|---|---|
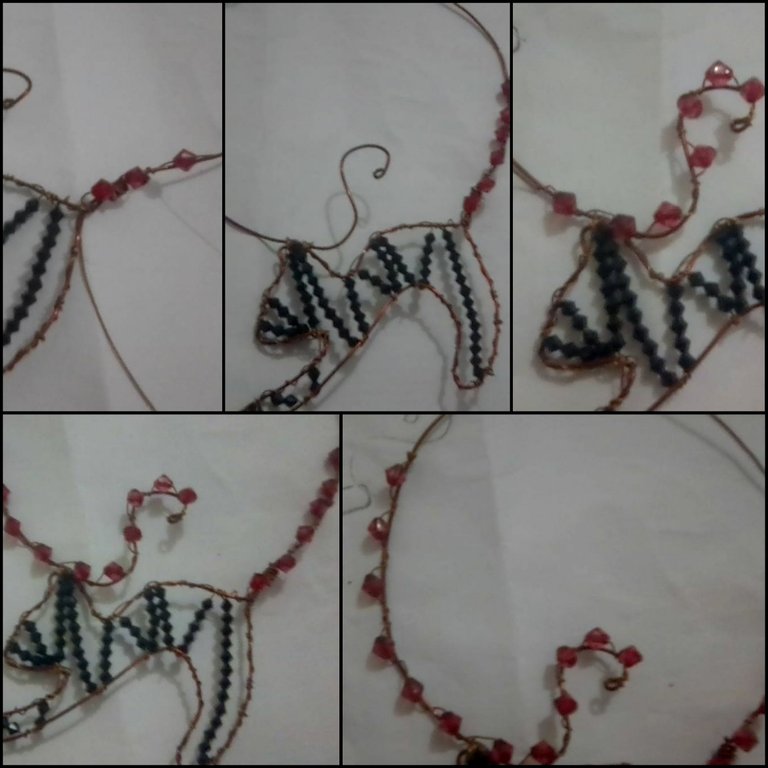
| Este último paso es adornar los lados del collar utilice 19 cristales rojos. Del lado de la cola 12 piedras que ajuste con alambre calibre 26, y del otro lado 7 piedras. | This last step is to embellish the sides of the necklace using 19 red crystals. On the tail side 12 stones that I adjust with 26 gauge wire, and on the other side 7 stones. |
| Despedida | Farewell |
|---|---|
| Ya rerminado "Mi bello y elegante collar de gatito, espero que les haya gustado, Gracias por visitar mi post. | Already finished "My beautiful and elegant kitty necklace, hope you liked it, Thanks for visiting my post. |
**Créditos **
Translated with www.DeepL.com/Translator (free version).
Las fotos fueron tomadas con mi Celular Samsung J2Prime.
Foto de portada editada con Canva.
Esto es una réplica de: Fuente