🔸Sin más que añadir, a continuación los dejo con el paso a paso:
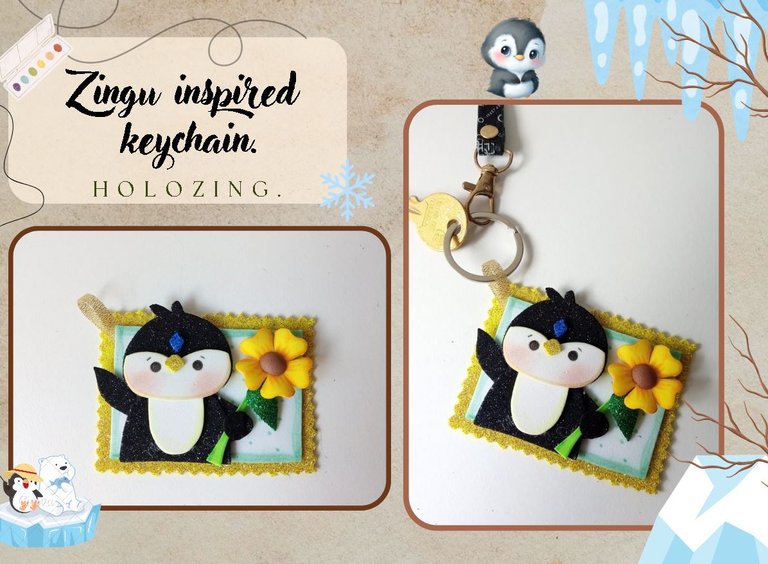
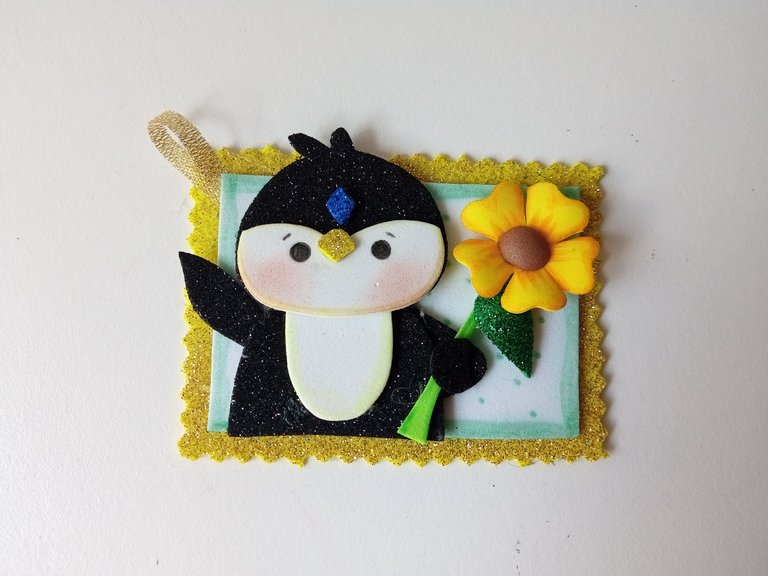
✨Good afternoon, holozing friends!✨ As always, I'm happy to stop by here again to share a nice keychain decoration idea, inspired by Zingu. This time I got a little more creative and imagined little Zingu as a portrait, holding a flower. I thought I wouldn't be able to recreate this idea, but it turned out much prettier than I thought, haha. Of course, it wasn't that easy, considering that they were very small pieces to make a good-sized keychain.
🔸Without more to add, then I leave you with the step by step:
♥️ESPERO QUE TE GUSTE,
¡Empecemos!
♥️I HOPE YOU LIKE IT,
Let's start!

✂️ MATERIALES | ✂️ MATERIALS
- Foami escarchado dorado.
- Foami escarchado negro.
- Foami escarchado azul.
- Foami escarchado verde.
- Foami blanco.
- Foami verde.
- Foami amarillo.
- Cinta delgada.
- Pinturas y marcadores.
- Hoja blanca.
- Pegamento.
- Tijeras.
- Lápiz.
- Gold frosted foam.
- Black frosted foam.
- Blue frosted foam.
- Green frosted foam.
- White foam.
- Green foam.
- Yellow foam.
- Thin ribbon.
- Paints and markers.
- White sheet.
- Glue.
- Scissors.
- Pencil.
✨ PROCEDIMIENTO | ✨ PROCESS
✨ PASO 1:
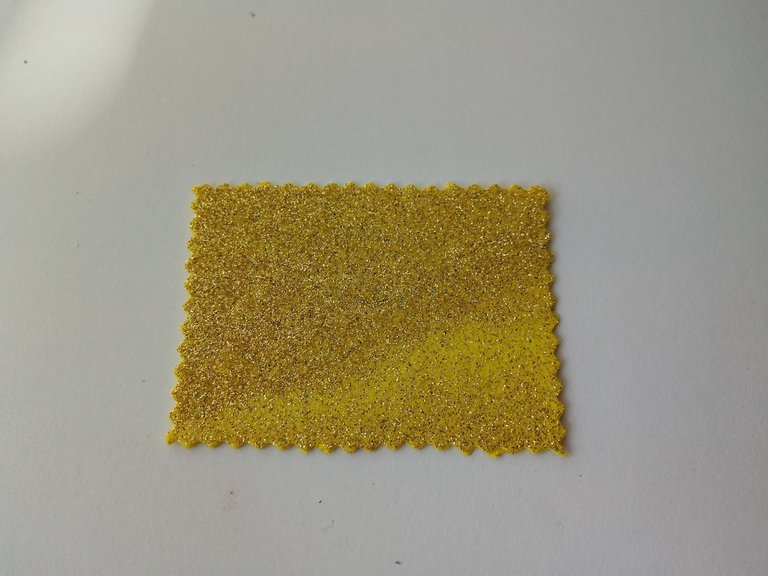
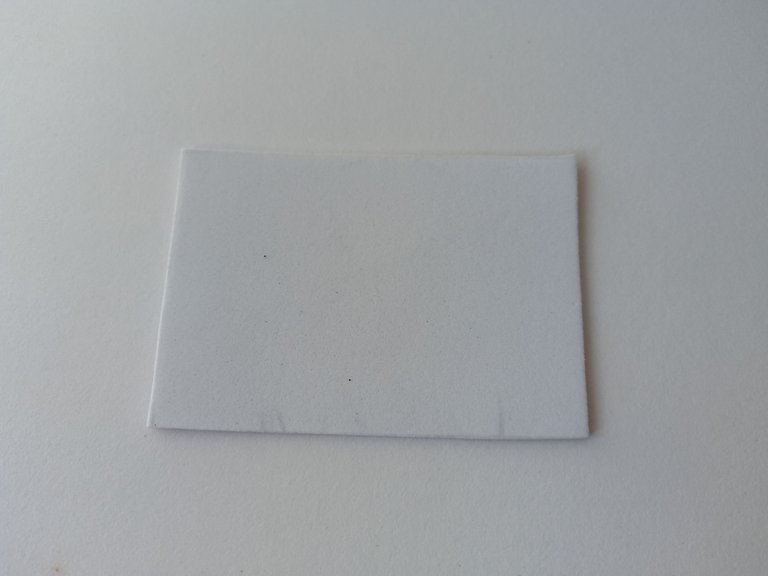
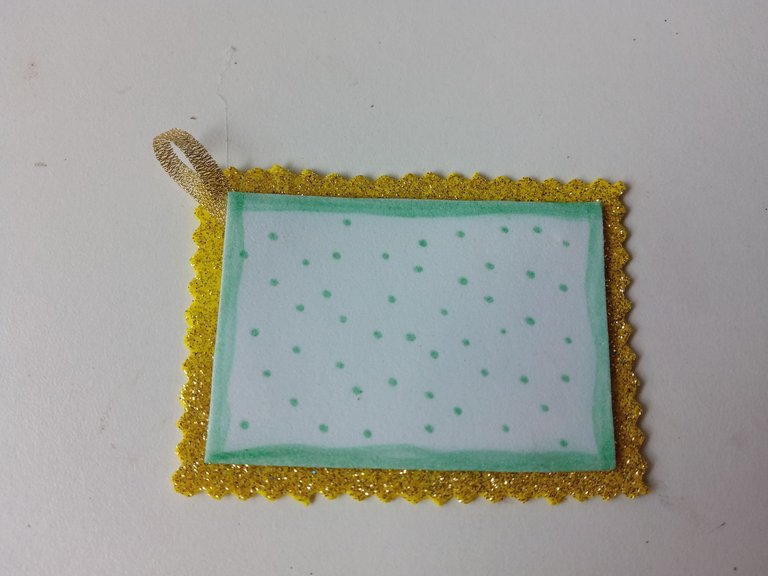
Lo primero que hice esta vez fue la base o marco y centro de lo que sería el portarretrato (según yo, jaja). Así que recorté con tijeras decoradas, y en foami escarchado dorado, un rectángulo de 8.5 cm x 6 cm. Por otra parte, recorté otro rectángulo, en foami blanco de 7 cm x 5 cm.
✨ STEP 1:
The first thing I did this time was the base or frame and center of what would be the picture frame (according to me, haha). So I cut out a rectangle of 8.5 cm x 6 cm using decorative scissors and gold frosted foam. On the other hand, I cut out another rectangle, in white foam, 7 cm x 5 cm.
✨ PASO 2:
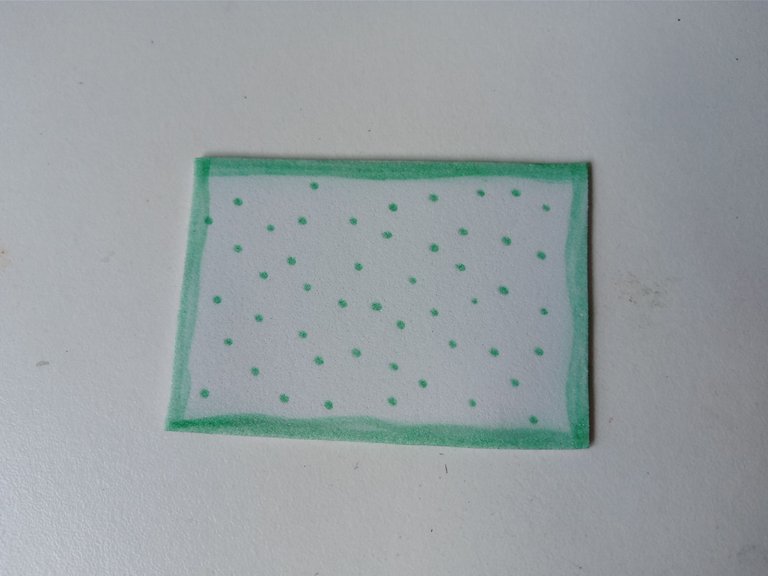
Al tener ambas piezas, es momento de dar un poco de color a los bordes de la pieza blanca con pinturas. En este caso utilicé un tono verde oscuro y difuminé con ayuda de una tela de algodón. Además, con marcador verde, hice puntos por toda la pieza. Luego, tomé un trozo de cinta de unos 4 cm, doblé a la mitad y pegué en la esquina superior izquierda del foami blanco y de ahí, pegué la pieza blanca en medio de la pieza de foami escarchado dorado.
✨ STEP 2:
Now that I have both pieces, it's time to give a little color to the edges of the white piece with paints. In this case I used a dark green tone and blended it with the help of a cotton cloth. Also, with a green marker, I made dots all over the piece. Then, I took a piece of ribbon about 4 cm long, folded it in half and glued it to the top left corner of the white foam and from there, I glued the white piece in the middle of the piece of gold frosted foam.
✨ PASO 3:
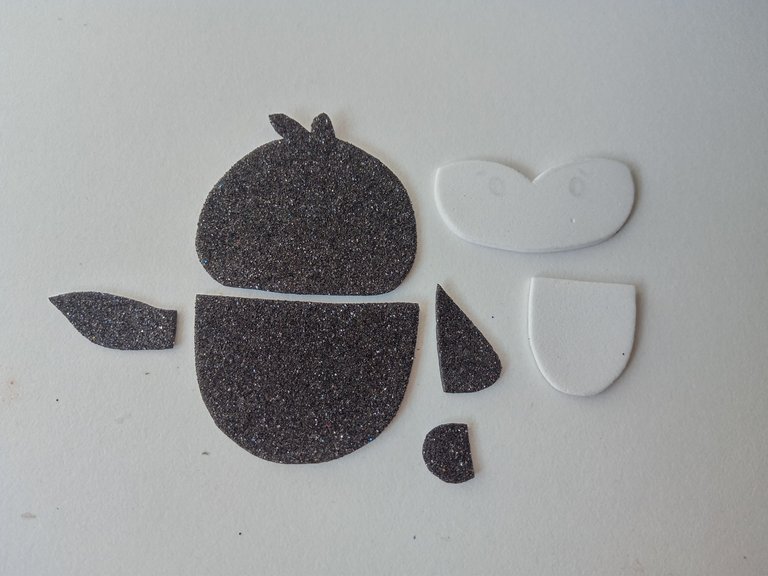
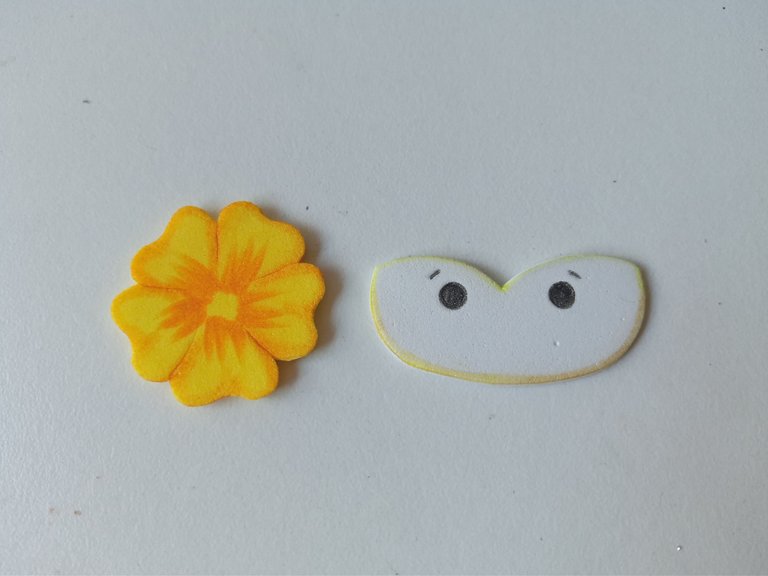
Ahora viene mi parte favorita, que es dibujar el diseño en una hoja blanca y luego, transferir cada una de las piezas a los colores correspondientes de foami, como explico a continuación:
🐧 Para Zingu:
✨Cuerpo y cabeza en foami escarchado negro.
✨Parte del rostro y centro del cuerpo en foami blanco.
✨Pico en foami escarchado dorado.
✨ Cristal en foami escarchado azul.
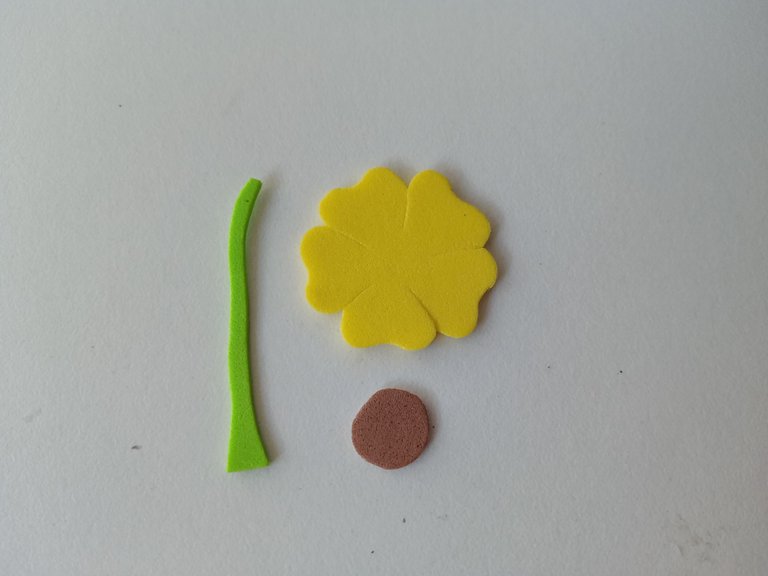
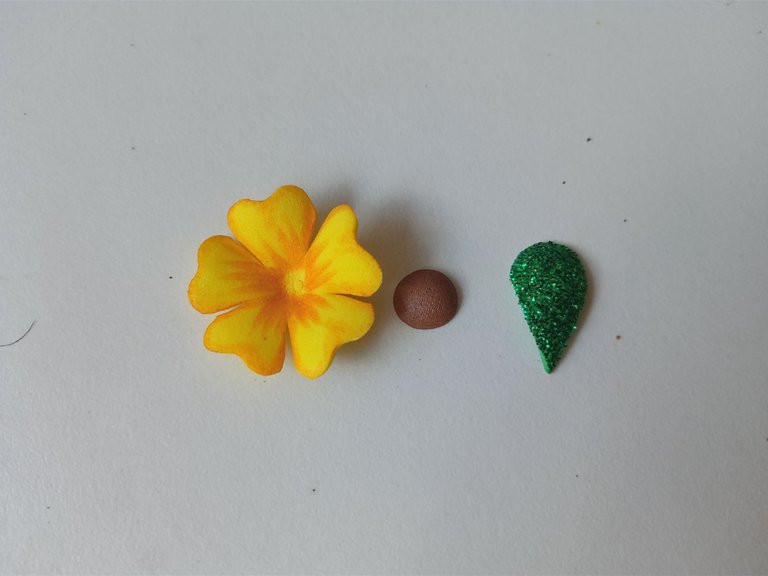
🌻 Para la flor:
✨Pétalos en foami amarillo.
✨Centro en foami marrón.
✨Tallo en foami verde.
✨ Hoja en foami escarchado verde.
✨ STEP 3:
Now comes my favorite part, which is drawing the design on a white sheet and then transferring each of the pieces to the corresponding colors of foam, as I explain below:
🐧 For Zingu:
✨Body and head in black frosted foam.
✨Part of the face and center of the body in white foam.
✨Beak in gold frosted foam.
✨ Crystal in blue frosted foam.
🌻 For the flower:
✨Petals in yellow foam.
✨Center in brown foam.
✨Stem in green foam.
✨ Leaf in green frosted foam.
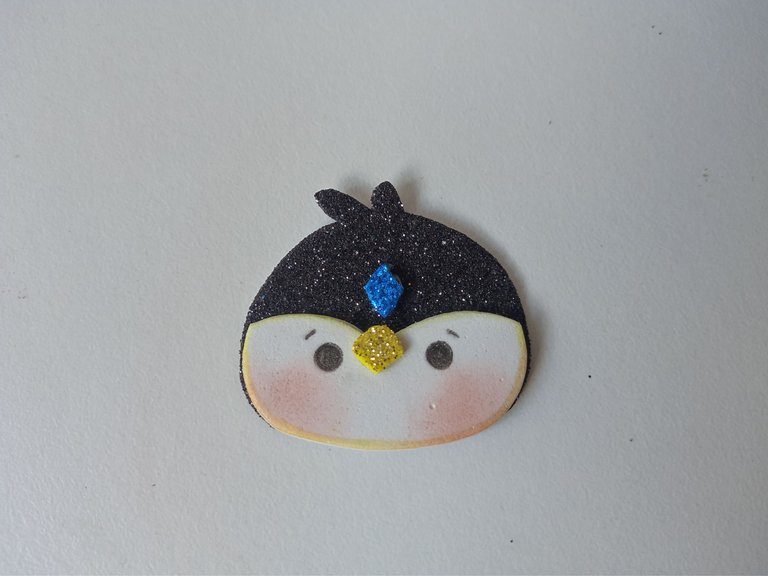
✨ PASO 4:
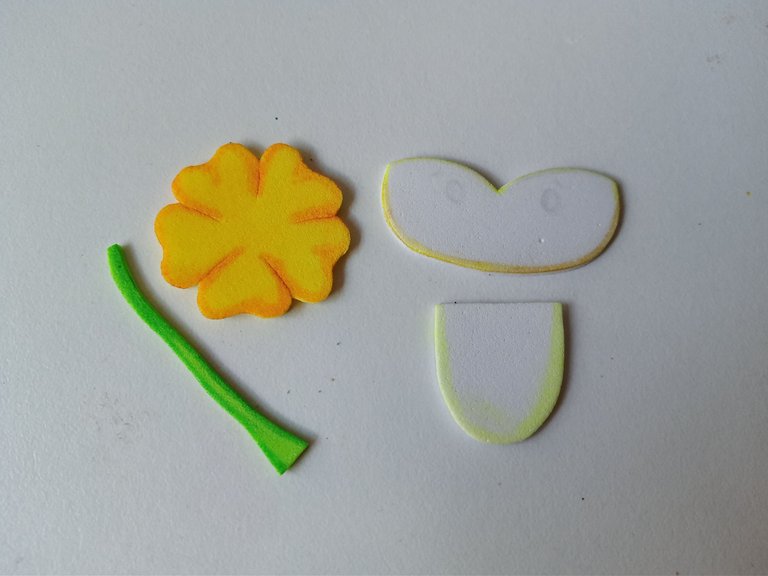
Al estar todas las piezas listas, es momento de dar color a los bordes de las piezas en foami liso, para dar contraste. En el caso de las partes blancas de Zingu, pinté con un tono amarillo, a la flor con un tono naranja y al tallo con un tono verde oscuro. Al estar secos, tomé los marcadores y dibujé detalles más específicos a la flor, los ojos y cejas. Además, pinté con rubor las mejillas.
✨ STEP 4:
Once all the pieces are ready, it's time to color the edges of the pieces in plain foam, to give contrast. For the white parts of Zingu, I painted them with a yellow shade, the flower with an orange shade, and the stem with a dark green shade. Once they were dry, I took the markers and drew more specific details on the flower, eyes, and eyebrows. I also painted the cheeks with blush.
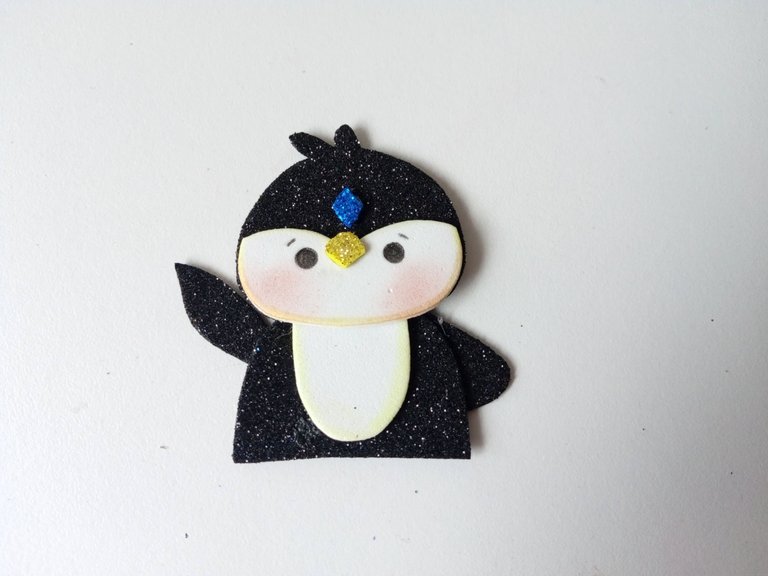
✨ PASO 5:
Ahora es momento de pegar las piezas, así que comencé pegando las partes de la cabeza: el rostro, el pico y el cristal, para luego pegar la parte baja del cuerpo. Seguidamente, pegué a Zingu a la base que hicimos al inicio.
✨ STEP 5:
Now it's time to glue the pieces together, so I started by gluing the head parts: the face, beak, and crystal, then gluing the lower part of the body. Next, I glued Zingu to the base we made at the beginning.
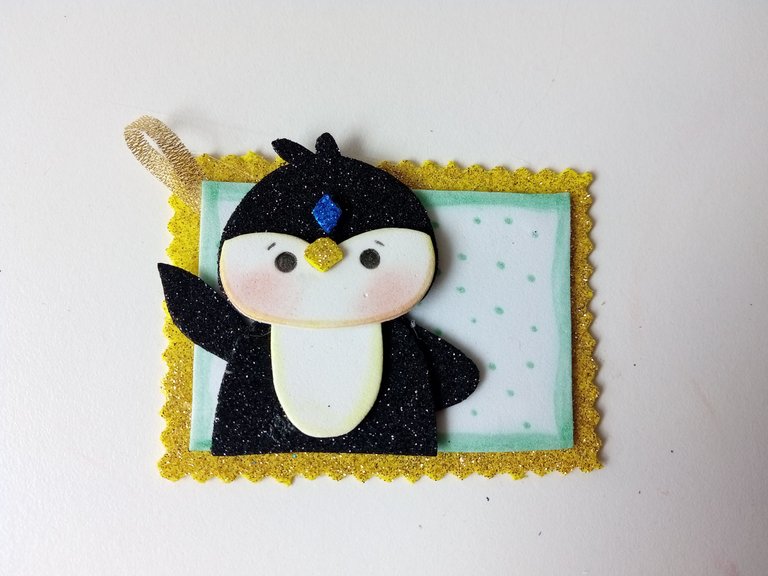
✨ PASO 6:
Luego, formé la flor, pero quise dar relieve, así que la coloqué en la plancha. Hundí la parte del centro con la parte trasera de un pincel y así mismo con el centro. Al estar listo, pegué hasta formar con el tallo justo en una de las aletas de Zingu. Al estar listo, pasé el aro metálico por la cinta de la esquina y listo.
✨ STEP 6:
Next, I formed the flower, but I wanted to give it relief, so I placed it on the iron. I dug the center part with the back of a paintbrush and the same with the center. When it was ready, I glued it until it formed with the stem right on one of Zingu's fins. When it was ready, I passed the metal ring through the corner tape and that's it.
 |  |  |
|---|
❤️ Hasta la próxima publicación.
❤️ Until the next post.

Todas las fotografías son de mi propiedad.
Separador y Fotos editadas en Canva
All photographs are my property.
Photos edited in Canva
Te quedó súper lindo mi Valen, me encantó la flor 😍😍
Muchas gracias mi Vane bella 💕
Ami es increíble la cantidad de detalles para algo tan pequeño! Quedo precioso amiga, cada día te quedan más lindos y hay más detalle en tu trabajo eso me encanta.
Gracias mi Rosita, gracias por fijarte en las pequeñas cositas jaja. Me egra mucho que te haya gustado 💕💖
Ay no qué hermosura 🥰 me encantó ami
Muchas gracias mi Eve! 🤭💖