In this post I explain how to install everything that is required to run spltools. spltools is a python package for working with Splinterlands data. It is currently a work in progress.
This post is a part of the series of posts im doing in my journey into open-sourcing the code I use in my Splinterlands posts. Links to the other posts in this series can be found at the end of this post.
A short summary of how we install and use the spltools package:
- Set up a conda environment
- Install packages in the conda environment.
- Download the source code
- Activate conda environment and run spltools python scripts.

Setting up and activating a conda environment.
Conda is a package manager that I am a big fan of. It is great for programming. Installation with conda is super easy, and if anything goes wrong with it, you can easily delete the environment you have been working in and start over. There is also much less clicking involved than in common gui installers. Official conda installation instructions can be found here: Getting started with conda
Step 1: Install miniconda
Follow instructions at https://docs.anaconda.com/miniconda/miniconda-install/
Step 2: Create a new conda environment
Depending on your OS, either open a standard terminal, or an Anaconda Prompt (Windows). Next, type the following in the terminal:
conda create -n <environment name> python=3.12
(Replace < environment name > with whatever you want to call it. Preferably something short as you will type it each time you want to activate it).

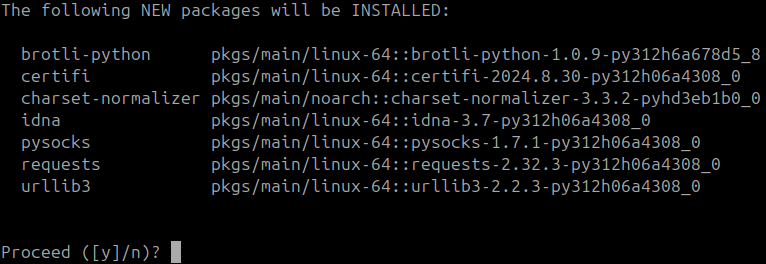
Accept the installation by pressing y+Enter when it asks to proceed (image above). Conda will now download and install a bunch of python packages.
Step 3: Activate the environent
conda activate <environment name>
You should now see the environment name to the at the left side of the terminal.
If you want to deactivate it again for some reason, you type:
conda deactivate
Step 4: Install additional packages
We could have specified more packages directly during our environment setup. However, conda is very easy to install new packages into, and it is useful to know how to do it. When I tried to run some of the spltools examples with the fresh environment we just set up, I got this error:

That means that we are missing the requests package in our environment. To fix this, we simply do:
conda install requests
That brings up another installation, which we just accept like before. Make sure that you have the environment activated before you install, otherwise it will be installed in the base conda environment. That is not a problem in itself, but it is generally better to keep the base environment as clean as possible, and install our things in a different one (That is why we set up a named environment above). Also, if we want to use the named environment, we have to install the packages in it.

We also need numpy for some of the examples, install it with:
conda install numpy
Numpy a somewhat big, but it is extremely powerful for everything math related.
Step 5: Celebrate
We're done!


Getting spltools
Next we need to download the spltools source code. This will give us a small directory containing python code.
Option 1: Download with git
Using git is the best way to setup spltools, because it allows for smooth updates. It is a bit of a programmers tool though, so depending how comfortable you are with that, this might not be the easiest option. First time use should be simple in either case since there will be no version conflicts. The url for the spltools repository is:
https://github.com/Kalkulus2/spltools/tree/main
On Linux, git is typically preinstalled. On Windows/Mac (or if your Linux distro somehow doesn't have it), you can install it in the conda environment (conda install git). Once you have git, simply navigate to wherever you want the spltools folder to end up, and then clone the environment with (cloning basically means downloading the source code).
git clone [email protected]:Kalkulus2/spltools.git
or
git clone https://github.com/Kalkulus2/spltools.git
Navigating in the conda terminal
If you are not familiar with using terminals, it can probably look a bit scary at first. To navigate around in your file system, you use the following commands:
cd <directory>
cd ..
ls
cd means "change directory". When you give a directory name that matches a folder name in the location you are currently in, the cd command will move your terminal into that folder.
cd .. means move one step up (out of the folder you are in).
ls means "list files". This will show you all the files and folders in your current location.
These three commands are sufficient for navigating around on your computer.
A nice reference for terminal commands can be found here:
Quick Reference List Of Unix Commands
Option 2: Download zip
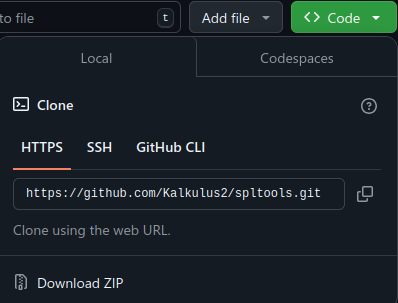
You can also download a zip folder with all the code. Press the green code button on the github page and then download zip at the bottom of the menu that appears.

Unpack the zip wherever you want spltools to be.


Running the spltools example scripts
If you got this far, you are now ready to actually use the code. In the anaconda terminal, navigate into the spltools/examples folder (See the Navigating in the conda terminal section above.)
Once you are in the examples folder, hit ls+Enter and verify that you can see something like this:

There should be a list of python files. Depending on when you try this, you might get a different list of files if I have changed/added more into the repository.
The simplest scripts are print_card_sets.py and print_all_names_and_ids.py. We will try to run them. Type the following command into the terminal (note that you can press tab when you have typed only part of the script name, and the terminal should try to autocomplete it for you):
python print_card_sets.py
This should make a long list of card names and card ids appear in the terminal:

Now try
python print_card_sets.py
This prints a long table that marks which set each card belongs to:

By now you probably understood how to run python. The first word you write in the terminal refers to which program you are trying to run. When we start with python, this tells the terminal that we want to run python. The next word is the name of the python file that we want to run. python print_card_sets.py means run print_card_sets.py with python.

Final words
Thank you for your attention. I hope that this setup guide can help some of our community members get started with python and spltools. If you are interested in more posts about the spltools python package, you can find the previous ones here:
spltools update posts:
5. Best brawler code
4. spltools update: Classes for Brawl data
3. spltools update: Reward chest classes
2. spltools update: Checking which set a card belongs to
1. Initial spltools commit
If you have not yet joined Splinterlands please click the referral link below to get started.
Join Splinterlands


Best wishes
@Kalkulus

Delegate Tokens and HP to Fallen Angels to earn weekly rewards!
Delegate | Join to the guildThis post has been supported by @fallen.angels guild!
Yeah good old conda... used it in the past very often. Now mostly use venvs in pycharm.
This is a nice manual for starting users 👏.
You may consider using requirement.txt for the request/numpy and eventual other dependencies.
Then the manual stays the same
pip install -r requirements.txtSure, I should eventually do a requirements file. For now the dependency list is small, and for this post I think it was actually valuable to show how to install packages in conda. After all, that is super easy as long as the package is in the conda repos.
I like to use conda because that introduces the linux-like terminal even on windows, and once I have that everything is much easier.
I try to avoid pip whenever it is possible because it easily breaks the conda environment. There is a good discussion on that here. Unforntunately, its not always possible.
Now I finally know why I had a hard time with conda sometimes...
Love conda for its ease to use and visual overview.
I had my fair share of broken environments in the past because of the bad interaction of pip and conda. 😫
Congratulations @kalkulus! You have completed the following achievement on the Hive blockchain And have been rewarded with New badge(s)
Your next target is to reach 1000 replies.
You can view your badges on your board and compare yourself to others in the Ranking
If you no longer want to receive notifications, reply to this comment with the word
STOPCheck out our last posts:
It will really help many who know well how to run it.
Thanks for sharing! - @mango-juice

Thanks for your contribution to the STEMsocial community. Feel free to join us on discord to get to know the rest of us!
Please consider delegating to the @stemsocial account (85% of the curation rewards are returned).
You may also include @stemsocial as a beneficiary of the rewards of this post to get a stronger support.
I've never used any plugins or extensions to help my play. Excited for tech mod for battles. What's good?
@kalkulus, I paid out 1.446 HIVE and 0.261 HBD to reward 1 comments in this discussion thread.