
Español
Holiii, amigos de la comunidad de Hivearte, ¿cómo se encuentran el día de hoy?, ¡espero que muy bien!
Esta vez quiero compartir algo especial con ustedes. Les conté anteriormente que estaba tomando unas pequeñas clases de dibujo por YouTube, pareciera que le doy mucho suspenso a la cosa con cada post que pasa, pero en realidad solo sucede que el hámster que rueda en mi cabeza está cansado, y no puedo hacer posts tan rápido, porque necesito estar bieeen motivada para escribir.
Como el título lo dice, hoy les voy a compartir un par de cositas que pude aprender acerca del dibujo, bastante simples, pero que me sirvieron como principiante, así que quizá te sirvan a ti también; pero eso era demasiado largo como para ponerlo de título.
Realmente, mi post va dirigido a las lindas personitas que están aprendiendo como yo, porque sé que ustedes me entienden, y yo los entiendo también. Aunque creo que todos los que dibujamos nos entendemos mutuamente, ¡así que vamos allá!
¿El artista nace o se hace?
Posiblemente, alguna vez llegaste a pensar que un artista era el fruto del talento con el que fue bendecido al nacer. En muchas ocasiones, quizá se trate de que una persona está predispuesta a tener más éxito en el dibujo que otra, pero esto no quiere decir que uno no pueda aprender a entrenar su mente y mano para dibujar.
Así que con esto tenemos la conclusión de que dibujar=saber observar. Y esto es algo que todos podemos aprender. Así que yo tengo la creencia de que cualquier técnica, no solo el dibujo, no es algo con lo que se nace, sino que se desarrolla.
Ejercicios
Una de las primeras cosas que aprendí, fue el agarre del lápiz, y es prácticamente lo que uno aprende en cualquier curso.
Por cierto, cabe destacar que solo voy a hablar muy por encima de lo que aprendí, ya que no quiero quitarle el mérito al mini-curso que vi. También les dejaré el canal de YouTube por si gustan visitarlo.
Bien, en el curso recomiendan hacer unos ejercicios para soltar la mano, para trazar con más soltura y para tener más precisión en el trazo. Eso es lo que compartiré con ustedes.
No me lo van a creer, pero realmente me funcionaron estos ejercicios, y yo los llevé a cabo de una manera… ingeniosa. Les compartiré unas fotos a continuación para explicar los ejercicios que inventé yo.
Piensen en estas formas
 |  |
|---|
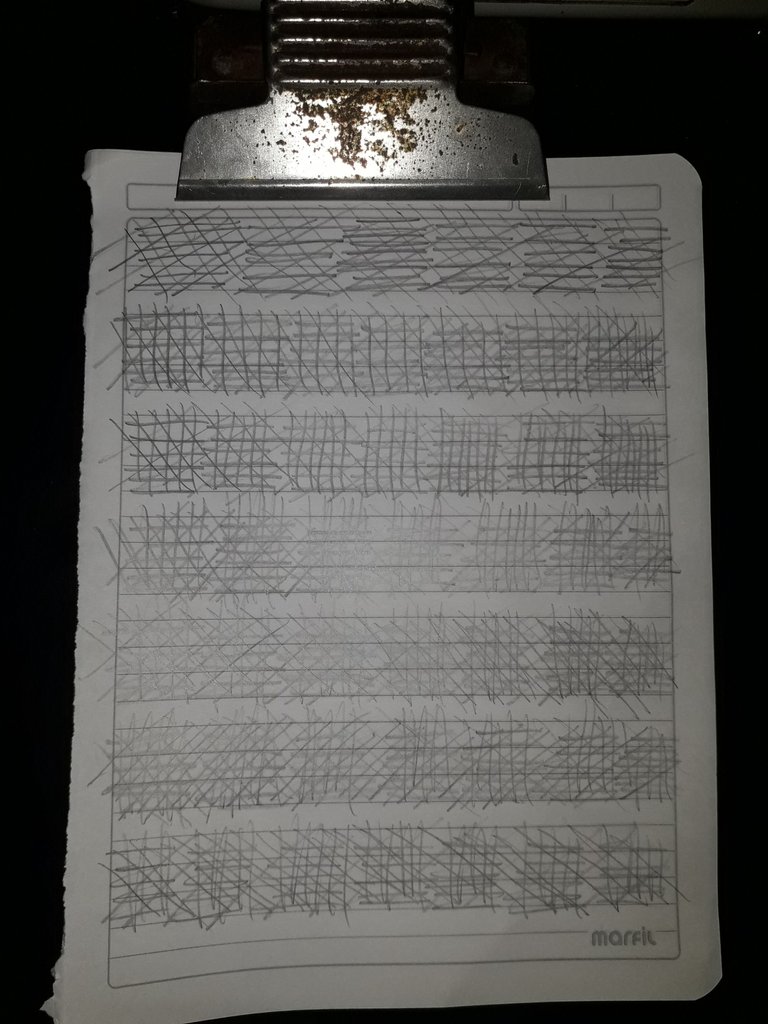
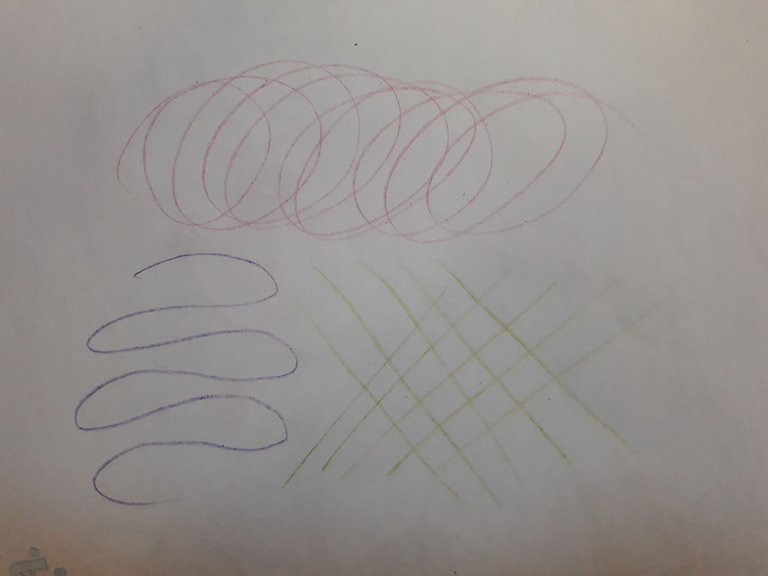
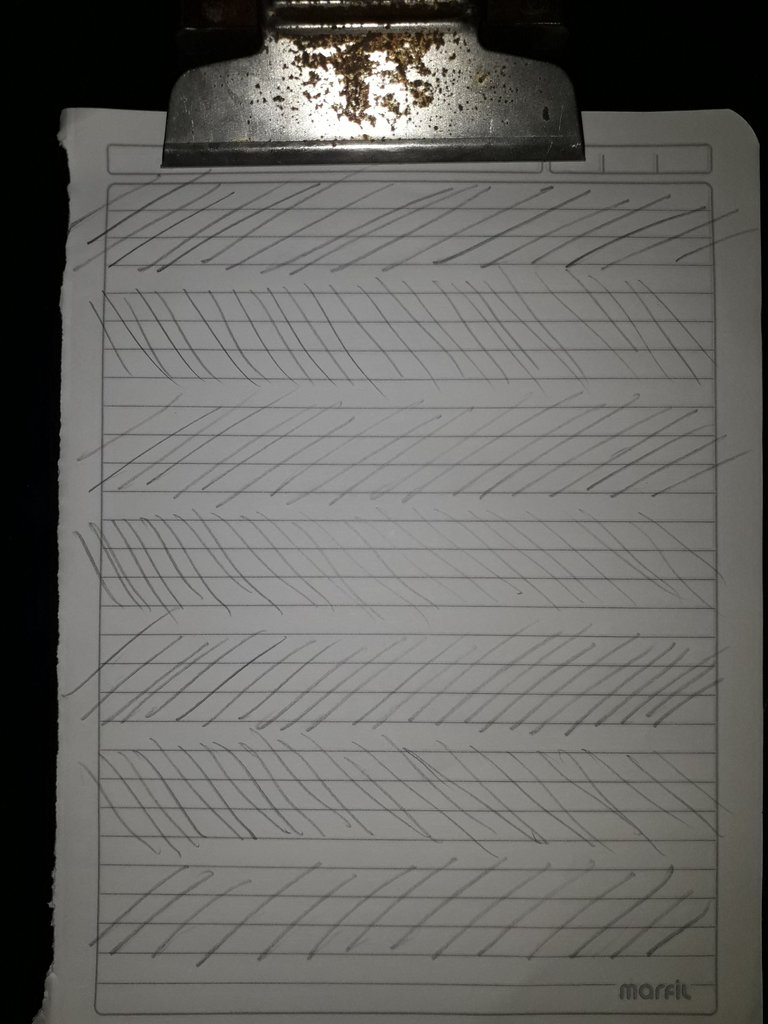
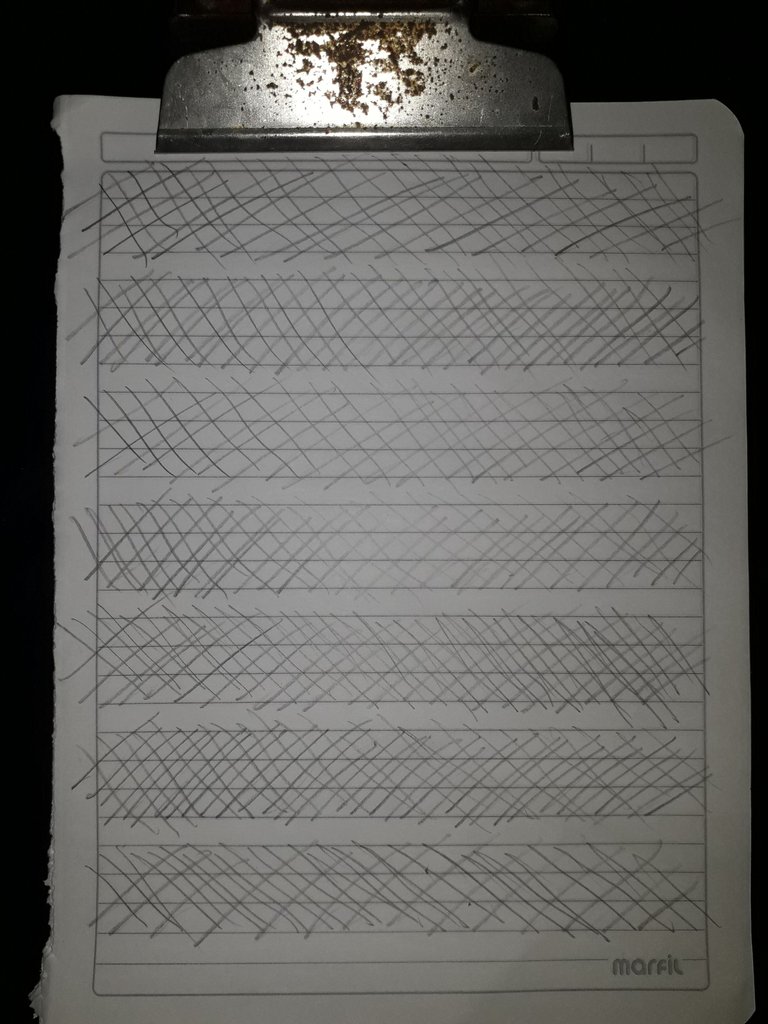
Uno de los ejercicios consistía en hacer líneas rectas, variando intencionalmente la presión entre trazos. Hice líneas inclinadas hacia la izquierda, la derecha, verticales y horizontales. ¿Se dan cuenta de que hice todas las líneas encima una de otras? A esto me refería cuando dije que las hice de manera ingeniosa, se trataba de ahorrar espacio, jajaja.
Ustedes pueden trazar las líneas donde ustedes quieran y del tamaño que ustedes quieran, la idea es que intenten hacer las líneas lo más rectas que puedan.
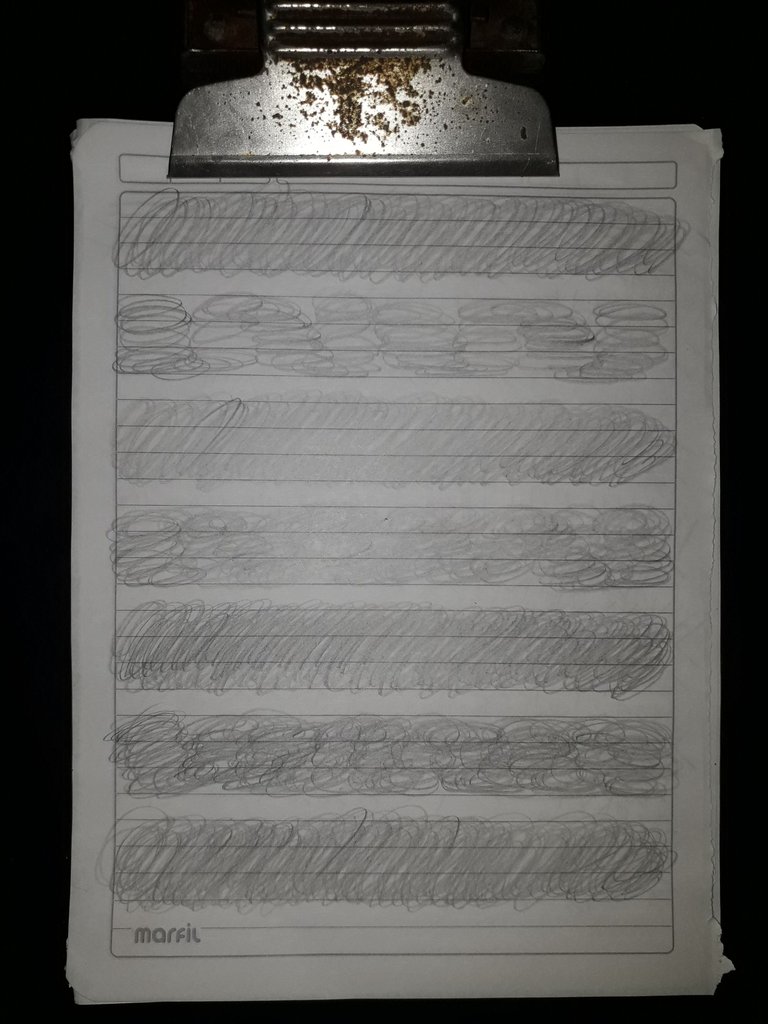
Aquí dibujé bucles, trazando de izquierda a derecha. Luego hacía otra serie de bucles, que iban de arriba a abajo. Es muy importante que su muñeca haga movimientos circulares, y procuren no levantar el lápiz en cada serie de bucles; piensen esto como si fuera hacer ejercicios de caligrafía, es muy parecido.
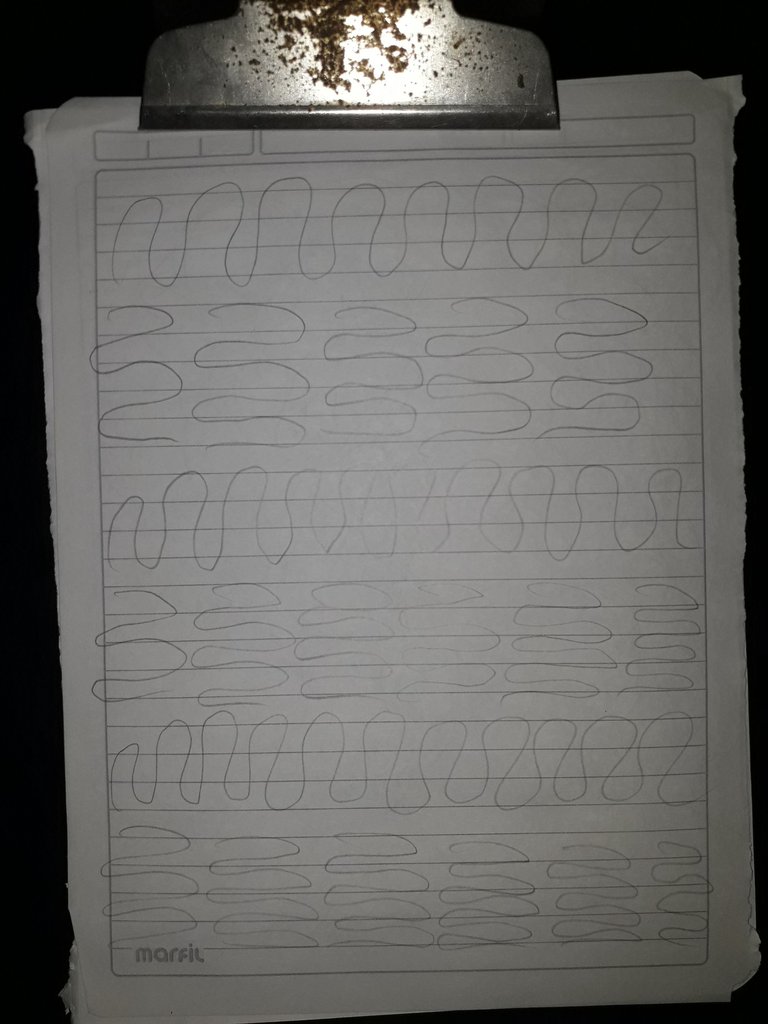
Ahora vamos con líneas curvas. No olviden mover la muñeca mientras hacen los trazos, y no levanten la mano mientras trazan.
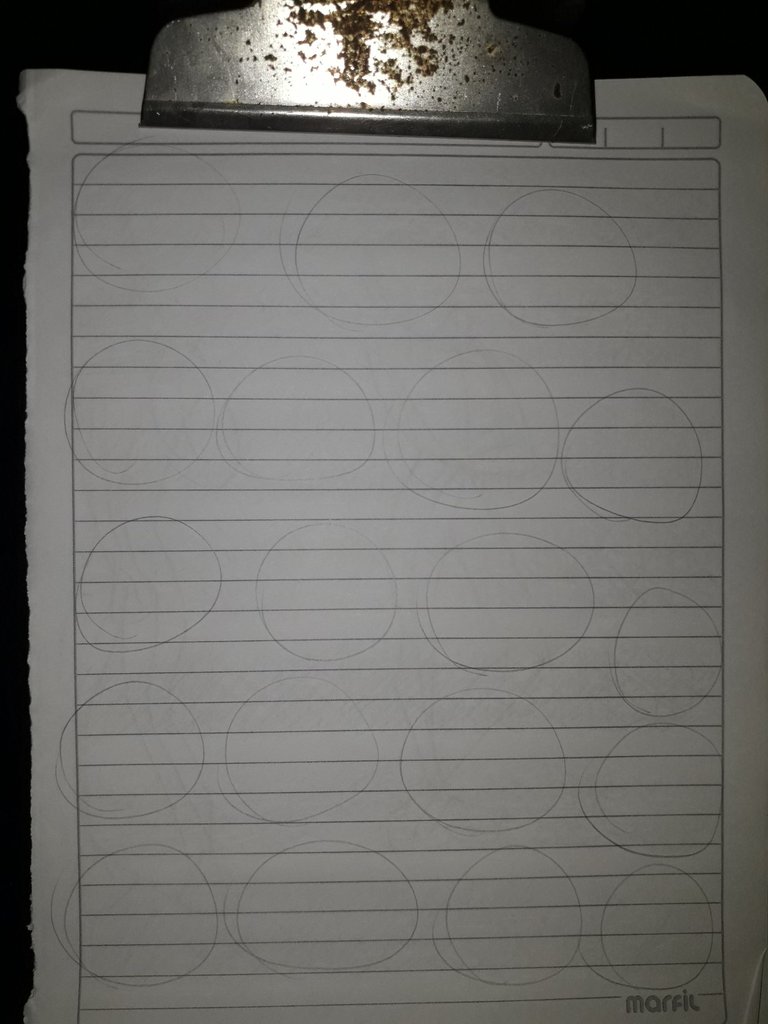
También círculos, intentando que queden lo más “redondos” posible. No olviden variar la presión del trazo.
No hay un orden específico para hacer estos ejercicios. Yo los hacía diariamente antes de dibujar, por bastante rato; pasaba 10 minutos haciendo cada uno, trataba de hacerlo como calentamiento. Pasé como un mes haciendo estos ejercicios, y creo que debería retomarlo nuevamente, ya que sí te ayuda mucho a “soltar la mano”.
De esta manera, entrenamos nuestro cerebro para que esté más consciente de la presión y la fluidez de los trazos que hacemos al dibujar.
Formas 2D
El siguiente “ejercicio” que les compartiré es uno bastante básico, pero realmente básico, y que, si tú dibujas, deberías saberlo; y si no lo sabes, tranqui, cariño, que aquí estoy yo: otra novata, jijiji.
Uno de los detalles más importantes a la hora de dibujar, es observar: uno debe poder entender lo que ve; debe entender el mundo a nuestro alrededor, para poder desglosarlo y dividirlo en figuras que resulten más fáciles de asimilar para nuestro cerebro. Este ejercicio se conoce como simplificación.
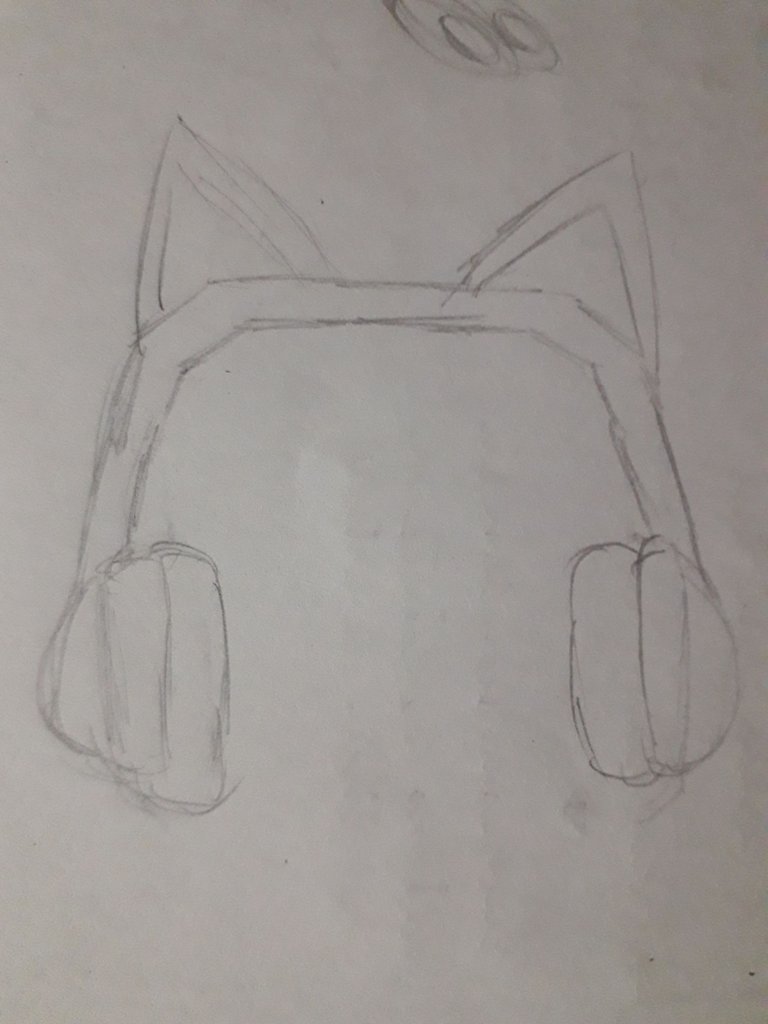
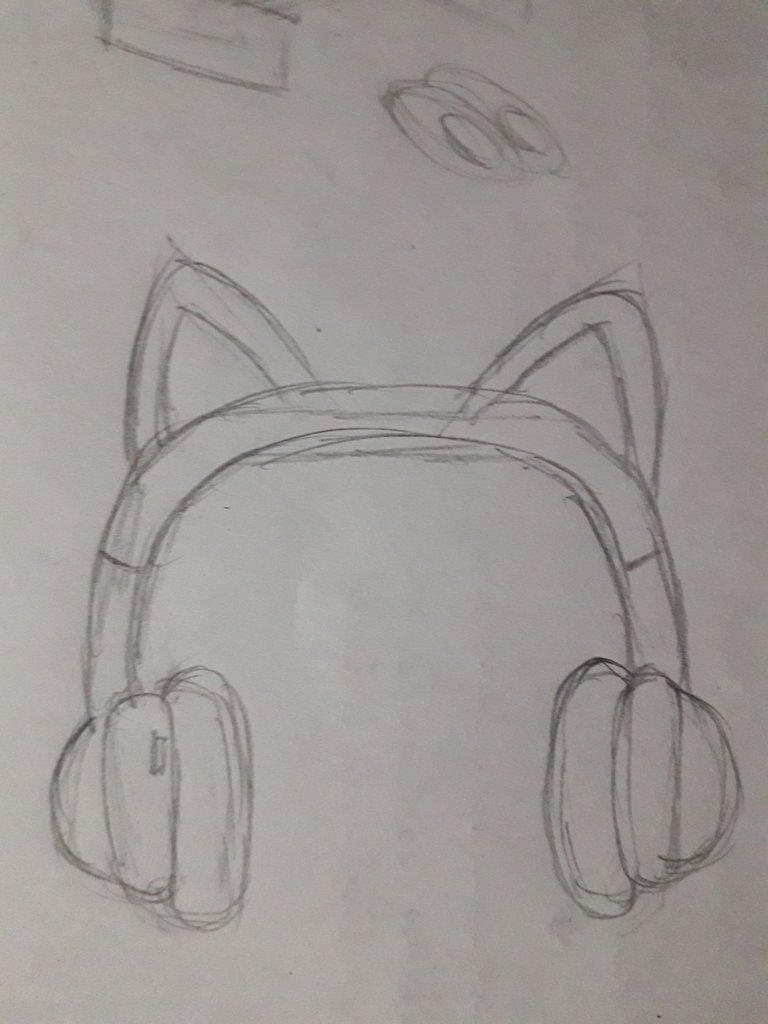
El ejercicio consiste en tomar cualquier objeto cercano o imagen de referencia y empezar a plasmarlo en figuras 2D. Es decir, vamos a simplificar todo en figuras geométricas 2D, les comparto lo que yo hice.
 |  |
|---|
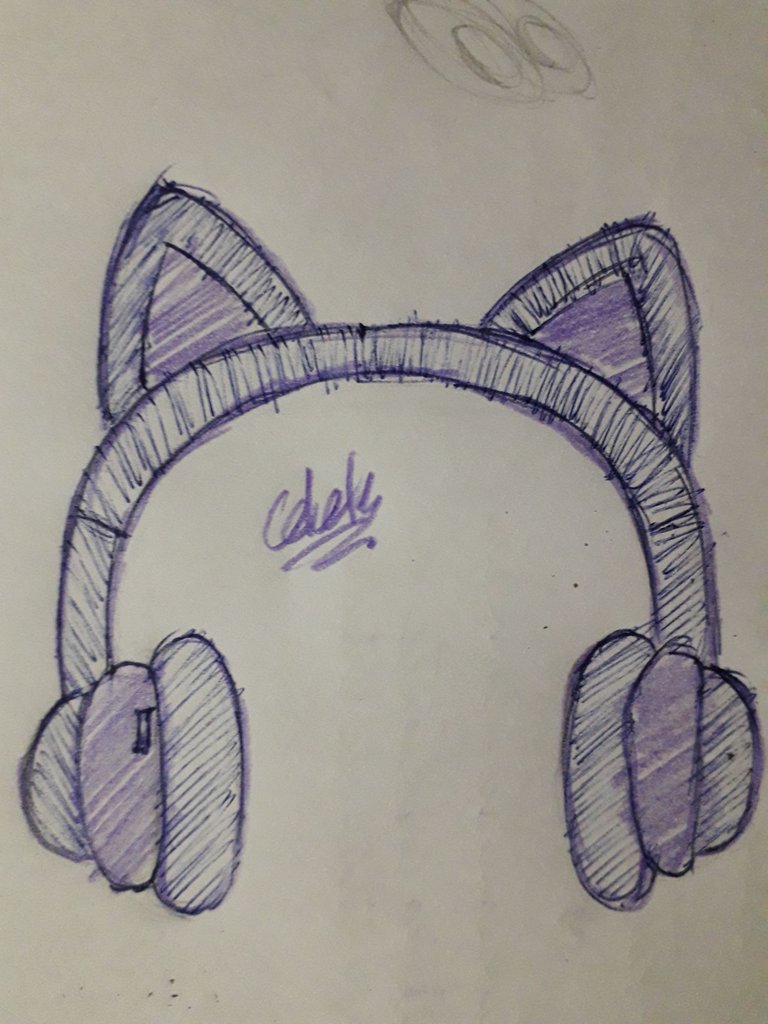
Aquí intenté dibujar mis audífonos de gatito. Fue algo que hice en unos dos minutitos. Lo que quiero mostrarles es como, de una serie de figuras geométricas, pudimos dibujar unos audífonos (o cualquier otro objeto).
La línea curva la simplifiqué como una serie de líneas rectas, porque de esta manera es más fácil capturar la dirección que sigue la línea curva, ¿si me explico? Así normalmente suelo simplificar las líneas curvas. Miren como utilicé óvalos y triángulos también, de eso se trata este ejercicio: usar formas simples, las que quieras, que te resulten fáciles de entender, y a partir de ellas vamos a plasmar una referencia real o de imagen.
Puntos importantes
Empezamos de lo general a lo particular: esto aplica para prácticamente todo en el mundillo del dibujo. En este caso, empezamos con las formas más grandes a las más pequeñas.
Algo interesante es que los objetos creados por el ser humano suelen tener formas simples, como cuadrados, círculos, triángulos y formas que estén compuestas de la mezcla de alguno de estos.
Este ejercicio es esencial para poder comprender las cosas que nos rodean, al convertirlas en formas que son no solo fáciles de entender, sino también de memorizar, y entonces podremos dibujar sin referencias.
Con el cuerpo humano se puede hacer la misma simplificación, pero es mucho más complicado. Sin embargo, es otro ejercicio que deben hacer más adelante, para familiarizarnos. No sé si hacer post de eso, ya que a mí aún me cuesta mucho, pero ustedes me dirán si quieren que practiquemos juntos, jaja.
Lo más genial de todo esto, de la simplificación, es que se puede practicar incluso en la vida diaria, sin dibujar.
Mi dibujo
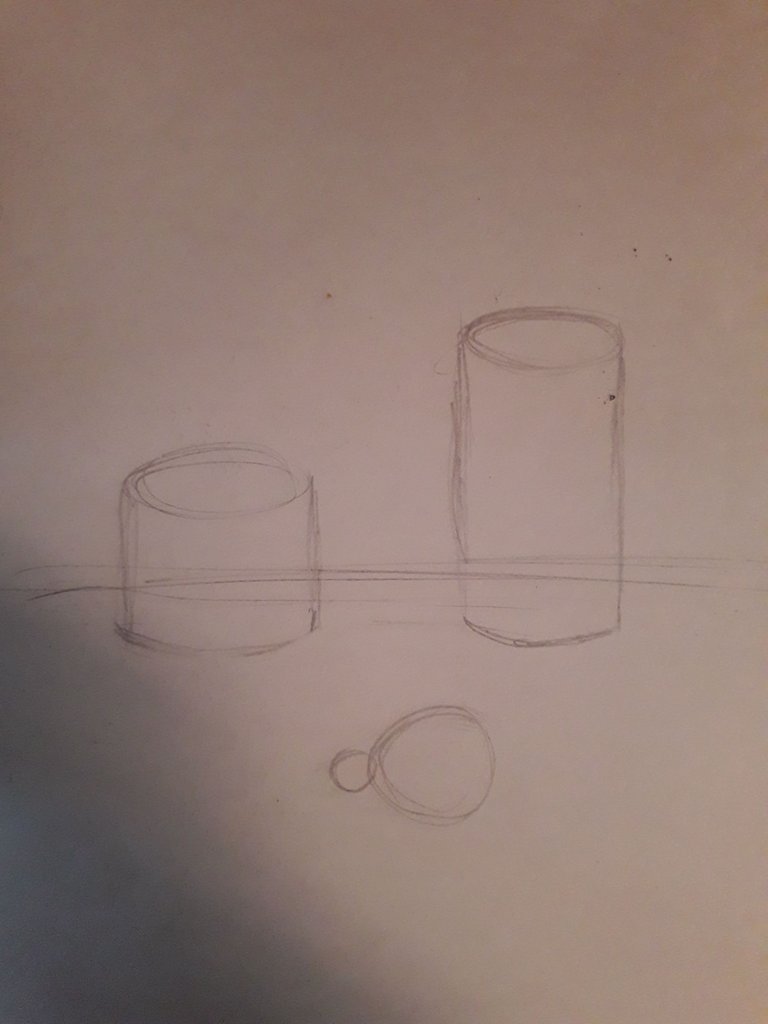
Por cierto, les voy a dejar un dibujo que hice simplificando formas, desde la memoria. Narraré el proceso un poco, sin entrar tanto en detalles, porque si no, el post sería eterno, jajaja.
 |  |
|---|
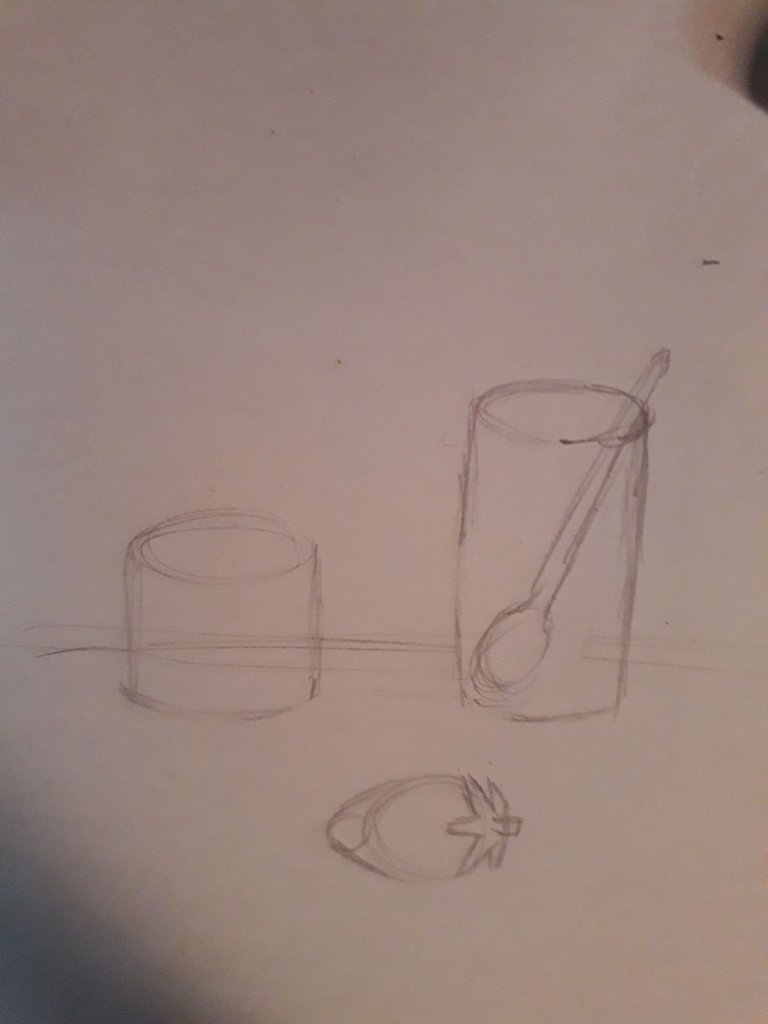
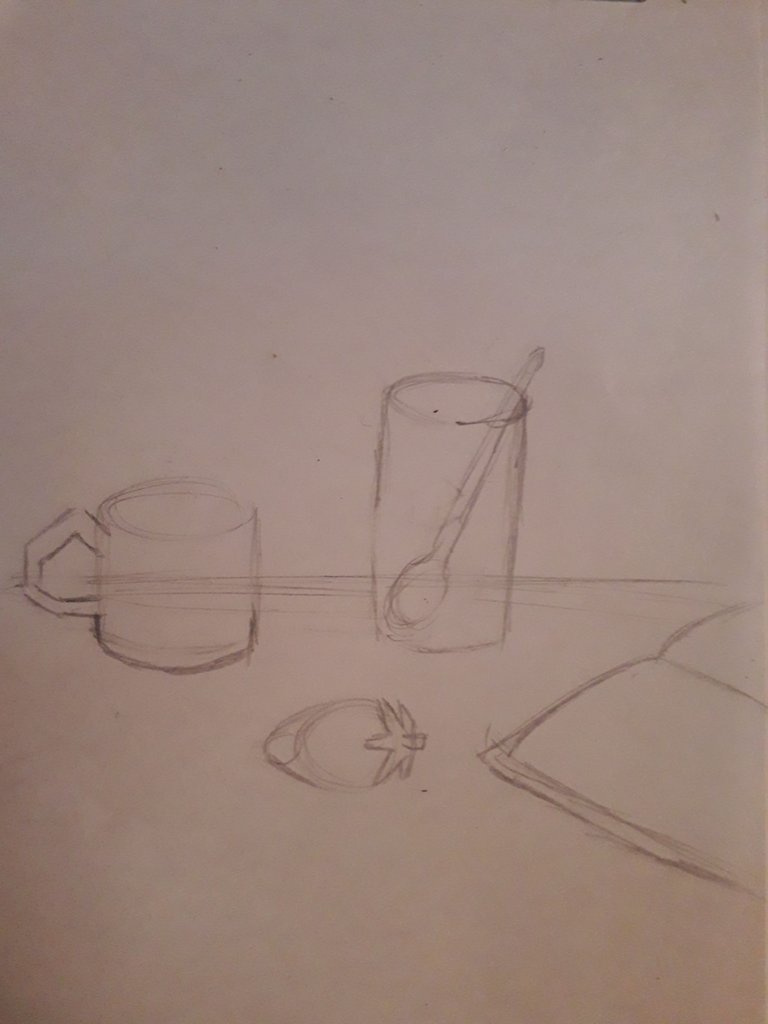
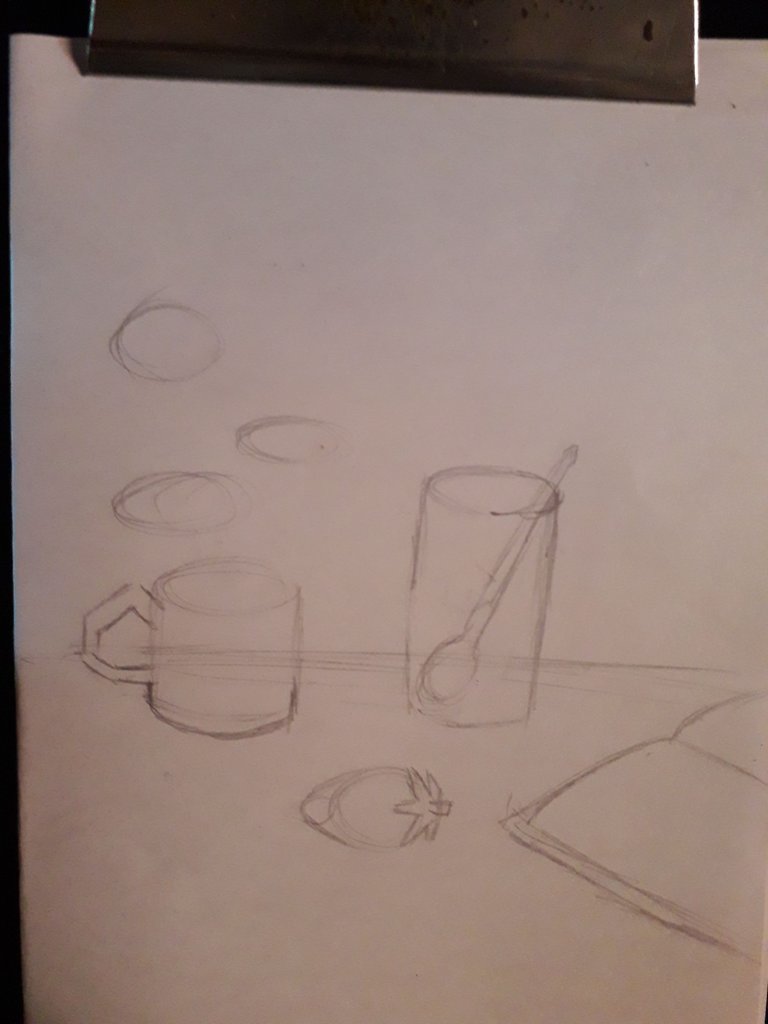
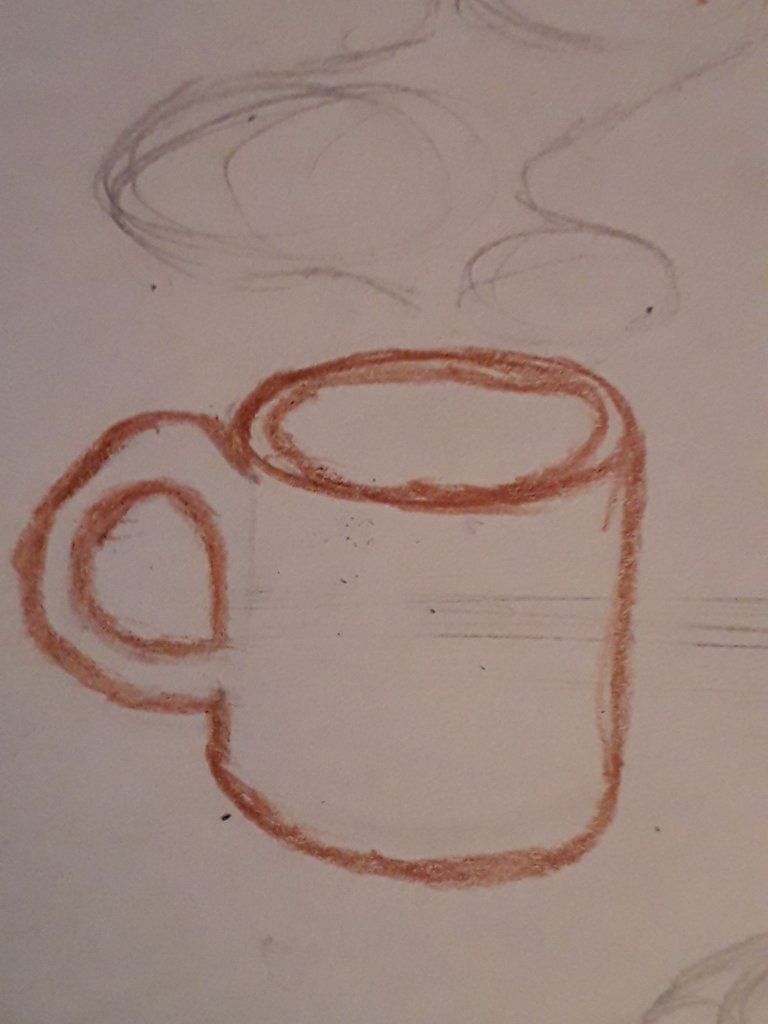
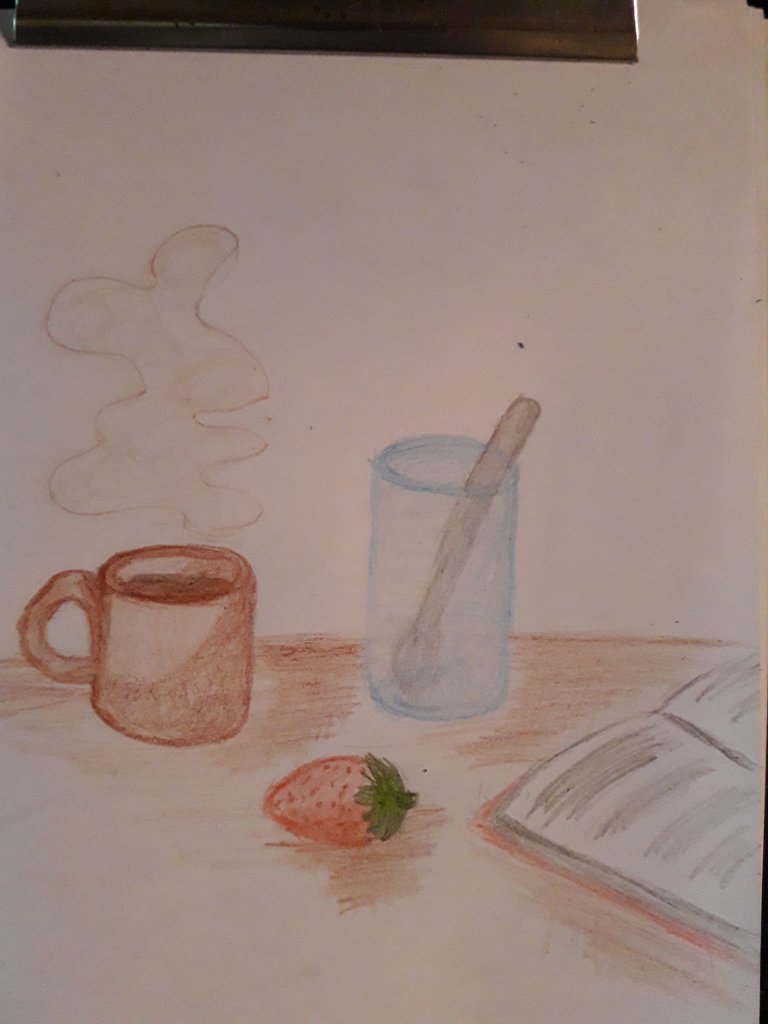
Aquí vean como comencé haciendo dos cilindros y dos pequeños círculos.
En la segunda imagen, hice un óvalo y dos líneas, para hacer una cucharilla.
 |  |
|---|
También añadí un rectángulo en la orilla, para hacer un libro.
Y comencé a bosquejar el resto de elementos del dibujo. También fíjense en los óvalos que hice arriba de la taza, es el bosquejo para el vapor.
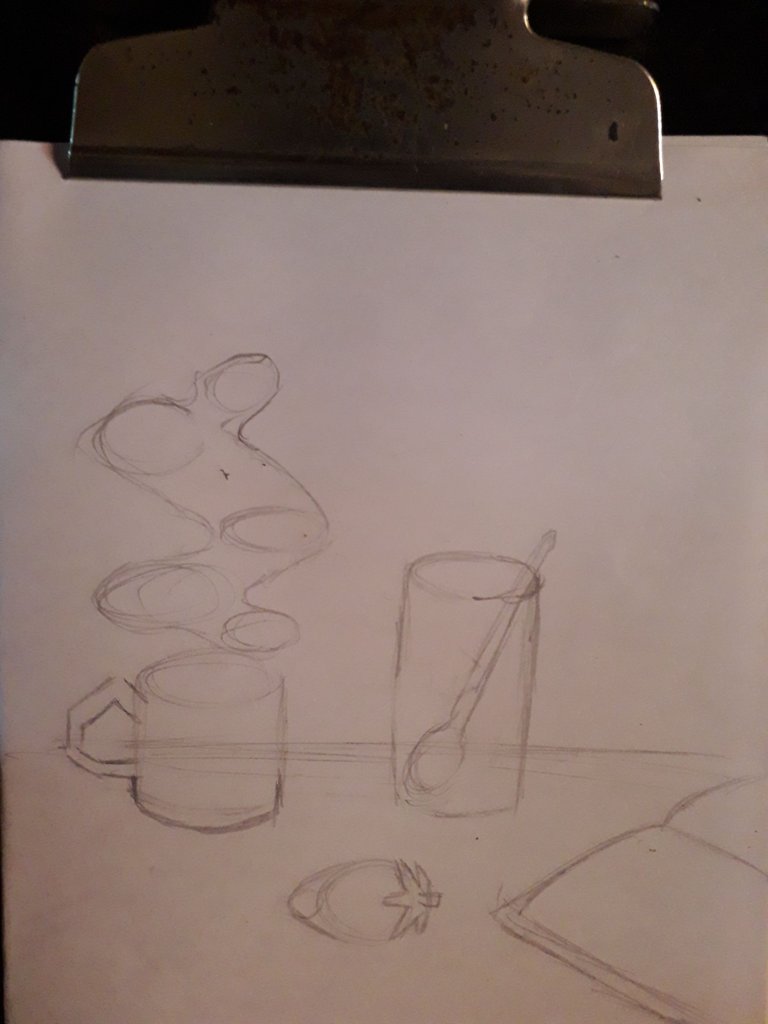
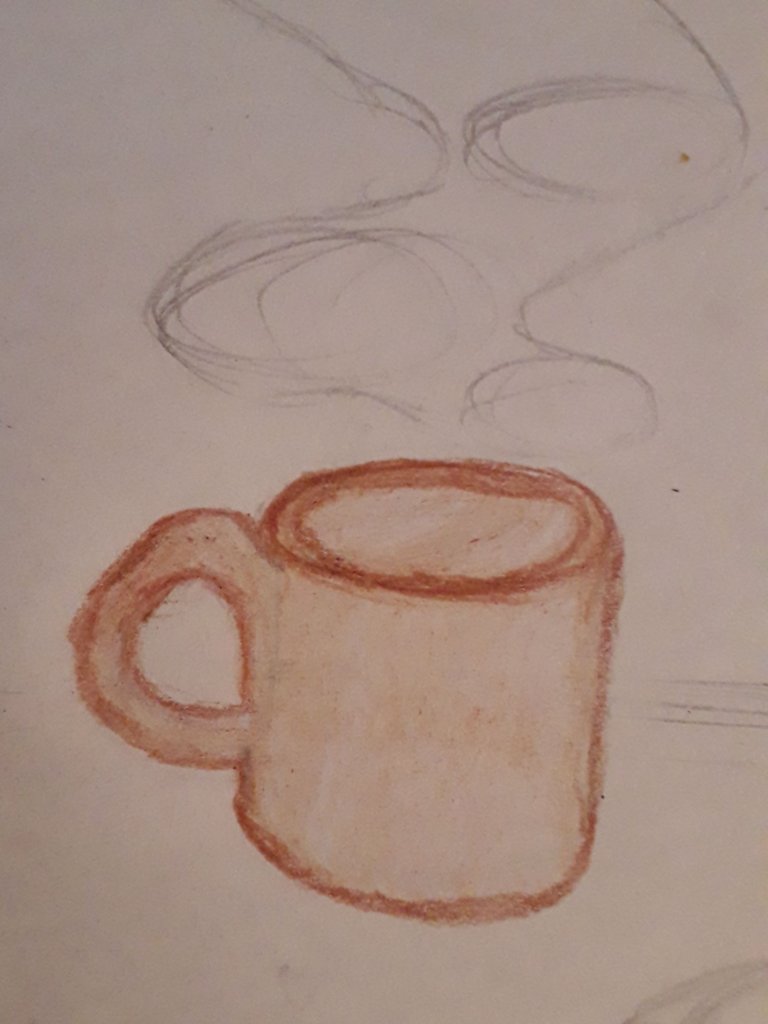
Siguiendo la dirección de los óvalos, pude hacer un patrón de vapor. Hora de colorear.
 |  |
|---|
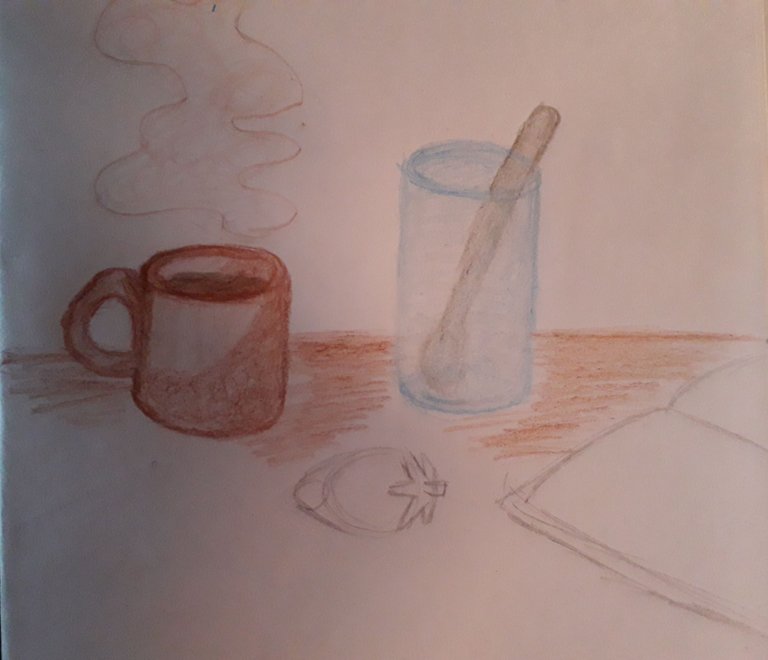
Con color marrón, delineamos la silueta de la taza, y coloreamos.
 |  |
|---|
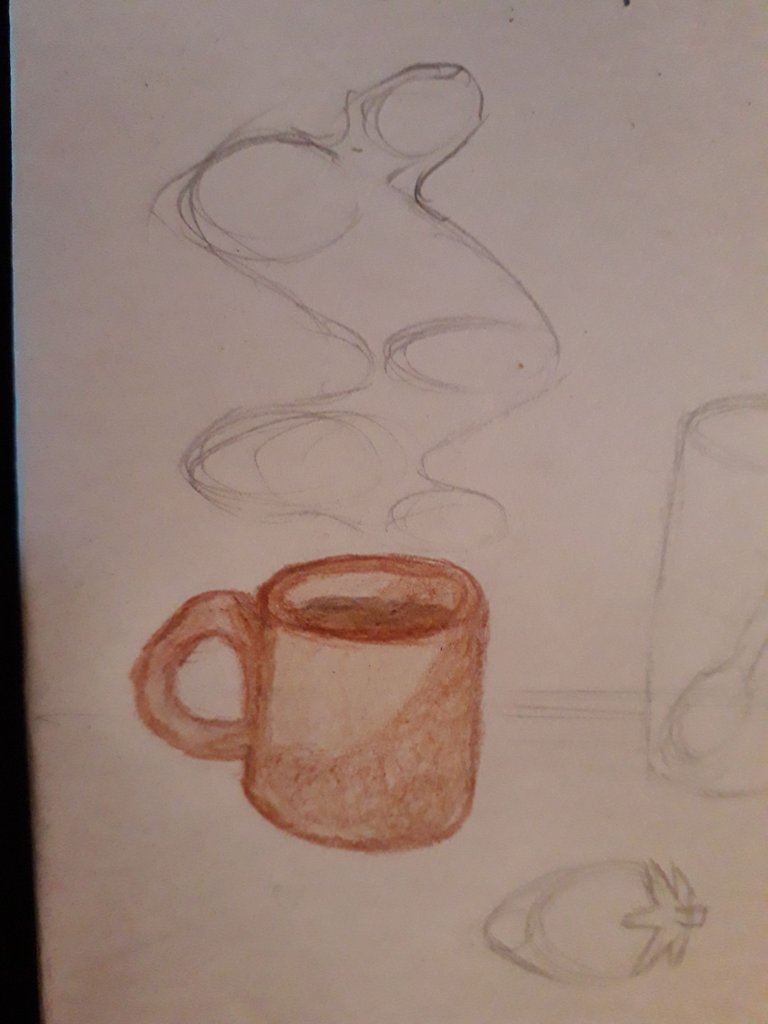
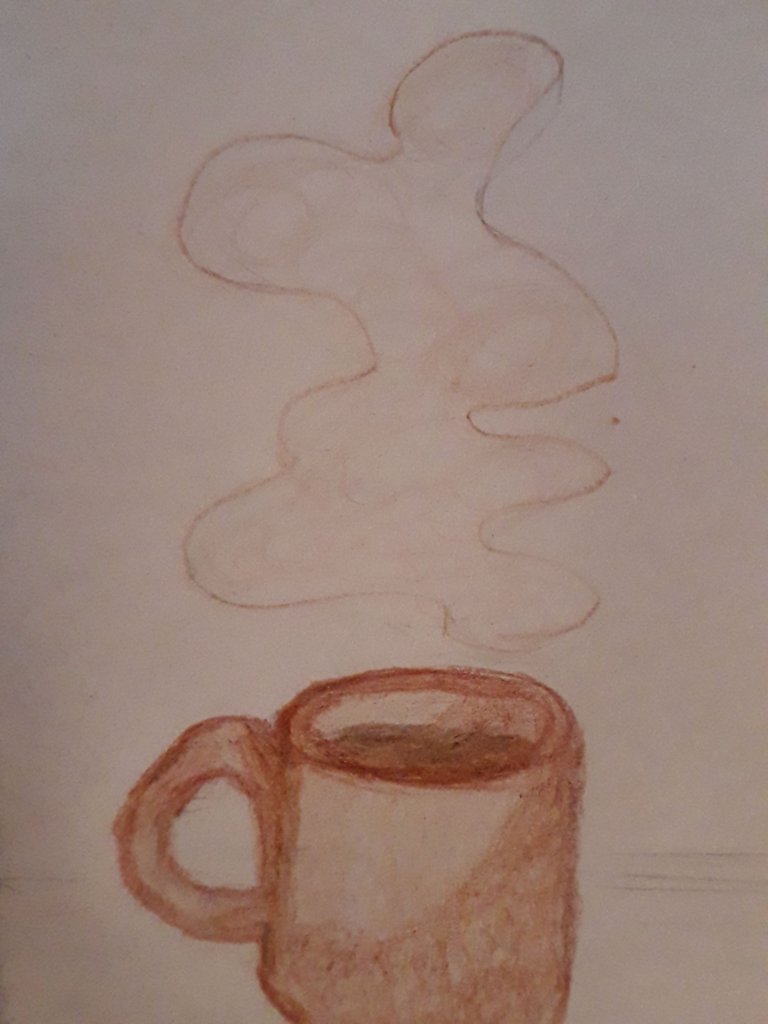
Añadimos la sombra. Delineamos el vapor y le damos color.
 |  |
|---|
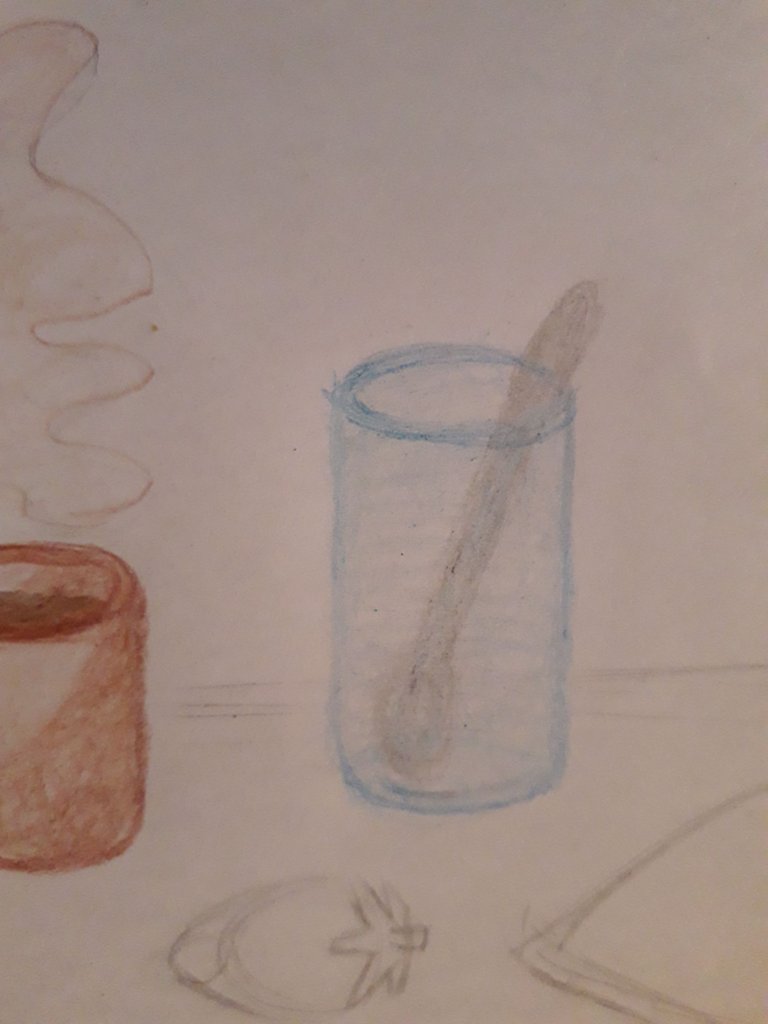
Con color azul, delineamos el vaso y le damos color. Con color gris, nos encargamos de la cucharilla.
 |  |  |
|---|
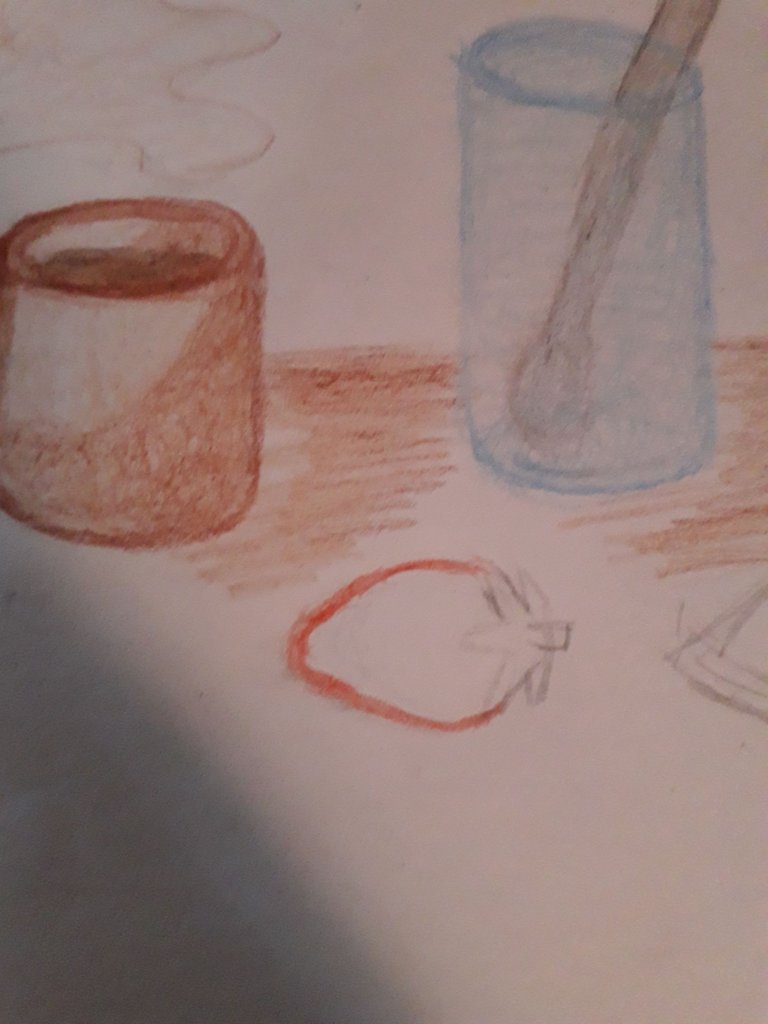
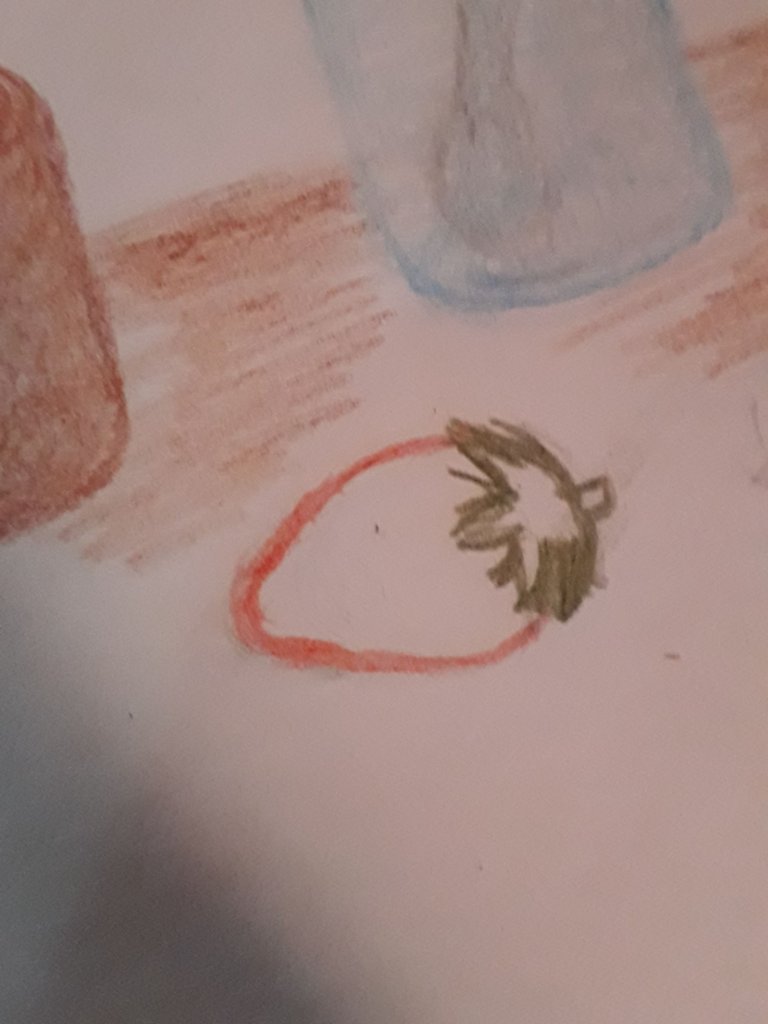
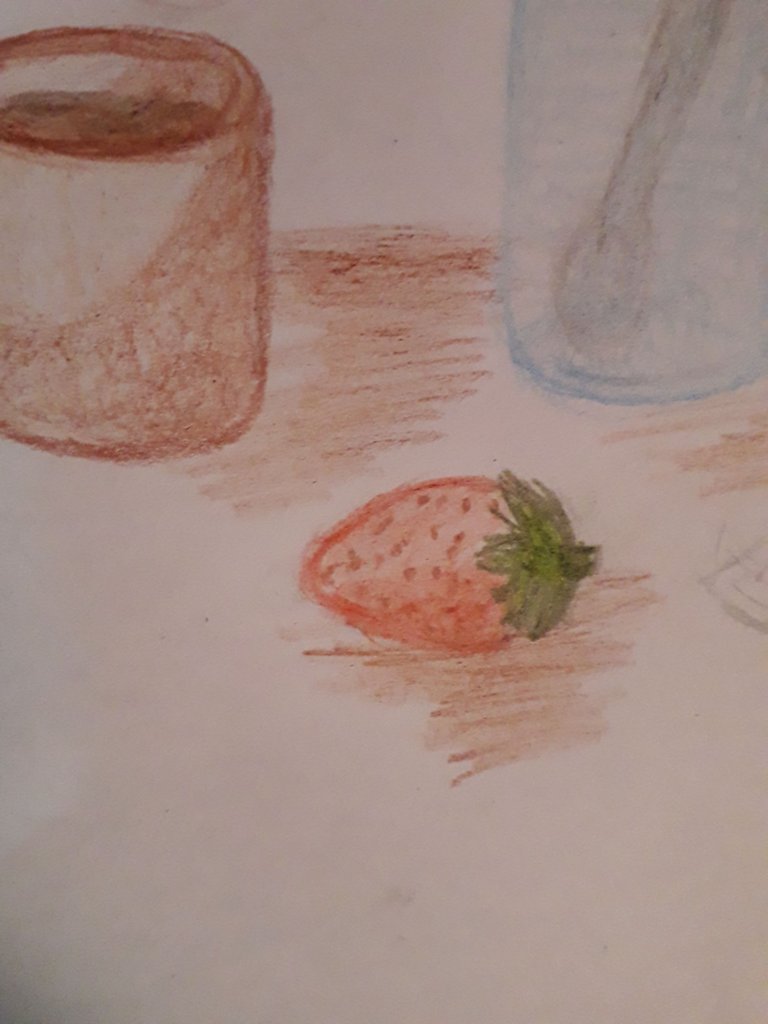
Con color rojo, delineamos el contorno de la fresa, y con color verde oscuro, delineamos la hoja. Coloreamos la fresa con rojo y la hoja con verde claro y verde oscuro. Por último, hacemos las pequitas de la fresa con color marrón.
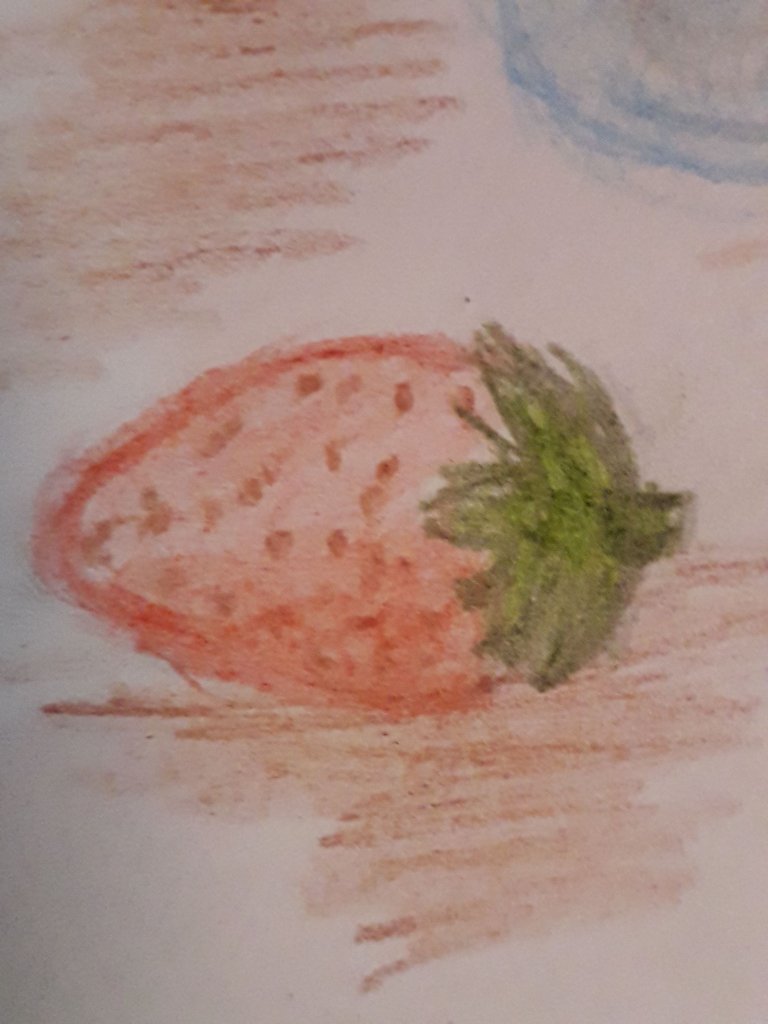
¡Miren que hermosa fresita!
 |  |
|---|
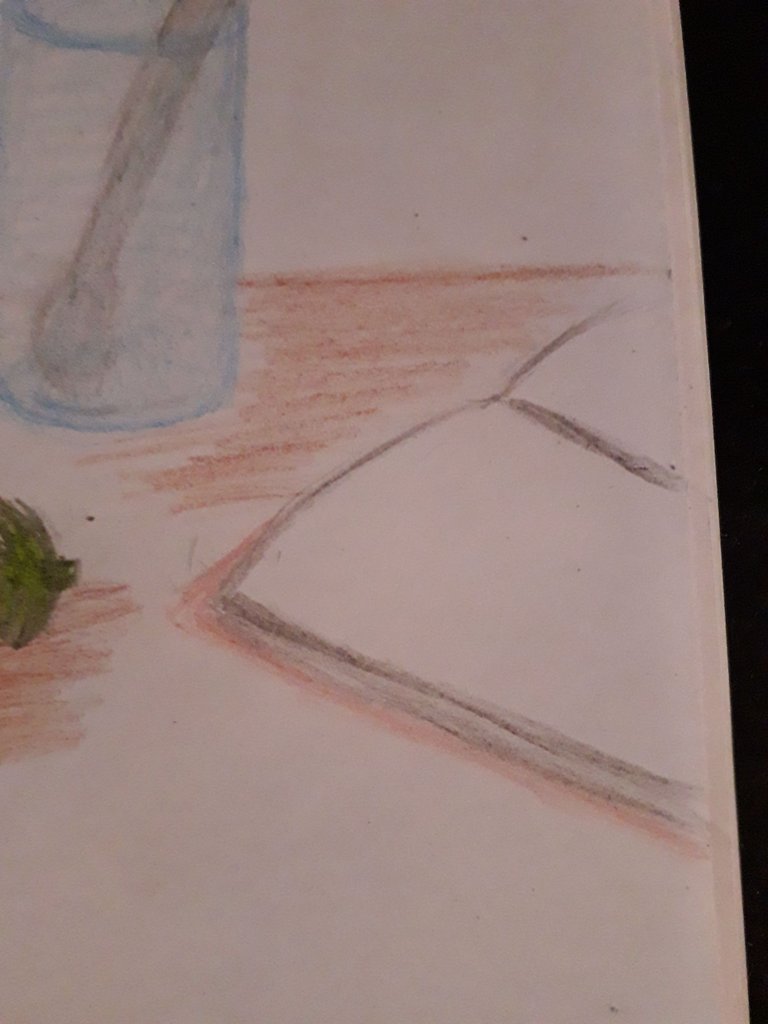
Con color negro, delineamos el contorno del libro, y con color rojo la tapa del libro. Con color negro, hago trazos en la hoja del libro para representar las letras.
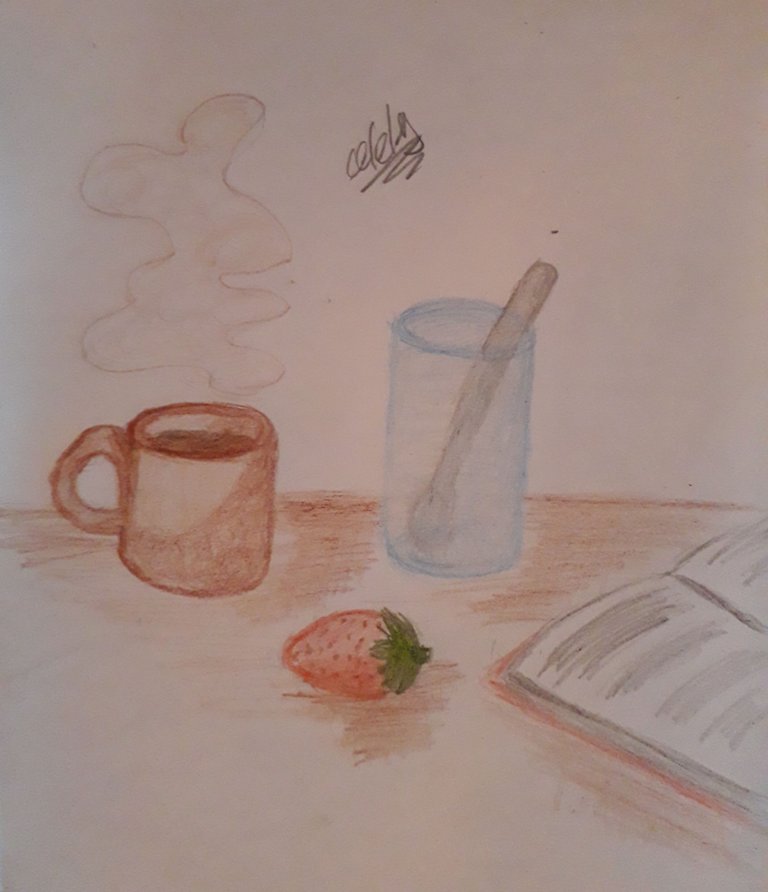
Y ya estaría, ¡sííí!
Y creo que hasta aquí dejaría lo que aprendí, es solo lo más básico: entrenar la muñeca y la vista. Si se dan cuenta, es todo lo que se necesita para dibujar: Tomamos lápiz, papel y vamos allá, yo confío en que lo harán bien.
Sin nada más que añadir, cuídense, tomen agua, y no se olviden de sonreír. ¡Se les quiere, nos vemos en el próximo post, chau!
English
This time I want to share something special with you. I told you before that I was taking a little drawing class on YouTube, it seems that I give a lot of suspense to the thing with every post that happens. But in reality it just happens that the hamster that rolls in my head is tired, and I can't make posts so fast, because I need to be well motivated to write.
As the title says, today I'm going to share with you a couple of little things I could learn about drawing, quite simple, but that worked for me as a beginner, so maybe they will work for you too; but that was too long to put it as a title.
Actually, my post is addressed to the cute little people who are learning like me, because I know you understand me, and I understand you too. Although I think all of us who draw understand each other, so here we go!
Is an artist born or made?
Possibly, you once thought that an artist was the fruit of the talent he/she was blessed with at birth. On many occasions, perhaps it is that one person is predisposed to be more successful at drawing than another, but this does not mean that one cannot learn to train one's mind and hand to draw.
So with this we have the conclusion that drawing=knowing how to observe. And this is something we can all learn. So I have the belief that any technique, not only drawing, is not something you are born with, but something you develop.
Exercises
One of the first things I learned, was the pencil grip, and it's pretty much what you learn in any course.
By the way, it's worth noting that I'm only going to talk very much about what I learned, as I don't want to take credit away from the mini-course I watched. I will also leave you the YouTube channel in case you like to visit it.
Well, in the course they recommend doing some exercises to loosen up the hand, to trace with more ease and to have more precision in the stroke. That is what I will share with you.
You won't believe it, but these exercises really worked for me, and I carried them out in a… ingenious way. I'll share some photos below to explain the exercises I invented.
Think of these shapes
| |
|---|
One of the exercises involved making straight lines, intentionally varying the pressure between strokes. I made lines slanting to the left, to the right, vertically and horizontally. Notice that I made all the lines on top of each other? This is what I meant when I said I did them in a clever way, it was all about saving space, hahaha.
You can draw the lines wherever you want and the size you want, the idea is that you try to make the lines as straight as you can.
Here I drew loops, tracing from left to right. Then I did another series of loops, going from top to bottom. It is very important that your wrist makes circular movements, and try not to lift the pencil in each series of loops; think of this as if you were doing calligraphy exercises, it is very similar.
Now let's go with curved lines. Don't forget to move your wrist while making the strokes, and don't raise your hand while tracing.
Also make circles, trying to make them as “round” as possible. Do not forget to vary the pressure of the stroke.
There is no specific order to do these exercises. I did them daily before drawing, for quite a while; I spent 10 minutes doing each one, I tried to do it as a warm-up. I spent about a month doing these exercises, and I think I should take them up again, since it does help you a lot to “loosen your hand”.
In this way, we train our brain to be more aware of the pressure and fluidity of the strokes we make when we draw.
2D Shapes
The next “exercise” I'll share with you is a pretty basic one, but really basic, and that, if you draw, you should know it; and if you don't know it, relax, honey, here I am: another novice, hehehe.
One of the most important details, when drawing, is to observe: one must be able to understand what one sees; one must understand the world around us, to be able to break it down and divide it into figures that are easier for our brain to assimilate. This exercise is known as simplification.
The exercise consists of taking any nearby object or reference image and starting to translate it into 2D figures. That is, we are going to simplify everything in 2D geometric figures, I share with you what I did.
| |
|---|
Here I tried to draw my kitty headphones. It was something I did in about two minutes. What I want to show you is how, from a series of geometric figures, we were able to draw headphones (or any other object).
The curved line I simplified it as a series of straight lines, because this way it is easier to capture the direction that the curved line follows, if I understand? This is how I usually simplify curved lines. Look how I used ovals and triangles too, that's what this exercise is all about: use simple shapes, as many as you want, that are easy for you to understand, and from them, we are going to capture a real or image reference.
Important points
We start from the general to the particular: this applies to practically everything in the drawing world. In this case, we start with the largest to the smallest shapes.
Interestingly, human-made objects typically have simple shapes, such as squares, circles, triangles, and shapes that are composed of a mixture of these.
This exercise is essential to be able to understand the surrounding things, by converting them into shapes that are not only easy to understand, but also to memorize, and then we can draw without references.
The same simplification can be done with the human body, but it is much more complicated. However, it is another exercise to do later, to familiarize ourselves. I don't know if I should make a post about it, since it's still very difficult for me, but you tell me if you want to practice together, haha.
The coolest thing about all this, about simplification, is that it can be practiced even in daily life, without drawing.
My drawing
By the way, I'm going to leave you a drawing I made simplifying shapes, from memory. I'll narrate the process a little bit, without going into so much detail, because otherwise, the post would be eternal, hahaha.
| |
|---|
Here see how I started by making two cylinders and two small circles.
In the second image, I made an oval and two lines, to make a teaspoon.
| |
|---|
I also added a rectangle on the edge, to make a book.
And I started to sketch the rest of the elements of the drawing. Also notice the ovals I made above the cup, it's the sketch for the steam.
Following the direction of the ovals, I was able to make a steam pattern. Time to color.
| |
|---|
With brown color, we outline the silhouette of the cup, and color.
| |
|---|
Add the shadow. We outline the steam and give it color.
| |
|---|
With blue color, we outline the glass and give it color. With gray color, we take care of the spoon.
| | |
|---|
With red color, we outline the outline of the strawberry, and with dark green color, we outline the leaf. We color the strawberry with red and the leaf with light green and dark green. Finally, we color the strawberry with brown.
Look what a beautiful little strawberry!
| |
|---|
With black color, we outline the outline of the book, and with red color the cover of the book. With black color, I make strokes on the leaf of the book to represent the letters.
And that's it, yayyy!
And I think that's as far as I'll leave what I've learned, it's just the basics: training the wrist and the eye. If you notice, that's all it takes to draw: We take pencil, paper and go there, I trust you will do well.
Without anything else to add, take care, drink water, and don't forget to smile, I love you, see you in the next post, bye!
Credits | Créditos
- English translation DeepL (sorry for any mistakes, I don't know much English)
- Traducción al inglés DeepL (lo siento por cualquier error, no sé mucho inglés.)
- Cover, dividers, and banners made in Canva
- Portada, separadores y banners hechos en Canva
- Photos used in the post were taken by me, using a Samsung Galaxy J6
- Las fotos usadas en el post fueron tomadas por mí, usando un Samsung Galaxy J6
Congratulations @celely! You have completed the following achievement on the Hive blockchain And have been rewarded with New badge(s)
Your next target is to reach 1000 comments.
You can view your badges on your board and compare yourself to others in the Ranking
If you no longer want to receive notifications, reply to this comment with the word
STOPCheck out our last posts:
!HUESO
Yo creo que el artista se hace definitivamente. Si uno nace con talento para esto o lo otro, igual debe cultivar el talento. El talento ayuda a inclinar la balanza, pero no siempre el talento es evidente. ¡¡¡Hay que seguir practicando!!! ¡No pares nunca de practicar! !PIZZA !BBH !HUESO !DIY
¡Exactamente!, por eso hay que seguir practicando y aprendiendo día a día. Muchas gracias por tu lindo comentario y por el apoyo. 🩷🎀
¡¡¡Con mucho gusto, Celely!!! !PIZZA !BBH !DIY
You can query your personal balance by
@cpol just sent you a DIY token as a little appreciation for your comment dear @celely! Feel free to multiply it by sending someone else !DIY in a comment :) You can do that x times a day depending on your balance so:!DIYSTATSYou can query your personal balance by
@cpol just sent you a DIY token as a little appreciation for your post dear @celely! Feel free to multiply it by sending someone else !DIY in a comment :) You can do that x times a day depending on your balance so:!DIYSTATSQuerida Celely, gracias por compartir tu post en la comunidad lleno de diversos tips que pueden servir mucho para los más nuevos en el mundo del dibujo, un post enriquecido e interesante. Sin embargo, te recomendamos leer nuevamente las reglas de la comunidad para que tus recompensas puedan ser más enriquecedoras. Un fuerte abrazo 🫂
Contáctenos para saber más del proyecto a nuestro servidor de Discord.
Si deseas delegar HP al proyecto: Delegue 5 HP - Delegue 10 HP - Delegue 20 HP - Delegue 30 HP - Delegue 50 HP - Delegue 100 HP.
Holiii, muchas gracias por la apreciación y la observación. ✨ Aunque no entiendo muy bien cuál regla incumplí o a qué lineamiento de la comunidad estoy faltando. Me gustaría saber, ya que aprecio mucho a esta comunidad y no me gustaría meter la pata de nuevo, jijiji. 🩷
Todos tenemos un artista por dentro, solo hay que saber desarrollarlo, sacarlo de vez en cuando jaja, te felicito por intentarlo, buscar aprender mas, esto es muy bonito, yo ahora es que estoy en esto de dibujar, no solo para aprender sino porque es una gran terapia, y me ha ayudado mucho, buen post, gracias por compartir, saludos.
@tipu curate 8
Que esperas para unirte a nuestro trail de curación y formar parte del "proyecto CAPYBARA TRAIL"
Upvoted 👌 (Mana: 0/75) Liquid rewards.
Interesante, genial lo que compartes, me das ánimo, yo tambien estoy aprendiendo