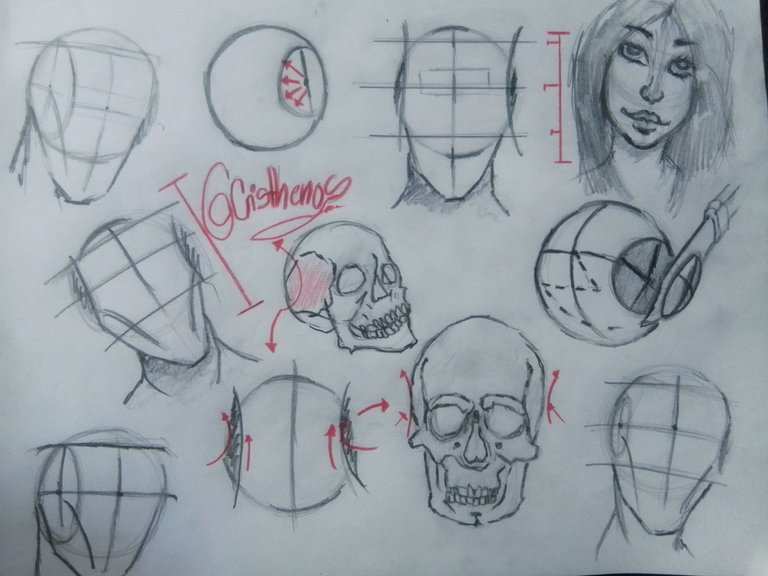
Hello again, @Hivearte community, it's me again, @Cristhenos; I hope everyone is feeling well today. This time I present to you the last post of the series drawing parts of the face, and I know that some of you may wonder which facial feature we have yet to draw. Well, if we try to draw everything we have learned lately, you will realize that we don't have a space where to place those facial features, so today I bring you a super simple technique to draw the face. Honestly, I found it very easy to learn how to draw a face with this method. With all this cleared up, I leave you with the procedures.
Hola de nuevo, comunidad de @Hivearte, soy yo nuevamente, @Cristhenos; espero todos se encuentren muy bien el día de hoy. En esta oportunidad les presento el último post de la serie dibujando partes de la cara, y sé que algunos se preguntarán cuál rasgo facial nos falta por dibujar. Pues si tratamos de dibujar todo lo aprendido últimamente, te darás cuenta de que no tenemos un espacio donde colocar esas facciones de la cara, así que hoy les traigo una técnica super sencilla para dibujar el rostro. Sinceramente, a mí me resultó muy fácil el aprender a dibujar un rostro con este método. Con todo esto aclarado, los dejo con los procedimientos.
procedure/procedimiento
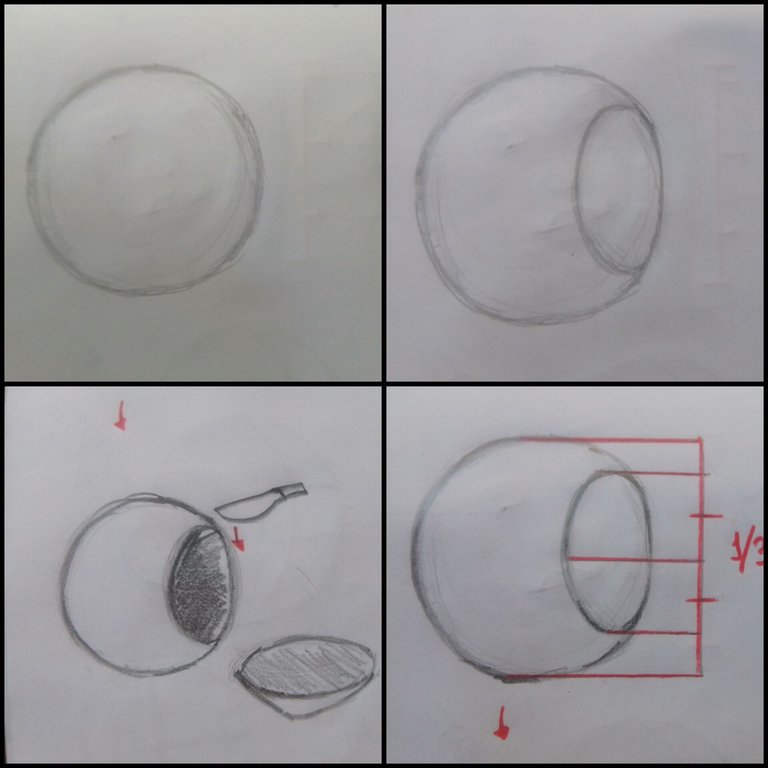
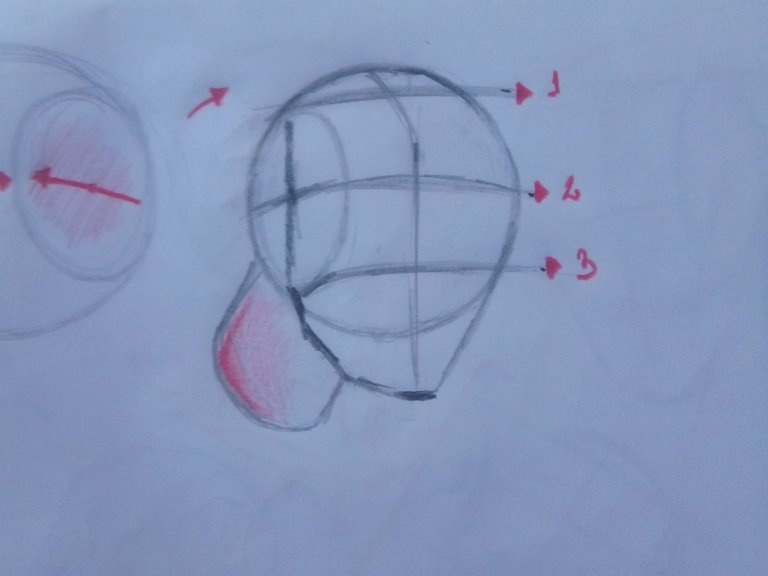
To draw a face or face we have to keep in mind a few things. The first thing to keep in mind is that the face is not completely round. With this in mind, we are going to draw a circle; we can do it by hand or with the help of a compass. Already with all this, we are going to take into account what was said before. So we are going to draw an oval inside the circle; we have to imagine as if we were cutting a piece of the circle. Another tip I give you is that, to determine the height of the oval, it will almost always occupy 1/3 of the circle.
Para dibujar un rostro o cara tenemos que tener en cuenta algunas cosas. Lo primero que hay que tener en cuenta es que la cara no es completamente redonda. Ya teniendo en cuenta esto, vamos a dibujar un círculo; podemos hacerlo a pulso o bien con la ayuda de un compás. Ya con todo esto, vamos a tomar en cuenta lo dicho anteriormente. Así que vamos a dibujar un óvalo dentro del círculo; tenemos que imaginar como si cortáramos un pedazo del círculo. Otro consejo que les doy es que, para determinar la altura del óvalo, este casi siempre ocupará 1/3 del círculo.
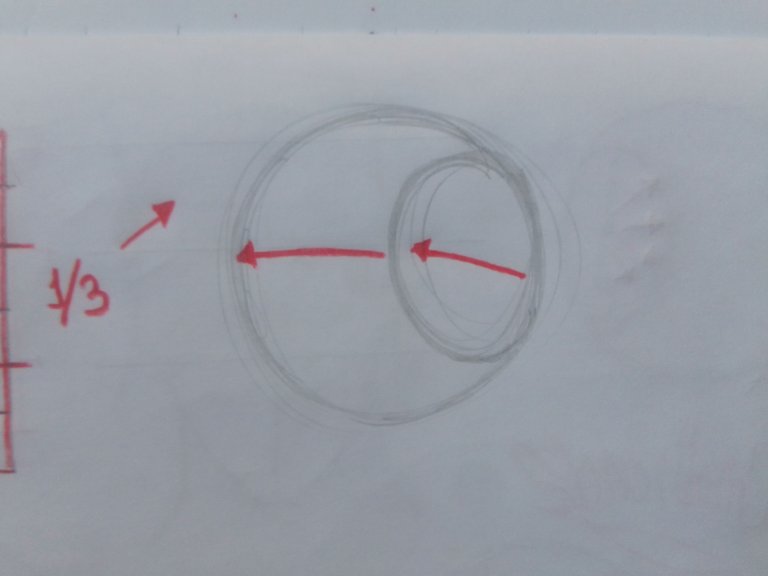
Now this circle will always be a very good way to start portraying a face, since it will always serve as a structure to be able to portray with a little more procedure. To be able to determine in which direction our face is looking with this method, we just need to place a line that will cross our oval, and this can be horizontal, a little up or down, but it will depend on the angle at which the face we are trying to draw is looking.
Ahora este círculo siempre será una muy buena forma de empezar a retratar rostro, ya que este siempre nos servirá como una estructura para poder retratar con un poco más de procedimiento. Para poder determinar en qué dirección está mirando nuestro rostro con este método, solo basta con colocar una línea que va a atravesar nuestro óvalo, y esta podrá ser horizontal, un poco hacia arriba o hacia abajo, pero ya dependerá en qué ángulo está mirando el rostro que tratamos de dibujar.
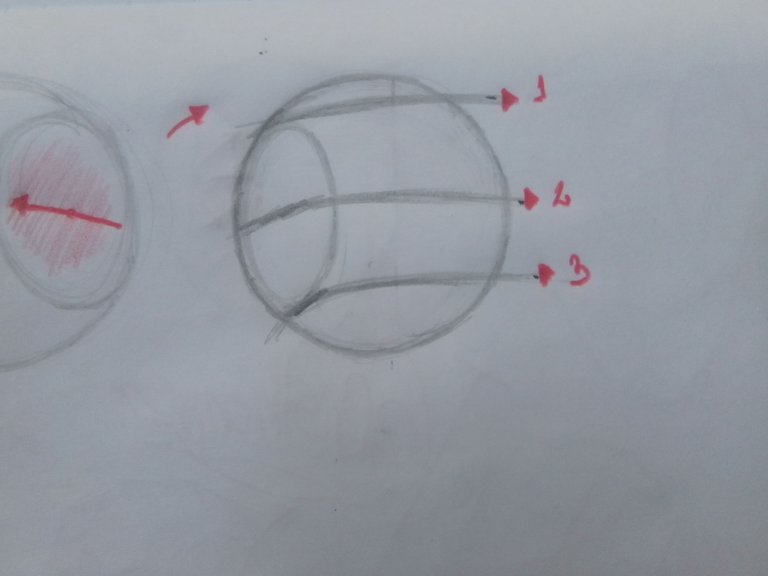
To clarify where we will place our facial features with this method, it is enough to know one thing: the face is divided into almost perfect thirds. What does all this mean? Well, we take everything we have learned so far and divide our circle into three almost equal parts and number them from the first line above. We have:
Line number 1: in which we can find the forehead and the beginning of the hair.
Line number 2: we will have the eyebrows, the eyes, the ears located on the sides of the face and the base of the nose.
Line number 3: in this last part we will find the lips, the chin and the neck.
Ya para aclarar donde ubicaremos nuestros rasgos faciales con este método, solo basta con saber una cosa: la cara está dividida en tercios casi perfectos. ¿Qué quiere decir todo esto? Pues tomamos todo lo aprendido hasta ahora y dividimos nuestro círculo en tres partes casi iguales y las enumeramos desde la primera línea de arriba. Tenemos:
La línea número 1: en la cual podemos encontrar la frente y el inicio del cabello.
La línea número 2: tendremos las cejas, los ojos, las orejas ubicadas en los laterales de la cara y la base de la nariz.
La línea número 3: en esta última parte encontraremos los labios, la barbilla y el cuello.
Finally, we only have to follow all the previous steps and keep practicing; remember that practice makes perfect.
Ya para finalizar, solo tenemos que seguir todos los pasos anteriores y seguir practicando; recuerden que la práctica hace al maestro.
Thank you very much for reading my post. I hope you liked it and see you until the next post.
Muchas gracias por haber leído mi post. Espero les haya gustado y nos vemos hasta la siguiente publicación.
Está muy detallada tu explicación, me encanta. Espero que luego nos expliques cómo dibujar los elementos del rostro como los ojos, nariz y boca... Los ojos siempre se me dificultan, jijiji. Un saludo ✨
Ya tengo algunos post donde explico las técnicas
Congratulations @cristhenos! You have completed the following achievement on the Hive blockchain And have been rewarded with New badge(s)
Your next target is to reach 20 posts.
You can view your badges on your board and compare yourself to others in the Ranking
If you no longer want to receive notifications, reply to this comment with the word
STOPContáctenos para saber más del proyecto a nuestro servidor de Discord.
Si deseas delegar HP al proyecto: Delegue 5 HP - Delegue 10 HP - Delegue 20 HP - Delegue 30 HP - Delegue 50 HP - Delegue 100 HP.