This is the 2nd post in a series of 3.
Part 1--Part 3

Warsaken Standard Setup Guide Part 2 [ Game Flow ]
Playing The Game
At the start of a game both players roll a die, the player with the highest die
value gets to choose who goes first. If playing on the pre-made setups, most
players use this method to select which Leader they will be as well. Rolling a die,
the player with the highest die value chooses the Leader they wish to play.
Once turn order has been decided, each player then shuffles their Arsenal. You
may shuffle as much as you want, however you must at the very least shuffle
once.
Each player then draws 8 cards from the top of their Arsenal. Warsaken allows for
2 mulligans, [do overs], on the initial draw of 8 cards. Every player is allowed to
mulligan 1 time with no recourse. A player may choose to mulligan again,
however after the initial mulligan, the second mulligan will provide the opponent
with an additional starting card drawn into their hand from their Arsenal.
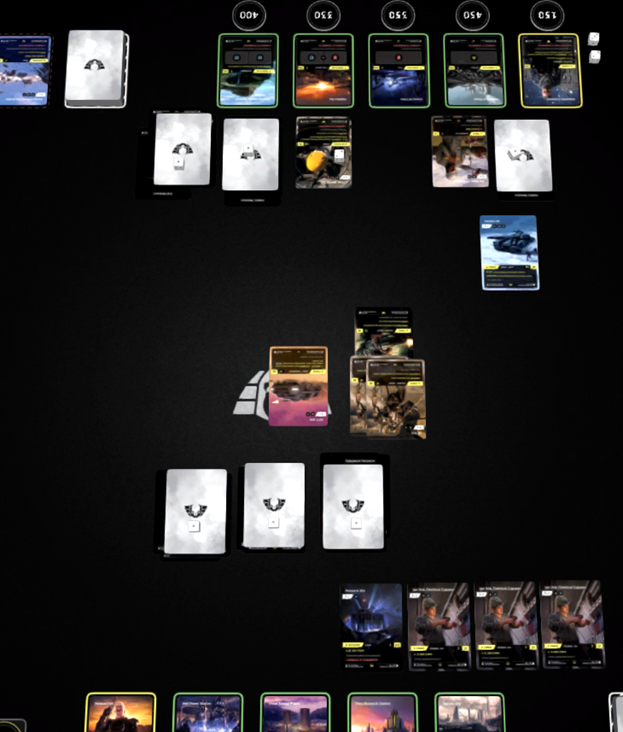
Now that the starting hands have been drawn, it is time to begin the game. For the purpose of this tutorial, I will be playing Lockwood v Zoff and having Lockwood start.
Lockwood’s starting hand:
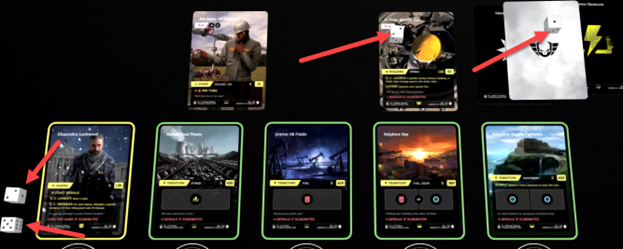
Being the first player, Lockwood will not Return, Draw, or Reduce. Lockwod will begin at the Production Phase.
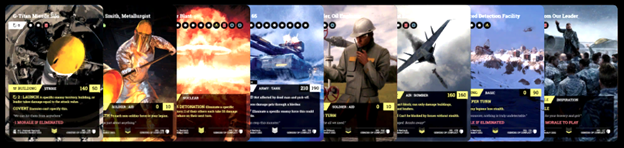
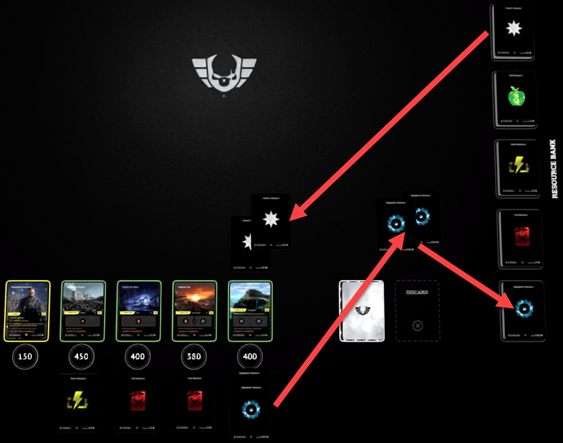
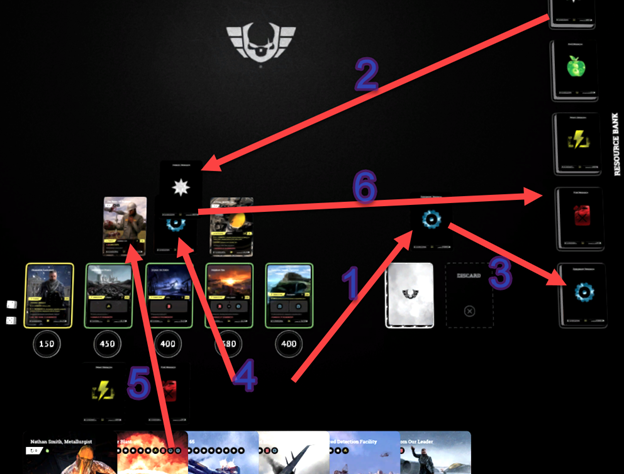
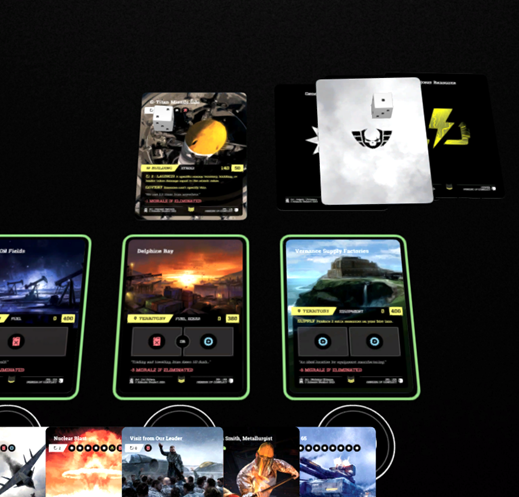
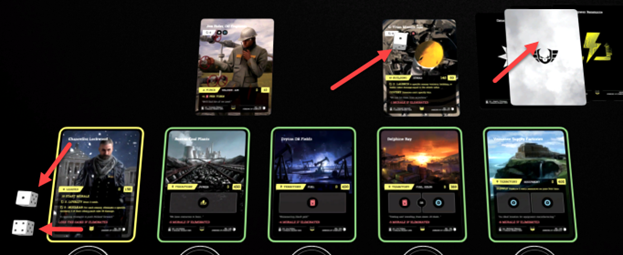
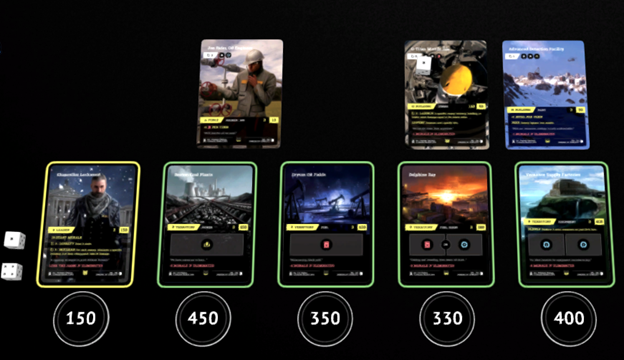
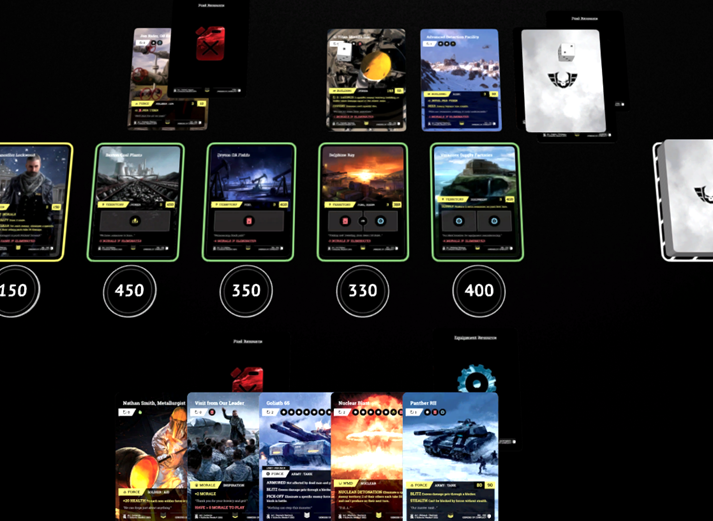
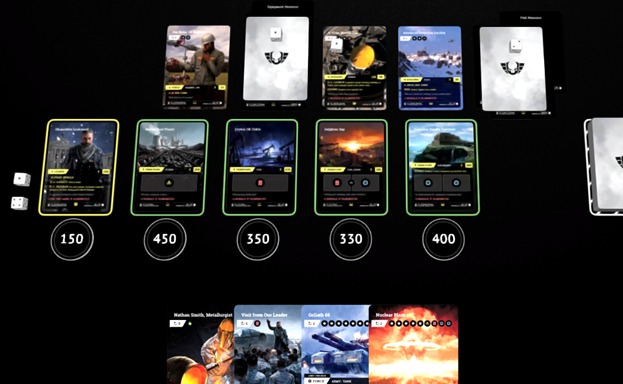
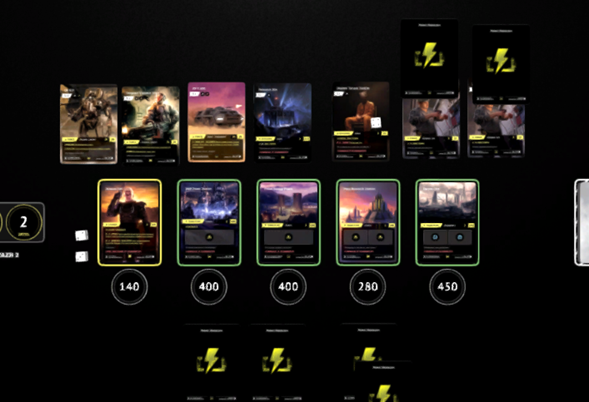
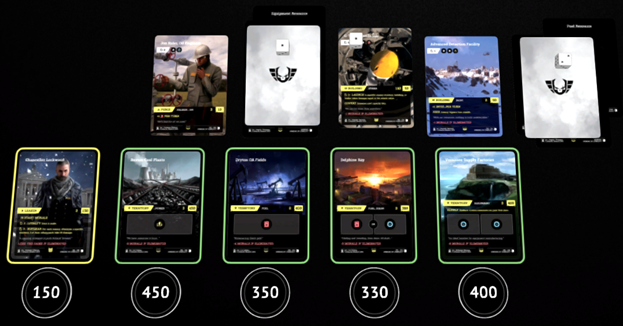
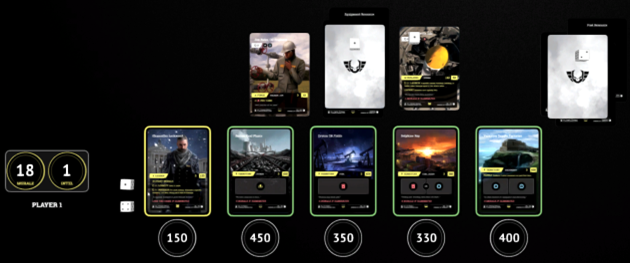
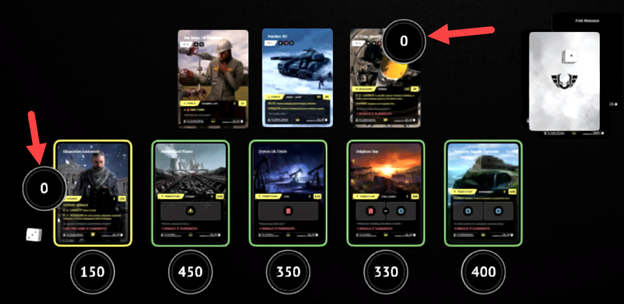
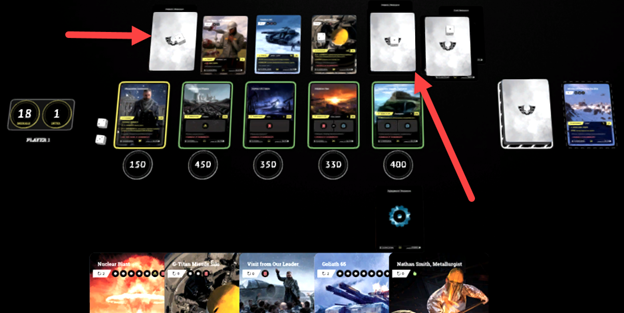
The first thing to do is to place a corresponding resource by each territory for each resource of which the territory produces. These resources are pulled from the Resource Bank. Lockwood has 1 Power territory, 1 Fuel territory, 1 Fuel or 1 Equipment territory, and a 2 Equipment territory. It is important to attach the resources to the respective card that produces the resource. If a production card is eliminated, all attached resources are eliminated as well.
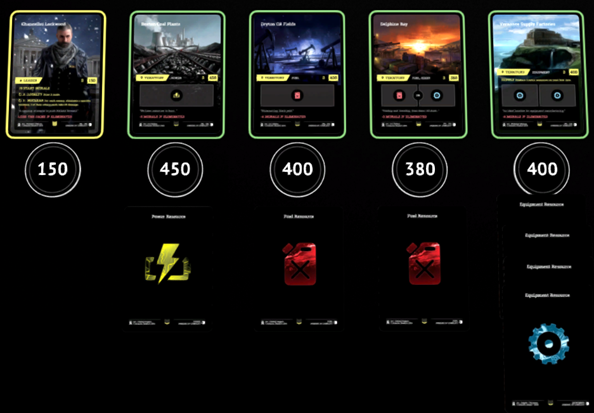
As seen above, with the added 2 Equipment resources produced by Vernance Supply Factory Lockwood starts with 1 Power, 2 Fuel, and 4 Equipment.
|
|
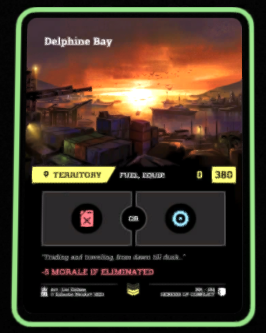
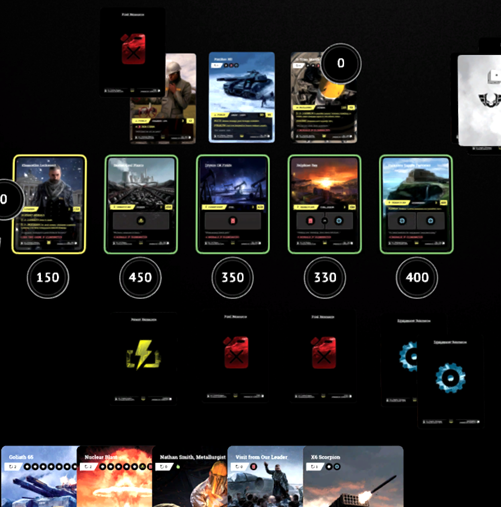
Territories that allow a player to choose which resource they would prefer to acquire do exist. In this case, a player has the option of which resource to produce. In the case of Delphine Bay, a player may choose either 1 Fuel, or 1 Equipment. The selected resource is attached to the territory. |
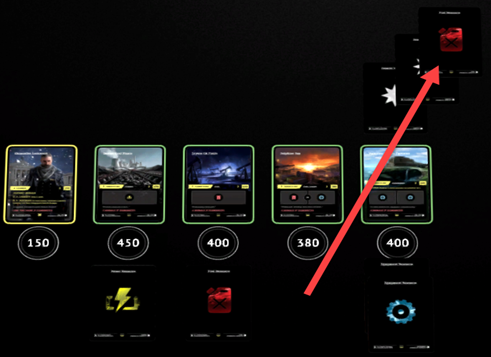
Once again here is Lockwood’s starting hand.
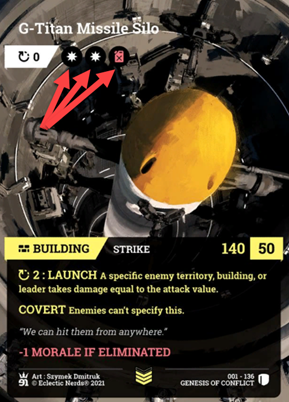
We have 8 cards to choose from which can be played. Knowing G-Titan in an opening hand is very strong, we will play that card first.
Playing a card in Warsaken requires certain prerequisites be met. The first thing that must be decided is whether or not the resources required to play the card have been acquired. The resource cost of a card can be found at the top of the card, under then name, to the right of the Turn Cost value.
The G-Titan requires 2 Generic and 1 Fuel resource in order to play the card.
|
|
Looking at Lockwood’s produced resources, he |
Now Lockwood has access to 2 Generics, the only resource left to pay is the 1
Fuel.
Now that the required resources are on the War Zone, the only thing left to
determine is the Turn Cost timer.
|
|
The Turn Cost timer value is located directly |
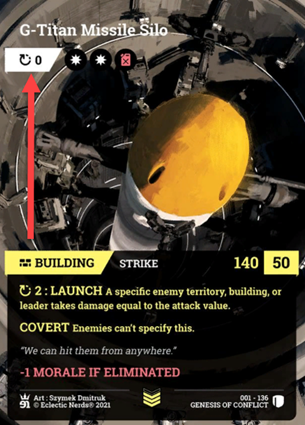
Now the first Ready card has been played. All of the card mechanics need to be negotiated prior to the next play. In the case of G-Titan, we see the ability LAUNCH. In front of the Ability is the number 2 with a countdown timer symbol. This means every 2 turns LAUNCH will activate. To track this, place a die on the card and set it to 2, the countdown timer value specified.
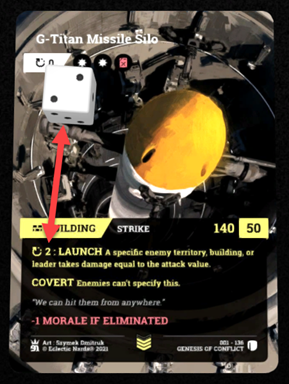
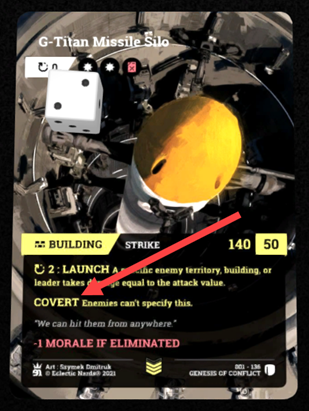
The next thing to notice about G-Titan is that the card has COVERT.
“COVERT Enemies can’t specify this.”
Game mechanics that do not require specifying can affect cards with covert like G-Titan.
This means an opponent cannot affect this card specifically. They may not attack G-Titan while the card has COVERT. However, game mechanics can affect the G-Titan card.
For example, Terrifying Storm, a Weather card, inflicts 30 damage to all territories and buildings. When this card is played, G-Titan also sees 30 damage.
A note about COVERT: When a card has COVERT, all aspects of the card are COVERT, even the countdown timers. So when a card mechanic states to affect a “specific” game component, that mechanic may NOT affect a component of a card with COVERT in any way while the card maintains COVERT.
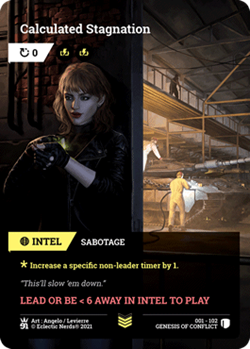
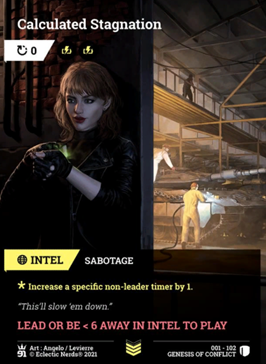
Example: Calculated Stagnation can NOT increase the LAUNCH countdown timer of the G-Titan Missile Silo, unless COVERT has been eliminated because of the word specific.
Calculated Stagnation
*Increase a specific non-leader timer by 1.
Now the next play I will make is Jon Rider, Oil Engineer.
- Declare a resource to trade into Generic
- Take Generic
- Return resource to Resource Bank
- Pay the Equipment cost
- Play Jon Rider, Oil Engineer
- Return resources to the Resource Bank
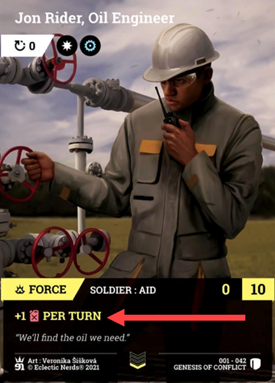
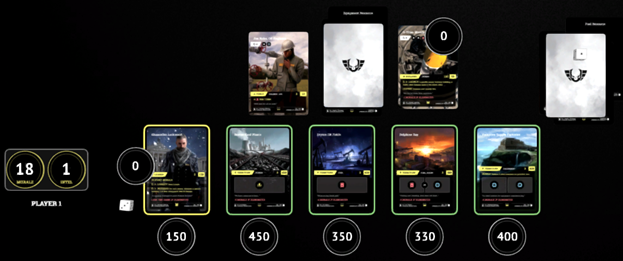
Jon Rider, Oil Engineer is a 0 Turn Cost, and is immediately Ready.
Now that I have played Jon Rider, Oil Engineer, the card mechanics must be negotiated. Jon Rider, Oil Engineer is a Soldier : Aid card, on this card you can see the card produces 1 Fuel resource per turn. This is also true on the turn that the card becomes Ready. So immediately Jon Rider, Oil Engineer produces 1 Fuel resource taken from the Resource Bank.
This extra Fuel resource will be much needed throughout the game, this is why I chose to bring out Jon Rider, Oil Engineer on the opening hand. Now we need to look and see what resources are left to spend and which cards we have that can be played.
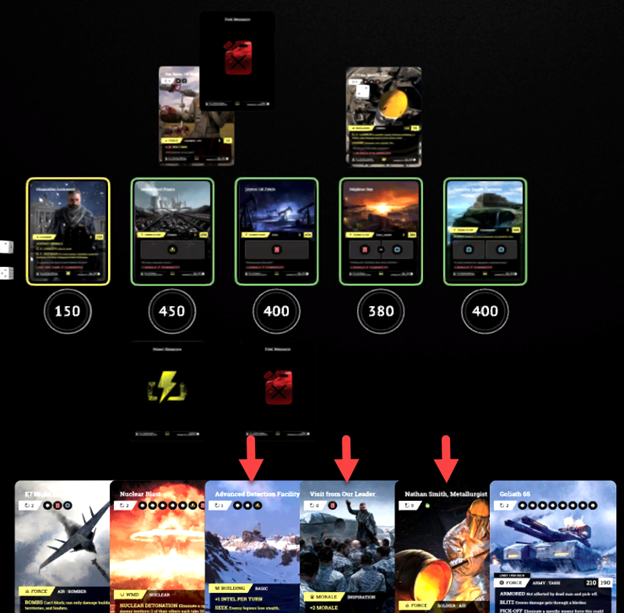
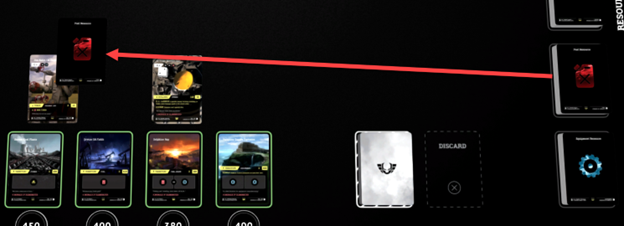
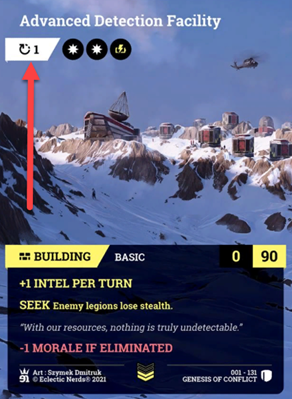
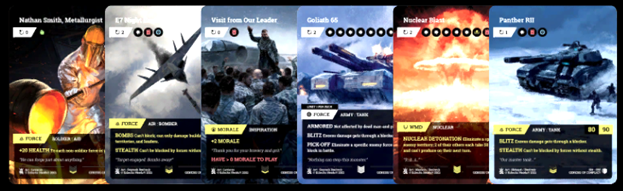
As you can see there are 2 Fuel and 1 Power left to spend. In Lockwood’s hand, there are only 3 cards that could be played. Advanced Detection Facility is a great card, it effectively neutralizes the opponent’s STEALTH.
STEALTH allows a card to attack and not be blocked unless the opponent’s card also has the STEALTH ability. So effectively if Lockwood removes STEALTH from his opponent, his opponent cannot block Lockwood’s STEALTH E7 Night Eagle. As well, it eliminates STEALTH from Lockwood’s opponents attackers, thus allowing a non-STEALTH card to block the opponent’s STEALTH cards during the opponent’s attack.
In order to play the Advanced Detection Facility, Lockwood must exchange the 2 Fuel resources, he has control of, for 2 Generics. Once the exchange is done we will add to the 2 Generics, the 1 Power Lockwood has left.
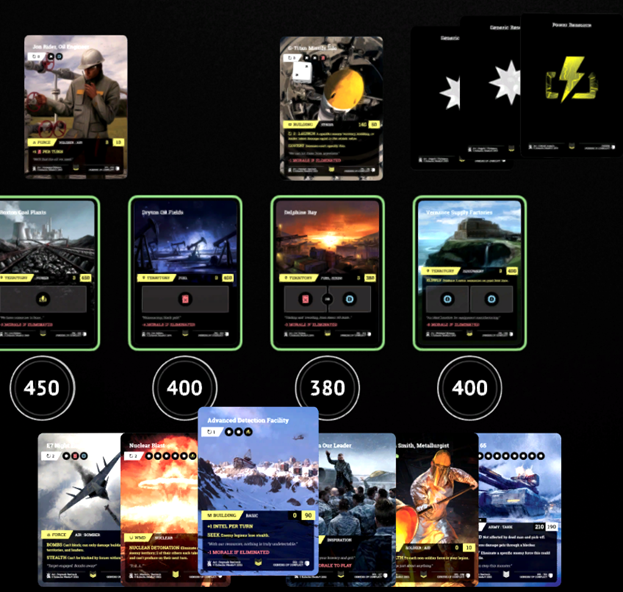
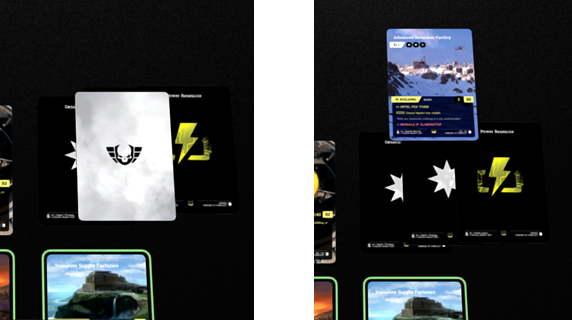
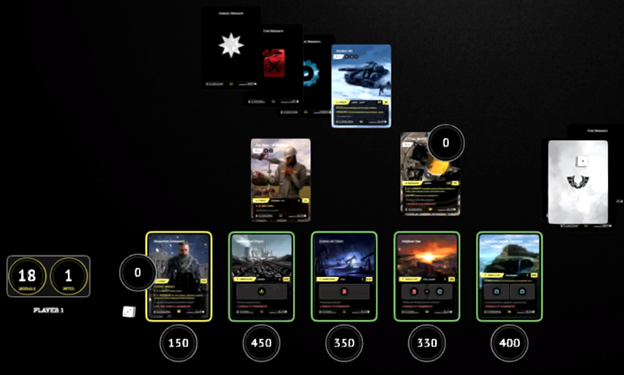
Now we can play the Advanced Detection Facility card. However, this card has a Turn Cost of 1, unlike a card with a Turn Cost of 0, this card will be played unseen to the opponent.
We can see the Turn Cost is located directly below the card name. In set 1 of Warsaken, Turn Costs can range from 1 to 4.
To play this card, Lockwood will first flip the card upside down, then place it on top the resources being used to pay for the card. This is followed by placing a turn cost dice set to 1, the Turn Cost value, on top of the face down card.
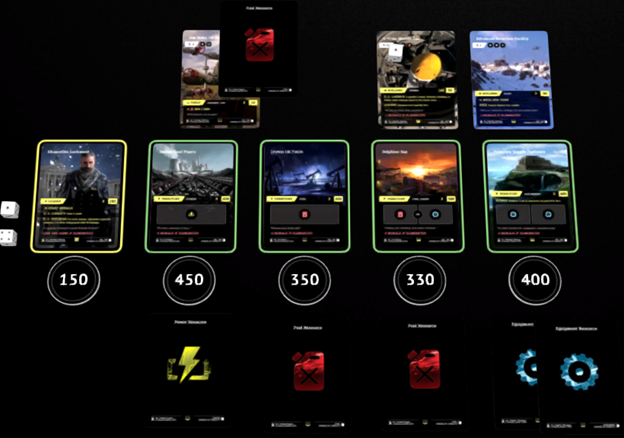
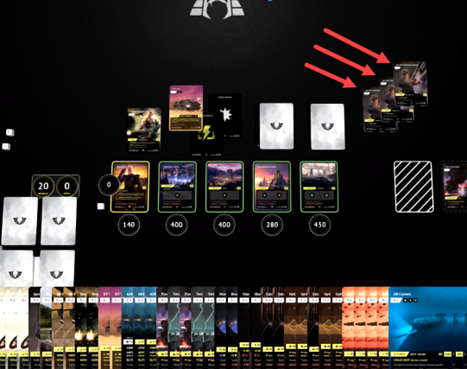
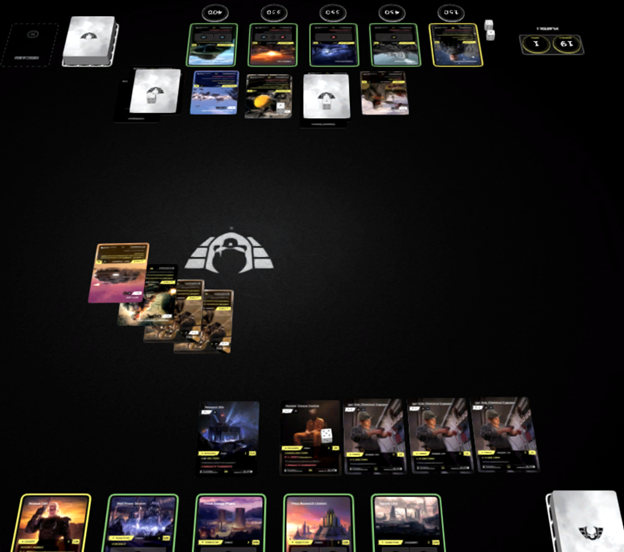
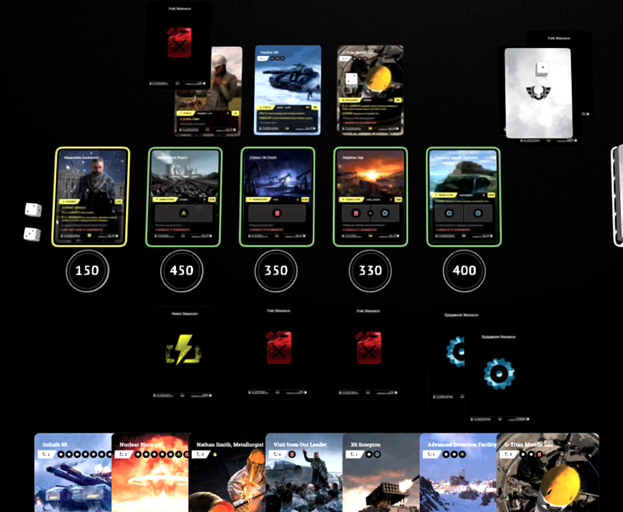
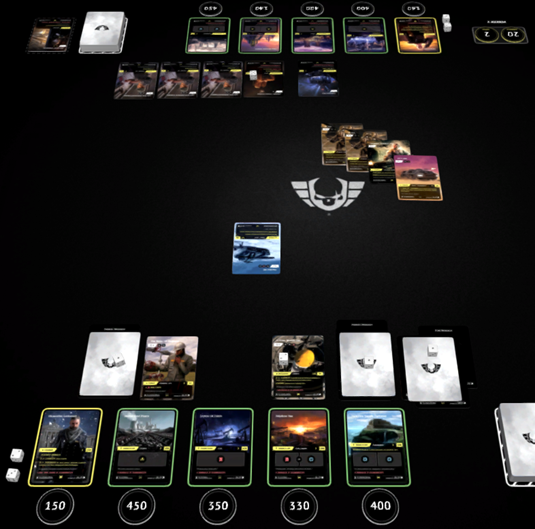
Now Lockwood’s resources have been depleted. With no Force cards to attack, this becomes the end of Lockwood’s first turn. The War Zone now looks like the following picture.
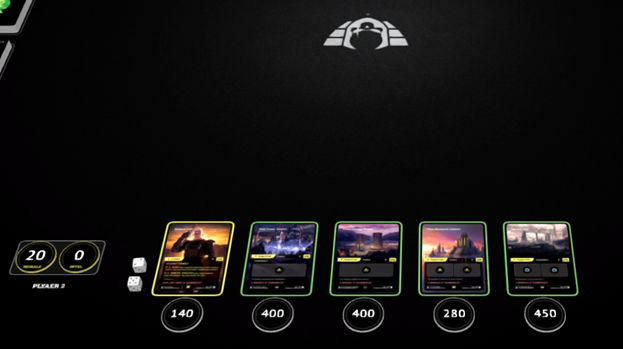
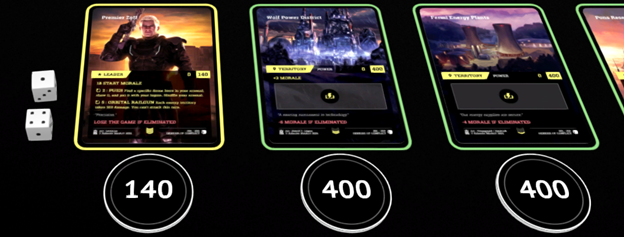
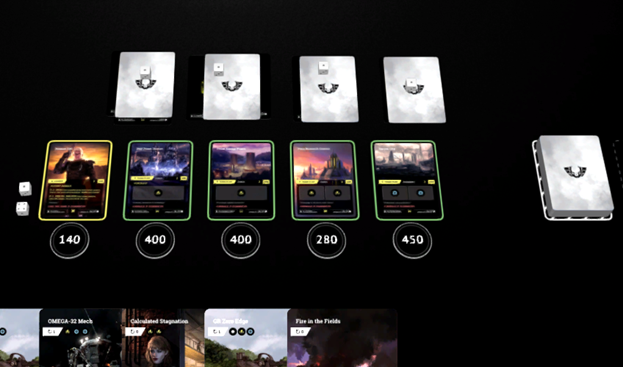
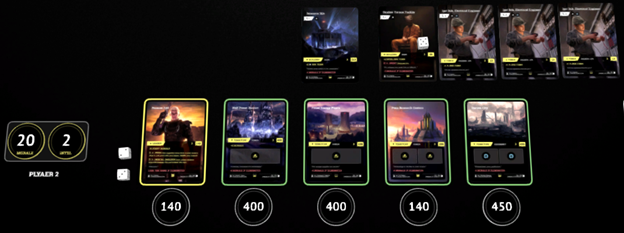
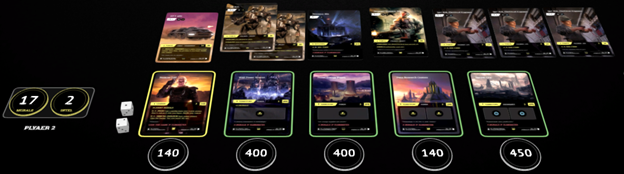
It is now Zoff’s first turn. Here is Zoff’s opening hand.
There are no Forces to RETURN from battle, so the first thing for Zoff to do is to DRAW a card from his Arsenal.
Zoff drew Fire In The Fields, a Weather card.
Zoff can move on to the Reduction Phase. During the Reduction Phase, Zoff will subtract 1 from all Turn Cost/Ability timers that he has in play. Most players will tend to start with any territory dice and then work their way through the War Zone. It is very important to understand, all cards that would be Ready on the current Reduction Phase need to be considered for all game and card mechanics. The reason being, ALL Turn Cost timers expire simultaneously. So each Ability/Turn Cost timer expiration happens at the same time.
We can see, Zoff only has 2 timers in play, the 2 Leader Ability dice. Currently set to 2 and 5 respective to the Leader’s Ability Turn Cost. We will change these each by -1. Making the 2 a 1 and the 5 a 4.
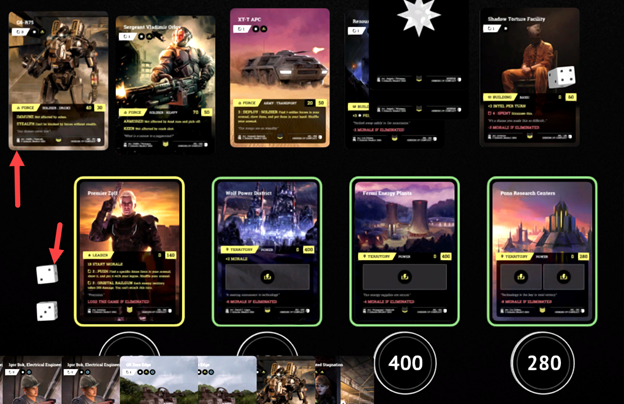
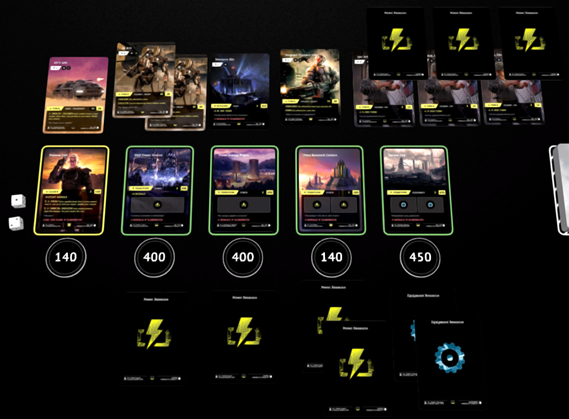
With this being the only dice to manipulate, Zoff has reached the end of the Reduction Phase and will now begin the Production Phase. Once Zoff produces he is in control of 4 Power and 2 Equipment resources.

Once the Production Phase is completed, Zoff will move on to the Play Phase and begin spending his resources and laying down cards.
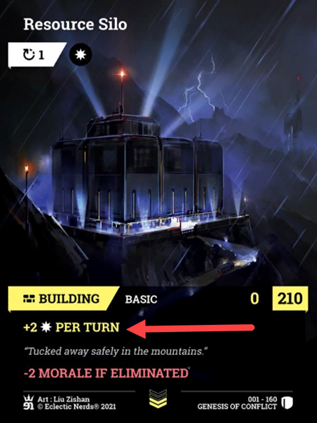
Resource production is huge in the game of Warsaken, so with this in mind, Zoff will firstly play Resource Silo. Resource Silo will gain +2 Generic resources per Production Phase. This will prove to be needed later on in the match. We can see Zoff doesn’t produce Generic resources, which are needed to play Resource Silo. In this case Zoff will choose to exchange an Equipment resource for the Generic resource. Once again we see a Turn Cost of 1. In this case, the resources to pay for the card are placed on the War Zone followed by the card face down, then followed by the Turn Cost die set to 1, the Turn Cost value.
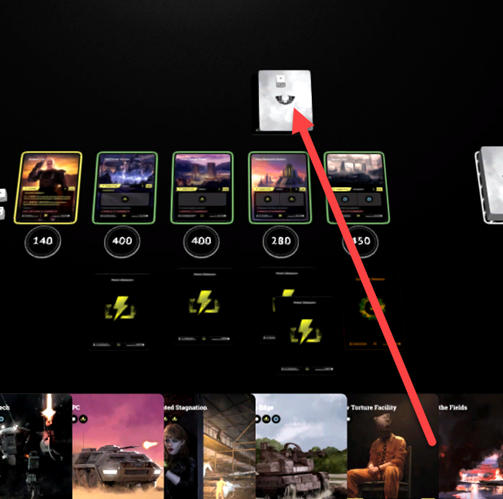
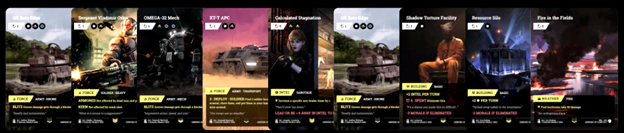
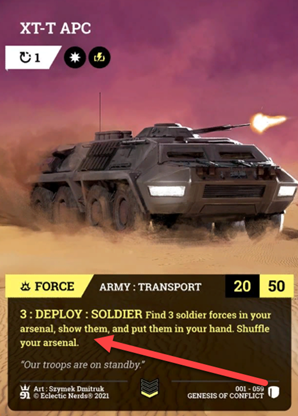
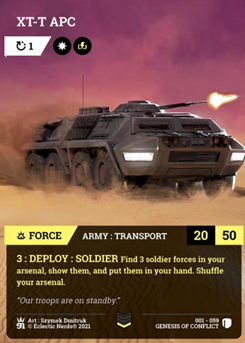
The next card Zoff will play is the XT-T APC.
The XT-T APC allows for Zoff to search within his Arsenal for 3 Soldier Forces with the DEPLOY mechanic.
3 : DEPLOY : SOLDIER Find 3 soldier forces in your arsenal, show them, and put them in your hand. Shuffle your arsenal.
Utilizing this card early will allow for Zoff to quickly get his soldiers into the battle.
Like Resource Silo, Zoff will exchange his last Equipment resource for a Generic, to play this card. Placing the 1 Generic and 1 Power in the War Zone, we will flip the card face down and place it on top the resources Zoff used to pay for the card. We also see that XT-T APC also has a Turn Cost timer of 1.
Zoff is now down to 3 Power resources left to play this turn. Looking through the opening hand Zoff has left, Sergeant Vladimir Orlov looks to be a good play at this point.

Zoff will need to exchange 1 of his Power resources for a Generic resource to play Sergeant Vladimir Orlov. Once the resources have been placed down into the War Zone, Sergeant Vladimir Orlov can be flipped face down and placed on top the resources. Finally a die set to a 1, the Turn Cost for the card, can be placed on top the face down card.
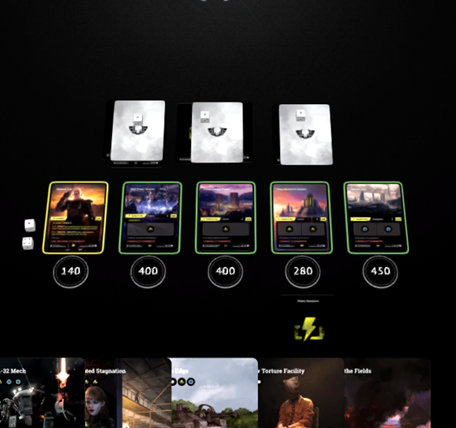
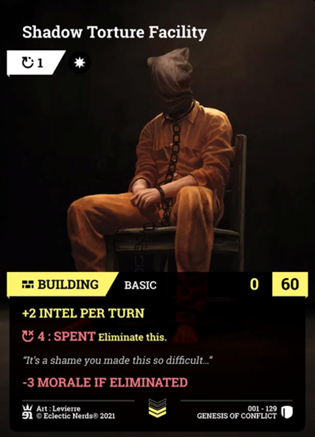
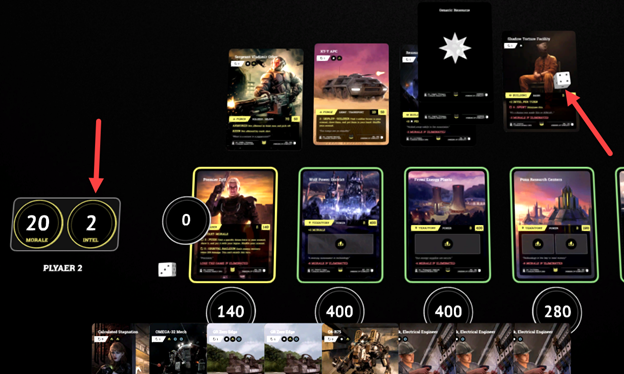
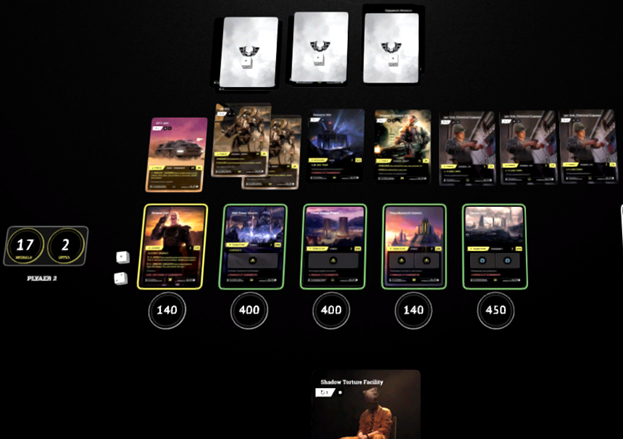
Now Zoff is down to 1 Power resource remaining to spend. There is only one resource requiring card that Zoff can afford to play, Shadow Torture Facility. Shadow Torture Facility costs 1 Generic resource to play, so Zoff will need to exchange the 1 Power resource for 1 Generic resource. We can also see that Shadow Torture Facility has a Turn Cost of 1.
Zoff will place the required resources onto the War Zone, flip Shadow Torture Facility face down on top the resources, and finally place the Turn Cost timer die set to 1 on top the card.
Now that Zoff has played all his resources, he no longer can play any cards that require resources. However, Zoff’s Play Phase is still not over. At the beginning of this turn, during the Draw Phase, Zoff drew Fire In The Fields.
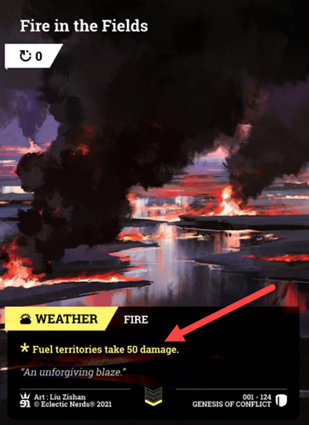
Fire In The Fields is a Weather card. Weather cards affect all players equally, and all Weather mechanics DO also affect the player that plays the card.
Weather cards have no resource cost as they are natural events that happen in the world of Warsaken.
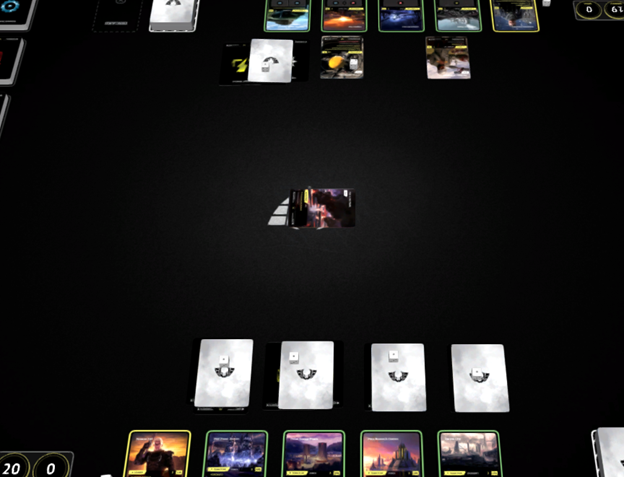
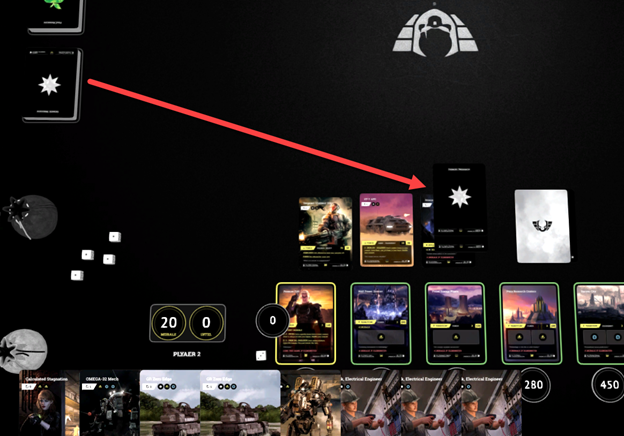
To play a Weather card it is placed in the center of the War Zone, rotated 90°.
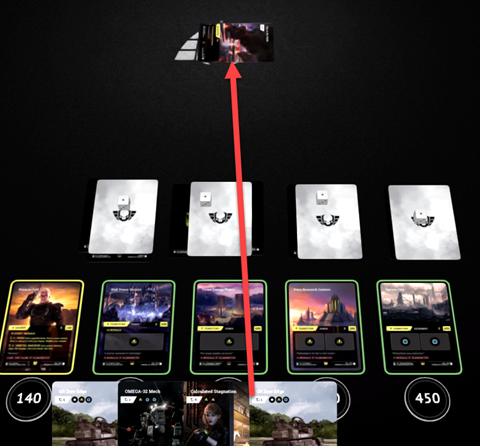
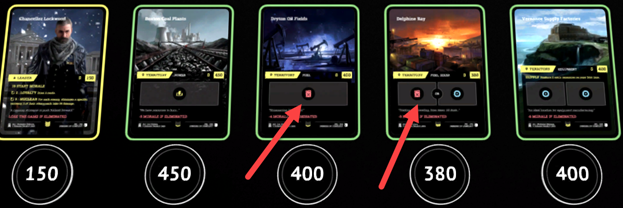
When a Weather card enters the War Zone, the effects are immediate. In the case of Fire In The Fields, *Fuel territories take 50 damage.
Looking at the War Zone, Zoff does not control any Fuel territories in play. However, Lockwood has several and each Fuel producing territory must see 50 damage. Lockwood must subtract 50 from each one of his Fuel territories HP counters as soon as the Weather enters the War Zone.
Once a Weather card is played it remains in the center of the War Zone until either:
Another player plays a Weather card. At which time the existing Weather card is removed and placed into the discard pile of the player that played the card initially.
At the beginning of the next turn of the player that plays the Weather card, the Weather card is removed and placed into the discard pile of the player that played the card initially.
The play of the Weather card will be the final card play that Zoff is able to perform this turn. So this will end Zoff’s Play Phase. Seeing Zoff has no Force cards in play there will be no Battle Phase, and Zoff’s turn is over.
It is now time for Lockwood to take his second turn. This time Lockwood will be able to Return, Draw, Reduce unlike his first turn. As there was no attack last turn for Lockwood, there are no Forces to return home. Lockwood will skip the Return Phase. Lockwood Draws a card from his Arsenal.
Lockwood has drawn the Panther RII card.
Now Lockwood moves into the Reduction Phase. During the Reduction Phase, Lockwood will reduce all of his Ability / Turn Cost timer dice by 1. Any Turn Cost die that is a 1 is removed, the card the die was on top of is now Ready.
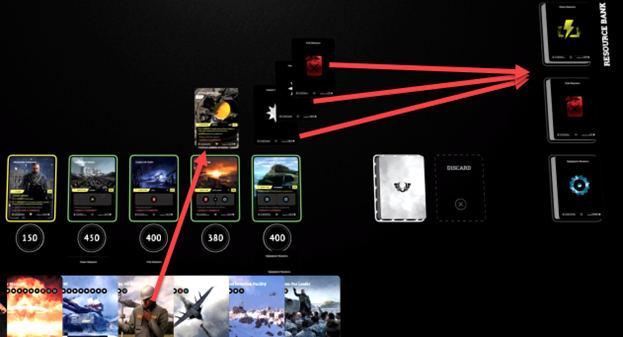
Now that Lockwood has a Ready card, it can be flipped over and shown. This allows the other players to verify the correct resources have been paid. After the resource count is complete, the resources are returned to the Resource Bank, and the card is placed with Lockwood’s Legion.
Now that Advanced Detection Facility is Ready, the card mechanics must be negotiated.
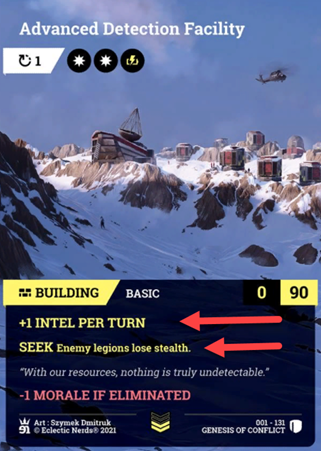
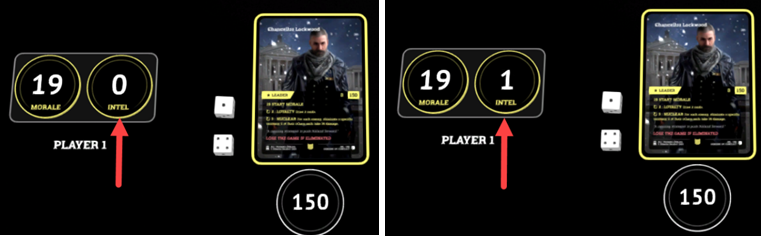
First we can see Advanced Detection Facility gains +1 Intel per turn. This effect happens immediately upon the card becoming Ready. Lockwood will increase his Intel counter by +1.
We can also see the mechanic SEEK.
SEEK Enemy legions lose stealth.
Zoff may no longer block anything Lockwood has that has STEALTH, nor do any of Zoff’s Forces have STEALTH, even if the card says it does. Until Advanced Detection Facility is eliminated, or a counter card is played.
Intel points are very important in Warsaken. If at any time an opponent falls behind 6 or more Intel points from any other player, the player that is behind in Intel is locked out of playing Intel cards. So be sure to pay attention to the Intel counters.
After we reconcile the mechanics for Advanced Detection Facility, Lockwood can now move into the Production Phase. After production, Lockwood has 1 Power, 3 Fuel, and 2 Equipment resources to start the Play Phase.
Lockwood’s current hand:
Looking at the hand, Lockwood still does not have enough resources to play any really big cards. So this turn Lockwood will play some Force cards. I will play E7 Night Eagle, which requires 1 Equipment, 1 Fuel, and 1 Generic. I will choose to use the 1 Power to exchange for 1 Generic. E7 Night Eagle also has a Turn Cost timer of 2. This time the Turn Cost die will be set to a 2, the Turn Cost value.
Now Lockwood is down to 2 Fuel and 1 Equipment, I will trade 1 Fuel for 1 Generic and play Panther II, which has a Turn Cost of 1.
Lockwood has once again reached the end of his resources. There are no longer any cards that Lockwood can play. This would move Lockwood into the Battle Phase, however there are still no Force cards in his Legion. This will be the end of Lockwood’s second turn.
At this point in the guide I expect you now understand how resources are produced, exchanged, and used to pay for each card played. I will no longer explain these mechanics moving forward through this guide. However, I will include resources when a time arises where resource production is affected in anyway.
I also expect you have an understanding of how Turn Cost timers operate. Where the values originate from, and how/when they reduce/increase. I will no longer draw attention to the turn cost timers, unless they are part of a mechanic function of the game.
Zoff’s second turn starts:
There are no Forces to return, however there is the Fire In The Fields Weather card still in the middle of the War Zone. Since Zoff was the player who played the Weather card, it will now go into Zoff’s discard pile.
Zoff can now Draw his card.
This is now Zoff’s hand after his Draw. Zoff pulled a G6-R75.
Now it’s time for Zoff to reduce his timers. Here is the War Zone as it looks before the timer reduction.
Now after the reduction.
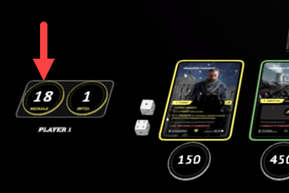
You can see all of the timers have been reduced by 1. If they were 1 the timer is gone. However, you can now see I have placed a marker on Zoff. This is to remind me that Zoff’s Ability timer has gone off so I remember to use it during my play phase.
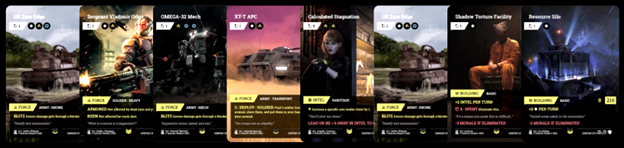
The first card to become Ready is Sergeant Vladimir Orlov.

There are no instant game mechanics to negotiate when Sergeant Vladimir Orlov becomes Ready. This card does have ARMORED and KEEN, both of which are battle related.
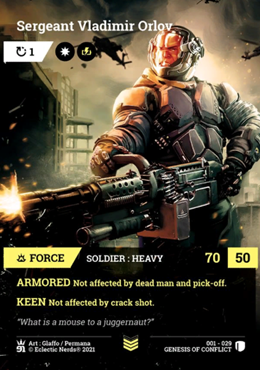
ARMORED: Not affected by DEAD MAN and PICK-OFF.
- DEAD MAN: If eliminated, eliminate the cause.
a. When cards attack or block a card with DEAD MAN, if the card with DEAD MAN were to be eliminated, which ever cards delt the final blow are also eliminated. Armored protects a card against this mechanic. - PICK-OFF: Eliminate a specific enemy force this could block in battle.
a. When a card becomes Ready that has the PICK-OFF ability, the player is to choose an enemy card to eliminate. The player must choose a card to which the card with PICK-OFF could block. For example, Air can PICK-OFF Air, Navy can PICK-OFF Navy, Ground can PICK-OFF Ground. Also keep in-mind, a ground force such as a Tank or Mech with ANTI-AIR would also be able to PICK-OFF Air forces as the card Can Block that type of force. Same is true for any Ability which allows a force to block a specific force. If no card exists to PICK-OFF at the time the card becomes Ready, the ability is lost. Armored protects a card against this mechanic.
KEEN: Not affected by CRACK SHOT. - CRACK SHOT: Hits first in battle.
a. When a card with CRACK SHOT goes to battle, whether to attack, or to block, the CRACK SHOT ability allows for the card to deal the damage first, before the opposing card deals any damage. If the card with CRACK SHOT has enough damage to eliminate the opposing card, no damage will occur to the card with CRACK SHOT. If 2 cards battle and both have CRACK SHOT, damage is simultaneous. KEEN protects a card against this mechanic.
The next card to come Ready for Zoff is the XT-T APC. There is an instant game mechanic that happens with this card. XT-T APC has the 3:DEPLOY:SOLDIER ability that we must negotiate before moving forward.
3: DEPLOY:SOLDIER Find 3 soldier forces in your arsenal, show them, and put them in your hand. Shuffle your arsenal.
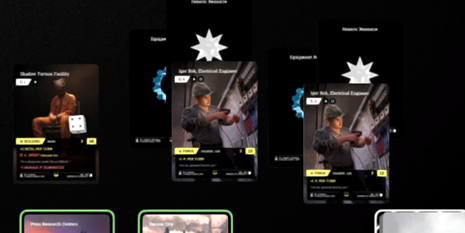
This mechanic is going to allow us to lay our hand face down, pick up our arsenal, and locate 3 Soldier Forces. The 3 Soldier cards taken from the arsenal must be shown. After they have been shown they can be put into your hand. You then re-shuffle your arsenal.
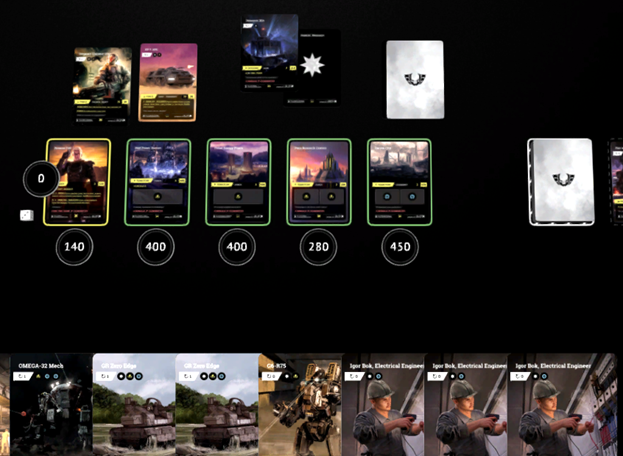
I chose 3 Igor Bok, Electrical Engineer cards from Zoff’s arsenal. Igor Bok, Electrical Engineer will gain Zoff +1 Power per turn once Ready.

Notice next to where the card type FORCE is printed, SOLDIER:AID. This is the sub-type. When a mechanic states to search for a soldier force, the sub-type must be SOLDIER.
The DEPLOY mechanic is a very useful mechanic to use. It comes in various fashions. There is also DEPLOY:ARMY. Which will allow a player to deploy Army Force cards such as tanks. In this case the sub-type would be ARMY.
The next card to become Ready is the Building Resource Silo. Resource Silo once Ready will produce 2 Generic resources immediately. Each following turn during the Production Phase, Zoff will be able to produce 2 Generic resources and attach them to the Resource Silo card.
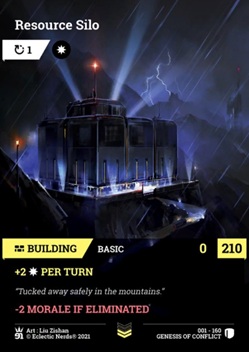
The resources are taken from the Resource Bank.
The next card to come Ready for Zoff is a Building, Shadow Torture Facility.
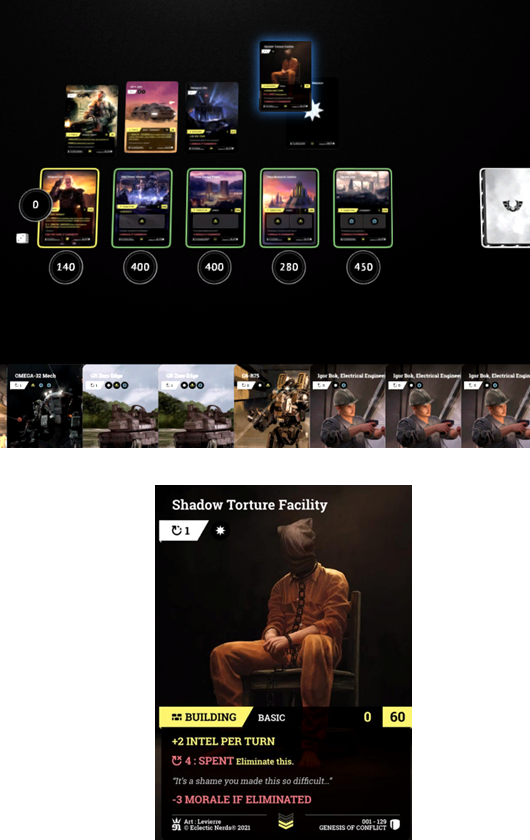
The Building Shadow Torture Facility, has a gain of +2 Intel per turn. At the end of the Reduction Phase that this card becomes ready, +2 Intel are taken. Each following turn Zoff will receive +2 Intel awarded at the “end” of the Reduction Phase while this card is in his Legion.
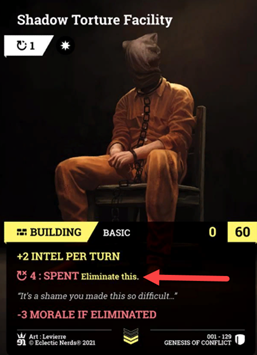
Notice Shadow Torture Facility has a Required Timer. This is the timer colored red. You can see the requirement is 4:SPENT. When there is a required timer, just as a turn cost timer, a die is placed on the card set to the required value. In this case the die will be set to 4.
4:SPENT Eliminate this.
When there is a required timer such as 4:SPENT, at the “beginning” of the Reduction Phase that the required timer expires, the required mechanic must be negotiated immediately. In the case of SPENT Eliminate this, the card is immediately moved to the discard pile. This will also cause Zoff to lose the -3 Morale for the elimination of Shadow Torture Facility when that time comes.
That ends the Reduction Phase for Zoff. It is now time for the Production Phase.
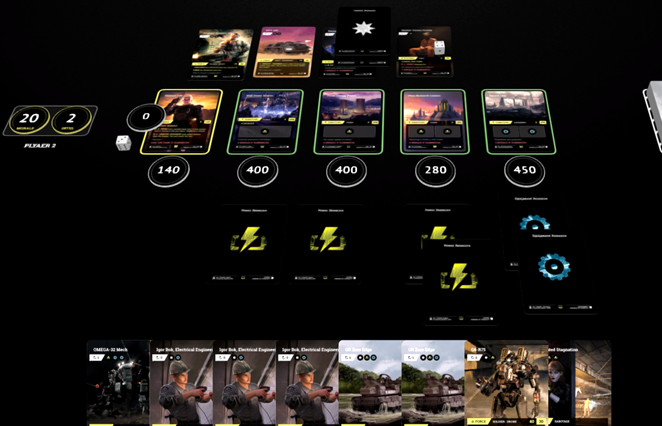
You can see by adding Resource Silo, Zoff was able to boost his resource count by 2 Generics. Production is done, Zoff can now move into his second Play Phase.
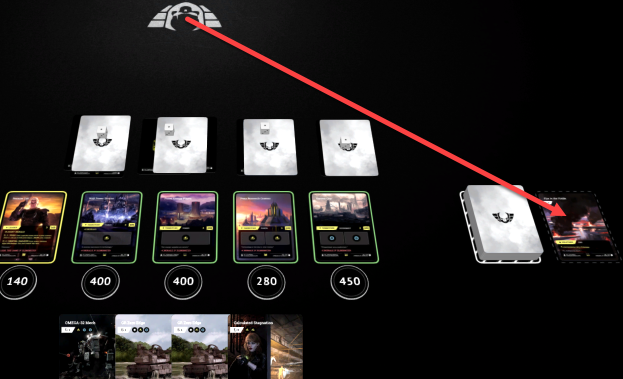
The first thing I will play is Zoff’s Leader Ability. This is the first Leader Ability timer to go off this match. Zoff has the PUSH ability which allows you to search his Arsenal for a DRONE force. Zoff’s 2 timer ability is a good way to get some forces on the battle field. Even if all your drawing from your Arsenal are production or intel cards, every 2 turns PUSH allows Zoff to pull out any drone Force.
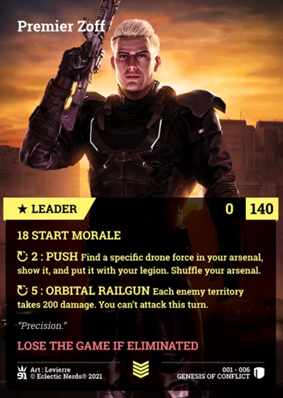
2 : PUSH : Find a specific drone force in your arsenal, show it, and put it with your legion. Shuffle your arsenal.
When a card states:
“put it with your legion”
There are no resources that must be paid for that said additional card you put with your legion, except turn cost.
The only time Turn Cost can be disregarded, is when the mechanic states: “it is ready.” It is also possible to manipulate turn cost timers with card mechanics.
I will select a G6-R75 from Zoff’s Arsenal for PUSH. The only stated stipulation for the card is that is has to be a Drone Force. This could be any drone force card in the Arsenal. The reason I am choosing the G6-R75 is because of Turn Cost. Since all the resource costs are negated, I can get the G6-R75 into play immediately with its 0 turn cost.
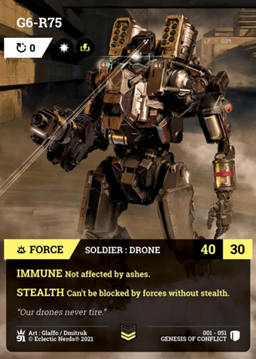
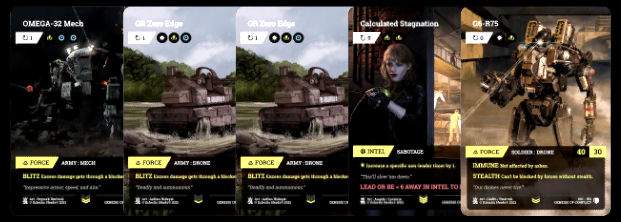
There are no immediate mechanics to negotiate when the G6-R75 becomes Ready. You can see this is a Soldier : Drone force card. It has the Ability IMMUNE and STEALTH.
- IMMUNE : Not affected by ASHES.
a. ASHES : All soldiers of a specific enemy are eliminated. - STEALTH : Can’t be blocked by forces without STEALTH.
After the G6-R75 is placed in the legion, the 0 marker is removed and replaced with a reset Ability timer set to 2.
The next play is going to be to bring out 2 Igor Bok, Electrical Engineer. Both have a 0 turn timer and will be ready immediately. When this happens each card will immediately produce +1 Power.
I then played another G6-R75, and also 1 more Igor Bok, Electrical Engineer which produced another Power resource. Both which were 0 cost timers and immediately ready.
Zoff’s really starting to get some forces together. There are still 2 Power resources to be spent. In this case I will use the 2 Power resources to pay for Calculated Stagnation.

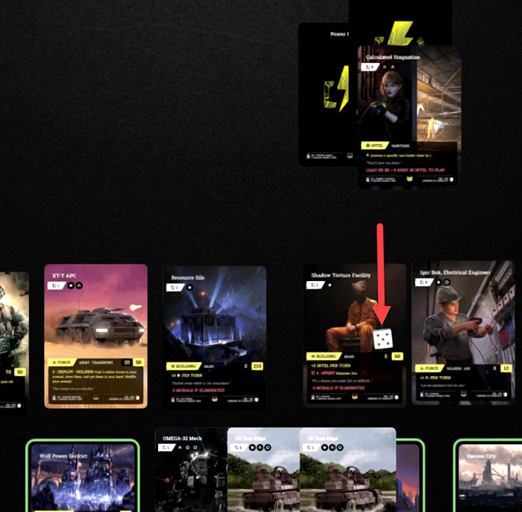
I will use Calculated Stagnation to increase the required timer on Shadow Torture Facility. By increasing this required timer, Zoff will be able to maintain the Shadow Torture Facility card in play for 1 extra turn.
Calculated Stagnation
*Increase a specific non-leader timer by 1.
Any non-leader timer may be manipulated with Calculated Stagnation. As long as the timer belongs to a card that is able to be specified.
After playing Calculated Stagnation and resolving the card’s mechanic, the card can be moved to the discard pile.
It is important to note, Calculated Stagnation is an Intel card. A player must be less than 6 Intel away from the total Intel of the player with the most Intel in order to play an Intel card.
Currently Zoff is in the Intel lead with the value of 2. Lockwood has 1.
With the final resources having been played, and no other play phase cards are in the hand, Zoff will now move into the Battle Phase. This will be the first attack phase of the game.
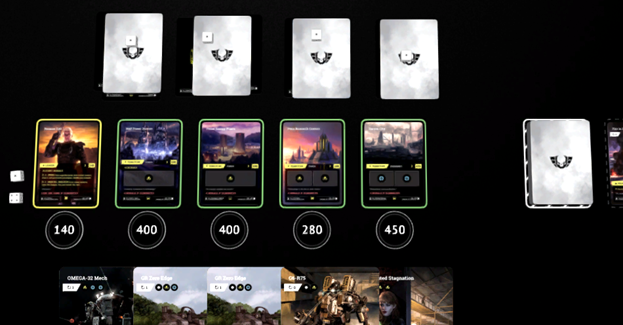
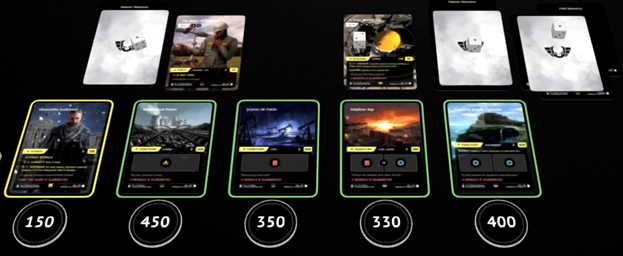
Here is what Lockwood has in play. Only Buildings, Territories, Leaders, or cards specifically allowing attack, may be specified for attack. As there are no other cards in play which specify they are able to be attacked, and Lockwood is uncompromised, we are confined to choosing Buildings and Territories.
Possible Targets: Advanced Detection Facility, Boxton Coal Plants, Dryton Oil Fields, Delphine Bay and Vernance Supply Factories.
At this early point in the match, it is very troublesome for Zoff to not have STEALTH. This is a huge disability to Zoff. By removing STEALTH with the Advanced Detection Facility’s SEEK, Lockwood has effectively created some unblockable conditions. If Lockwood sends any force which has the STEALTH ability, Zoff is unable to stop the attack. Also, when one of Zoff’s forces which have the STEALTH ability attack, Lockwood can treat the attack as if it has NO STEALTH. This allows Lockwood to block even STEALTH enabled cards with non-STEALTH cards. These factors really put Advanced Detection Facility at the top of the attack list.
Advanced Detection Facility has 90 HP. It will require Zoff sends at least 90 damage toward Advanced Detection Facility in order to eliminate the card.
Zoff must also keep in mind any cards that Lockwood could potentially use to block. Currently the only Blocking card Lockwood has in play is Jon Rider, Oil Engineer. Even though Jon Rider, Oil Engineer is a production card, it is still a Force card and can be used to block.
While Advanced Detection Facility is in play, Jon Rider, Oil Engineer can even block STEALTH forces. This early in the match, it is unlikely an opponent will sacrifice production to block an attack, as in most cases Jon Rider, Oil Engineer would be eliminated, however it is important to understand, any Force card can block unless otherwise specified such as BOMBS.
BOMBS: Can’t block; can only damage buildings, territories, and leaders.
Knowing Lockwood could potentially use Jon Rider, Oil Engineer for a block, I will include the block in my damage calculation. I really want Advanced Detection Facility eliminated. Jon Rider, Oil Engineer has a HP of 10. This 10 plus the 90 HP of Advanced Detection Facility will mean I need to at least send 100 attack to successfully eliminate the card.
Knowing I need at least 100, I will now look at the forces in my legion to see what the damage values of each of them are, and arrange an attack.
G6-R75 has 40 damage each, the XT-T APC has 20 damage, this will be my 100. However, there is the potential this 100 damage will not eliminate the Advanced Detection Facility. If Lockwood were to use Jon Rider, Oil Engineer to block, theoretically he would block the largest card possible. In the case of the thought attack, he would block the G6-R75, thus negating 40 damage. This would leave my attack damage at 60, 30 less than needed to eliminated the card.
Knowing this, I will also send Sergeant Vladimir Orlov which will add another 70 damage. Zoff will specify the attack by turning the card to face the opponent, then state the intended target.
Once Zoff has declared his attack, the Battle Phase moves into the Blocking step. Lockwood has the option to state any blocking he would like to perform. In this case, Lockwood will not choose to block any of the attacks. There would be no gain for Lockwood to block. As a matter of fact it would actually cost Lockwood Advanced Detection Facility and Jon Rider, Oil Engineer as well.

This battle will result in the elimination of Advanced Detection Facility and will cost Lockwood -1 Morale.
Once the battle is over and damage has been taken, Zoff’s turn is over. This is what the War Zone looks like at the end of the turn.
The attacking cards are left facing the opponent to signify they have attacked and are unable to block during the next battle. Now it is Lockwood’s 3rd turn. As Lockwood did not attack last turn, there are no forces to return, nor is there a weather card to discard, it is right to the Draw phase.
Lockwood draws a X6 Scorpion. The X6 Scorpion is an incredible Air defense card.
Now the Reduction Phase.
Before Reduction
After Reduction
Reduction results in a Panther RII becoming Ready for Lockwood.
When the Panther RII becomes ready, there are no immediate mechanics to resolve. You can see the card has BLITZ and STEALTH.
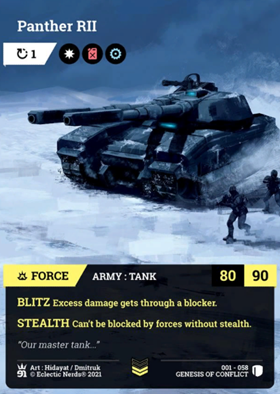
BLITZ: Excess damage gets through a blocker.
STEALTH: Can’t be blocked by forces without stealth.
When a card has the BLITZ ability, all excessive damage will pass through the blocker, and damage the intended target. This is true even if the blocking card is not eliminated.
Calculation for BLITZ:
Attack Points – Blocker Health Points = BLITZ Damage Inflicted On Target
EVADE does not negate BLITZ. The BLITZ calculation is still used for damage.
a. EVADE: Takes no damage during battle.
You can also see there is now a marker chip in place of the ability timers that have expired. This is how I mark the cards so I do not forget to use the ability during my play phase. Lockwood will now produce.
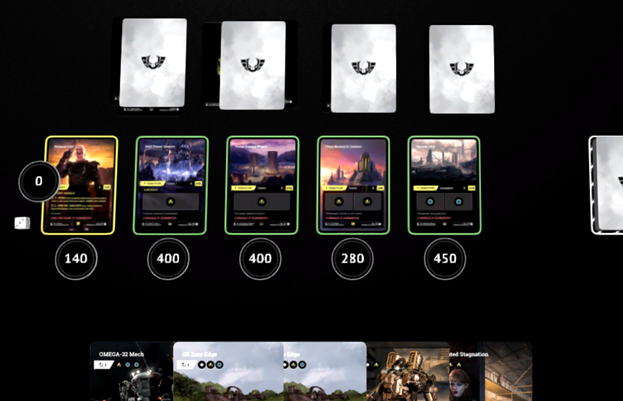
Now that production is done, Lockwood can move into the play phase. The first play I will make is the Leader ability timer.
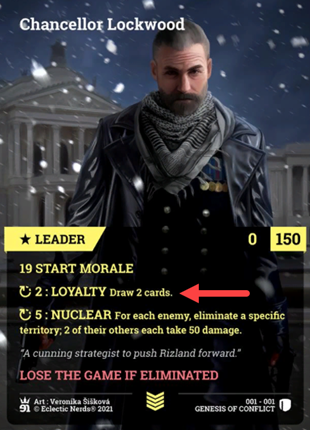
The ability timer that has expired is for the ability LOYALTY.
LOYALTY: Draw 2 cards.
After drawing 2 cards, the 2 timer will be reset, and placed next to the leader card to begin counting down again on Lockwood’s next turn. Lockwood drew another Advanced Detection Facility, and another G-Titan.
Now that the leader ability timer has been negotiated, I will resolve the G-Titan LAUNCH.
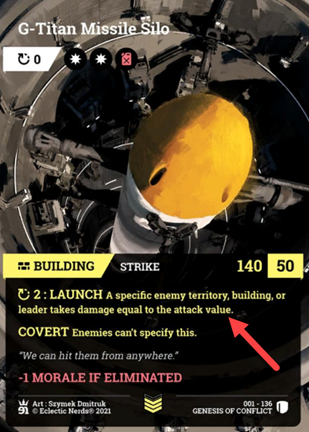
LAUNCH: A specific enemy territory, building, or leader takes damage equal to the attack value.
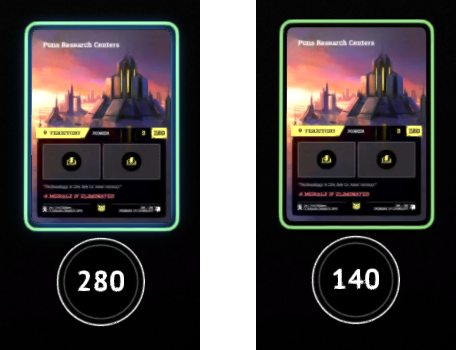
As Zoff is still uncompromised, I can not specify him for the attack. In my experience, the right target will be Pons Research Centers. Pons Research Centers only has a health of 280. The G-Titan has 140 damage to deal and will cut the territories health in half.
I will specify Pons Research Centers for the G-Titan attack. An unstoppable 140 damage will be taken off the HP of the territory.
Once the target has been specified and the damage has been taken, I will replace the 2 timer on the G-Titan. This timer will begin counting down again.
The next play is going to be the Advanced Detection Facility for the second time. With Zoff eliminating the first Advanced Detection Facility Lockwood played, Lockwood will want to get that card out again. I will choose 2 Fuel for the Generic resources.
I am also going to get an X6 Scorpion into Lockwood’s legion, this will also require I use 1 Fuel for a Generic resource. Now this is how Lockwood’s board looks.
I will hold on to the Equipment resource I have left on Vernance Supply Factories for the next turn. This now brings Lockwood to the Battle phase.
The only attacking Force card Lockwood has currently Ready is Panther RII. Lockwood will specify his target and then Zoff will specify whether or not he would like to block if possible.
Currently Lockwood could choose any of the territories, or the buildings to attack.
Looking at Panther RII, we can see the card has 80 Attack. I could choose to send 80 damage to Pons Research Centers, or any other territory, but this will not eliminated any of them. I could attack Resource Silo, but with the 210 Health, I’d barely scratch it. Knowing next turn I have the E7 Night Eagle becoming Ready, which has a 160 Attack, I will hit Pons Research Centers with that. This turn however, I’m looking at Shadow Torture Facility. Shadow Torture Facility has a Health of 60. With the Panther RII Attack at 80, Lockwood could eliminate this Building. Not only will we stop Zoff from receiving +2 Intel per turn while the card is active, the elimination of the card will cost Zoff -3 Morale.
Even if Zoff were to send an Igor Bok, Electrical Engineer to block, had he the STEALTH ability, the BLITZ ability on Panther RII would still be strong enough to make the play. After looking at the current game setup, that is the right decision. Lockwood will rotate the Panther RII card so it is upright to the opponent and declare his attack.
Not having any card to block, because all of Zoff’s Ground Forces attacked last turn, except Igor Bok, Electrical Engineer, Zoff will choose to eliminate the card and take the Morale loss without blocking. Even if Zoff sent Igor Bok, Electrical Engineer to block, it would result in the elimination of Shadow Torture Facility and also 1 Igor Bok, Electrical Engineer would be eliminated.
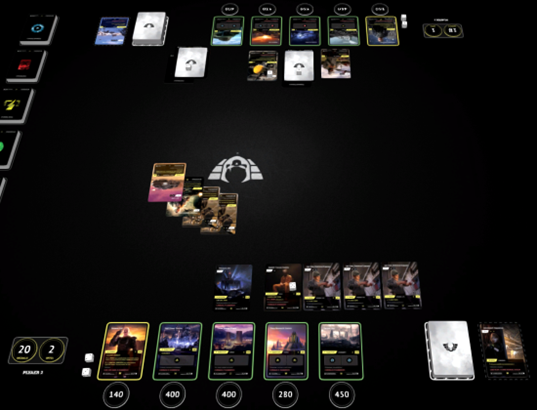
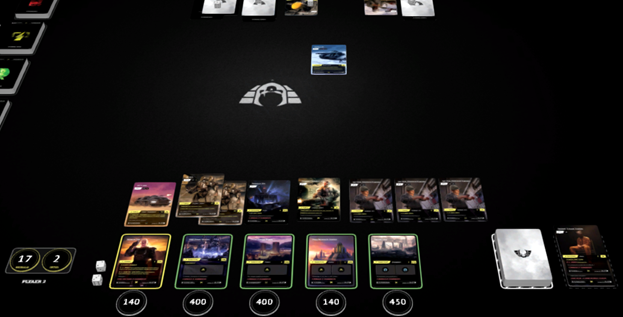
This is what the War Zone looks like after Lockwood’s attack.

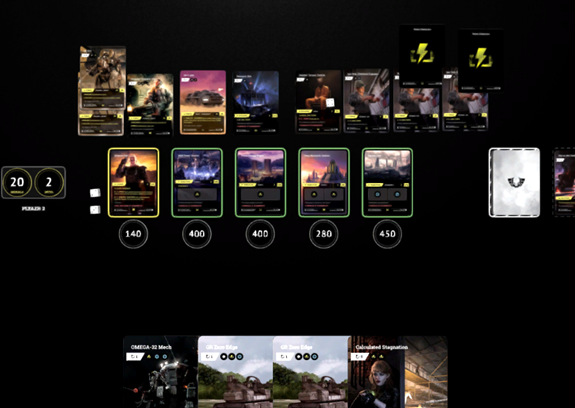
After subtracting the -3 Morale, Zoff is now at 17 Morale. The end of the Battle phase concludes Lockwood’s turn. It is now Zoff’s turn.
After Zoff plays his Return Phase, he rotates his attacking Force cards back to upright, and places them back into his legion.
Having no Weather to remove from the War Zone, Zoff will Draw his card.
Zoff draws another Shadow Torture Facility. Now it’s time for Reduction.
Before reduction.

After reduction.
The only timers Zoff had to reduce were his Leader ability timers. Now Zoff can move into the Production phase.
Zoff will play some more Force cards this Play phase. The game is getting close to the leader’s ultimate ability timer expiring. Zoff’s ultimate ability is ORBITAL RAILGUN.
ORBITAL RAILGUN: Each enemy territory takes 200 damage. You can’t attack this turn.
So we need to pluck away at Lockwood’s territories to get each of their health points down to at least 200. This way when turn 5 hits, the ultimate ability can take out the territories completely. Thus compromising Lockwood.
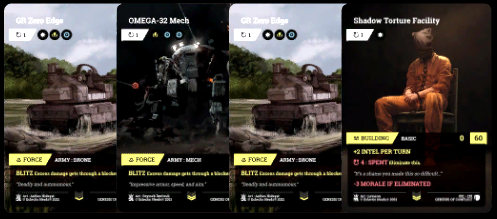
Zoff plays 2 GR Zero Edge, and 1 Omega-32 Mech.
Having depleted all his resources, Zoff now moves into the Battle phase.
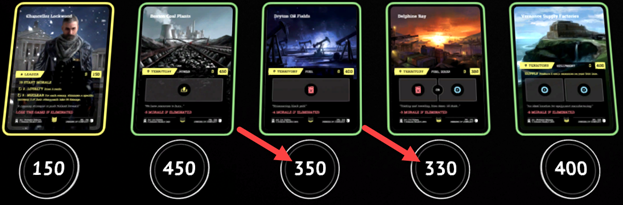
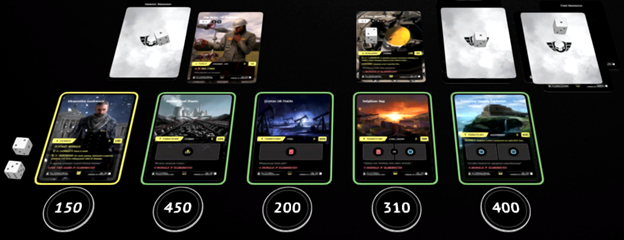
Zoff will send 2 G6-R75 and 1 Sergeant Vladimir Orlov to attack Dryton Oil Fields for 150 damage, and he will also send the XT-T APC to attack Delphine Bay for 20 damage. Lockwood will not block this turn, so all damage is effective and removed from the respective targets.
Before damage:
After Damage:
With the damage being resolved, it is now once again Lockwood’s turn. This will be a good time to close part 2 of this post.
This concludes Part 2 of the Guide. I will begin with Lockwood's next turn in Part 3. Until then, be sure to check out Warsaken.
written by @relaylogix
Congratulations @relaylogix! You have completed the following achievement on the Hive blockchain And have been rewarded with New badge(s)
Your next target is to reach 30 posts.
You can view your badges on your board and compare yourself to others in the Ranking
If you no longer want to receive notifications, reply to this comment with the word
STOPTo support your work, I also upvoted your post!
Check out our last posts:
Support the HiveBuzz project. Vote for our proposal!