Hello friends of the hives, today I bring you a super tip for all women like me that it costs us to grow nails to be so weak and break, therefore do not grow, well first I will tell you that I like in my free time to fix my fingernails, paint my nails relaxes me I like to do my nails whenever I have time, I also like a lot to be always changing the color.
Bueno este dato que hoy les voy dar para que las uñas le crezcan bonitas y resistente, surgió hace poco ya que en enero me hicieron un sistema que se llama Dip- powder, esto me lo hizo una persona especializada y quedaron bellas y duraron como mes y medio, aunque ya a ese tiempo me había crecido la uña y ya el trabajo no se veía bonito, bueno allí me retire lo que quedaba de ese trabajo que me hicieron en el momento y desde entonces tuve la idea de hacerlo yo misma parecido a ese trabajo pero con los utensilios que tenía yo disponible , y créeme que funciono las uñas seguían largas y bonitas, también súper duras y resistente , bueno ya les voy a explicar paso a paso como lo logre.
Well this information that I am going to give you today so that your nails grow beautiful and resistant, came up recently since in January I had a system called Dip-Powder, this was done by a specialized person and they were beautiful and lasted about a month and a half, although at that time my nails had already grown and the work did not look nice, Well there I removed what was left of the work that was done at the time and since then I had the idea of doing it myself similar to that work but with the tools I had available, and believe me it worked, the nails were still long and beautiful, also super hard and resistant, well I will explain step by step how I did it.

Foto tomada por mí con fondo de editor del paso numero 12 / Photo taken by me with editor's background of step number 12
Aclaro que tuve todo este tiempo desde enero con las uñas súper largas, y me las corte pero sigo manteniendo la técnica que me sirvió para que vuelvan a crecer y también para que sean siempre resistente.
I should clarify that I had all this time since January with super long nails, and I cut them but I still keep the technique that helped me to grow them back and also to make them always resistant.
Yo uso la técnica del semipermanente ya que este tipo de pintura permite tener por tiempo más prolongado las uñas bonitas, fresca con color y brillo duradero, bien las uñas semipermanente son el resultado de aplicar un esmalte o pintura con base en gel que, para su secado necesita una lámpara especial el efecto es natural y duradero, se retira con un quita esmalte semipermanente, cabe acotar que la fórmula de este tipo de esmaltado no es agresiva y protege la uña.
I use the semi-permanent technique because this type of painting allows to have for a longer time beautiful nails, fresh with color and lasting shine, well the semi-permanent nails are the result of applying an enamel or gel-based paint that, for drying needs a special lamp the effect is natural and durable, it is removed with a semi-permanent nail polish remover, it should be noted that the formula of this type of enamel is not aggressive and protects the nail.
Bien ahora si les contare lo que hago antes de aplicar el semipermanente a la uñas, yo uso dos capas de polvo acrílico transparente y esto es lo que hace que mi uña quede súper resistente y crezca bonita, pero este polvo acrílico, lo aplico junto con la base de la semipermanente, cabe acotar que este método no vine para trabajar de esta forma ya que cada una de las técnicas se hacen por separado de distintas formas pero yo lo probé así, y me funciona a la perfección ya que el acrílico lo suele trabajar con monómero, bien a continuación les contare el paso a paso de esta técnica.
Well now I will tell you what I do before applying the semi-permanent to the nails, I use two layers of transparent acrylic powder and this is what makes my nail is super resistant and grow beautiful, but this acrylic powder, I apply it along with the base of the semi-permanent, it should be noted that this method did not come to work in this way since each of the techniques are done separately in different ways but I tried it this way, and it works perfectly for me since the acrylic usually works with monomer, well then I will tell you the step by step of this technique.

- Limpio la uña con alcohol etílico al 70%, previamente la uña tiene que estar preparada sin cutícula.
- Se lima la uña con lima número 180, por toda la parte de arriba muy cuidadosamente
- Se lima también el largo que se quiere tener
- Se chequea que toda la uña está bien limada y se vuelve a limpiar con el alcohol.
- Se aplica una capa de primer, que son polimer de liberación rápida que sirve para adherir la pintura o el polvo acrílico a la uña, y también sirve para protegerla
- Agrego una capa de base en gel, lo cual es el producto que viene para usar con la pintura semipermanente.
- Luego con la base en gel en la uña, introduzco mi dedo en el polvo acrílico, de forma que la uña quede con un ángulo aproximado de 40º grados.
- Repito el paso número 7 en con todas las uñas.
- Dejo secar en la lámpara LED UV, durante 10 segundos, y repito nuevamente el paso número 8 y por ultimo limo nuevamente toda la uña con lima número 180, y luego limo con lima 100, que es la que da el pulido, vuelvo y aplico la base gel en todas la uñas, y allí ya está lista la uña para el sistema de esmaltado semipermanente.
- Se coloca el esmaltado color rosa en la uña y se deja secar en la lámpara LED UV, por 10 segundos y así se aplican dos capas de este esmaltado con el mismo procedimiento.
- Por último se aplica el top coat, lo cual ayuda a fijar el color y que el esmaltado dure más tiempo y se deja secar por dos minutos en la lámpara LED UV, y listo uñas perfectas echas en casita.
- I clean the nail with 70% ethyl alcohol, previously the nail has to be prepared without cuticle.
- File the nail with file number 180, all over the top of the nail very carefully.
- File also the length that you want to have.
- Check that the whole nail is well filed and clean it again with alcohol.
- Apply a coat of primer, which is a quick release polymer that serves to adhere the paint or acrylic powder to the nail, and also serves to protect it.
- I add a base coat of gel, which is the product that comes with the semi-permanent paint.
- Then with the gel base coat on the nail, I dip my finger into the acrylic powder so that the nail is at about a 40 degree angle.
- I repeat step number 7 on all the nails.
- I let it dry in the LED UV lamp, for 10 seconds, and I repeat again step number 8 and finally I file again the whole nail with file number 180, and then I file with file number 100, which is the one that gives the polish, I go back and apply the gel base on all the nails, and there the nail is ready for the semi-permanent enamel system.
- Place the pink polish on the nail and let it dry in the LED UV lamp for 10 seconds and then apply two coats of this polish with the same procedure.
- Finally apply the top coat, which helps to fix the color and make the polish last longer and let it dry for two minutes in the LED UV lamp, and ready, perfect nails at home.
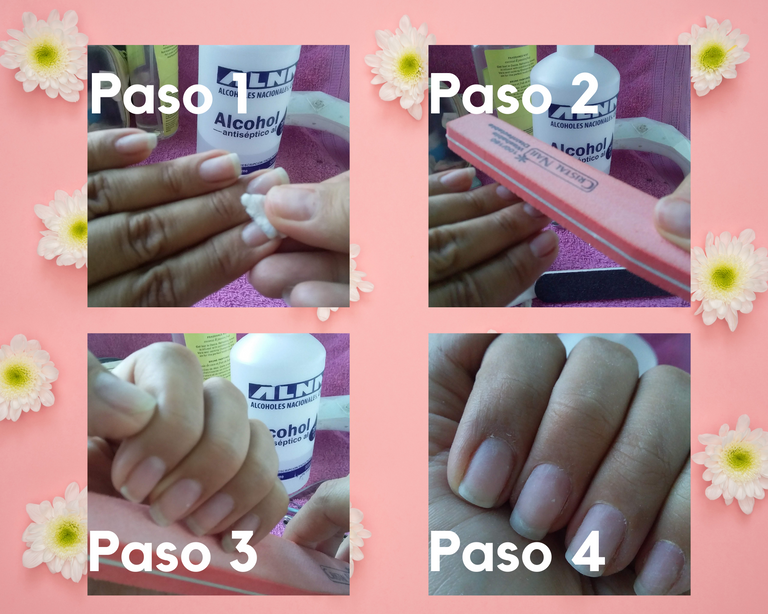
Galería de fotos del paso a paso del 1 al 4 / Photo gallery of step by step from 1 to 4
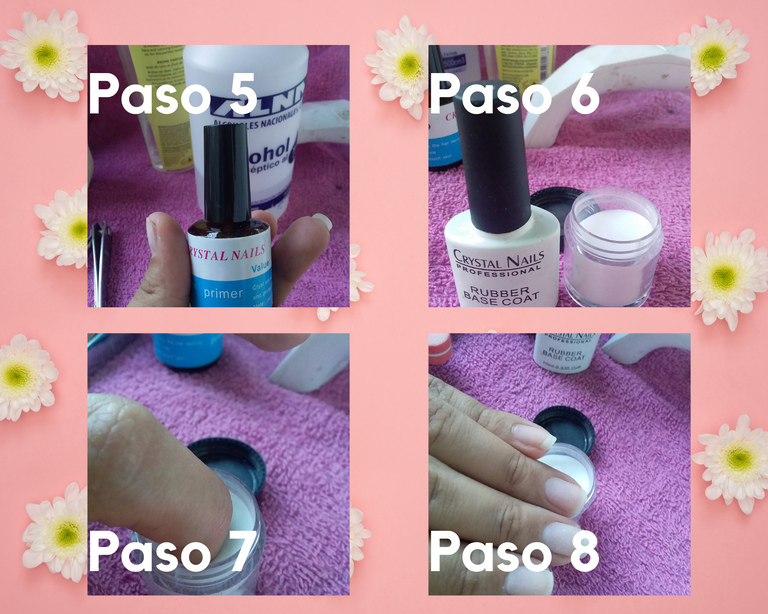
Galería de fotos del paso a paso del 5 al 8 / Photo gallery of step by step from 5 to 8
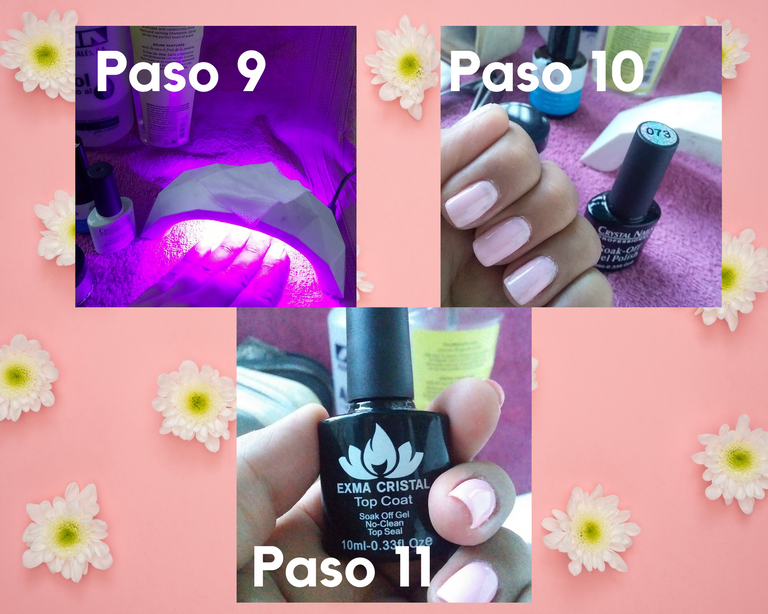
Galería de fotos del paso a paso del 9 al 11 / Photo gallery of step by step from 9 to 11
Espero y les haya gustado esta técnica que a mí me ha funcionado a la perfección, si te gusto la idea practícala tú también puedes y verán que esto relaja cuando tenemos tiempo libre y queremos darnos un cariñito, también nos sirve si no podemos ir al manicurista o si estamos corto de dinero, esto es una muy buena opción. Hasta una próxima oportunidad amigos.
I hope you liked this technique that has worked perfectly for me, if you like the idea practice it and you will see that this relaxes when we have free time and we want to give ourselves a little love, it is also useful if we can not go to the manicurist or if we are short of money, this is a very good option. See you next time friends.
Fotos tomadas por mi / Photos taken by me
Texto traducido en | Texto traducido en: https://www.deepl.com Galería de fotos realizadas por mí en / Gallery of photos taken by me in https://www.canva.com/

Muy genial tu dato amiga, está todo bien explicado, lo único es que yo no sé hacer nada de eso jajajaj, tendría que decirle a alguien que sepa que lo haga. Saludos!
Buenísima tu recomendación, yo no se nada de esto del esmalte semipermanente, tendré que aprender, porque mis uñas están débiles.