CLASS #2
Learn to draw like a professional in no time !!! tutorial 2 (DRAW AND PRACTICE YOUR LINES WITH THIS EXCELLENT METHOD)
BIENVENIDOS !!! Si han llegado hasta aquí es por algo bueno, continuando con el aprendizaje esta vez seguimos con esta serie de tutoriales en cadena y en esta oportunidad les enseñare a como hacer sus primeros trazos con el programa MediBang anteriormente ya les mostré a como descargarlo y ahora pienso mostrarles a como dibujar con una de las mejores técnicas que sin duda tiene este programa para todos nosotros:
Justo como cuando un rockstar se prepara para tocar la guitarra el sabe muy bien que antes debe estar afinada, pues acá es lo mismo, primero abra que ajustar el programa para empezar a usarlo.
WELCOME !!! If you have come this far it is for a good thing, continuing with the learning this time we continue with this series of chain tutorials and this time I will teach you how to make your first lines with the ** MediBang ** program. download it and now I plan to show you how to draw with one of the best techniques that this program undoubtedly has for all of us:
Just like when a rockstar prepares to play the guitar, he knows very well that it must be in tune before, because here it is the same, first open the program to start using it.
**CONFIGURAR LA RESOLUCIÓN DE TRABAJO**
SET THE JOB RESOLUTION
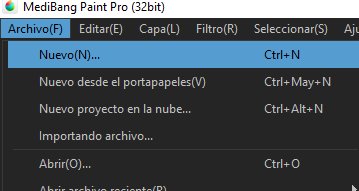
PASO 1: Lo primero es ejecutar el programa y una vez dentro de la interfaz procederemos a crear un nuevo proyecto, Archivo > Nuevo(N), justo como se ve en estas imágenes:
STEP 1: The first thing is to run the program and once inside the interface we will proceed to create a ** new project **, File> New (N), just as you can see in these images:
|
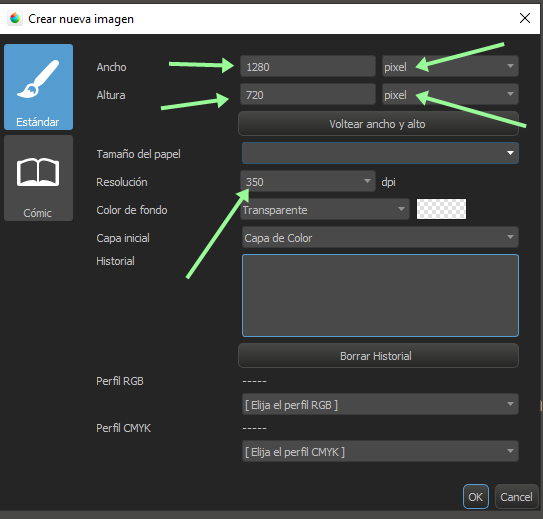
**PASO 2**: Nos aparece un recuadro donde configuramos de la resolución en la que trabajaremos en este caso 1280 x 720 pixel justo como se muestra en la imagen luego pincharemos en el boton de **OK**:
(realmente podrian trabajar con la configuración que quieran pero esta resolución es perfecta para hiveblog).
STEP 2: A box appears where we configure the resolution in which we will work in this case 1280 x 720 pixel just as shown in the image then we will click on the ** OK ** button:
(They could really work with whatever configuration they want but this resolution is perfect for hiveblog).
|
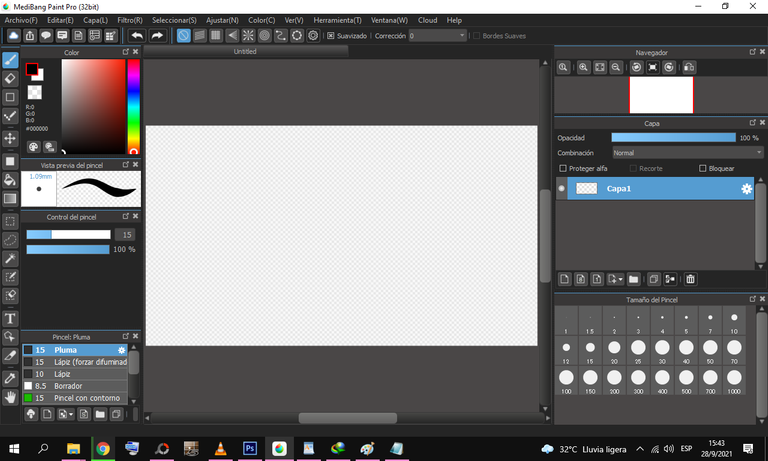
al configurar todo nos quedaría de esta manera:
When configuring everything, it would look like this:
|
Ahora pasamos directamente a configurar nuestra herramienta con la que crearemos nuestros trazados o lineas en este caso nuestro **pincel**
CONFIGURAR EL PINCEL A MODO F&FOUT 'FadeInFadeOut'
PASO 1: En esta parte nos vamos al apartado de pinceles y pinchamos en el icono de agregar pincel como se ve en la imagen:
Now we go directly to configure our tool with which we will create our paths or lines in this case our ** brush **
SET THE BRUSH IN F & FOUT MODE 'FadeInFadeOut
**STEP 1**: In this part we go to the brushes section and click on the add brush icon as seen in the image:
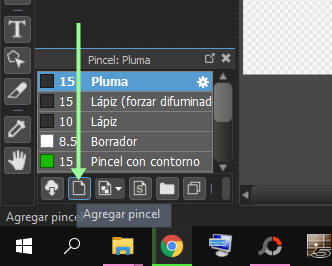
|
**PASO 2:** se nos abrira otro recuadro donde tendremos que configurarlo justo como se ve en la siguiente imagen y pinchamos en el boton de OK:
STEP 2: Another box will open where we will have to configure it just as seen in the following image and click on the OK button:
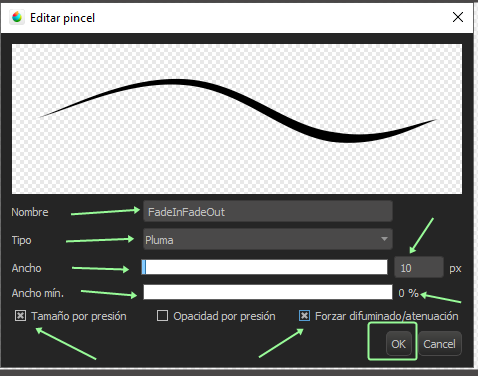
|
Cumpliendo estos dos pasos ya tendríamos configurado nuestro nuevo pincel 'FadeInFadeOut', y ahora para activarlo es cuestión de aprender esto:
nos iremos a herramienta de pincel y lo seleccionamos
Fulfilling these two steps we should already establish our new brush 'FadeInFadeOut', and now to activate it it is a matter of learning this:
we will go to the brush tool and select it
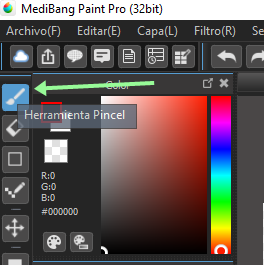
|
luego de ello, trazaremos pinceladas por todas partes dentro de nuestra área de trabajo como se muestra en la siguiente imagen :
after that, we will trace brush lines everywhere within our work area as shown in the following image:
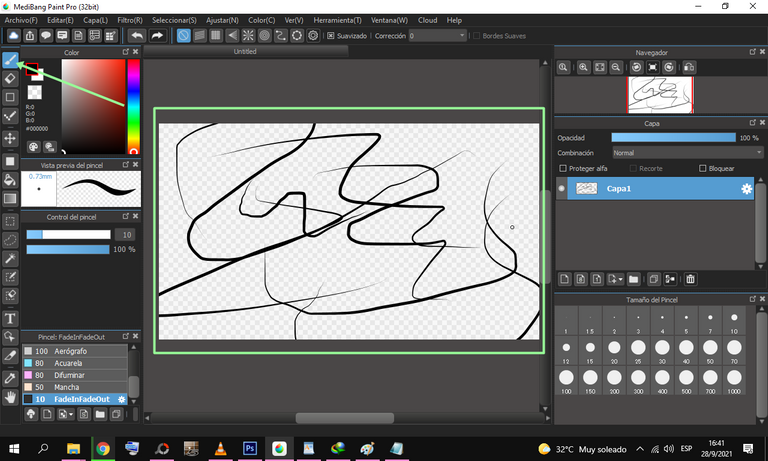
|
OK !! a estas alturas ya tenemos activado nuestro efecto de '**FadeInFadeOut**' pero necesitamos dibujar de una manera mas eficiente porque muchos no contamos con alguna tableta de dibujo asi que para lograrlo a continuación les mostrare la herramienta mas sofisticada para dibujar con el mouse desde **MediaBang**
a partir de ahora ya activamos mediante pinceladas el FadeInFadeOut ahora el siguiente paso es crear una nueva capa de dibujo y para eso seguirán estos pasos:
CREAR UNA NUEVA CAPA DE DIBUJO Y SELECCIONAR LA MEJOR HERRAMIENTA DE DIBUJO
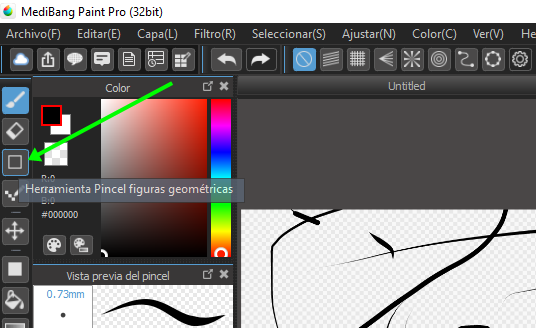
Como les muestro en la siguiente imagen pincharemos en Herramienta de Pincel figuras geométricas
OKAY !! At this point we have activated our effect of '** FadeInFadeOut **' but we need to draw in a more efficient way because many of us do not have a drawing tablet so to achieve this I will show you the most sophisticated tool to draw with the mouse from ** MediaBang **
From now on we activate the ** FadeInFadeOut ** using brush strokes. Now the next step is to create a new drawing layer and for that they will follow these steps:
** CREATE A NEW DRAWING LAYER AND SELECT THE BEST DRAWING TOOL **
As I show you in the following image we will click on the Brush Tool geometric figures
|
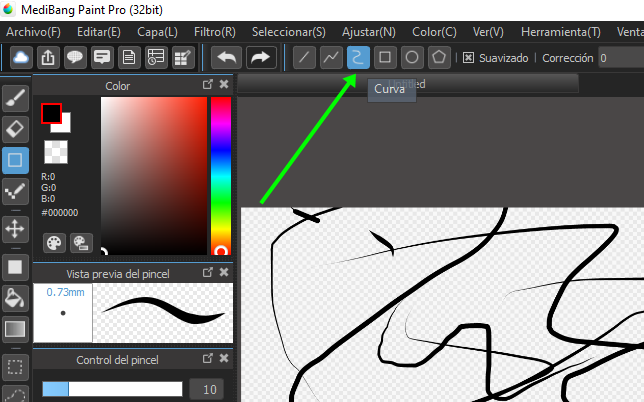
Al seleccionar la nueva herramienta de pincel se activaran nuevas figuras en la parte superior del programa y deberan seleccionar la figura geometrica llamada **CURVA** justo como les muestro en la siguiente imagen:
When selecting the new brush tool, new figures will be activated in the upper part of the program and they must select the geometric figure called ** CURVE ** just as I show them in the following image:
|
OKK!!!!! teniendo ya seleccionada nuestra nueva herramienta para dibujar es momento de crear otra capa para empezar con la mejor parte, si amigos DIBUJAR ALGO!!
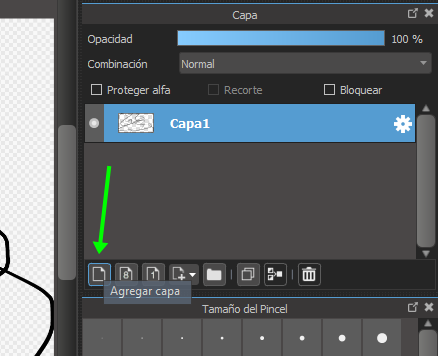
Vamos rápidamente a la parte derecha del programa y pincharemos en el icono de agragar capa comos se muestra en la siguiente imagen:
OKK !!!!! having already selected our new drawing tool, it is time to create another layer to start with the best part, yes friends DRAW SOMETHING !!
We go quickly to the right part of the program and we will click on the ** add layer ** icon as shown in the following image:
|
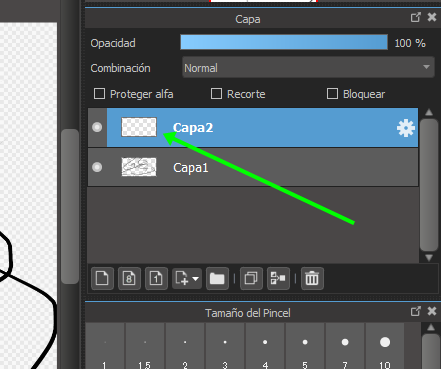
y nos quedara algo asi:
and we will have something like this:
|
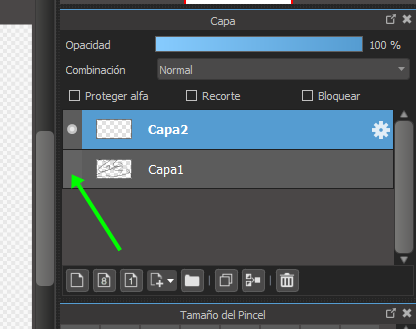
desactivaremos la capa de abajo pinchando en el circulo que lleva en el lado izquierdo y nos quedara así como se muestra en la siguiente imagen:
We will deactivate the layer below by clicking on the circle on the left side and it will remain as shown in the following image:
|
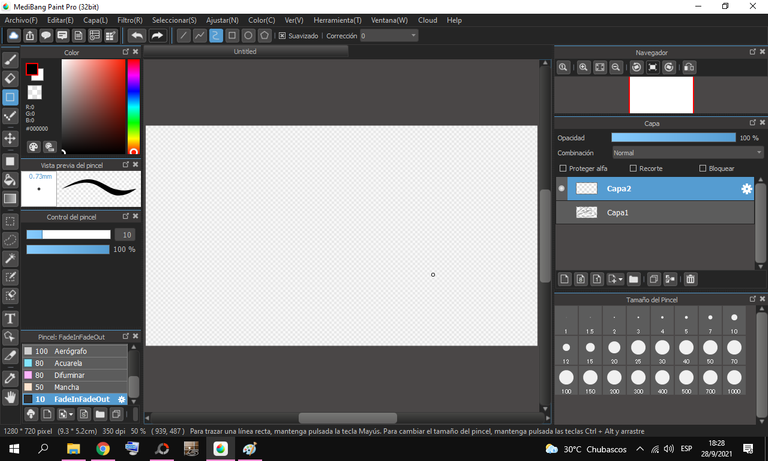
En este momento todo esta preparado y la interfaz de **MediaBang** se vera de esta forma :
At this moment everything is ready and the ** MediaBang ** interface will look like this:
|
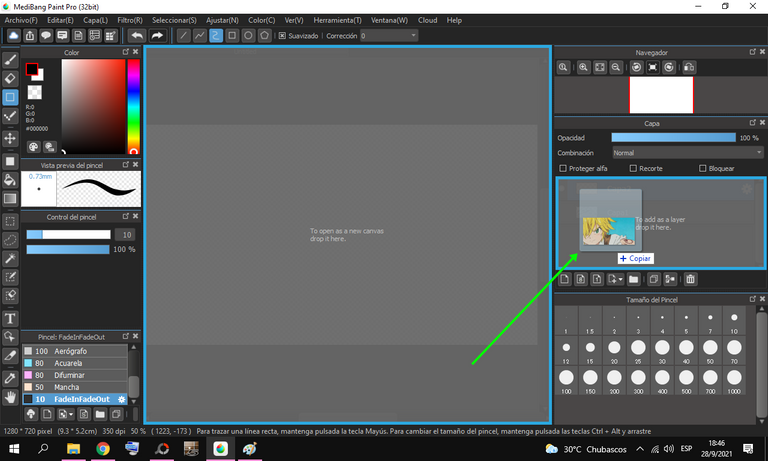
A continuación ..... tomaremos cualquier imagen que queramos ilustrar desde nuestro ordenador y simplemente la arrastraremos dentro del programa justamente en la sección de CAPAS y soltaremos como muestro en las siguientes imágenes:
ARRASTRAMOS Y SOLTAMOS LA IMAGEN
Next ..... we will take any image that we want to illustrate from our computer and we will simply drag it into the program exactly in the ** LAYERS ** section and we will drop it as shown in the following images:
WE DRAG AND DROP THE IMAGE
|
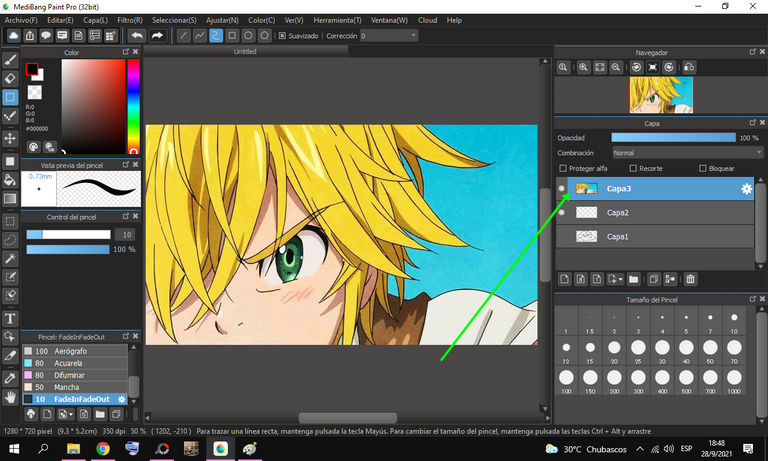
Y QUEDARA DE ESTA MANERA
AND IT WILL STAY THIS WAY
|
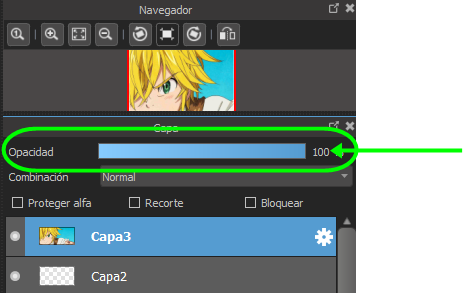
AHORA BAJAREMOS LA OPACIDAD Y CAMBIAREMOS DE LUGAR LAS CAPAS COMO MUESTRO EN LAS SIGUIENTES IMAGENES:
CONTROL DE OPACIDAD
NOW WE WILL LOWER THE OPACITY AND CHANGE THE PLACES OF THE LAYERS AS SHOWN IN THE FOLLOWING PHOTOS:
OPACITY CONTROL
|
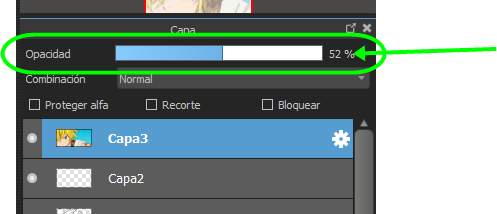
BAJAMOS LA OPACIDAD
We will lower the opacity
|
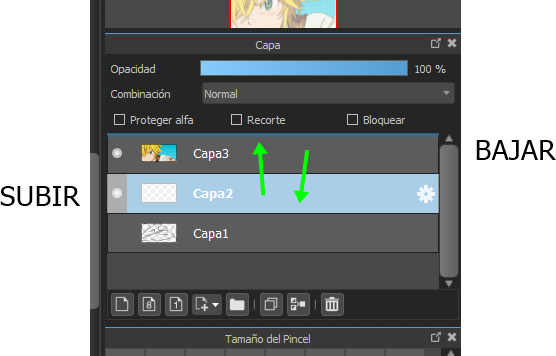
EN ESTA PARTE CAMBIAREMOS EL ORDEN DE LAS CAPAZ, SIMPLEMENTE DEJAMOS PINCHADO LA IMAGEN DE ABAJO Y LA SUBIREMOS, AUTOMÁTICAMENTE AL HACER ESTO LA PRIMER IMAGEN SE POSICIONARA EN LA PARTE DE ABAJO COMO SE MUESTRA EN LA IMÁGENES:
IN THIS PART WE WILL CHANGE THE ORDER OF THE LAYERS, WE SIMPLY LEAVE THE PHOTO BELOW AND UPLOAD IT, AUTOMATICALLY WHEN DOING THIS THE FIRST IMAGE WILL BE PLACED IN THE BOTTOM AS SHOWN IN THE IMAGES:
|
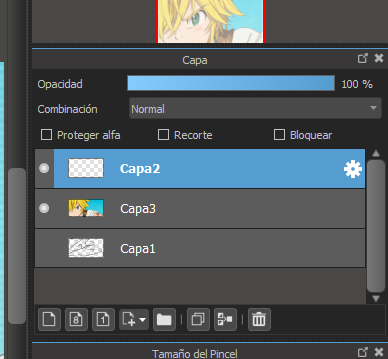
Y DE ESTA MANERA QUEDARAN LAS CAPAS EN EL ORDEN CORRECTO PARA EMPEZAR A DIBUJAR, LA IDEA ES TENER UNA GUÍA O PLANTILLA DEBAJO Y NOSOTROS CON LA PRIMERA CAPA IR TRAZANDO Y ASÍ MISMO IR PRACTICANDO EN EL PROCESO HASTA DOMINAR LA TÉCNICA
AND IN THIS WAY, THE LAYERS WILL BE IN THE CORRECT ORDER TO START DRAWING, THE IDEA IS TO HAVE A GUIDE OR TEMPLATE UNDERNEATH AND WE, WITH THE FIRST LAYER, GO DRAWING AND ALSO GOING PRACTICING IN THE PROCESS UNTIL MASTERING THE TECHNIQUE
|
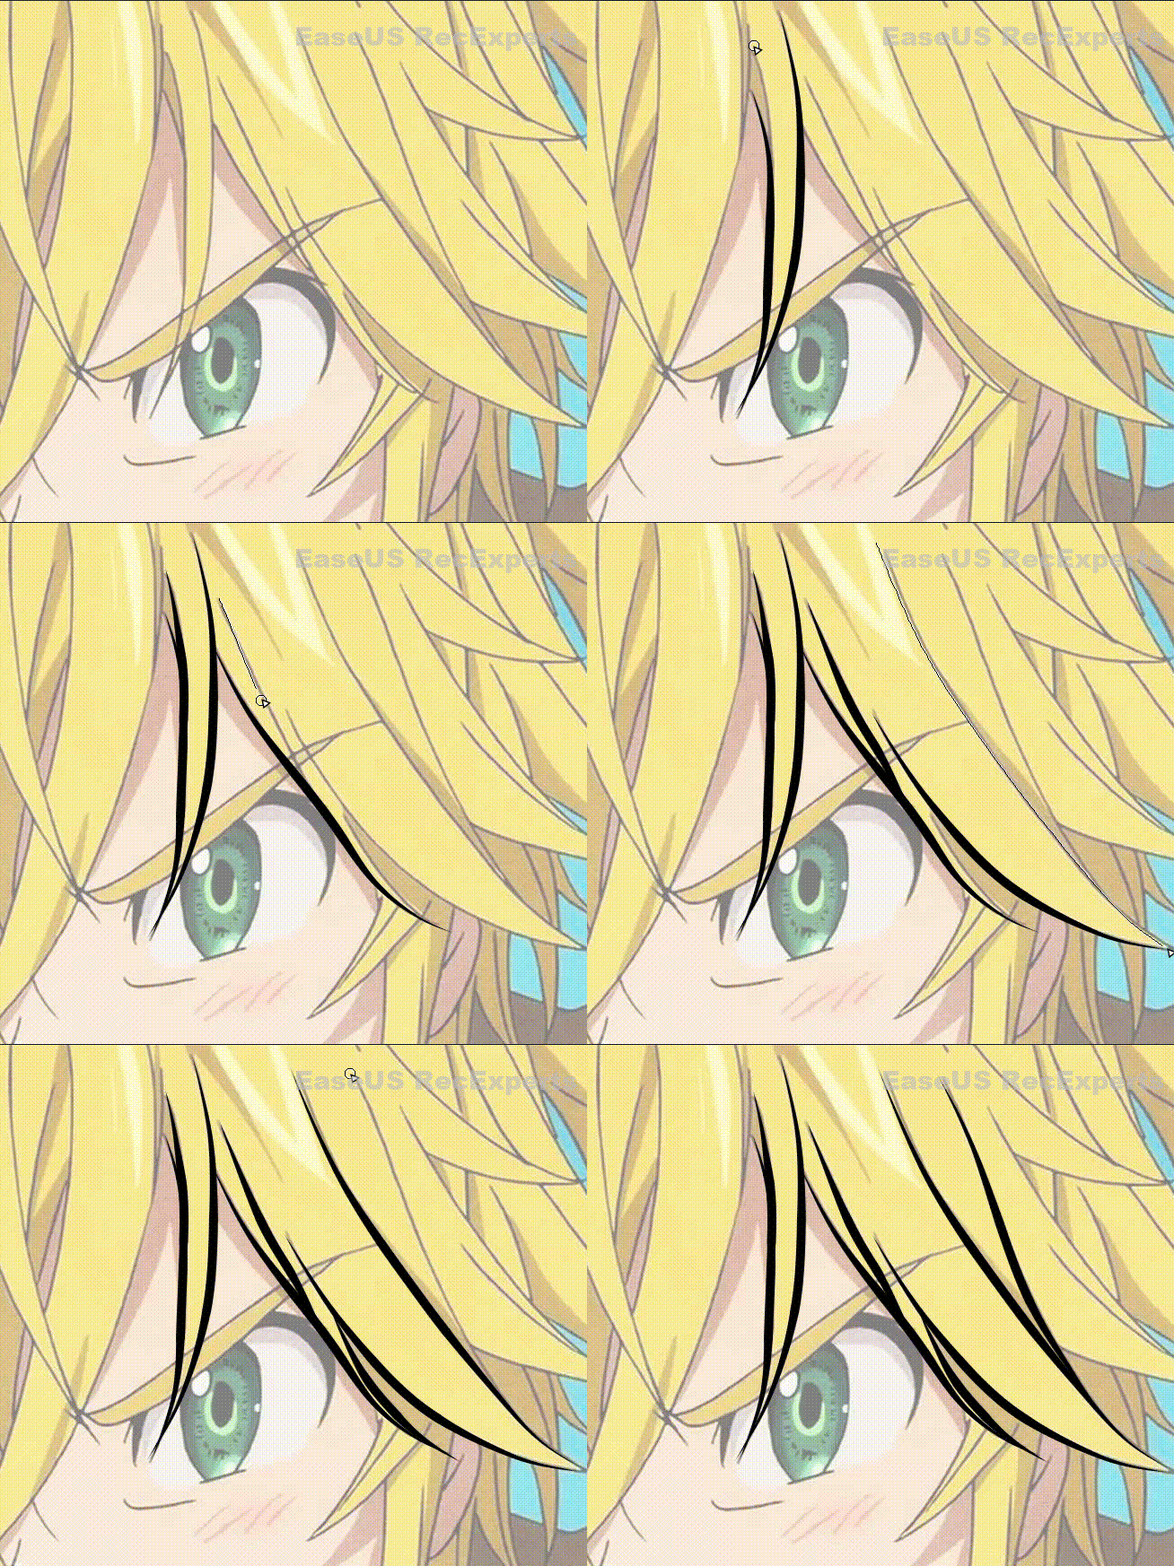
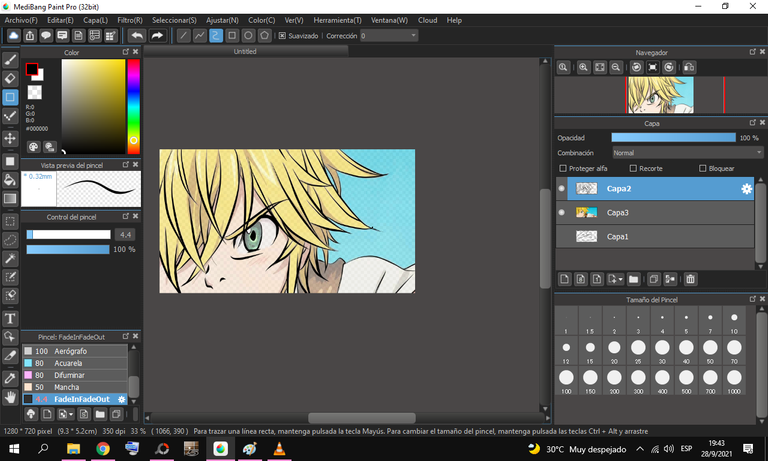
BIEN AQUÍ LES MUESTRO ALGUNOS TRAZOS QUE HICE SOBRE LA IMAGEN QUE TOME COMO PLANTILLA, LES MUESTRO COMO FORMA DE EJEMPLO :
WELL HERE I SHOW TO YOU SOME LINES I DID ON THE IMAGE THAT IS TAKEN AS A TEMPLATE, I SHOW THEM AS AN EXAMPLE :
|
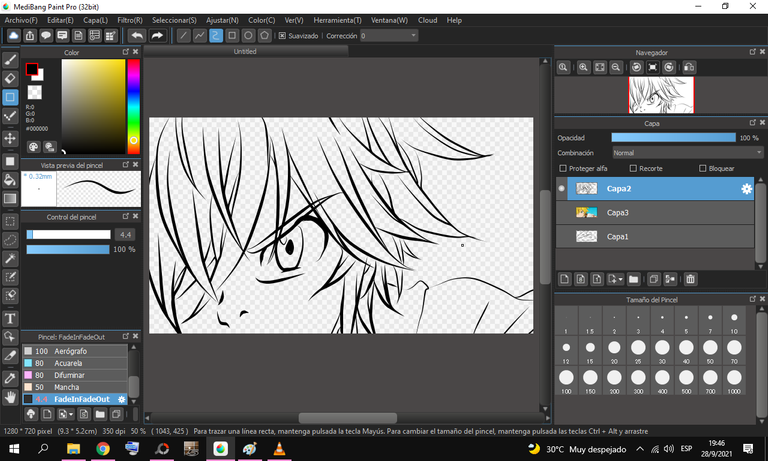
SI DESACTIVO LA CAPA DE ABAJO PODRE VER MUCHO MEJOR COMO VA QUEDANDO EL DIBUJO, Y DE ESTA FORMA PODRÁN ACTIVARLA Y DESACTIVARLA LAS VECES QUE QUIERAN, INCLUSIVE ELIMINAR Y AGREGAR LAS CAPAS QUE DESEEN:
IF I DEACTIVATE THE LAYER BELOW I WILL BE ABLE TO SEE MUCH BETTER HOW THE DRAWING IS LOOKING, AND IN THIS WAY THEY WILL BE ABLE TO ACTIVATE AND DEACTIVATE IT THE TIMES YOU WANT, EVEN DELETE AND ADD THE LAYERS YOU WANT:
|
A CONTINUACIÓN LES DEJARE ALGUNOS TIPS BÁSICOS PERO MUY EFECTIVOS AL MOMENTO DE DIBUJAR:
¿¿¿COMO GUARDAR EN PNG ESTE DIBUJO SIN FONDO ALGUNO ???
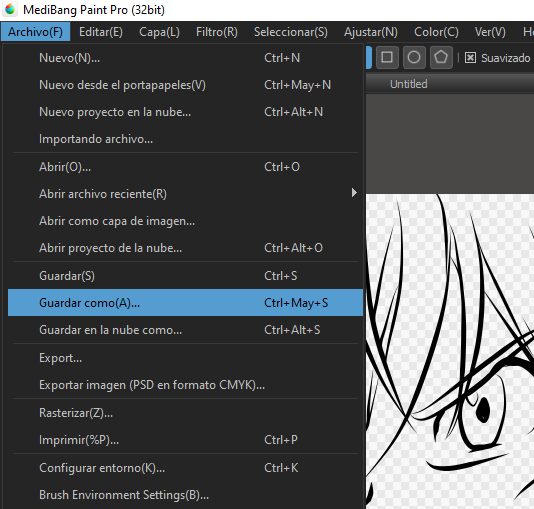
Dejando desactivada la capa de la plantilla (en este caso la de abajo), y dejando solo activada la de nuestros trazos nos dirigimos
hasta archivo > Guardar como
como se muestra en la imagen de abajo
| BELOW I WILL LEAVE YOU SOME BASIC BUT VERY EFFECTIVE TIPS THE TIME OF DRAWING:
HOW TO SAVE THIS DRAWING IN PNG WITHOUT ANY BACKGROUND ???
Leaving the template layer deactivated (in this case the one below), and leaving only the one with our strokes activated, we go
to file > Save as
as shown in the picture below
|
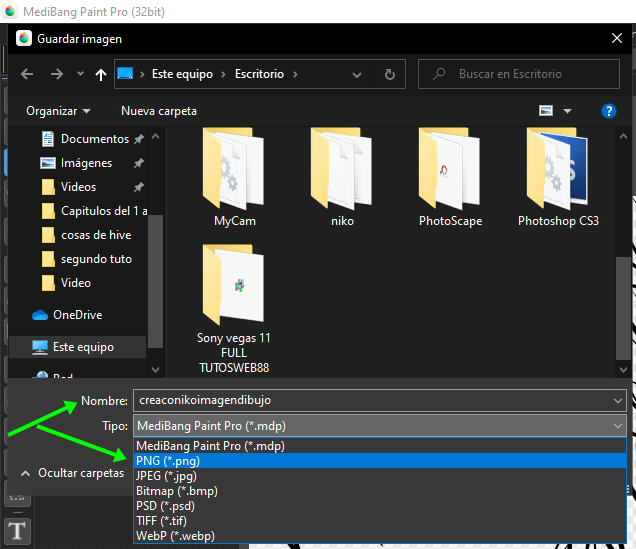
Seguidamente de esta acción se despliega el recuadro de guardado típico del windows, en el primer campo le pondremos un nombre , y en el segundo campo le pondremos el formato PNG y pincharemos en el boton de guardar como se muestra en la imagen de abajo:
Following this action, the typical windows save box is displayed, in the first field we will put a name, and in the second field we will put the PNG format and click on the save button as shown in the image below:
|
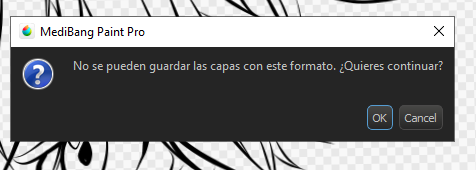
si les aparece este mensaje simplemente le dan en el boton OK para continuar
If this message appears, simply click the OK button to continue
|
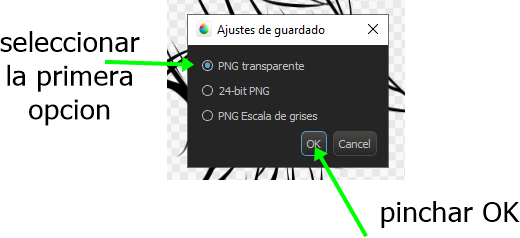
Por ultimo saldrá este recuadro en el cual deberán dejar seleccionada la primera opción y seguidamente pinchar en el botón de OK justo como les muestro en la imagen de abajo y ya con esto se guardaría nuestra imagen sin ningún tipo de fondo
Finally, this box will appear in which you must leave the first option selected and then click on the OK button just as I show you in the image below and with this our image would be saved without any background
|
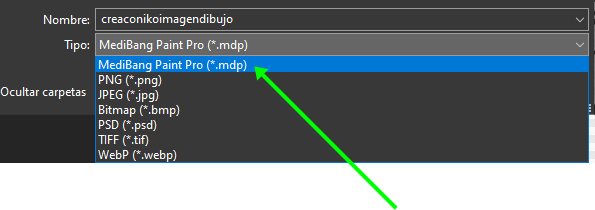
en el caso de guardar todo el proyecto en formato editable seleccionamos la primera opción *.mdp como se muestra en la imagen de abajo:
In the case of saving the entire project in editable format, we select the first option * .mdp as shown in the image below:
|
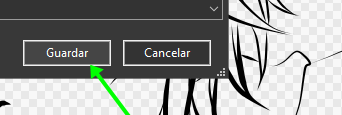
luego guardamos
and will you save
|
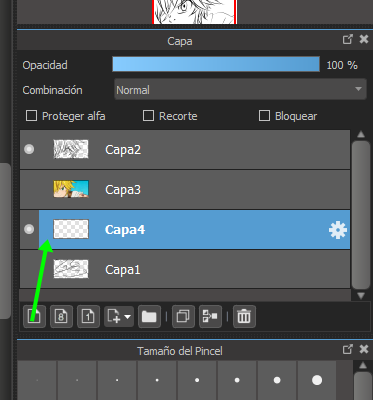
¿¿¡BIEN Y SI QUIERO GUARDAR ESTE DIBUJO CON ALGÚN FONDO SOLIDO???
Entonces debes crear una capa y ponerla debajo de tus trazos como te muestro en la imagen de abajo:
WELL AND IF I WANT TO SAVE THIS DRAWING WITH SOME SOLID BACKGROUND ???
Then you must create a layer and put it under your strokes as I show you in the image below:
|
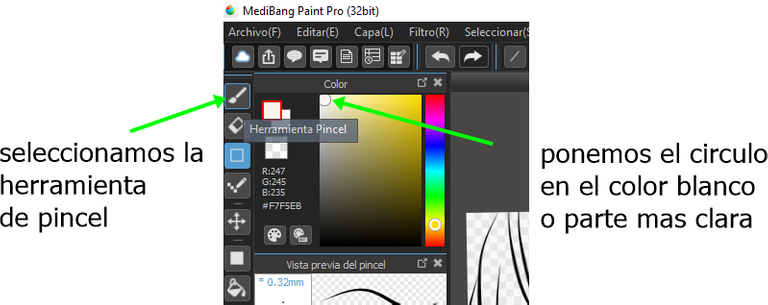
a continuación mientras seleccionas la capa de abajo procederás a pintarla de cualquier color, yo en este caso utilizare el color blanco
primero seleccionaremos le herramienta de pincel y en el panel de pintura ponemos el cursor en forma de circulo en la parte clara o blanco como se muestra en la imagen:
then while you select the layer below you will proceed to paint it in any color, in this case I will use the white color
First we will select the brush tool and in the paint panel we put the cursor in the shape of a circle in the light or white part as shown in the image:
|
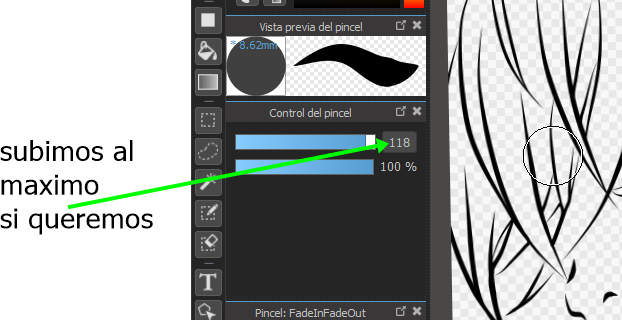
Ajustamos el grosor del pincel como se muestra en la imagen de abajo:
We adjust the thickness of the brush as shown in the image below:
|
una vez calibrado el grosor del pincel procedemos a pintar hasta rellenar todo el cuadro como se muestran en las imagenes de abajo:
Once the thickness of the brush is calibrated, we proceed to paint until the entire frame is filled as shown in the images below:
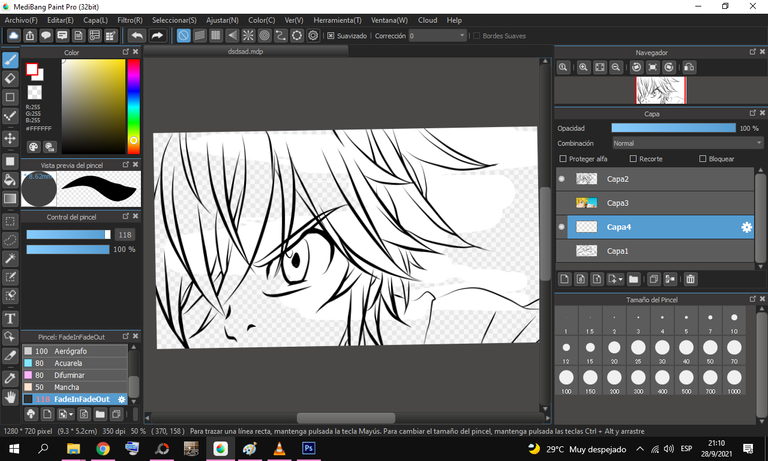
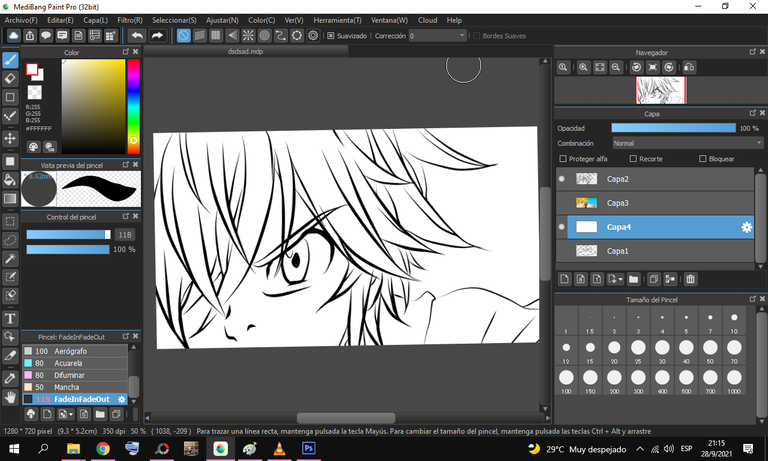
|
ahora si gustas guardarla podrás hacerlo en el formato que quieras pues ya posee un fondo bastante solido, podrás guardarla de la forma tradicional y ya antes mencionada en los pasos anteriores.
now if you like to save it you can do it in the format you want because it already has a fairly solid background, you can save it in the traditional way and already mentioned in the previous steps.
|
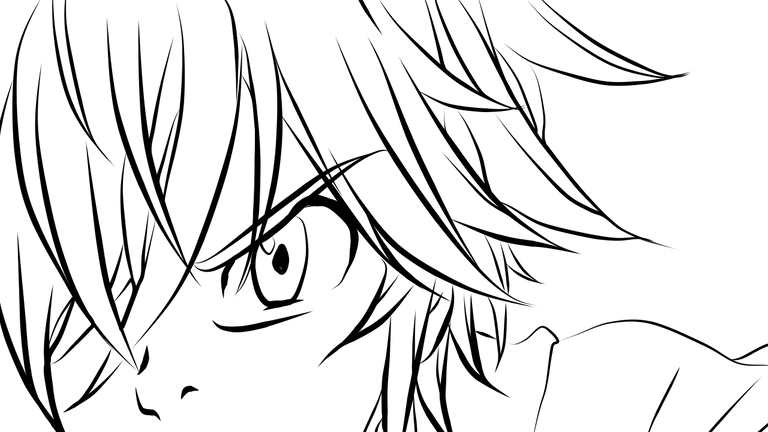
Y ASÍ DE ESTA MANERA QUEDARÍA LA IMAGEN QUE SE GUARDO EN PNG SIN FONDO, COMO SE MUESTRA A CONTINUACIÓN EN LA IMAGEN DE ABAJO:
(Descargar para ver ejemplo)
AND THIS WAY THE IMAGE THAT WAS SAVED IN PNG WITH NO BACKGROUND, AS SHOWN IN THE IMAGE BELOW, WOULD LOOK LIKE BELOW:
(Download to see example)
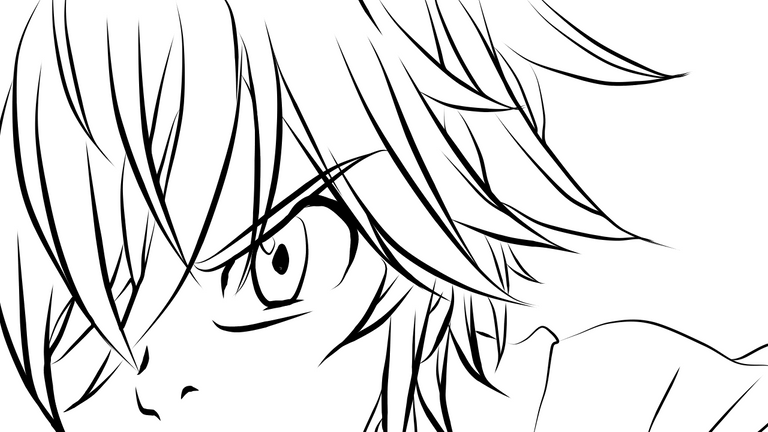
Y DE ESTA OTRA MANERA QUEDARÍA GUARDADA CON FONDO DOLIDO COMO SE MUESTRA EN LA SIGUIENTE IMAGEN DE ABAJO:
(Descargar para ver ejemplo)
AND IN THIS OTHER WAY IT IS SAVED WITH A SOLID BACKGROUND AS SHOWN IN THE FOLLOWING IMAGE BELOW:
(Download to see example)
|
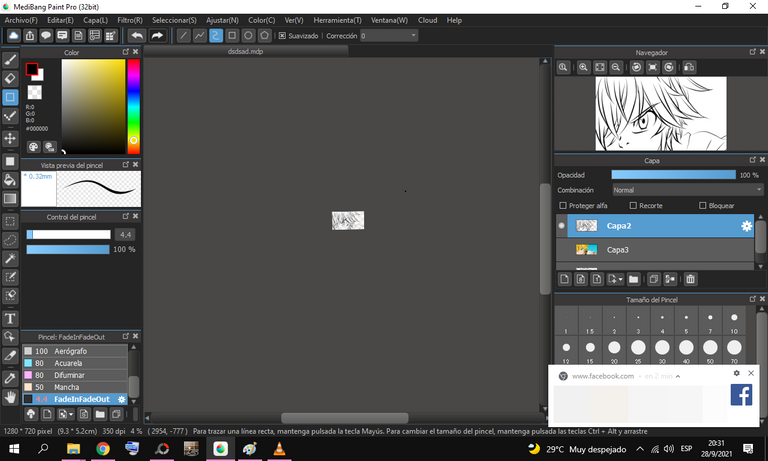
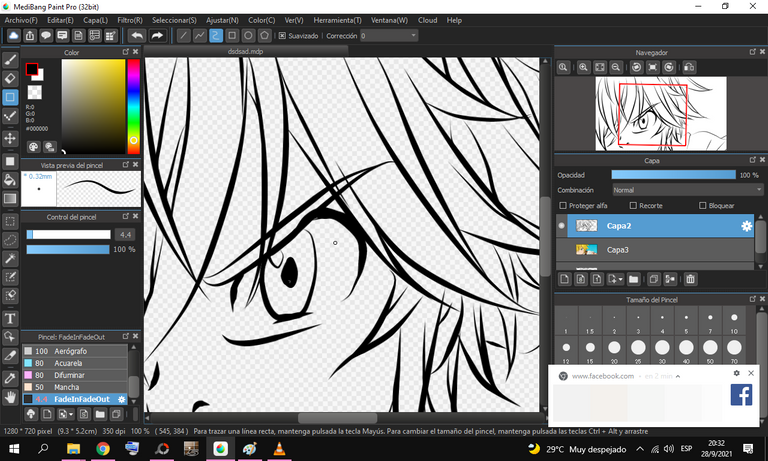
POR OTRO LADO HACIENDO USO DE LA RUEDA DEL MOUSE PODRAS TENER LA FUNCION DE ALEJAR O ACERCAR COMO SE MUESTRA EN LAS IMAGENES DE ABAJO:
ALEJAR
ON THE OTHER HAND BY USING THE MOUSE WHEEL YOU CAN HAVE THE FUNCTION OF ZOOMING OR ZOOMING AS SHOWN IN THE IMAGES BELOW:
WARD OFF
|
ACERCAR
ZOOM IN>
|
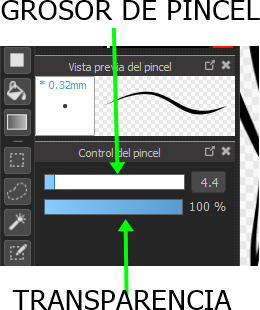
EN ESTE APARTADO PODRAS MODULAR EL GROSOR Y TRANSPARENCIA DE LA HERRAMIENTA DEL PINCEL , GROSOR PARA TRAZADOS MAS FINOS O GRUESOS Y TRANSPARENCIA PARA APOCAR LOS TRAZOS
IN THIS SECTION YOU WILL BE ABLE TO MODULATE THE THICKNESS AND TRANSPARENCY OF THE BRUSH TOOL, THICKNESS FOR THINNER OR THICKER TRACES AND TRANSPARENCY TO APPROACH THE TRACES:
|
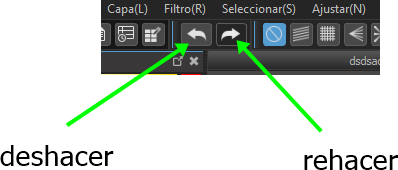
DESHACER Y REHACER SON BOTONES DE SUMAMENTE IMPORTANCIA PUES CON ELLOS PODRÁS IR O VOLVER PASOS ATRÁS PARA CORREGIR COSAS
UNDO AND REDO ARE VERY IMPORTANT BUTTONS
BECAUSE WITH THEM YOU WILL BE ABLE TO GO OR GO BACK STEPS TO CORRECT THINGS
|
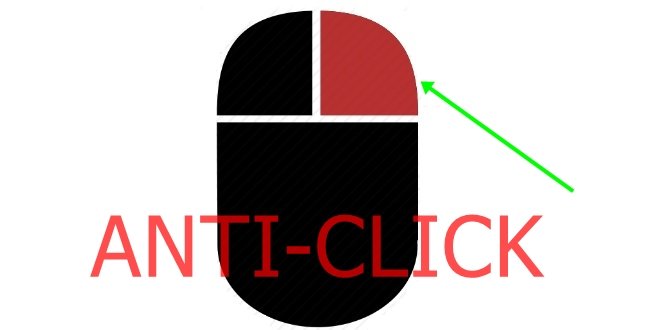
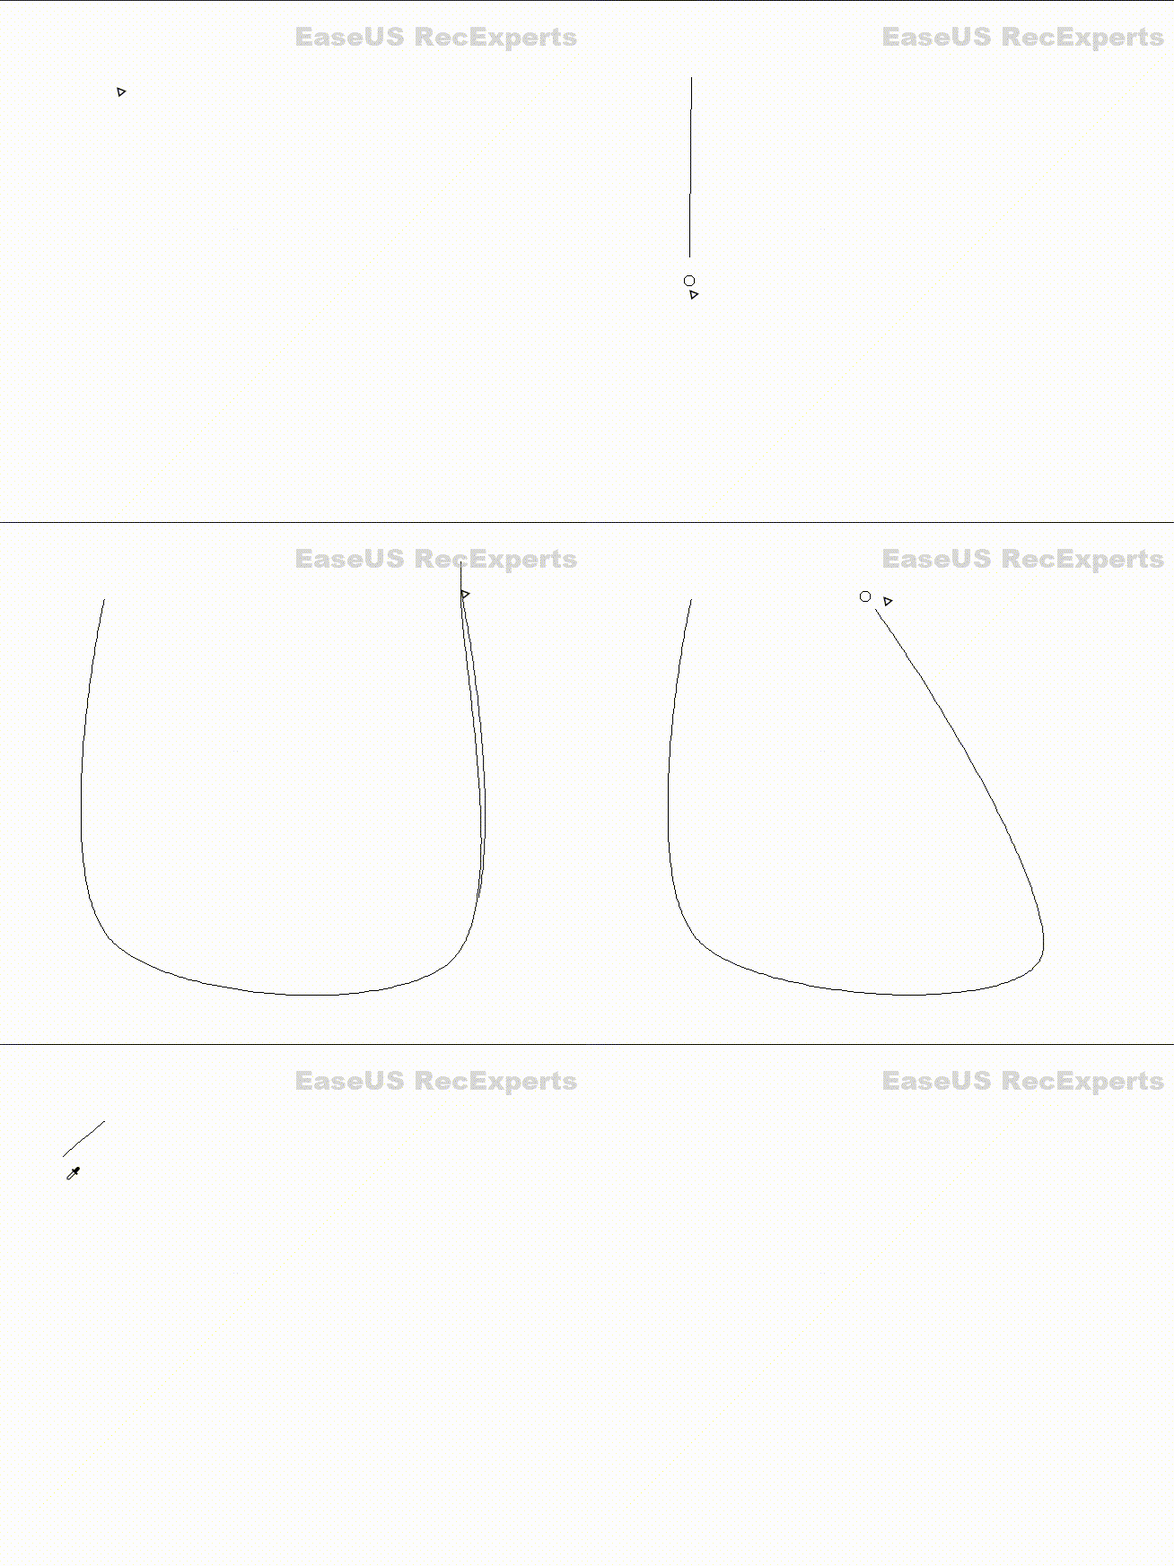
**OTRA MANERA DE DESHACER TRAZOS EN EL MOMENTO QUE DIBUJAS ES PRESIONANDO EL ANTI-CLICK DEL MOUSE, COMO SE MUESTRA EN EL SIGUIENTE IMAGEN GIF:**
ANOTHER WAY TO UNDO LINES AT THE MOMENT YOU DRAW IS BY PRESSING THE ANTI-CLICK OF THE MOUSE, AS SHOWN IN THE FOLLOWING GIF IMAGE:
|
EJEMPLO
EXAMPLE
|
¿COMO USAR EL CLICK NORMAL PARA HACER TRAZOS?
| HOW TO USE THE NORMAL CLICK TO MAKE LINES?
|
Primeramente presionar el click usando la herramientas ya antes mencionada y configurada 'FadeInFadeOut', al hacer primer click movemos el cursor a la dirección que elijas y para darle formas o direccionarla a otro punto deberás presionar nuevamente click para cambiar la dirección y así sucesivamente, cuando estés conforme con la forma que buscas y quieras terminar el proceso simplemente debes hacer DOBLE CLICK NORMAL para concluir todo el patrón de formas y este quedara establecido y solido.
imagen gif de ejemplos de formas (recordar concluir todo con DOBLE CLICK NORMAL) :
First, press the click using the tools already mentioned and configured 'FadeInFadeOut', when we make the first click we move the cursor to the direction you choose and to give it shapes or direct it to another point you must press again click to change the direction and so on, when you are satisfied with the shape you are looking for and you want to finish the process, you simply have to DOUBLE CLICK NORMAL to complete the whole pattern of shapes and it will be established and solid.
gif image of examples of shapes (remember to finish everything with NORMAL DOUBLE CLICK):
|
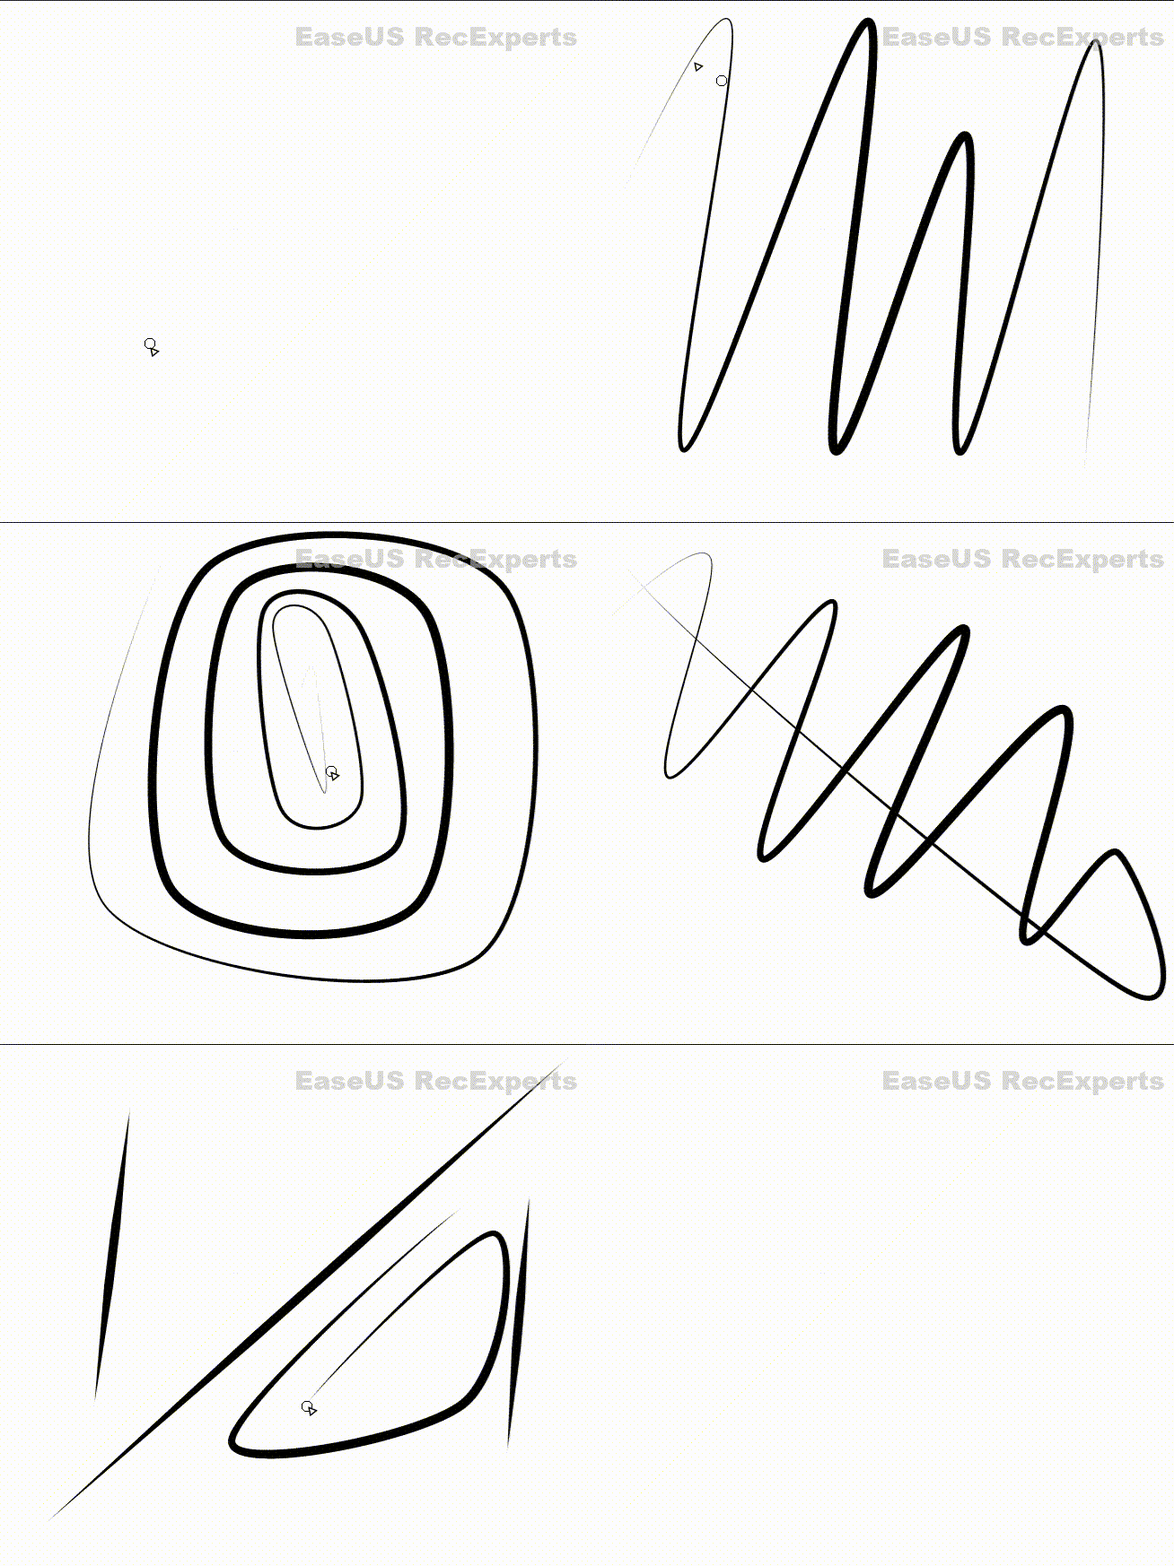
Y DE ESTA MANERA AMIGOS PODEMOS IR PRACTICANDO NUESTROS TRAZADOS FINOS Y GRUESOS E IR JUGANDO CON LAS CAPAZ PARA TENER RESULTADOS MUCHOS MAS PROMETEDORES HASTA LLEGAR A NIVELES SUMAMENTE GRATIFICANTES
AND IN THIS WAY, FRIENDS, WE CAN PRACTICE OUR THIN AND THICK LINES AND PLAY WITH THE ABLE TO HAVE MUCH MORE PROMISING RESULTS UNTIL WE REACH HIGHLY REWARDING LEVELS
|
 PARA SEGUIR CON ESTA SERIE DE TUTORIALES POR FAVOR APOYAME MUCHO (MUY PRONTO ENSEÑARE HACER ANIMACIONES TIPO ANIME Y CARTOON, DOBLAJE DE VOCES Y PRODUCCION MUSICAL INSTRUMENTAL)
PRONTO:
Aprende a dibujar como todo un profesional en muy poco tiempo!!!!! tutorial 3/∞ (AGREGAR COLOR CON PHOTOSHOP)
TO CONTINUE WITH THIS TUTORIAL SERIES PLEASE SUPPORT ME A LOT THIS CAUSE (VERY SOON I WILL TEACH TO HOW DO ANIMATIONS IN STYLE ANIME AND CARTOON STYLE, VOICE DUBBING AND INSTRUMENTAL MUSICAL PRODUCTION)
VERY SOON:
Learn to draw like a professional in no time !!!!! tutorial 3 / ∞ (ADD COLOR WITH PHOTOSHOP)
|
| | |


Congratulations @creaconiko! You have completed the following achievement on the Hive blockchain and have been rewarded with new badge(s):
Your next target is to reach 50 upvotes.
You can view your badges on your board and compare yourself to others in the Ranking
If you no longer want to receive notifications, reply to this comment with the word
STOPCheck out the last post from @hivebuzz:
Support the HiveBuzz project. Vote for our proposal!
thanks hive !! :)
Excelente tutorial amigo, veo que estas comenzando aquí y tienes mucho talento, recuerda que cuando usamos fuentes (contenido que no no es nuestro como imágenes o texto) debemos colocarlas en el post, debemos colocar los recursos que usamos, dando creditos a su autor como por ejemplo en mis post, puedes darte cuenta:
Lo vez asi en la presentación del post:
Pero en el maquetado va de esta manera:
Lo que no entiendas, te puedo ayudar, búscame por discord en mi comunidad, con gusto te explico:
https://discord.gg/ayRjEtXVK3
vale! entiendo agradezco mucho esta información y que te tomaras el tiempo para aclararme todo esto dice mucho de ti , eres una excelente persona muchísimas gracias lo valoro mucho, con gusto en lo que se pueda entrare a tu comunidad :)
Your post has been curated by us! Received 20.00% upvote from @opb. Do consider delegate to us to help support our project.
Do join our discord channel to give us feedback, https://discord.gg/bwb2ENt
* This bot is upvoting based on the criteria : 1. Not plagiarised, 2. Persistent previous quality posts, 3. Active engagement with other usersDo upvote this commment if you 💚 our service :)
hi, thanks guys very much !! <3