Hello, Hello, friends Hiveanimalists
I am Zulay Pulido, Graphic Design Apprentice with Philosophical Thought.
“All children are born artists. The problem is how to continue being artists as you grow.” - Pablo Picasso
Featured Image is My Own.
Today is Tuesday, April 14, 2020.

Cómo Diseñar una Jirafa - Estilo Aurinegro Animales Salvajes (Español - English)
Hola, Hola, amigos Hiveanimalistas.
Soy Zulay Pulido, Aprendiz de Diseño Gráfico con Pensamiento Filosófico.
“Todos los niños nacen artistas. El problema es cómo seguir siendo artistas al crecer.” - Pablo Picasso
La imagen Destacada es de mi Autoría.
Hoy es martes 14 de abril de 2020.
Today, once again I will take the risk for Art, that flame that induces us from within and that only by doing We learn to do.
This time, I bring you a Giraffe, an extraordinary wild animal native to Africa. It is the highest in the world and is at the level of Extinction Vulnerability. In Wikipedia you can find all the information about this beautiful species.

| Taxonomy | Taxonomía |
|---|---|
| Kingdom: Animalia | Reino: Animalia |
| Class: Mammalia | Clase: Mammalia |
| Order: Artiodactyla | Orden: Artiodactyla |
| Family: Giraffidae | Familia: Giraffidae |
| Génre: Giraffa | Género: Giraffa |
| Species: G. camelopardalis Linnaeus, 1758 | Especie: G. camelopardalis Linnaeus, 1758 |
The style that I am going to experience is typical of my imagination and I call it Wild Animals Black & Gold Style.
Software, Materials and Techniques to Use:
1.- Photo of a Giraffe obtained from the Alphacoder Web, specialist in free download Wallpaper.
2.- Golden styles for Photoshop (80) free download from the web Ps Tutorials.
3.- Fabric texture obtained courtesy of Georgiana Romanovna (Pixabay).
4.- Tutorial How to make sunken style in Photoshop from Youtube.
5.- Adobe Illustrator CC 2017.
6.- Adobe Photoshop CC 2017.
Execution time, including publication: 10 hours.
Hoy, nuevamente me arriesgaré por el Arte, esa llamita que nos induce desde adentro y que solo haciendo se aprende a hacer.
En esta oportunidad, les traigo una Jirafa. Un extraordinario animal salvaje nativo de África. Es el más alto del mundo y se encuentra en nivel de Vulnerabilidad de Extinción. En Wikipedia puedes encontrar toda la información sobre esta hermosa especie.
El estilo que voy a experimentar es propio de mi imaginación y lo llamo Aurinegro para Animales Salvajes.
Software, Materiales y Técnicas a Utilizar:
1.- Foto de una Jirafa obtenida de la Web Alphacoder, especialista en Wallpaper de libre descarga.
2.- Estilos dorados para Photoshop (80) de descarga gratuita de la web Ps Tutoriales.
3.- Textura de tela obtenido por cortesía de Georgiana Romanovna (Pixabay)
4.- Tutorial Cómo hacer estilo hundido en Photoshop de Youtube.
5.- Adobe Illustrator CC 2017.
6.- Adobe Photoshop CC 2017.
Tiempo de ejecución, incluida la publicación: 10 horas.
Tutorial:
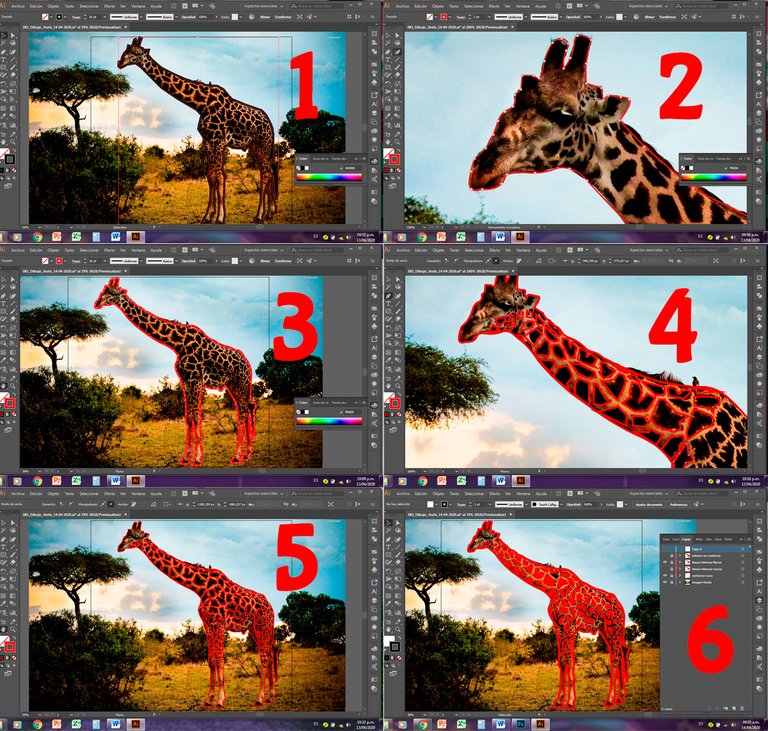
- I open in Adobe Illustrator the image of the Giraffe.
2.- I draw the outline of the complete giraffe with a thick red line so that the work I am doing can be seen.
3.- I correct the outline of the complete giraffe until I get the almost perfect shape and save it as a .png image.
4.- I draw the exterior of each one of the pints of the animal's skin with a thick and red line.
5.- I correct the perimeter of each pint, until it looks the way I want it and save it as a .png image.
6.- I remove the stroke of the pints and fill them with red color and save it as a .png image.
Tutorial:
- Abro en Adobe Illustrator la imagen de la Jirafa.
2.- Dibujo el Contorno de la Jirafa completa con un trazo rojo y grueso para que se note el trabajo que estoy haciendo.
3.- Corrijo el Contorno de la Jirafa completa hasta conseguir la forma casi perfecta y lo guardo como imagen .png.
4.- Dibujo el exterior de cada una de las pintas de la piel del animal con un trazo grueso y rojo.
5.- Corrijo el perímetro de cada pinta, hasta que se vea como lo deseo y lo guardo como imagen .png.
6.- Elimino el trazo de las pintas y las relleno de color rojo y lo guardo como imagen .png.
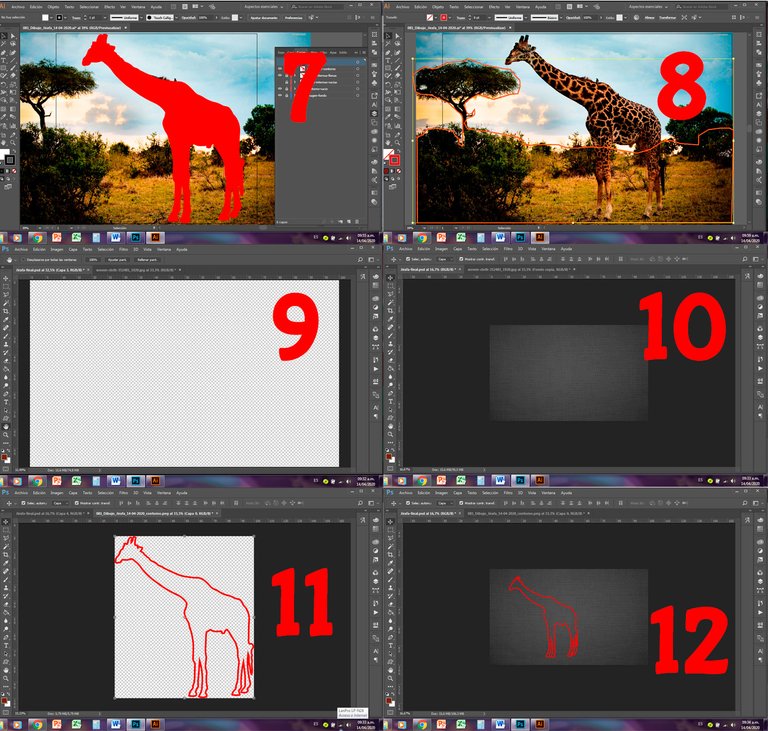
7.- I make a complete fill of the outline of the Giraffe and delete the trace and save it as a .png image.
8.- I draw the outline of the landscape without much detail and save it as a .png image.
9.- I open Adobe Photoshop.
10.- I place the dark cloth texture on the work table.
11.- I open the .png image of the giraffe outline that I made in Illustrator.
12.- I place it on the fabric texture.
7.- Hago un relleno total del contorno de la Jirafa y le elimino el trazo y lo guardo como imagen .png.
8.- Dibujo el contorno del paisaje sin mucho detalle y lo guardo como imagen .png.
9.- Abro Adobe Photoshop.
10.- Coloco en la Mesa de Trabajo la Textura de tela oscura.
11.- Abro la imagen .png del contorno de la Jirafa que hice en Illustrator.
12.- La coloco sobre la textura de tela.
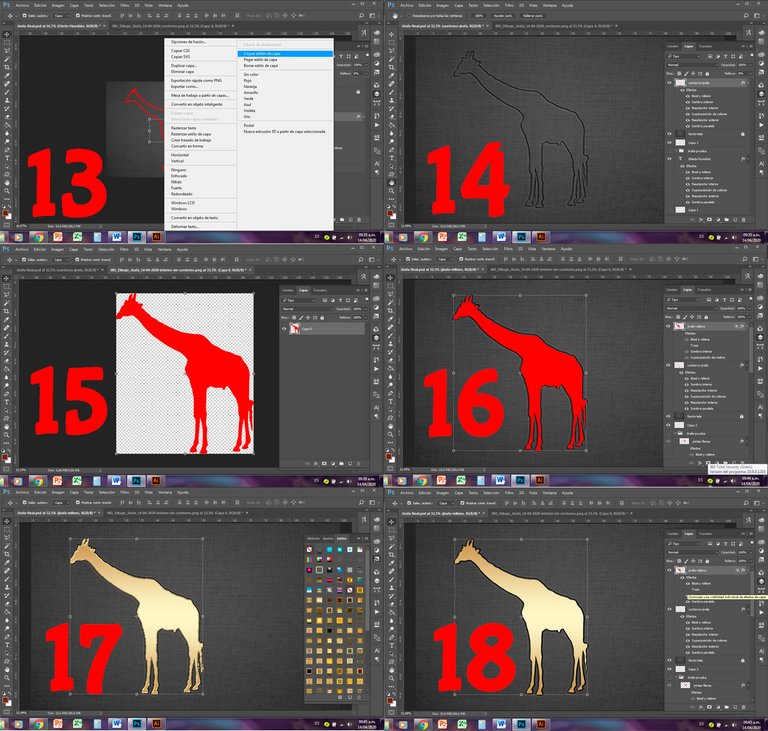
13.- In Photoshop, I have previously created a Sunken Style, according to the Youtube video.
14.- I apply the Sunken Style to the Contour of the Giraffe.
15.- I open the .png image of the giraffe filling that I made in Illustrator.
16.- I place the Image of the Giraffe filling on the fabric texture, so that it coincides inside the Sunken Edge.
17.- Previously, I have loaded in Photoshop the Golden Styles free obtained from the internet. I apply several of them on the stuffing of the Giraffe and remove the Stroke that it originally brings, until I find the one that I like the most.
18.- I correct the stroke of the filling with an eraser so that the Sunken Outline is seen as sharp as possible.
13.- En Photoshop, he creado previamente un Estilo Hundido, de acuerdo al video de Youtube.
14.- Aplico el Estilo Hundido al Contorno de la Jirafa.
15.- Abro la imagen .png del relleno de la Jirafa que hice en Illustrator.
16.- Coloco la Imagen del relleno de la Jirafa sobre la textura de tela, de manera que coincida en el interior del Borde Hundido.
17.- Previamente, he cargado en Photoshop los Estilos Dorados obtenidos de internet. Aplico varios de ellos sobre el relleno de la Jirafa y le quito el Trazo que trae originalmente, hasta encontrar el que más me agrada.
18.- Corrijo el Trazo del relleno con borrador para que se vea el Contorno Hundido lo más nítido posible.
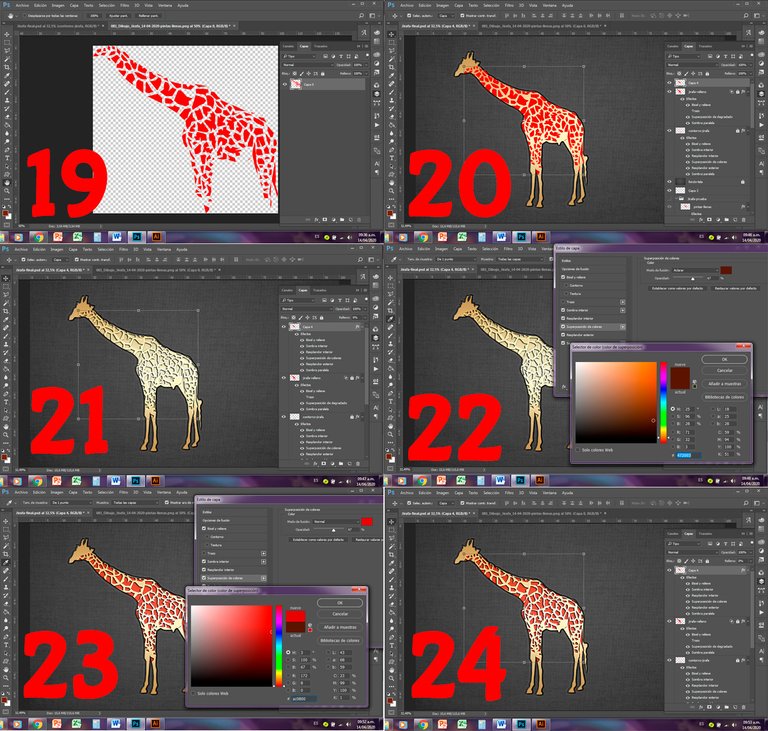
19.- I open the image .png of the spots of the Giraffe.
20.- I place the spots on the golden body.
21.- I apply the Sunken Style on the stains.
22 and 23.- I am looking for Color Overlay and I change the color of the spots to a reddish brown, so that it has a greater contrast with the background texture.
24.- So it is, for the moment.
19.- Abro la imagen .png de las manchas de la Jirafa.
20.- Coloco las manchas sobre el cuerpo dorado.
21.- Aplico sobre las manchas el Estilo Hundido.
22 y 23.- Busco Superposición de Color y cambio el color de las manchas hacia un marrón rojizo, para que tenga mayor contrate con la textura de fondo.
24.- Así queda, por los momentos.
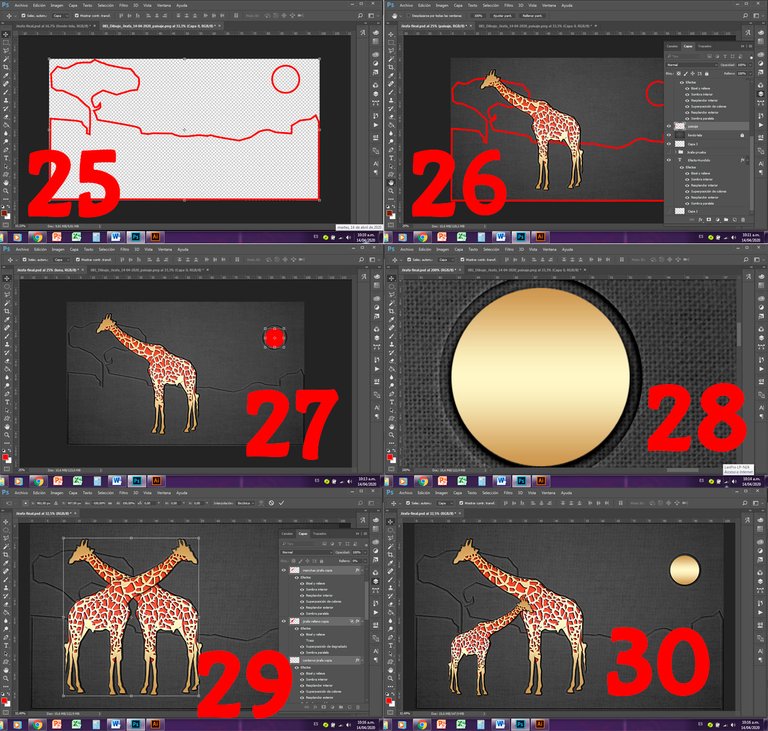
25.- Upload in Photoshop the .png image of the landscape outline created in Illustrator above.
26.- I place the landscape in a layer on the background texture, but under the Giraffe.
27.- I apply the Sunken Effect to the contour of the landscape. I create a circle that simulates the Sun, I apply the Sunken effect to the Contour the Sun and I draw an inner circle.
28.- I apply to the circle of the Sun the same Golden Effect of the body of the Giraffe.
29.- I copy the Giraffe and flip it horizontally with the Mirror Transformation Tool. In this way I duplicate the body of the animal.
30.- I reduce the size of the second Giraffe, until I reach the size of a baby Giraffe. And so I finish my design.
25.- Cargo en Photoshop la imagen .png del contorno del paisaje creado en Illustrator anteriormente.
26.- Coloco el paisaje en una capa sobre la textura de fondo, pero debajo de la Jirafa.
27.- Aplico el Efecto Hundido al contorno del paisaje. Creo un círculo que simule el Sol, le aplico el Efecto Hundido al Contorno del Sol y le dibujo un círculo interior.
28.- Aplico al círculo del Sol el mismo Efecto Dorado del cuerpo de la Jirafa.
29.- Copio la Jirafa y la volteo horizontalmente con la Herramienta Transformación Espejo. De esta manera duplico el cuerpo del animal.
30.- Reduzco el tamaño de la segunda Jirafa, hasta lograr el tamaño de una Jirafa bebé. Y así termino mi diseño.
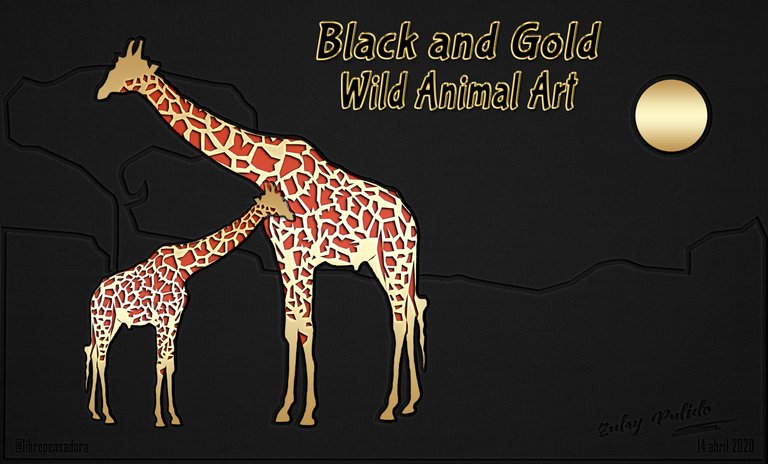
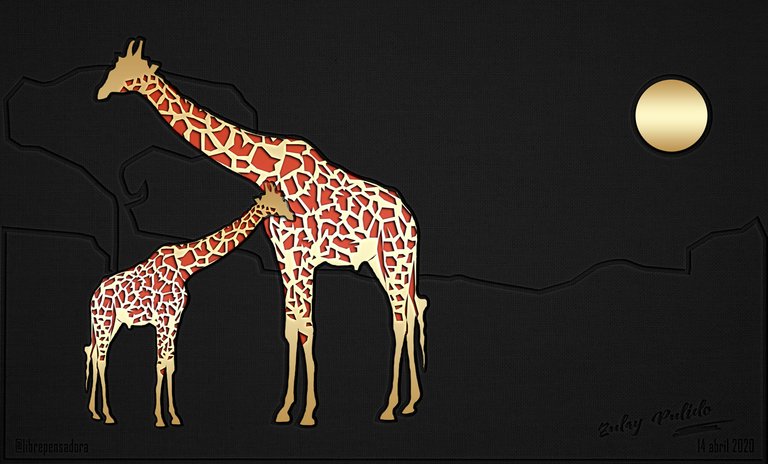
Here I present the final result, to which I have added, at the bottom of the drawing, the date, my signature and my Hive user with the Sunken Effect, to maintain the coherence of the whole set.
Aquí les presento el resultado final, al cual le he agregado, al pie del dibujo, la fecha, mi firma y mi usuario de Hive con el Efecto Hundido, para mantener la coherencia de todo el conjunto.
I hope that my work today is to your liking.
Espero que mi obra de hoy sea de tu agrado.
Mis Redes Sociales personales son:
Facebook: https://www.facebook.com/zupulido,
y Twitter: https://twitter.com/zupulido, pero no las uso con frecuencia.
Sin embargo, las de la FAVTachira,
Facebook: https://www.facebook.com/FAVTachira/,
Twiiter: https://twitter.com/favtachira
e Instagram: https://www.instagram.com/favtachira/,
sí se actualizan constantemente.
If you liked this article, I thank you for leaving your comments, advice or recommendations to improve my collaboration in this important community.
Remember, you can find me at https://steemit.com/@librepensadora
A big hug from Venezuela, a country with Great Disigners.
Si te ha gustado este artículo, te agradezco dejar tus comentarios, consejos o recomendaciones, para mejorar mi colaboración en esta importante comunidad.
Recuerda, puedes encontrarme en https://steemit.com/@librepensadora
Un gran abrazo desde Venezuela, un país de Grandes Diseñadores.

This post was shared in the Curation Collective Discord community
community witness. Please consider using one of your witness votes on us here for curators, and upvoted and reblogged by the @c-squared community account after manual review.@c-squared runs a
Hi, dear friends of @c-squared
I am very grateful to you for taking me into account
A hug
Hola @librepensadora. Interesante tu tutorial. Me descargué los estilos dorados. Gracias.
Hola, amigo @capp
Me alegro de que te haya servido de algo
Un abrazo
Beautiful drawing @librepensadora. This type of drawing takes time and patience. You do a wonderful job creating unique illustrations.
Thank you very much, friend @justclickindiva
You are an excellent motivator
Hugs
Thank you for using the recommended tag/s. This post has been manually rewarded with BUILD tokens in the form of an upvote. You can buy, stake, and exchange our "BUILD" tokens for steem on steem engine or SteemLeo.
Build-ithere and earn extra 'HIVE' tokens. is a DIY (do it yourself) platform where you can find tons of how-to's, ideas, and advice to create or build something all by yourself. The platform leverages a robust digital token, called the BUILD. The recommended tags required when creating a DIY article are #diy, #build-it. #how-to, or #doityourself. Please subscribe to our HIVE community
Chat with us on our discord and telegram channels Discord, Telegram.
Thank you, friends of @buil-it.curator
I am honored by the assessment that you make of my work
Have a Happy Day