Desarrollo web N15. Table
Cordiales Saludos
Table
Es necesario conocer las tablas si se desea tabular algunos datos y como conocimiento general porque puede ocurrir que estemos revisando una web antigua y seguro encontraresmos una tabla por allí, en la actualidad está en desuso, no es muy usada ya que es más fácil hacer una estructura parecida y mejor con CSS.
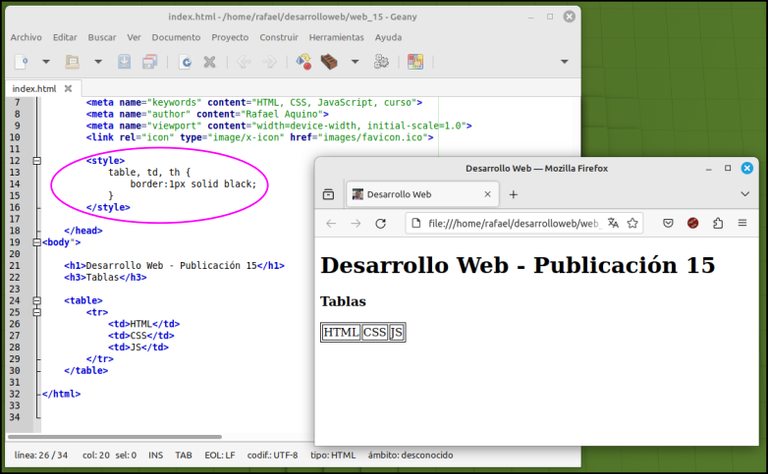
La sintaxis básica de las tablas se muestra en el siguiente código y posteriormente en la captura de pantalla, la cual nos sirve para entender la estructura:
<table>
    <tr>
        <td>HTML</td>
        <td>CSS</td>
        <td>JS</td>
    </tr>
</table>
Donde table es el elemento principal de la tabla, tr es table raw (fila de tabla) y td es table data. Es muy fácil hacer esta estructura al tener muy claro: table, tr y td.
Las tablas para poder visualizarlas debemos colocarle un estilo de borde (visto en la publicación anterior). Sin esto no podemos ver su estructura.
En la siguiente captura podemos ver una fila con tres datos. Un tr con tres td.
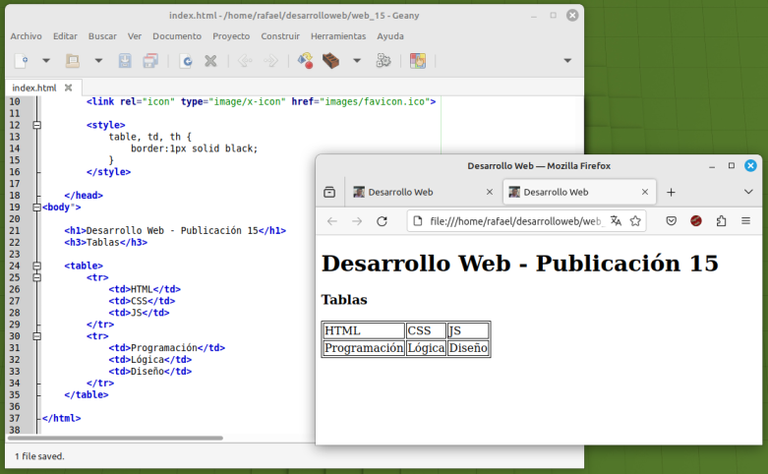
En la sigyiente captura de pantalla ya podemos apreciar una tabla como la conocemos, Aquí tenemos dos filas con tres columnas: seis datos.
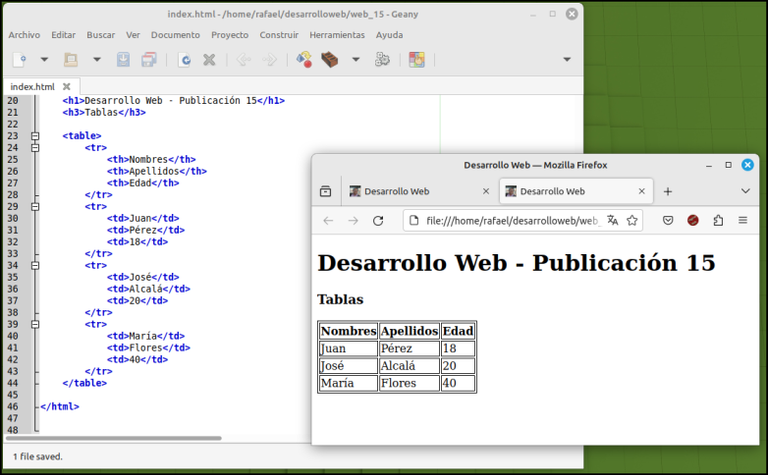
Una forma de agregarle encabezados a una tabla es por medio de th lo cual es table header, encabezado de tabla.
Las tablas se podrían hacer más complejas pero no está dentro de la finalidad de este curso.
💻 Código
<!DOCTYPE html>
<html lang="es">
    <head>
        <title>Desarrollo Web</title>
        <meta charset="UTF-8">
        <meta name="description" content="Curso de Desarrollo Web">
        <meta name="keywords" content="HTML, CSS, JavaScript, curso">
        <meta name="author" content="Rafael Aquino">
        <meta name="viewport" content="width=device-width, initial-scale=1.0">
        <link rel="icon" type="image/x-icon" href="images/favicon.ico">

        <style>
            table, td, th {
                border:1px solid black;
            }
        </style>

    </head>
<body">
    <h1>Desarrollo Web - Publicación 15</h1>
    <h3>Tablas</h3>

    <table>
        <tr>
            <th>Nombres</th>
            <th>Apellidos</th>
            <th>Edad</th>
        </tr>
        <tr>
            <td>Juan</td>
            <td>Pérez</td>
            <td>18</td>
        </tr>
        <tr>
            <td>José</td>
            <td>Alcalá</td>
            <td>20</td>
        </tr>
        <tr>
            <td>María</td>
            <td>Flores</td>
            <td>40</td>
        </tr>
    </table>

</html>
Este tema está dentro de los fundamentos básicos de HTML. Como en otras oportunidades ya he mencionado que estas publicaiones te permitirán saber de que trata todo lo referente a los conceptos básicos de HTML y con la finalidad de que algún lector se interese por el tema.

📍 https://inkscape.org/es/
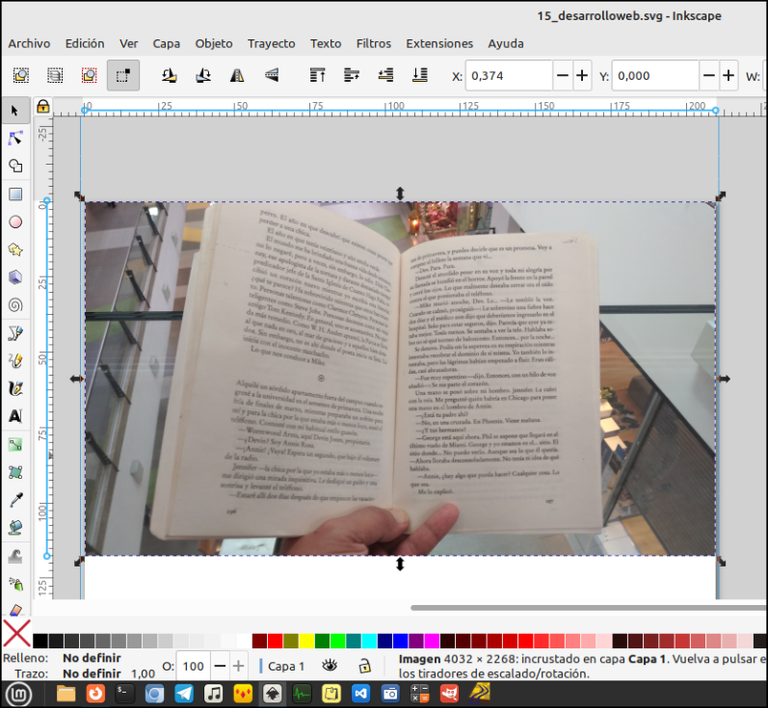
Marco a una imagen
Inkscape nos da la posibilidad de agregarle un marco a una imagen, de forma automática. Para comenzar el proceso debemos primereramente seleccionar la imagen.
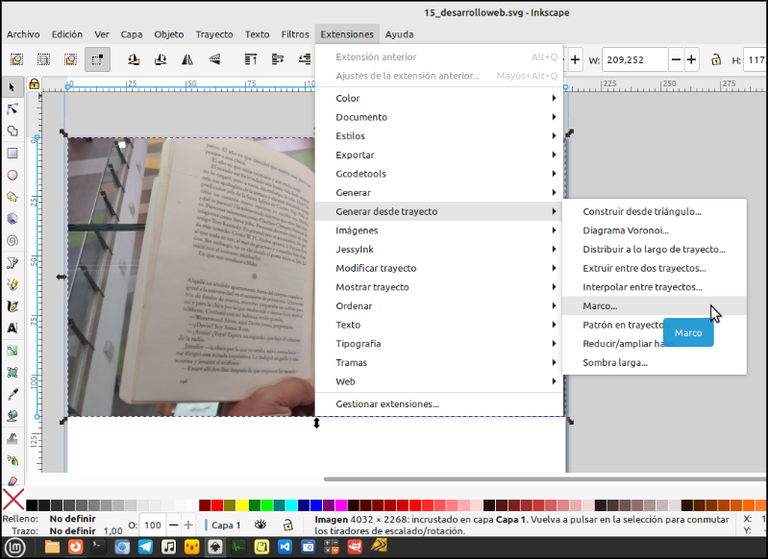
Después de selccionar la imagen, debemos entrar a: Extensiones/Generar desde trayecto/Marco
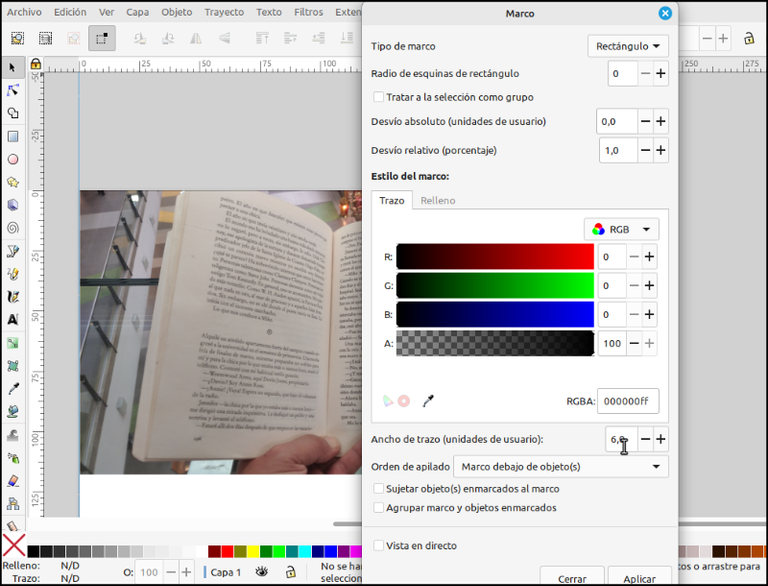
Podemos seleccionar el color que deseamos para el marco y el Ancho de trazo. Luego Aplicar
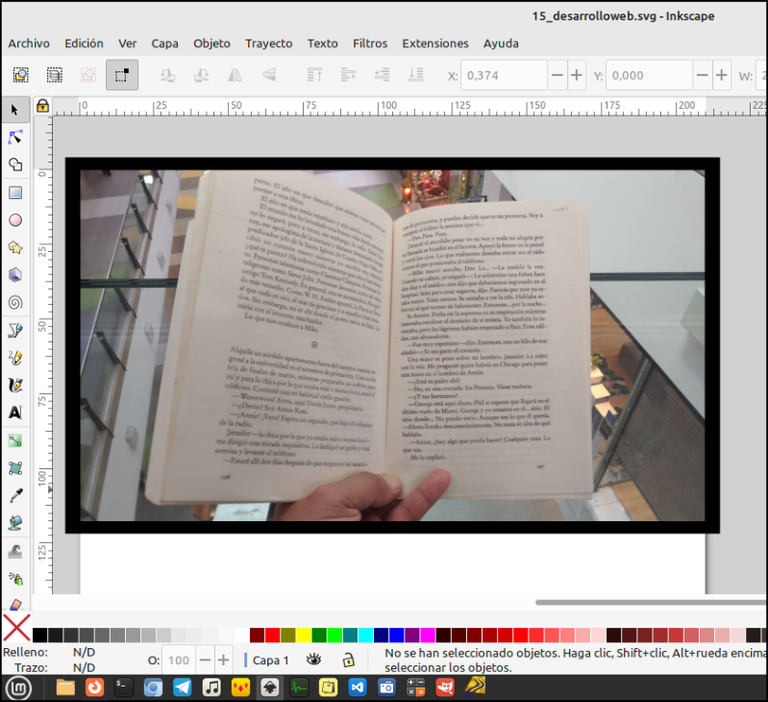
Como al colocar el marco queda separado de la imagen, debemos agruparlo. Para agruoarlo debemos seleccionar todo, y Ctrl + G así la imagen y el marco quedan fucionados.

Así queda la imagen con el marco.
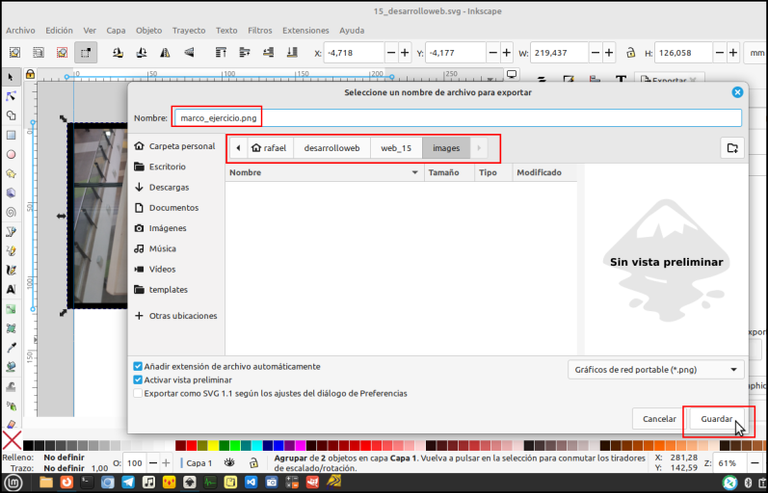
Ahora corresponde exportar la imagén, como lo vimos en una publicación pasada.
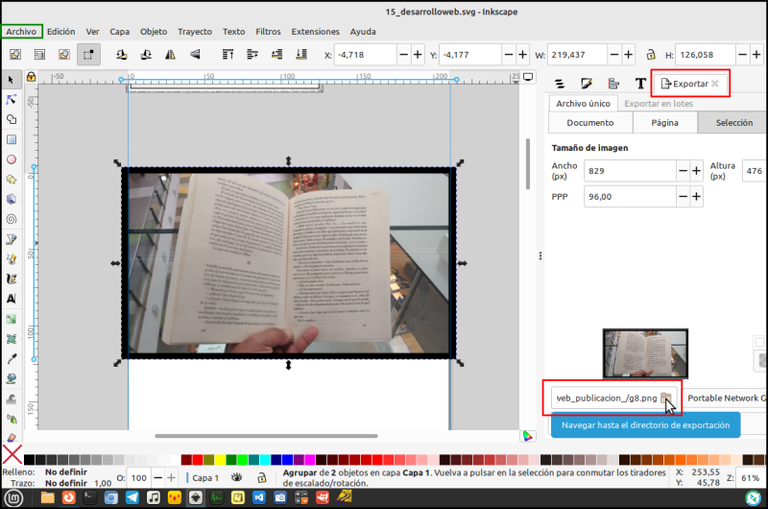
Luego buscamos la carpeta donde deseamos exportar la imagen, y Guardar.
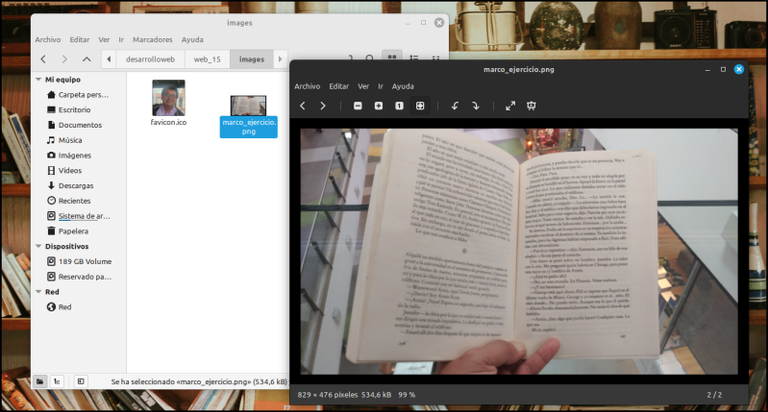
Revisamos en nuestro explorador de archivos, para revisar la imegen. Listo.
Estas son las nociones básicas de Inkscape tratadas hasta ahora en estas publicaciones.
Aprendimos:
✅ Crear nuestro favicoin
✅ Importar imágenes
✅ Exportar imágenes
✅ Redimensionar imágenes
✅ Guardar una captura de pantalla como imagen
✅ Realizar un separador para nuestra web
✅ Extracción de una parte de una foto

Corresponde al finalizar esta jornada actualizar nuestro repositorio local. Con la práctica constante de git, se realizan los comandos de forma natural, sin mucho esfuerzo. eso sí, debes estudiar git diariamente. Será parte de tu formación profesional. te sorprenderás que en todas las ofertas de empleo se solicita el conocimiento de Git.
💻 Código
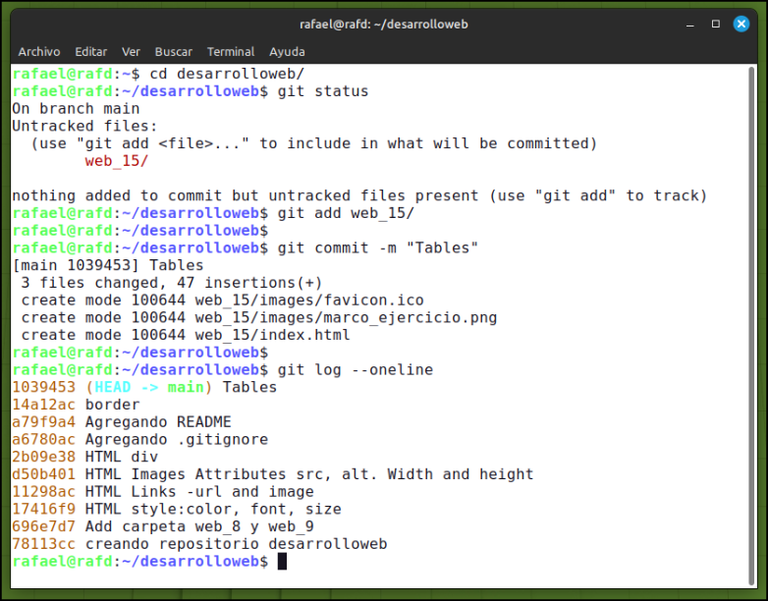
rafael@rafd:~$ cd desarrolloweb/
rafael@rafd:~/desarrolloweb$ git status
On branch main
Untracked files:
  (use "git add <file>..." to include in what will be committed)
    web_15/

nothing added to commit but untracked files present (use "git add" to track)
rafael@rafd:~/desarrolloweb$ git add web_15/
rafael@rafd:~/desarrolloweb$
rafael@rafd:~/desarrolloweb$ git commit -m "Tables"
[main 1039453] Tables
 3 files changed, 47 insertions(+)
 create mode 100644 web_15/images/favicon.ico
 create mode 100644 web_15/images/marco_ejercicio.png
 create mode 100644 web_15/index.html
rafael@rafd:~/desarrolloweb$
rafael@rafd:~/desarrolloweb$ git log --oneline
1039453 (HEAD -> main) Tables
14a12ac border
a79f9a4 Agregando README
a6780ac Agregando .gitignore
2b09e38 HTML div
d50b401 HTML Images Attributes src, alt. Width and height
11298ac HTML Links -url and image
17416f9 HTML style:color, font, size
696e7d7 Add carpeta web_8 y web_9
78113cc creando repositorio desarrolloweb
rafael@rafd:~/desarrolloweb$
Resumen de comandos git, utilizados hasta ahora:
- git init --initial-branch=main
- git config user.name "Nombre_XXX"
- git config user.email "[email protected]"
- git config --list
- git status
- git add .
- git commit -m "Mensaje del commit"
- git log
- git commit --amend
- git add Nombre directorio o archivo
- git log --oneline
- git commit
- touch .gitignore
- touch README.md

Mis 8 últimas publicaciones de esta serie de Desarrollo Web.
📌 N07. ✅ Reinicio ➕ Geany
📌 N08. Metadatos - head
📌 N09. head (favicon - estilos - scripts)
📌 N10. Atributo HTML style
📌 N11. HTML Links
📌 N12. HTML Images
📌 N13. El elemento div
📌 N14. Estilo border
Mi twitter
Nos vemos en una próxima entrega!
Rafael Aquino
Thanks for your contribution to the STEMsocial community. Feel free to join us on discord to get to know the rest of us!
Please consider delegating to the @stemsocial account (85% of the curation rewards are returned).
You may also include @stemsocial as a beneficiary of the rewards of this post to get a stronger support.