How about Hive community!
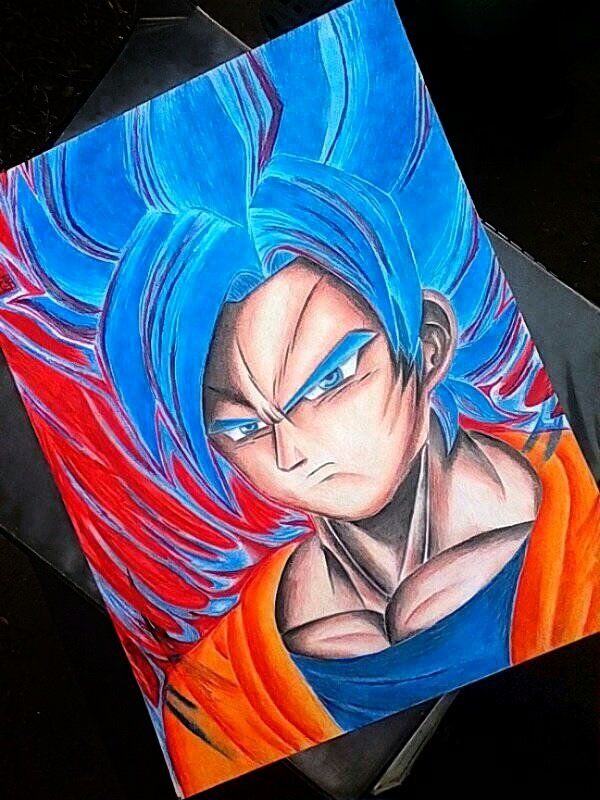
Today I bring you a fan art of Son Goku super Sayan Blue with kaiyo ken, it was something super fast, however I really liked the result. This was a commission that a friend from the University who is a fan of the franchise asked me, although I did not have much time to do everything I had in mind, I feel that I was able to make a good combination between my technique and the original animation and complying with
a excellent work capable of meeting the expectations of those who requested it.
Que tal comunidad de Hive!
hoy les traigo un fan art de Son Goku super Sayan Blue con kaiyo ken, fue algo super rapido sin embargo me gusto mucho el resultado. Esto fue un encargo que me pidio una amiga de la Universidad que es fan de la franquicia, aunque no tuve mucho tiempo de hacer todo lo que tenia en mente siento que pude hacer una buena combinación entre mi técnica y la animación original y cumpliendo con un excelente trabajo capaz de cumplir con las espectativas de quien lo pidió.
The truth is that although Goku is the protagonist of this work, he is far from being my favorite character, although I must admit that my favorite design is that of Goku Super sayan 4 since I feel that among all the designs it is the most original and emblematic taking into account the origin of the sayan, but as I said, only the design, since my favorite character of the entire Franchise is Broly, of which I already made a Fan art that I showed in a previous publication, for those who want to see it here I leave them the link:
la verdad es que aunque Goku sea el protagonista de esta obra, esta lejos de ser mi personaje favorito, aunque debo admitir que mi diseño favorito es el de Goku Super sayan 4 ya que siento que entre todos los diseños es el mas original y emblemático tomando en cuenta el origen de los sayan, pero como dije, solo el diseño, ya que mi persoaje favorito de toda la Franquicia es Broly, del cual ya hice un Fan art que mostre en una publicación anterior, para quienes quieran verla aquí les dejo el link
The realization was as follows:
1 Sketch: with the Loomis method and a bit of intuition and imagination.
2 colored: three faded layers each except for the last one applied in the following order: Medium, Dark, Light.
3 Lined: For each edge use the medium shade applied firmly before filling and after filling, smoothing at the end with the light shade.
4 background: I made it with a red shearpie marker and a blue highlighter, applying on these a little red, pink, orange and light and dark blue.
La realización fue la siguiente:
1 Boceto: con el método Loomis y un poco de intuición e imaginación.
2 coloreado: tres capas difuminadas cada una a excepción de la última aplicadas en el siguiente orden: Medio, Oscuro, Claro.
3 Delineado: para cada borde utilice el tono medio aplicado firmemente antes de rellenar y luego de rellenar, suavizando al final con el tono claro.
4 fondo: lo hice a base de marcador shearpie rojo y un resaltador azul, aplicando sobre estos un poco de color rojo, rosa, naranja y azul clar y oscuro.
Materials:
1 Sketch: MONGOL paper matte brand graphite pencil. It is the cheapest in my town but I recommend a lighter one or a mechanical pencil, the clearer the better since that way I could draw on it freely.
2 colored: Use a box of 12 units of SOLITA brand school colors, it is not very famous, but it is inexpensive, if in your possibilities, buying PRISMACOLOR or FABER CASTEL school would be much better.
Materiales:
1 Boceto: lápiz de grafito marca MONGOL paper matte. Es el más económico de mi localidad pero recomiendo uno mas claro o un portaminas, mientras más claro mejor ya que así podría dibujar sobre el libremente
2 coloreado: Utilice una caja de colores escolares de 12 unidades marca SOLITA, no es muy famosa, pero si económica, si en sus posibilidades esta comprar PRISMACOLOR o FABER CASTEL escolares seria mucho mejor.

Many people have asked me in my networks to clearly show what materials I use in their entirety, and since in this publication I could not bring them the processes, I decided to leave this to them so that they see that I do not use anything that is difficult to obtain.
simple office markers and colors and school supplies.
muchas personas me han pedido en mis redes que muestre con claridad cuales son los materiales que uso en su totalidad, y puesto que en esta publicacion no pude traerles los procesos decidi dejarles esto para que vean que no uso nada que sea dificil de conseguir.
simples marcadores de oficina y colores y materiales escolares.
I remind you that if you want to learn how to use these simple materials, you can tell me in the comments, since I have in mind to upload guides and tutorials of my processes either through videos or step-by-step images.
les recuerdo que si quieren aprender a utilizar estos sencillos materiales me lo pueden decir en los comentarios, ya que tengo en mente subir guias y tutoriales de mis procesos ya sea a travez de videos o imagenes paso a paso.
Congratulations @miguelartaleman! You have completed the following achievement on the Hive blockchain and have been rewarded with new badge(s) :
Your next payout target is 50 HP.
The unit is Hive Power equivalent because your rewards can be split into HP and HBD
You can view your badges on your board and compare yourself to others in the Ranking
If you no longer want to receive notifications, reply to this comment with the word
STOPTo support your work, I also upvoted your post!
Check out the last post from @hivebuzz: