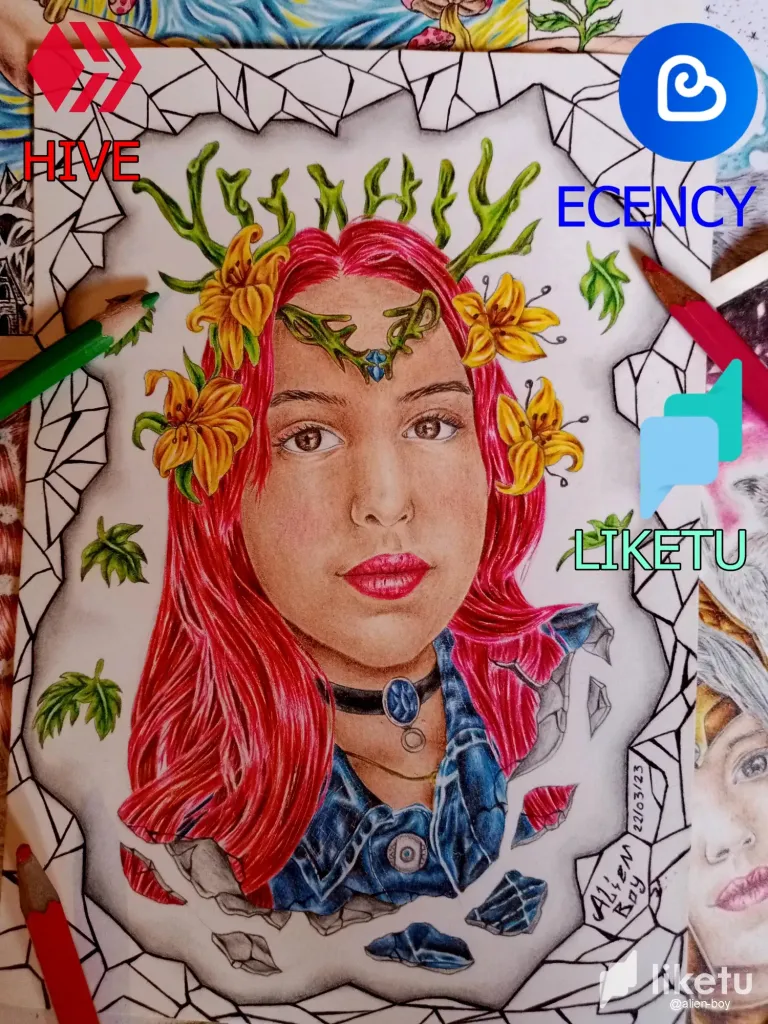
🖤Δ ・゚ 𝓕𝓸𝓻𝓮𝓼𝓽 𝓟𝓻𝓲𝓷𝓬𝓮𝓼𝓼 ° Sueña como una princesa y lucha como una guerrera 👸 ✧ . ・ ¥ 👽
-------------Español-------
Terminado: 22/03/2023 ✍️ Materiales: Bolígrafo - Colores escolares - Cartulina de dibujo
Muy buen día mis estimadas personas. Hoy les comparto este diseño que hice hace un tiempo atrás. A continuación les explicare el paso a paso que realice en el dibujo.
Paso 1: Lo primero que hice tomar una hoja de block - Cartulina de dibujo y recortarlas con las dimensiones 20 centímetros verticalmente y 14 centímetros horizontalmente
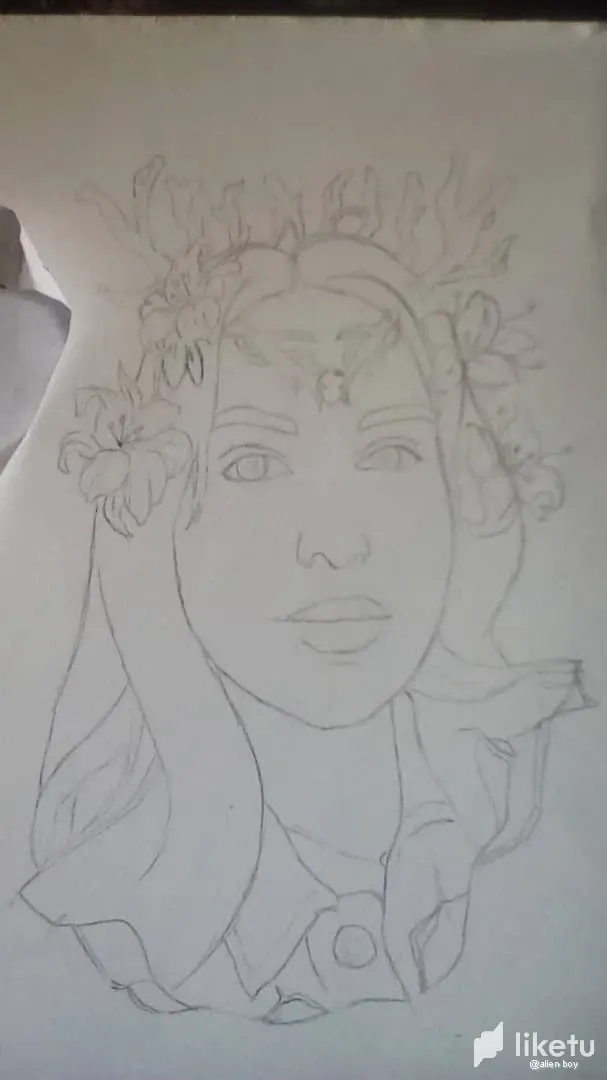
Paso 2: Una vez recortada la hola me dispuse a realizar el boceto, Para hacerlo utilice una lápiz de grafito HD. Perfecto para un boceto claro.
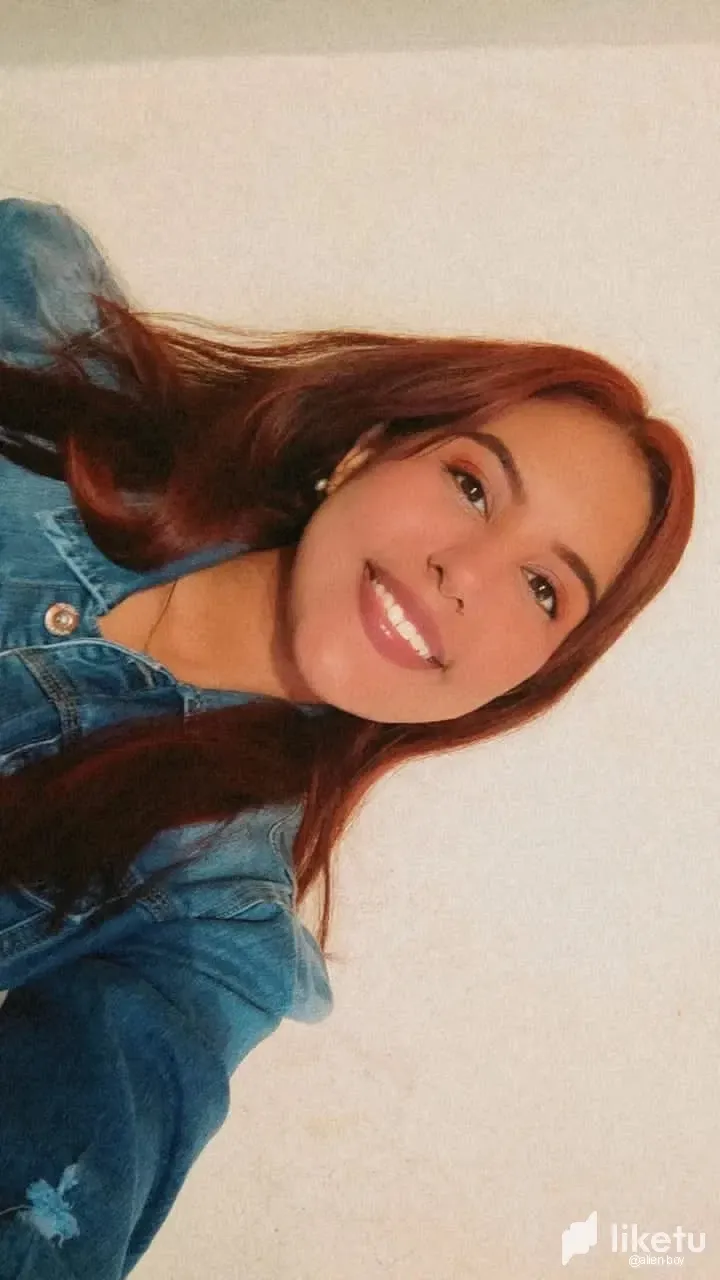
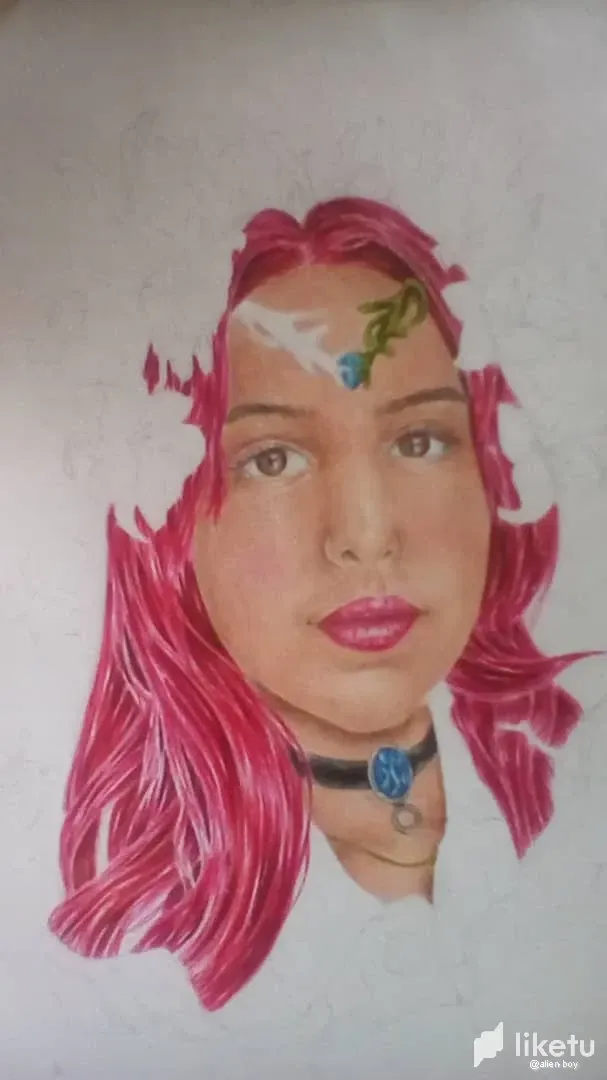
Para este dibujo tome como referencia el rostro de una amiga, Pero con algunas modificaciones personales,
Como por ejemplo una corona de árbol verde y algunas flores en su cabello
Paso 3: Una vez finalizado el boceto, Me propuse a colorear.
Para ese dibujo utilice los colores Kores de 48 unidades el cual es una marca que se encuentra mucho aquí en Venezuela.
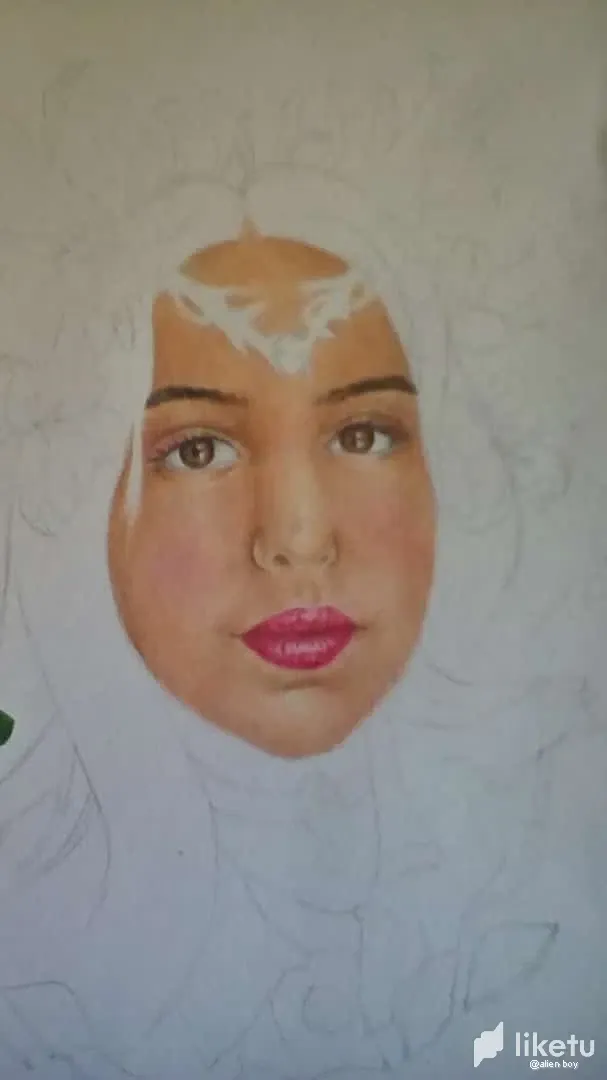
Antes de colorear cada zona del dibujo primer pase la borra para que así los colores se se aplique de forma realista.
Primero comencé por los ojos , Allí utilice los colores: Negro, Café oscuro y marrón.
Para luego continuar con el rostro completo, Allí utilice los colores: Marrón, Rosa claro y durazno. Para los labios utilice: Rosa claro y rojo.
Es muy importante sabes que lo mejor para lograr una buena combinación y mezcla de colores es aplicar cada uno sin mucha fuerza por capaz hasta llegar al tono deseado.
Paso 4: Luego de finalizar toda la piel, Continué con el cabello aquí utilices los colores: Marrón, Rojo y rosa claro. Aquí es muy importante recalcar que se debe de seguir la forma natural del cabello para crear un efecto realista.
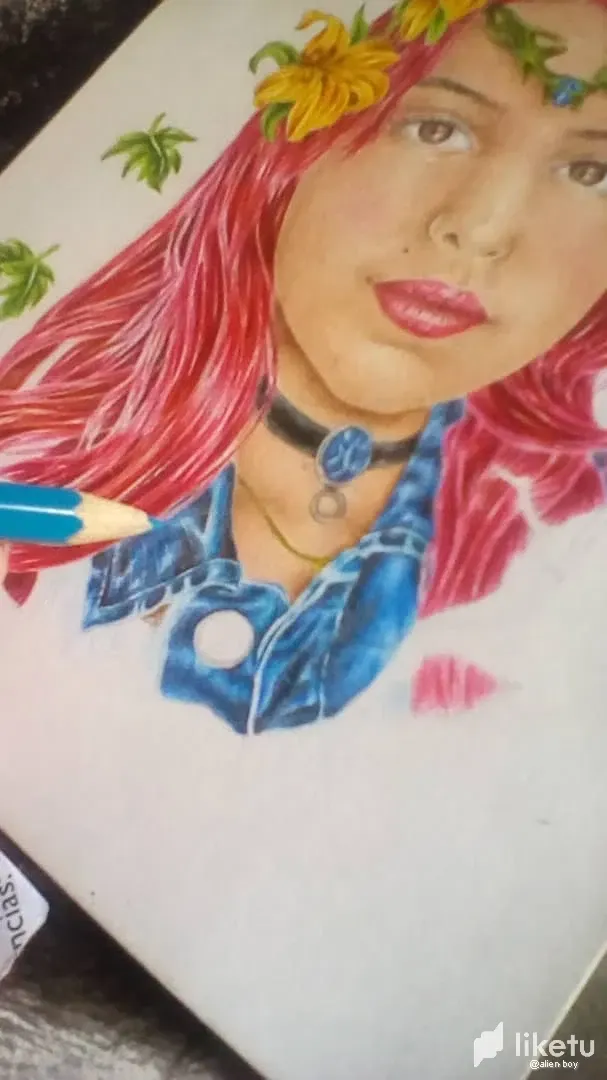
Paso 5: Luego continué con las corona y las flores. Para la corona utilices: Verde bosque, Marrón y amarillo. Aquí empece con el todo mas claro, En este caso el amarillo.
Para luego mezclar levemente con el marrón y con el verde bosque, Para las flores solo utilice: Marrón, Naranja y amarillo.
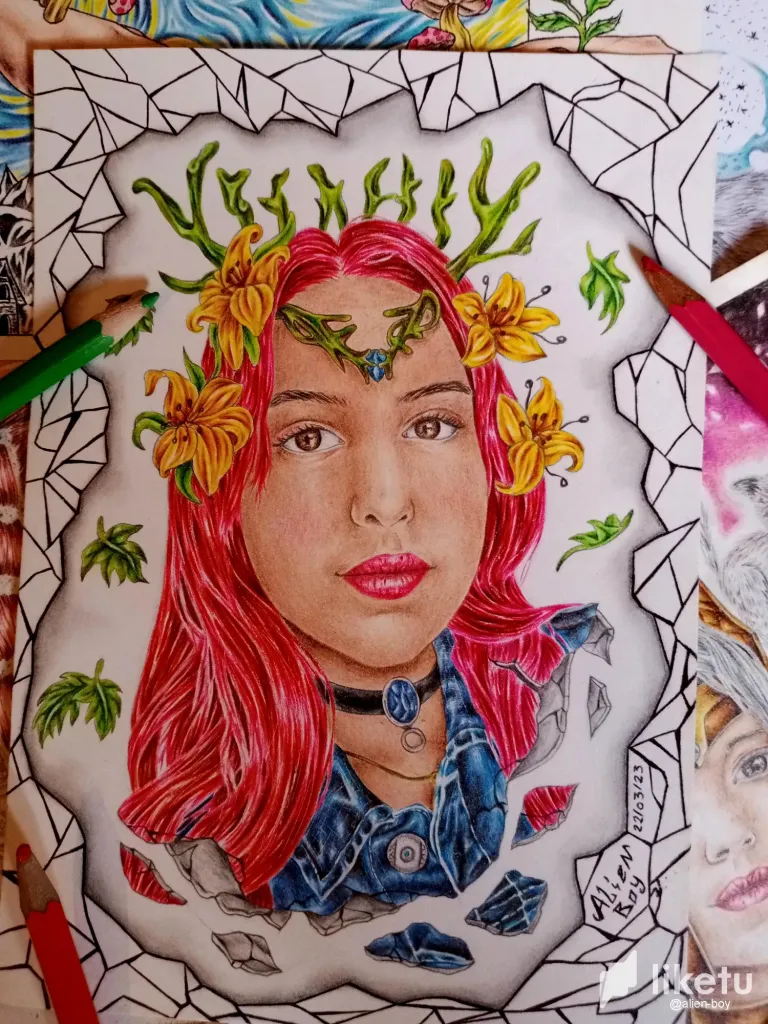
Paso 6: Ya casi finalizando el diseño principal continue con la ropa donde utilices los colores: Negro, Azul marino y azul cielo. Además de un plateado para el botón.
Paso 7: Por ultimo pero no menos importante, Utilice un Bolígrafo negro para el fondo.
Realmente espero hayan disfrutado y les haya gustado el diseño. Pero muy pronto volver a subir otro mas, Nos vemos en la próxima
-------------English-------
Finished: 03/22/2023 ✍️ Materials: Pen - School colors - Drawing cardboard
Good morning my dear people. Today I share with you this design that I made some time ago. Next I will explain you the step by step that I made in the drawing.
Step 1: The first thing I did was to take a sheet of drawing cardboard and cut it with the dimensions 20 centimeters vertically and 14 centimeters horizontally.
Step 2: Once I had cut out the hello I set out to make the sketch, To do this I used a HD graphite pencil. Perfect for a clear sketch.
For this drawing I took as a reference the face of a friend, but with some personal modifications,
For example a green tree crown and some flowers in her hair.
Step 3: Once the sketch was finished, I set out to color.
For this drawing I used Kores colors of 48 units which is a brand that is found a lot here in Venezuela.
Before coloring each area of the drawing I first pass the eraser so that the colors are applied realistically.
First I started with the eyes, where I used the colors: black, dark brown and brown.
Then I continued with the full face, where I used the colors: Brown, light pink and peach. For the lips I used: Light pink and red.
It is very important to know that the best way to achieve a good combination and mixture of colors is to apply each one without much force until you reach the desired tone.
Step 4: After finishing all the skin, continue with the hair here use the colors: Brown, Red and light pink. Here it is very important to emphasize that you must follow the natural shape of the hair to create a realistic effect.
Step 5: Then continue with the crown and flowers. For the crown I used: Forest Green, Brown and Yellow. Here I started with the lighter everything, in this case yellow.
Then mix lightly with brown and forest green. For the flowers I only used: Brown, Orange and yellow.
Step 6: Almost finishing the main design continue with the clothing where you use the colors: Black, Navy Blue and Sky Blue. Plus a silver for the button.
Step 7: Last but not least, use a black pen for the background.
I really hope you enjoyed and liked the design. But very soon I will upload another one, See you in the next one.
For the best experience view this post on Liketu
This is a fabulous artwork and your model is gorgeous! Great job of capturing her beauty and adding the flowers and other details! Bravo!
Thank you very much. I'm glad you loved it. 😊
Te quedo precioso, idéntica a la modelo, a simple vista pensé que era un dibujo digital, tienes mucho talento.
¡Te lo agradezco mucho estimada!. Si es que quise hacerlo lo mas realista posible 😊
Congratulations @alien-boy! You have completed the following achievement on the Hive blockchain And have been rewarded with New badge(s)
Your next target is to reach 300 upvotes.
You can view your badges on your board and compare yourself to others in the Ranking
If you no longer want to receive notifications, reply to this comment with the word
STOPCheck out our last posts: