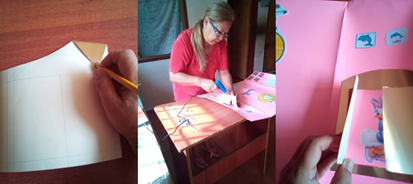
¿Como están mis queridos amigos de Hive? Un abrazo para todos. Me complace compartir con ustedes mi linda experiencia preparando una lámina interactiva para una exposición que debe hacer mi nieta Camila, en su Prescolar, le tocó hablar sobre la letra “D”.
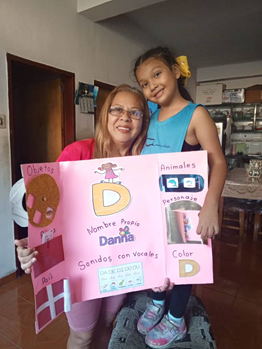
Feliz con su lámina
Para empezar nuestra lámina, vamos a revisar las instrucciones de la maestra.
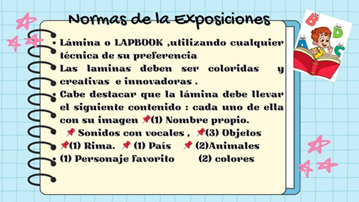
Instrucciones de la maestra
Pensamos cómo la vamos a hacer, reuniremos el material necesario y herramientas a utilizar.
Así tendremos la siguiente lista de materiales:
- Cartulina de color fosforescente para la lámina.
- Trozos de cartulinas metalizada, escarchada, de colores.
- Pedazos de cartón.
- Los dibujos a pegar, impresos y recortados.
- Barras de Silicón.
- Silicón líquido.
- Un serafín.
Las herramientas a utilizar serían:
- Tijeras.
- Exacto o Cúter.
- Pistola de Silicón.
- Regla.
- Lápiz.
- Borra.
- Marcador negro punta fina.
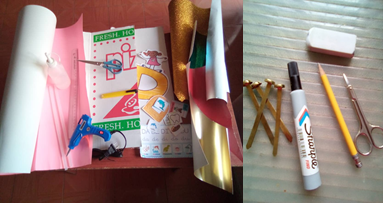
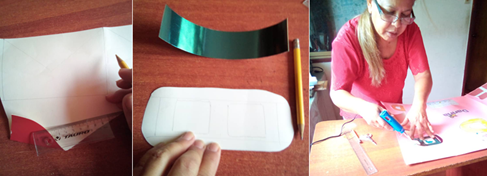
Materiales y herramientas utilizadas
Teniendo el diseño en nuestra mente, material y las herramientas, nos ponemos manos a la obra; iniciamos extendiendo la cartulina y como viene enrollada, cortamos unas tiras de aproximadamente 3.5 cm. que usaremos para pegarlas en el borde superior e inferior para darle firmeza a la cartulina, recortaremos los excesos de las tiras.
Pegamos las tiras de cartón con la pistola de silicón y doblamos la lámina de cartulina como un libro de dos tapas, para que cuando se desplieguen revelen lo que hay en su interior. Levantamos la lámina en la mesa para probar que se sostiene.
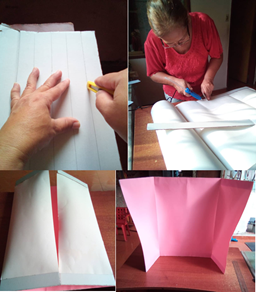
Iniciando la elaboración de la lámina
Ahora extendemos la cartulina y presentamos (sin pegar) los dibujos en la disposición que decidamos o donde mejor convenga. Al estar seguros de donde queremos que estén los dibujos, procedemos a pegarlos todos con silicón líquido, a excepción de los objetos, ya que éstos los vamos a pegar después, porque les vamos a hacer una especie de ruleta. Dejamos un espacio para pegar el sobre de la rima.
Presentación de los dibujos y a pegar
Vamos ahora a construir una ruleta, que va a ocultar y luego revelar los objetos pegados en la lámina. Primero, tomamos algo que nos sirva para trazar un círculo y a su vez que cubra los objetos cuando los peguemos; se me ocurrió utilizar la tapa transparente de una olla, que casualmente, quedó perfecta para hacer la ruleta.
Dibujamos el circulo en cartulina escarchada dorada, lo recortamos y para darle firmeza, recortamos dos tiras de cartón de la medida del circulo y lo pegamos en forma de cruz en la parte posterior del círculo.
Con la punta de la tijera perforamos en el centro del círculo y colocamos un serafín, para que nuestra ruleta gire fácilmente.
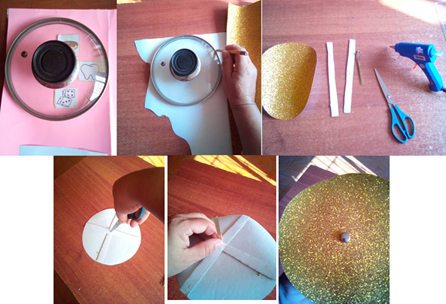
Elaboración de la ruleta
A continuación, vamos a pegar nuestra ruleta; perforamos con la punta de la tijera el centro del espacio destinado a la ruleta en nuestra lámina; introducimos la ruleta al revés y marcamos los recuadros de los objetos con un lápiz, recortamos los recuadros, y ahora marcamos donde van a ir los objetos y allí los pegamos.
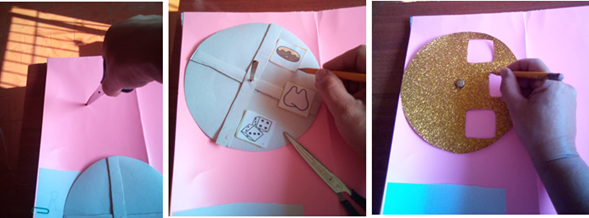
Colocación de la ruleta en la lámina
Ahora vamos a elaborar una puerta para ocultar el personaje favorito; tomamos el trozo de cartulina metalizada de color dorado y dibujamos la puerta; con el exacto recortamos dejando las dos pestañas que abren y cierran para revelar el personaje y la pegamos.
Armando la puerta para ocultar al personaje
Así mismo, tomamos un trozo de cartulina, en este caso usé la roja para dibujar un sobre por la parte de atrás, lo recorté para pegarlo donde va la rima.
Igualmente, usaremos un pedazo de cartulina metalizada color azul, para realizar una ventana deslizable y colocarla donde van los animales, que, para esta actividad, no encontramos dibujo de otro animal y pusimos dos delfines.
Elaborando el sobre para la rima y la ventana para los animales
Ya, por último, escribimos los títulos, según las indicaciones de la maestra.
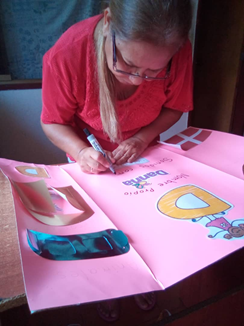
Escribiendo los títulos
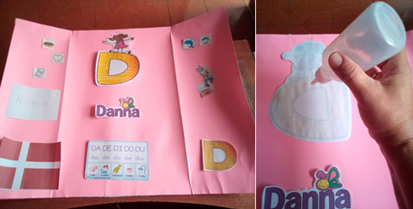
Para el frente o portada de la lámina, elaboramos una “D” y la pegamos justo en las patas del serafín para ocultarlas. Esta letra se moverá cuando gire la ruleta, pero no se verá cuando la lámina esté abierta. Recortamos dibujos y nombres, los pegamos distribuidos entre las dos tapas.

Portada de la lámina
Abrimos la lámina, primero con los dibujos tapados y luego cuando giramos la ruleta, abrimos la ventana y la puerta.

Ya terminamos la lámina!
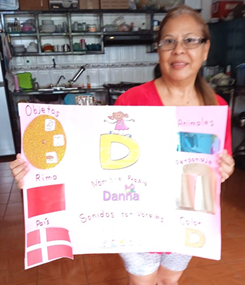
Lámina terminada
De esta manera terminamos nuestra actividad y mi nieta Camila recibió, súper feliz, su lámina.
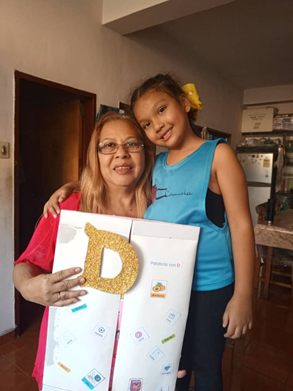
Recibiendo su lámina
Hasta otra oportunidad mis amigos de Hive, espero que les haya gustado esta actividad.
Las fotografías pertenecen al autor
INTERACTIVE POSTER ABOUT THE LETTER "D" FOR MY GRANDDAUGHTER
How are you my dear Hive friends? A hug for everyone. I am pleased to share with you my nice experience preparing an interactive sheet for an exhibition that my granddaughter Camila has to do, in her Preschool, it was her turn to talk about the letter "D".
Happy with her poster
To start our lamina, let's review the teacher's instructions.
Teacher's instructions
We think about how we are going to make it, we will gather the necessary material and tools to use.
Thus we will have the following list of materials:
- Phosphorescent colored cardstock for the foil.
- Pieces of metallic, frosted, colored cardboard.
- Pieces of cardboard.
- The drawings to glue, printed and cut out.
- Silicone sticks.
- Liquid silicone.
- A seraph.
The tools to use would be:
- Scissors.
- Exact or Cutter.
- Silicone gun.
- Ruler.
- Pencil.
- Eraser.
- Black fine tip marker.
Materials and tools used
Having the design in our mind, material and the tools, we get down to work; we start by extending the cardboard and as it comes rolled, we cut some strips of approximately 3.5 cm. that we will use to glue them on the top and bottom edge to give firmness to the cardboard, we will trim the excess of the strips.
We glue the cardboard strips with the silicone gun and fold the cardboard sheet like a book with two covers, so that when they unfold they reveal what is inside. We lifted the sheet on the table to test that it holds up.
Starting the elaboration of the sheet
Now we spread out the cardboard and lay out (without gluing) the drawings in the arrangement we decide or where it suits best. Once we are sure where we want the drawings to be, we proceed to glue them all with liquid silicone, except for the objects, since we are going to glue them later, because we are going to make a kind of roulette. We leave a space to glue the envelope of the rhyme.
Presentation of the drawings and pasting
We are now going to build a roulette, which is going to hide and then reveal the objects pasted on the sheet. First, we take something that we can use to draw a circle and at the same time to cover the objects when we glue them; I thought of using the transparent lid of a pot, which happened to be perfect to make the roulette.
We drew the circle on gold frosted cardboard, cut it out and to give it firmness, we cut two strips of cardboard the size of the circle and glued them in the shape of a cross on the back of the circle.
With the tip of the scissors we pierce in the center of the circle and place a seraph, so that our roulette can rotate easily.
Roulette making
Next, we are going to glue our roulette; we pierce with the tip of the scissors the center of the space intended for the roulette on our sheet; we insert the roulette upside down and mark the boxes of the objects with a pencil, we cut out the boxes, and now we mark where the objects are going to go and glue them there.
Placing the roulette on the sheet
Now we are going to elaborate a door to hide the favorite character; we take the piece of gold-colored metallic cardboard and draw the door; with the exact one we cut out leaving the two tabs that open and close to reveal the character and we glue it.
Arming the door to hide the character
Likewise, we take a piece of cardstock, in this case I used the red one to draw an envelope on the back, I cut it out to glue it where the rhyme goes.
Likewise, we will use a piece of blue metallic cardboard to make a sliding window and place it where the animals go, which, for this activity, we did not find a drawing of another animal and we put two dolphins.
Making the envelope for the rhyme and the window for the animals
Now, finally, we write the titles, according to the teacher's instructions.
Writing the titles
For the front or cover of the sheet, we draw up a "D" and glue it right on the legs of the seraph to hide them. This letter will move when the roulette wheel turns, but it will not be visible when the sheet is open. We cut out drawings and names, glue them distributed between the two covers.
Cover of the sheet
We open the sheet, first with the drawings covered and then when we turn the roulette, we open the window and the door.
We are done with the sheet!
Finished lamina
This way we finished our activity and my granddaughter Camila received, super happy, her laminate.
Receiving her poster
Until another time my Hive friends, I hope you liked this activity.
Photographs belong to the author
Posted Using InLeo Alpha
Me siento identificado contigo y ese amor para ti nieta
Gracias, así es, siempre le hago las cosas que sean de manualidades, con mucho cariño para mi única nieta (hasta los momentos) 🤣
Si me gustó mucho esta publicación
Muchísimas gracias 😘
Un placer conocerte @norisplus
Muchas gracias 🥰
Gracias, eso motiva para continuar.
Me alegra el poder hacerlo
hermoso para la princesa de la casa😘
Gracias. Sí, Camila es la Princesa de todos en casa 🥰
Congratulations @norisplus! You have completed the following achievement on the Hive blockchain And have been rewarded with New badge(s)
Your next target is to reach 1500 upvotes.
You can view your badges on your board and compare yourself to others in the Ranking
If you no longer want to receive notifications, reply to this comment with the word
STOPTo support your work, I also upvoted your post!
Thank you very much for your support.
Awesome job @norisplus! Keep pushing yourself and you'll reach your Hive goals before you know it.
BTW, we noticed we miss your support for our proposal. Mays we ask you to check it out and consider supporting it?
Thank you!
Muy buen trabajo Camila, les quedo excelente y estoy segura que la vas a defender muy bien.
Hola amiga. Sí y salió excelente en su exposición. Gracias