Hi mushroom lovers.
Today we will discuss a little information about mushrooms.
However, this time I will not discuss poisonous mushrooms, but today I will discuss about mushrooms that can be consumed for the family. And besides being consumed, we can cultivate these mushrooms ourselves.
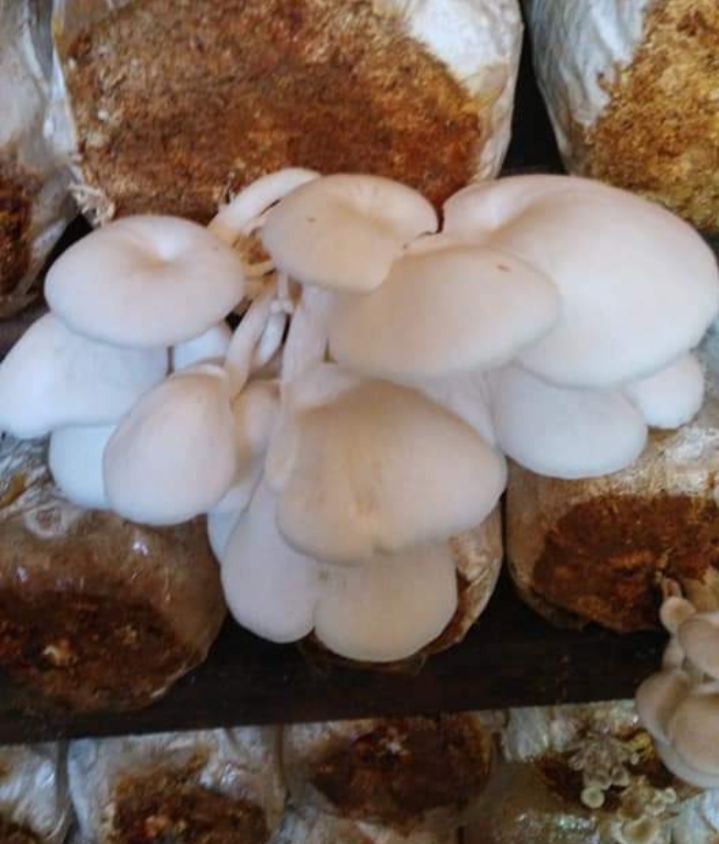
This time we will discuss about oyster mushrooms.
Who does not know this delicious mushroom. Oyster mushroom is a mushroom that grows wild and is safe to eat.
This mushroom has become a fairly popular everyday food. In addition to consuming it, this mushroom can also be cultivated for sale.
Oyster mushrooms provide dietary fiber, beta-glucan, and other health-promoting ingredients.
Mushrooms have a delicate taste and can be used to add flavor to a variety of savory dishes.
In addition to saving costs, we can also cultivate oyster mushrooms and earn income.
How to cultivate oyster mushrooms is
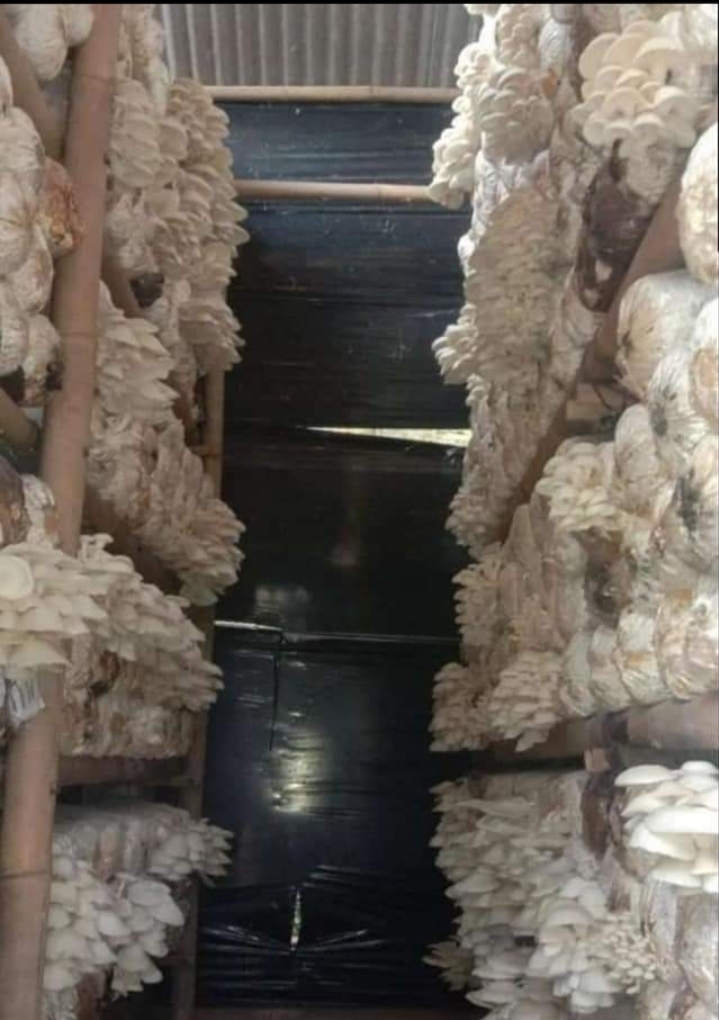
- choose good mushroom seeds. The selection of mushroom seeds is very important in your experiment because it will also determine the ease with which the oyster mushrooms grow.. Setting up a mushroom house is a place to take care of baglog and grow mushrooms. Kumbung is usually a building or room filled with shelves to put baglogs. This room must have the ability to maintain temperature and humidity.
Kumbung is usually made of bamboo or wood. The walls of the kumbung can be made of boards. The roof you can use tile. It is advisable not to use asbestos or tin roofs, as they will generate heat.
While on the floor still uses soil, so that the water used to flush the mushrooms can seep in.
Inside the kumbung is equipped with a shelf in the form of a lattice made terraced. The shelf serves to arrange baglogs. Shelf frames can be made of bamboo or wood. The position of the shelves is placed in a row and the shelves are separated from one another by aisles for maintenance.
The recommended kumbung size should not be less than 40 cm. Shelves can be made only 2-3 levels. The width of the shelf is 40 cm and the length of each segment of the shelf is 1 meter. Each segment of the rack of this size is able to store 70-80 baglogs. The number of shelves itself is adjusted to the number of baglogs to be cultivated.
Before entering the baglog into the kumbung, there are several things you need to pay attention to, namely: we need to clean the kumbung and the shelves from dirt.
Second, do liming and spraying with fungicides. It needs to be left for 2 days before baglog is put into the kumbung.
Finally, when the smell is gone, we can enter the baglog which is ready to be grown. Where the entire surface is covered with white fibers.
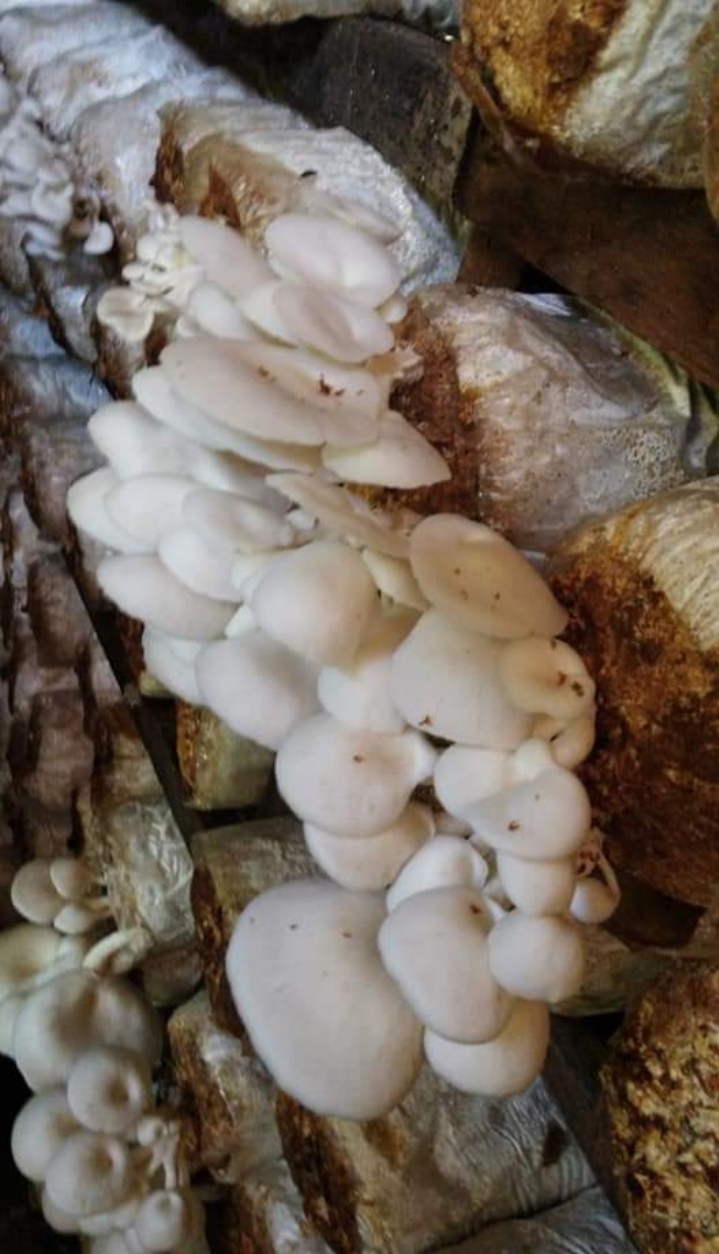
Baglog is a planting medium for placing oyster mushroom seeds. Because oyster mushrooms are wood mushrooms, the main ingredients of baglog are bran, (sawdust) and lime. All these ingredients must be mixed well and added water about 60% of the weight of the medium.
Baglog is wrapped in cylindrical plastic, with a hole at one end. In this hole the oyster mushroom will grow poking out.
In large-scale oyster mushroom cultivation, mushroom farmers usually make their own baglog. However, for beginners, baglogs are usually purchased from other parties. So that farmers can focus only on running a cultivation business without having to create their own baglog.
However, for beginners, baglogs are usually purchased from other parties. So that farmers can focus only on running a cultivation business without having to create their own baglog.
There are two ways to arrange baglogs on shelves, namely by placing them vertically and horizontally. Putting it vertically where the baglog hole is facing up while the horizontal way the baglog hole is facing the side.
Both methods of oyster mushroom cultivation have their respective advantages. If it is arranged horizontally, it will be safer from being splashed by water. Because if the watering is excessive, the water will not enter the baglog.
In addition, to do the harvest easier. However, this horizontal arrangement takes up more space.
Here's how to cultivate oyster mushrooms and their care:
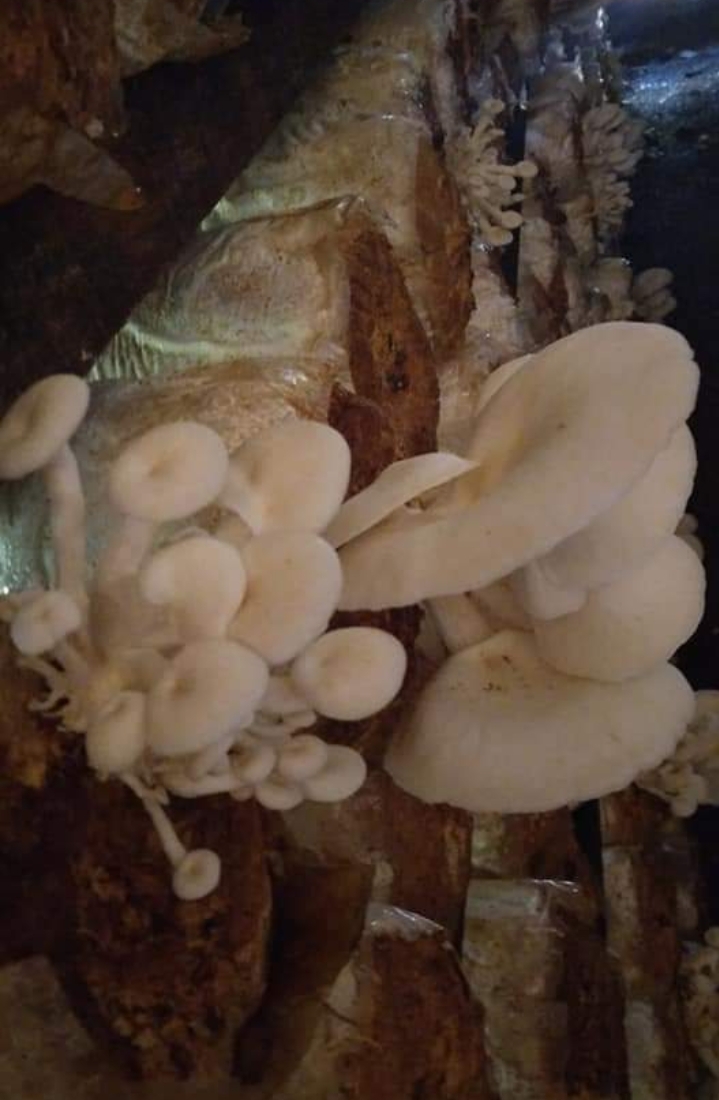
Before compiling the baglog, first open the ring and the baglog cover paper. Then leave it for about 5 days. If the floor is made of soil, do watering to add moisture.
After that, cut the ends of the baglog to give it more space to grow. Leave for 3 days, and do not water. Just flush it on the floor.
Do watering with a sprinkler Watering should form a mist, not water droplets. The more perfect the fogging, the better. You can water it 2
3 times a day, depending on the temperature and humidity of the kumbung. You still need to keep the temperature in the range of 16-24 degrees Celsius.
If the baglog used has a completely covered surface with mycelium, usually within 1-2 weeks from the opening of the baglog lid, the mushrooms will grow and can be harvested. Mushroom baglog can be harvested 5-8 times, if the care is good.
Baglog weighing about 1 kilogram will produce mushrooms as much as 0.7 - 0.8 kilograms. After that baglog is discarded or can be used as compost material. This harvest is done on mushrooms that have bloomed and enlarged. Precisely when the edges have seen tapered. But the hood has not been broken, the color is still pure white.
If the harvest period is over half a day, the color can become slightly brownish yellow and the hood will break. If it's like this, the mushrooms will quickly wither and not last long. The distance from the first harvest to the next harvest ranges from 2-3 weeks.
That's how to cultivate oyster mushrooms that we can practice at home.
Hopefully useful for mushroom lovers.
Hai sahabat pecinta jamur.
Hari ini kita akan membahas sedikit informasi mengenai jamur.
Namun,kali ini saya tidak akan membahas tentang jamur yang beracun, namun hari ini saya akan membahas tentang jamur yang bisa di konsumsi untuk keluarga .dan selain bisa dikonsumsi,jamur ini bisa kita budidaya sendiri.
Kali ini kita akan membahas tentang jamur tiram.
Siapa yang tidak mengenal jamur yang enak ini.Jamur tiram merupakan jamur yang tumbuh liar dan aman untuk dimakan.
Jamur ini telah menjadi makanan sehari-hari yang cukup populer. Selain mengkonsumsi nya,Jamur ini pun bisa dibudidayakan untuk dijual.
Jamur tiram menyediakan serat makanan, beta-glukan, dan bahan-bahan lain yang dapat meningkatkan kesehatan.
Jamur memiliki rasa yang lembut dan dapat digunakan untuk menambah rasa ke berbagai hidangan gurih.
Selain menghemat biaya,jamur tiram juga bisa kita budidaya dan bisa mendapatkan penghasilan.Cara budidaya jamur tiram adalah 1.memilih bibit yang jamur yang bagus. Pemilihan bibit jamur sangat penting dalam percobaan Anda karena itu juga akan menentukan kemudahan jamur tiram tumbuh.2. Menyiapkan rumah jamur merupakan tempat untuk merawat baglog dan menumbuhkan jamur. Kumbung biasanya berupa sebuah bangunan atau ruangan yang diisi dengan rak-rak untuk meletakkan baglog. Ruangan ini harus memiliki kemampuan untuk menjaga suhu dan kelembaban.
Kumbung biasanya terbuat dari bambu atau kayu. Dinding kumbung bisa dibuat dari papan. Atapnya Anda bisa menggunakan genteng. Dianjurkan untuk tidak menggunakan atap asbes atau seng, karena akan mendatangkan panas.
Sedangkan pada bagian lantainya tetap menggunakan tanah, agar air yang digunakan untuk menyiram jamur bisa meresap.
Di dalam kumbung dilengkapi dengan rak berupa kisi-kisi yang dibuat bertingkat. Rak tersebut berfungsi untuk menyusun baglog. Rangka rak bisa dibuat dari bambu atau kayu. Posisi rak diletakkan berjajar dan antara rak satu dengan yang lain dipisahkan oleh lorong untuk perawatan.
Ukuran kumbung yang dianjurkan sebaiknya tidak kurang dari 40 cm. Rak bisa dibuat hanya 2 – 3 tingkat saja. Lebar rak 40 cm dan panjang setiap ruas rak 1 meter. Setiap ruas rak sebesar ini mampu menyimpan 70 – 80 baglog. Banyaknya rak sendiri disesuaikan dengan jumlah baglog yang akan dibudidayakan.
Sebelum mamasukkan baglog ke dalam kumbung, ada beberapa hal yang perlu kamu perhatikan ,yaitu : kita perlu membersihkan kumbung dan rak-rak dari kotoran.
Kedua, lakukan pengapuran dan penyemprotan dengan fungisida. Perlu diamkan selama 2 hari sebelum baglog dimasukkan ke dalam kumbung.
Terakhir, saat bau sudah hilang kita bisa masukkan baglog yang sudah siap untuk ditumbuhkan. Di mana seluruh permukaannya sudah tertutupi dengan serabut putih.
Baglog adalah media tanam untuk meletakkan bibit jamur tiram. Karena jamur tiram merupakan jamur kayu, sehingga bahan utama dari baglog adalah bekatul, (serbuk gergaji) dan kapur. Semua bahan ini harus diaduk rata dan ditambahkan air sekitar 60% dari berat media tersebut.
Baglog dibungkus plastik berbentuk silender, yang dimana salah satu ujungnya diberi lubang. Di lubang inilah jamur tiram akan tumbuh menyembul keluar.
Pada budidaya jamur tiram skala besar, petani jamur biasanya membuat baglog sendiri. Namun bagi pemula, biasanya baglog dibeli dari pihak lain. Sehingga petani bisa fokus hanya menjalankan usaha budidaya saja tanpa harus membuat baglog sendiri.
Terdapat dua cara menyusun baglog dalam rak, yaitu dengan diletakkan secara vertikal dan horizontal. Meletakkan secara vertikal dimana lubang baglog menghadap ke atas sedangkan cara horizontal lubang baglog menghadap ke samping.
Kedua cara budidaya jamur tiram ini memiliki kelebihannya masing-masing. Kalau disusun secara horizontal menjadi lebih aman dari siraman air. Karena jika penyiraman berlebih, air tidak akan masuk ke dalam baglog.
Selain itu, untuk melakukan panen lebih mudah. Hanya saja, penyusunan dengan cara horizontal ini lebih banyak memakan ruang.
Berikut cara budidaya jamur tiram dan perawatannya:
Sebelum menyusun baglog, buka terlebih dahulu cincin dan kertas penutup baglog. Kemudian diamkan kurang lebih 5 hari. Bila lantai terbuat dari tanah, lakukan penyiraman untuk menambah kelembaban.
Setelah itu, potong ujung baglog untuk memberikan ruang tumbuh lebih lebar. Biarkan selama 3 hari, dan jangan disiram. Cukup siram pada bagian lantai saja.
Lakukan penyiraman dengan alat penyiram Penyiraman sebaiknya membentuk kabut, bukan tetesan-tetesan air. Semakin sempurna pengabutan, maka akan semakin baik. Kamu bisa menyiramnya 2
3 kali sehari, tergantung suhu dan kelembaban kumbung. Kamu tetap perlu menjaga suhu pada kisaran 16 – 24 derajat celsius.
Kalau baglog yang digunakan permukaannya telah tertutup sempurna dengan miselium, biasanya dalam waktu 1 – 2 minggu sejak pembukaan tutup baglog, jamur akan tumbuh dan sudah bisa dipanen. Baglog jamur bisa dipanen 5 – 8 kali, bila perawatannya baik.
Baglog dengan bobot sekitar 1 kilogram akan menghasilkan jamur sebanyak 0,7 – 0,8 kilogram. Setelah itu baglog dibuang atau bisa dijadikan bahan kompos. Panen ini dilakukan pada jamur yang telah mekar dan membesar. Tepatnya bila ujung-ujungnya telah terlihat meruncing. Namun tudungnya belum pecah, warnanya masih putih bersih.
Bila masa panen lewat setengah hari saja, maka warna bisa menjadi agak kuning kecoklatan dan tudungnya akan pecah. Kalau sudah seperti ini, jamur akan cepat layu dan tidak tahan lama. Jarak panen pertama ke panen berikutnya berkisar 2 – 3 minggu lagi.
Demikian cara budidya jamur tiram yang bisa kita praktikkan sendiri di rumah.
Semoga bermanfaat para pecinta jamur.
🍄🍄🍄🍄🍄🍄🍄
I understand, you have poor lighting conditions, this is bad for your smartphone and photos. Welcome to the community, anyway! 😌
Please vote a lot, so I can buy a new camera. Hehehe
joking.
thx for the input
haha, funny joke yeah. lol. instead of that I will give you a good advise, which is even more valuable: Do not buy new camera -- go buy old camera which is a far more cheaper option. for example, a full-frame DSLR (like Canon's 5d, which I posess) - may cost you less then 300 US dollars. it is a ridiculous price! and full-frame is a must if you head for macro. cheers!
🤧🤣. Okeh thanks 🍄🍄🍄🍄🍄🍄🍄🍄🍄 😁
Congratulations @tyafaradilla! You have completed the following achievement on the Hive blockchain and have been rewarded with new badge(s) :
Your next target is to reach 2000 upvotes.
You can view your badges on your board and compare yourself to others in the Ranking
If you no longer want to receive notifications, reply to this comment with the word
STOPCheck out the last post from @hivebuzz: