As you may know, I am on my way to becoming a Full Stack JavaScript developer, and I intend to do it soon - preferably before this year finishes, so I can be kind of job ready by 2022 - and one of the main skills one needs to have in order to be a FSDev is CSS (Cascading Style Sheets).
CSS is easy, it is actually the easiest language I have learned so far; granted, I have only learned JS, HTML, a bit of SQL and CSS so there's not much to compare it to but still, once you understand the logic of this language, the only obstacle you will find in your way is the number of classes and attributes they can have, but that is manageable with some research and keeping a close and ordered record of what does what, and where should I manipulate what.
This is just a small intro, tomorrow I will post the good stuff of the beginner side of CSS.
For every CSS file we create, we need an HTML file that we will manipulate and style, so first things first, here's my HTML doc:
<title>Eric Flores - Becoming a Fullstack Developer</title>
<style>
h1 {
color: blue;
}
</style>
</head>
<body>
<header class="main-header">
<h1 style="color: blue">Becoming a Fullstack Developer</h1>
<nav>
<a href="About.html">About </a>
<a href="Learn.html">Learn </a>
<a href="Timeline.html">Timeline </a>
<a href="blog.html">Blog </a>
</nav>
</header>
<article>
<header>
<h3>The Guide to becoming a JS full stack developer</h3>
<img src="Eric.jpg" alt="Image of the Author, Eric" height="50" />
<p id="related-author">Posted by Eric on Monday 17th August</p>
</header>
<p>
One of the things I despise the most - and I don't mean to be political
here, take this post as a general critique to humanity and our deviant
ways, not a specific political party - is censorship masked as
protection and cancel culture disguised as oppression.
</p>
<p>This is a list that I will style differently for each line:</p>
<ul>
(html comment removed: I will give the first element of the list a class name so I can manipulate it directly on the CSS file )
<li class="first-li">First Item of the list</li>
<li>Second Item of the list</li>
<li>Third item of the list</li>
<li>Fourth item of the list</li>
<li>Fifth item of the list</li>
<li>Last item of the list</li>
</ul>
<h4>This is a divisor</h4>
<p>
See, the problem of giving this kind of power to tech giants like
Instagram/Facebook/Whatsapp to do things like this that little by
little, tech giants continue to get a hold of every single piece of
controllable entity.
</p>
<p>
Instagram and Fact checkers get to decide what gets posted or not, just
like an publisher and like a social media platform.
</p>
</article>
<aside>
<h5>Related Posts</h5>
<ul>
<li>
<a href="https://hive.blog/hivefest/@anomadsoul/a-bit-of-hive-fest"
>A bit about HiveFest</a
>
</li>
<li>
<a
href="https://hive.blog/hive-169321/@anomadsoul/the-learning-continues-or-two"
>The learning continues</a
>
</li>
<li>
<a
href="https://hive.blog/hive-169321/@anomadsoul/the-full-guide-to-arrays"
>The Array Guide</a
>
</li>
</ul>
</aside>
<footer>
<p>Copyright ©2027 Anomadsoul</p>
</footer>
</body>
</html>
Don't mind the paragraphs and all that, they are just part of some of my hive.blog posts.
And now, for the good stuff, here's the CSS part, the one we are actually interested in.
First of all, we can style different headers by selecting them all using commas and then, after the curly braces we tell CSS how to style all of them. We can actually set several attributes at the same time, we just need to use a ; between them.
h1, h2, h3 {
  font-family: sans-serif;
  color: rgb(160, 105, 66);
}
Let's begin styling the headers.
- The color indicates the color of the letters.
- The font-size indicates the desired height of glyphs from the font. For scalable fonts, the font-size is a scale factor applied to the EM unit of the font.
- The font family specifies a prioritized list of font family names or generic family names. A user agent iterates through the list of family names until it matches an available font that contains a glyph for the character to be rendered.
- The font style indicates the style of the letters.
- The text-align indicates how we want the text to be positioned in the website.
h1 {
  color: blue;
  font-size: 26px;
  font-family: sans-serif;
  text-transform: Uppercase;
  font-style: italic;
}

h3 {
  font-size: 28px;
  font-family: sans-serif;
  text-transform: capitalize;
  text-align: center;
}

h4 {
  font-size: 36px;
  font-family: sans-serif;
  text-transform: lowercase;
  text-align: left;
  color: rgb(22, 14, 16);
  background-color: #a8b1c7;
}

p {
  font-size: 22px;
  font-family: sans-serif;
  line-height: 1.5; /* 1.5 sizes the font size, we do not need to specifiy a unit.*/
}

li {
  font-size: 20px;
  font-family: sans-serif;
}

footer p {
  /*Selects all the "P" elements inside the "footer" element.*/
  font-size: 16px;
}

#author {
  font-style: italic;
  font-size: 18px;
}

.related-author {
  font-size: 18px;
  font-weight: bold;
}

.related {
  list-style: none;
}
Colors
RGB notation
rgb(0, 255, 255)
To give the color some transparency we include a last argument for the attribute, giving it a 0.X that will define the transparency.
rgb(217, 134, 68, 0.3)
Hexadecimal notation
We only use RGB notation when we need transparency
.main-header {
  background-color: rgb(10, 10, 26);
}

aside {
  background-color: rgb(160, 105, 66);
  border: 5px solid #a8b1c7;
}

element {
  background-color: rgb(160, 105, 66);
  border-top: 5px solid #a8b1c7;     // This means bottom-left
}
Pseudo classes
We can manipulate several elements by creating a pseudo class for said elements, this way we can target them all at the same time:
.first-li {
    font-weight: bold;
}
We could do it like above, but there is a way to do it by using pseudo classes.
li:first-child {
  font-weight: bold;
}
We added a pseudo class to the list element, and it will select all the first child elements of the class li.
li:last-child {
  font-style: italic;
}
We can also target a specific number of the list by doing this:
li:nth-child(2) {
  color: blue;
}
We can actually target the list items in different ways such as:
li:nth-child(odd) {
  font-size: 24px;
}

li:nth-child(even) {
  font-size: 16px;
}
We can use this technique to style tables and make them different from each other.
Pseudo classes are not exclusive to specific types of classes, in fact, whenever we target the first child of any class, CSS will target the first child no matter what class it is (could be a paragraph p, a header, an image, etc
article p:last-child {
  color: chartreuse;
}
As we can use, using pseudo classes to manipulate elements is good when all the child elements are the of the same type
This pseudo classes technique are about matching the existing HTML structure, but there are other types of pseudo classes that can ignore this
Styling hyperlinks using pseudo classes
We need to create a pseudo class for the anchor elements that have an href attributeto target specific hyperlinks.
a:link {
  color: crimson;
  /* Whenever we style links, it is a good practice to get rid of the underline from links*/
  text-decoration: none;
}
Some websites display a link differently if they have been visited before, we can do that ourselves.
a:visited {
  color: black;
}
The most important pseudo class for links is hover, where we can apply styles when the element is hovered by the mouse
a:hover {
  color: coral;
  font-weight: bold;
  /*In the text decoration attribute, we can define style, color and underlined at the same time*/
  text-decoration: underline dotted #812b81;
}
When actually click on a link, then the active pseudo class comes into action
a:active {
  background-color: rgb(145, 137, 26);
  font-style: italic;
}
The fourth states are always declared in the order we did right now, it is a bad practice to define them in a different order.
That's it, you are now introduced to CSS, there's still like 95% of the way to go, but you now know some basic CSS. This is how the website looks after everything we have done:
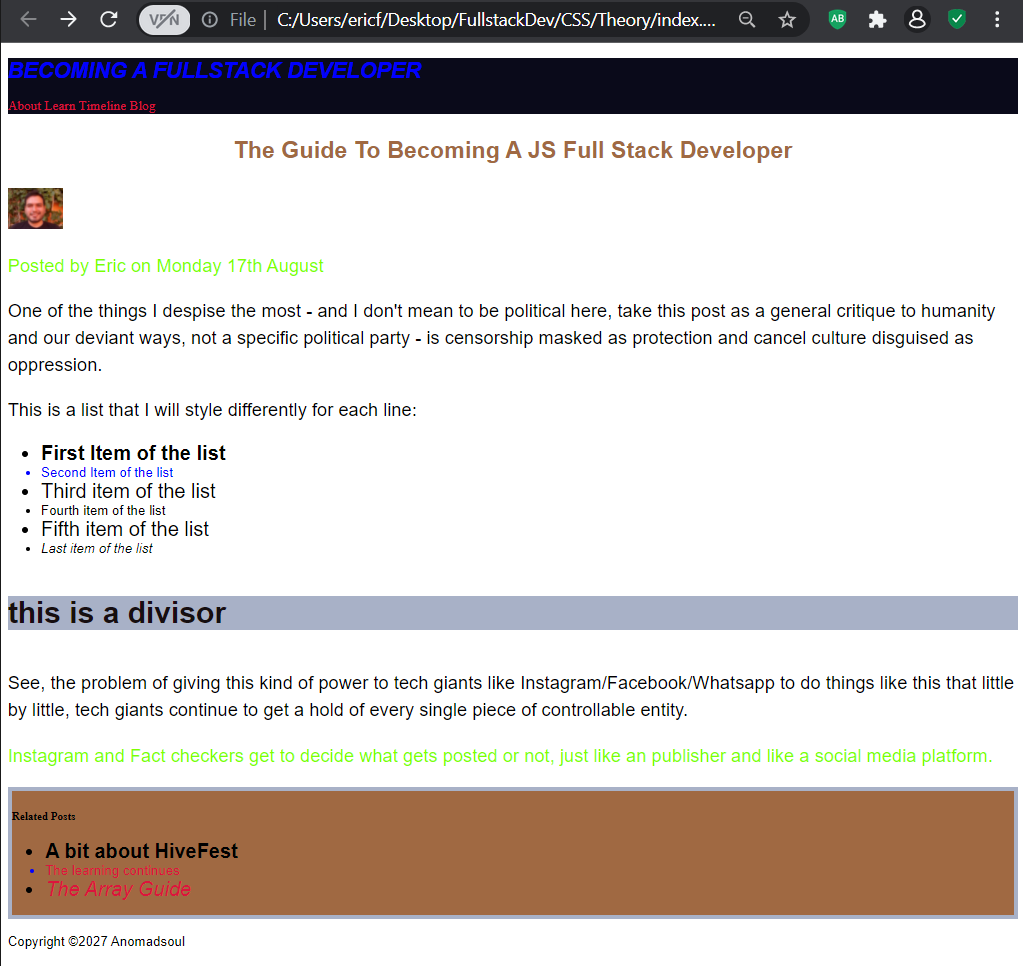
Best part about CSS, it simple, minimal, fast, powerful aaaand beautiful !!
I am beginning to wonder if I should learn some UX design because no matter how beautiful you can make a website using CSS, it doesn't matter if you just don't know what beautiful means. Sigh, the learning never ends.
😄😄 Personally i would not take up UI/UX as a career because it's way too dynamic and keeps on changing every day ... but hang in there CSS won't disappoint you
Nah me neither, just some basics so I know that yellow combines with fuschia and that people click more on a button set on the top right than on the bottom left... that kind of knowledege, what a youtube course or something even simpler can give me.
it looks very nice tho! step by step every day, we can add better things! CSS looks easy but sometimes you get stuck really easy😅
So far so good, but I am aware that at some point once I reach the more advanced stuff I am definitely going to be over my head, I just hope that I find a way to float over :P