
Proceso
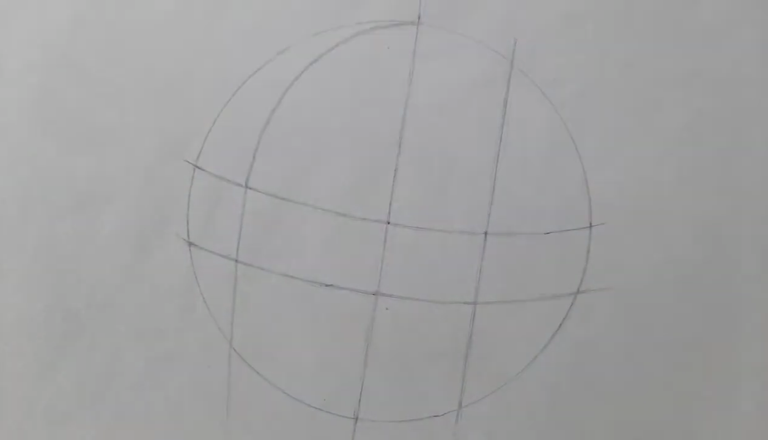
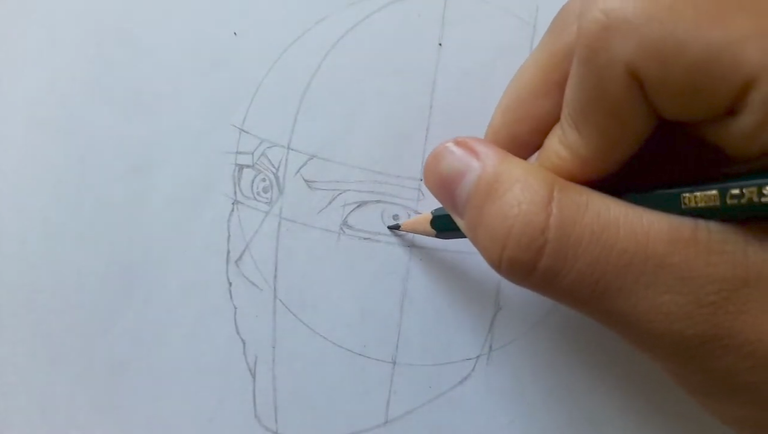
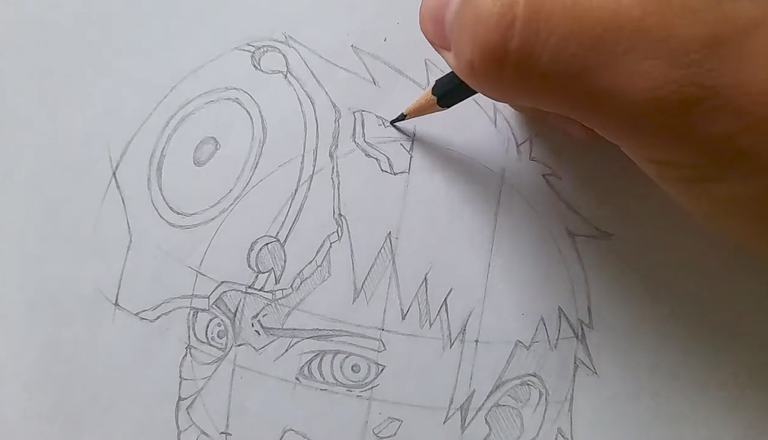
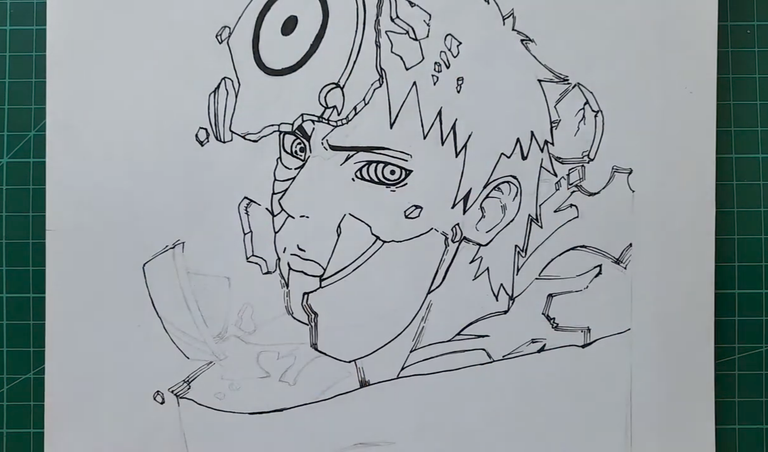
Para comenzar a dibujar a Óbito Uchiha, el primer paso fue trazar un círculo que serviría como base para la cabeza. Este círculo me permitió establecer las proporciones del rostro. Luego, dibujé una diagonal que pasara por el centro de esta circunferencia, lo que me ayudaría a alinear los rasgos faciales. A continuación, añadí otra diagonal que dividía la parte inferior del círculo, creando una referencia para la ubicación de la mandíbula y el mentón con estas líneas guía en su lugar, procedí a dibujar dos líneas curvas casi paralelas que se dirigían hacia abajo. Estas líneas fueron fundamentales para identificar la posición de los ojos, las cejas y parte de la oreja. Después, tracé una curva que comenzaba en la frente y terminaba en el mentón. Esta línea me ayudó a dividir la cara y a ubicar la nariz y la boca de manera más precisa. Para definir la mandíbula, utilicé la línea del ojo como referencia, asegurándome de que se conectara con el otro lado del rostro. Esto me permitió tener una forma más natural y proporcionada. Al llegar a la parte de los ojos, dibujé un rectángulo que me sirvió de guía. Desde ahí, tracé una línea casi en el centro y comencé a dar forma al ojo, que tenía una base romboidal pero con un contorno ovalado. Para el otro ojo, utilicé un rectángulo más pequeño, ya que estaba más alejado en la perspectiva. No quería dejar esta parte en blanco, así que comencé a dibujar una porción de la máscara de Óbito. Aquí, ya estaba dando forma a lo que sería un cachete, utilizando curvas para identificar los pliegues de la piel. Como mencioné anteriormente, la línea que había trazado me ayudaría a dibujar la boca, así que presté atención a su ubicación. Cada parte de la máscara de Óbito tiene que ver con su rostro, por lo que es importante que tenga una forma ovalada y que en algunas partes sea casi curva. Para dibujar la oreja, utilicé la línea que había dividido el círculo como referencia, asegurándome de que se integrara bien con el resto del dibujo. A medida que avanzaba, comencé a añadir detalles complementarios, como los mechones de cabello y algunos elementos de la máscara, como las piedras que parecen flotar alrededor. Para el boceto, utilicé poca presión con el lápiz, lo que me permitió hacer correcciones fácilmente. A medida que mejoraba el boceto, comencé a marcar lo que serían las sombras. Esto es opcional, pero ayuda a visualizar mejor el volumen del dibujo. La máscara de Óbito tiene líneas que son circulares y ovaladas, así que me aseguré de dibujarlas con cuidado.
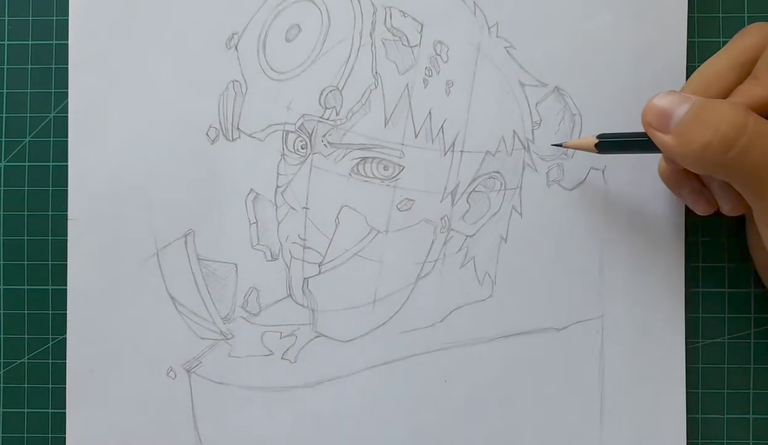
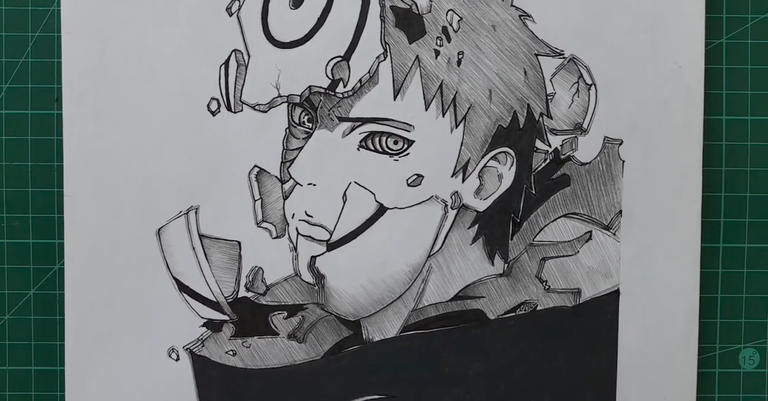
El resto del proceso consistió en añadir detalles y fragmentos de la máscara. Cada uno de estos detalles puede ser modificado en tamaño y posición, lo que permite personalizar el diseño. La línea que dibujé también marcaba lo que sería la túnica de Óbito, comenzando desde abajo y elevándose hacia arriba. Una vez que el boceto estuvo completo, pasé a la etapa de delineado. Primero, borré las líneas iniciales que había utilizado para el boceto. Luego, con un rotulador estilógrafo, comencé a delinear todo el dibujo, asegurándome de que las líneas quedaran limpias y definidas. Para facilitar el delineado, moví la hoja en la dirección que más me acomodaba, lo que me permitió trabajar con mayor comodidad. Después de delinear, marqué todas las partes negras, ya sea con color o con el plumón que tenía a mano. Luego, comencé a sombrear, identificando las áreas más claras y oscuras. Para esto, utilicé un lápiz, aplicando presión variable para crear un contraste adecuado. El estilo que elegí para el sombreado consistía en hacer líneas diagonales, lo que le daba un toque dinámico al dibujo. Es importante recordar que si el lápiz es oscuro, no se debe aplicar demasiada presión, ya que esto puede arruinar el acabado. También se puede optar por difuminar las sombras para lograr un efecto más suave y realista. Como regla básica, para oscurecer más los tonos, simplemente hay que aplicar más presión. A medida que avanzaba, me di cuenta de que, aunque al principio puede parecer complicado, con la práctica se vuelve más sencillo y rápido. Así, culminé el dibujo de Óbito Uchiha en estilo manga, disfrutando del proceso creativo y aprendiendo en cada paso. Al final, revisé los detalles y ajusté lo que consideré necesario, asegurándome de que cada elemento del dibujo estuviera en armonía y reflejara la esencia del personaje. Una vez que estuve satisfecho con el delineado y el sombreado, decidí añadir algunos toques finales. Esto incluyó resaltar ciertas áreas de la máscara y la túnica para darles más profundidad y dimensión. Utilicé un lápiz blanco para agregar luces en las partes más brillantes, lo que ayudó a que el dibujo cobrara vida. También consideré la dirección de la luz al aplicar las sombras, asegurándome de que fueran coherentes con la fuente de luz imaginaria que había visualizado. Después de completar todos los detalles, me tomé un momento para revisar el dibujo en su totalidad. Observé si había áreas que necesitaban más definición o si había detalles que podrían mejorarse. A veces, un pequeño ajuste en la sombra o un ligero cambio en la forma puede hacer una gran diferencia en el resultado final. Finalmente, para proteger el dibujo, decidí escanearlo y guardarlo digitalmente. Esto no solo me permitió tener una copia de seguridad, sino que también me dio la oportunidad de experimentar con la edición digital. Utilicé un software de edición para ajustar el contraste y la saturación, lo que hizo que los colores y las sombras se vieran aún más vibrantes. Al concluir el proceso, me sentí satisfecho con el resultado. No solo había creado un dibujo de Óbito Uchiha, sino que también había disfrutado del viaje creativo que implica cada trazo y cada decisión. Cada dibujo es una oportunidad para aprender y mejorar, y este no fue la excepción. Si alguien está interesado en aprender a dibujar personajes de anime o manga, les animo a que practiquen y experimenten con diferentes estilos y técnicas. Cada artista tiene su propio enfoque, y lo más importante es disfrutar del proceso y no tener miedo de cometer errores. Con el tiempo, cada uno encontrará su propio estilo y se sentirá más cómodo con las herramientas y técnicas que elija. Así que, amigos, así es como culminé el dibujo de Óbito Uchiha en estilo manga. Espero que esta descripción del proceso les haya sido útil e inspiradora. Si tienen algún comentario o, no duden en decírmelo. Estoy aquí para ayudar y compartir mi pasión por el arte Nos vemos en el próximo proyecto
Process
To begin drawing Obito Uchiha, the first step was to draw a circle that would serve as the base for the head. This circle allowed me to establish the proportions of the face. Next, I drew a diagonal line through the center of this circle, which would help me align the facial features. I then added another diagonal line bisecting the bottom of the circle, creating a reference for the location of the jaw and chin. With these guidelines in place, I proceeded to draw two almost parallel curved lines running downward. These lines were essential for identifying the position of the eyes, eyebrows, and part of the ear. Next, I drew a curve starting at the forehead and ending at the chin. This line helped me divide the face and locate the nose and mouth more precisely. To define the jaw, I used the eye line as a reference, ensuring it connected to the other side of the face. This allowed me to achieve a more natural and proportionate shape. When I got to the eyes, I drew a rectangle to serve as a guide. From there, I drew a line almost in the center and began shaping the eye, which had a rhomboid base but an oval outline. For the other eye, I used a smaller rectangle, as it was further away in perspective. I didn't want to leave this part blank, so I began drawing a portion of Óbito's mask. Here, I was already shaping what would be the cheek, using curves to identify the skin folds. As I mentioned earlier, the line I had drawn would help me draw the mouth, so I paid attention to its placement. Every part of Óbito's mask relates to his face, so it's important that it has an oval shape and is almost curved in some places. To draw the ear, I used the line that had divided the circle as a reference, making sure it blended well with the rest of the drawing. As I progressed, I began adding complementary details, such as the strands of hair and some elements of the mask, like the stones that seem to float around. For the sketch, I used light pencil pressure, which allowed me to make corrections easily. As the sketch improved, I began to mark what the shadows would be. This is optional, but it helps better visualize the volume of the drawing. Óbito's mask has lines that are circular and oval, so I made sure to draw them carefully.
The rest of the process consisted of adding details and fragments of the mask. Each of these details can be modified in size and position, allowing me to customize the design. The line I drew also marked what Óbito's tunic would be, starting from the bottom and rising upwards. Once the sketch was complete, I moved on to the outlining stage. First, I erased the initial lines I had used for the sketch. Then, using a fountain pen, I began outlining the entire drawing, ensuring the lines were clean and defined. To make outlining easier, I moved the paper in the direction that suited me best, allowing me to work more comfortably. After outlining, I marked all the black areas, either with color or with the marker I had on hand. Then, I began shading, identifying the lightest and darkest areas. To do this, I used a pencil, applying varying pressure to create the right contrast. The style I chose for shading consisted of diagonal lines, which gave the drawing a dynamic touch. It's important to remember that if your pencil is dark, don't apply too much pressure, as this can ruin the finish. You can also choose to blend the shadows to achieve a softer, more realistic effect. As a basic rule, to make the tones darker, simply apply more pressure. As I progressed, I realized that although it may seem complicated at first, with practice it becomes easier and faster. Thus, I completed the manga-style drawing of Obito Uchiha, enjoying the creative process and learning with every step. In the end, I reviewed the details and adjusted where necessary, ensuring that each element of the drawing was in harmony and reflected the essence of the character. Once I was satisfied with the outlining and shading, I decided to add some finishing touches. This included highlighting certain areas of the mask and robe to give them more depth and dimension. I used a white pencil to add highlights to the brightest parts, which helped bring the drawing to life. I also considered the direction of the light when applying shadows, ensuring they were consistent with the imaginary light source I had visualized. After completing all the details, I took a moment to review the drawing as a whole. I noted whether there were areas that needed more definition or details that could be improved. Sometimes, a small adjustment to the shading or a slight change in shape can make a big difference in the final result. Finally, to protect the drawing, I decided to scan it and save it digitally. This not only allowed me to have a backup copy but also gave me the opportunity to experiment with digital editing. I used editing software to adjust the contrast and saturation, which made the colors and shadows look even more vibrant. Upon completion, I was satisfied with the result. Not only had I created a drawing of Obito Uchiha, but I had also enjoyed the creative journey involved in every stroke and every decision. Every drawing is an opportunity to learn and improve, and this one was no exception. If anyone is interested in learning how to draw anime or manga characters, I encourage them to practice and experiment with different styles and techniques. Every artist has their own approach, and the most important thing is to enjoy the process and not be afraid to make mistakes. Over time, everyone will find their own style and become more comfortable with the tools and techniques they choose. So, friends, this is how I completed the manga-style drawing of Obito Uchiha. I hope this description of the process has been helpful and inspiring. If you have any comments or suggestions, please don't hesitate to let me know. I'm here to help and share my passion for art. See you in the next project.

Created: blog gif
The images were taken from my YouTube video
The translation was done in Google Translate
Congratulations @johayron! You have completed the following achievement on the Hive blockchain And have been rewarded with New badge(s)
You can view your badges on your board and compare yourself to others in the Ranking
If you no longer want to receive notifications, reply to this comment with the word
STOPThis is cool! I love the show Naruto. 😁