English
Hello hivers!!! welcome to a new art post, this time I bring you a little tutorial.
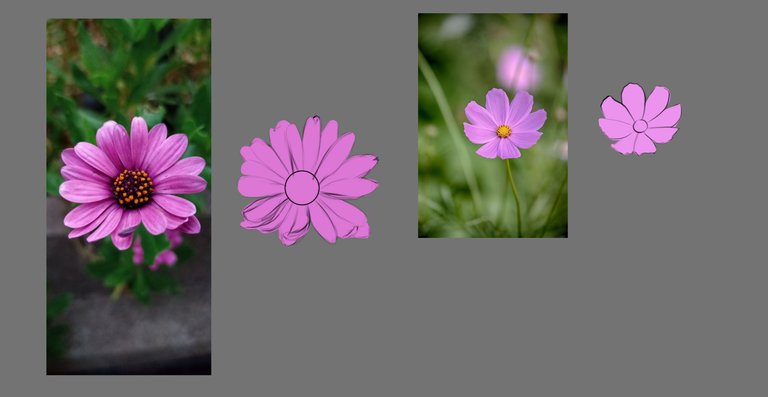
I have been getting comments for a while now that they like how I do my flowers, and a month or so ago I got an order in which I had to make many flowers, so each of them I did them separately and it occurred to me to do this little tutorial, so today I want to share with you how I do them and I hope you can understand me, because I am usually very bad at explaining certain things hahaha. I consider that it is very simple, but if you have to invest some time in its realization, I usually take 20 minutes to 1 hour to make a flower, but all this depends on whether the flower has many petals (as can be a sunflower, a daisy or a gerbera). Without further ado, I will share with you the process.
Spanish
Hola hivers!!! bienvenidos a un nuevo post de arte, esta vez les traigo un pequeño tutorial.
Hace tiempo que recibo comentarios de que les gusta como hago mis flores, y hace un mes más o menos me llegó un encargo en el que tenía que hacer muchas flores, así que cada una de ellas las hice por separado y se me ocurrió hacer este pequeño tutorial, por eso hoy quiero compartir con ustedes como las hago y espero que puedan entenderme, porque suelo ser muy mala explicando ciertas cosas jajaja. Considero que es muy sencillo, pero si hay que invertir algo de tiempo en su realización, normalmente tardo 20 minutos a 1 hora en hacer una flor, pero todo esto depende de si la flor tiene muchos pétalos (como puede ser un girasol, una margarita o una gerbera). Sin más preámbulos, comparto con ustedes el proceso.

Like everything else, you have to create a base, I don't usually draw without a sketch so that's the main thing. After that I place a layer under the sketch and there I put a base color and then I join these two layers, the next thing I do is to use the pixel lock so that when I draw I don't get out of what is that base.
I usually use three types of brushes to create my flowers, the main one is a normal round brush, with it I usually place the base color and if I need to perfect the edges of the flower this is the one that helps me in that. The second brush I use is a watercolor brush with a little texture, I usually use it for shadows and highlights, I usually use it with low opacity varying between 50% to 80% depending on the stroke I am going to make. My last brush would be a pointillism brush, or a brush with drops or dots, there is a great variety of brushes of this type, but I really like the pointillism brush that brings by default the clip studio paint, because it has some variety when applying the color, I usually use this brush for the center of the flower.
Como todo, hay que crear una base, yo no suelo dibujar sin un boceto así que eso es lo principal. Después de esto coloco una capa debajo del boceto y ahí pongo un color base y luego uno estas dos capas, lo siguiente que hago es usar el pixel lock para que cuando dibuje no me salga de lo que es esa base.
Suelo utilizar tres tipos de pinceles para crear mis flores, el principal es un pincel redondo normal, con él suelo colocar el color base y si necesito perfeccionar los bordes de la flor este es el que me ayuda en eso. El segundo pincel que utilizo es un pincel de acuarela con un poco de textura, lo suelo utilizar para sombras e iluminaciones, habitualmente lo uso con opacidad baja variándola entre el 50% al 80% dependiendo del trazo que vaya a realizar. Mi último pincel sería un pincel de puntillismo, o algún pincel que sea de gotas o puntos, hay una gran variedad de pinceles de este tipo, pero a mi me gusta mucho el pincel de puntillismo que trae por defecto el clip studio paint, ya que tiene cierta variedad a la hora de aplicar el color, suelo utilizar este pincel para lo que es el centro de la flor.
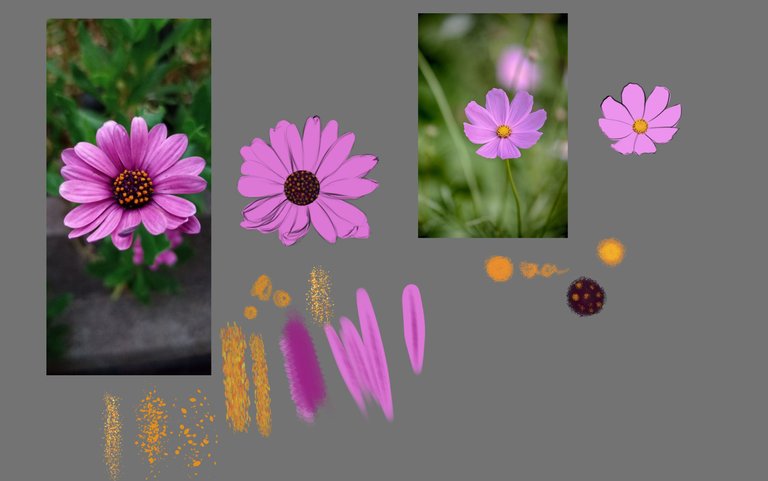
Well with that in mind I proceed to make my flower. I add a new layer where here I make what is the center of the flower with the pointillism brush, with the eyedropper I select the color and make strokes in circles, if the center of the flower has some details I try to make them in the same way, this brush adds a very nice texture.
Bueno con eso en mente procedo a hacer mi flor. Agrego una nueva capa donde aquí hago lo que es el centro de la flor con el pincel puntillismo, con el cuentagotas selecciono el color y hago trazos en círculos, si el centro de la flor tiene algunos detalles trato de hacerlos de la misma manera, este pincel agrega una textura muy bonita.
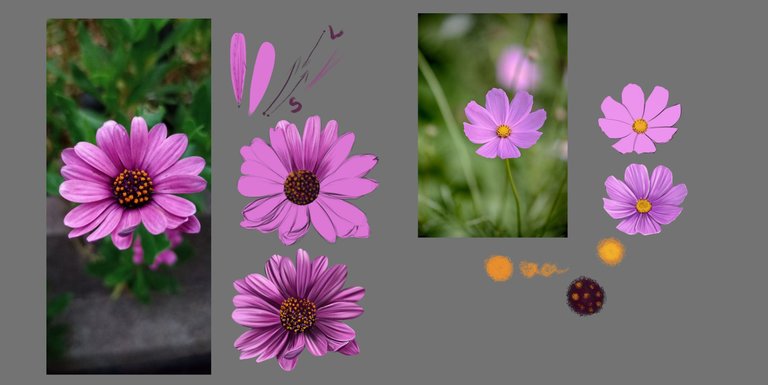
Once the center is done I go back to the layer where I have the base of the petals and select the watercolor brush, I place it in a small size (between 10 to 12), with the eyedropper I take a darker color than the base and start to make strokes from the center of the flower outwards, this way I create some texture that the petals of the flower have and I give them their respective shadows. Then I take a lighter color and do the same but this time from the outer margin of the petals towards the center, normally these are shortened to the middle of the line, this would be like to give those little touches of light on the petals.
Una vez hecho el centro vuelvo a la capa donde tengo la base de los pétalos y selecciono el pincel de acuarela, lo coloco de un tamaño pequeño (entre 10 a 12), con el cuentagotas tomo un color más oscuro que la base y empiezo a hacer trazos desde el centro de la flor hacia afuera, de esta manera creo cierta textura que tienen los pétalos de la flor y les doy sus respectivas sombras. Luego tomo un color más claro y hago lo mismo pero esta vez desde el margen exterior de los pétalos hacia el centro, normalmente estos se acortan hasta la mitad de la línea, esto sería como para dar esos pequeños toques de luz en los pétalos.
In this way the strokes are covering what is the sketch as I advance with each petal, if I need to make the shadows between the separations of the petals I take a darker color of the palette of colors that I am using and I follow a little the line of the sketch. Finally, with the round brush and a color slightly close to white I perfect the outside edges.
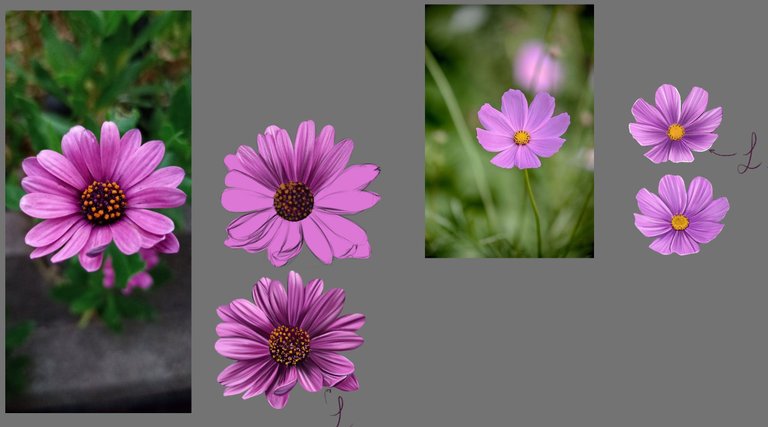
As I said it is something very simple, you just have to spend time, as a last tip I can give, is that if you see that the lines made to create the texture of the flower is very accentuated you can lightly pass a blending brush over it, so it softens a little. This is all, I hope you like it, I usually use this technique for all the flowers :D . Here I share with you some varieties that you can do in that order for a wreath, I have saved this file in case at some point I want to add some floral detail in some future illustration. hehe See you next time.
De esta forma los trazos van cubriendo lo que es el boceto a medida que avanzo con cada pétalo, si necesito hacer las sombras entre las separaciones de los pétalos tomo un color más oscuro de la paleta de colores que estoy utilizando y sigo un poco la línea del boceto. Por último, con el pincel redondo y un color ligeramente cercano al blanco perfecciono los bordes exteriores.
Como ya he dicho es algo muy sencillo, solo hay que dedicarle tiempo, como último consejo que les puedo dar, es que si ven que las líneas hechas para crear la textura de la flor está muy acentuada pueden pasar ligeramente un pincel difuminador por encima, así se suaviza un poco. Esto es todo, espero que les guste, yo suelo usar esta técnica para todas las flores :D . Aquí les comparto algunas variedades que pueden hacer en ese pedido para una corona, he guardado este archivo por si en algún momento quiero agregar algún detalle floral en alguna ilustración futura. jeje Hasta la próxima.

Thanks for taking a few minutes to read me, until next time ✨😊.
Gracias por dedicar unos minutos a leerme, hasta la próxima ✨😊.

Instagram:
Tools - Herramientas
Huion H1060P Graphics Tablet | Tableta Gráfica Huion H1060P
Translated in Deelp
App used | App utilizadas:
Illustration made in Clip Studio Paint - Ilustración elaborada en Clip Studio Paint
All images are my own - Todas las imágenes son de mi autoría
So pretty! Thank you for this helpful tutorial, @oscariart. Your version has more interest than the reference : )
Hehe! I tried to explain as best as I could, I'm glad you liked it :D cheers.
Gracias mi amor, me encanta aprender de ti y de tus flores♥ iloviu estan bellisimasn.n
jejejej gracias mi vida, :D
Quedaron geniales y la explicación aún mejor!