¡HOLA AMIGOS DE HIVE! / HELLO HIVE FRIENDS!
La flexibilidad es un aspecto importante en el mundo de la danza, a partir de ésta podemos innovar y crear nuevos pasos y así volver nuestras secuencias y coreografías un poco más interesantes. A pesar de no ser un requisito obligatorio, es bastante útil.
Recordemos que existen varias zonas del cuerpo que necesitan tener flexibilidad, no sólo las piernas (como mayormente se cree) sino también espalda, brazos y hombros.
Hoy hablaremos específicamente de flexibilidad de piernas, porque generalmente es la más pedida y en la que muchos se enfocan en conseguir. Por lo que te daré la clave secreta para lograr ese split que tanto quieres.
Lo importante aquí es que sepas que una apertura de piernas requiere constancia y paciencia, no sucede de forma express. El secreto de todo es: El estiramiento.
Y en eso es lo que nos enfocaremos hoy.
Flexibility is an important aspect in the world of dance, from this we can innovate and create new steps and thus make our sequences and choreographies a little more interesting. Although it is not a mandatory requirement, it is quite useful.
Let's remember that there are several areas of the body that need to have flexibility, not only the legs (as most people think) but also the back, arms and shoulders.
Today we will talk specifically about leg flexibility, because it is usually the most requested and the one that many focus on achieving. So I will give you the secret key to achieve that split you want so much.
The important thing here is that you know that a leg split requires consistency and patience, it doesn't happen in an express way. The secret of it all is: stretching.
And that's what we'll focus on today.
Nota para evitar lesiones:
1) Estos estiramientos debes realizarlos DESPUÉS de haber hecho un calentamiento por mínimo 7 minutos(puedes trotar un poco, practicar zumba, entre otros)
2) Debes realizarlos por 15 o 30 min aproximadamente, 6 días a la semana. Dale a tu cuerpo un día de descanso, no te excedas con los estiramientos.
3) Todos tenemos un límite diferente, un poco de dolor es normal, ya que tú cuerpo no está acostumbrado, ten paciencia, irá cediendo a su ritmo. Mucho dolor no es bueno y tampoco normal, si consideras que es demasiado, para y hazlo a tu medida de la mejor forma posible.
Ahora sí, mis estiramientos favoritos y los que mejor me funcionan
Note to avoid injuries:
- These stretches should be performed AFTER having done a warm-up for at least 7 minutes (you can jog a little, practice Zumba, among others).
- You should do them for 15 to 30 minutes approximately, 6 days a week. Give your body a rest day, do not overdo the stretching.
- Everyone has a different limit, a little pain is normal, since your body is not used to it, be patient, it will give in at its own pace. Too much pain is not good and not normal either, if you feel it is too much, stop and do it the best way you can.
Now yes, my favorite stretches and the ones that work best for me.
a) La mariposa | The butterfly
Ya sé, es muy cliché, todo el mundo lo hace, bla, bla, bla. ¡Inténtalo! siéntate en el piso, parecido al estilo indio, pero en lugar de cruzar tus piernas, pegarás la planta de tus pies, asegúrate de que toda la planta desde la punta de tus dedos hasta tu talón estén juntas, y luego pegalos lo más que puedas a tu pelvis, ayudate con tus manos, cuando ya todo esté bien colocado, usa tus manos para ejercer presión sobre tus rodillas, cuenta hasta 8 y relaja.
Para avanzados: Si ya tus rodillas tocan el piso sin necesidad de ejercer presión, puedes variar la posición, estirando tu torso hacia el frente, tratando de tocar el piso con tu frente, esto ayudará a estirar mejor.
Dato importante: inspira bastante aire y cuando toque ejercer presión exhala, la relajación ayuda a mejorar el estiramiento.
I know, it's very cliché, everybody does it, blah, blah, blah. Try it! sit on the floor, similar to Indian style, but instead of crossing your legs, you will glue the soles of your feet, make sure that all the soles from the tip of your toes to your heel are together, and then glue them as much as possible to your pelvis, help yourself with your hands, when everything is well placed, use your hands to exert pressure on your knees, count to 8 and relax.
For advanced: If your knees already touch the floor without pressure, you can vary the position, stretching your torso to the front, trying to touch the floor with your forehead, this will help to stretch better.
Important fact: breathe in a lot of air and when it is time to exhale, the relaxation helps to improve the stretch.

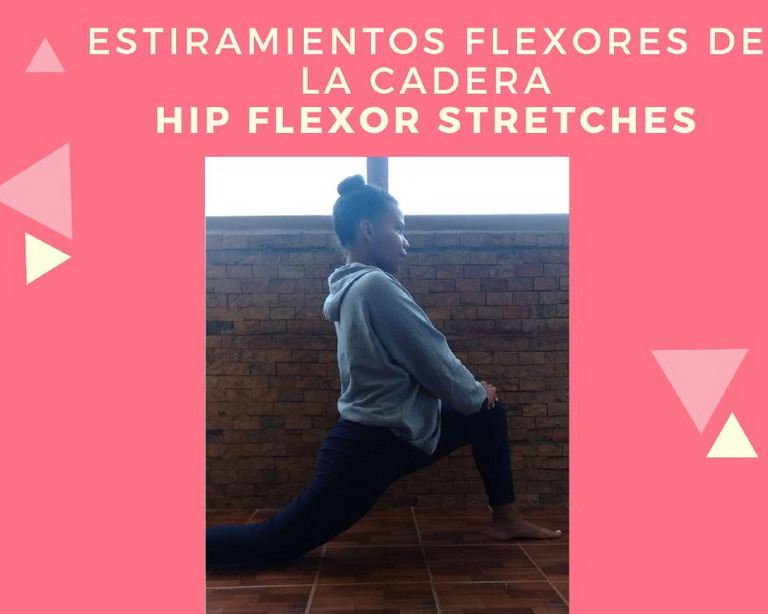
b) Estiramiento para flexores de cadera | Stretching for hip flexors
Para este estiramiento unos colocaremos en genuflexion (como cuando van a pedir matrimonio) la única diferencia es que la pierna que está hacia abajo vamos a estirarla hacia atrás. Una vez que te encuentres en posición correcta, tienes que hundir tu cadera lo más que puedes, verás a Diosito, pero los resultados son increíbles. Recuerda mantener tu torso erguido. Mantendrás esta posición mientras cuentas hasta 8, luego cambio de pierna. Puedes hacer 3 repeticiones cada una variando la cuenta, por ejemplo: en la primera cuentas hasta 8, en la segunda hasta 15 y en la tercera hasta 20. Utiliza el consejo de las inhalaciones, ayuda mucho.
For this stretch we will place you in genuflexion (like when you go to ask for marriage) the only difference is that the leg that is down we are going to stretch it backwards. Once you are in the correct position, you have to sink your hip as much as you can, you'll see God, but the results are incredible. Remember to keep your torso upright. You will hold this position for a count of 8, then change legs. You can do 3 repetitions each one varying the count, for example: in the first one you count to 8, in the second one to 15 and in the third one to 20. Use the tip of the inhalations, it helps a lot.
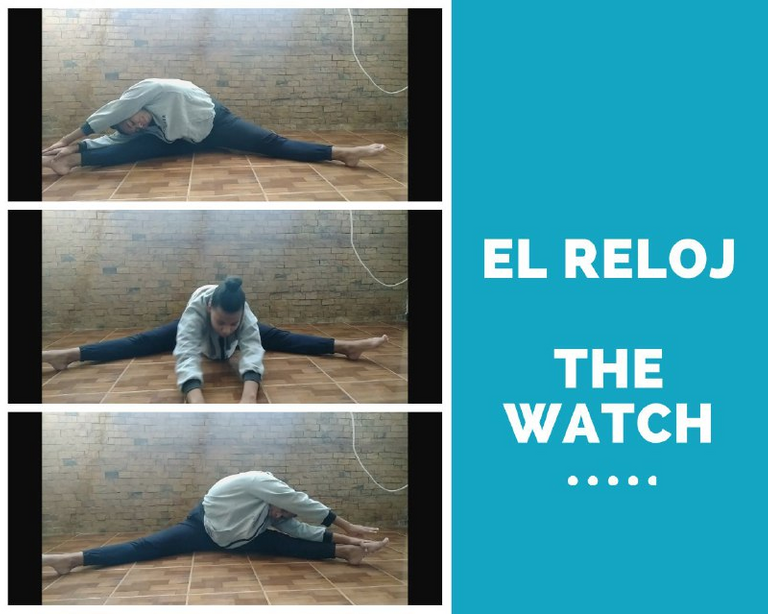
c) El reloj (así lo llamo yo) | The clock (that's what I call it)
Sentado en el piso, vas a estirar tus piernas completamente y luego abrirlas lo más que puedas hacia los lados, ahora con tu torso lo más estirado que puedas, trata de tocar la punta de tus pies (si no puedes tocarlas todavía no te preocupes) y contarás hasta 8, luego comenzarás a mover tu torso como si fuesen las agujas del reloj por el espacio entre tus piernas hasta llegar al centro, aquí contaras nuevamente hasta 8, y seguirás el camino hasta llegar a la otra pierna, dónde contarás nuevamente. Al igual que con el flexor de cadera, en esta puedes hacer varias repeticiones, con cuentas de 8, 15 y 20
Sitting on the floor, you will stretch your legs completely and then open them as much as you can to the sides, now with your torso as stretched as you can, try to touch the tip of your feet (if you can't touch them yet don't worry) and count to 8, then you will start moving your torso like clockwise through the space between your legs until you reach the center, here you will count again to 8, and follow the path until you reach the other leg, where you will count again. As with the hip flexor, in this one you can do several repetitions, with counts of 8, 15 and 20.
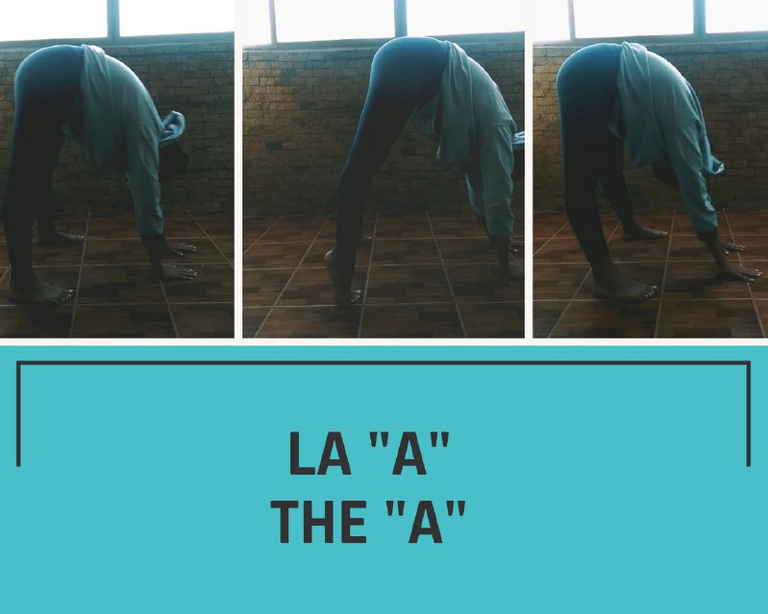
d) La A | The A
Realmente se llama estiramiento de isquiotibiales, pero yo la llamo A por la semejanza que tiene la postura con la letra. Aquí nos podremos de pie para luego doblarnos y tocar el piso con nuestras manos, formando una especie de A. Lo importante aquí es mantener las piernas bien estiradas para que el estiramiento funcione. Debemos contar hasta 8, levantarnos y luego repetir, aproximadamente con 3 o 4 repeticiones, es más que suficiente.
It is actually called hamstring stretch, but I call it A because of the similarity of the posture with the letter. Here we can stand up and then bend and touch the floor with our hands, forming a kind of A. The important thing here is to keep the legs straight for the stretch to work. We must count to 8, stand up and then repeat, approximately with 3 or 4 repetitions, it is more than enough.
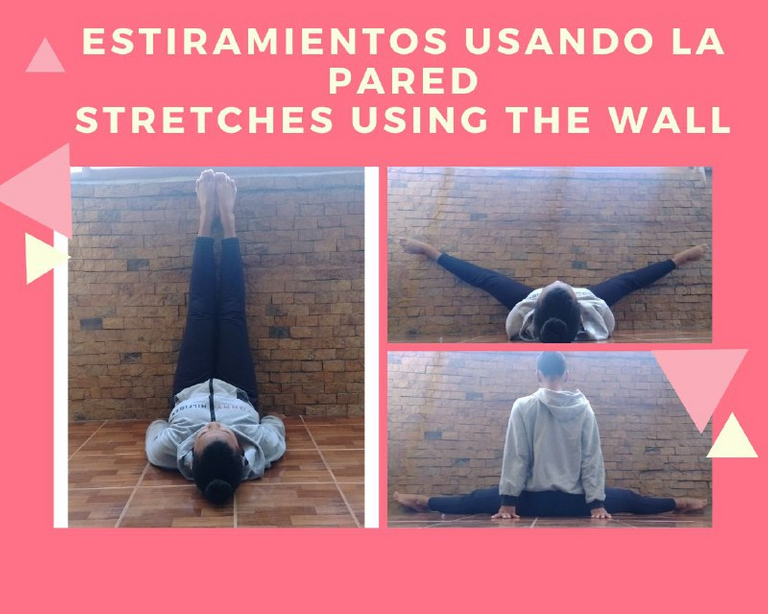
e) Estiramientos usando la pared
Estos estiramientos son muy buenos y tienen como ventaja que usan un elemento que todos tenemos: Una pared. Ahora, acuestate bocarriba con las piernas y los talones apoyados contra la pared. Abre las piernas lentamente, trata de deslizar las piernas por la pared, dejándolas caer lentamente en direcciones opuestas hasta que llegues a tu abertura máxima. Aquí es muy importante que hagas exhalaciones para ayudar a tu cuerpo a relajarse y tener un mejor estiramiento.
Otra variante de este estiramiento con la pared, es sentarse frente a la misma e ir abriendo tus piernas tanto como puedas, el objetivo es conseguir a largo plazo que tu pelvis toque la pared, ayudate con tus manos para ejercer presión hacia adelante.
Ambos estiramientos con la pared deberes realizarlos contando hasta 8. Recuerda que puedes hacer varias repeticiones y cada una variando el tiempo entre 8, 15 y 20 cuentas.
e) Stretches using the wall
These stretches are very good and have the advantage of using an element that we all have: A wall. Now, lie on your back with your legs and heels against the wall. Spread your legs slowly, try to slide your legs down the wall, letting them fall slowly in opposite directions until you reach your maximum opening. Here it is very important that you exhale to help your body relax and have a better stretch.
Another variation of this wall stretch is to sit in front of the wall and open your legs as much as you can, the goal is to get your pelvis to touch the wall in the long run, help yourself with your hands to exert forward pressure.
Remember that you can do several repetitions and each one varying the time between 8, 15 and 20 counts.
A raíz de la pandemia deje de estirar una larga temporada y perdí mucha de mi flexibilidad, con estos ejercicios es que estoy tratando de recuperarla, espero que te funcionen como a mí. En fin estos fueron mis estiramientos favoritos y los que más me han dado resultados. Besitos y abrazos. Gracias por leerme, hasta el próximo post.
As a result of the pandemic I stopped stretching for a long time and I lost a lot of my flexibility, with these exercises I am trying to recover it, I hope they work for you as they did for me. Anyway, these were my favorite stretches and the ones that have given me the most results. Kisses and hugs. Thanks for reading me, see you next post.

¡Bienvenida a nuestra comunidad..!
Muy interesante la serie de movimientos y creemos los estiramientos son la parte básica de cualquier actividad física.
Saludos y sigamos construyendo desde el contenido original..!
MUCHAS gracias por aceptarme! Espero seguir contando con su apoyo
Es importante cuidar un par de detalles en su publicación:
Las fotografías fueron tomadas con una fuente de luz detrás de usted, la cual le quita la nitidez a la visibilidad de los movimientos que está realizando. Sugerencia: procure colocar las fuentes de iluminación de la escena a espaldas de quien hace las capturas fotográficas.
Es evidente que usted no hizo las tomas, lo conducente entonces es dar los créditos de la captura a quien los tiene. El que la cámara o dispositivo sea suyo, no le transfieres los derechos de propiedad de la imagen, así sea usted quien aparece en ellas ¿la razón? Es el fotógrafo quien tiene la propiedad intelectual de las gráficas.
Saludos.
¡Bienvenida a #Hive y a Full Deportes..!
Por favor, sírvase leer ésta publicación en la que conseguirá recursos suficientes y respuestas a muchas preguntas.
Lea éste otro post con el fin de buscar la fuente de imágenes correcta cuando usted no sea quien las toma. Los enlaces de Google no son fuentes de imágenes, el enlace de la fuente debe apuntar al repositorio donde está alojada ésta.
Le sugerimos ver éste vídeo que le enseñará a manejar las etiquetas o "tags", recuerde separar las etiquetas con comas si se encuentra en la interfaz de 3speak o con barra espaciadora si se encuentra en la interfaz de peakd.com/hive.blog
Saludos,
Siempre tan bella, te amo!